RS Booking
(For Restaurant Managers/Front-of-House Supervisors)
1 Introduction
The Booking Management Module empowers you with end-to-end reservation configuration and order management capabilities. It covers core functions including store profile setup, reservation rule customization, H5 booking portal generation, and data analytics. What’s more, it supports multi-role permission control and notification configuration—enabling you to standardise and automate your reservation workflows, boost operational efficiency, and enhance every customer’s booking experience.
2 Back Office (PC End)
2.1 Reservation Settings
Notes
The RS Booking APP currently supports only Android and iPadOS devices.
The RS Booking APP can only sync table data with specific POS versions (marked with the -book tag). The sync logic is as follows:
After the RS Booking APP executes the seat-assignment operation for a target table, the POS system will automatically open the table and sync the reservation contact information to the table.
When the customer finishes dining, the POS system executes the table-clearing operation, and the status of the corresponding table in the App will automatically update from In Use to Available.
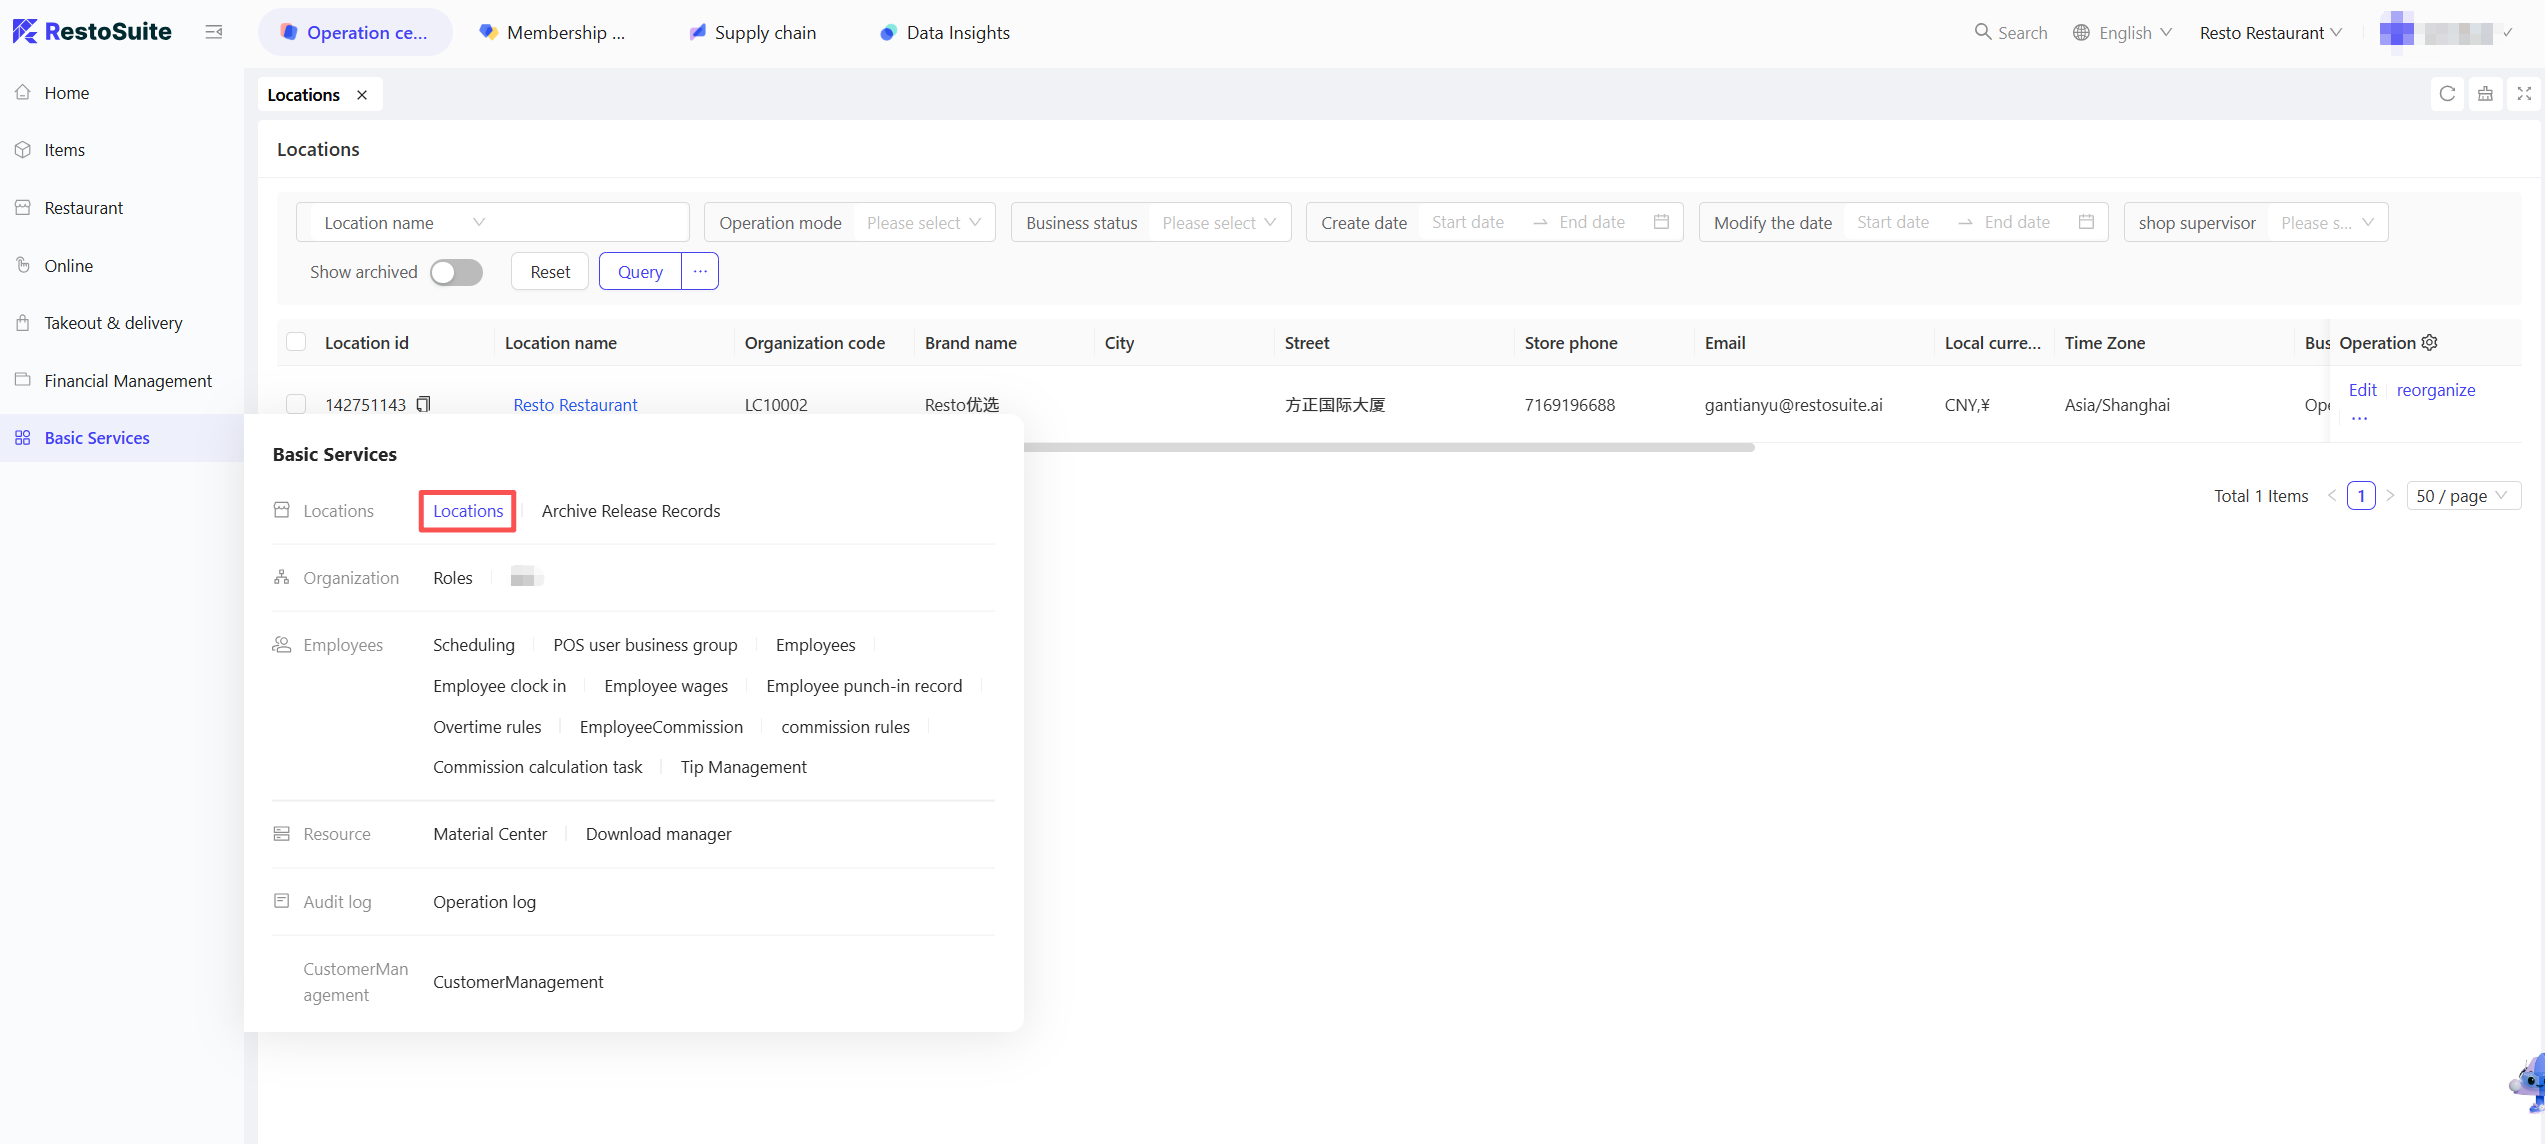
2.1.1 Store Basic Information
Booking configurations are managed from a store perspective.
Before configuring booking settings, you need to complete the store’s basic information setup first. For full details, refer to the Front-of-House Management Help Manual.
Below are the key configuration steps:
STEP 1: Add store information: Store Name, Address, Phone Number, Business Hours
STEP 2: Set service areas (e.g., Indoor, Outdoor)
Notes
The table layout in the App's table selection pop-up can be viewed by switching perspectives via the Tab button in the upper right corner.
A Publish operation is required after configuration to sync the settings to the terminals.
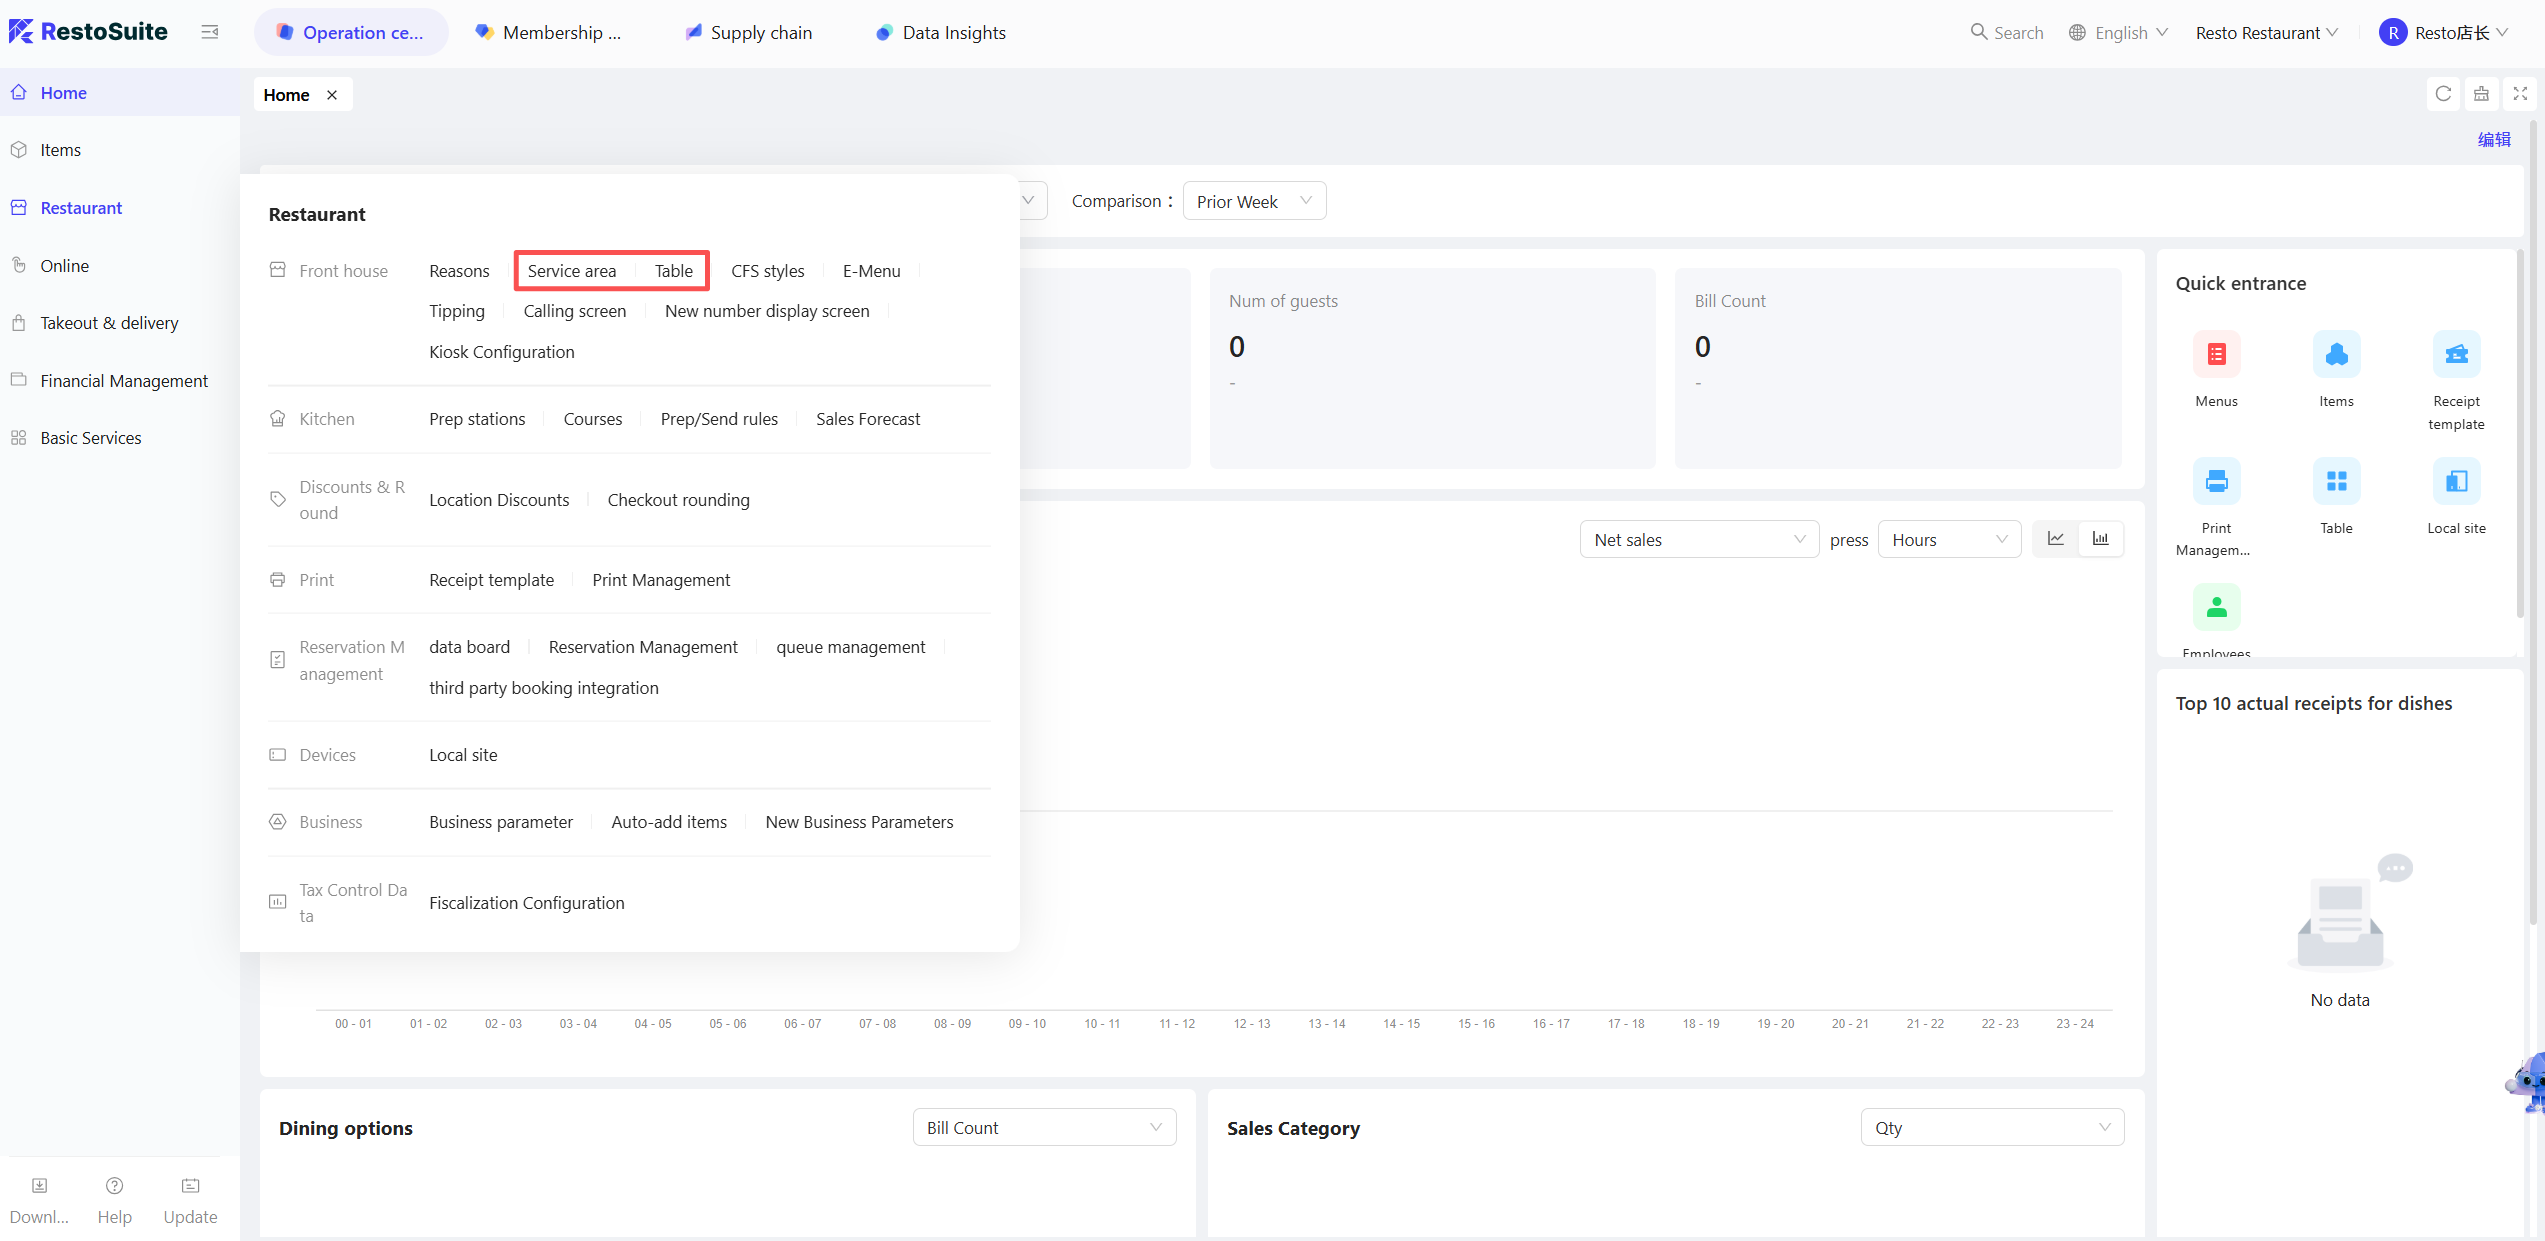
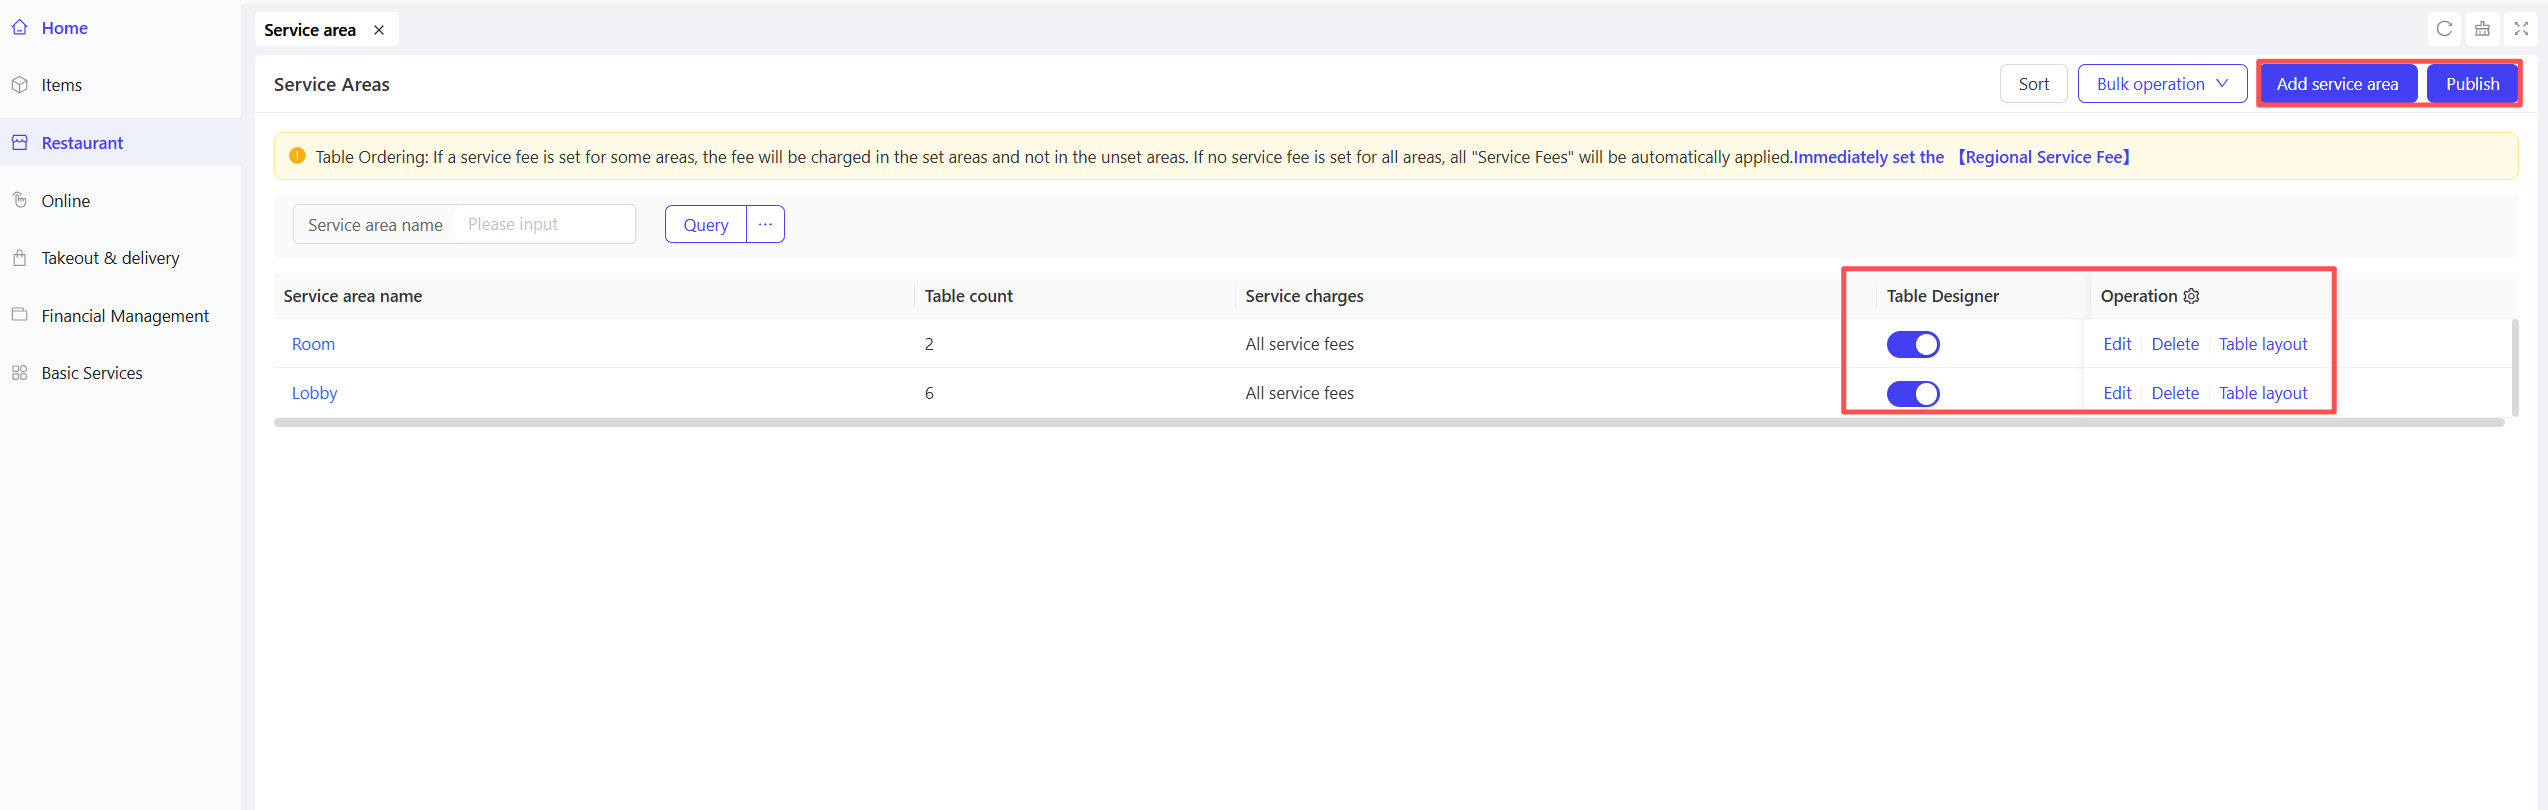
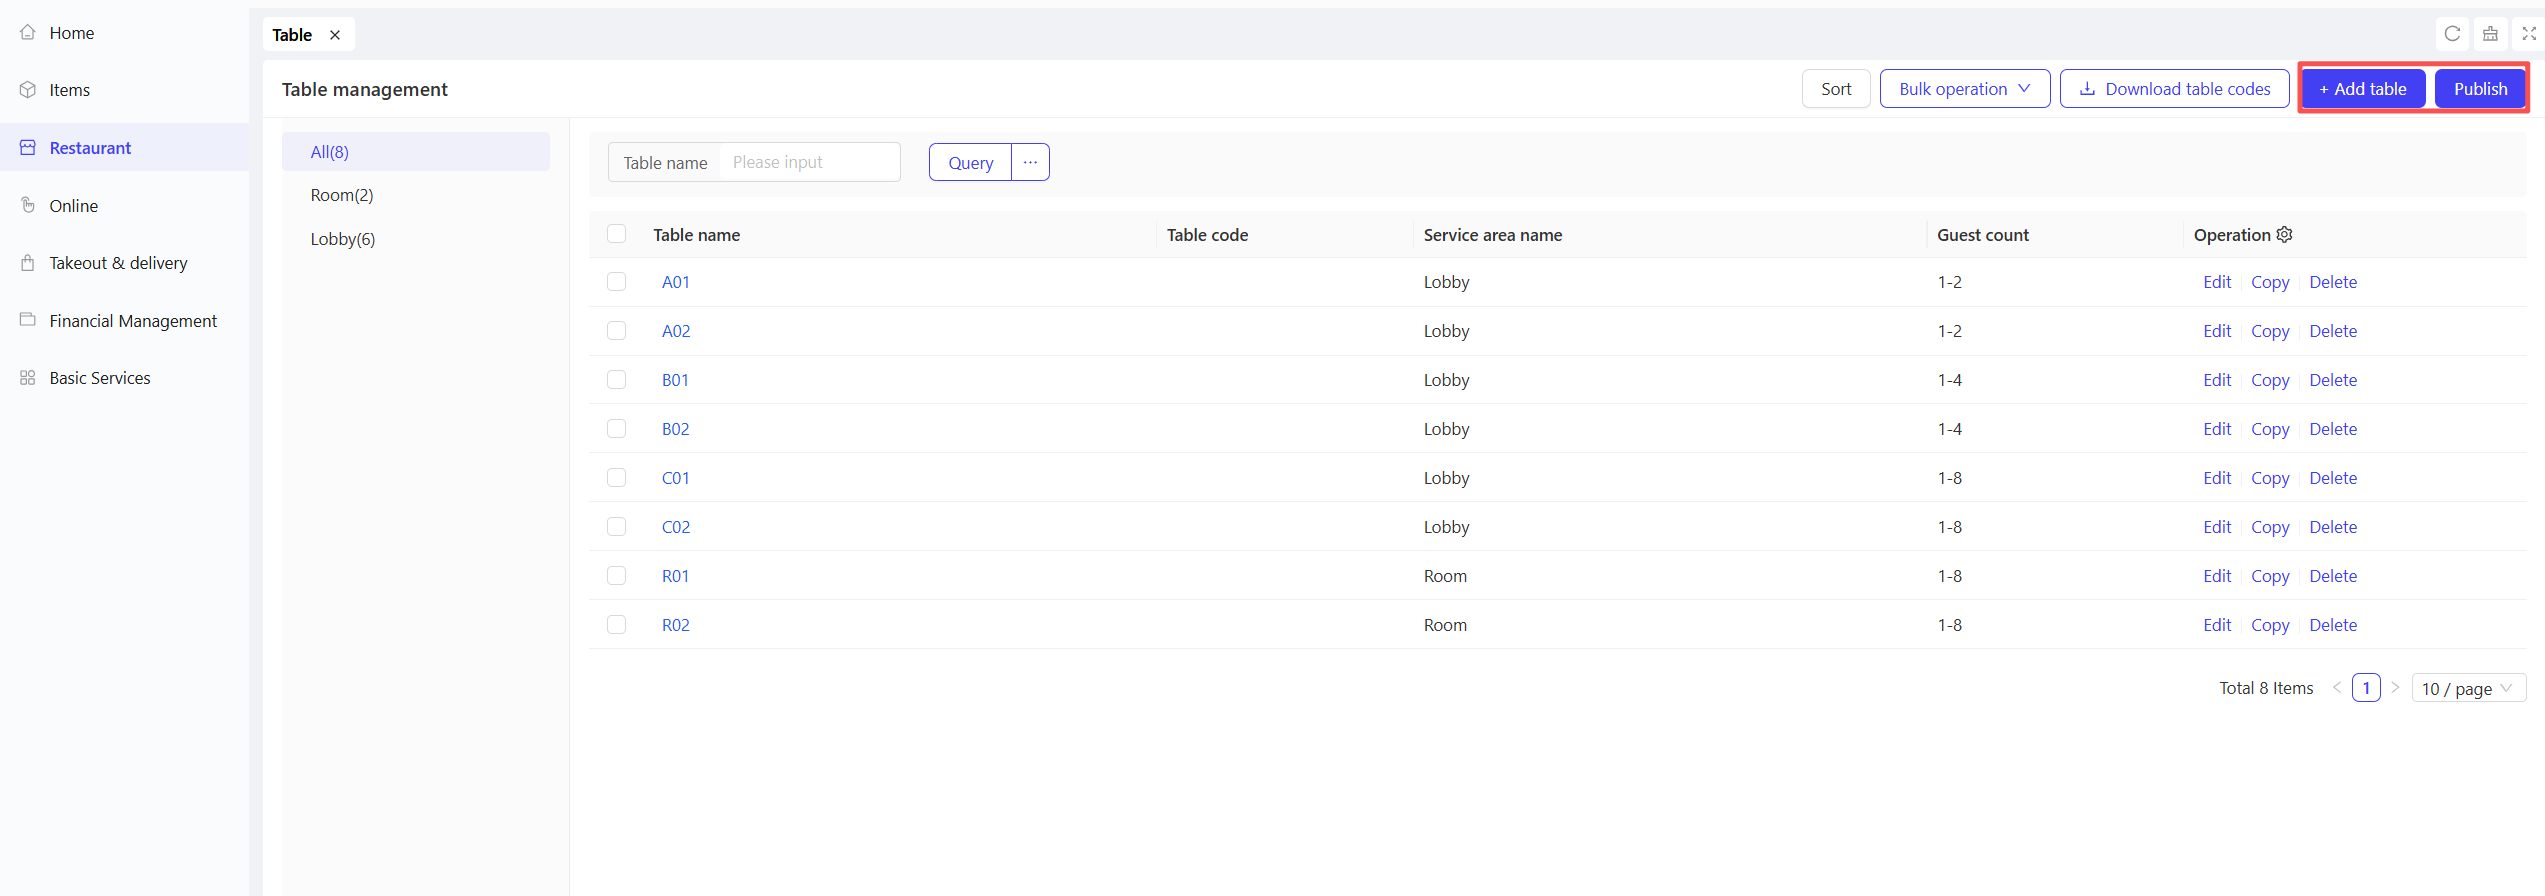
STEP 3: Configure table resources (e.g., 2-seat table, 4-seat table)
2.1.2 Reservation Settings
STEP 1: From the target store perspective, click to enter the Reservation Management page
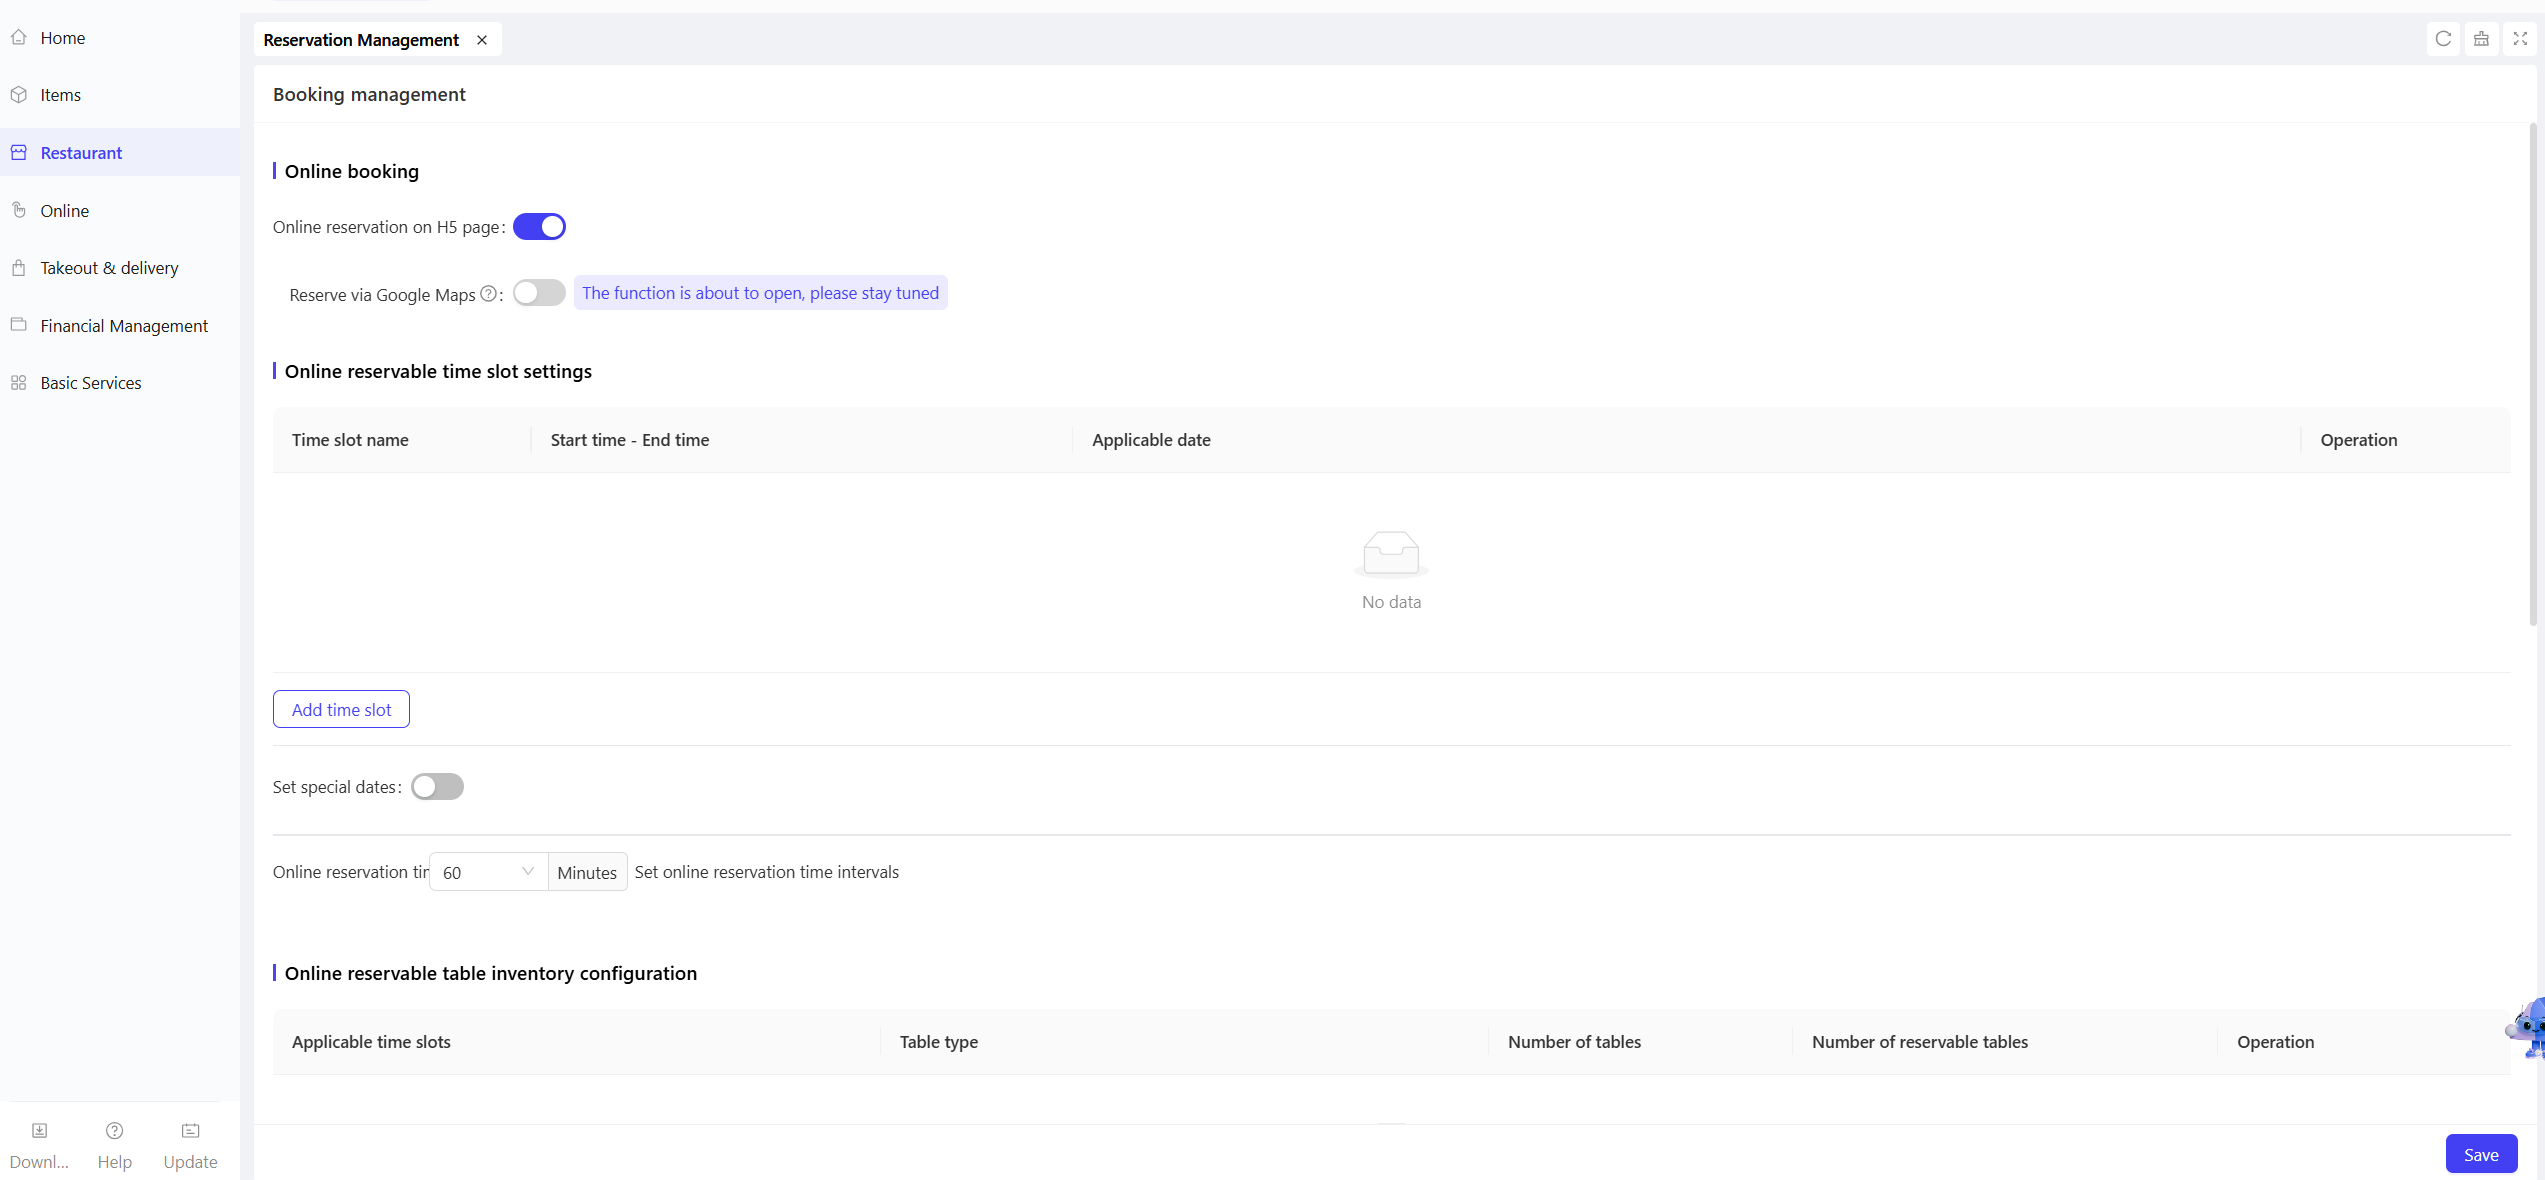
STEP 2: Configure online reservation time
Configure the following items:
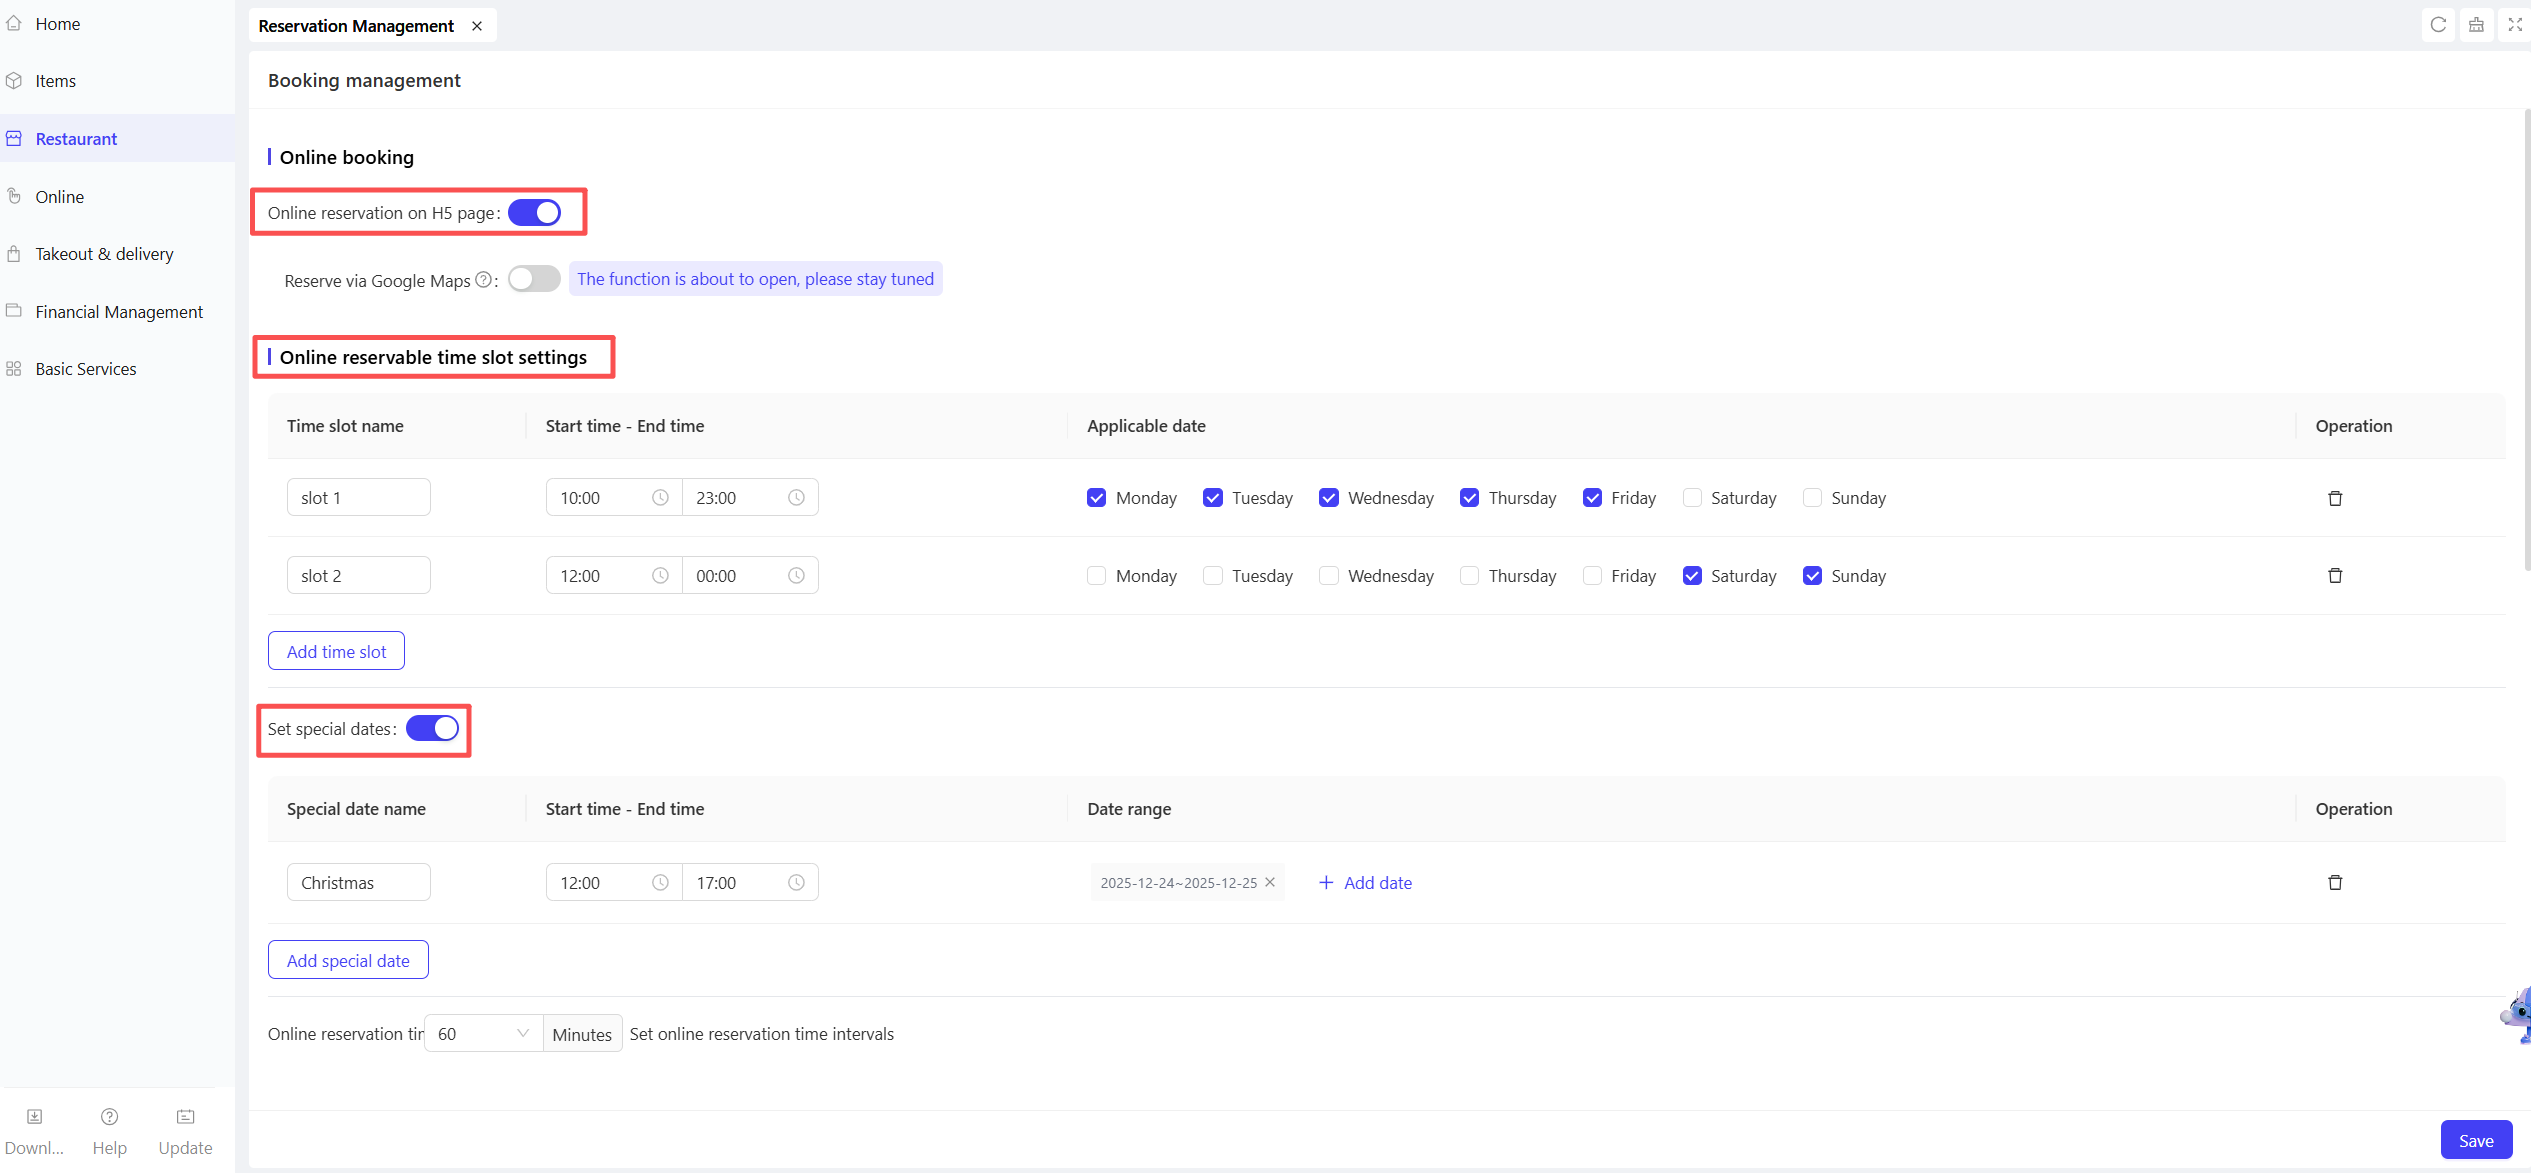
- Online reservation on the H5 page: When enabled, customers can place reservation orders via the H5 page.
- Set available reservation time slots; multiple slots are supported, but slots for the same date must not overlap.
- Enable the Special Date Toggle to configure reservation time slots for special dates. Time slots for special dates will override the regular time slots for the target date.
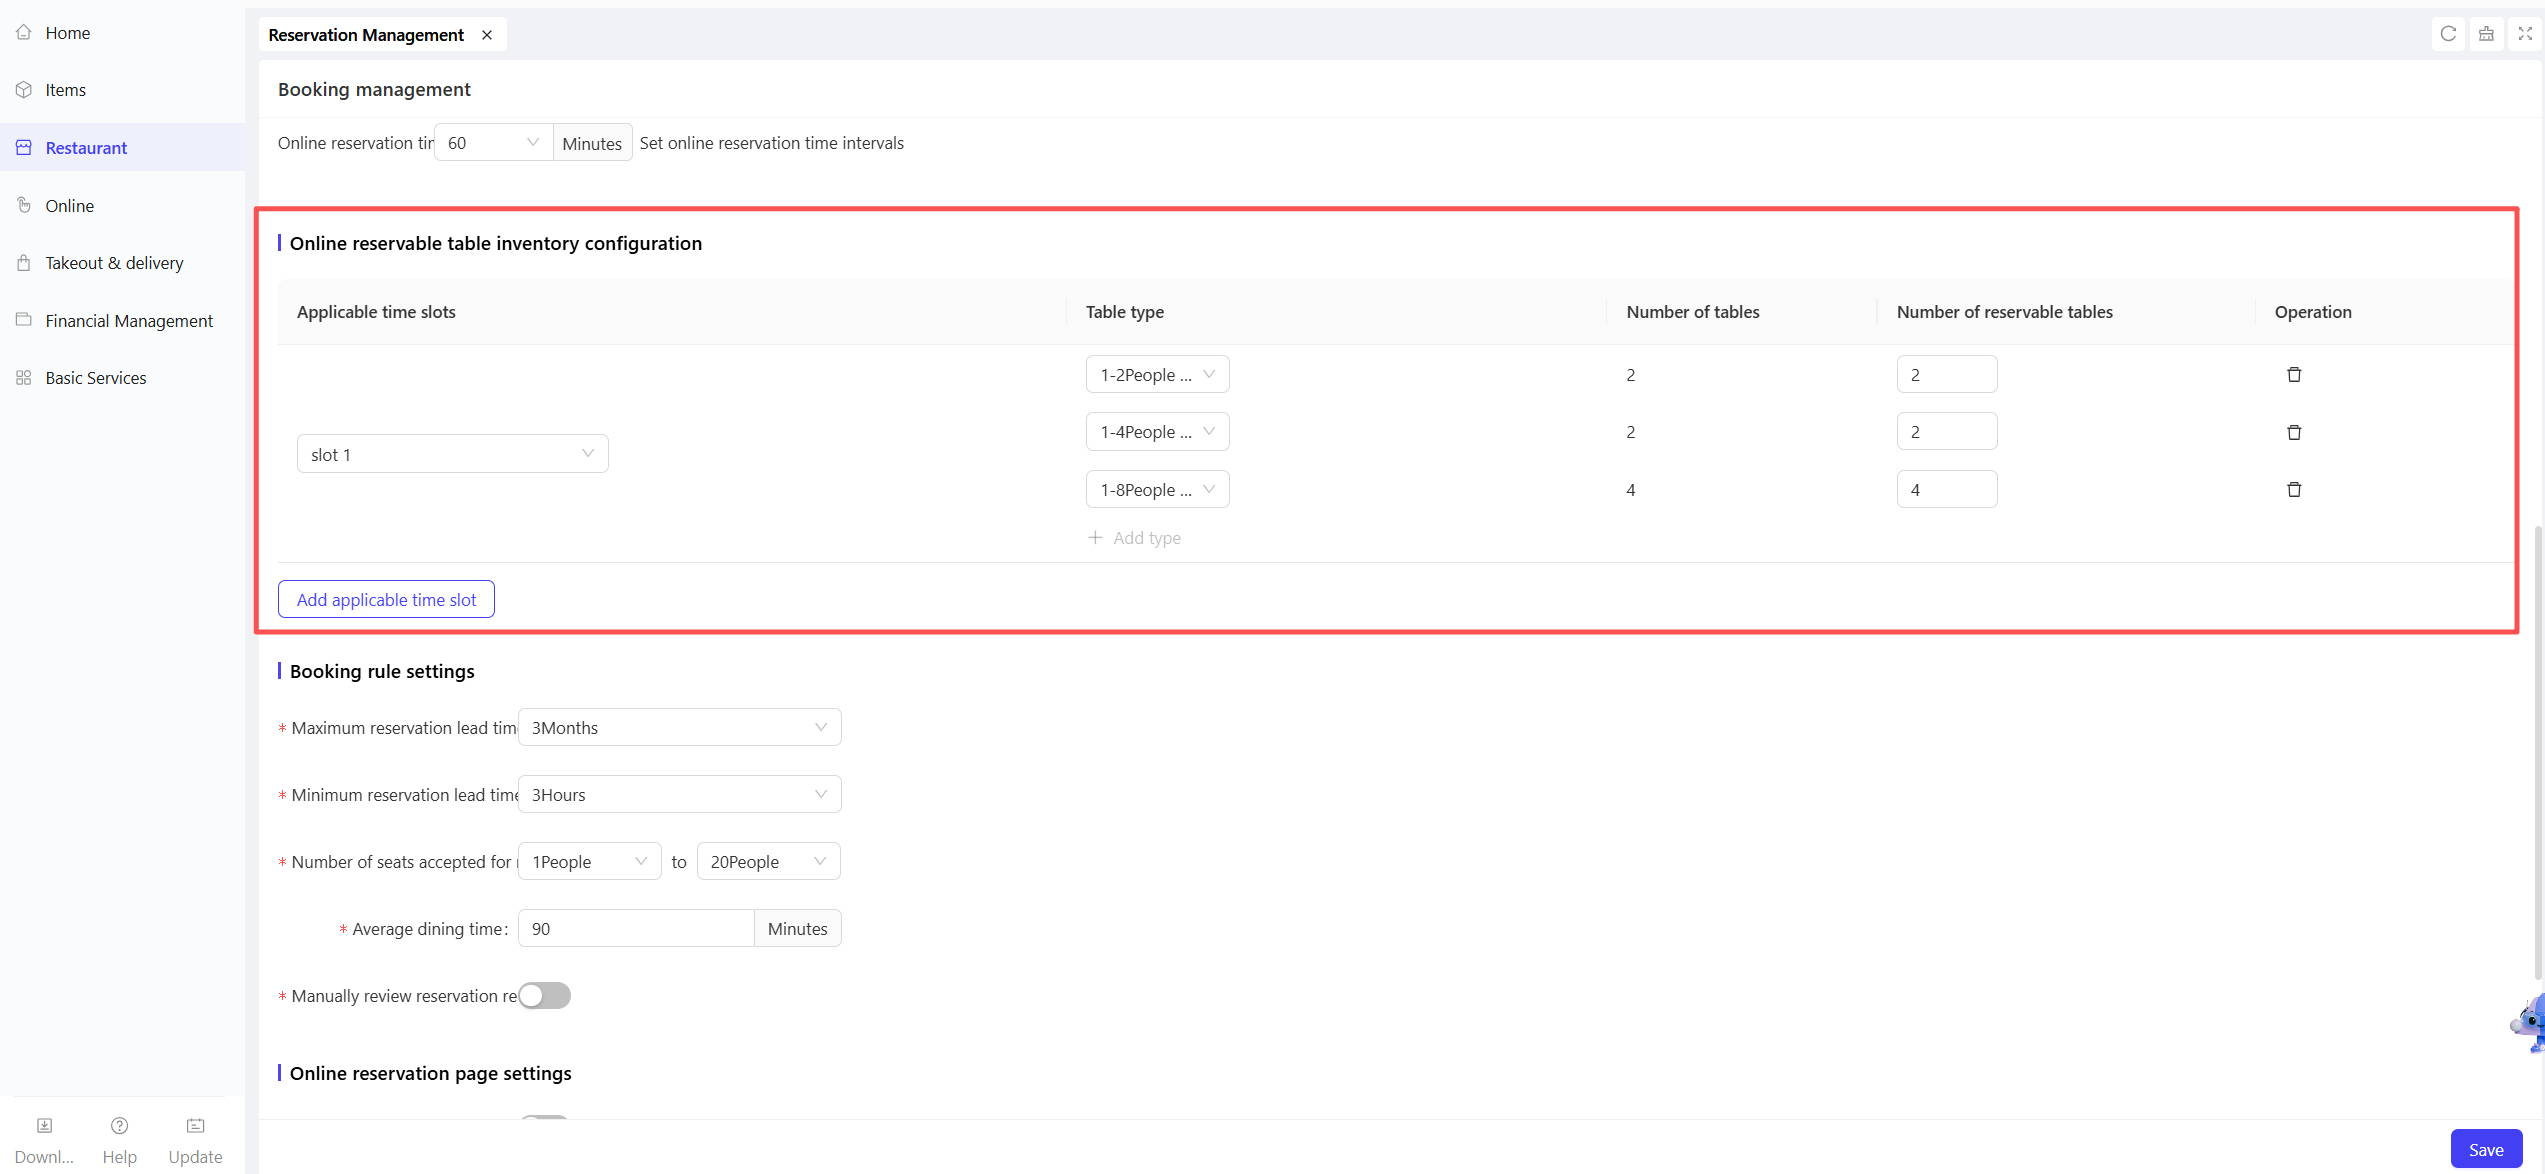
STEP 3: Configure online reservation inventory
- Set reservation inventory for the target time slots.
- For each table type, select the number of tables available for reservation.
Notes
Inventory deduction is based on the table assignment.
It is recommended not to disable the Auto Table Assignment Toggle.
Reservations without assigned tables will not reduce the reservation inventory.
STEP 4: Configure other settings as per business requirements, then click Save.
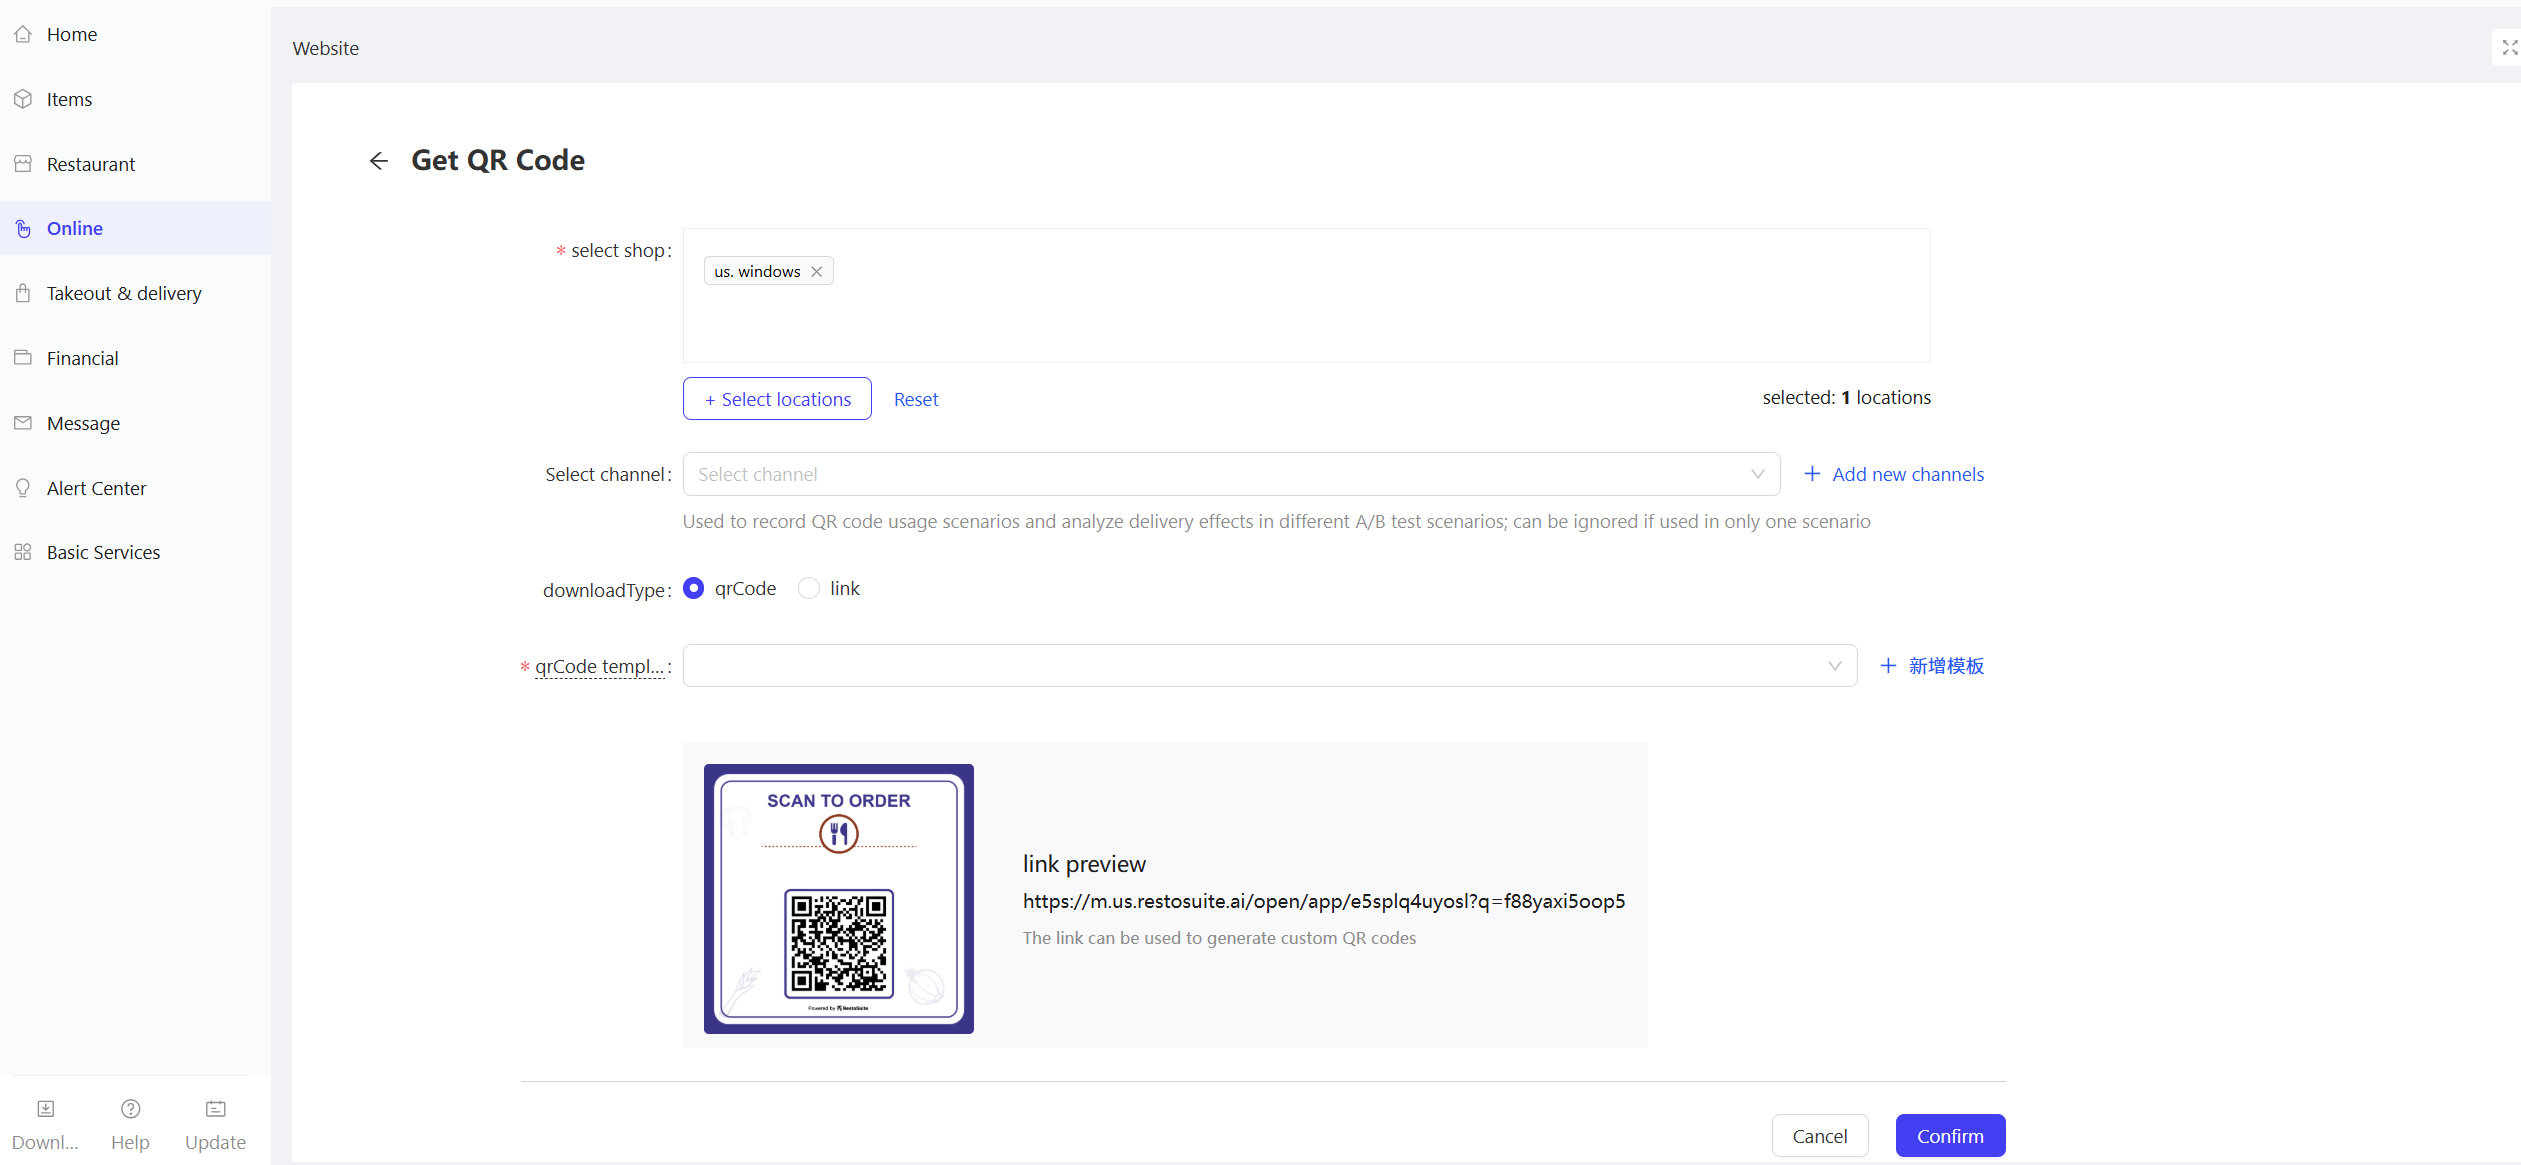
STEP 5: Generate the reservation H5 page QR code
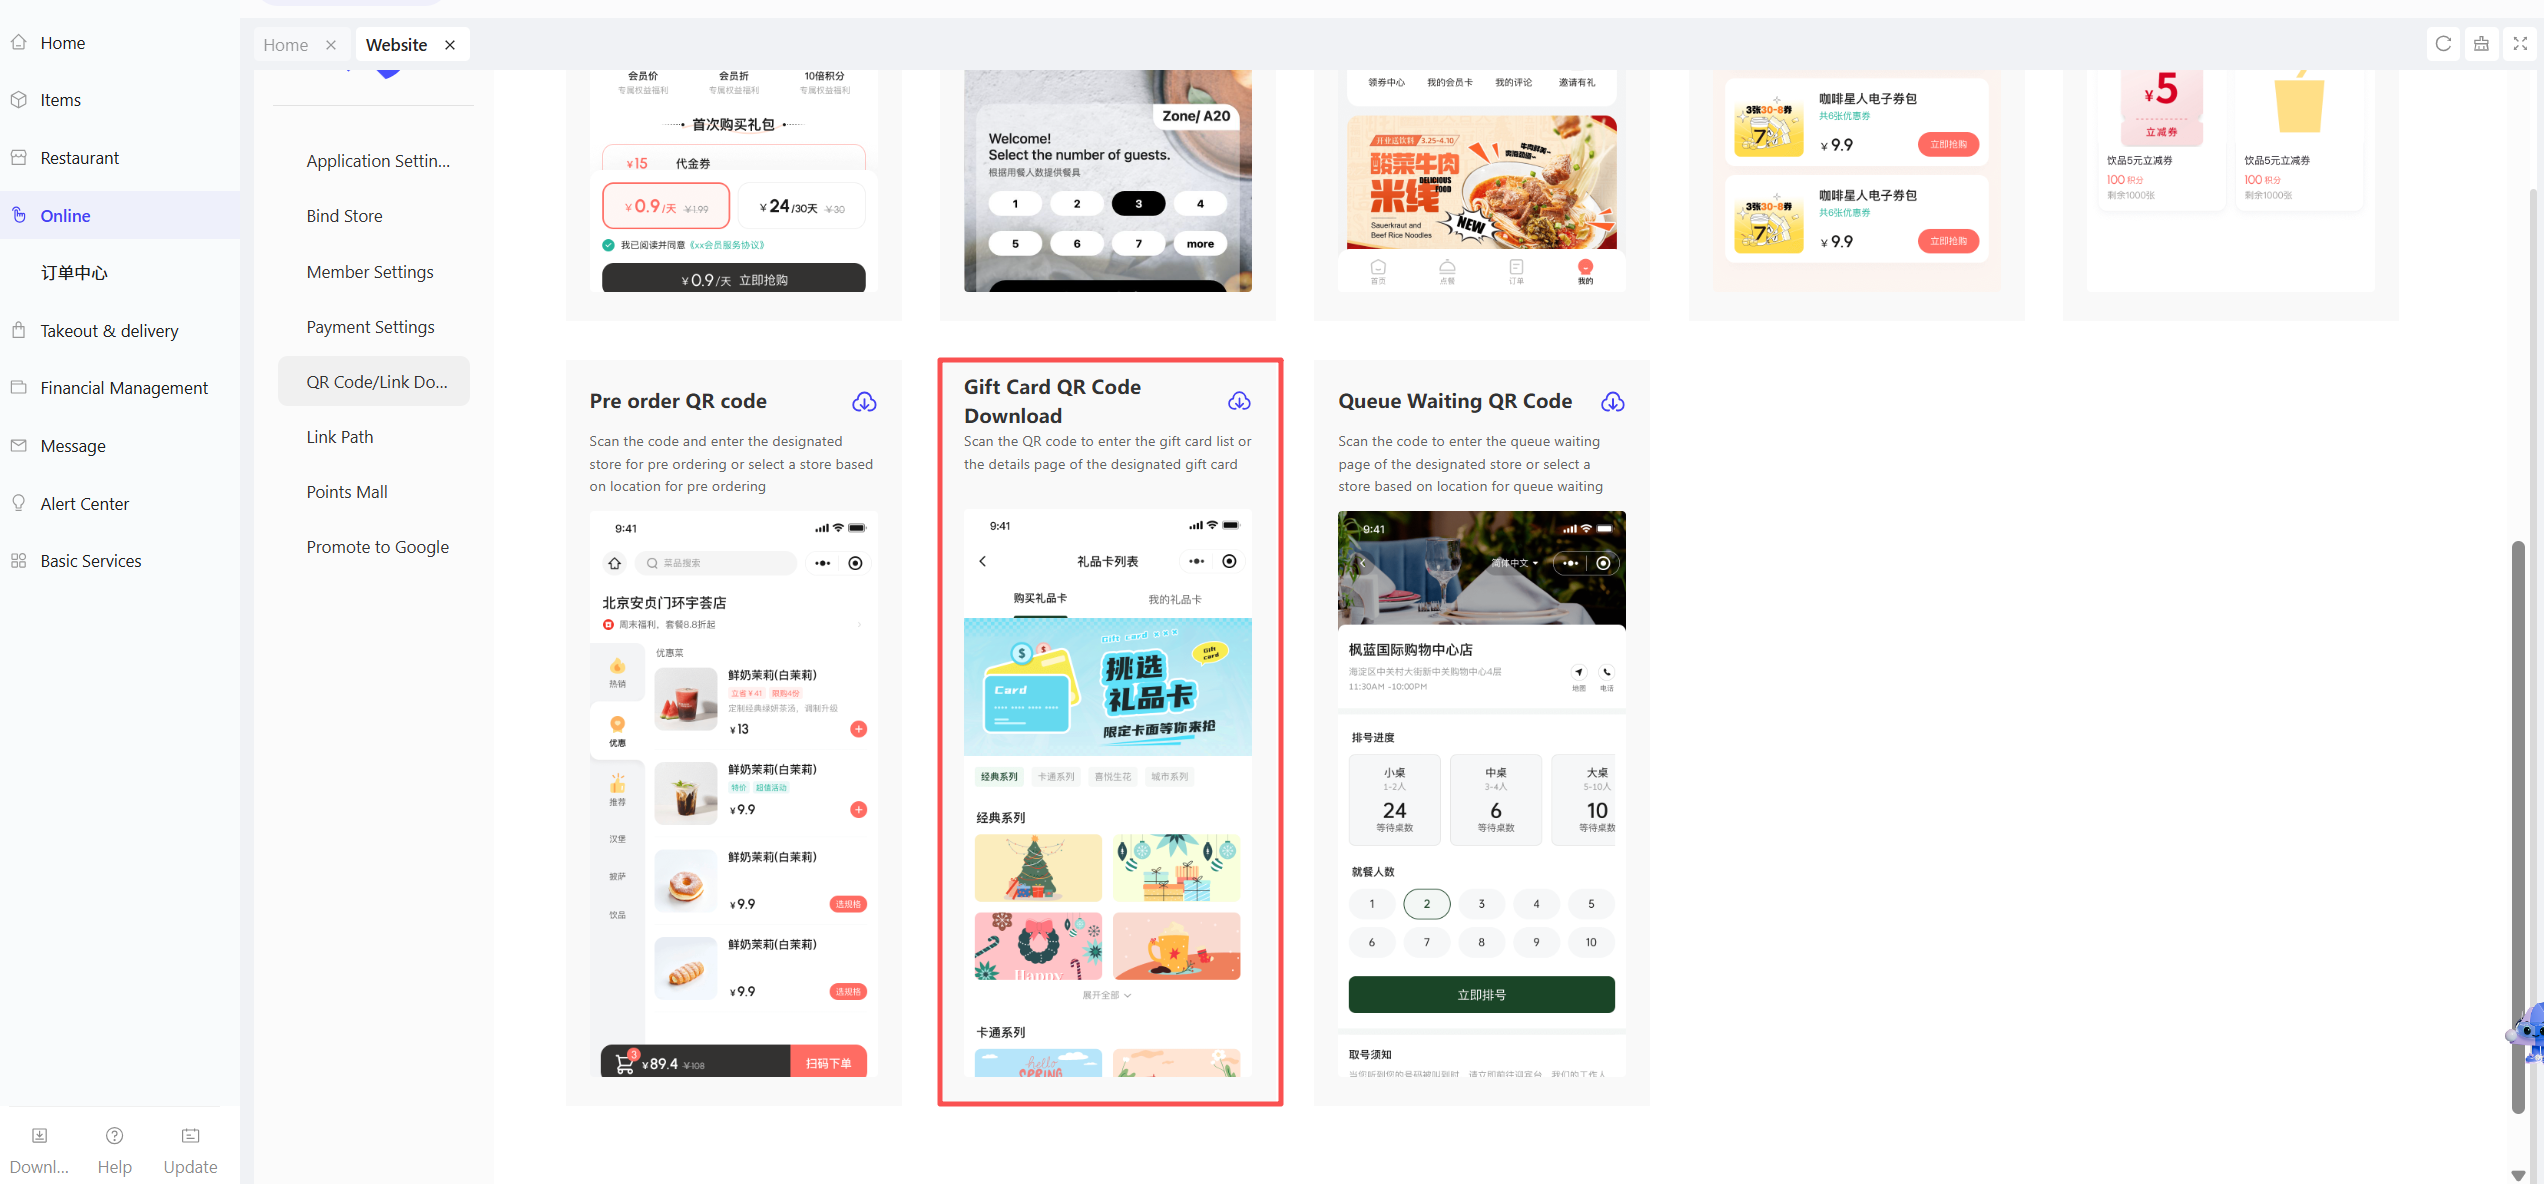
- From the Group perspective, click 【Online】>【Website Management】
- Select the HTML5 Website, then click【QR Code Download】. On the page, select Reservation
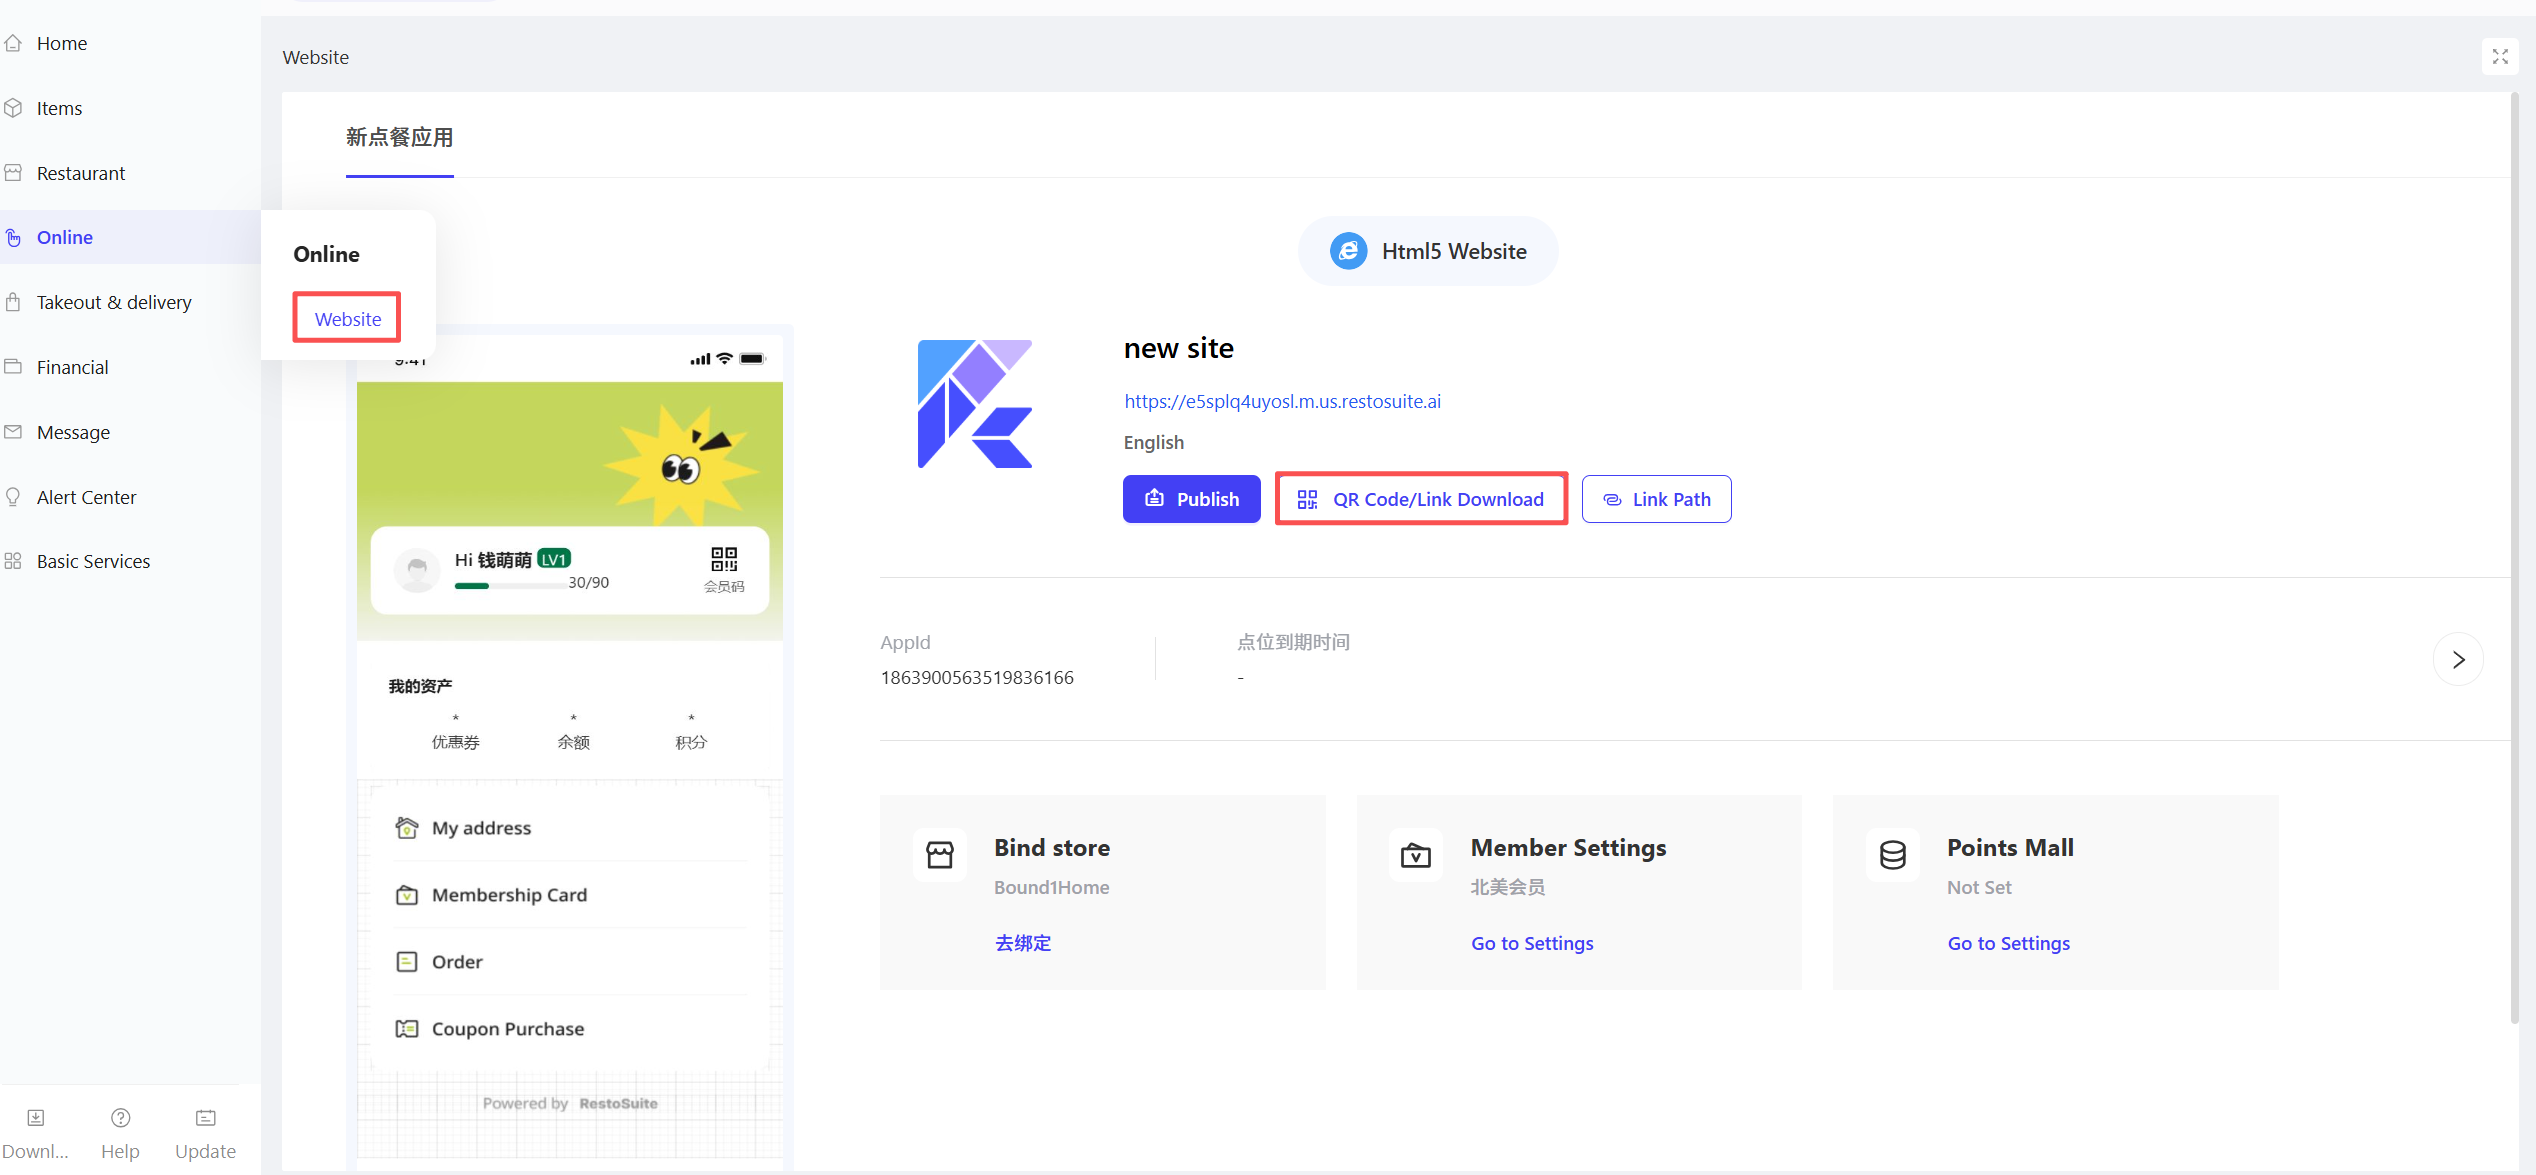
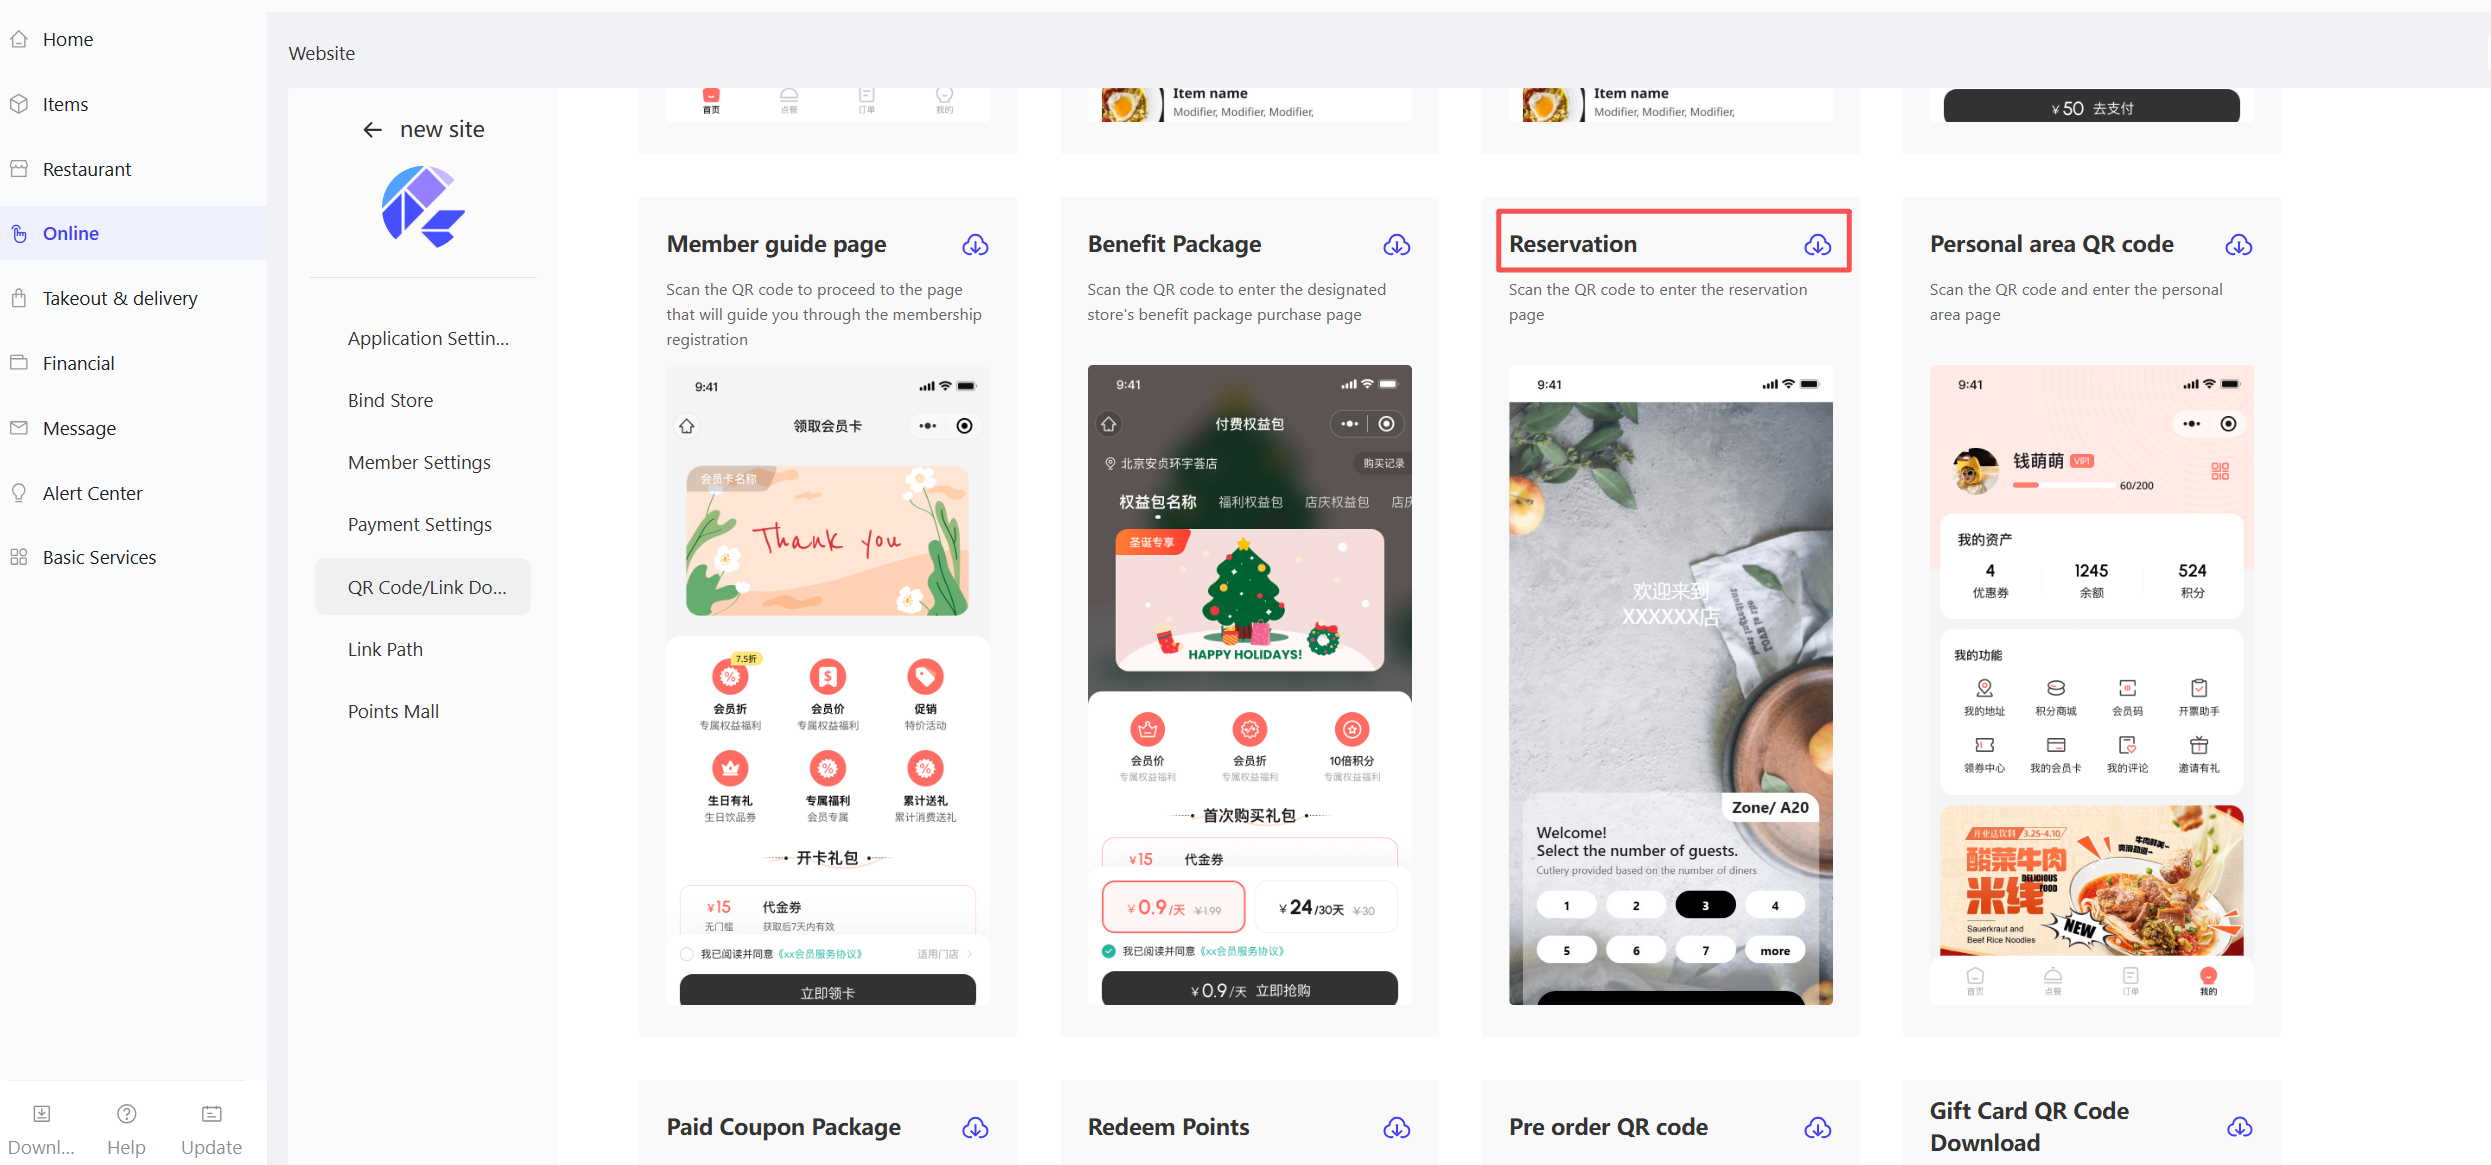
- Select the Store, then choose a QR Code Template, and click Confirm to generate the QR code.
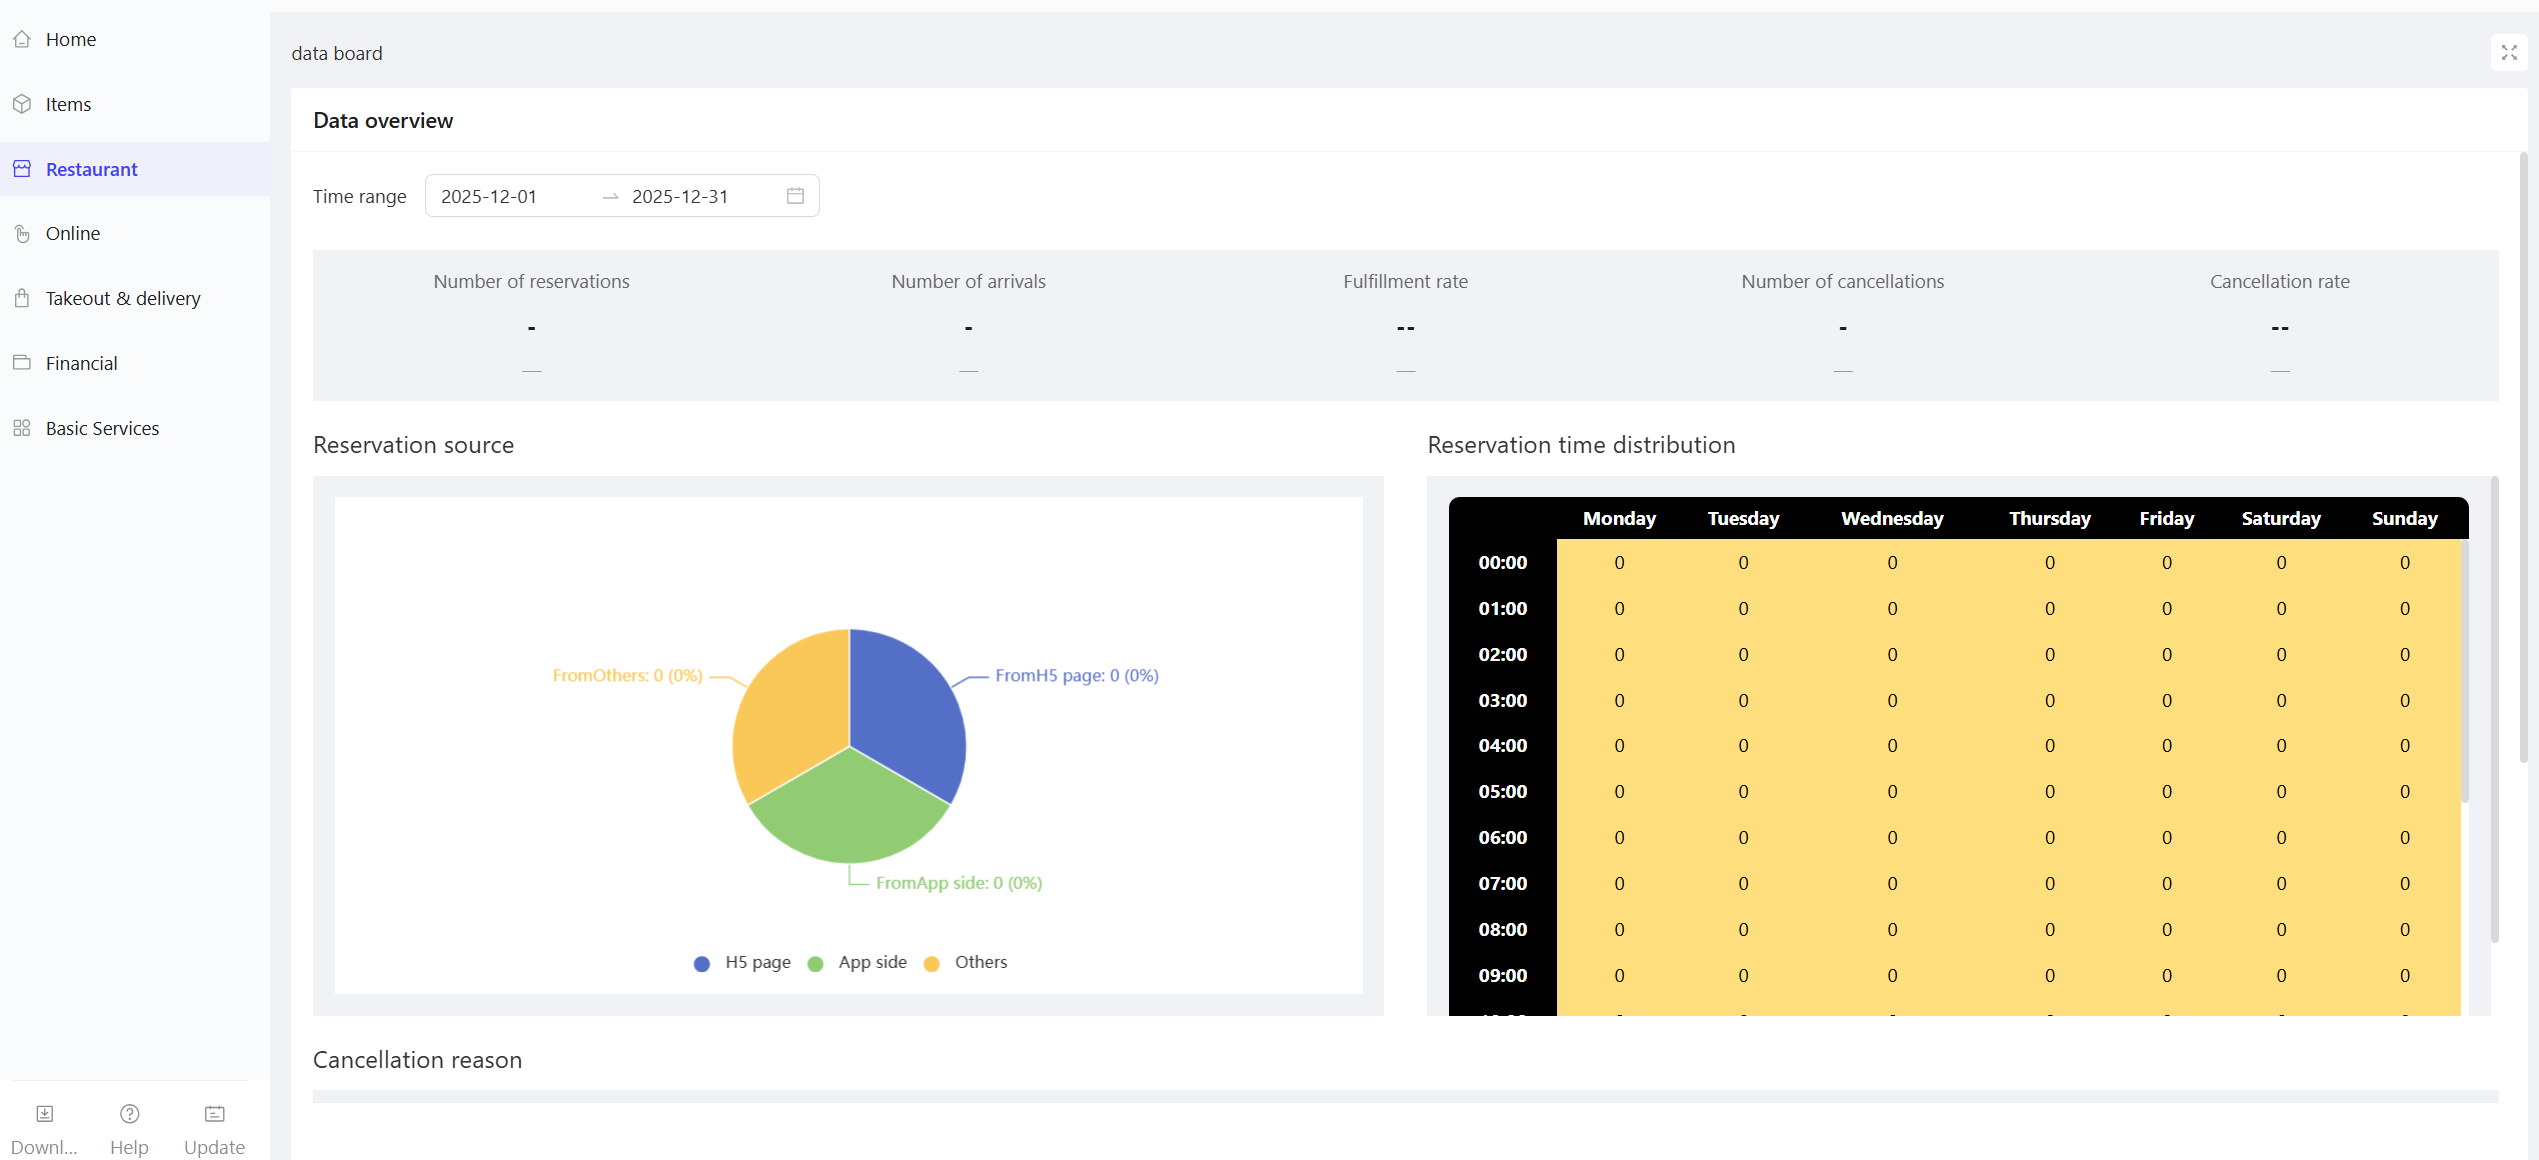
2.1.3 Reservation Data Dashboard
STEP 1: From the store perspective, click【Restaurant Management】>【Reservation Management】>【Data Dashboard】
STEP 2: On the Data Dashboard page, view reservation-related statistics, such as: Reservation Source, Reservation Time Distribution, and Cancellation Reasons.
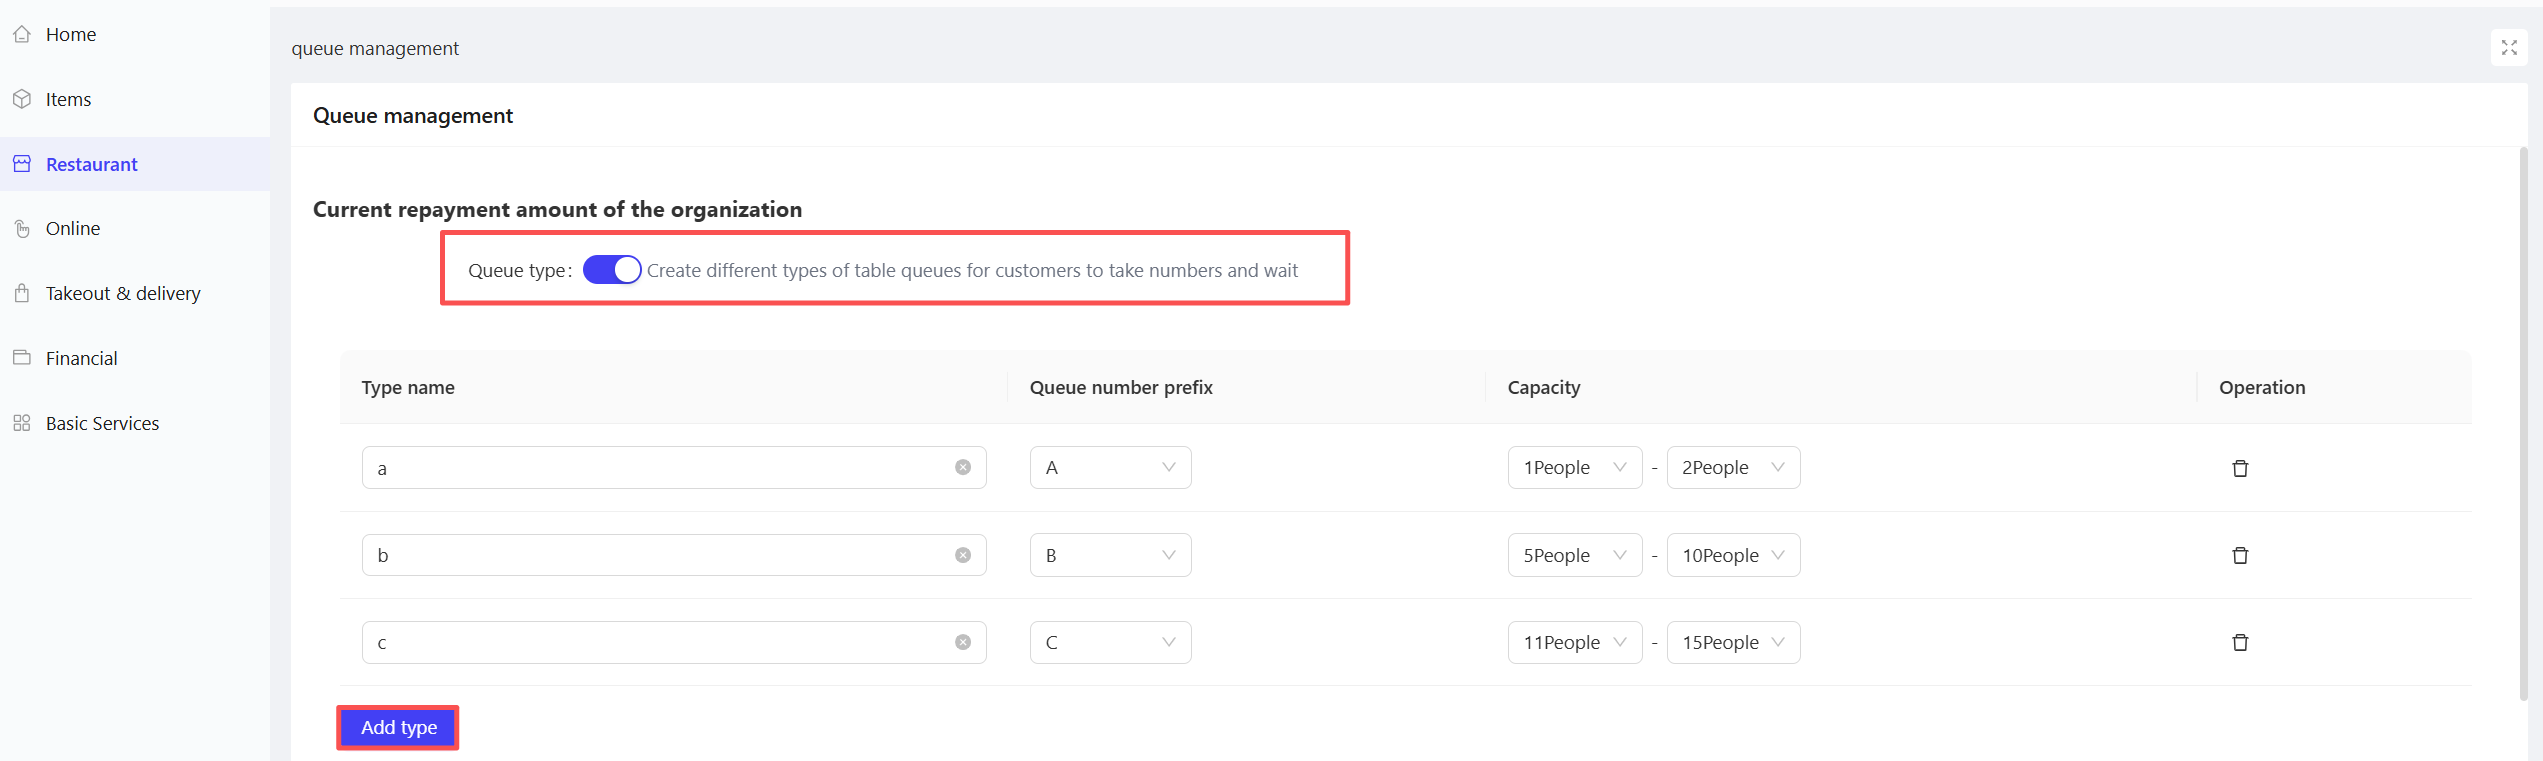
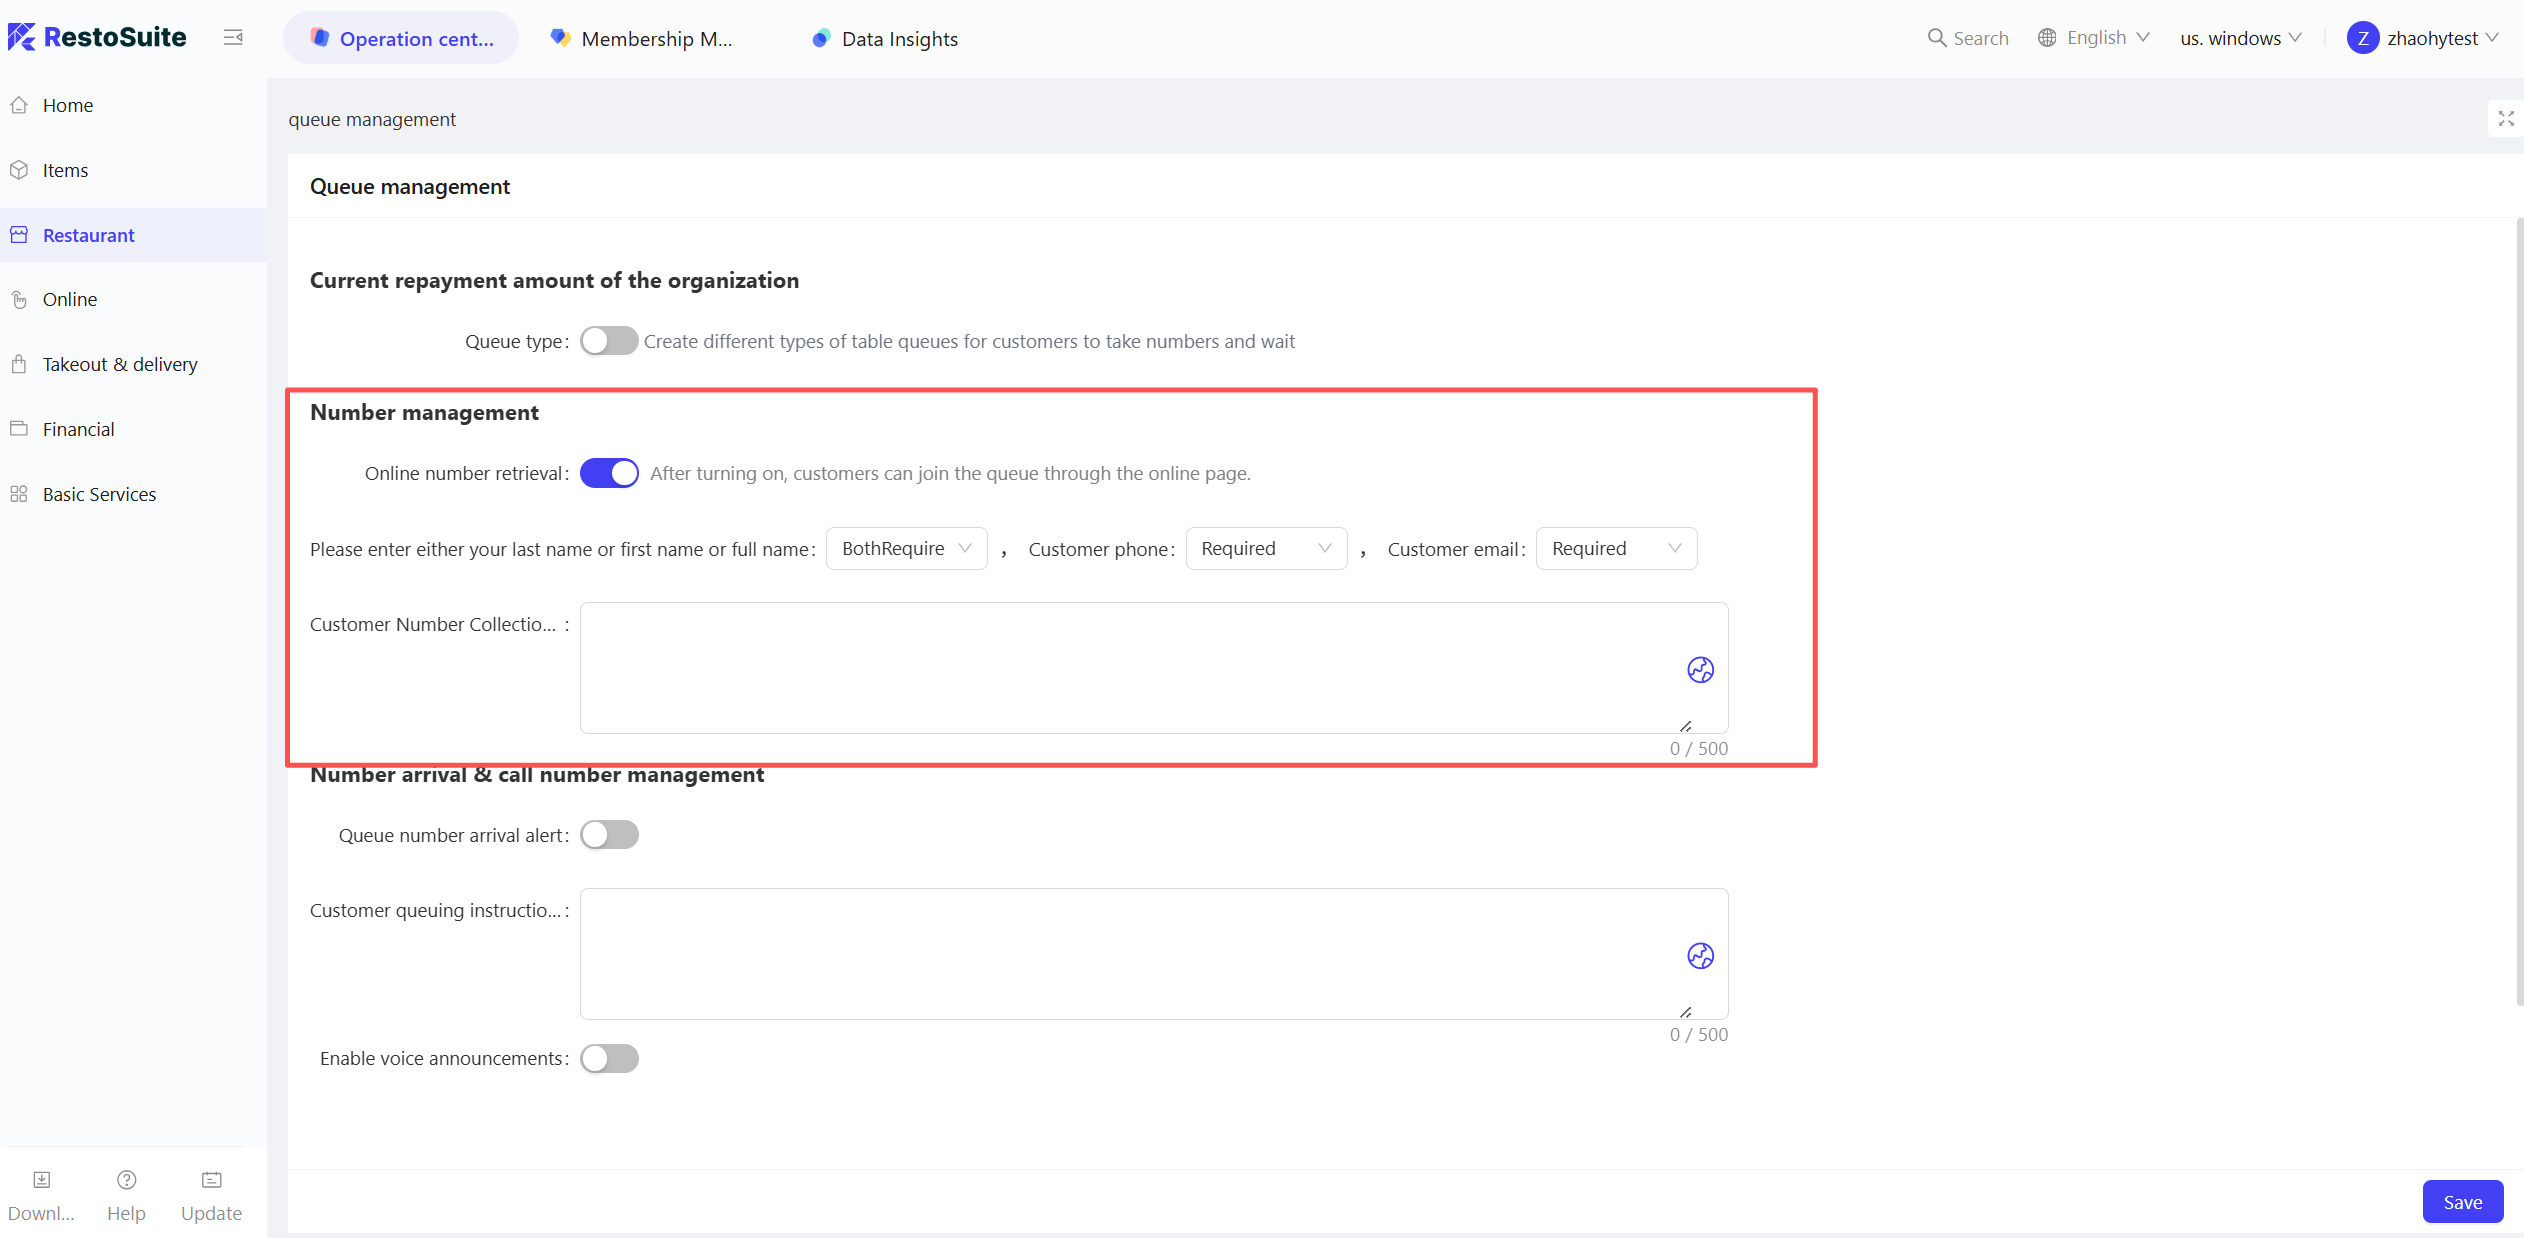
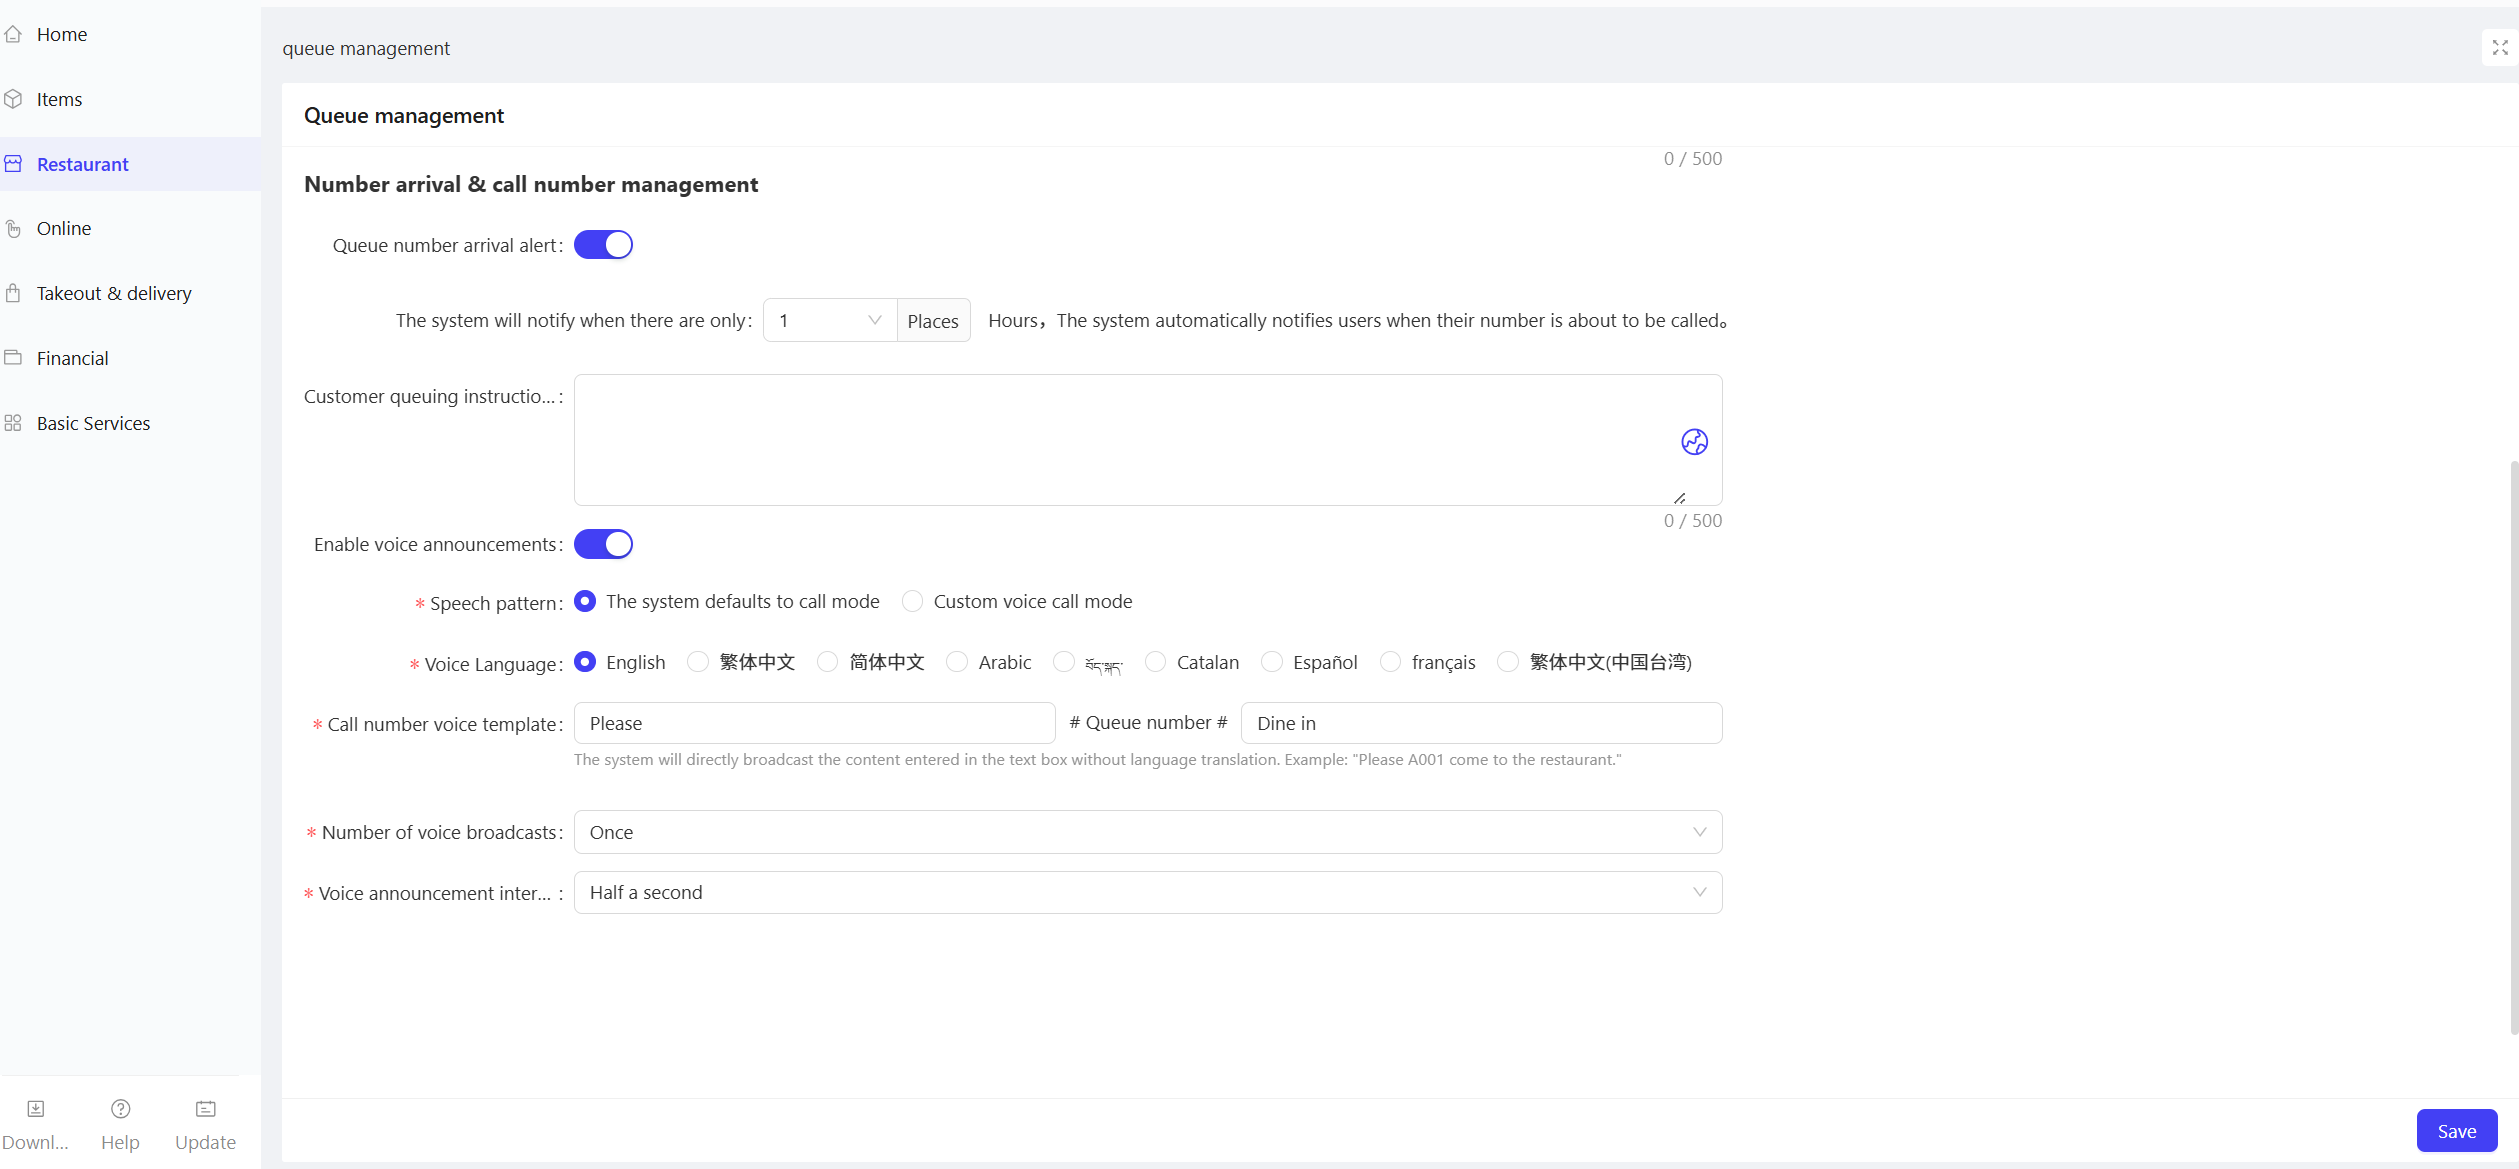
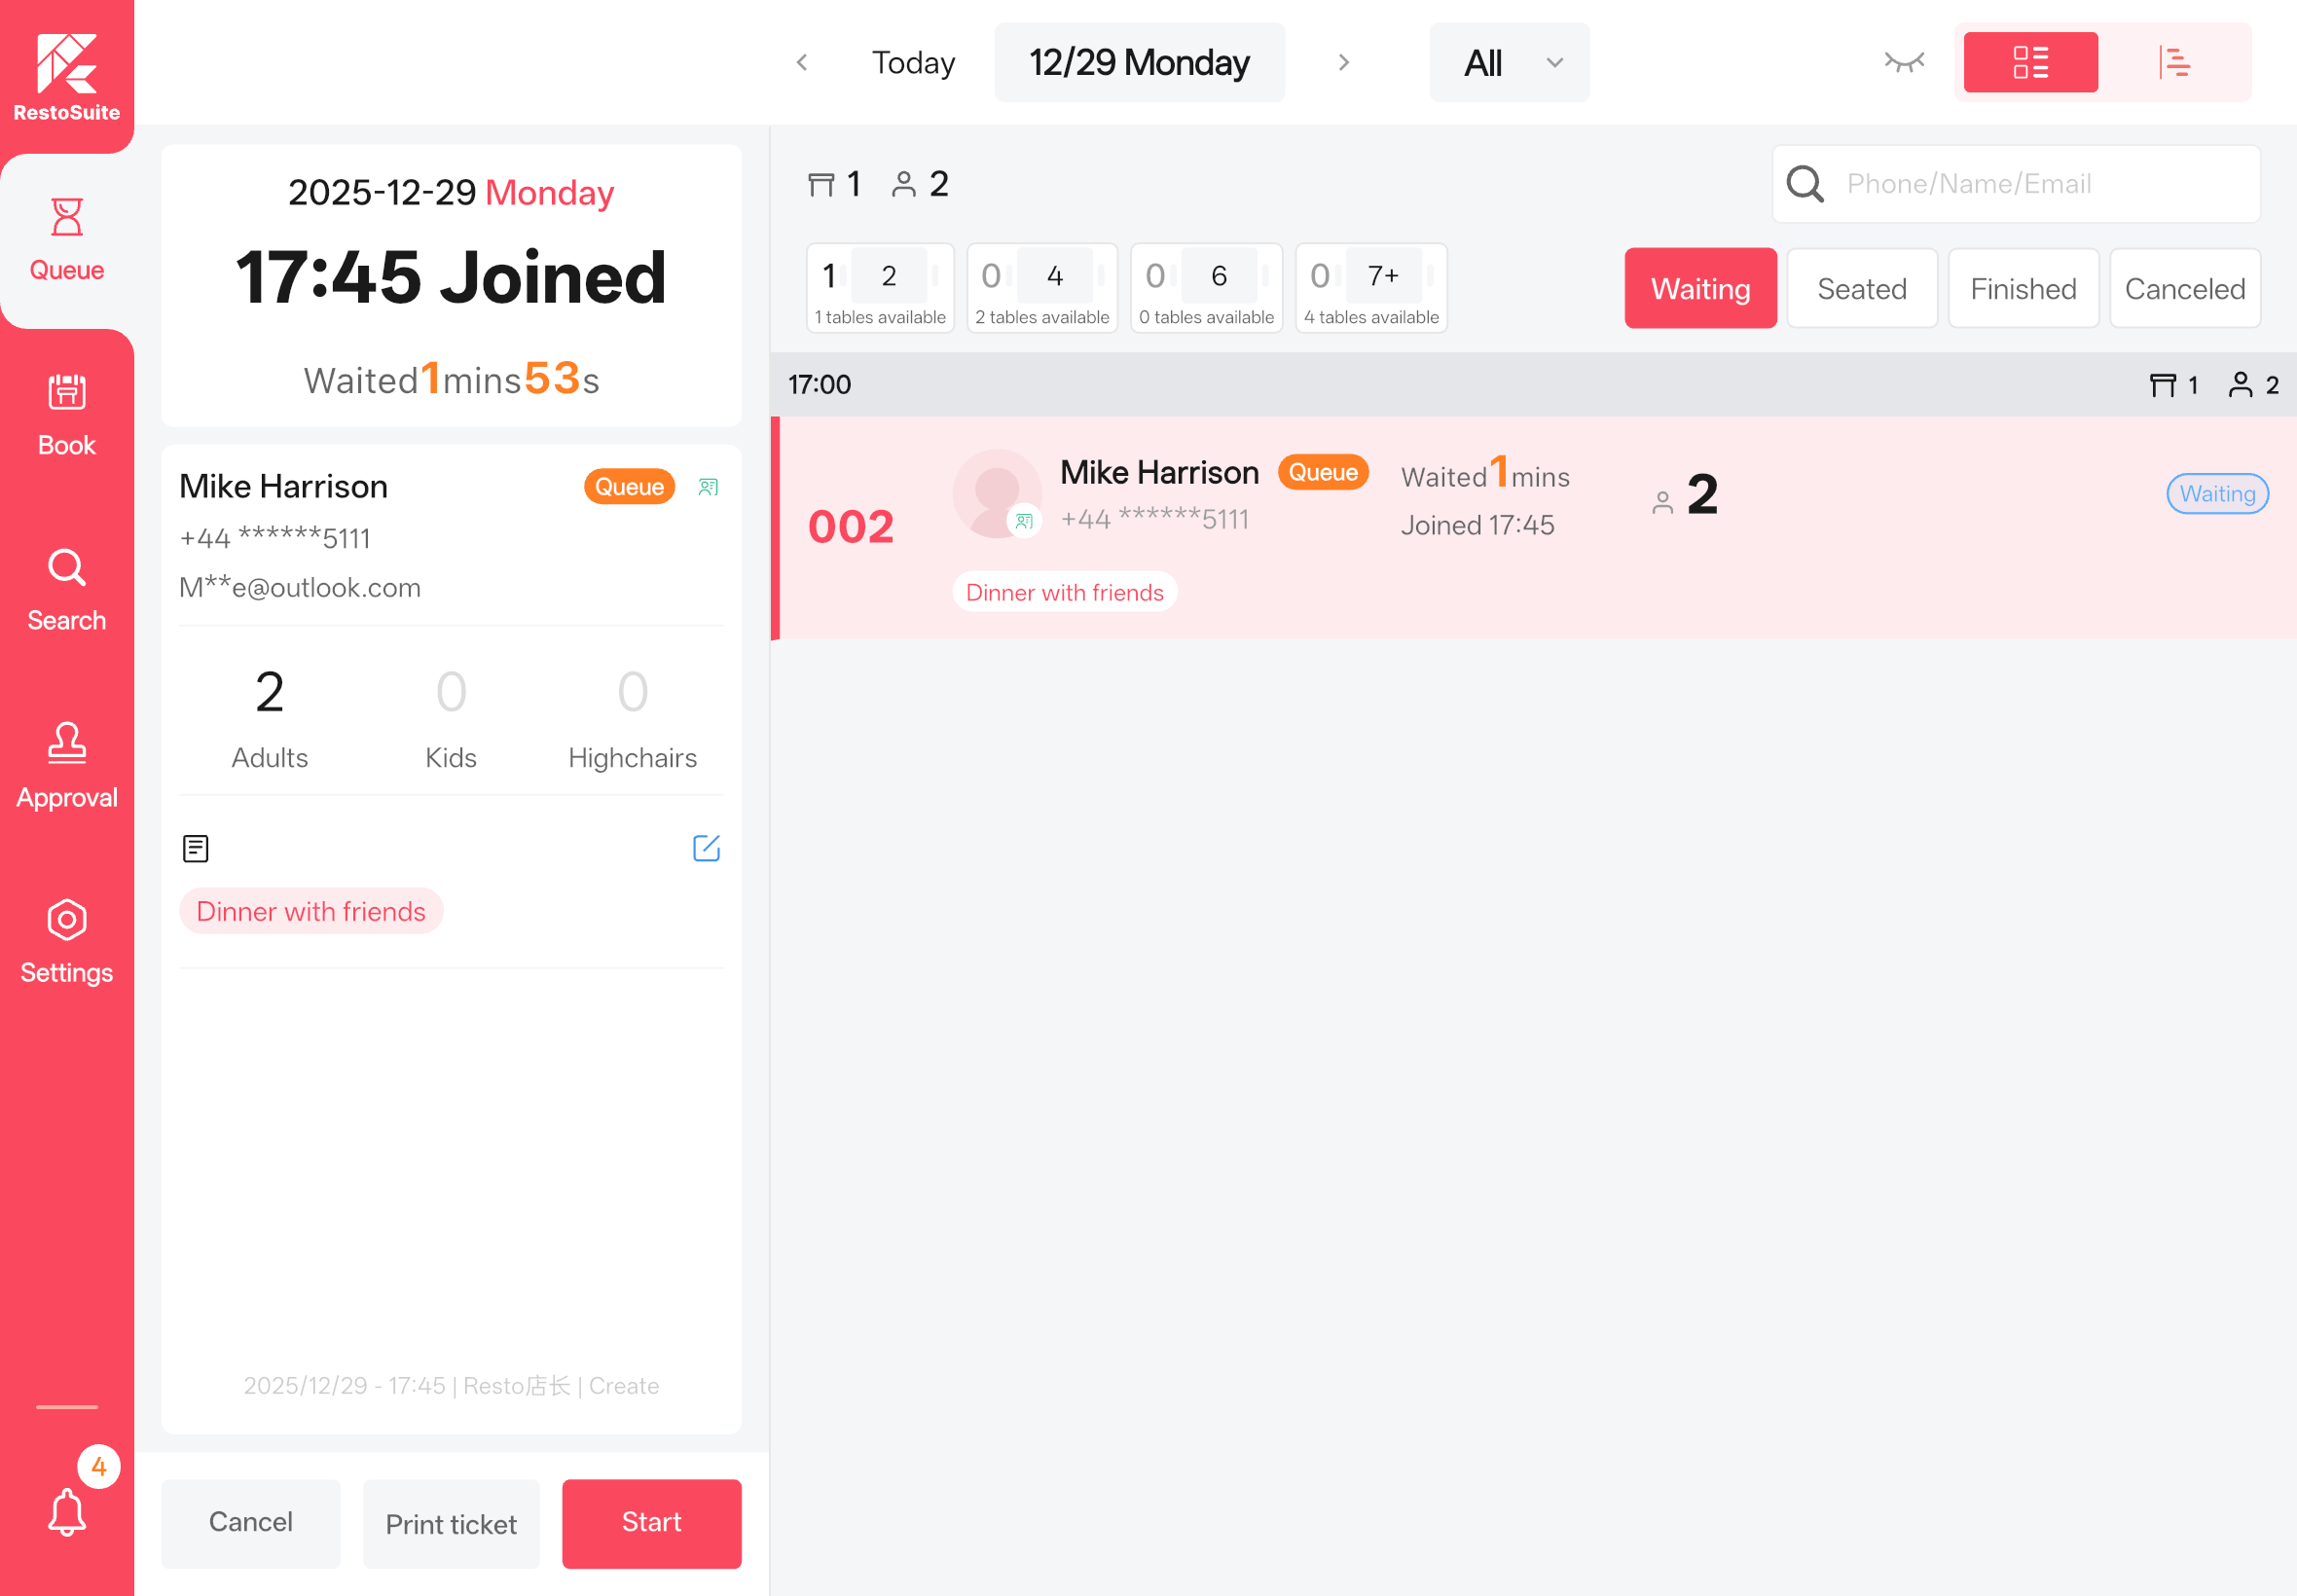
2.2 Queue Settings
STEP 1: From the store perspective, click【Restaurant Management】>【Reservation Management】>【Queue Management】
STEP 2: Configure the following items on the Queue Management page:
- Set Queue Types: Enable the toggle to customize queue types
-
Configure Number Management Settings:
- Customer Name and Phone Number fields are optional to speed up the ticket-getting process.
- Click the globe icon on the right side of the Instruction Text input box to edit multilingual content.
-
Configure Queue Notification & Number Calling Settings:
- The voice calling function requires a TTS (Text-to-Speech) engine installed on the device (e.g., iFlytek).
- Configure rules for queue notifications and enable/disable voice calling.
2.3 Permission Settings
STEP 1: From the store perspective, click【Basic Services】>【Roles】and go to the【System Roles】tab.
- Default Settings
- Three default roles have full access to the Reservation App:
- Store Manager
- Store Administrator
- Front-of-House Supervisor
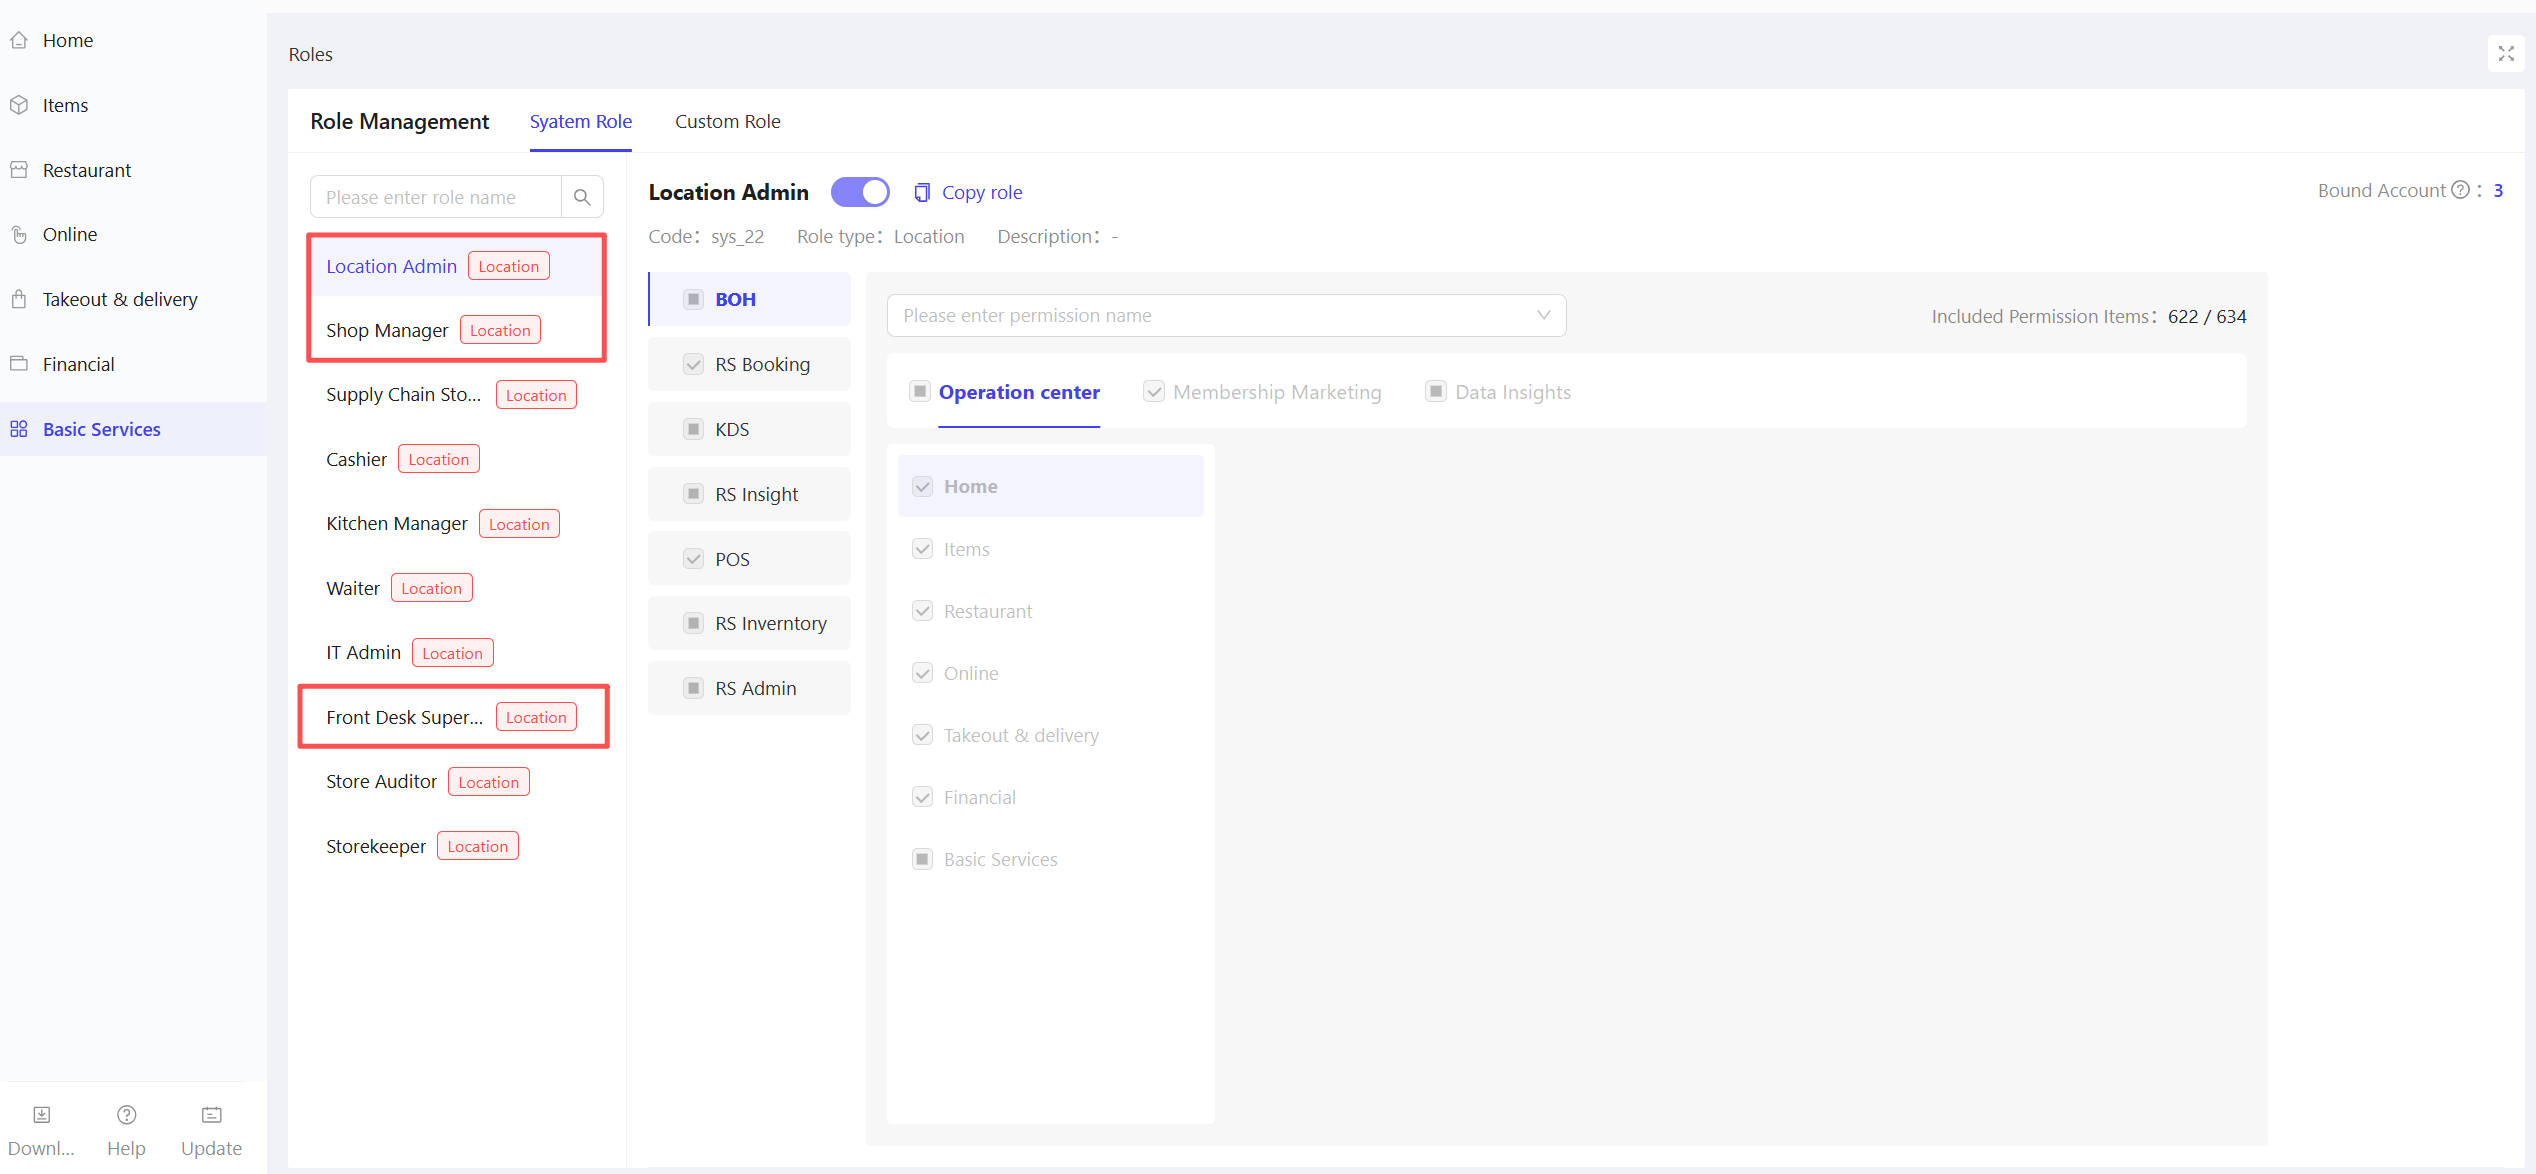
- Custom Roles
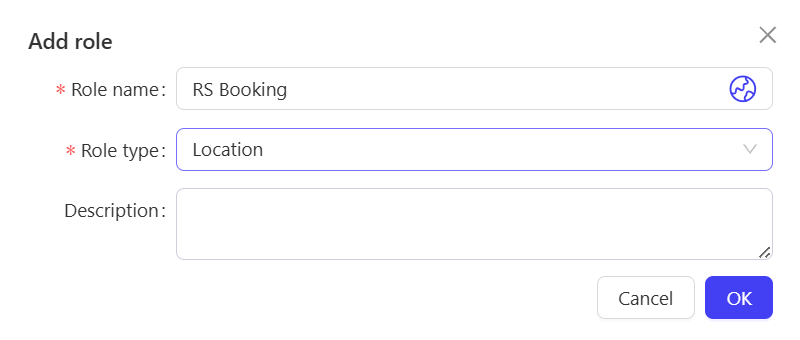
- Click【Custom Roles】, then Add Role. On the pop-up page, enter the role name and select the role type.
- For store-level custom roles, select the corresponding permissions as needed.

- Employees without permission can log in to the App with their accounts, but a permission verification pop-up will appear when performing restricted operations. Enter the PIN code of an authorized account to gain temporary access (same logic as the POS system).
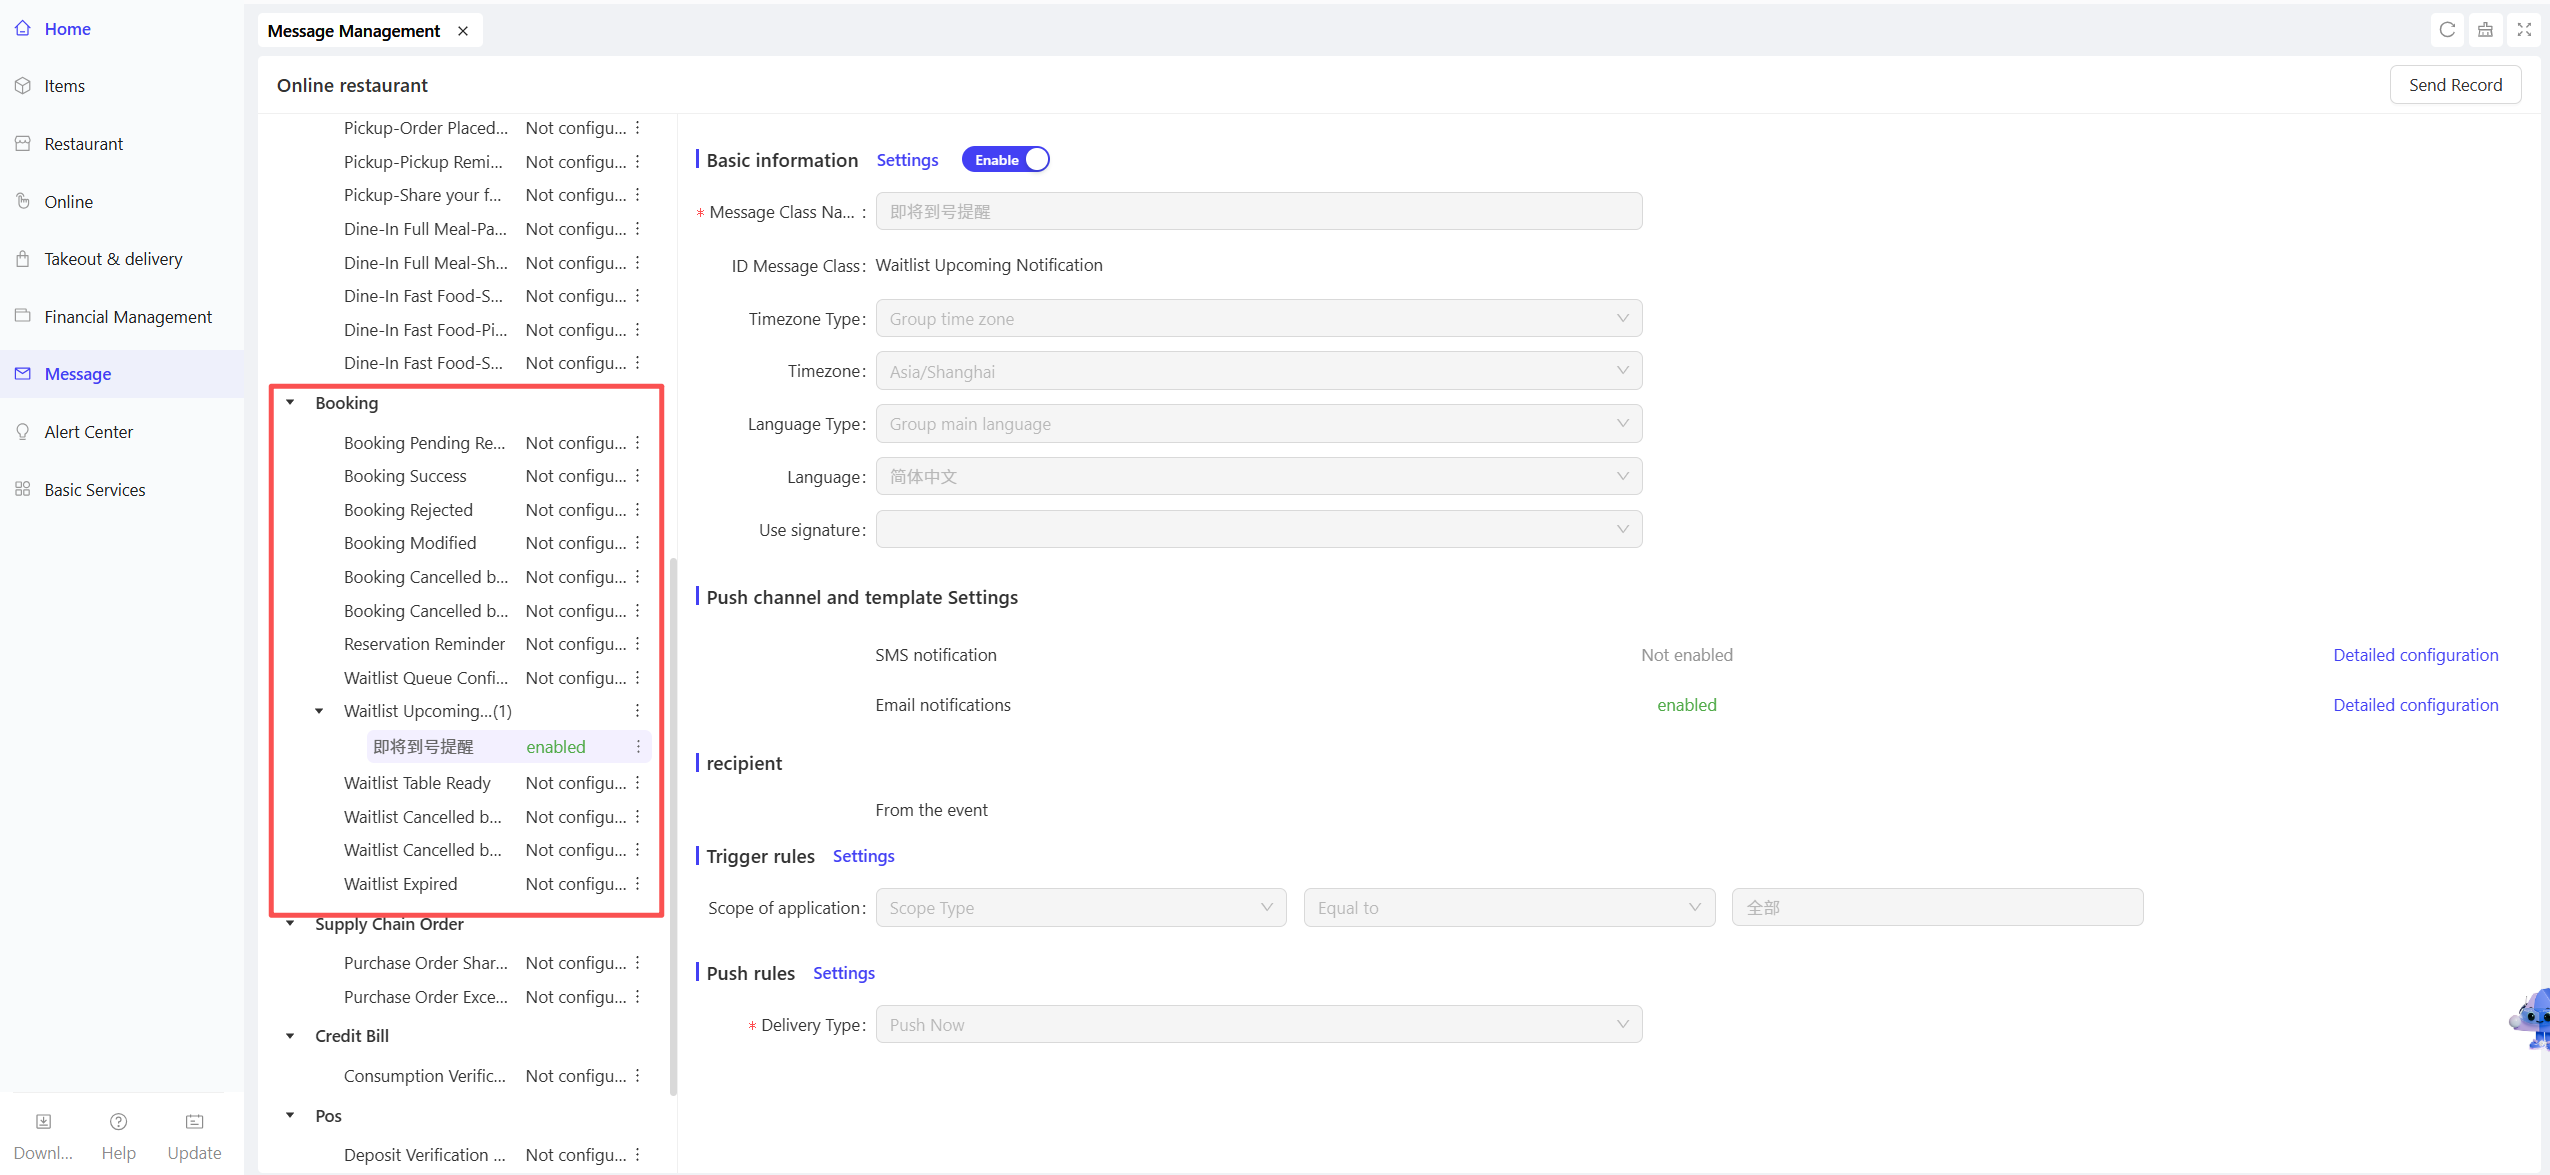
2.4 Notification Settings
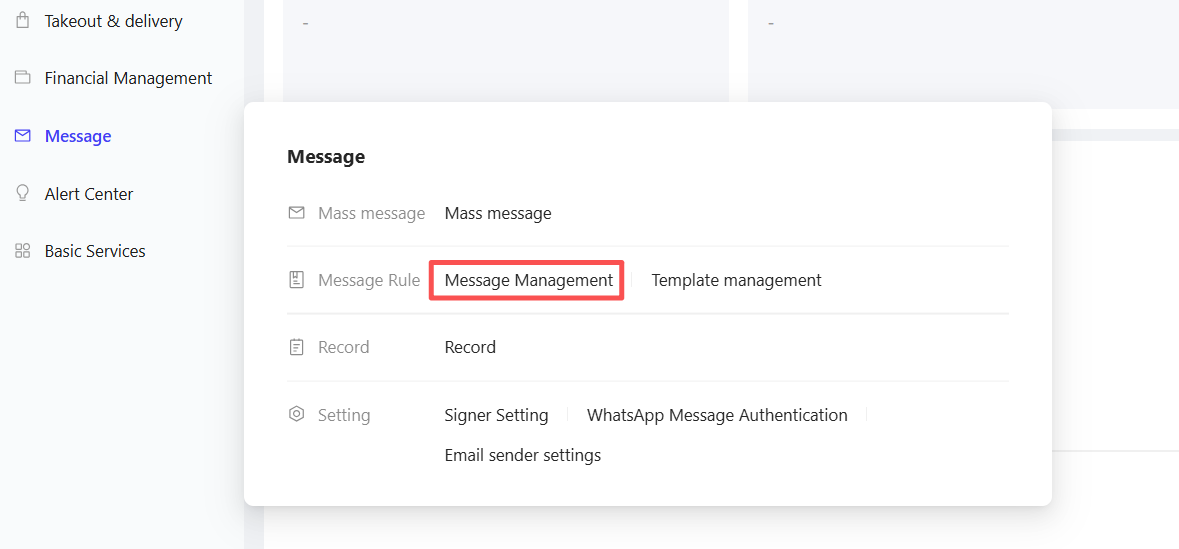
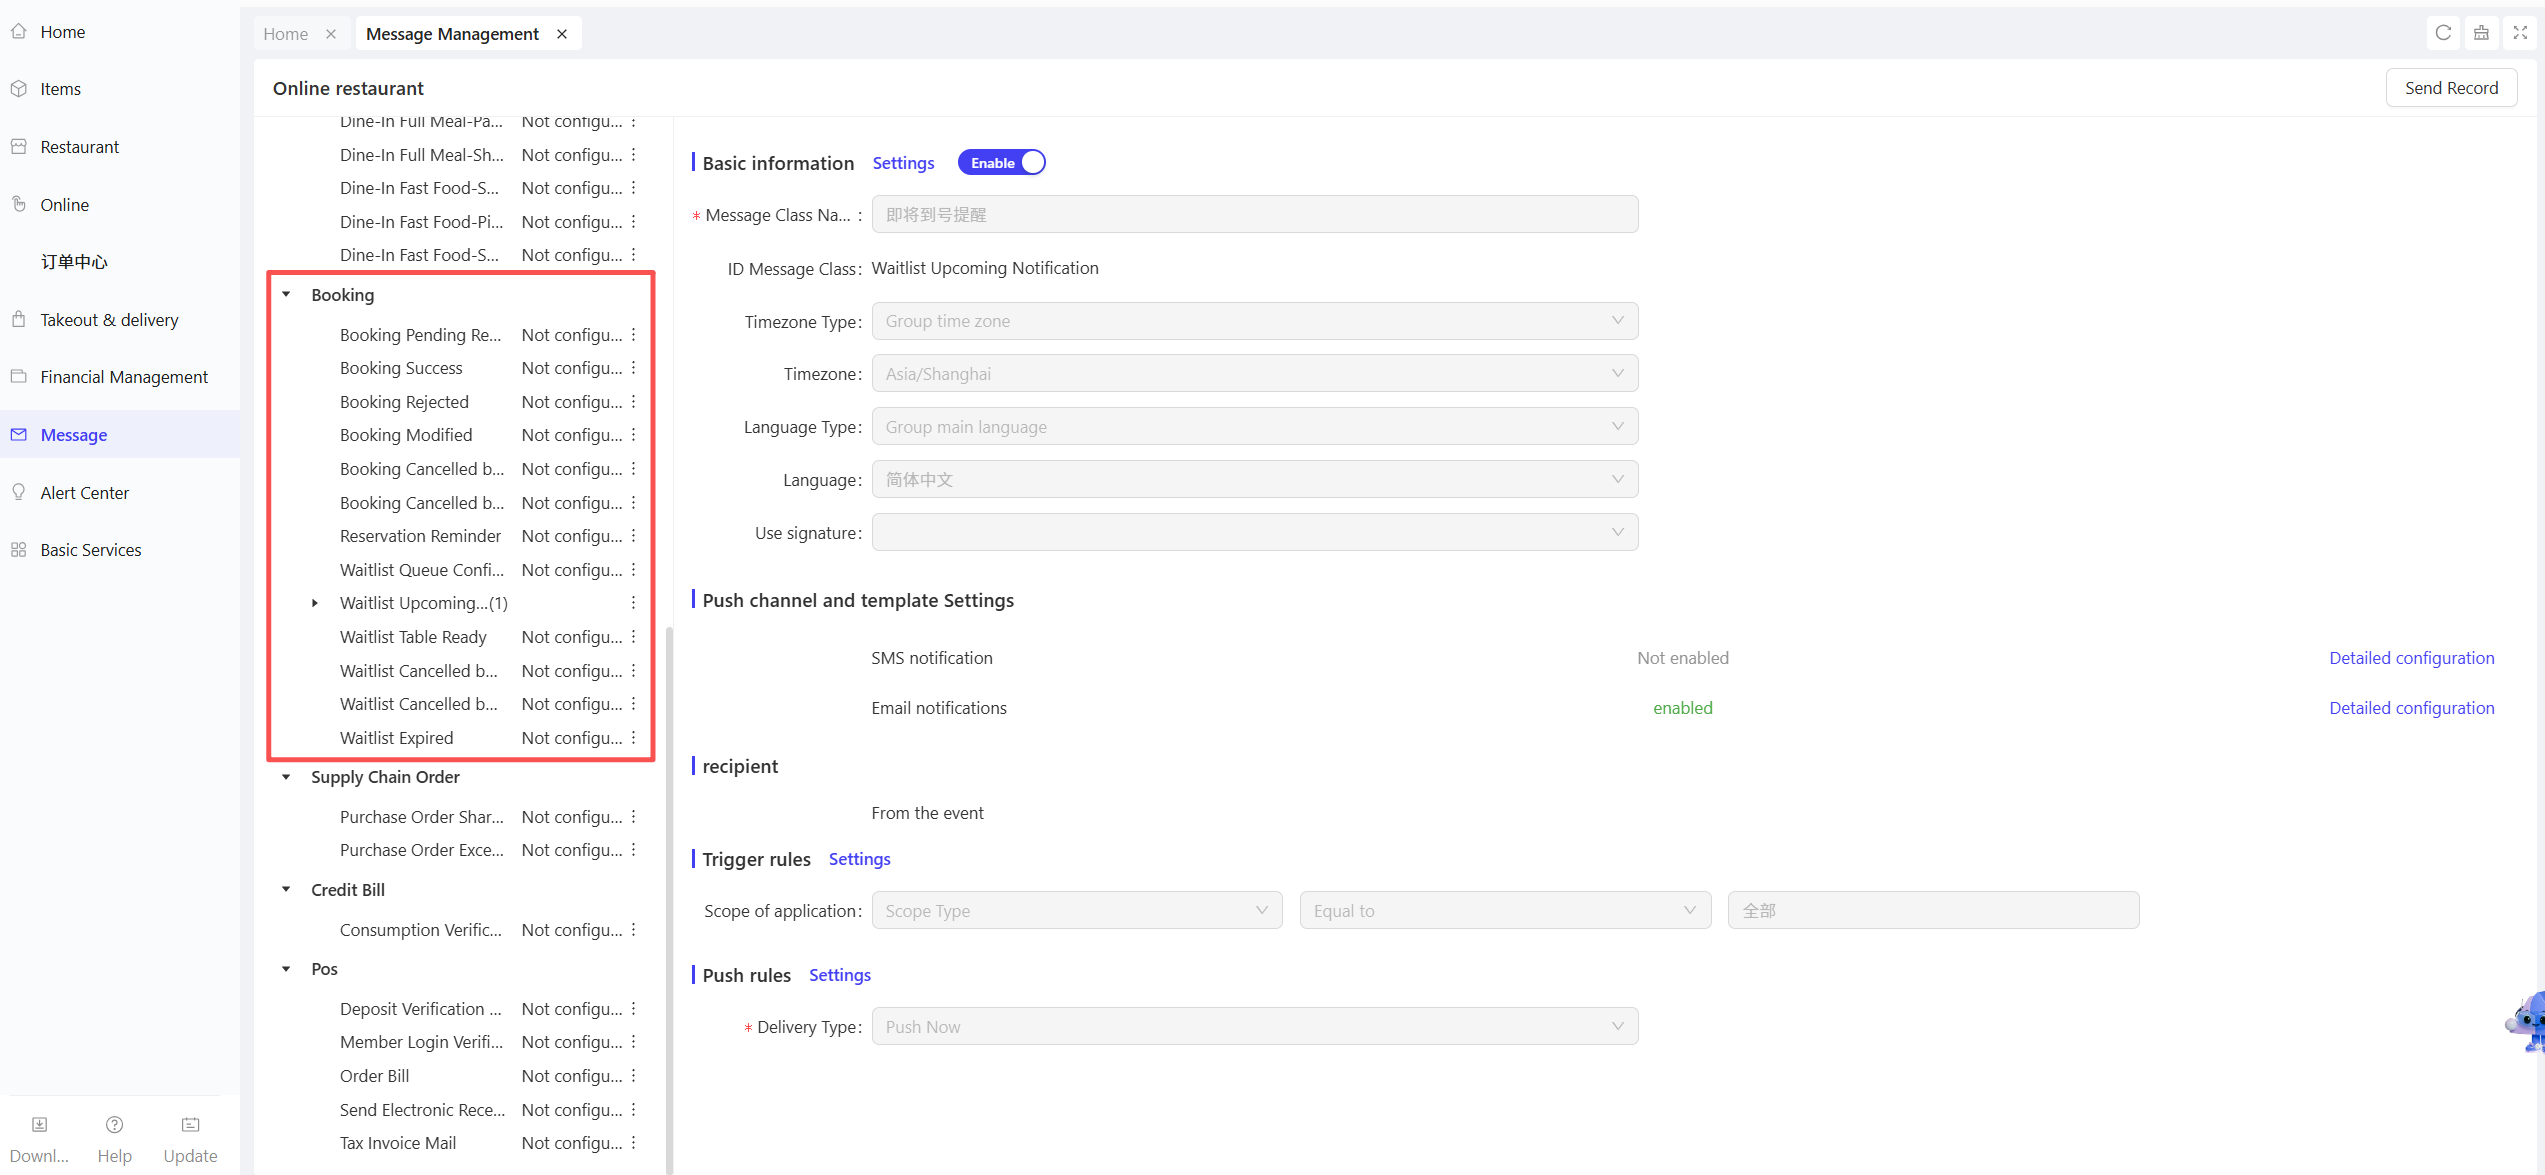
STEP 1: From the Group perspective, click【Message Center】>【Rule Management】> 【Message Management】
STEP 2: On the details page, under the Booking Module, enable and configure notification rules for key reservation process nodes.
3 RS Booking App
3.1 App Download
-
Android Version:
- Download from the official website: https://www.restosuite.cn/zh_cn/download-center
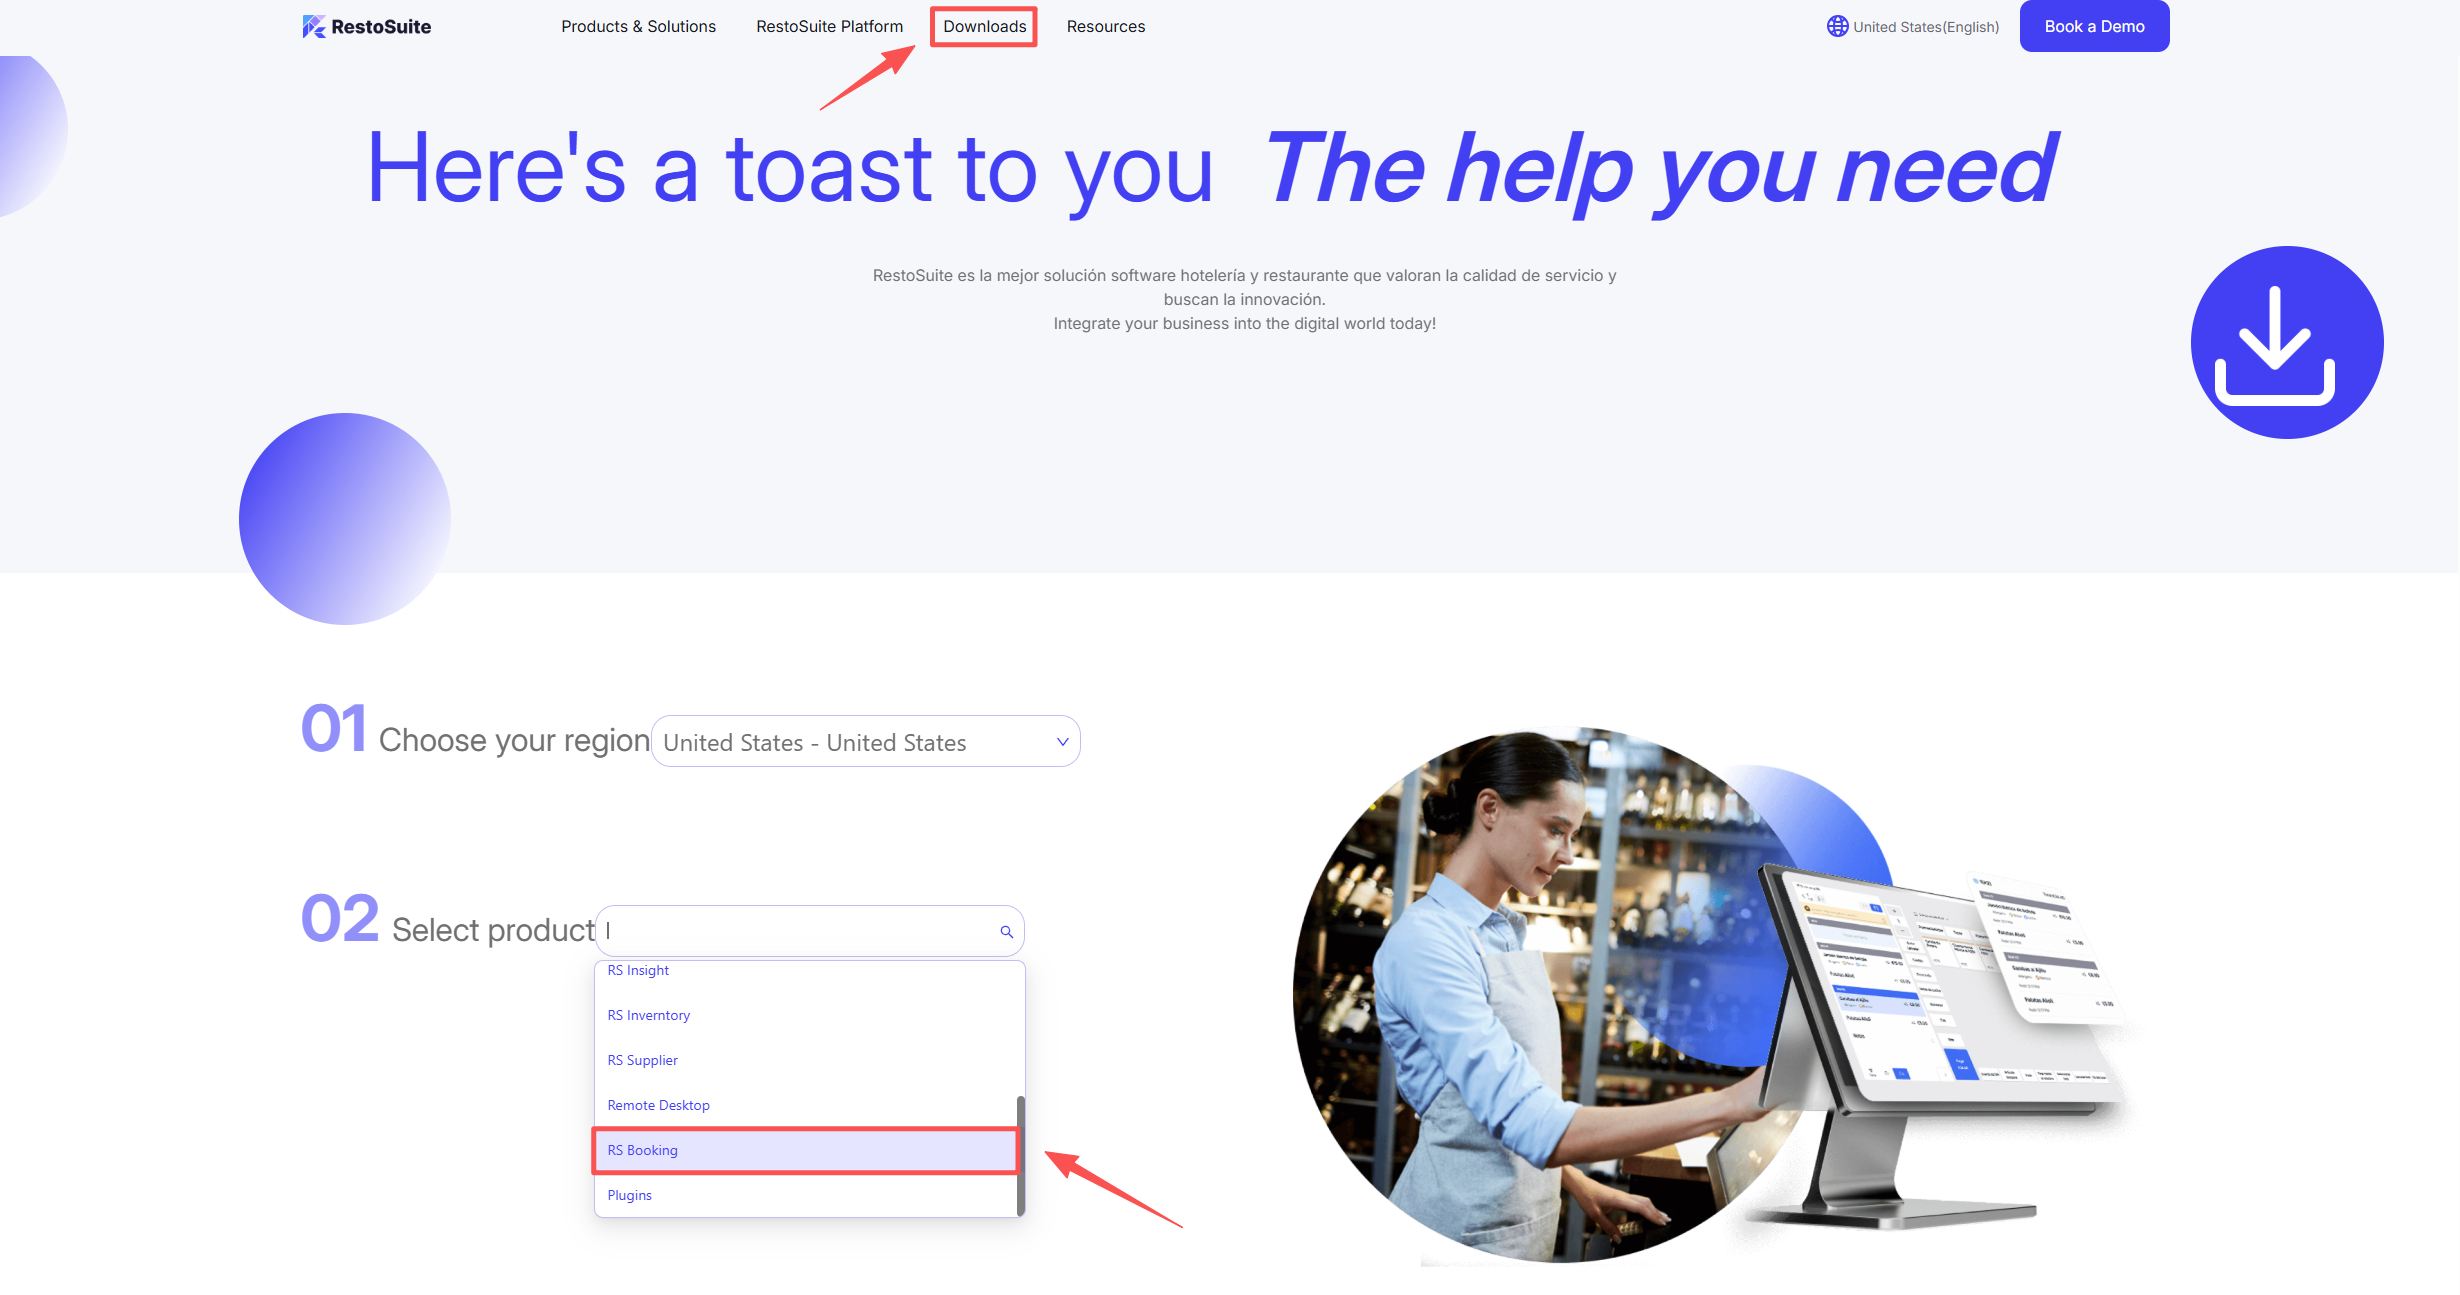
- Download from Google Play: https://play.google.com/store/apps/details?id=ai.restosuite.inc.tables
- Download from the official website: https://www.restosuite.cn/zh_cn/download-center
-
IOS Version: Download from the Apple App Store (currently supports PadOS only)
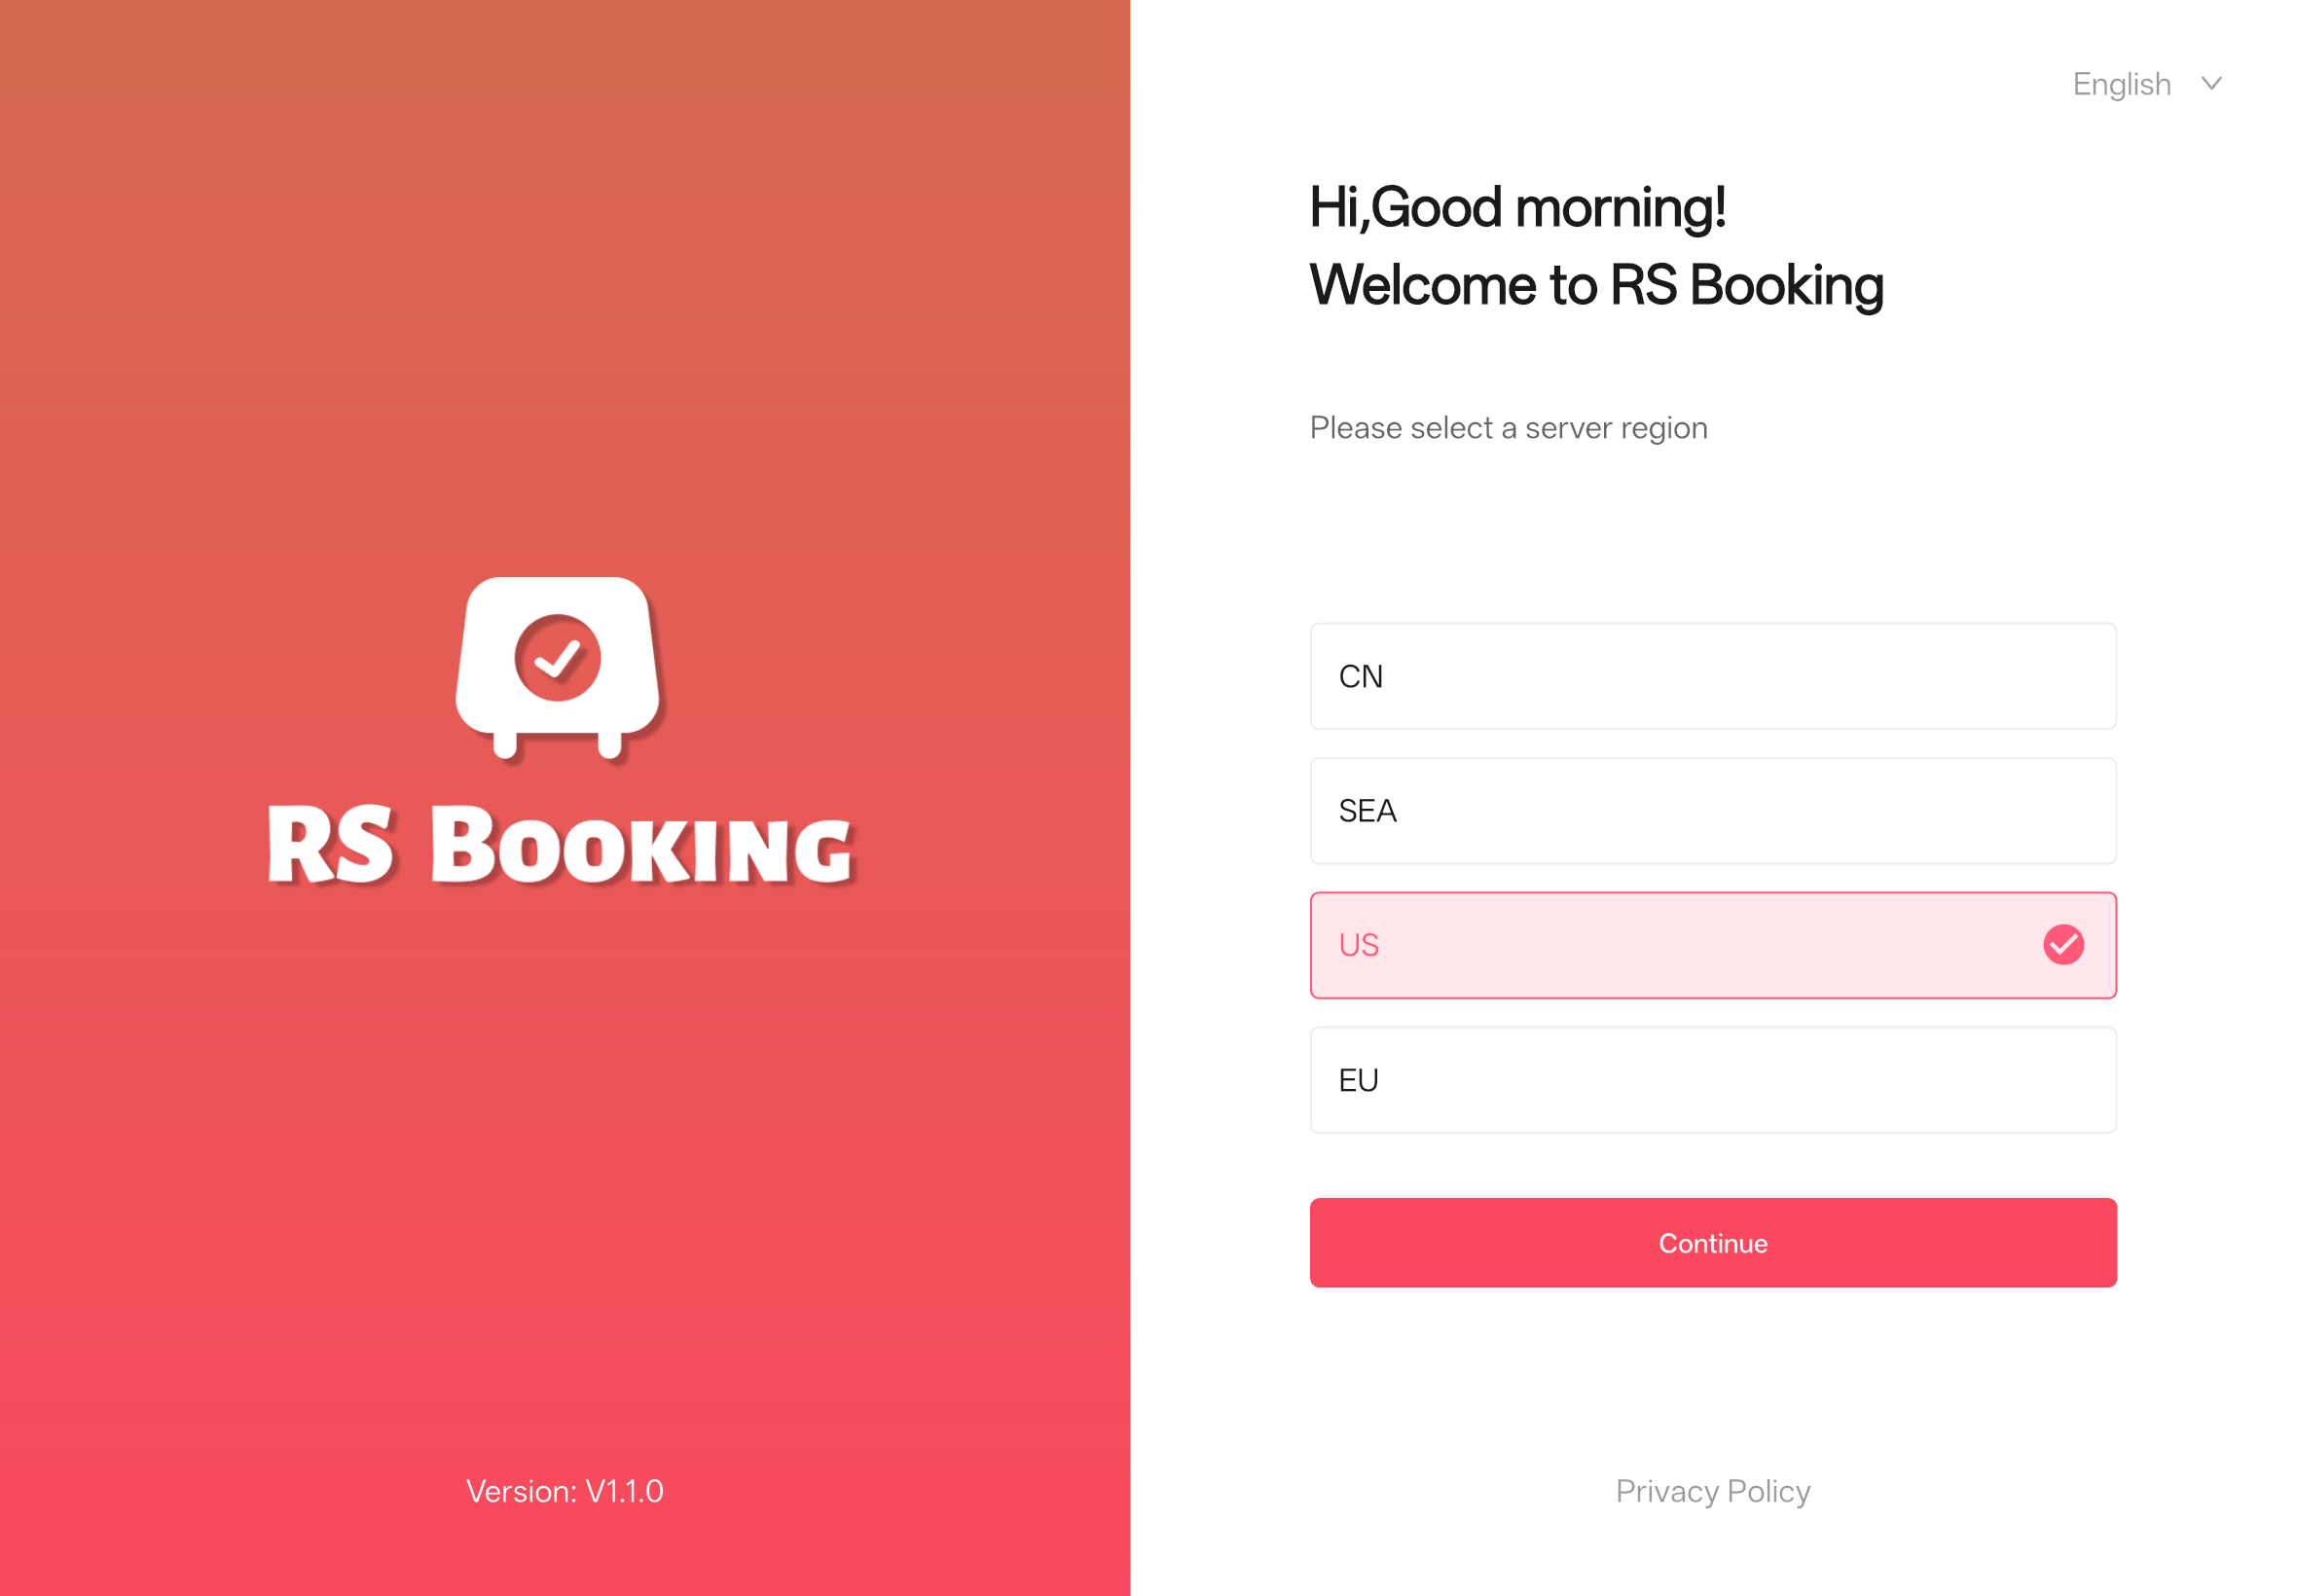
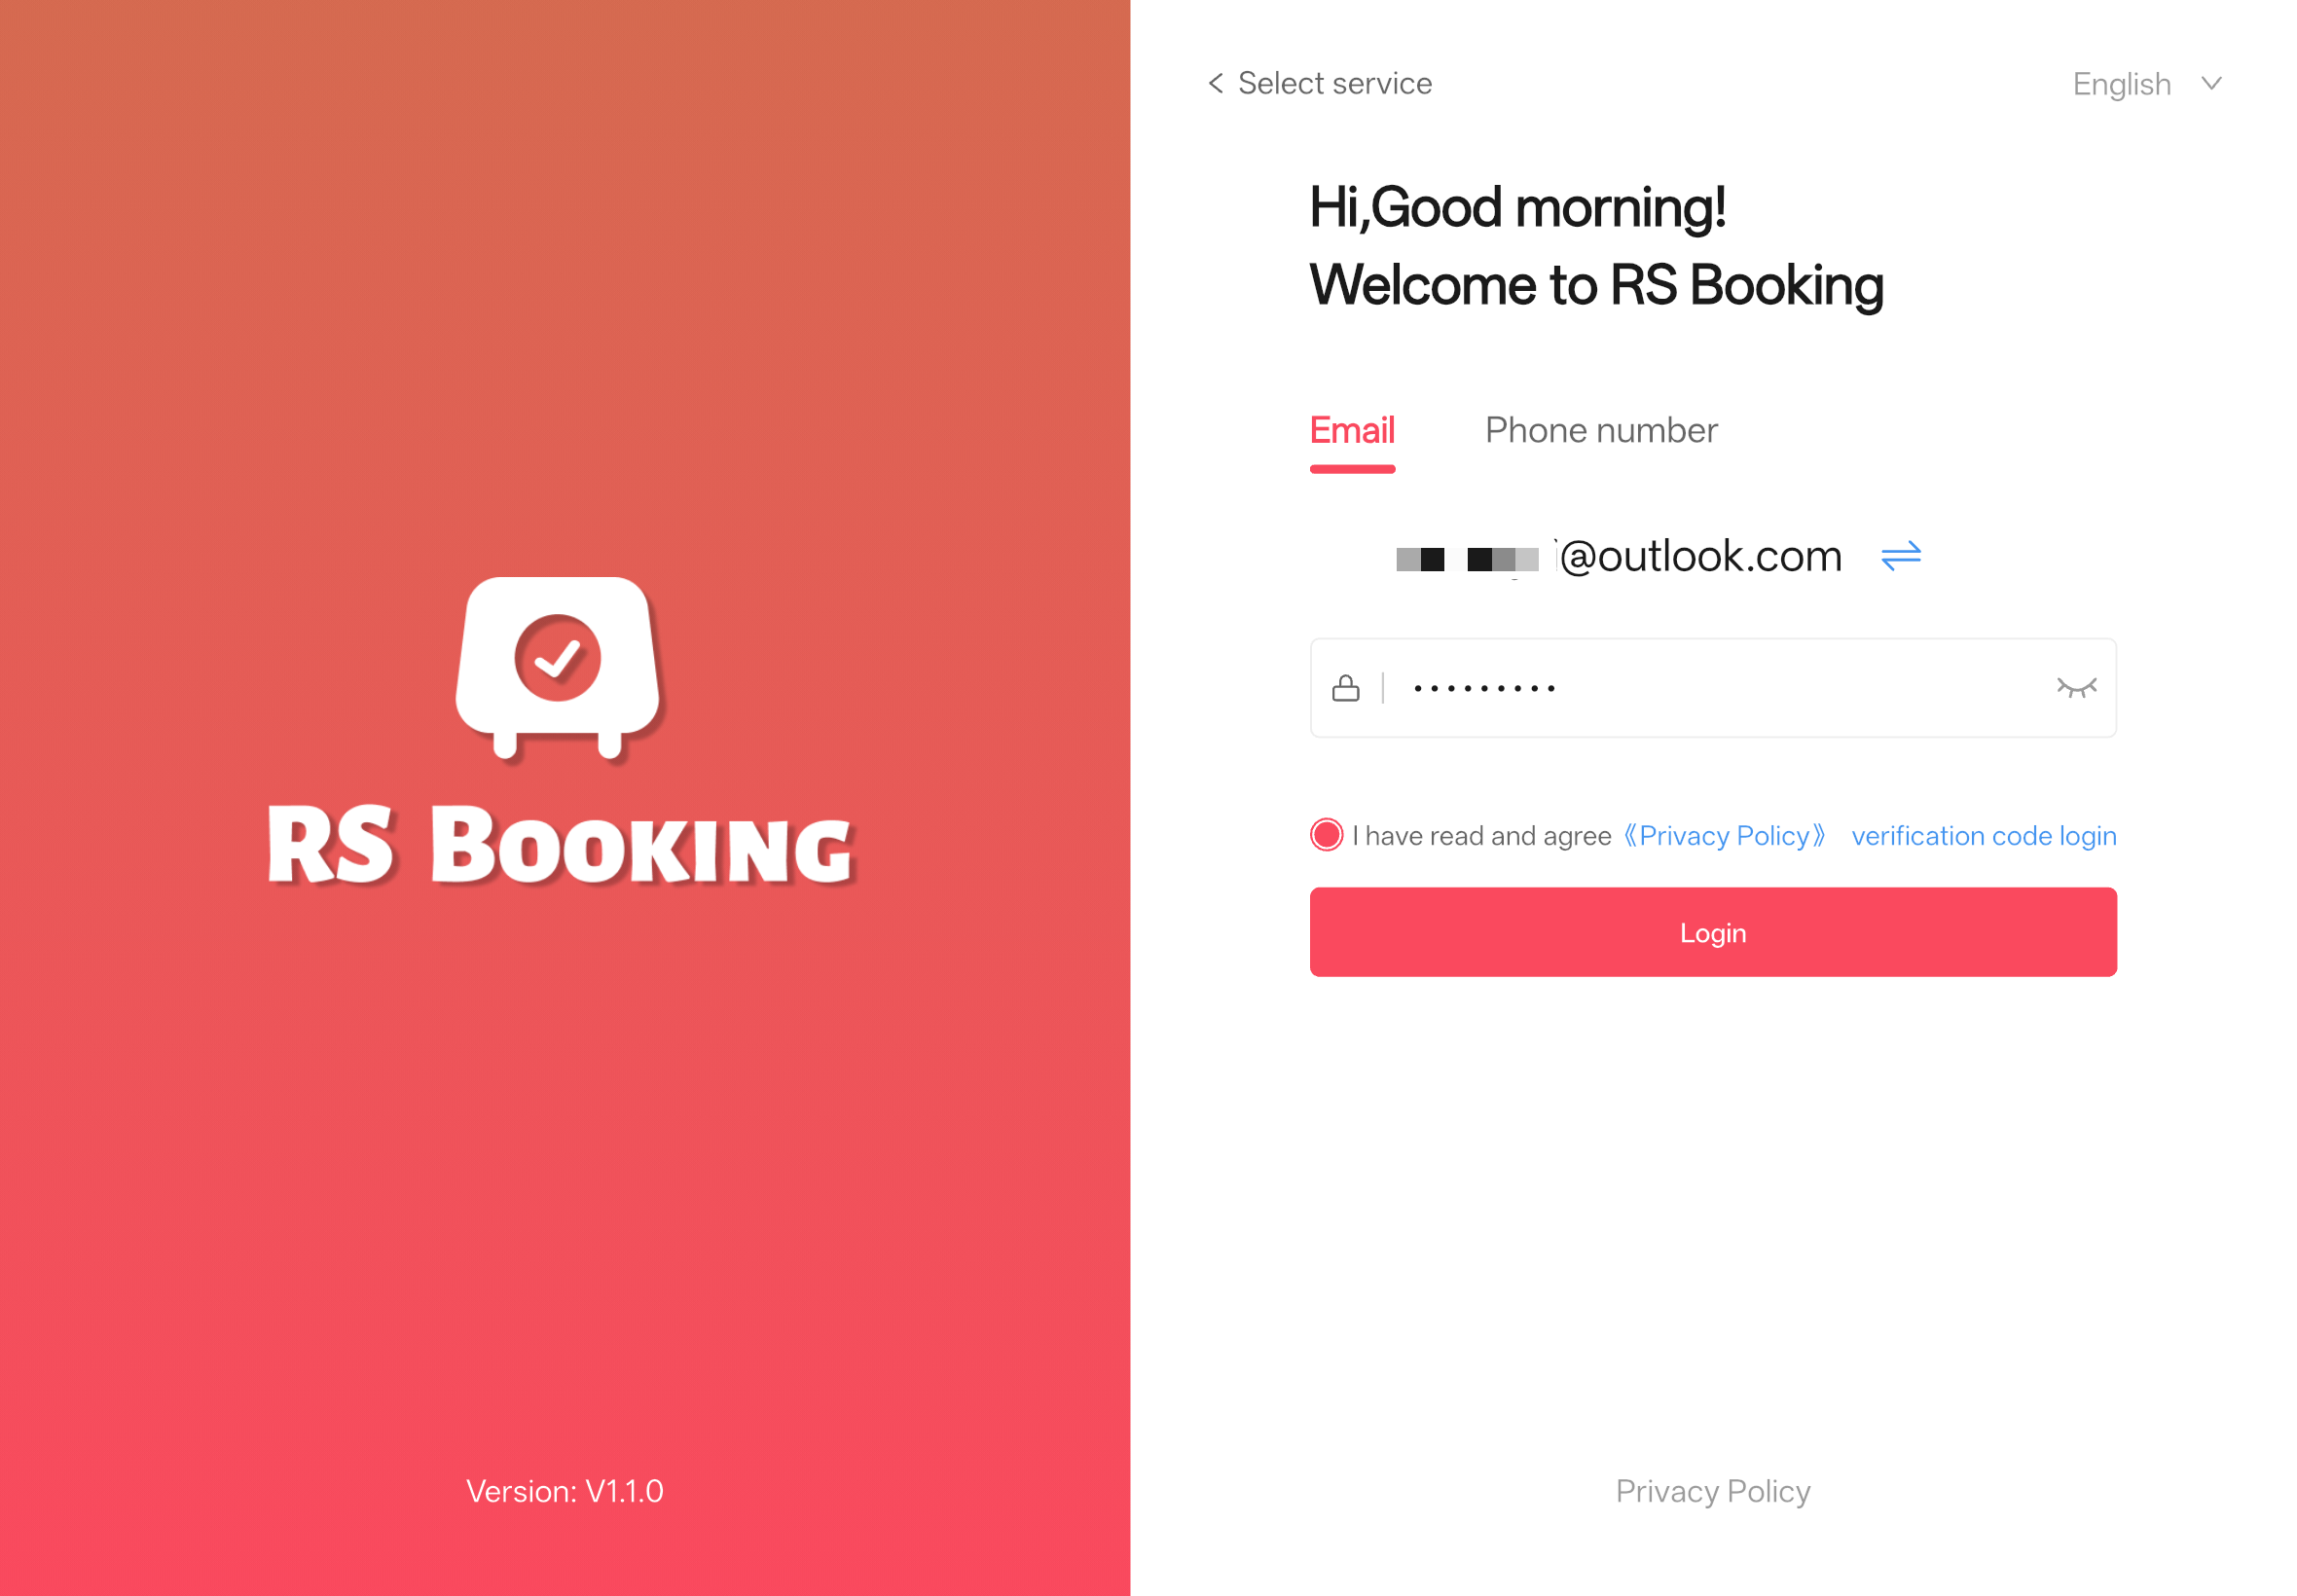
3.2 App Login
STEP 1: Open the App, select the server region (CN / SEA / US / EU), and click 【Continue】
STEP 2: On the login page, enter your login email/phone number and password (same as the Back Office), then click【Login】to complete the process.
3.3 App Settings
-
Access the Settings Page:
- The default display shows merchant information. Click the toggle button to switch to other stores associated with the logged-in account.
- To switch the group, you need to log out and log in again.
-
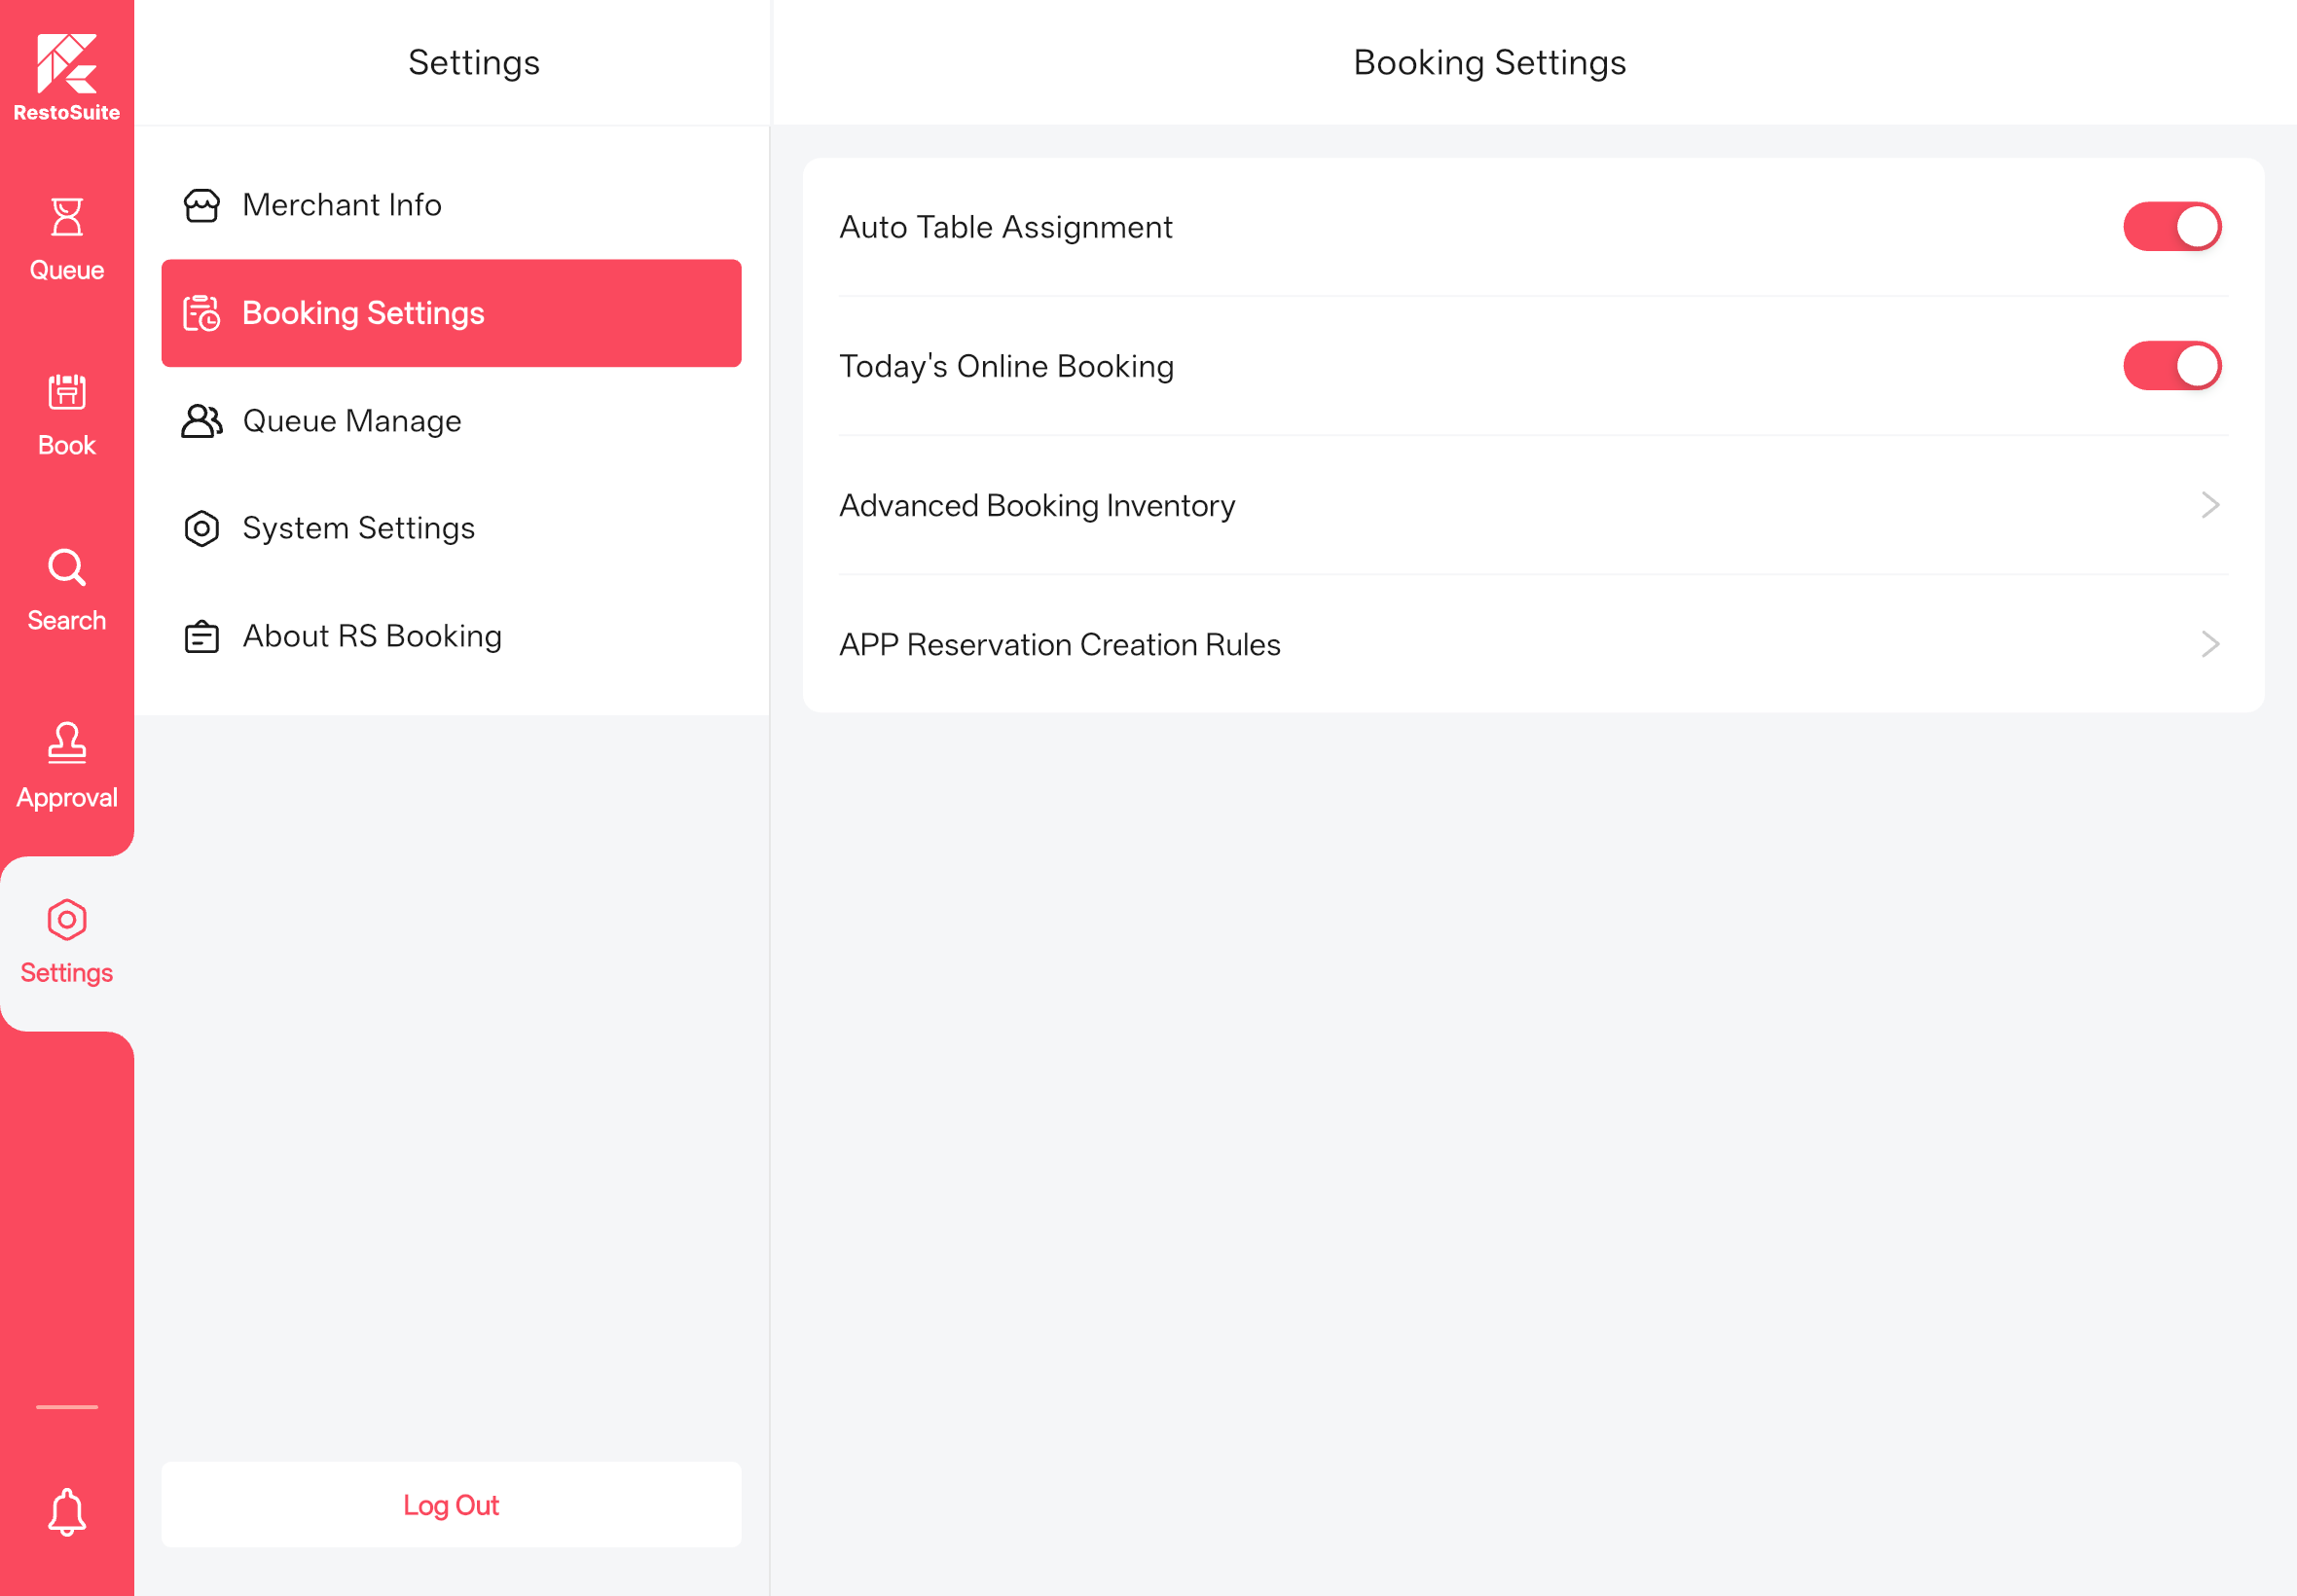
Booking Settings:
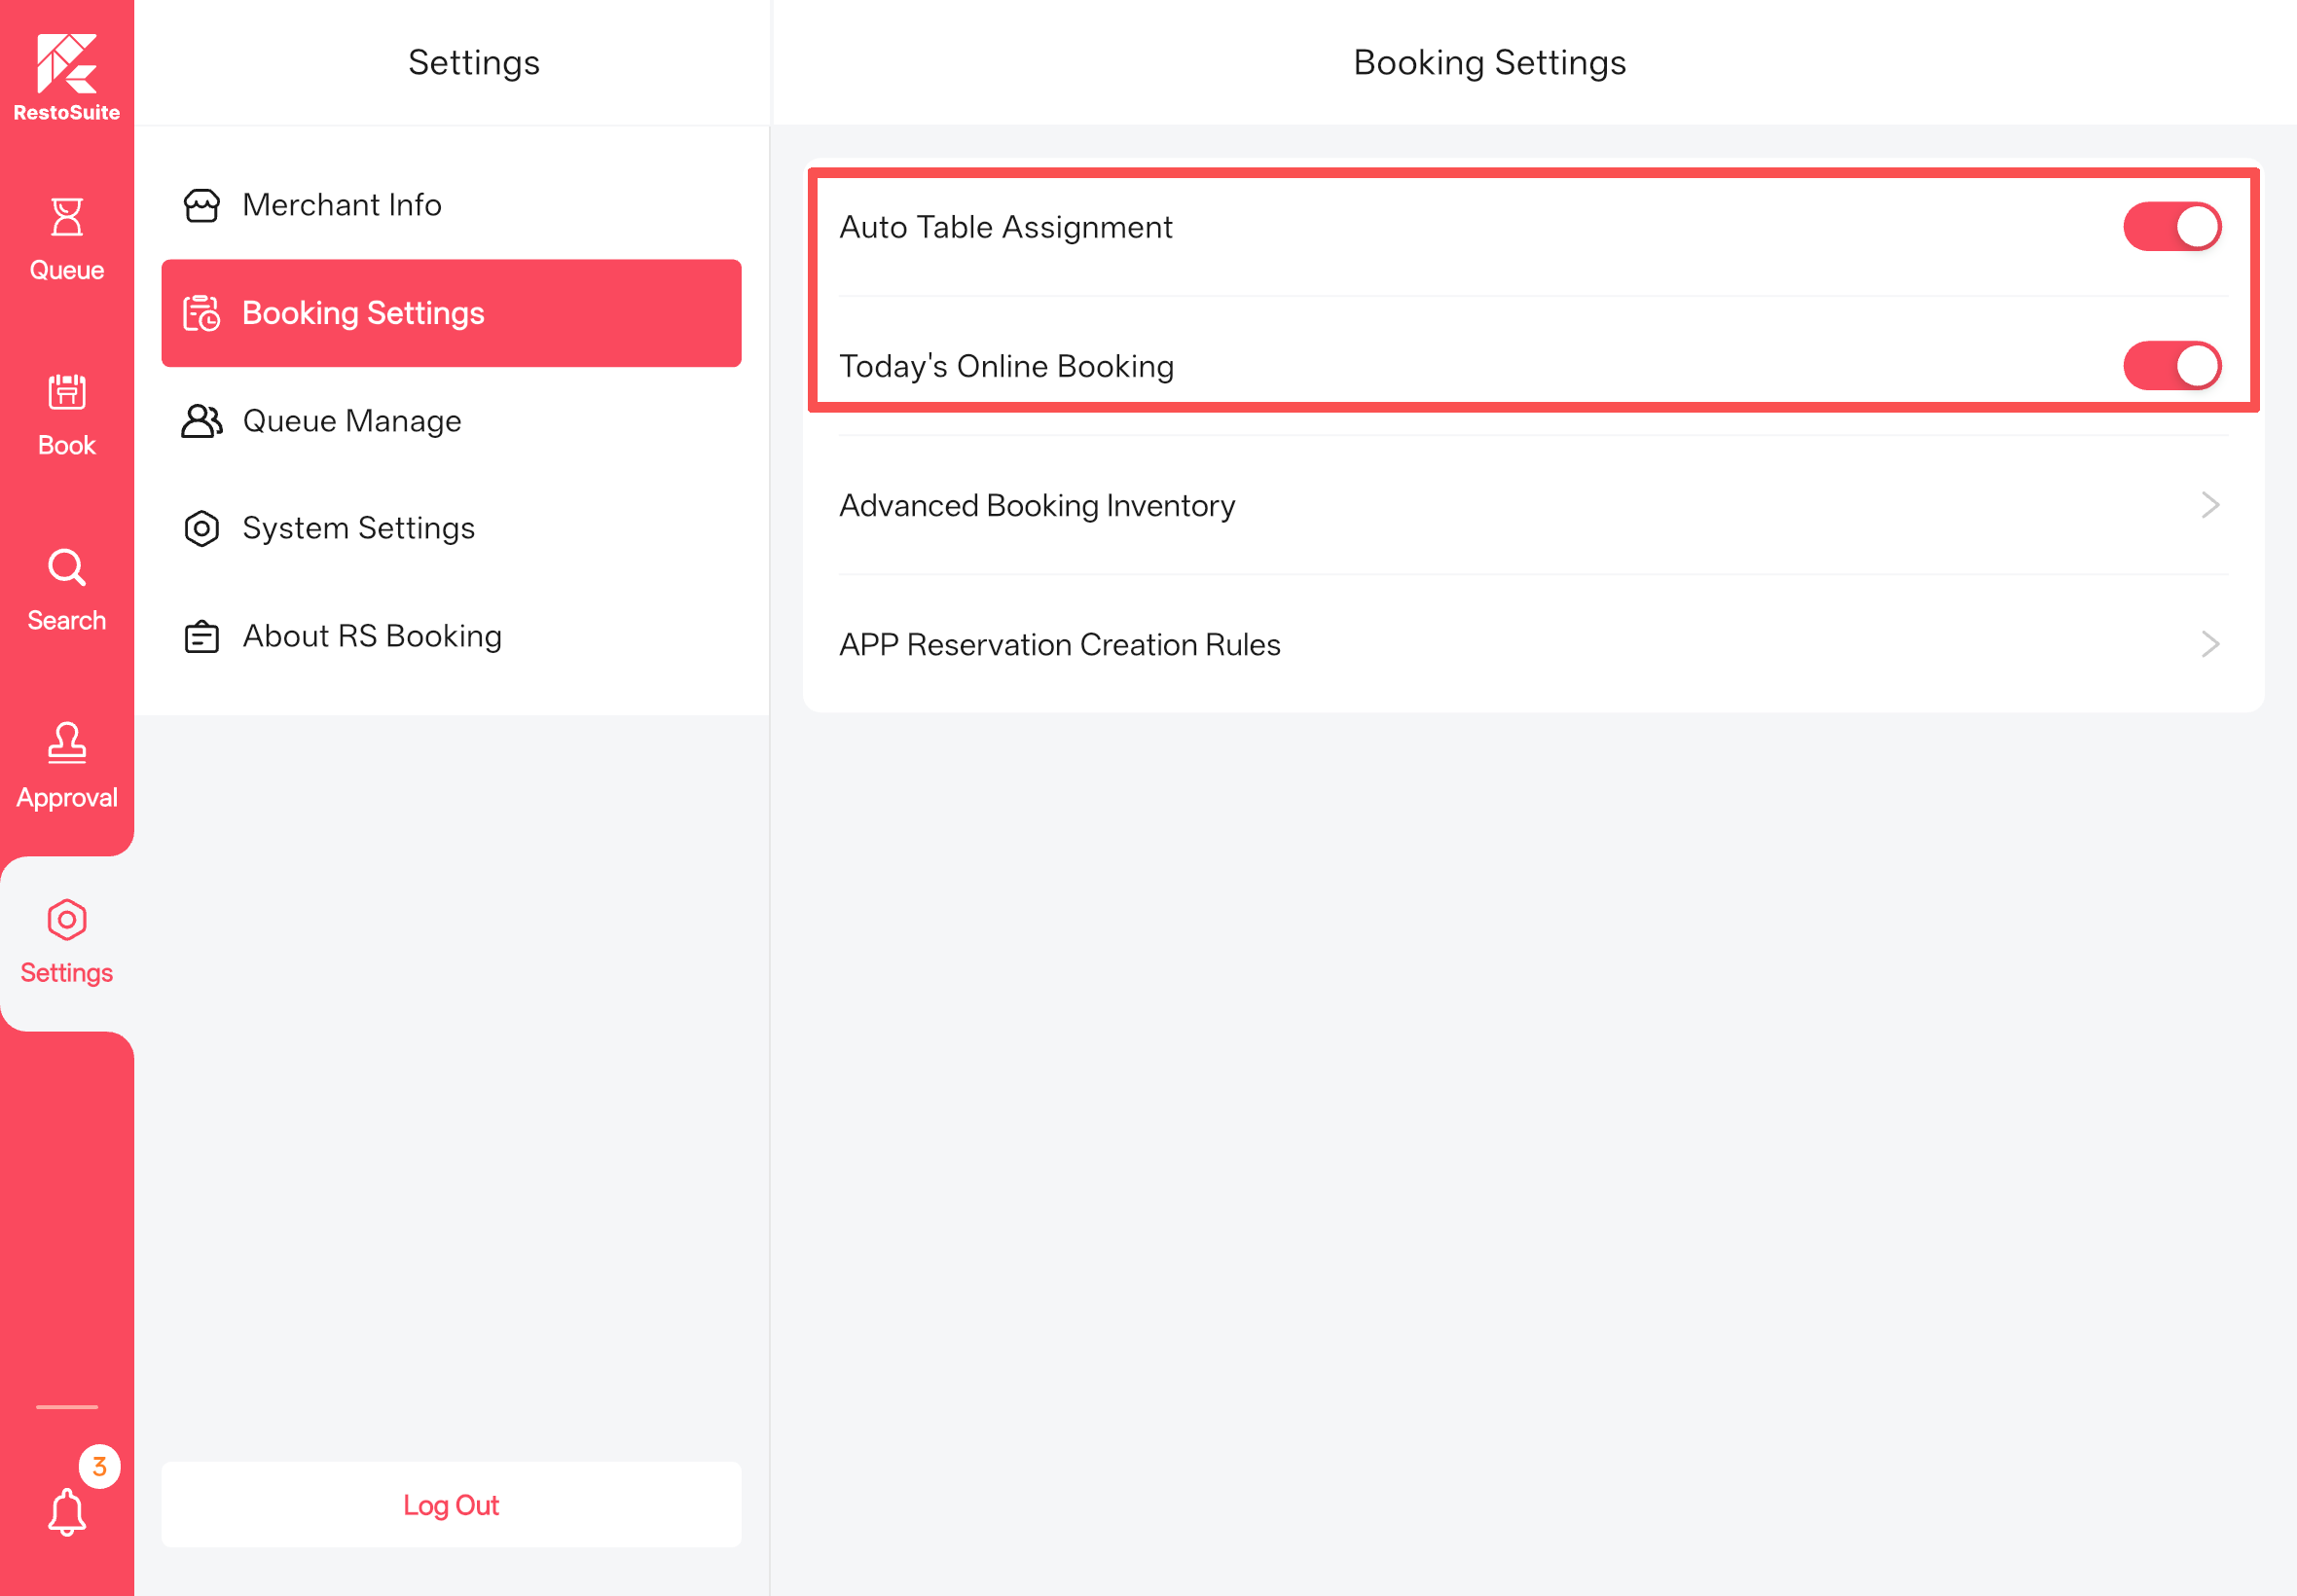
- Auto Table Assignment Toggle: Synced with the Back Office setting, enabled by default; it is not recommended to disable it. If disabled, online reservations will not be assigned tables and will not deduct inventory.
- Today’s Online Booking Toggle: When the store is overloaded and stops accepting same-day reservations, disable this toggle to set the same-day online reservation inventory to 0. Reservations for future dates remain available.
- Advanced Booking Inventory: Overrides the Back Office inventory settings. When enabled, you can configure specific tables’ available reservation times and statuses by time slot.
-
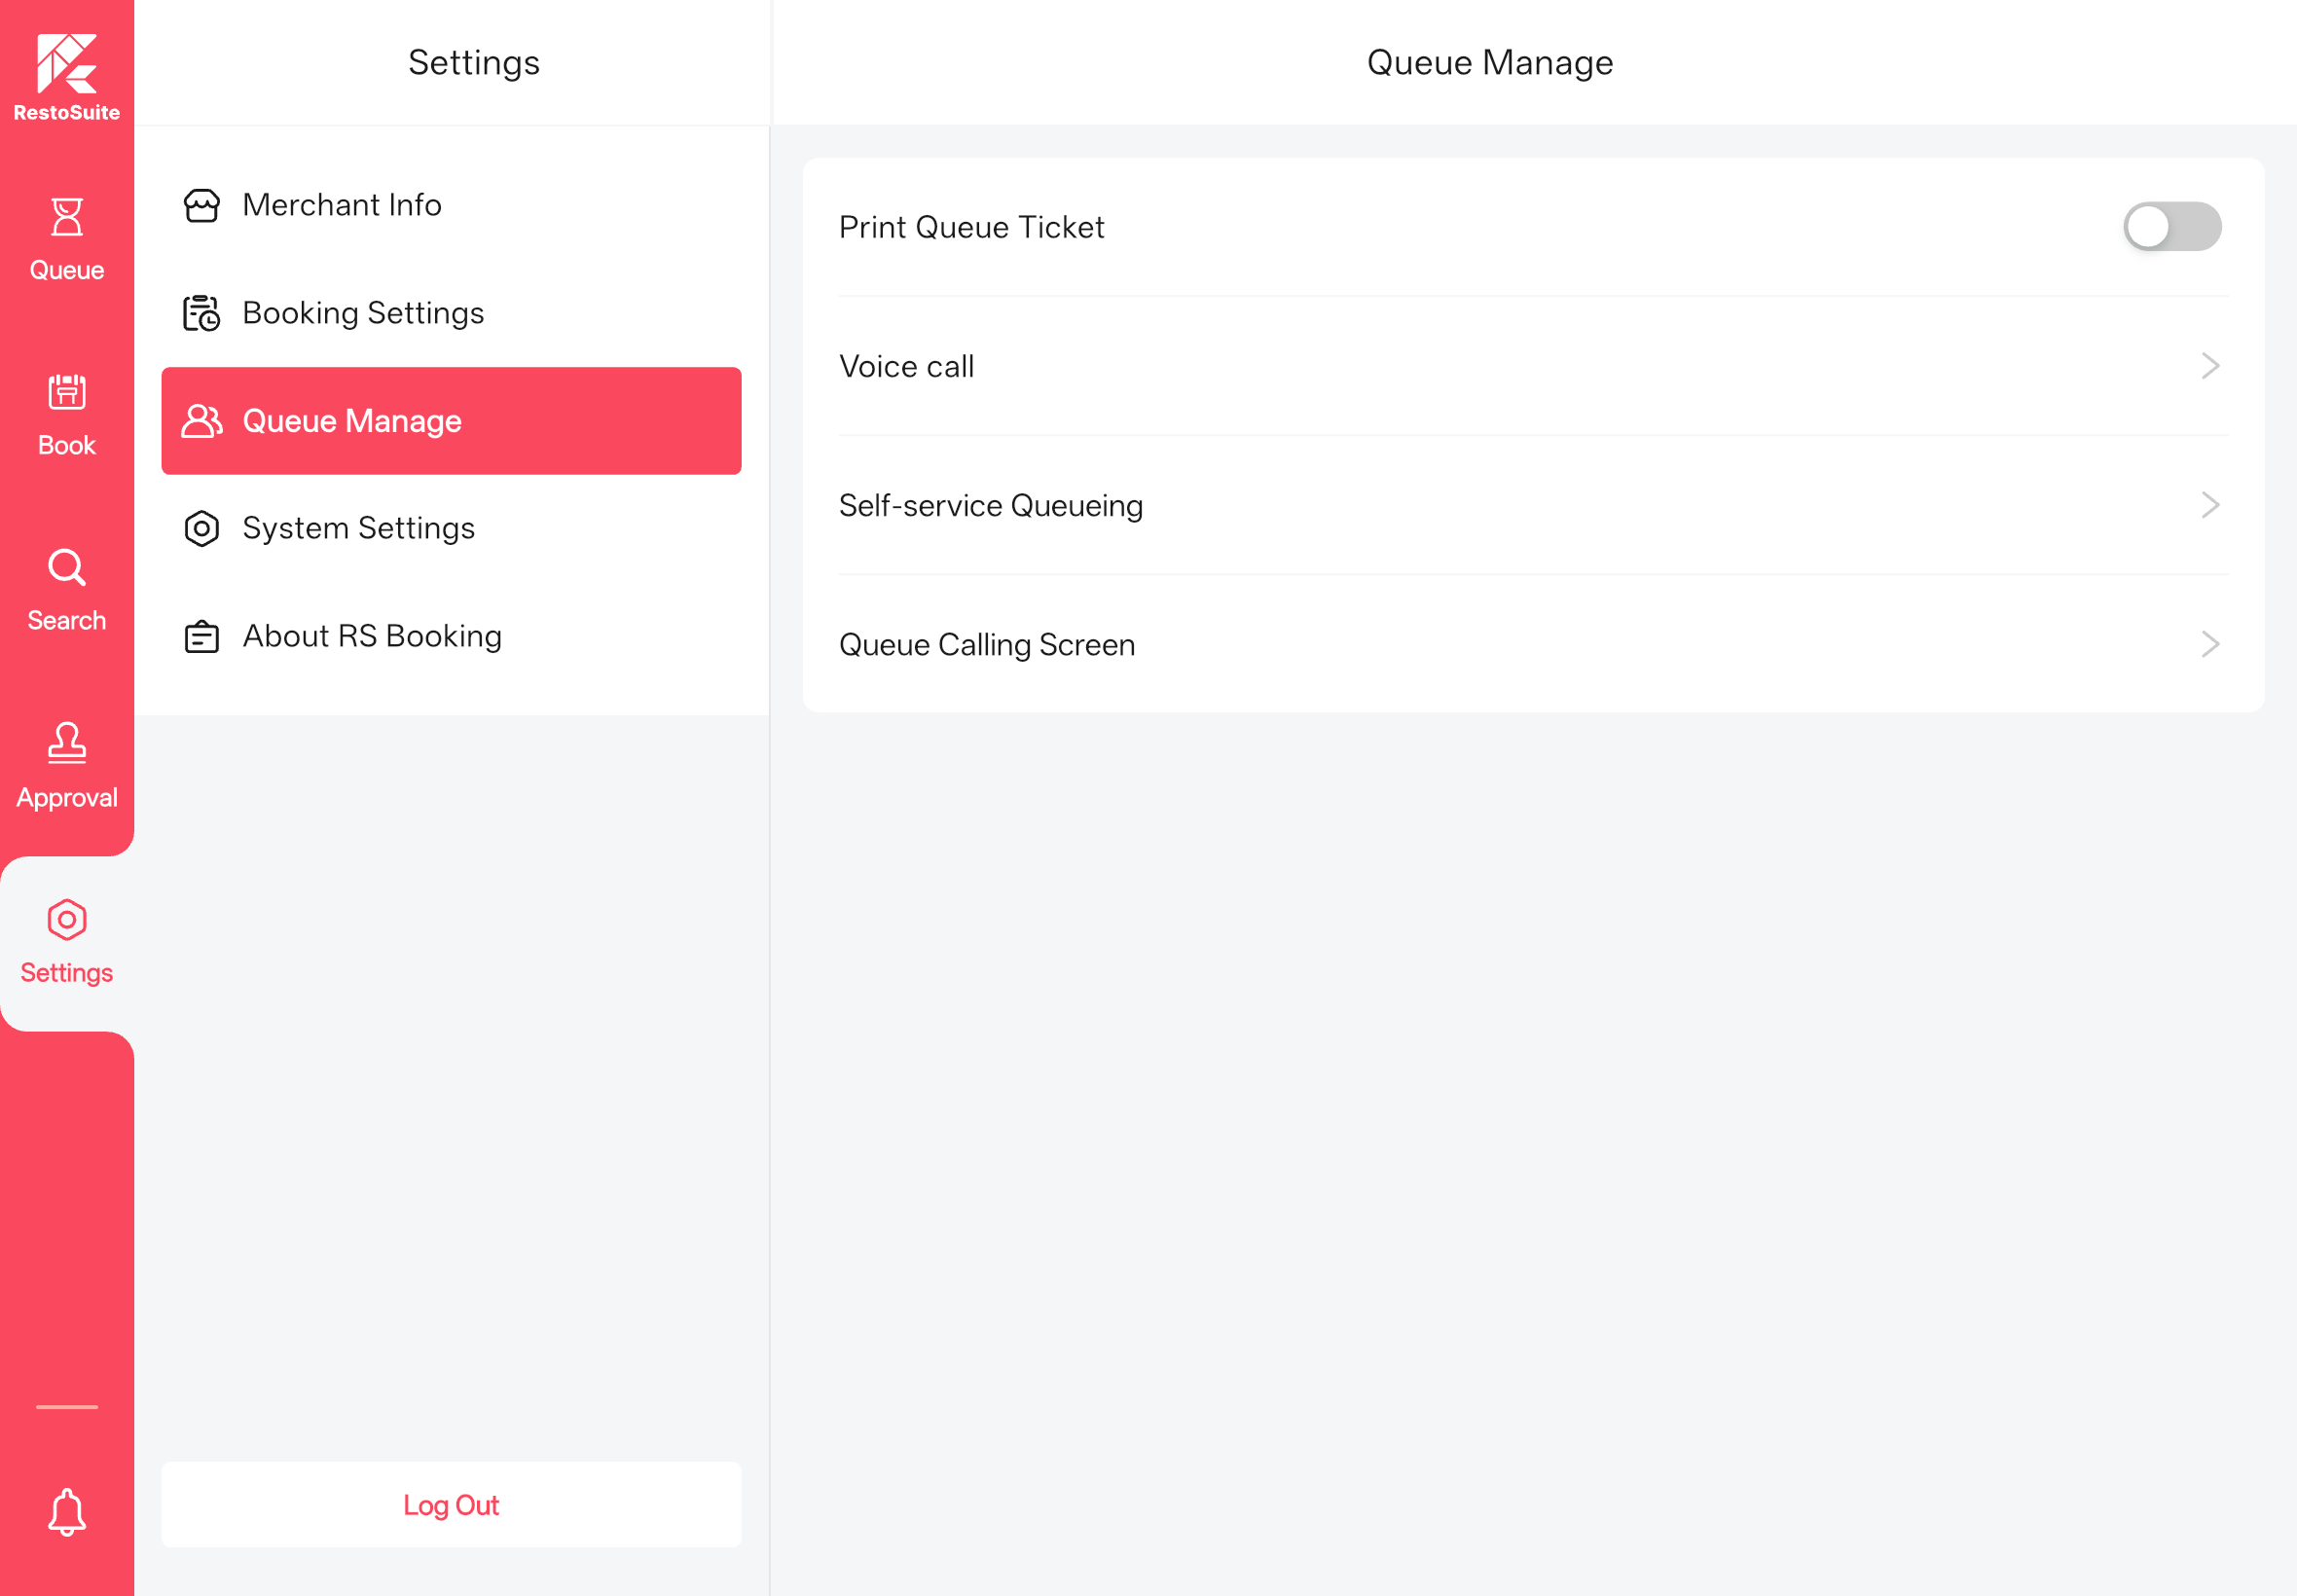
Queue Settings:
- Print Queue Ticket Toggle: When enabled, ticket printing buttons will be displayed in the App. Printer configurations are managed in the Back Office.
- Voice Calling Toggle: When enabled, voice calling buttons will be displayed in the App.
- Self-service Queueing: A ToC interface for customers to get queue tickets independently.
-
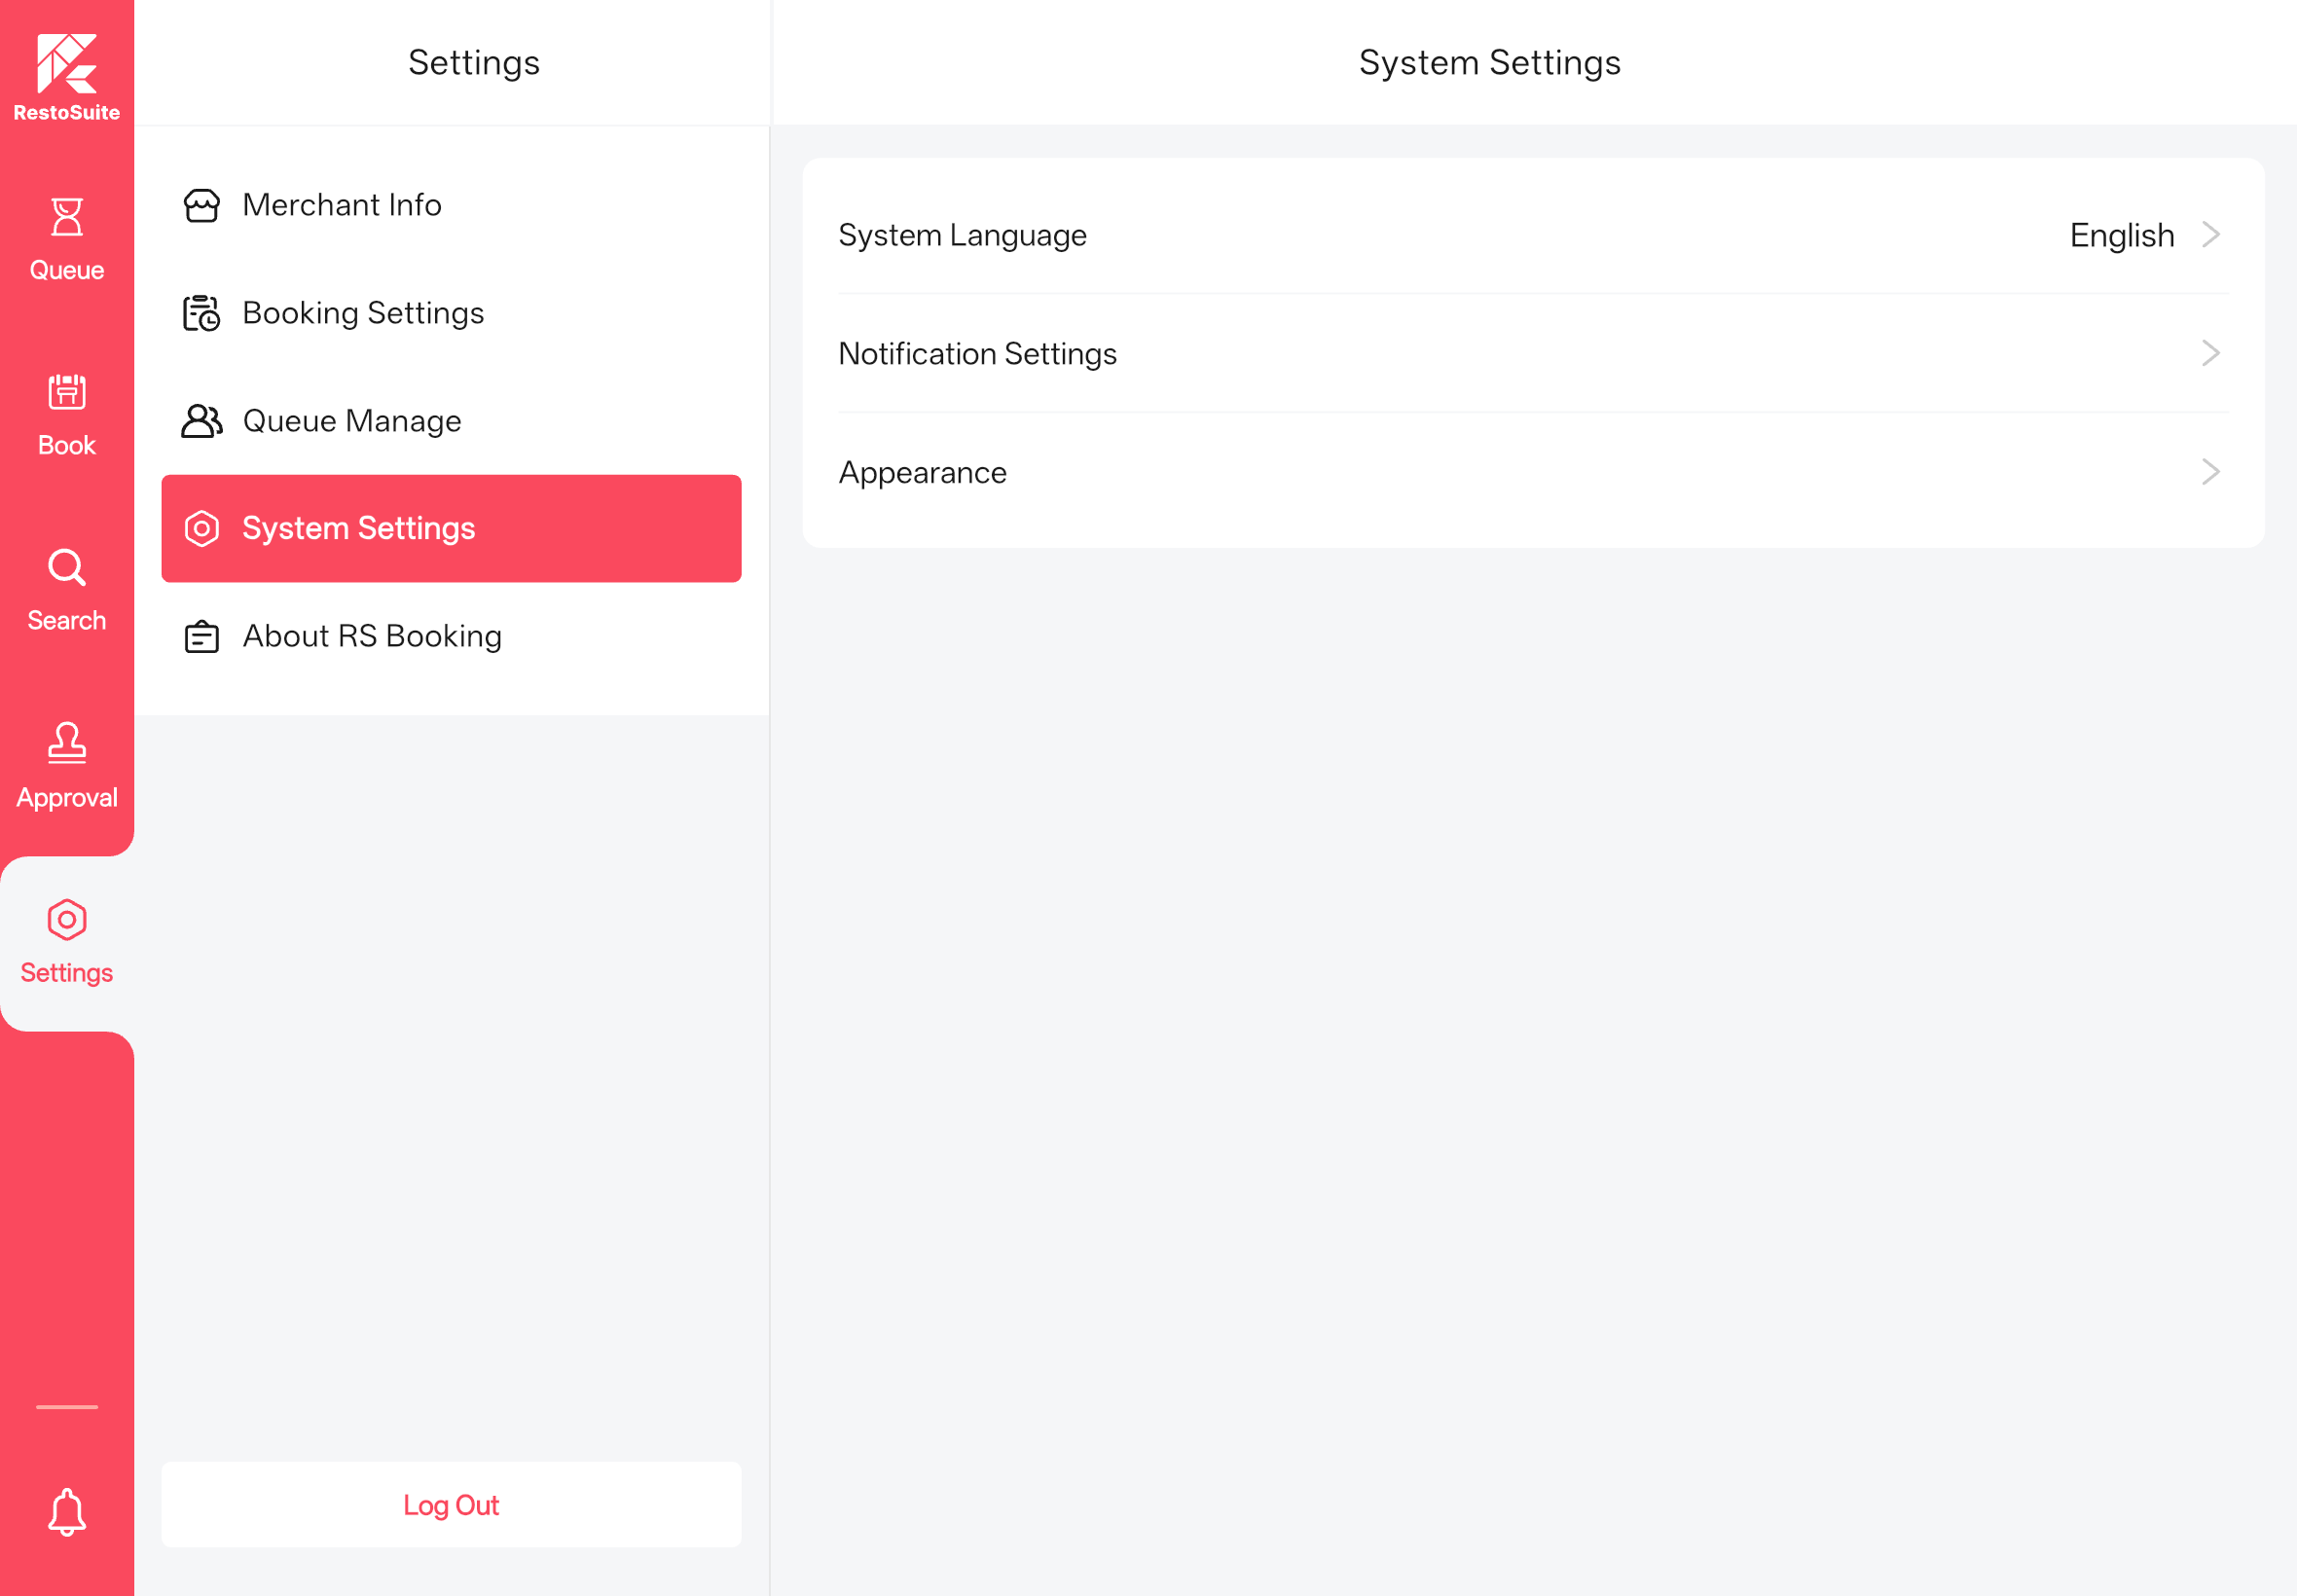
System Settings:
- Switch the App interface language.
- Manage in-app notification rules.
- Switch the App theme color.
3.4 Scenario Guide
3.4.1 Reservation Scenarios
3.4.1.1 How to Create a Booking Order via the App?
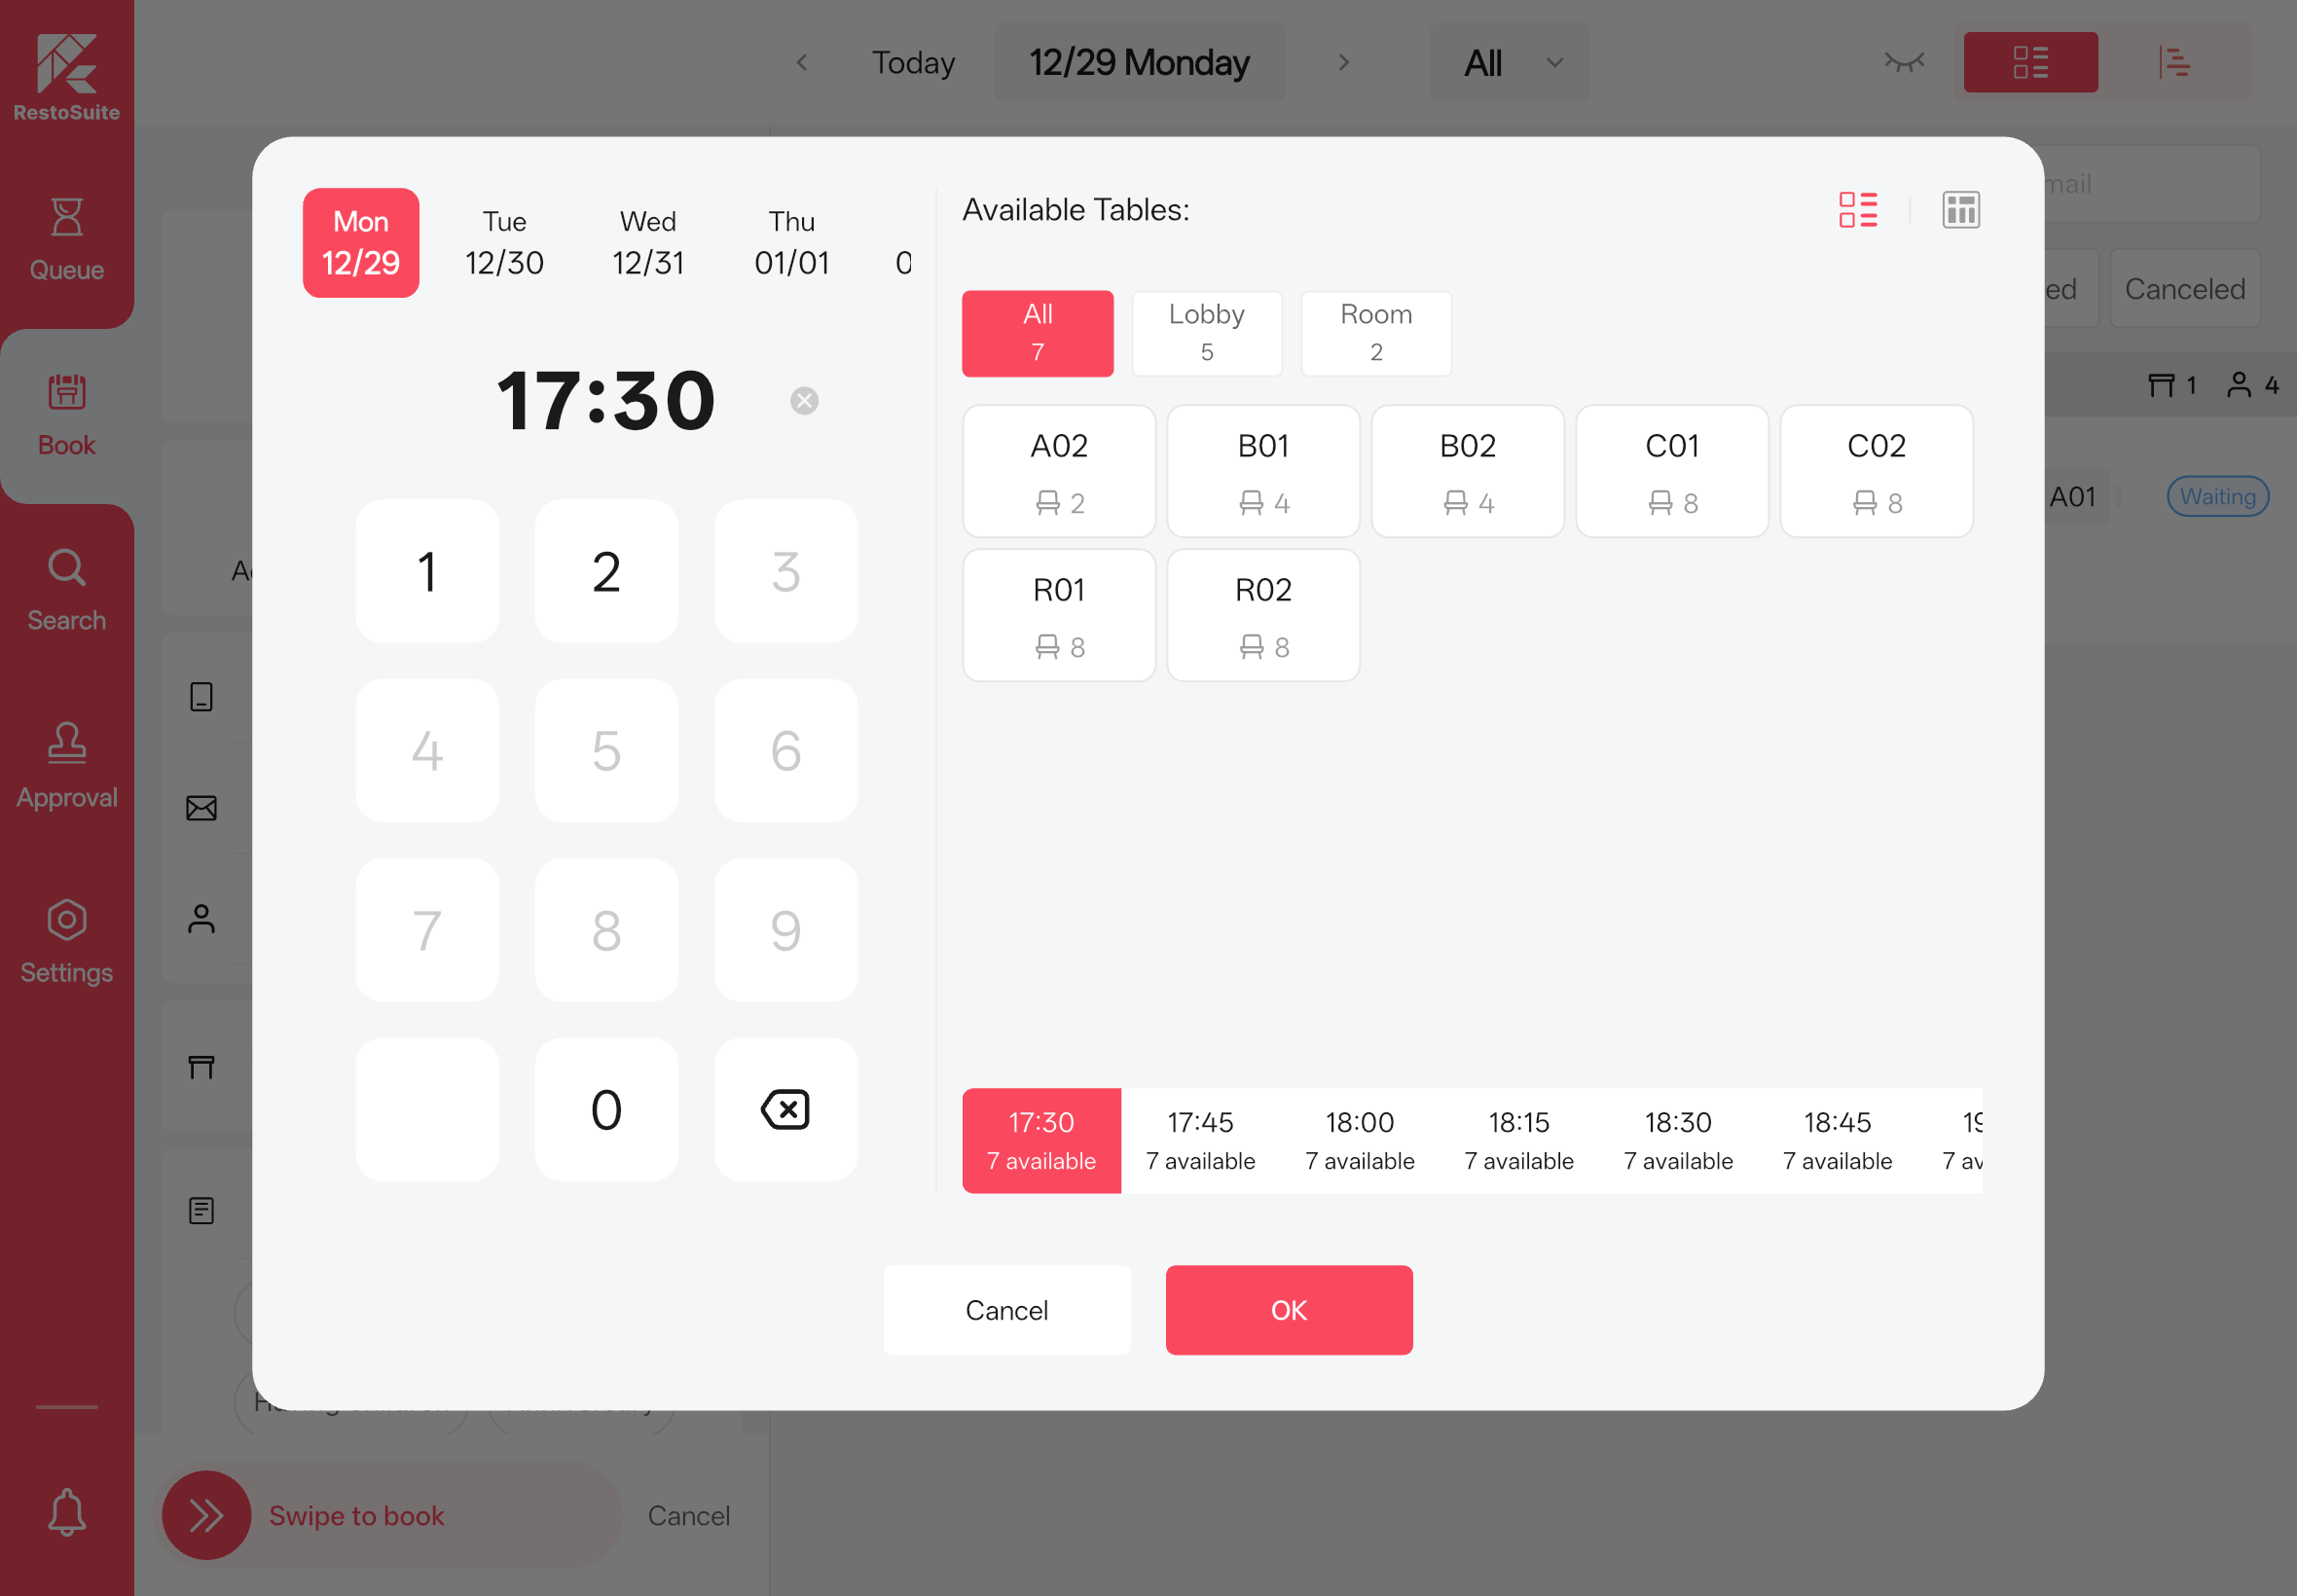
STEP 1: Go to the Reservation module.
STEP 2: Select the date and time on the left side.
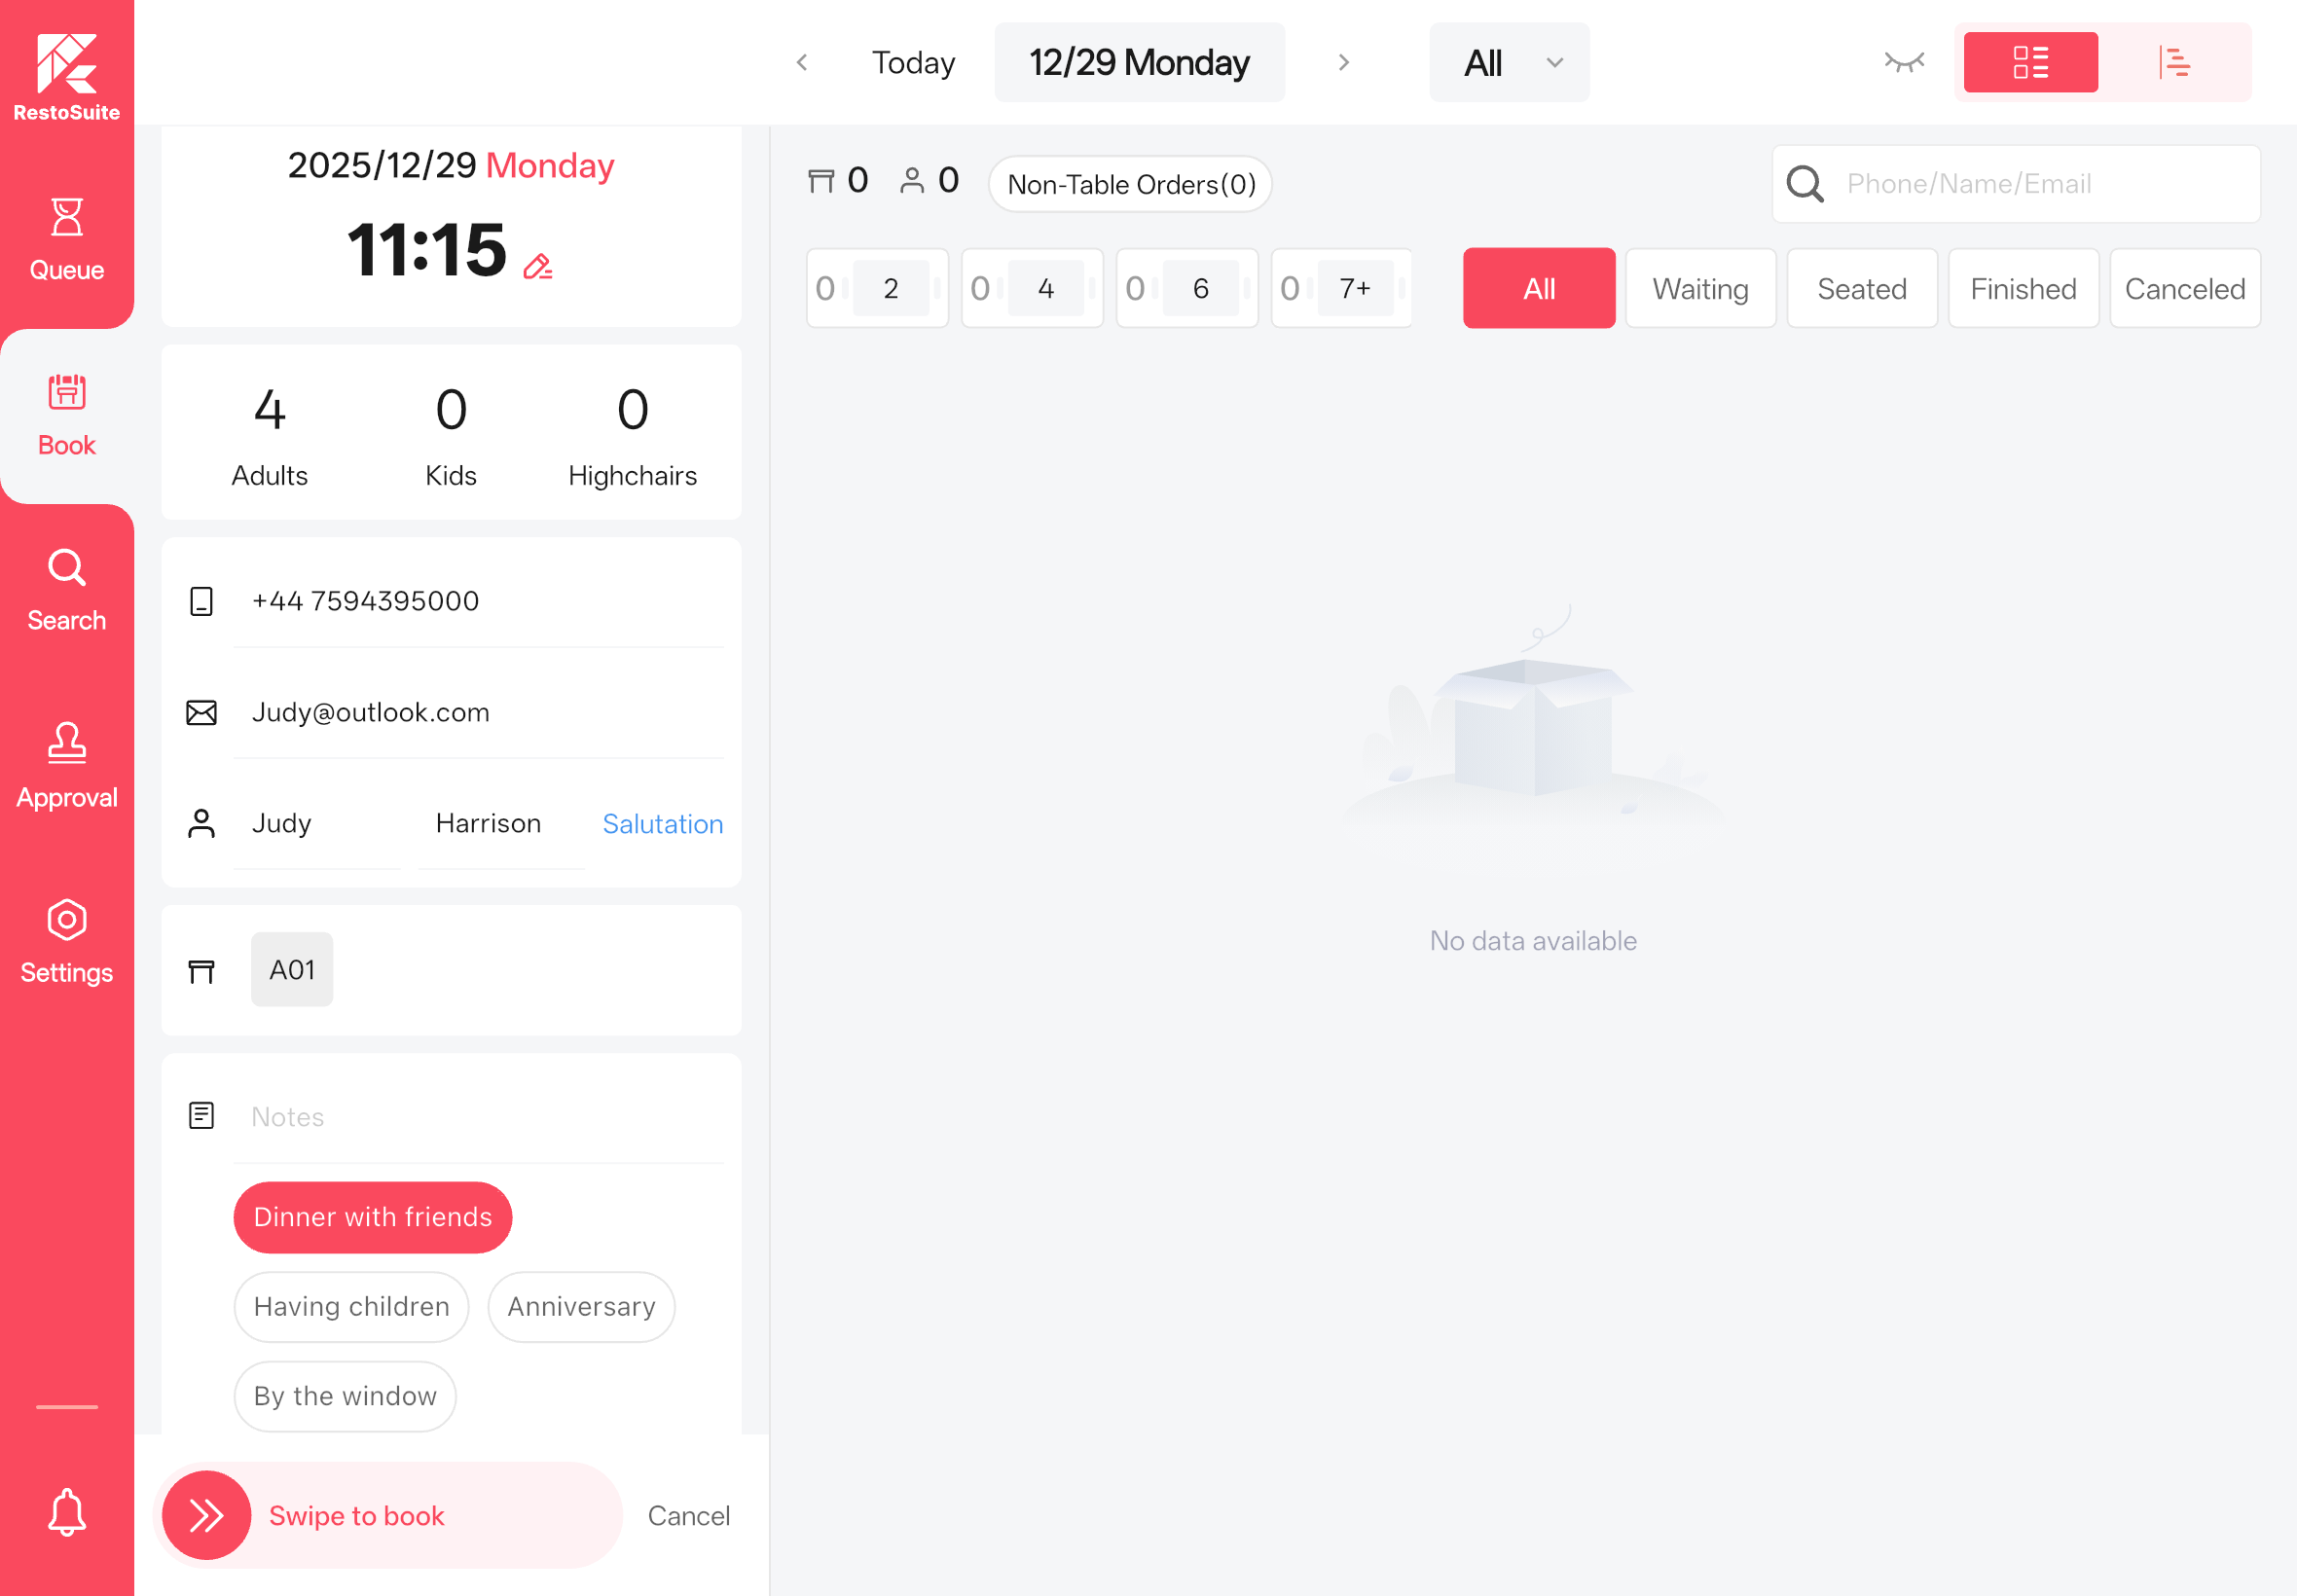
STEP 3: On the right side of the pop-up window, view the tables available for reservation at the selected date and time.
STEP 4: Click the toggle button in the upper-right corner to switch to the table layout view and verify the availability of all tables.
STEP 5: Enter the number of diners, contact information, and notes.
STEP 6: Swipe the slider to confirm and create the reservation.
Note
Entering a member's phone number will automatically link the reservation to the member account.
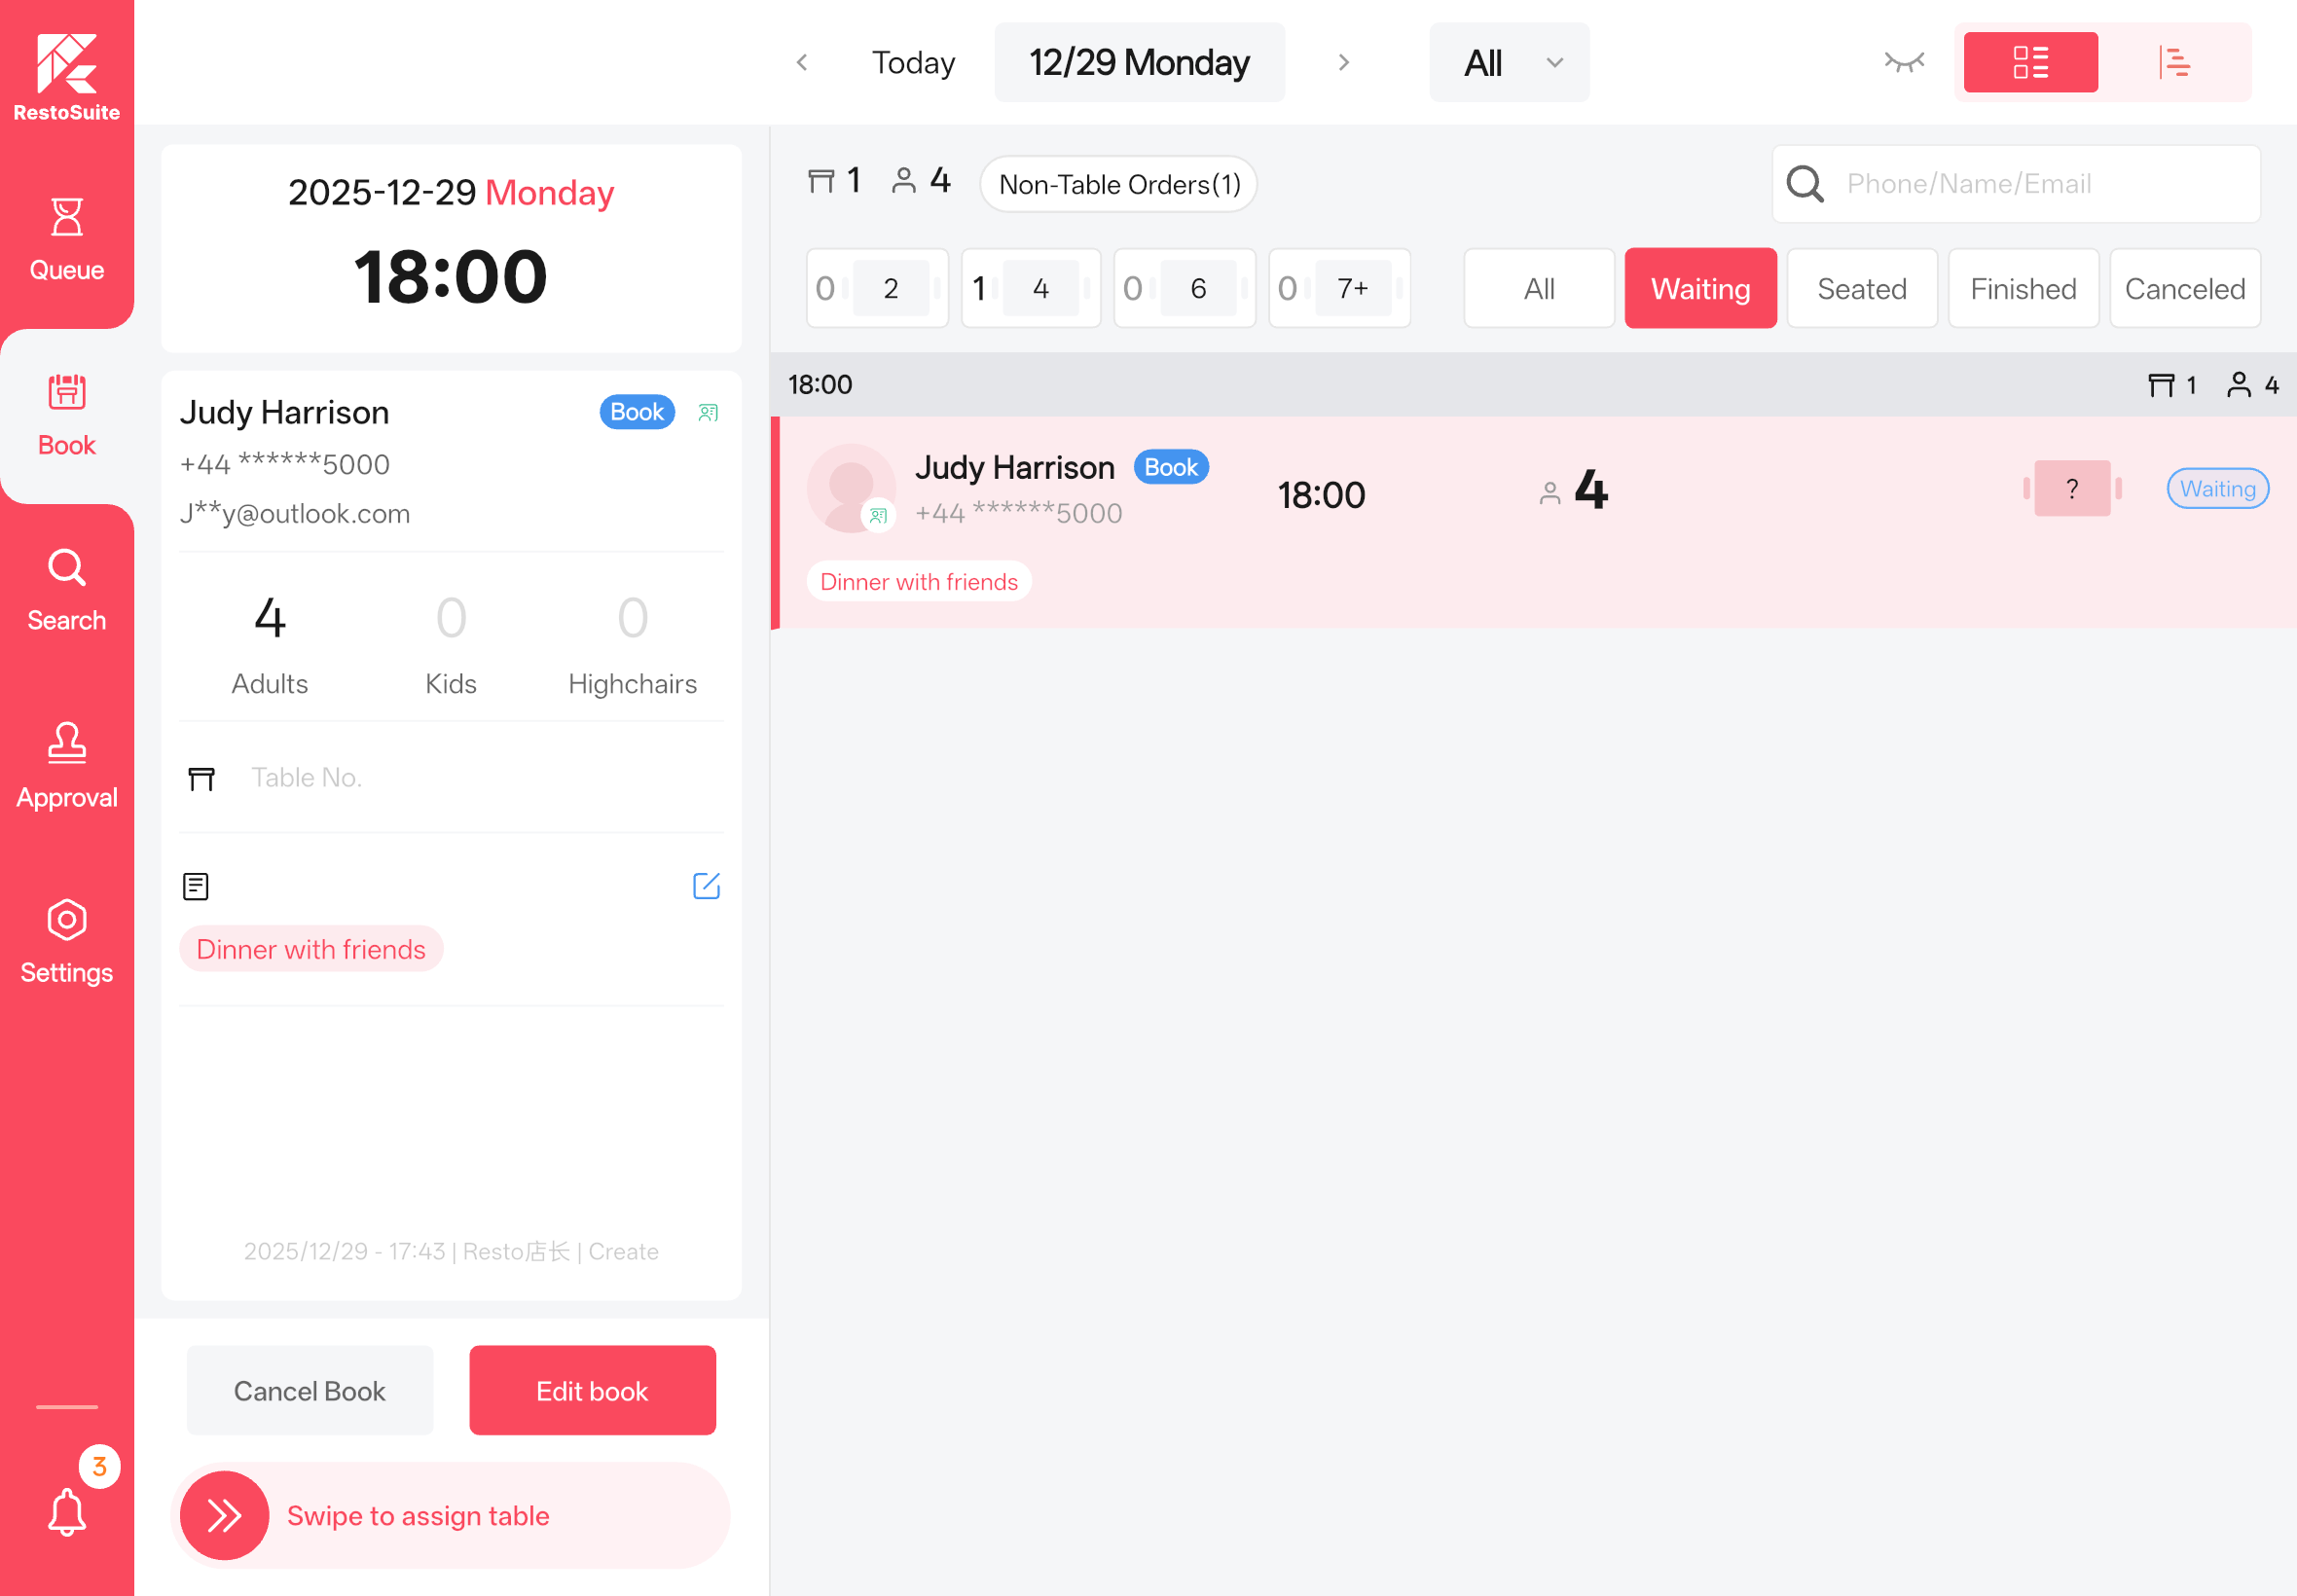
3.4.1.2 How to Perform Seat Assignment for a Pending Reservation?
STEP 1: Select the target reservation from the order list.
STEP 2: View the reservation details on the left side and confirm the assigned table.
STEP 3: Swipe the slider at the bottom to complete the seat assignment.

Notes
Seat assignment requires the POS system to use a specific version (marked with the -book tag).
3.4.1.3 When Does an Assigned Reservation Order Mark be Completed?
After the POS system completes the table-clearing operation for the assigned table, it will notify the Reservation App. The App will then mark the reservation as Completed and update the table status to Available.
3.4.2 Queue Scenarios
3.4.2.1 How to Create a Queue Ticket via the App?
Same process as creating a reservation order.
3.4.2.2 How to Perform Seat Assignment for a Pending Queue Ticket?
Same process as seat assignment for reservations.
3.4.2.3 When Does an Assigned Queue Ticket Mark as Completed?
Same logic as reservation orders.
3.4.2.4 How to Print Queue Tickets for Customers?
STEP 1: Enable the Ticket Printing Toggle in the App Settings.
STEP 2: Select the pending queue ticket, then click the Print Ticket button at the bottom of the details page.
Note:
Printer configuration is required to print queue tickets. Follow the steps below:
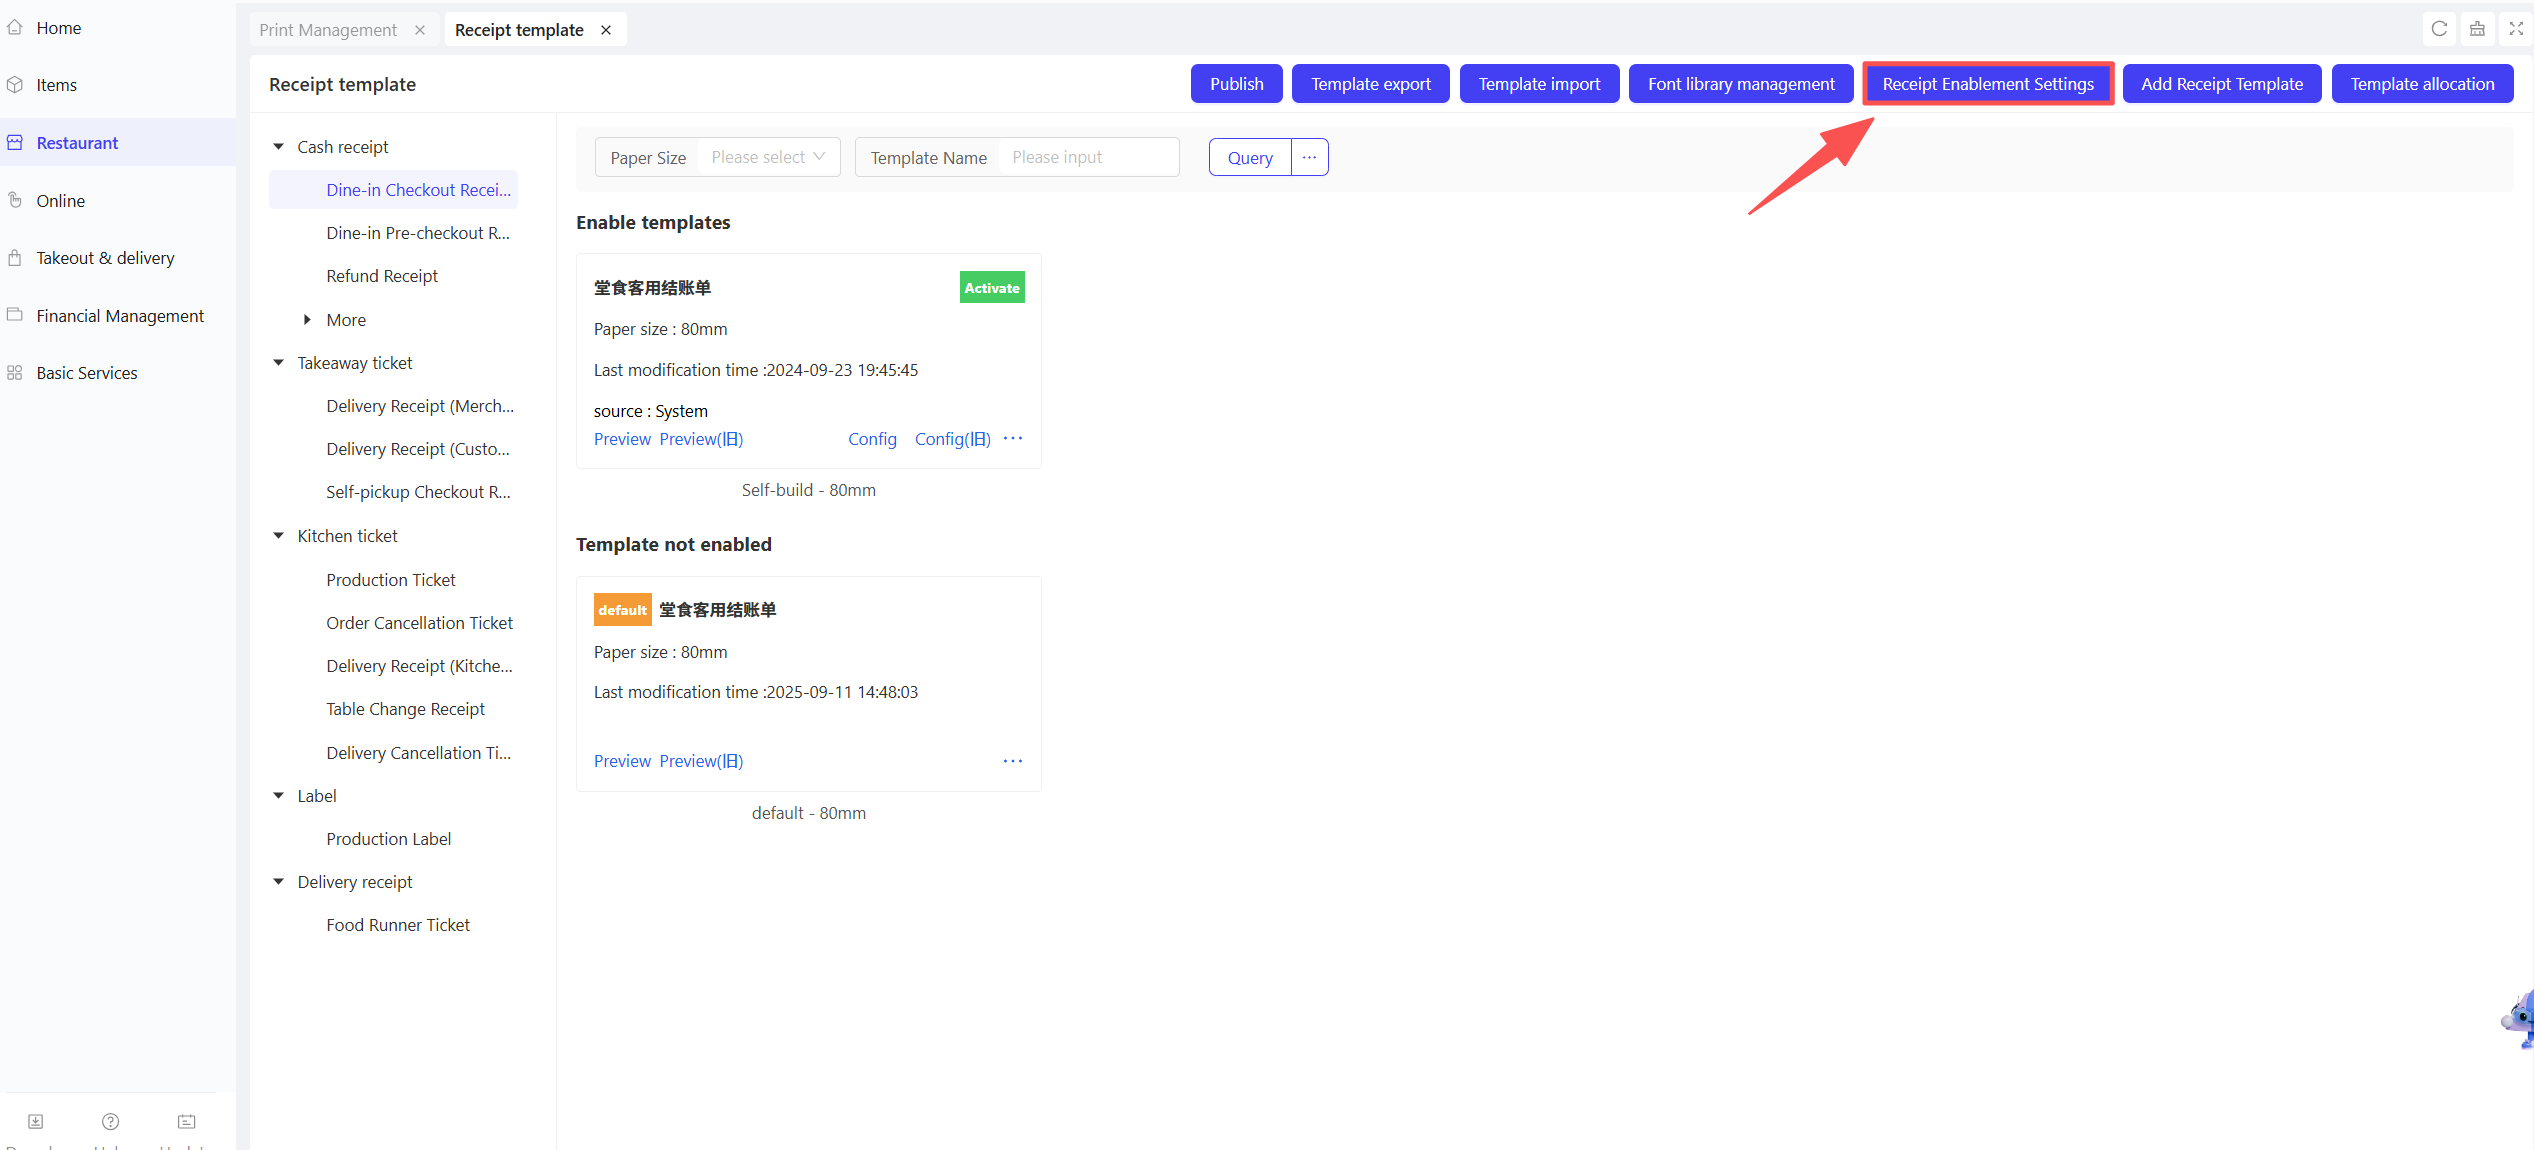
STEP 1: From the Group perspective, navigate to【Restaurant Management】>【Print Management】>【Receipt Template Management】.
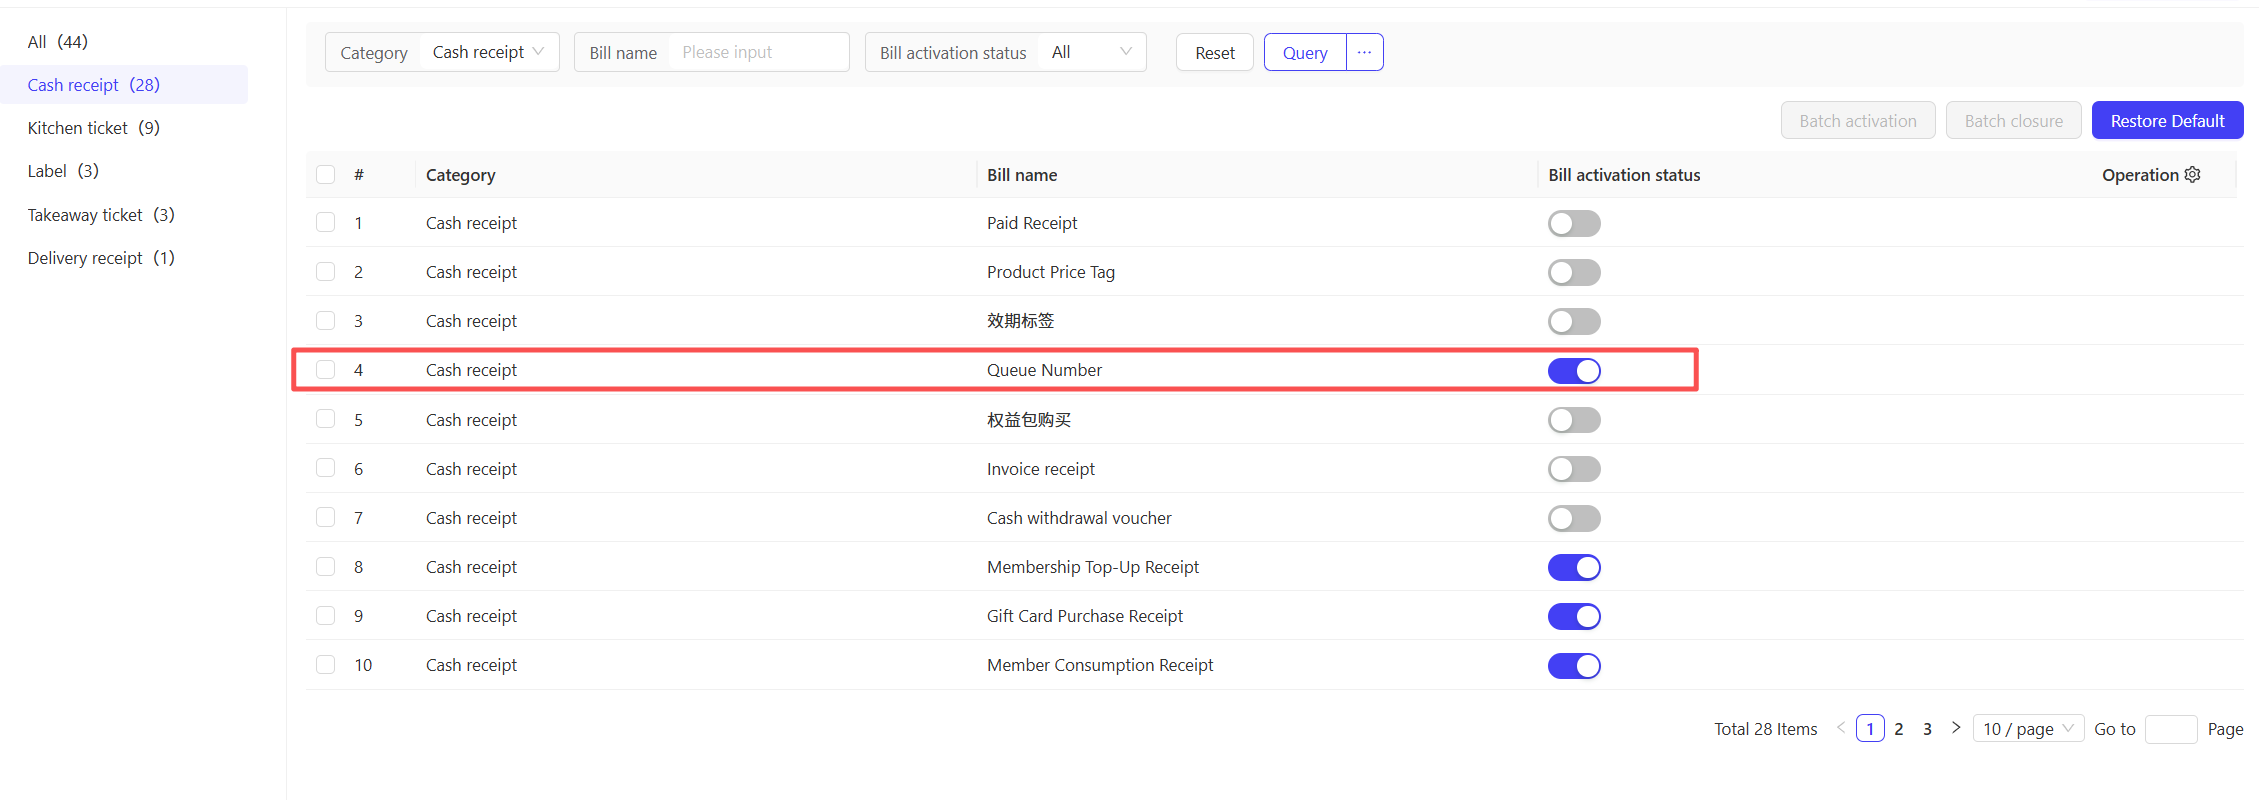
STEP 2: Access Ticket Enable Settings and turn on the Queue Ticket toggle.
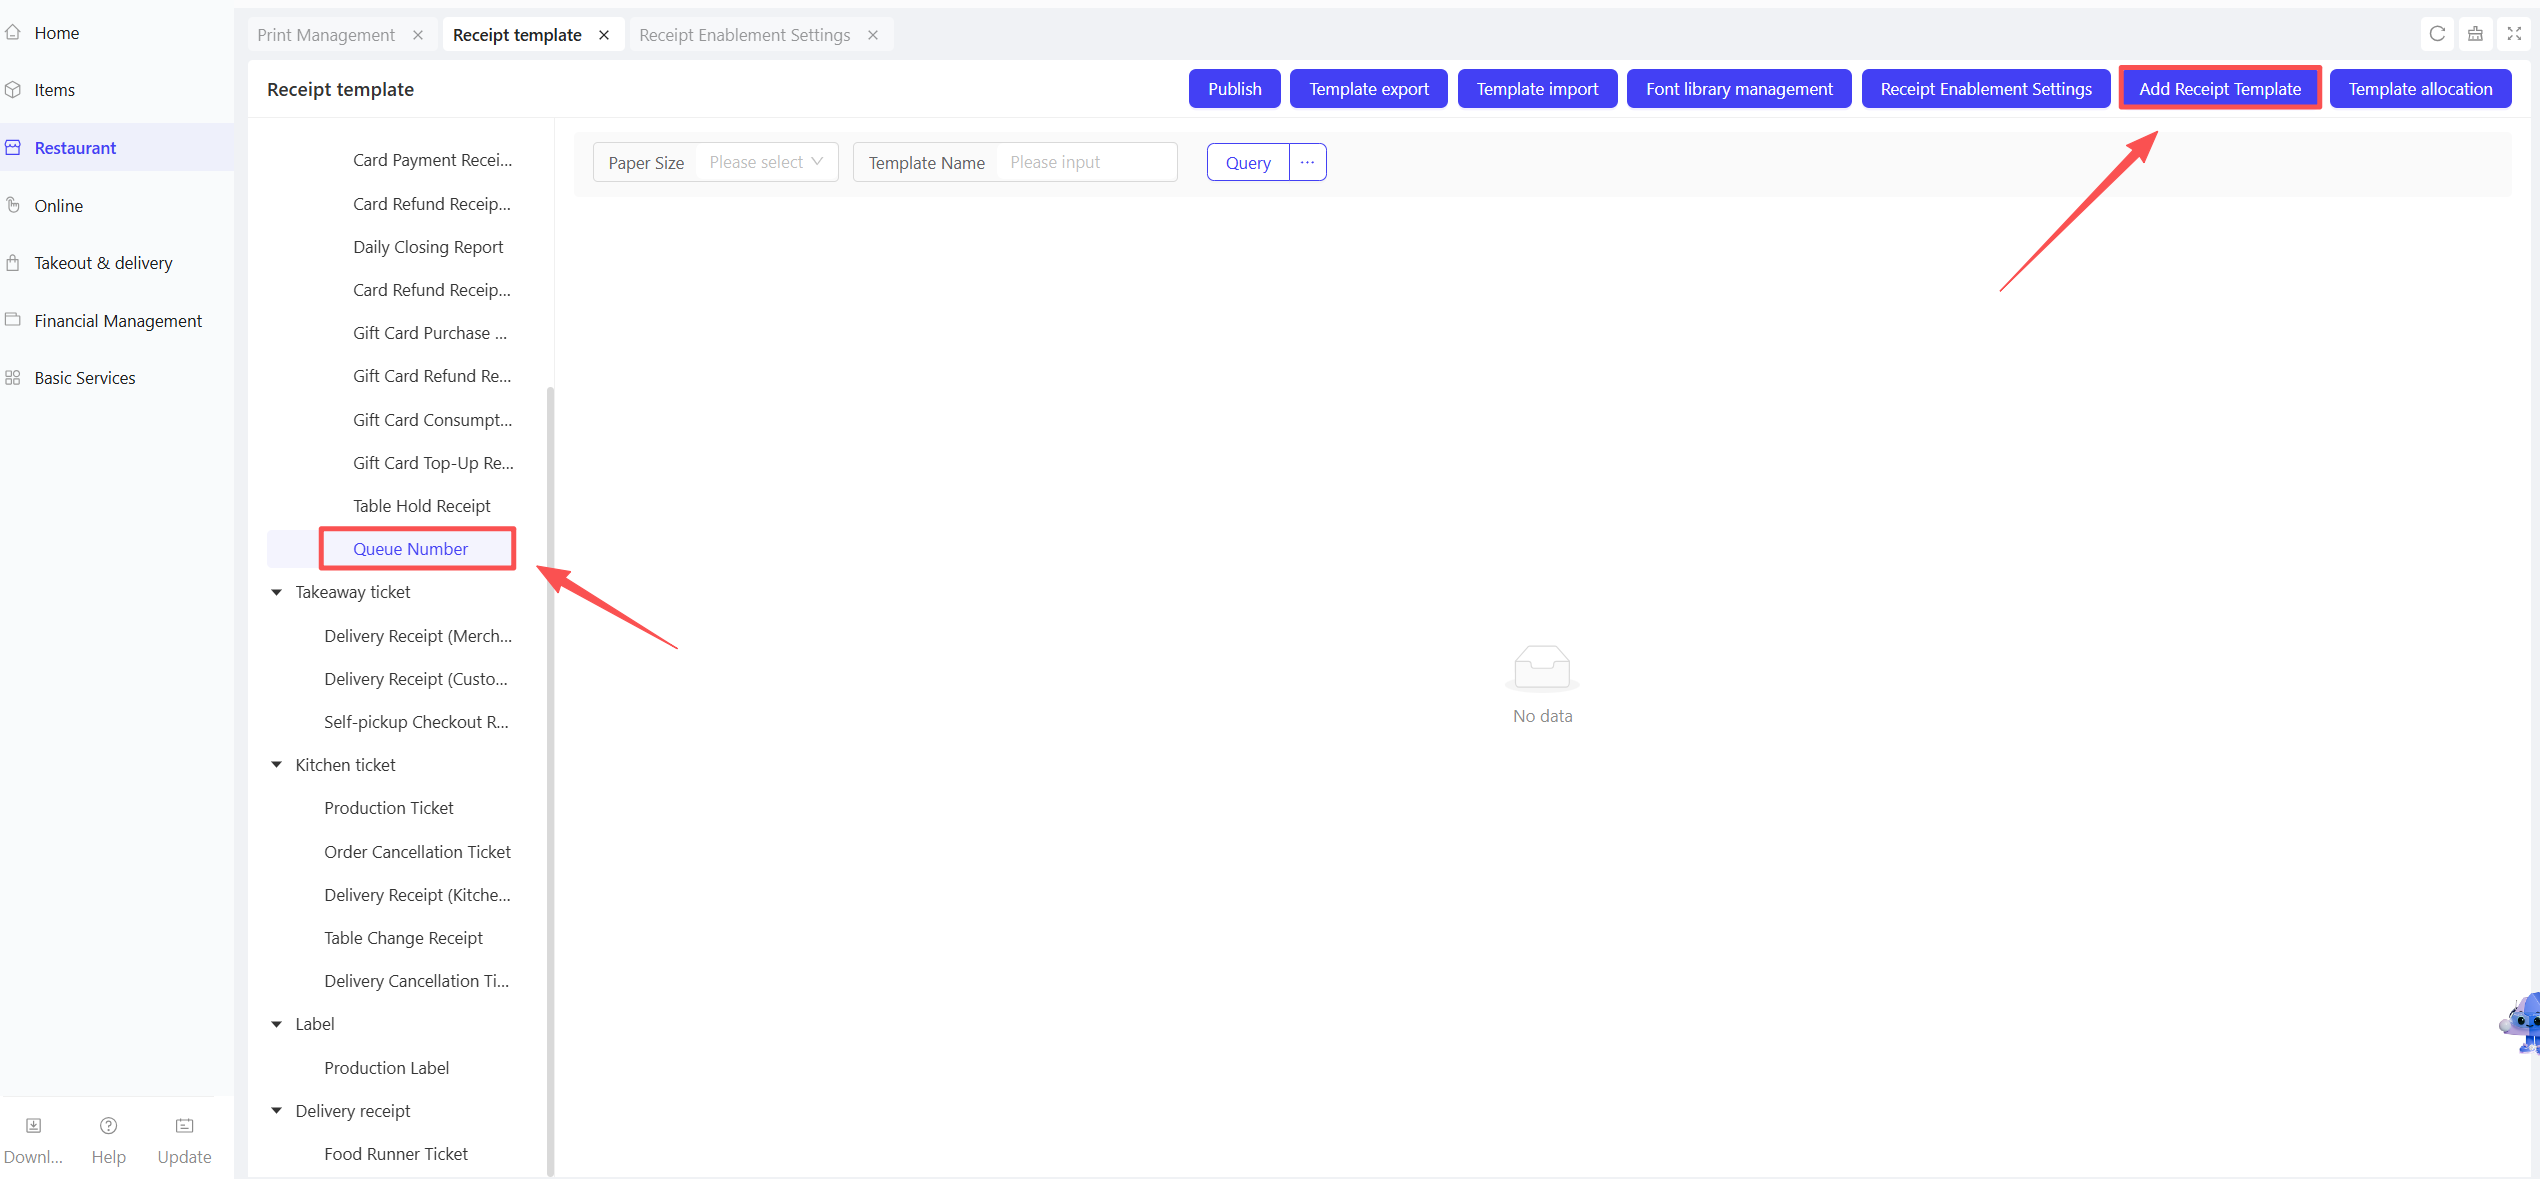
STEP 3: In Ticket Template Management, select【Queue Number】and click【Add Receipt Template】
STEP 4: Select the paper size that matches the actual printer specifications.
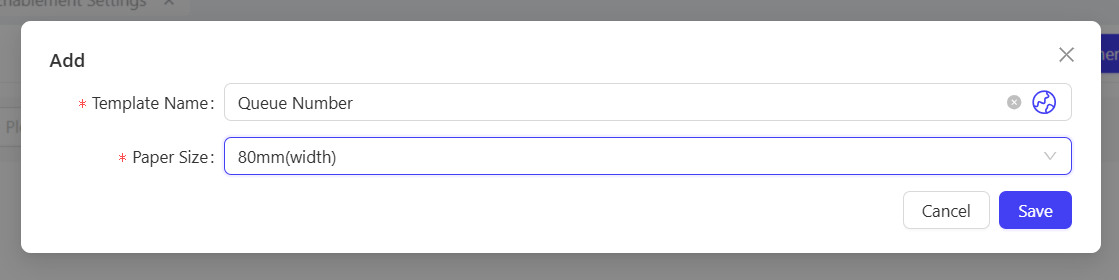
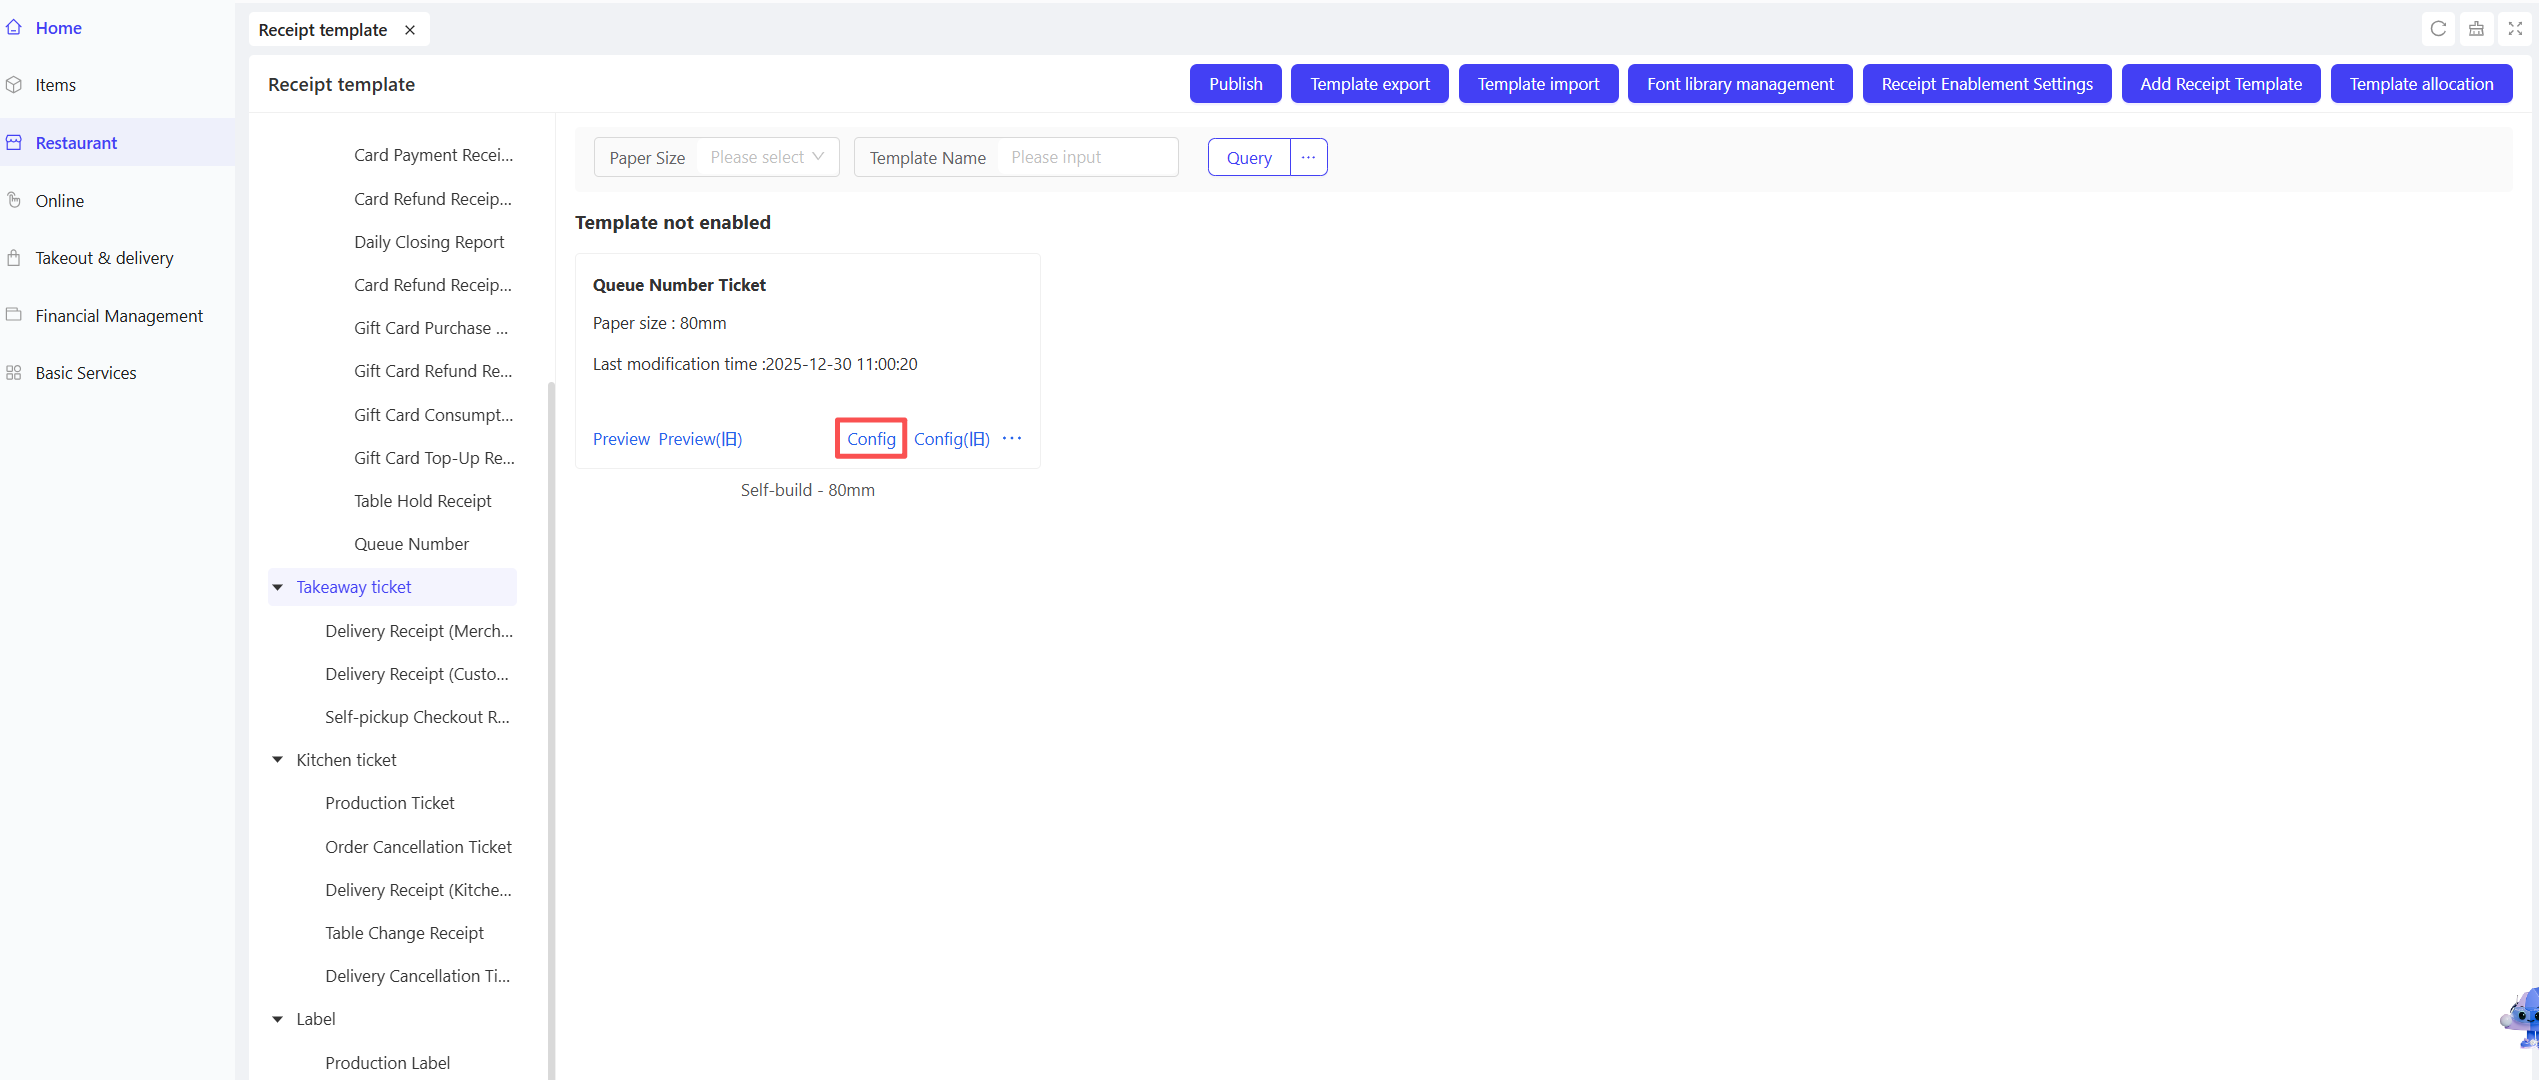
STEP 5: Click【Configure】on the newly created template to customize the ticket layout.

Note
For multilingual scenarios, you need to configure templates for each language separately.
STEP 6: Click【Save】after configuration is completed.
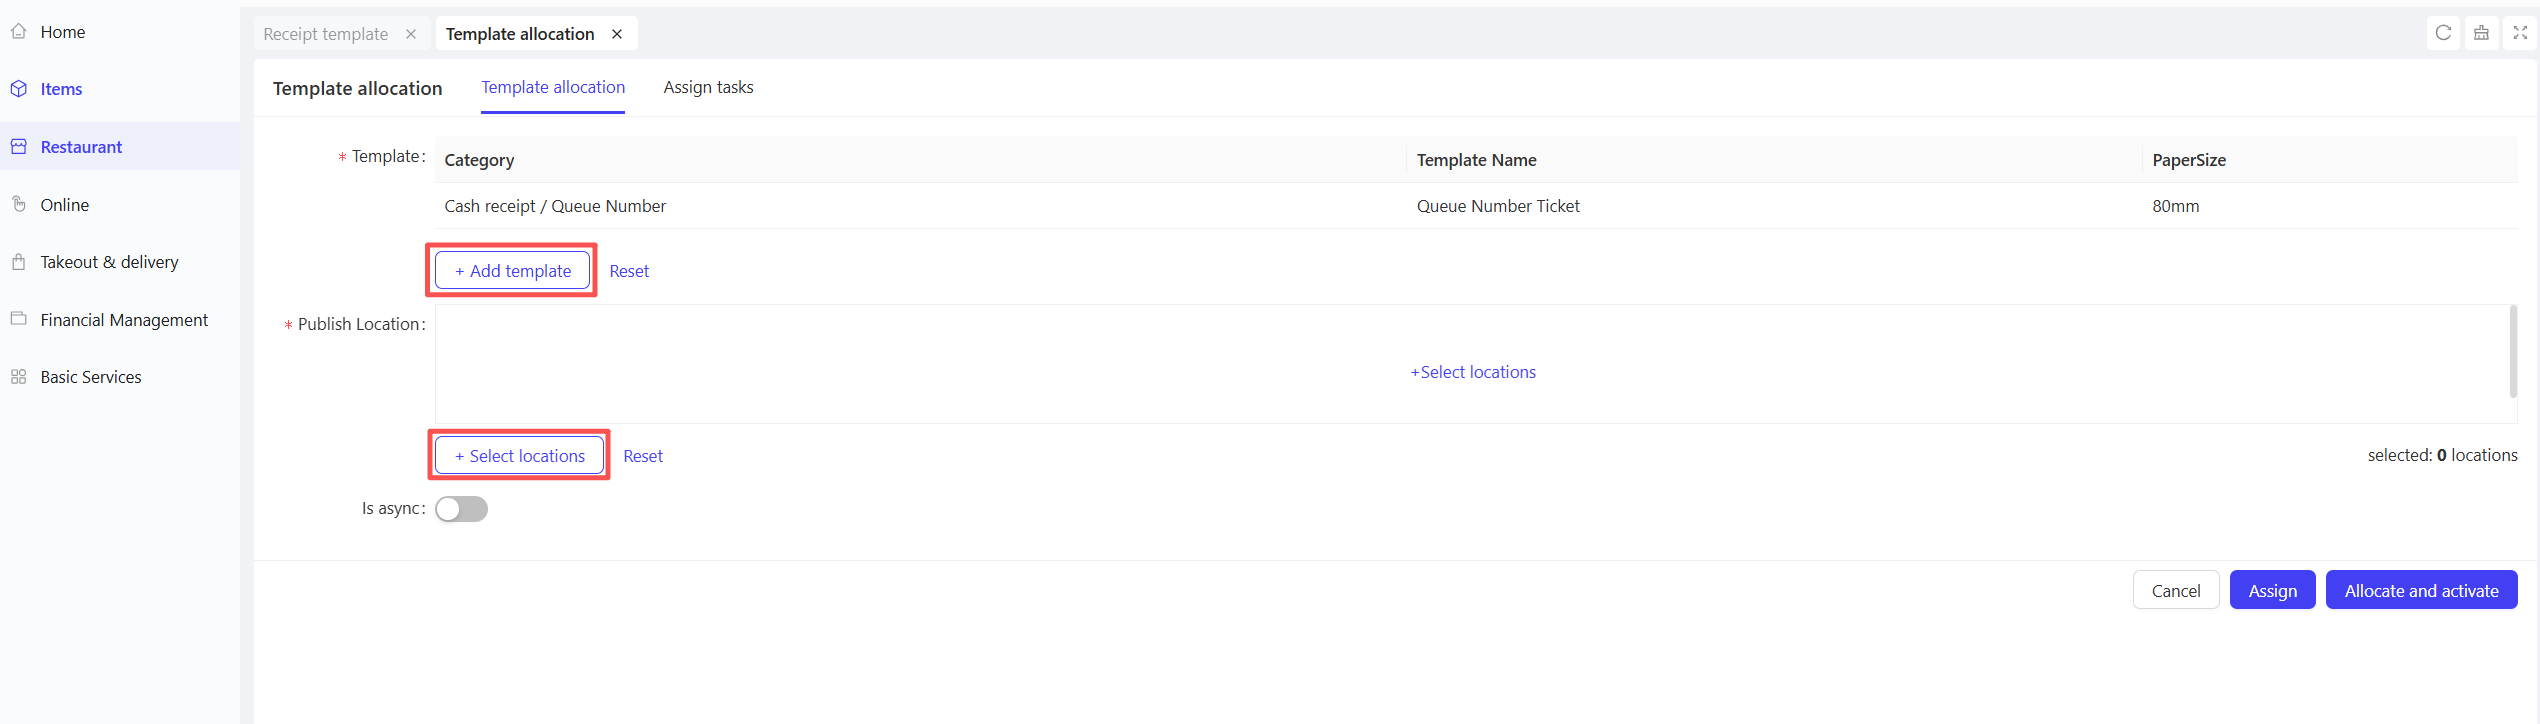
STEP 7: Assign the target template to the designated store by clicking【Assign and Activate】.
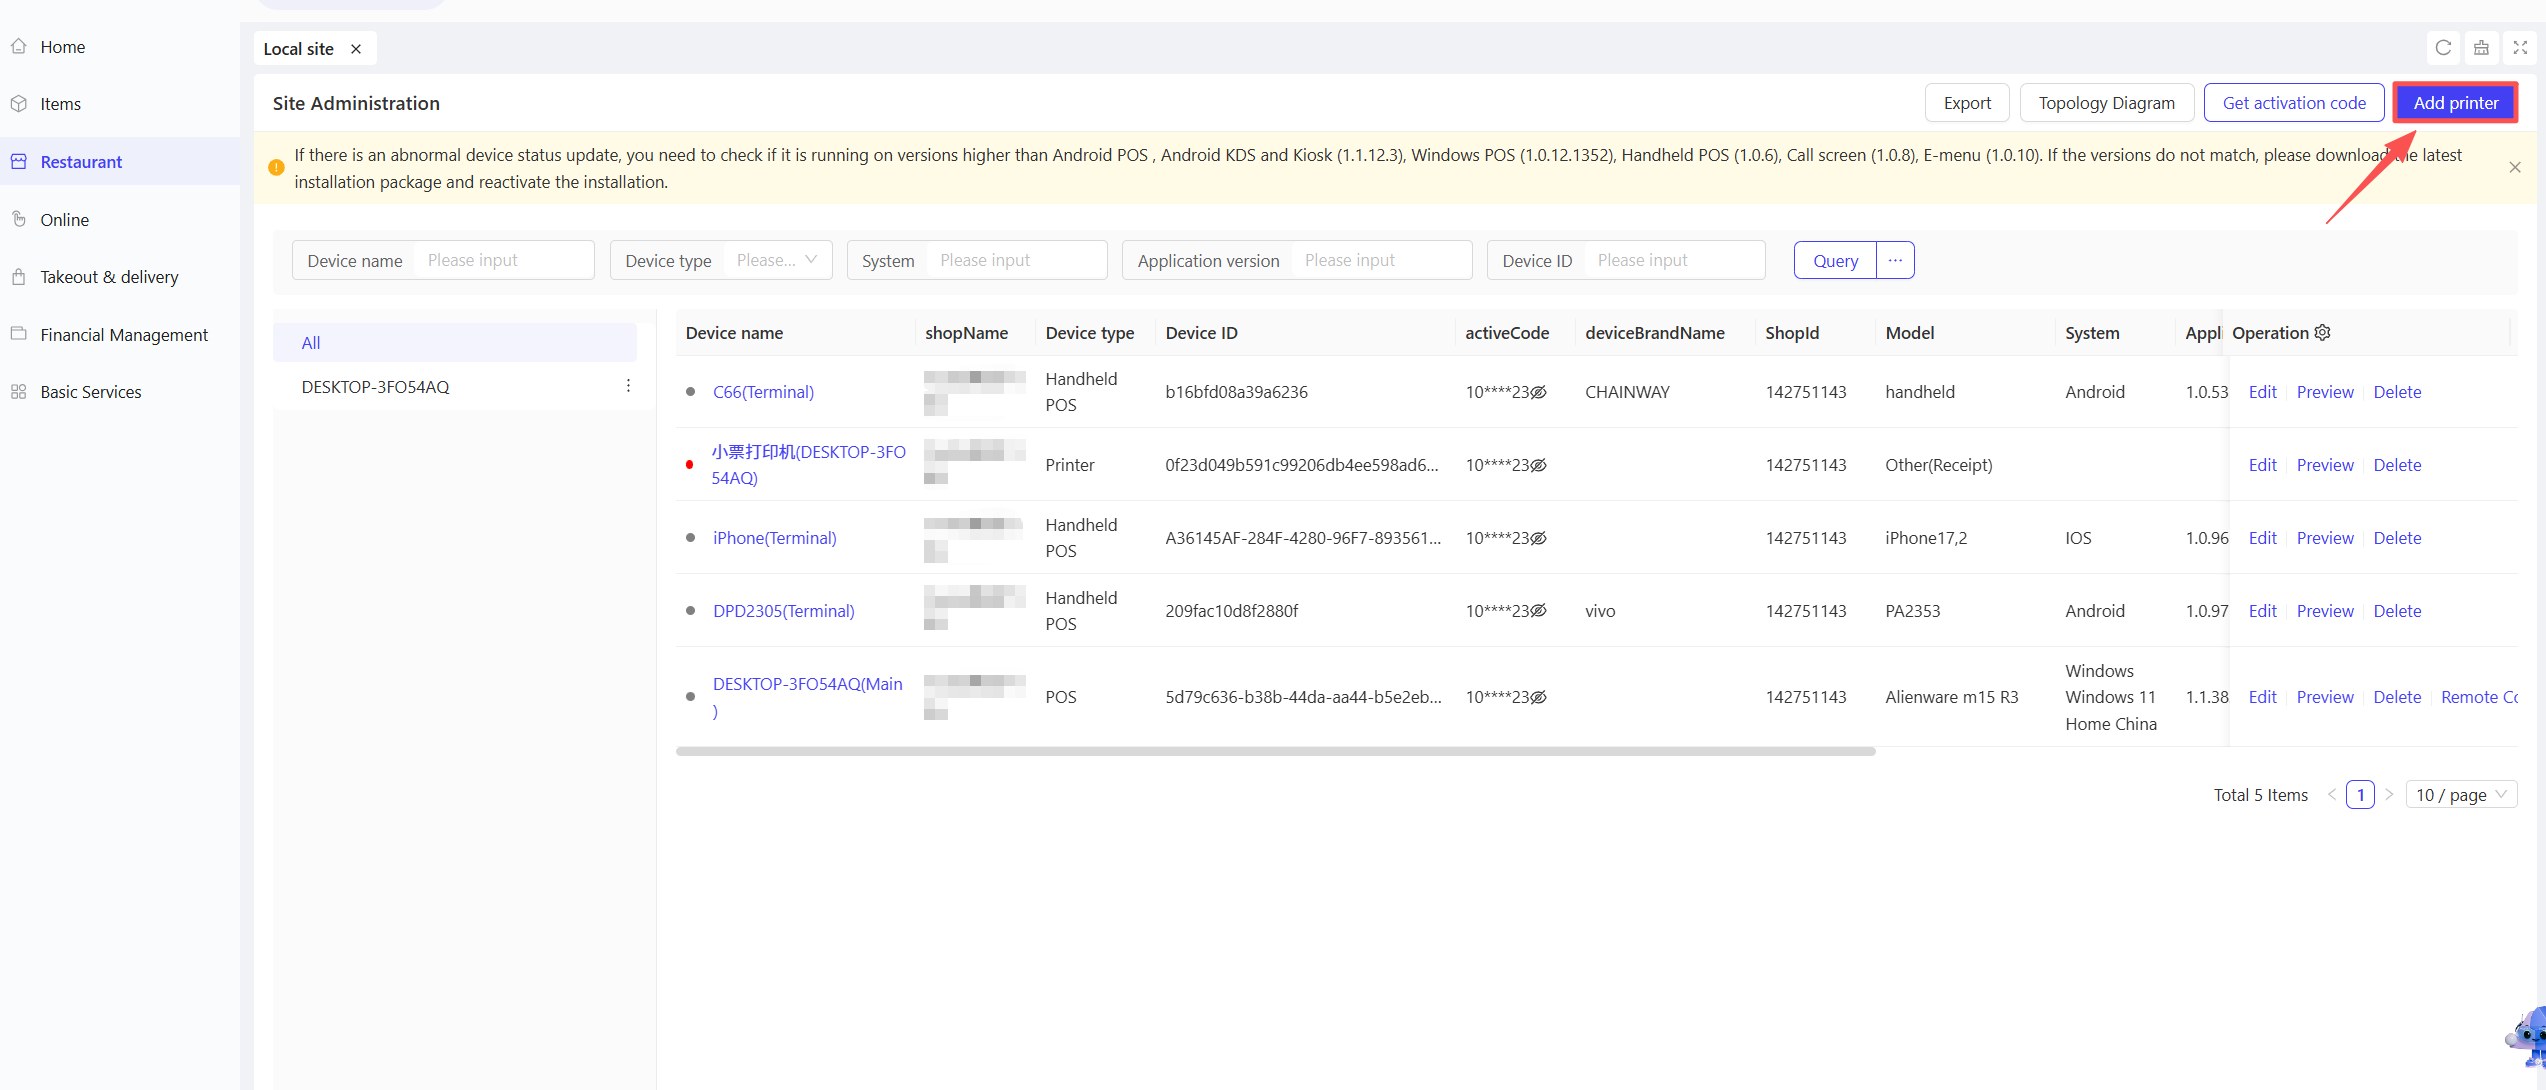
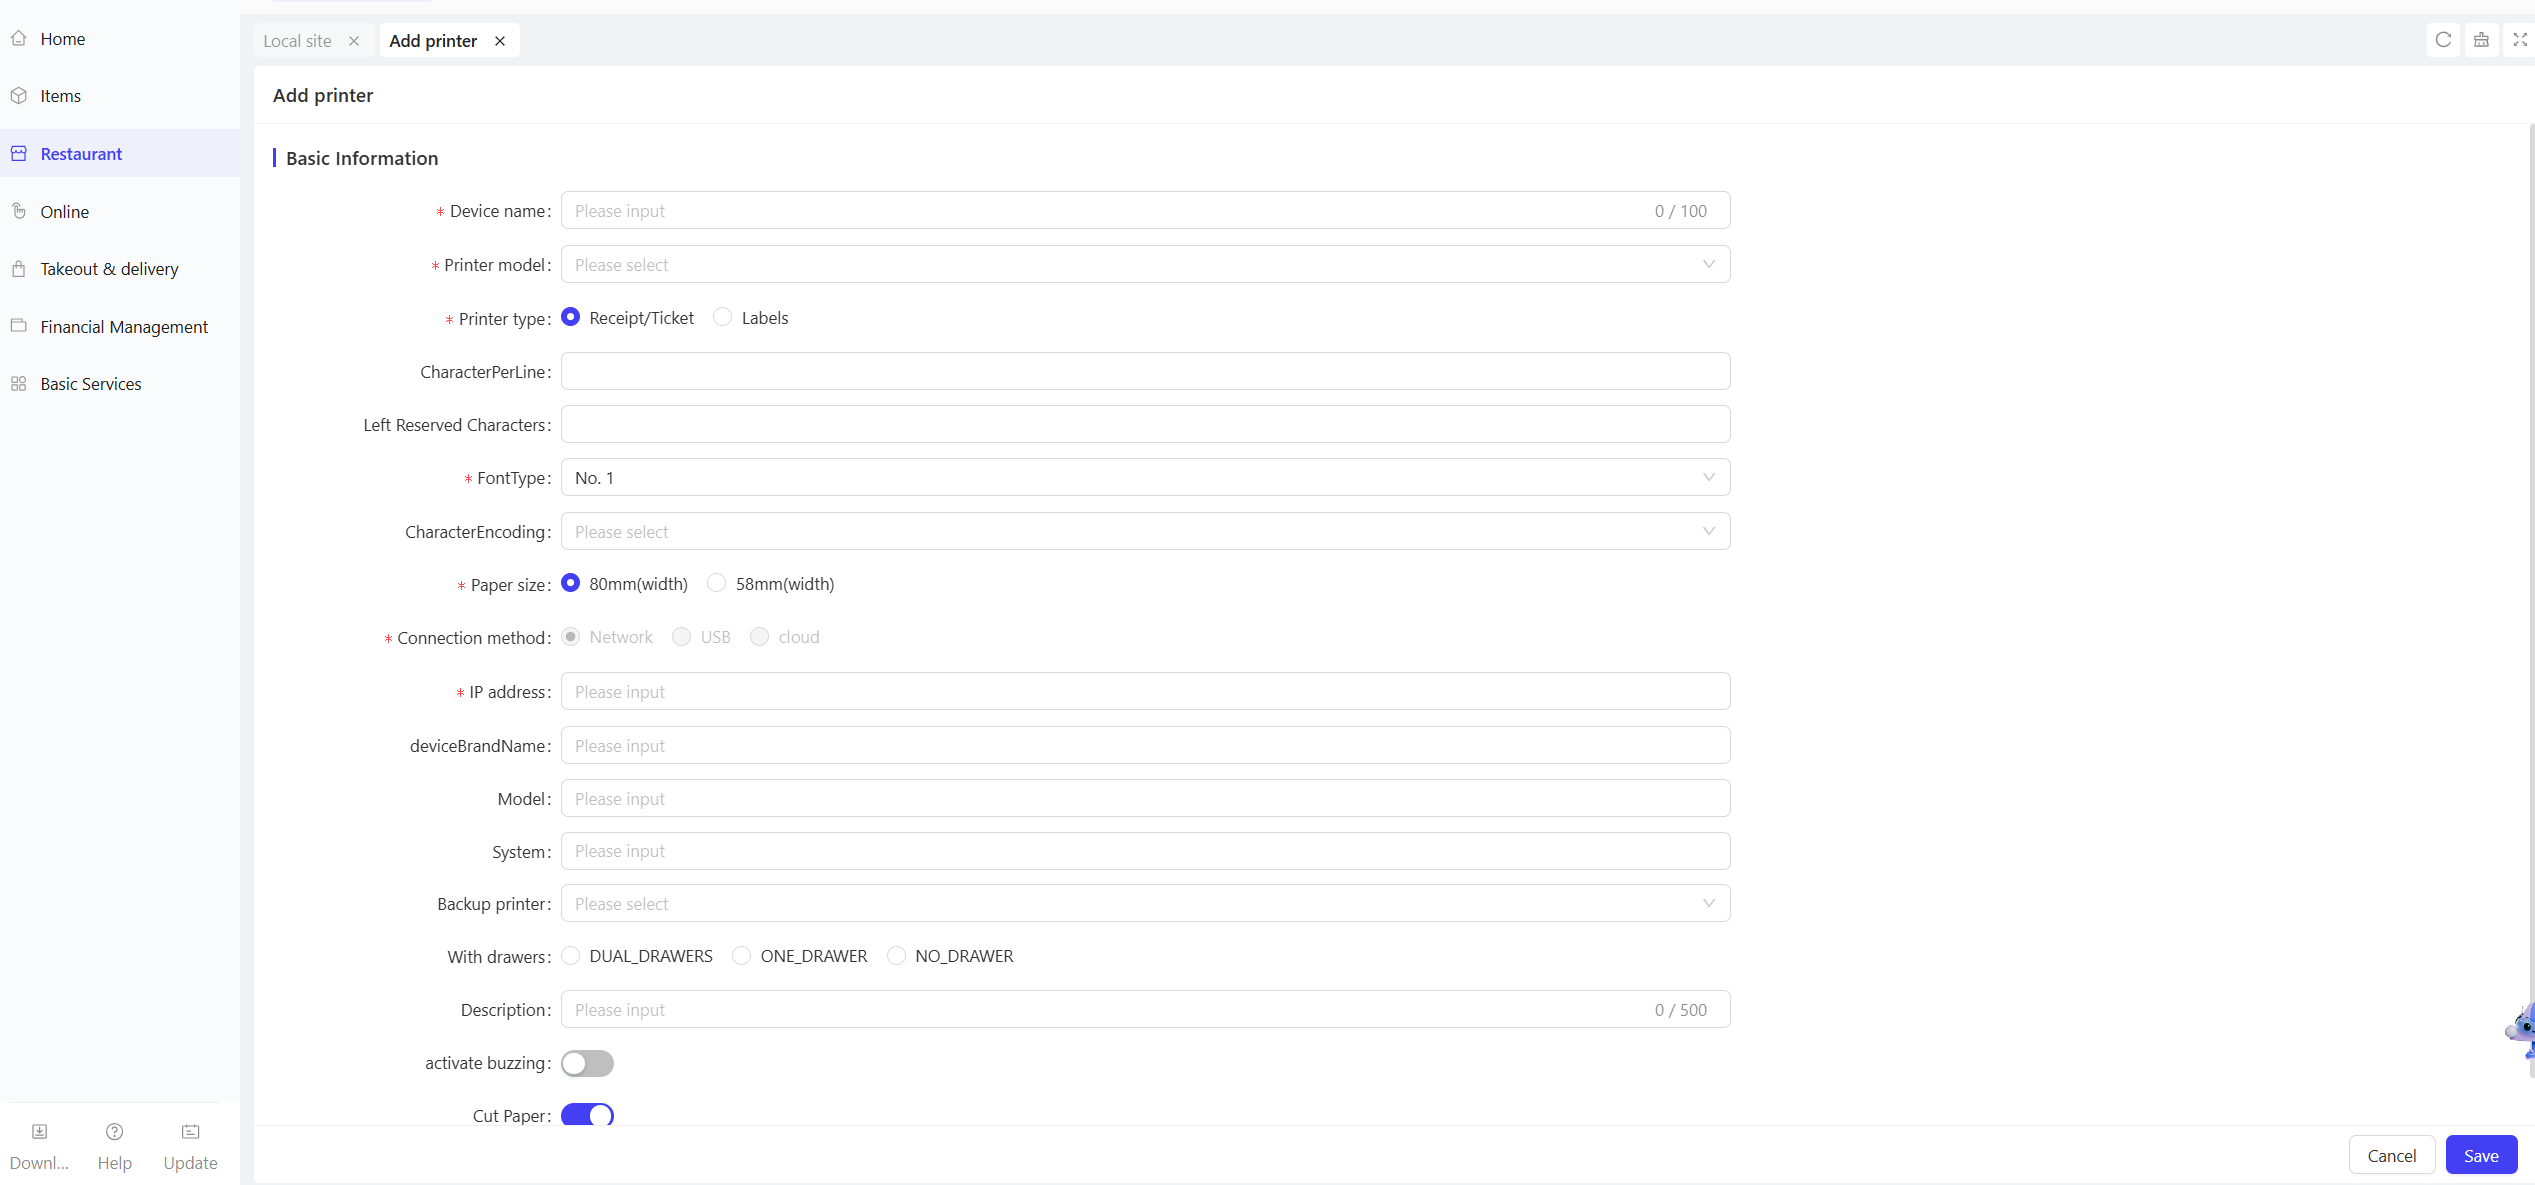
STEP 8: From the store perspective, go to【Restaurant Management】>【Local Site】, Click【Add Printer】.
Note
Enter the printer details and ensure the paper size matches the actual printer specifications.
STEP 9: Click【Save】to complete the printer setup.
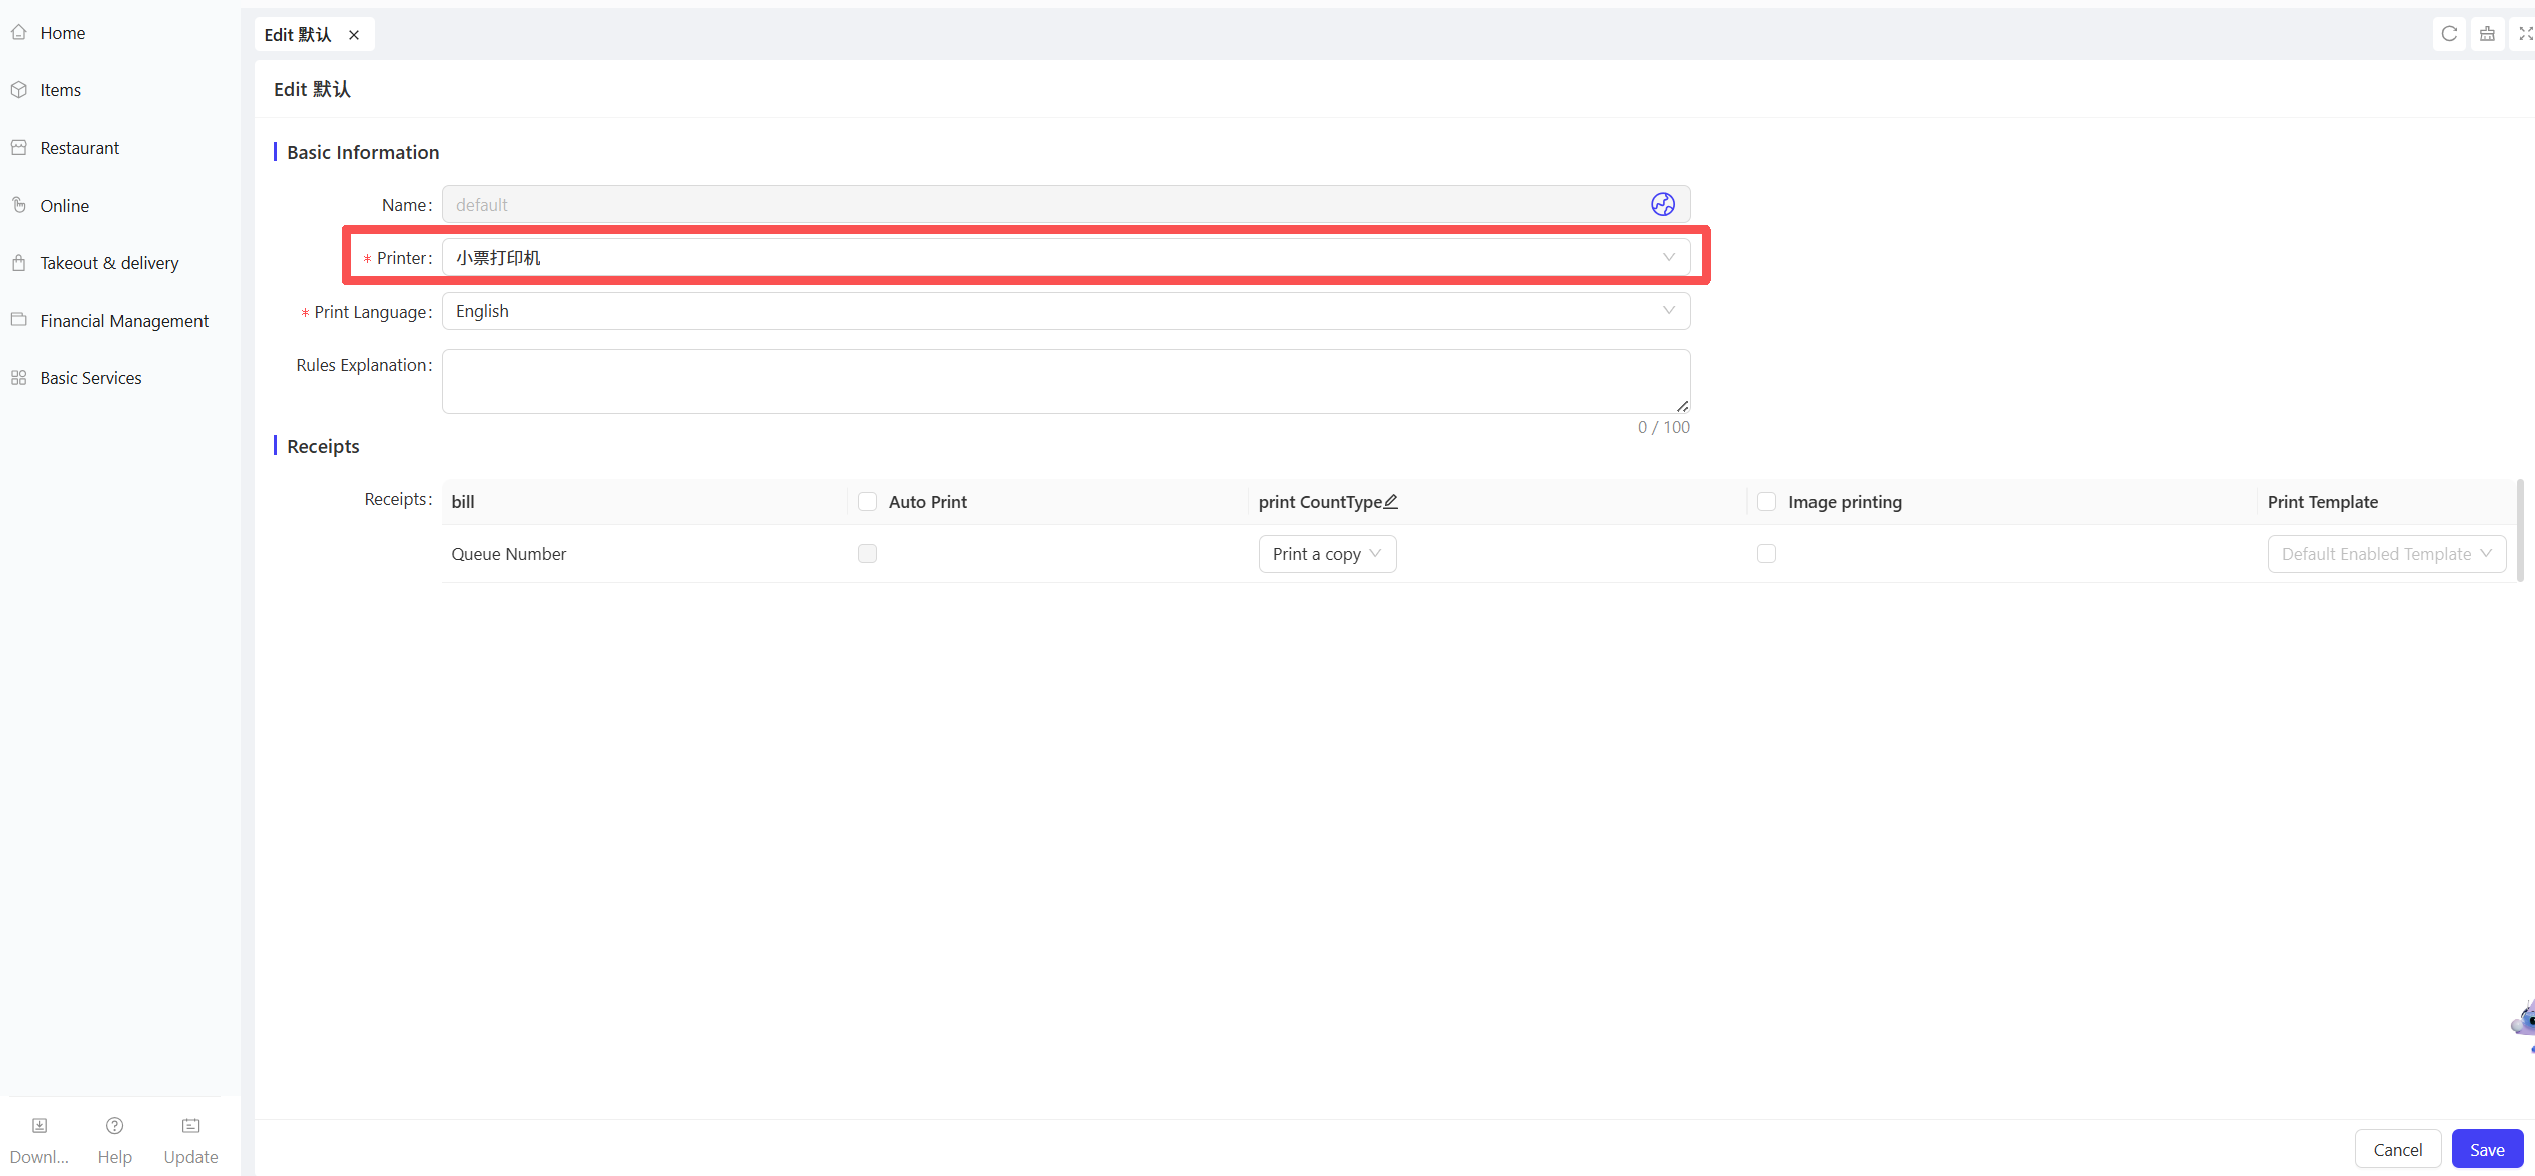
STEP 10: From the store perspective, go to【Print Management】, scroll down to find Reservation & Queue Print Settings.
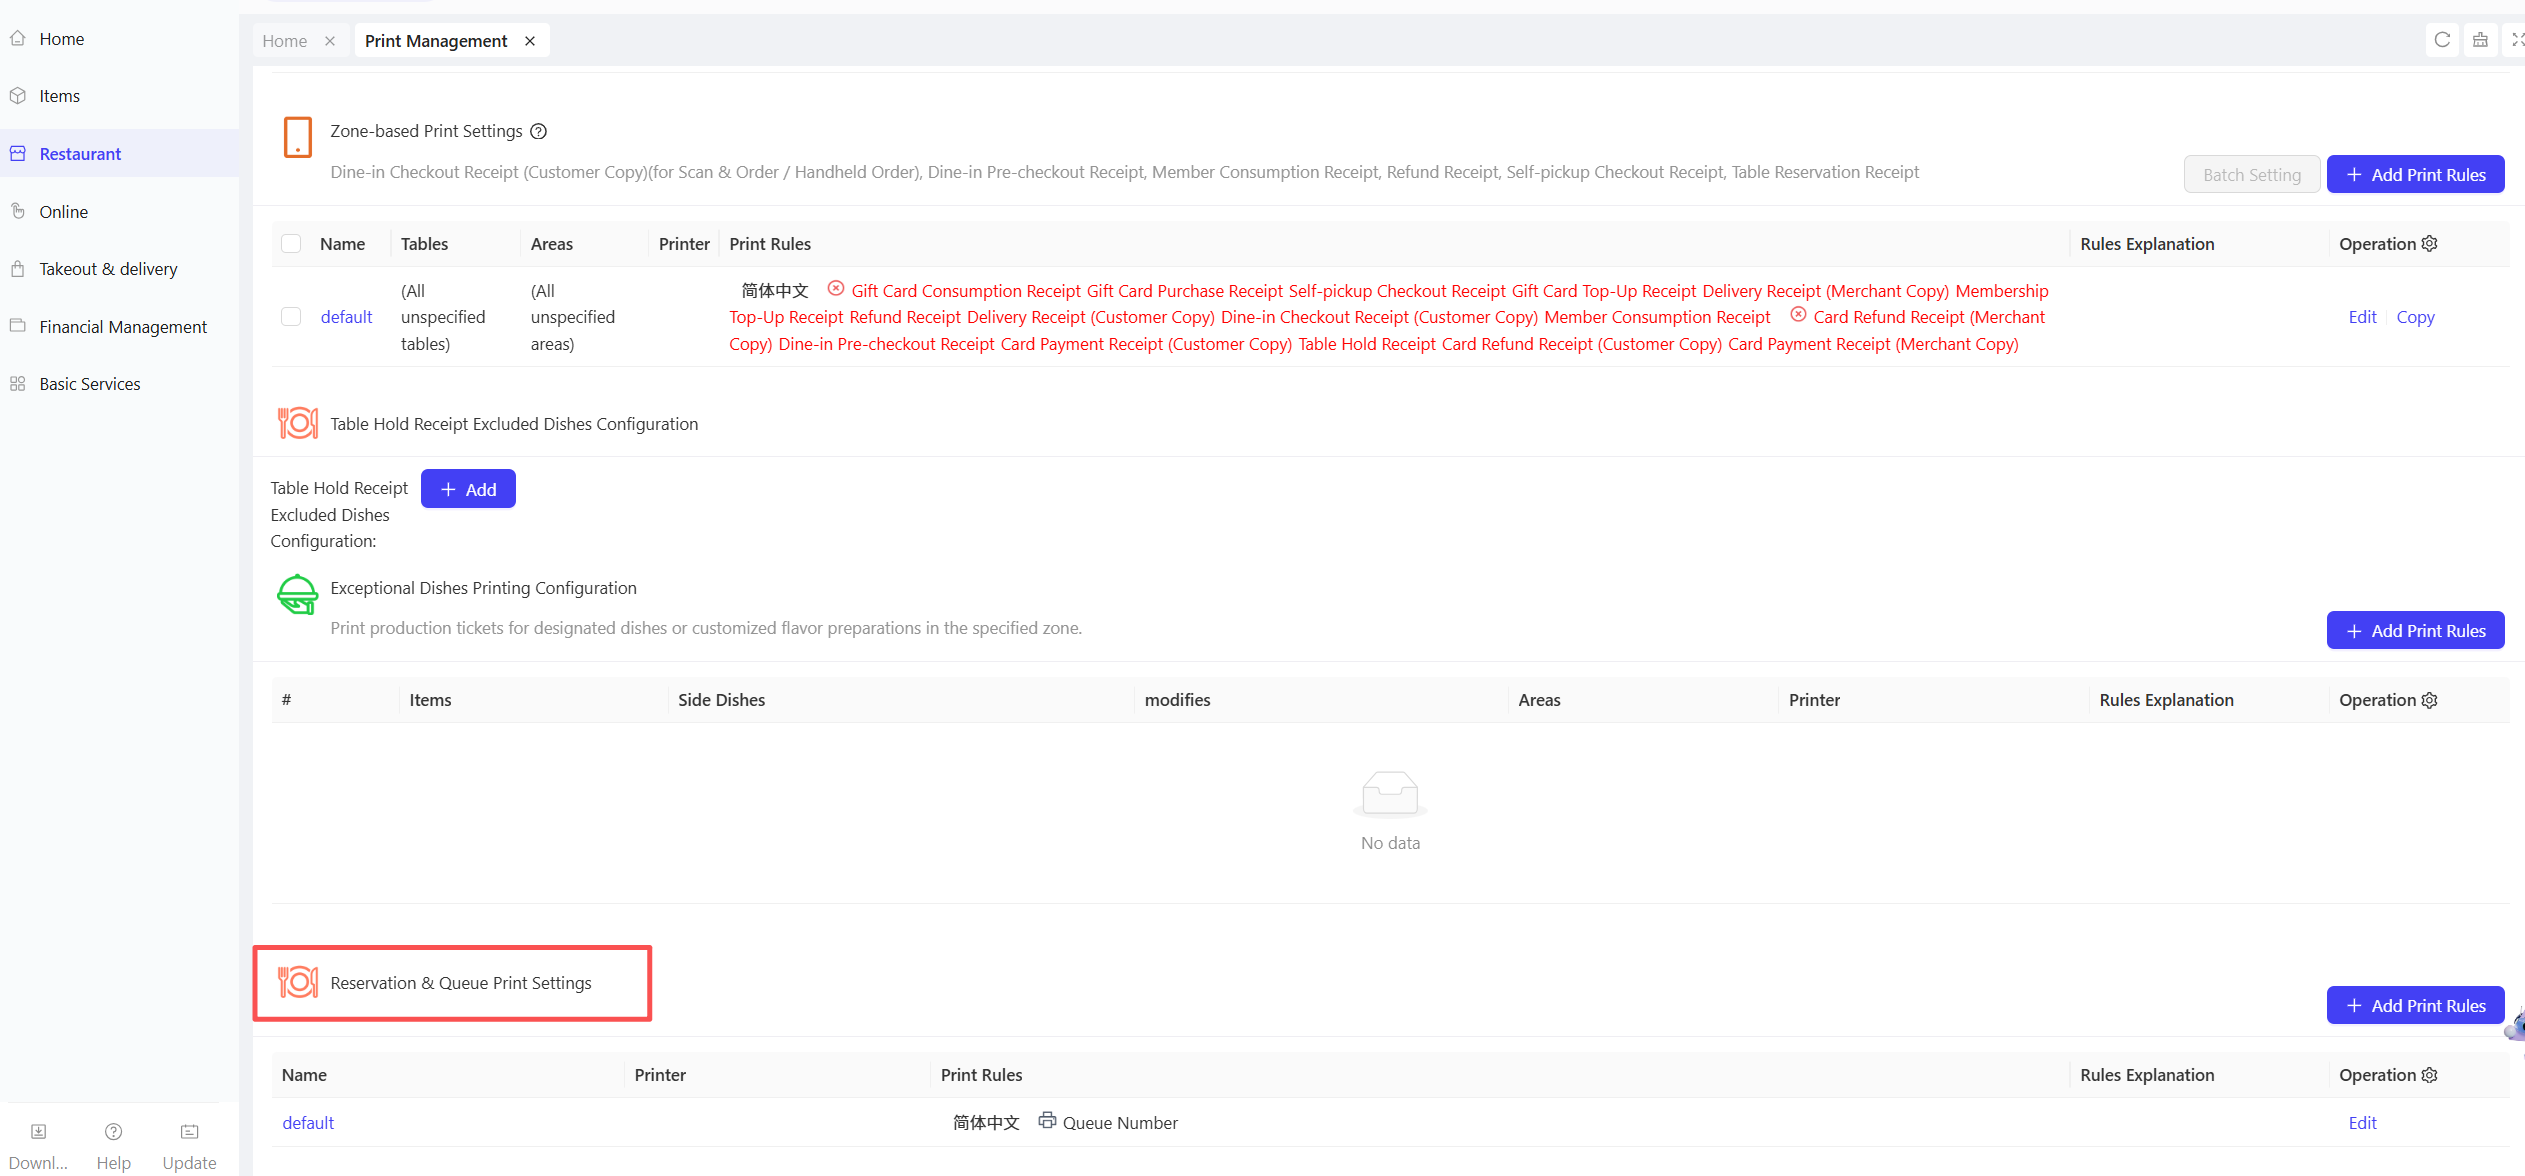
-
Click【Edit】, then:
- Select the printer from the dropdown menu (choose the printer just created).
- Select the print language (ensure the language is configured in the corresponding ticket template).
- Select the ticket template.
-
Click【Save】
STEP 11: In Print Management, click【Publish】to apply the settings.
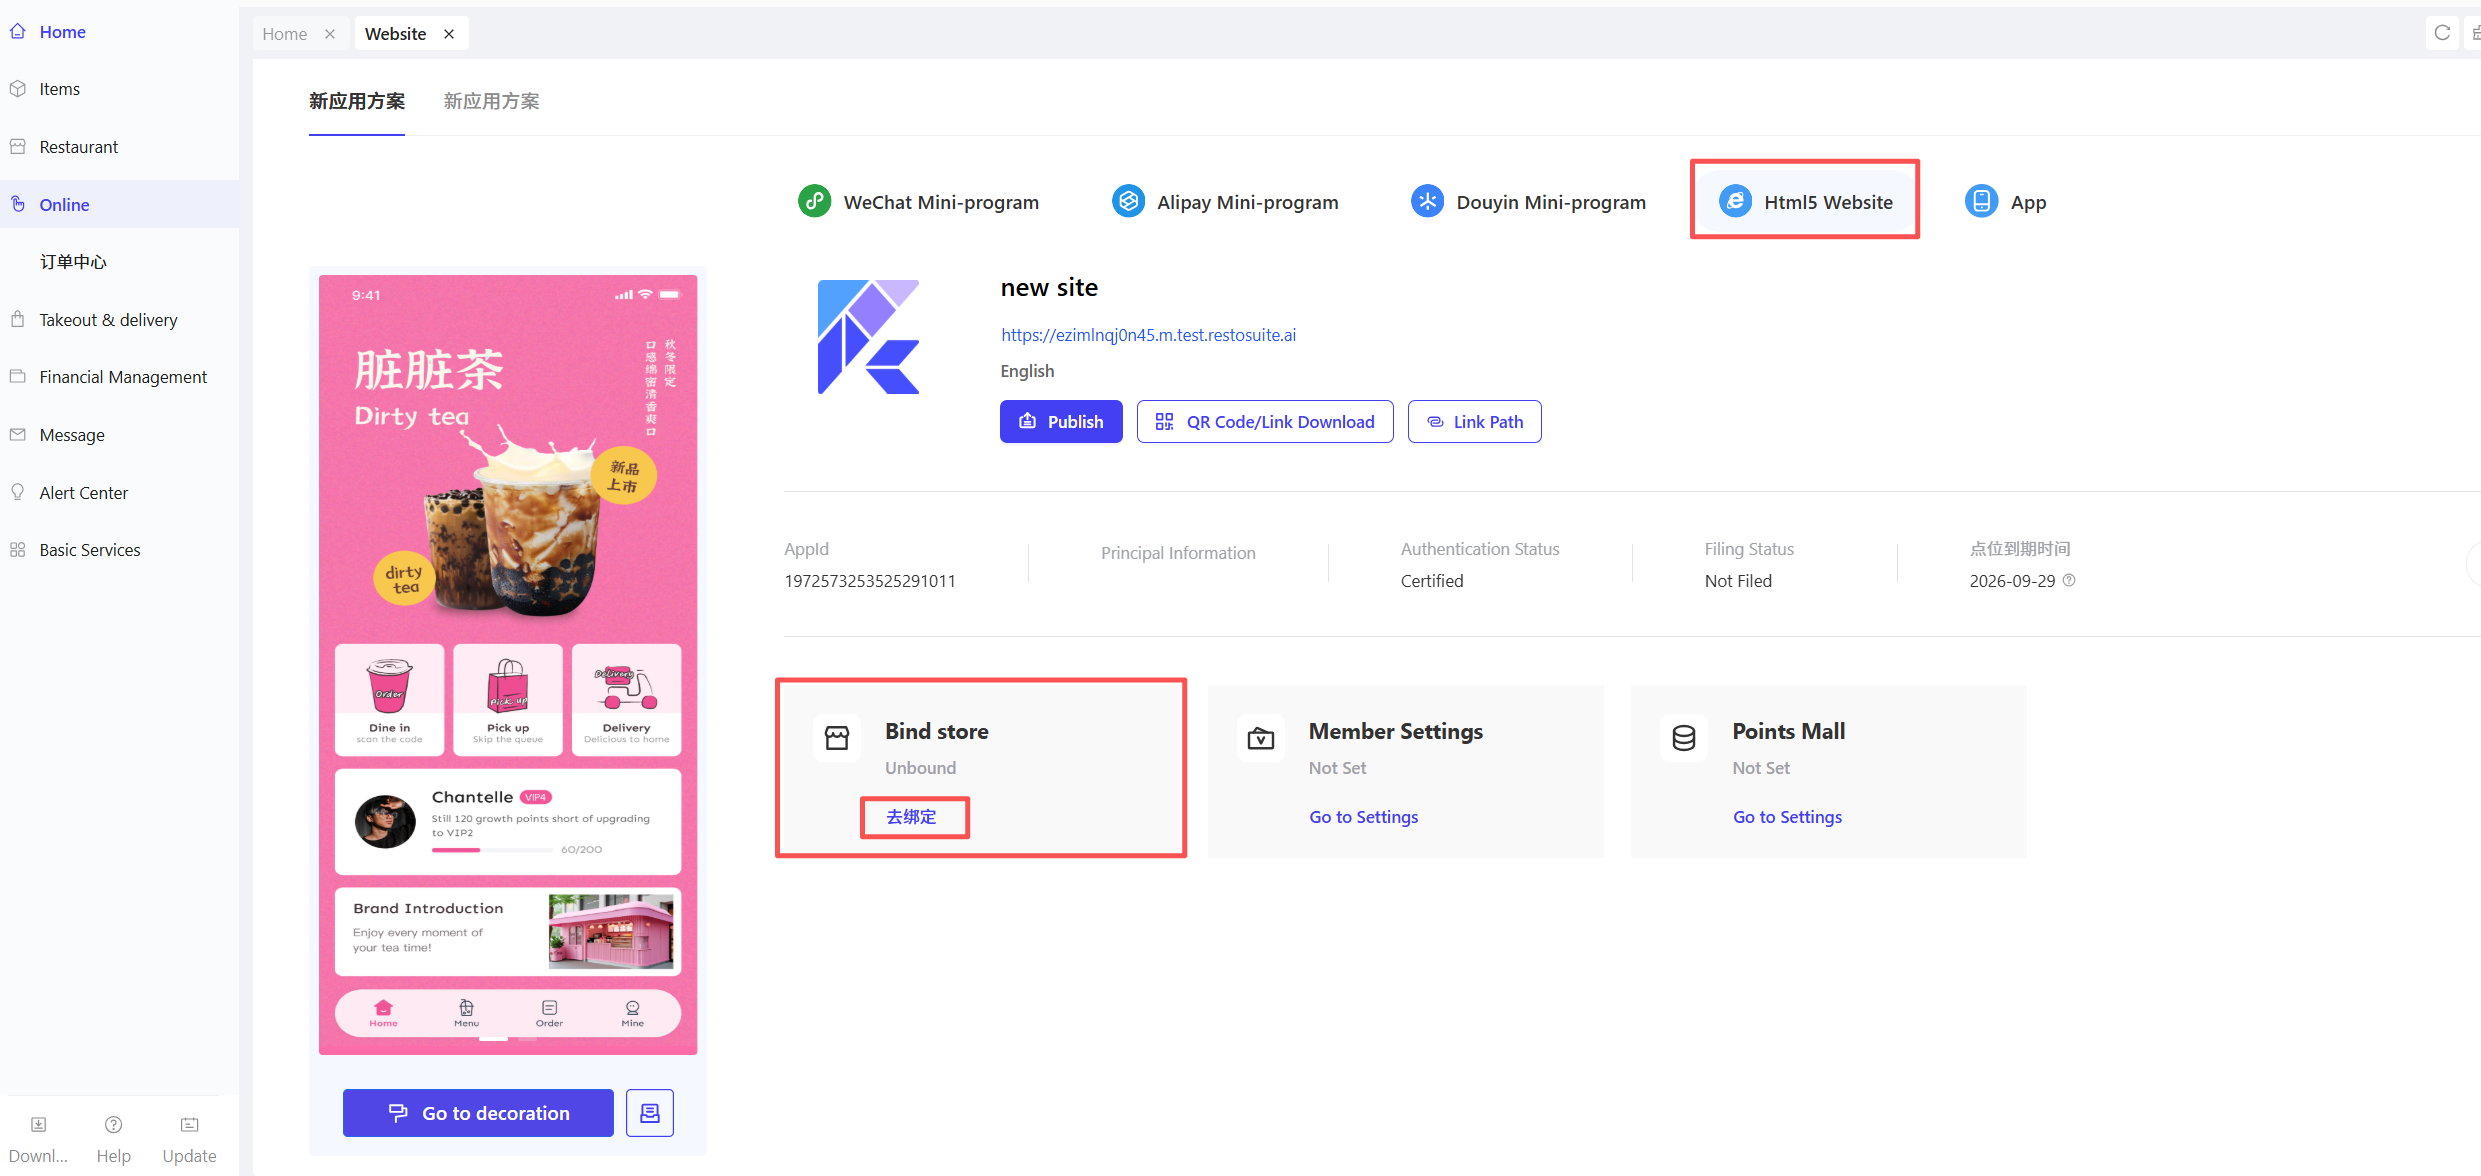
STEP 12: Finally, configure the QR code on the queue ticket:
- From the Group perspective, go to【Online】>【Website Management】
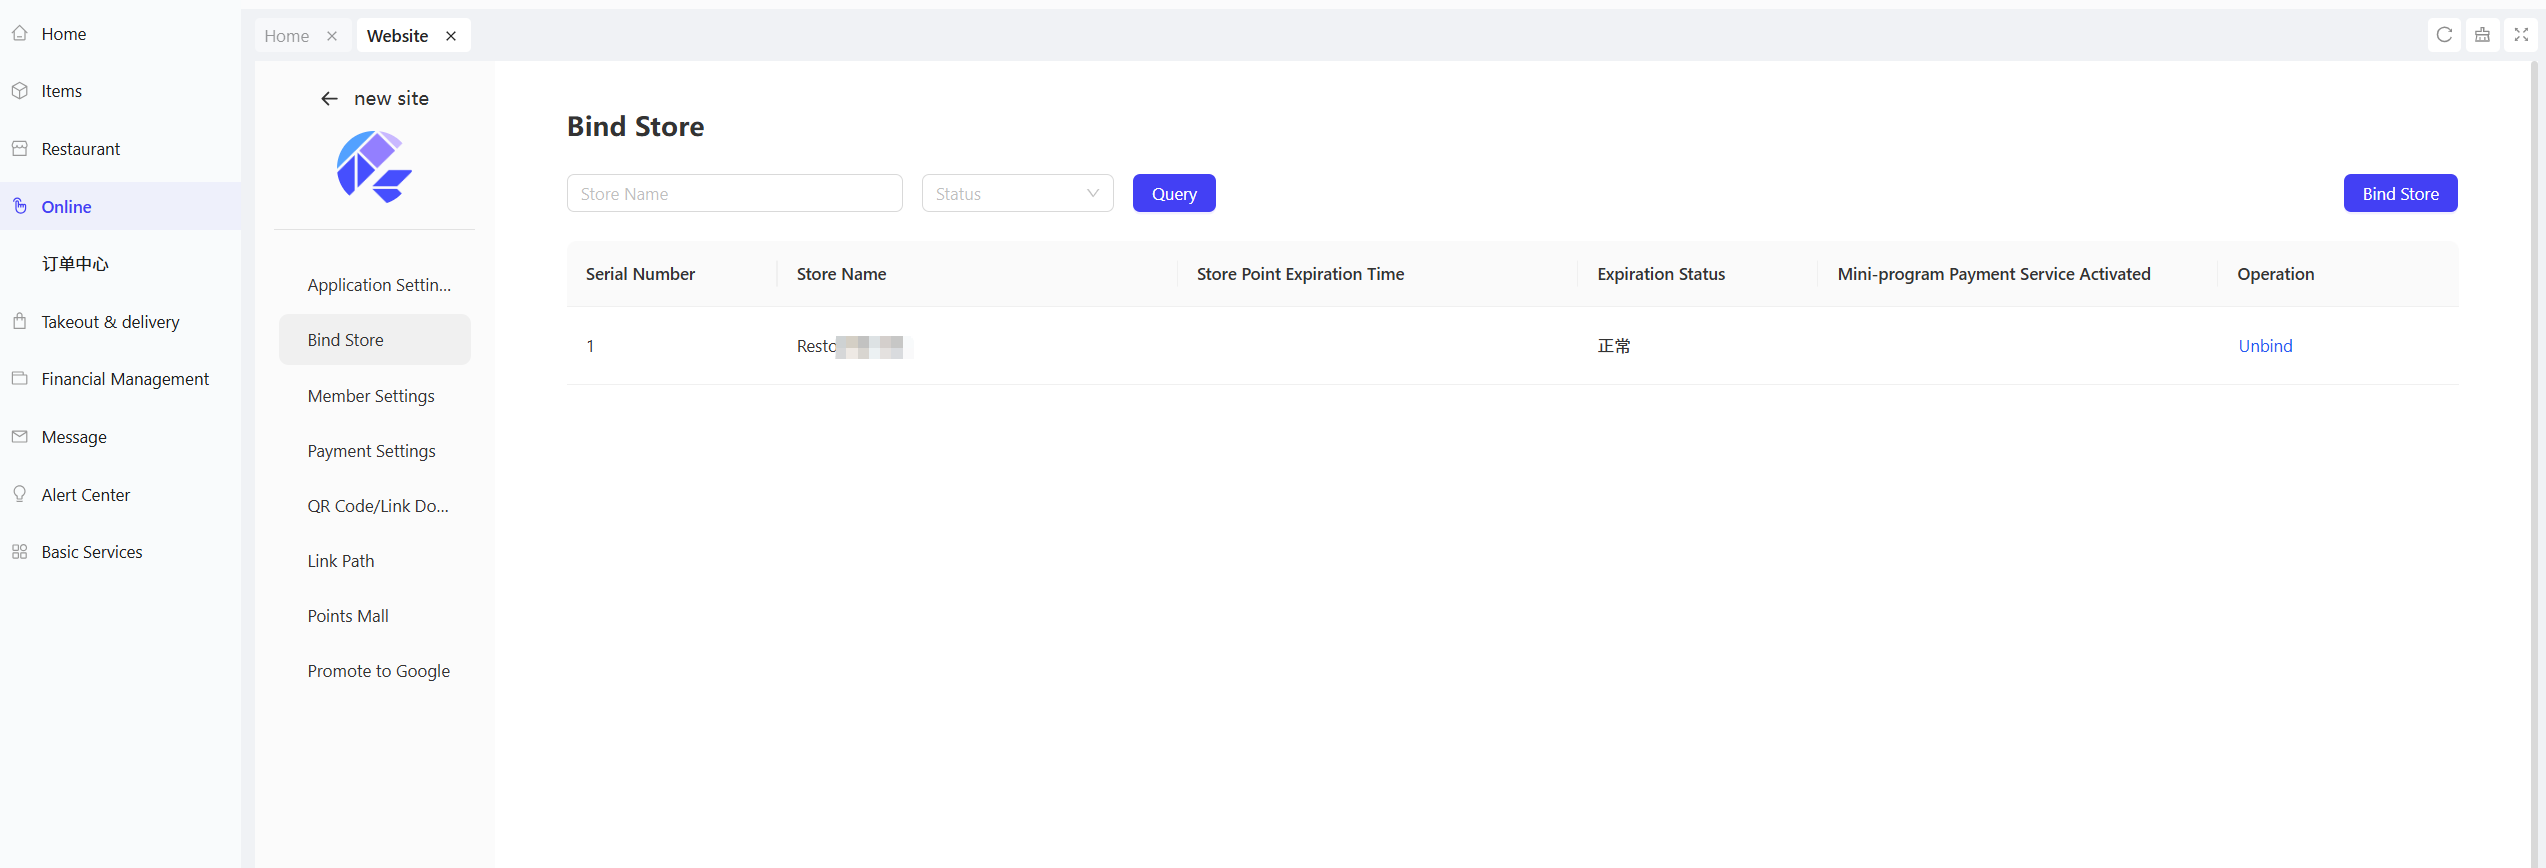
- Select the HTML5 Website, find Store Binding, and click Bind Store.
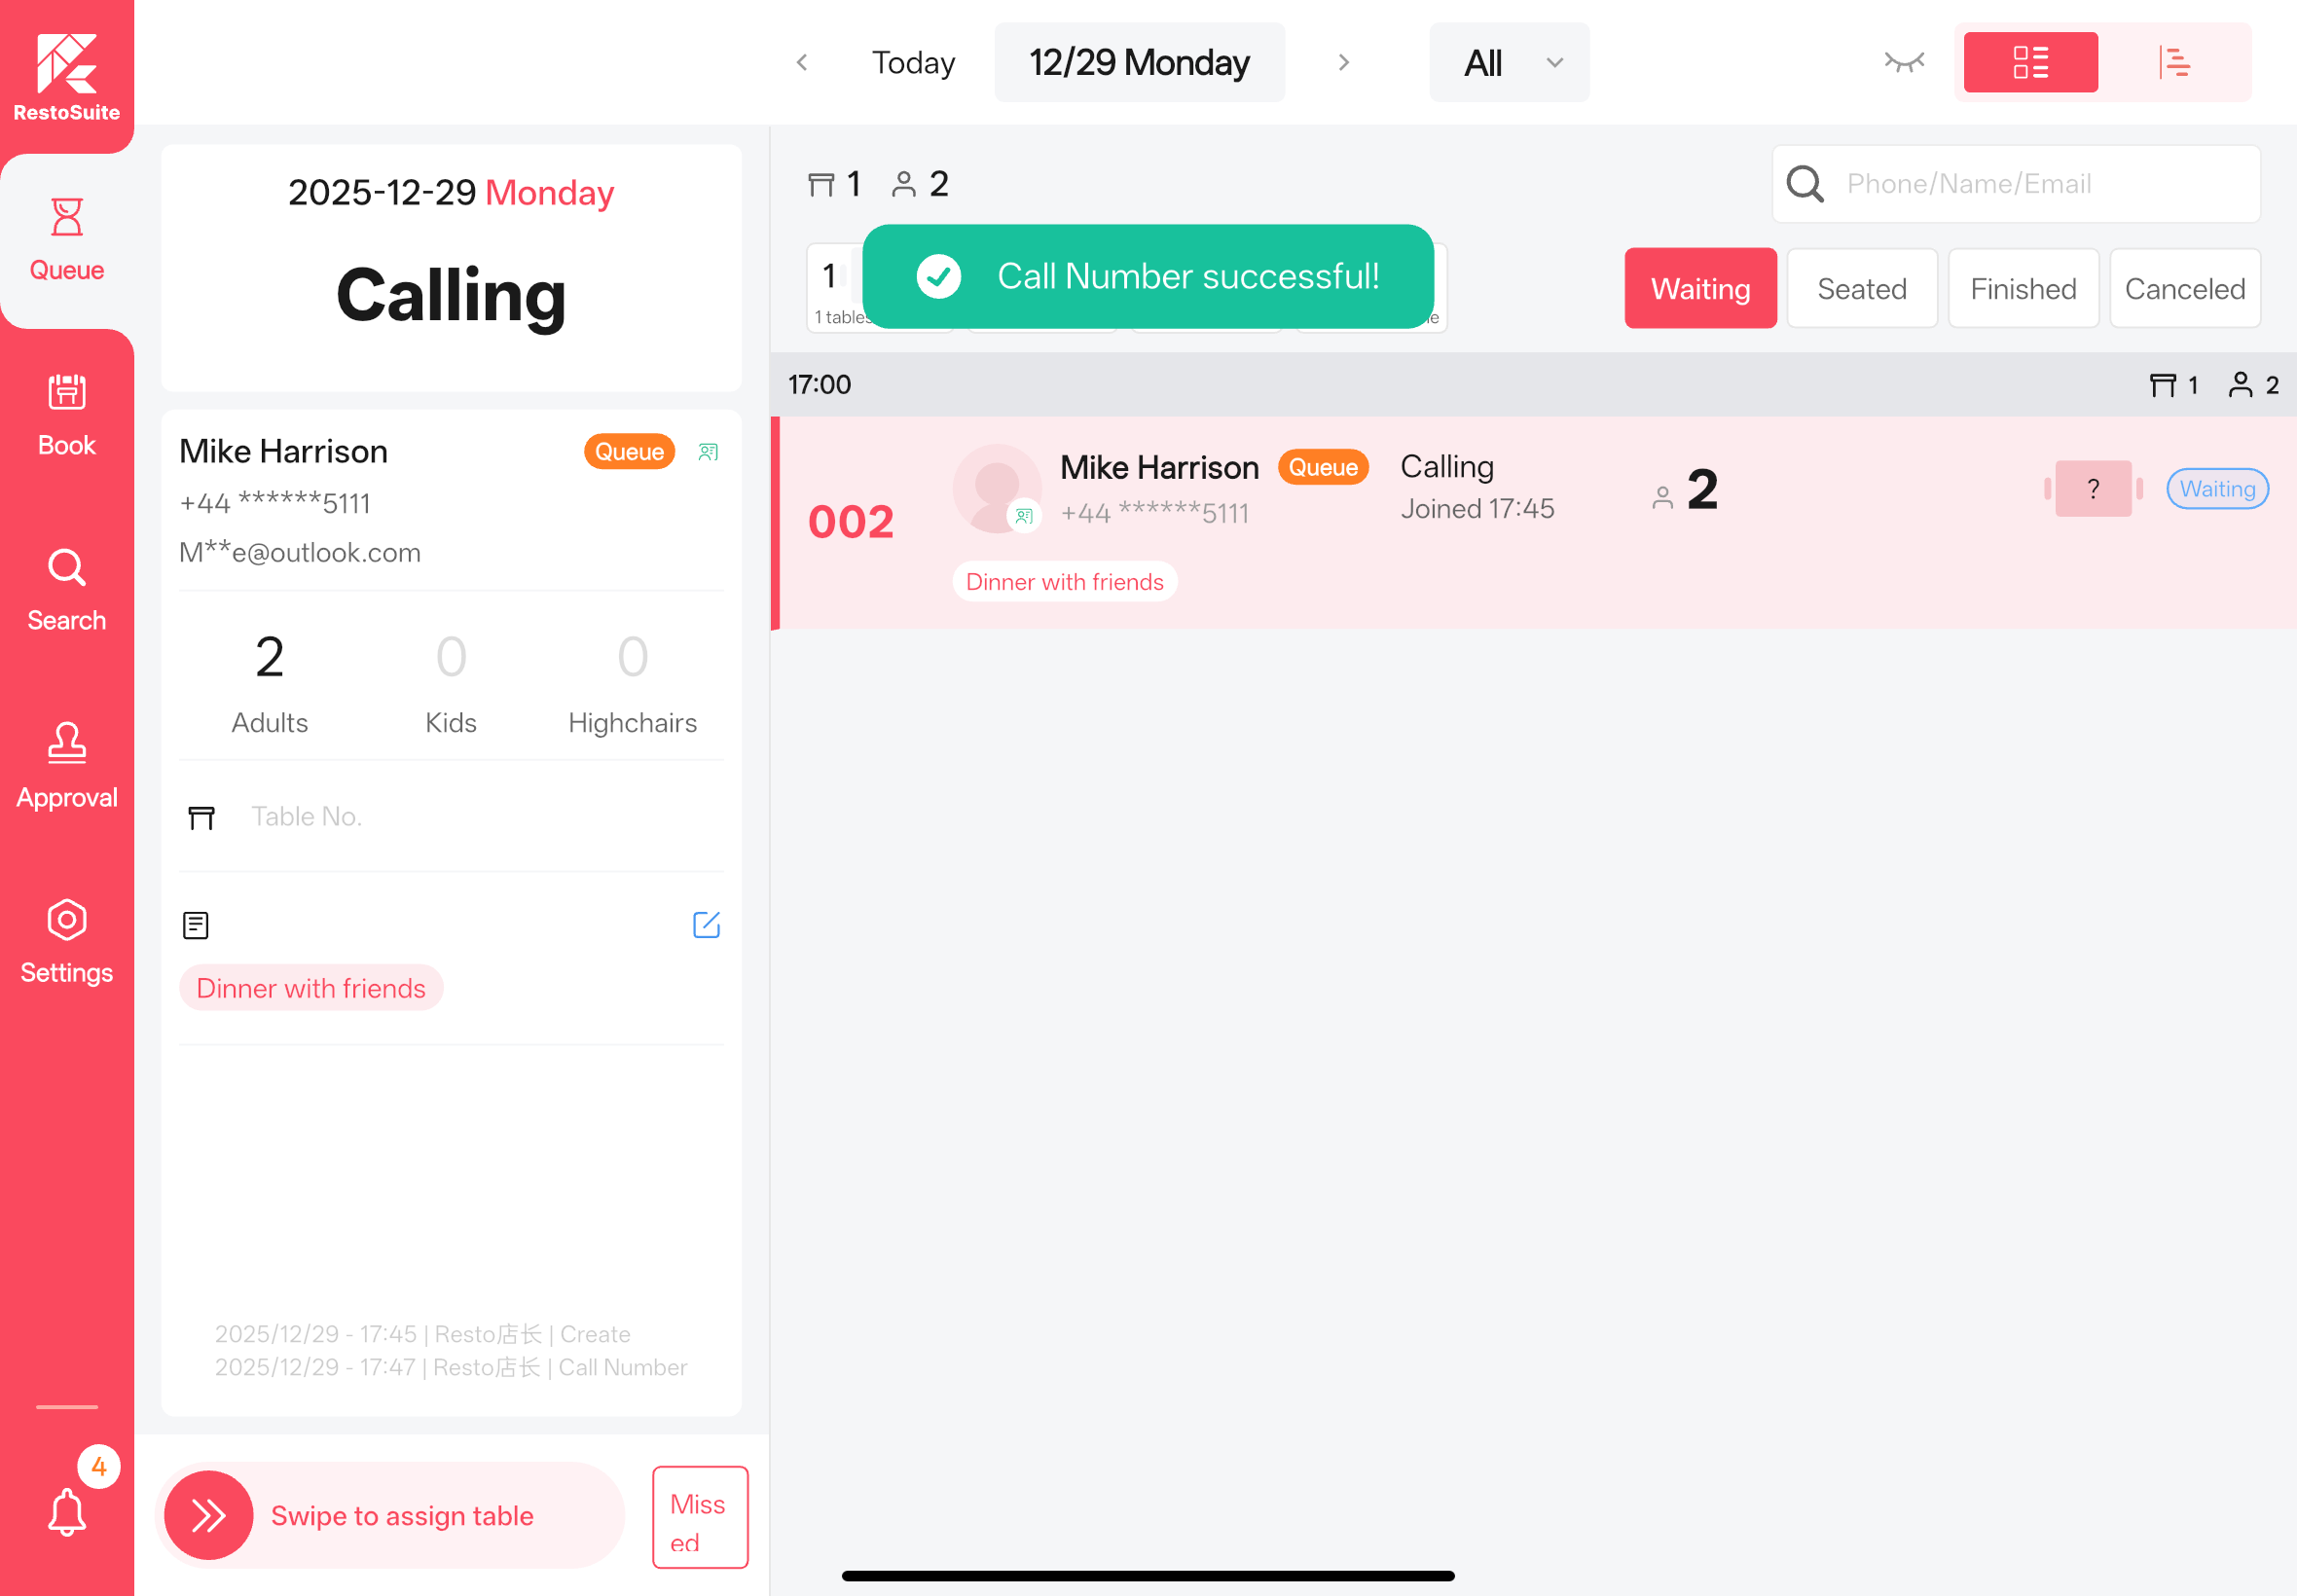
3.4.2.5 How to Make Voice Calls for Queued Customers?
STEP 1: Enable the【Voice Calling】Toggle in the App Settings.
STEP 2: Select the pending queue ticket from the queue list and click【Start】Calling.

STEP 3: Click the speaker icon to trigger voice calls according to the rules configured in the Back Office. For amplified sound, connect the App device to an external speaker.
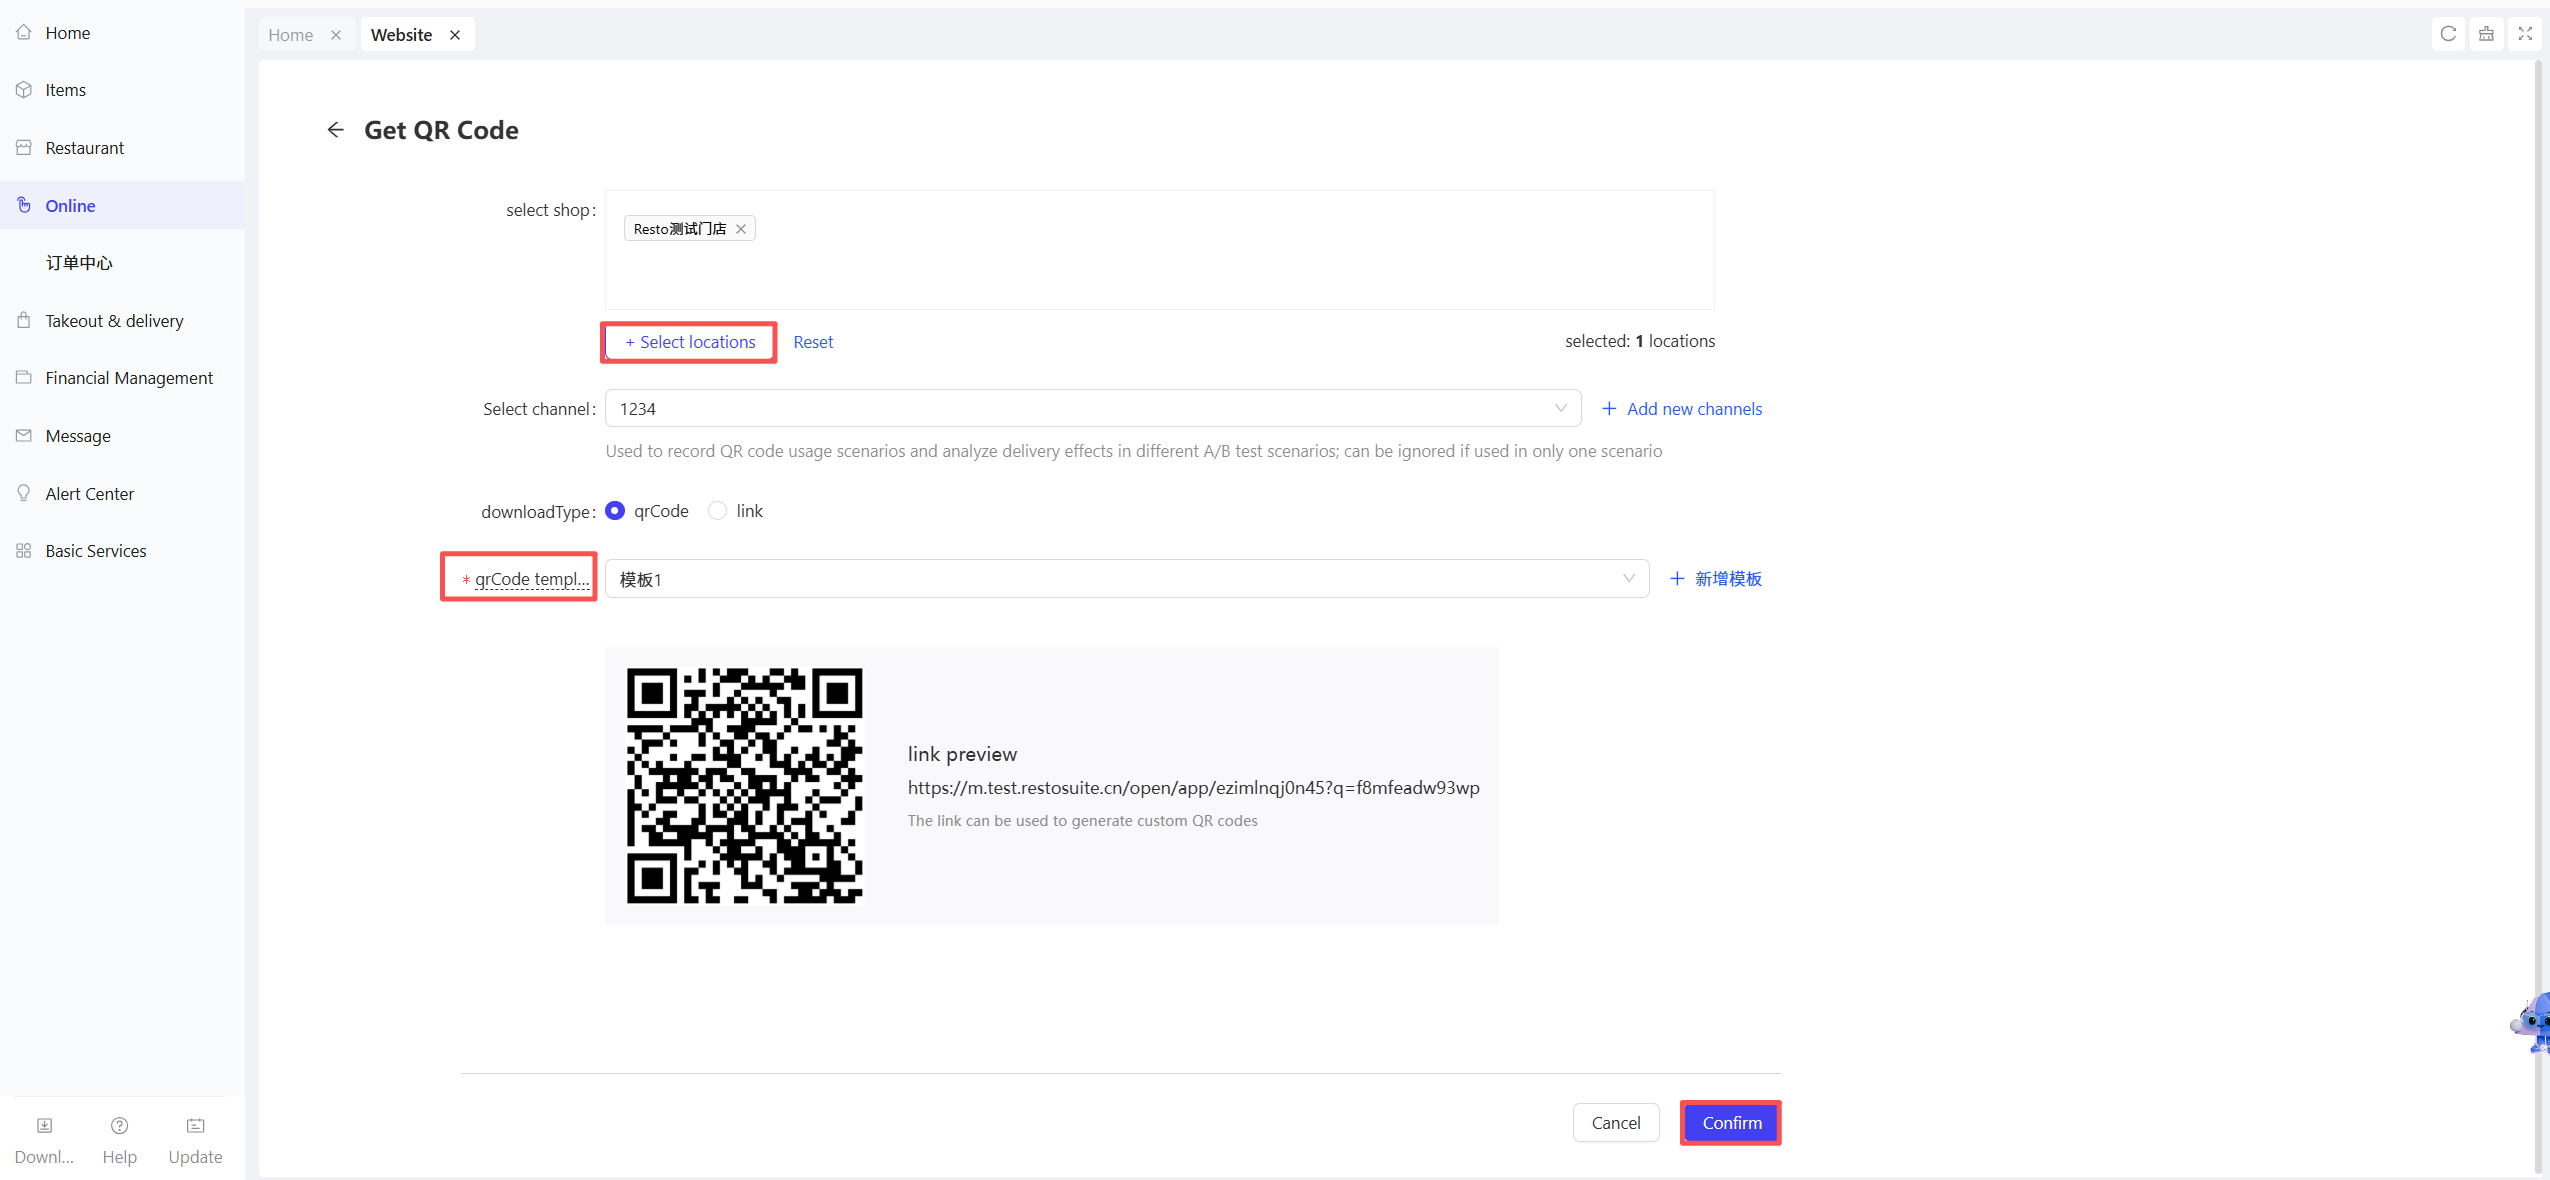
3.4.2.6 How to Download the Queue QR Code for Customers to Join the Queue Independently?
STEP 1: Switch to the Group perspective.
STEP 2: Go to【Online】>【Website Management】.
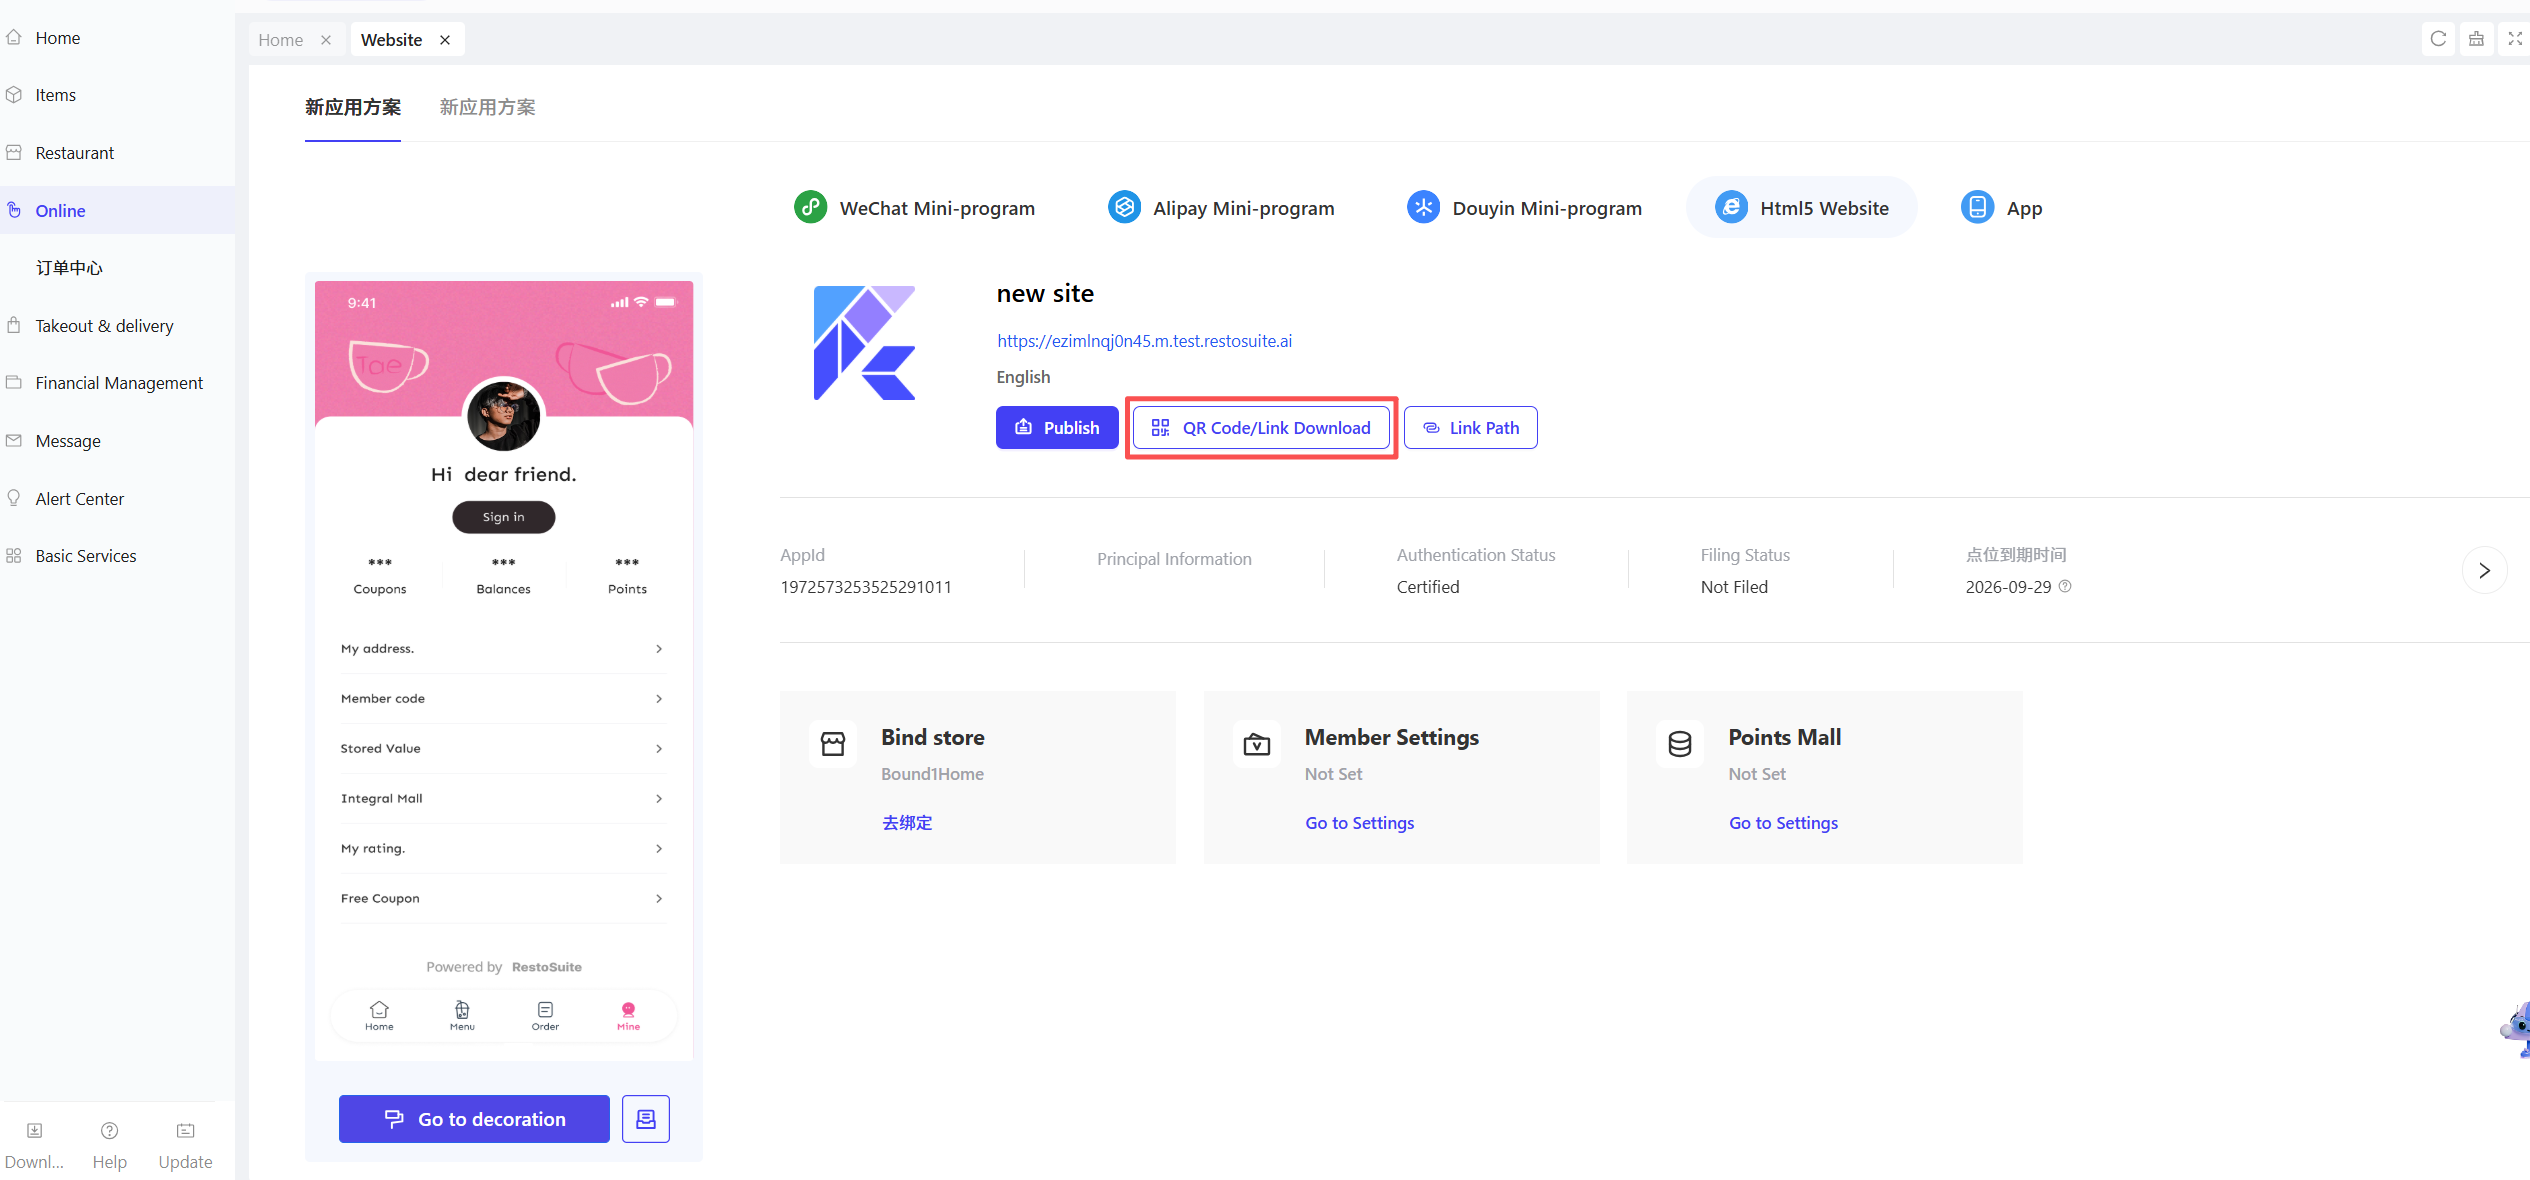
STEP 3: Click QR Code Download.
STEP 4: Locate the Queue QR Code and click the download icon.
STEP 5:
-
Select the target store and a QR code template.
- Preview the QR code by scanning it before downloading.
-
Click【Confirm】to download the QR code.
4 Calling Screen
4.1 Bind the Calling Screen
4.1.1 Calling Screen Side
STEP 1: Download and open the Calling Screen App. A unique QR code for device binding will pop up automatically.
4.1.2 RestoSuite App Side
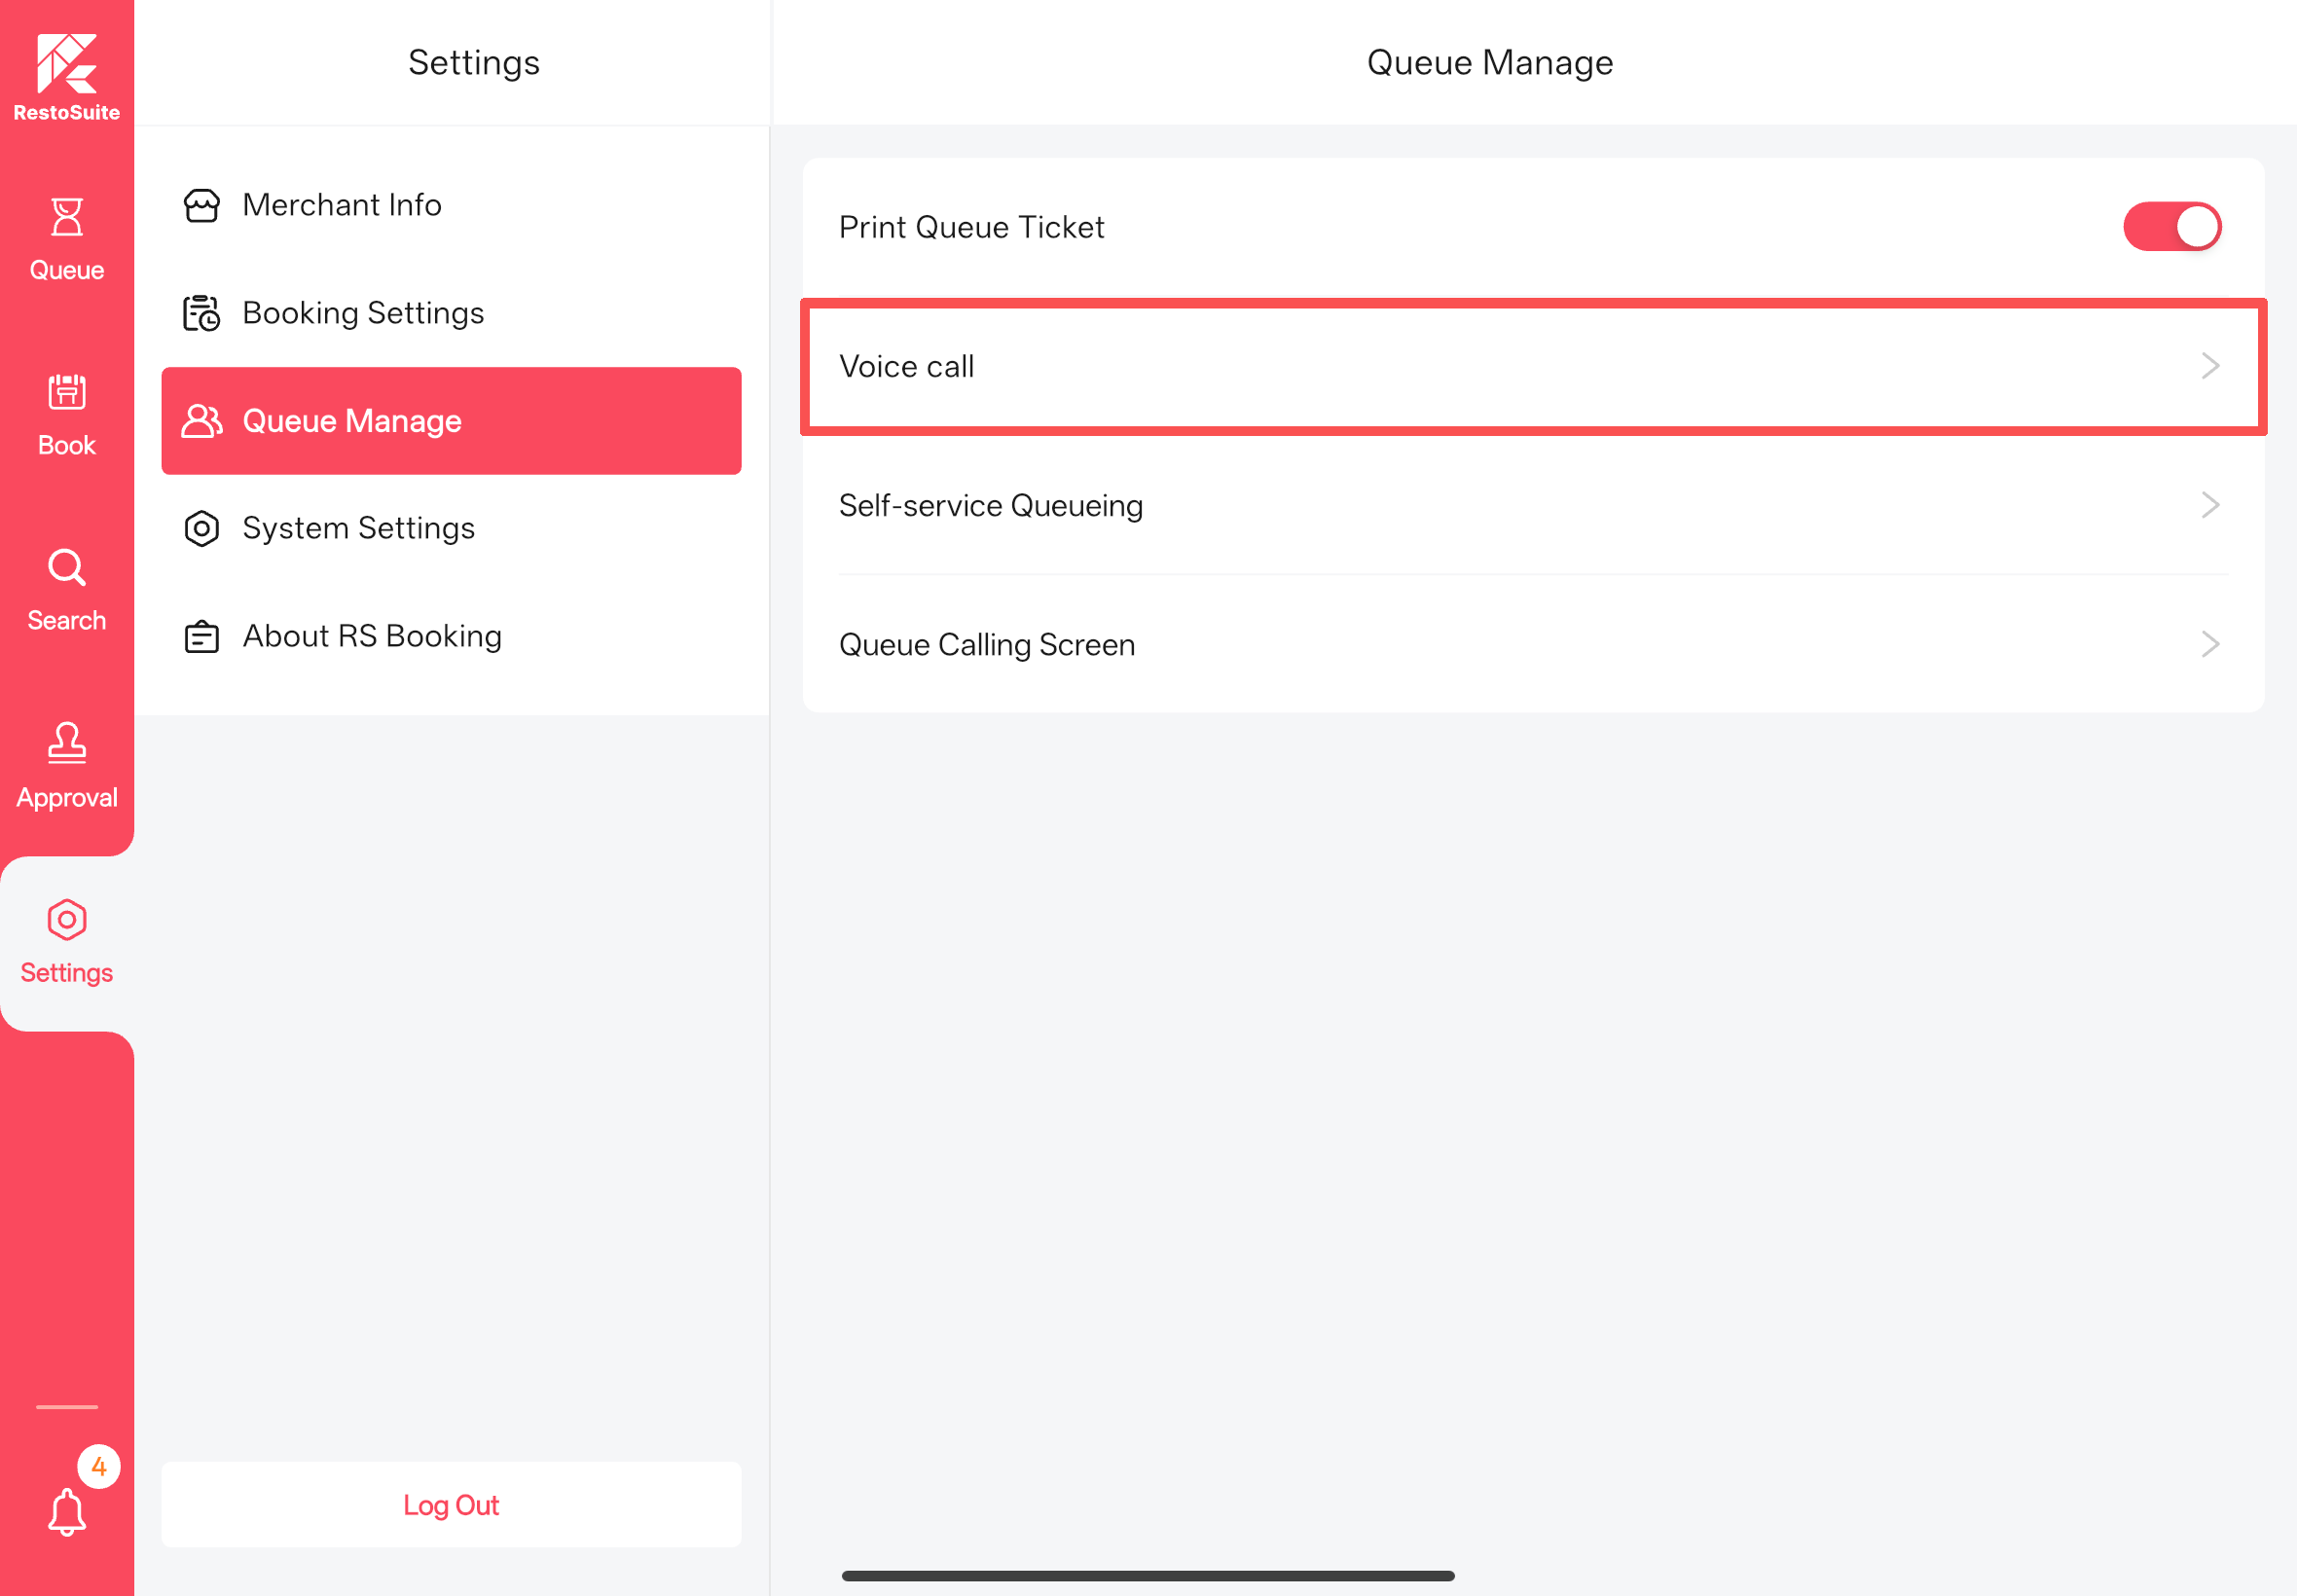
STEP 1: Go to【Settings】>【Queue Management】>【Queue Calling Screen】
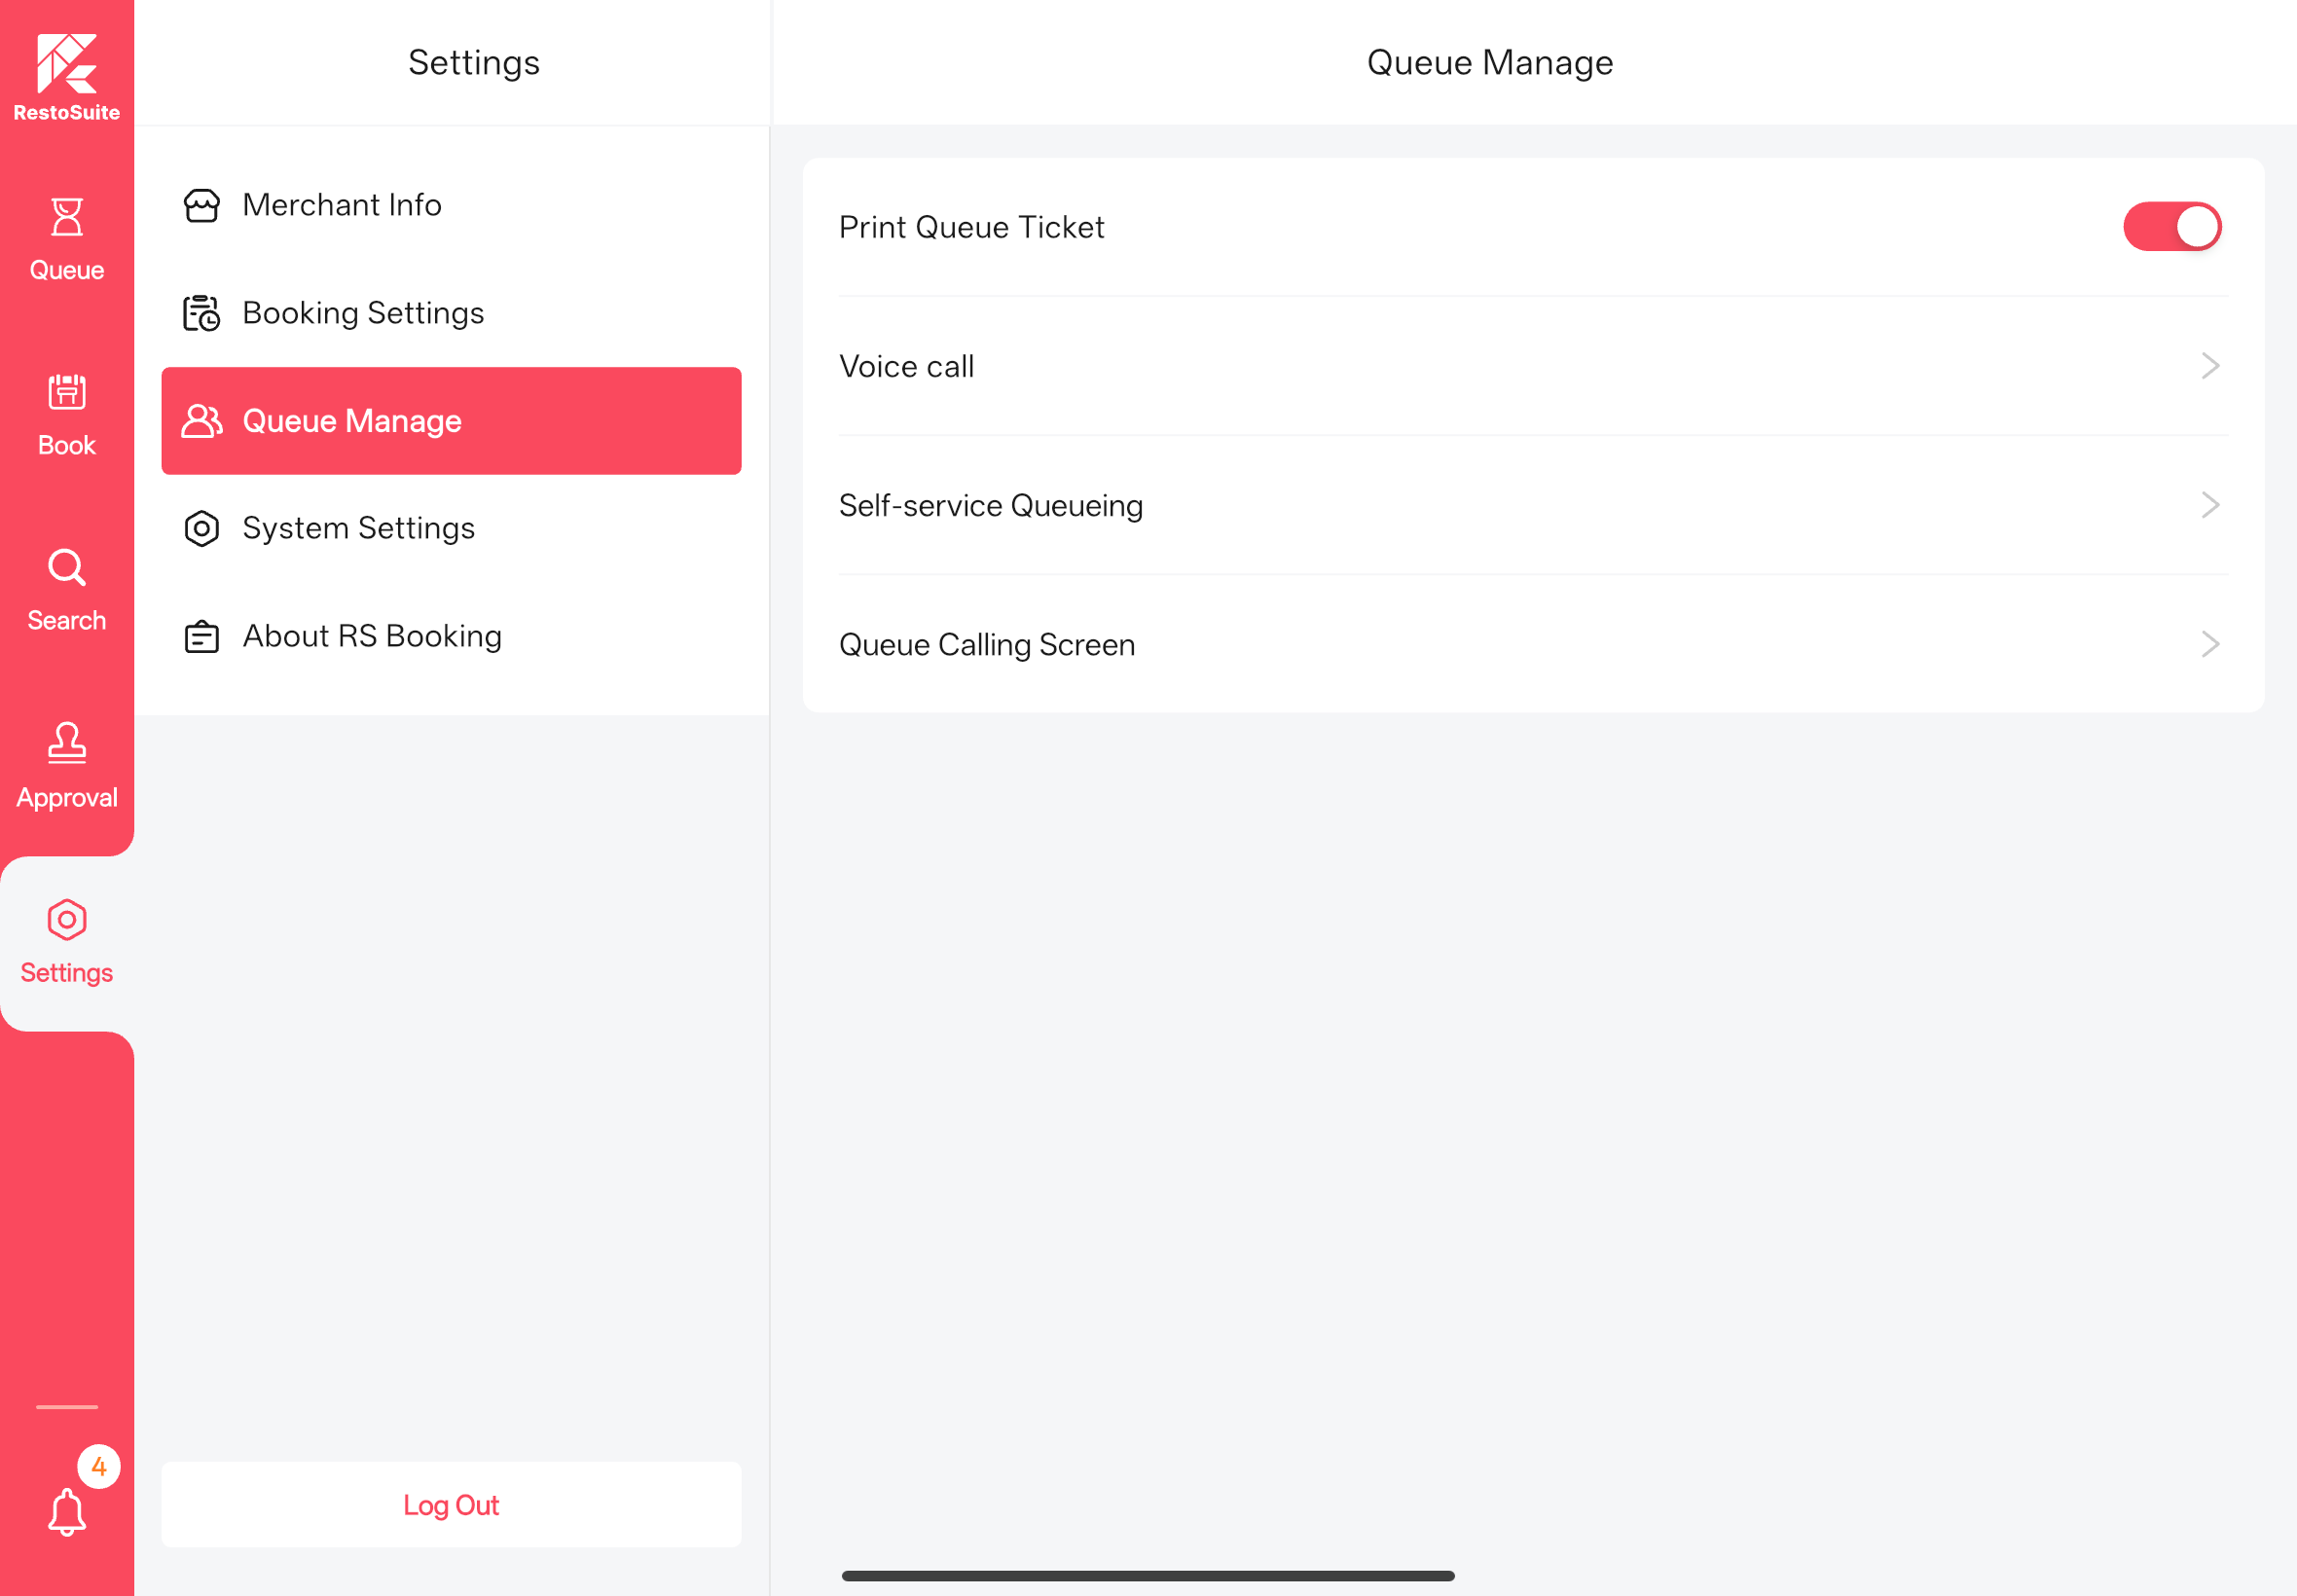
STEP 2: Click Bind Calling Screen Device; the system will automatically activate the camera function.
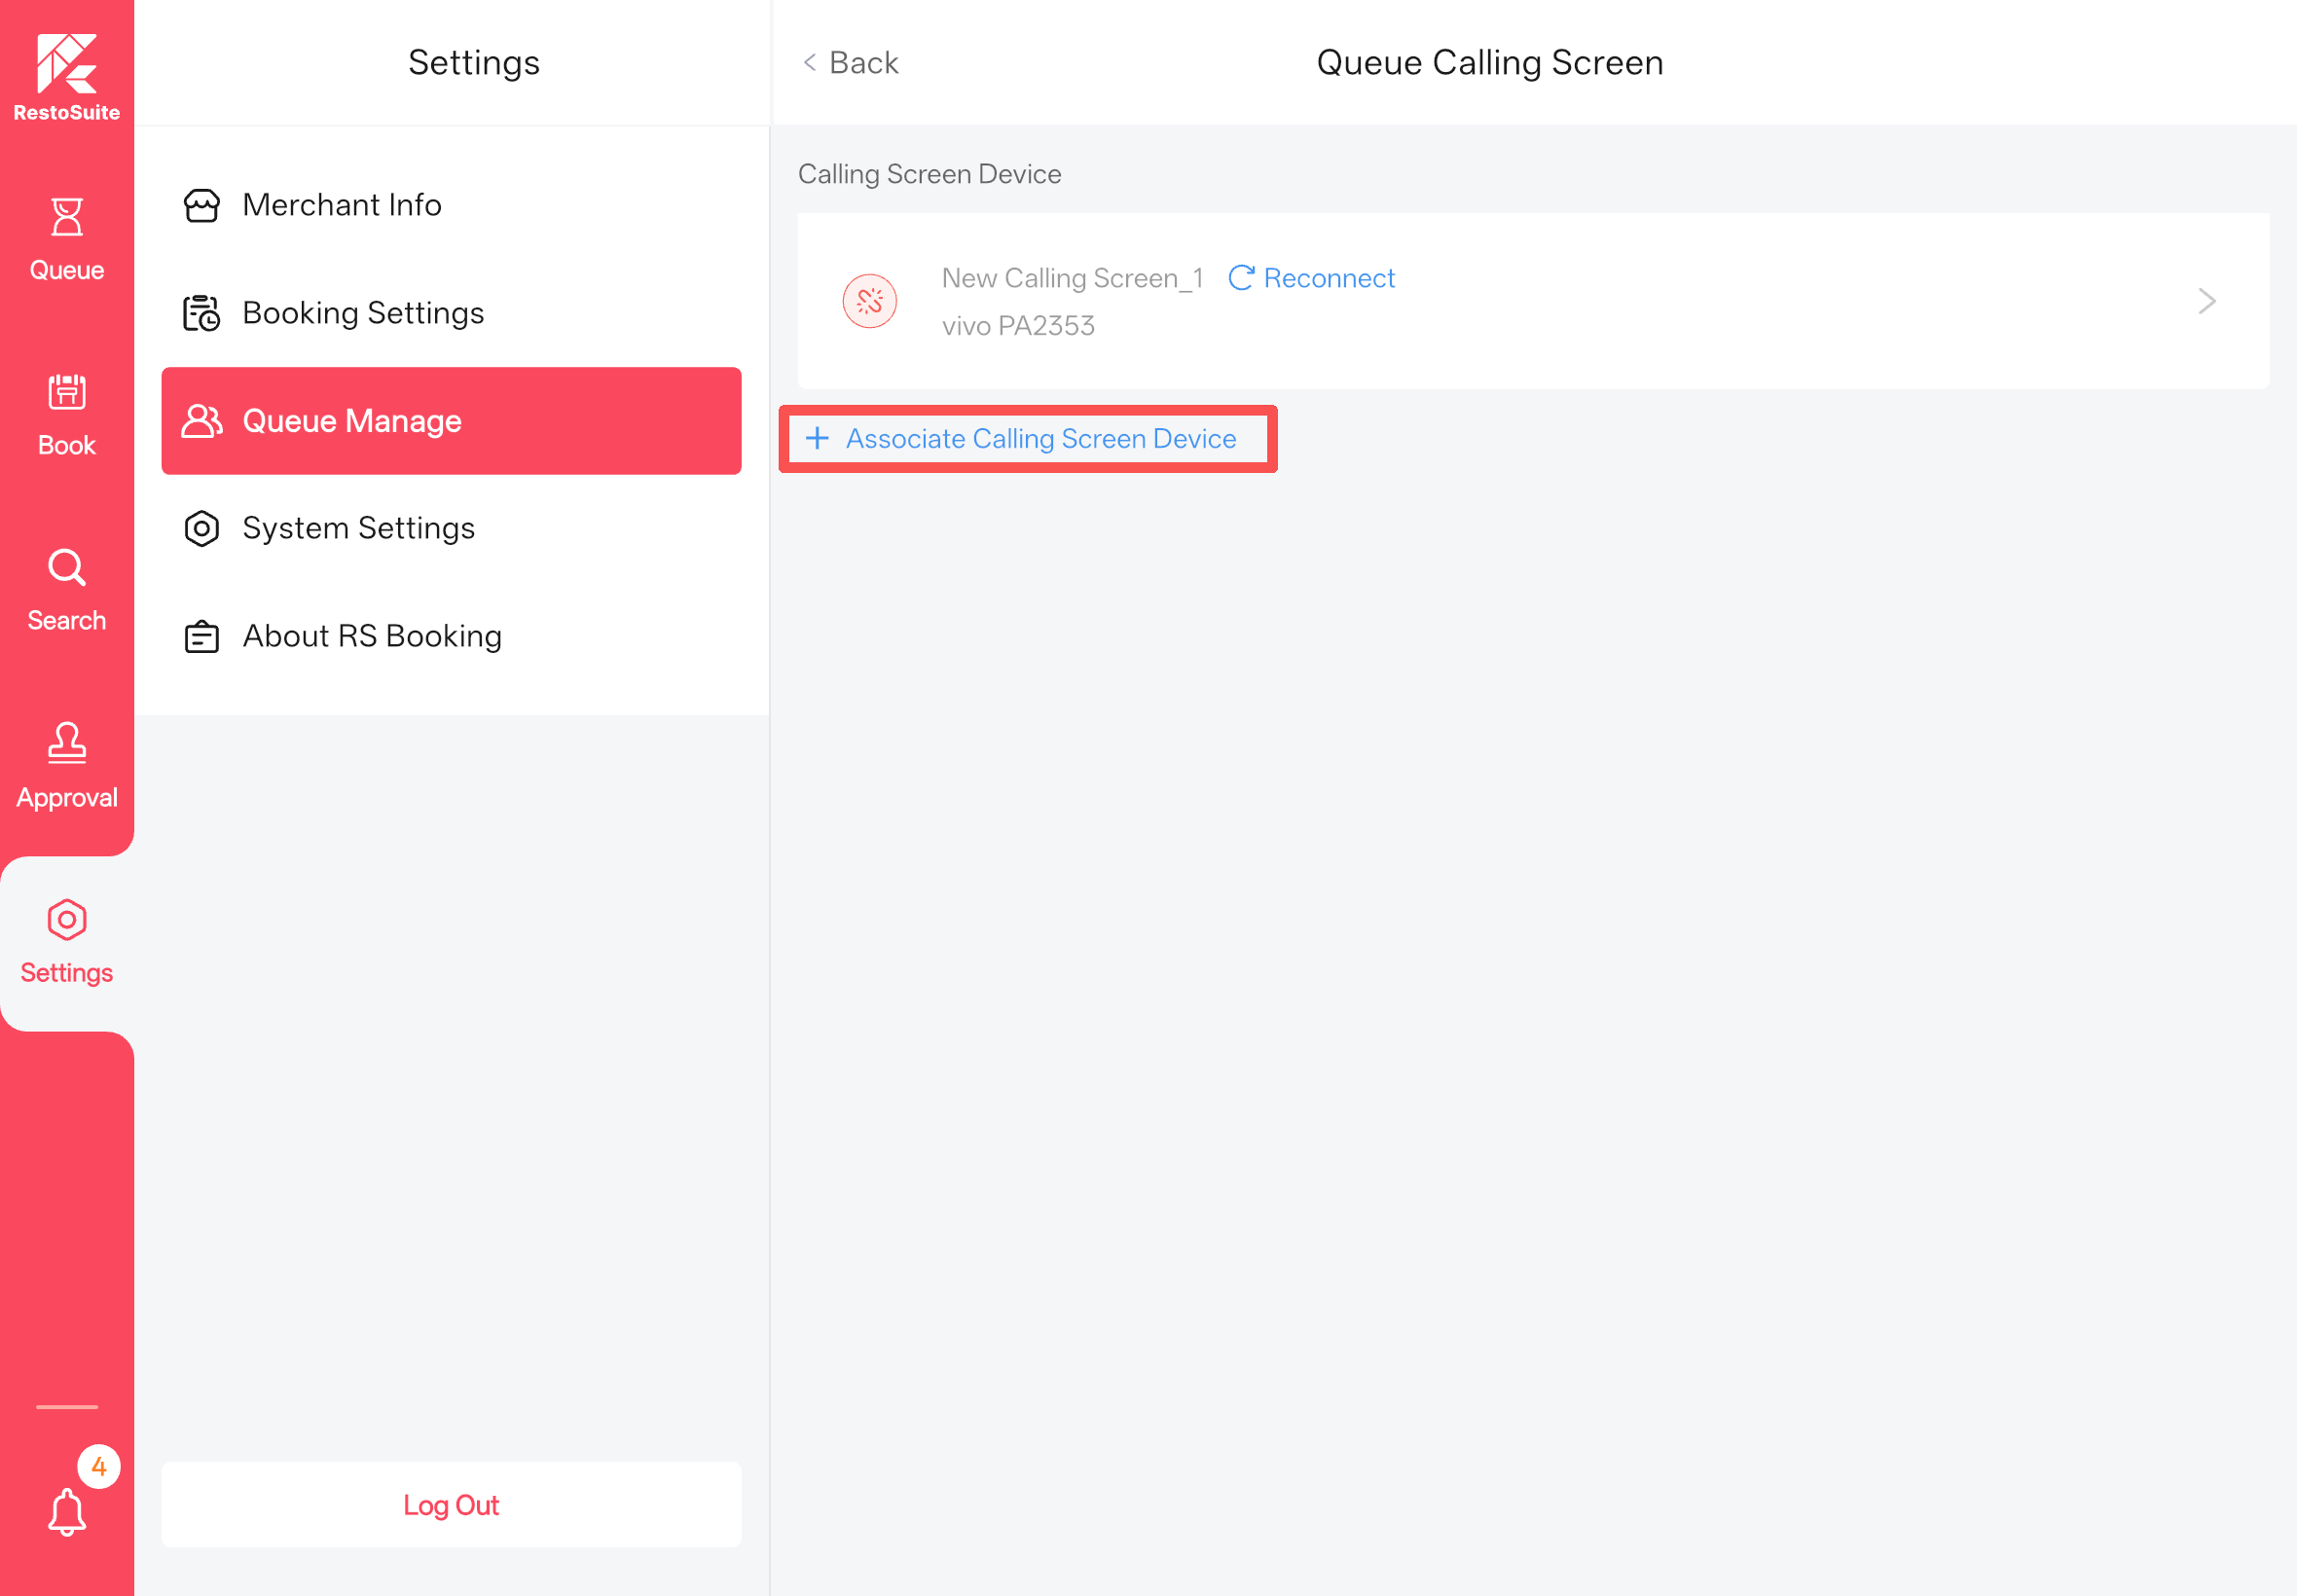
STEP 3: Scan the QR code displayed on the calling screen to complete the binding.
Notes
Prerequisite: Ensure the calling screen device and the RestoSuite App are on the same IP network segment.
Troubleshooting: If the devices are on different IP network segments, adjust the IP address of either device or the App first. Then log out of the RestoSuite App, log back in, and retry the QR code scanning and binding process.
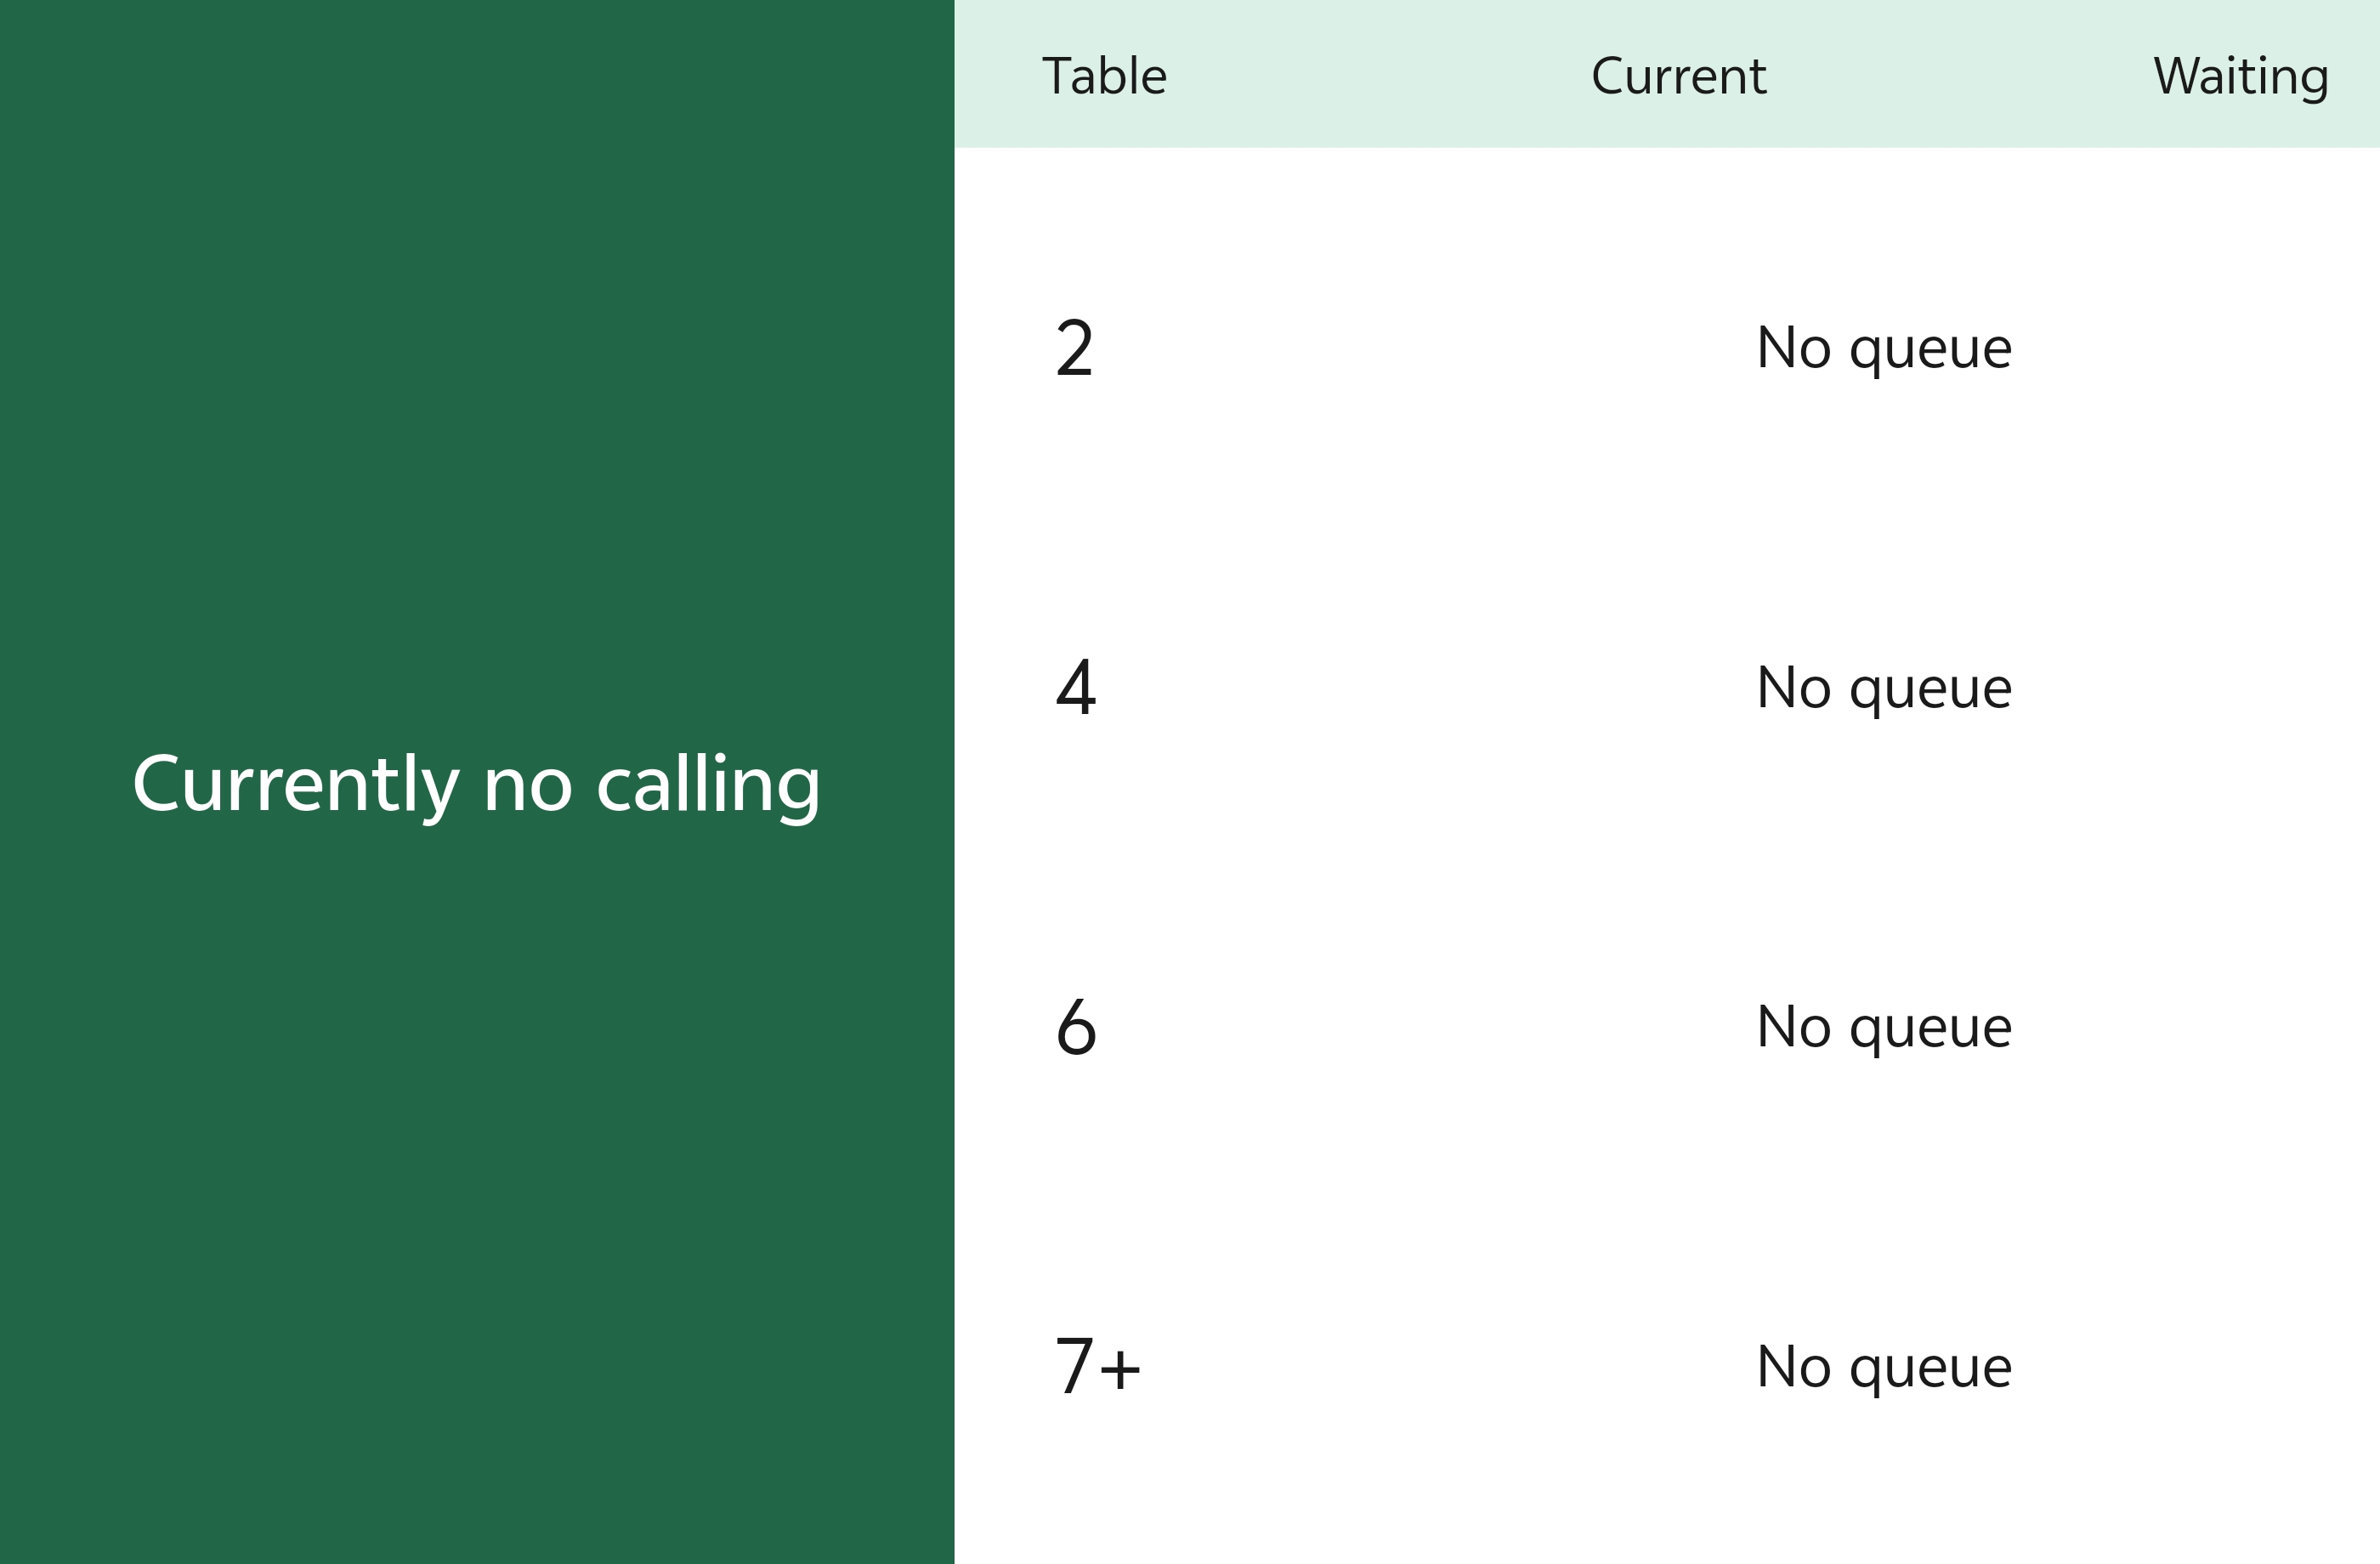
4.2 Calling Screen Settings
STEP 1: After binding the calling screen, click to access the Device Information details page.
STEP 2: Customize the following settings:
Configuration Item | Configuration Description |
|---|---|
Device Name | Modify the device name for easy identification and management of multiple devices (e.g., Entrance Calling Screen 1, Pickup Area Calling Screen 2). |
Screen Display Scheme | 3 differentiated appearance styles are available; select the one that matches the restaurant's brand style. |
Screen Display Mode | Landscape/Portrait modes are supported; screen rotation is available in Landscape mode. |
Media Display Toggle | When enabled, upload promotional videos or materials; the content will play in a loop on the calling screen automatically. |
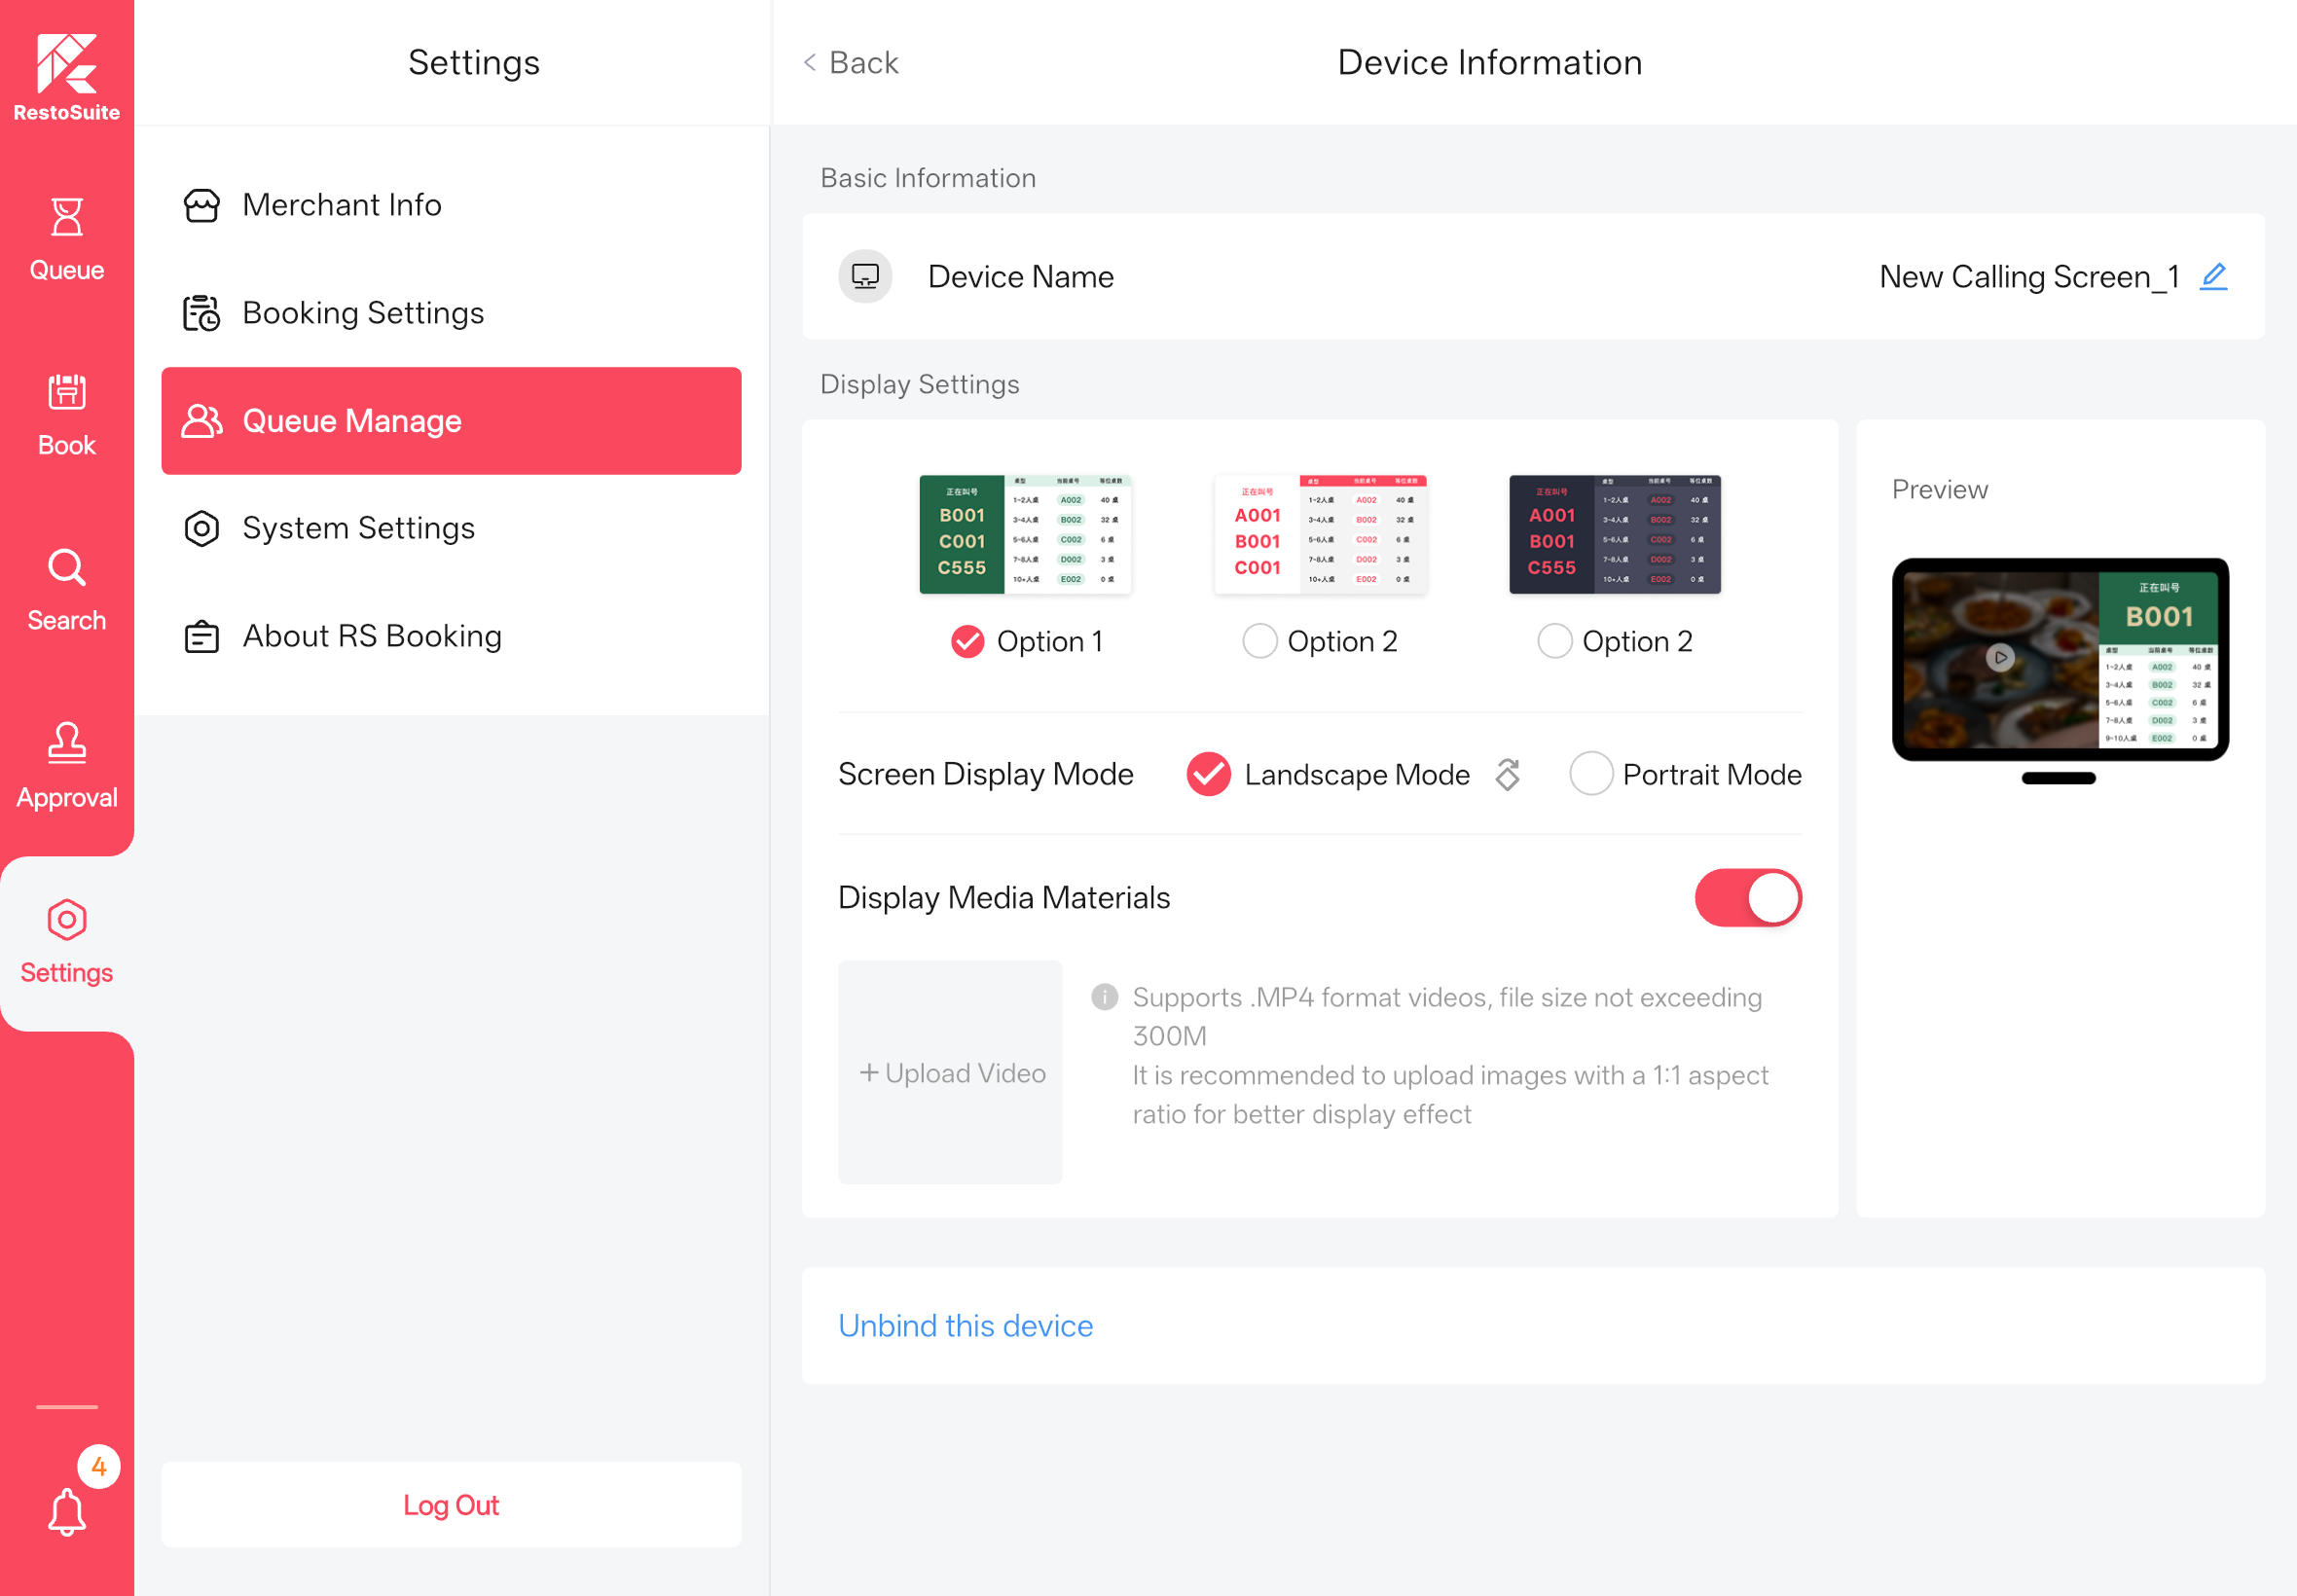
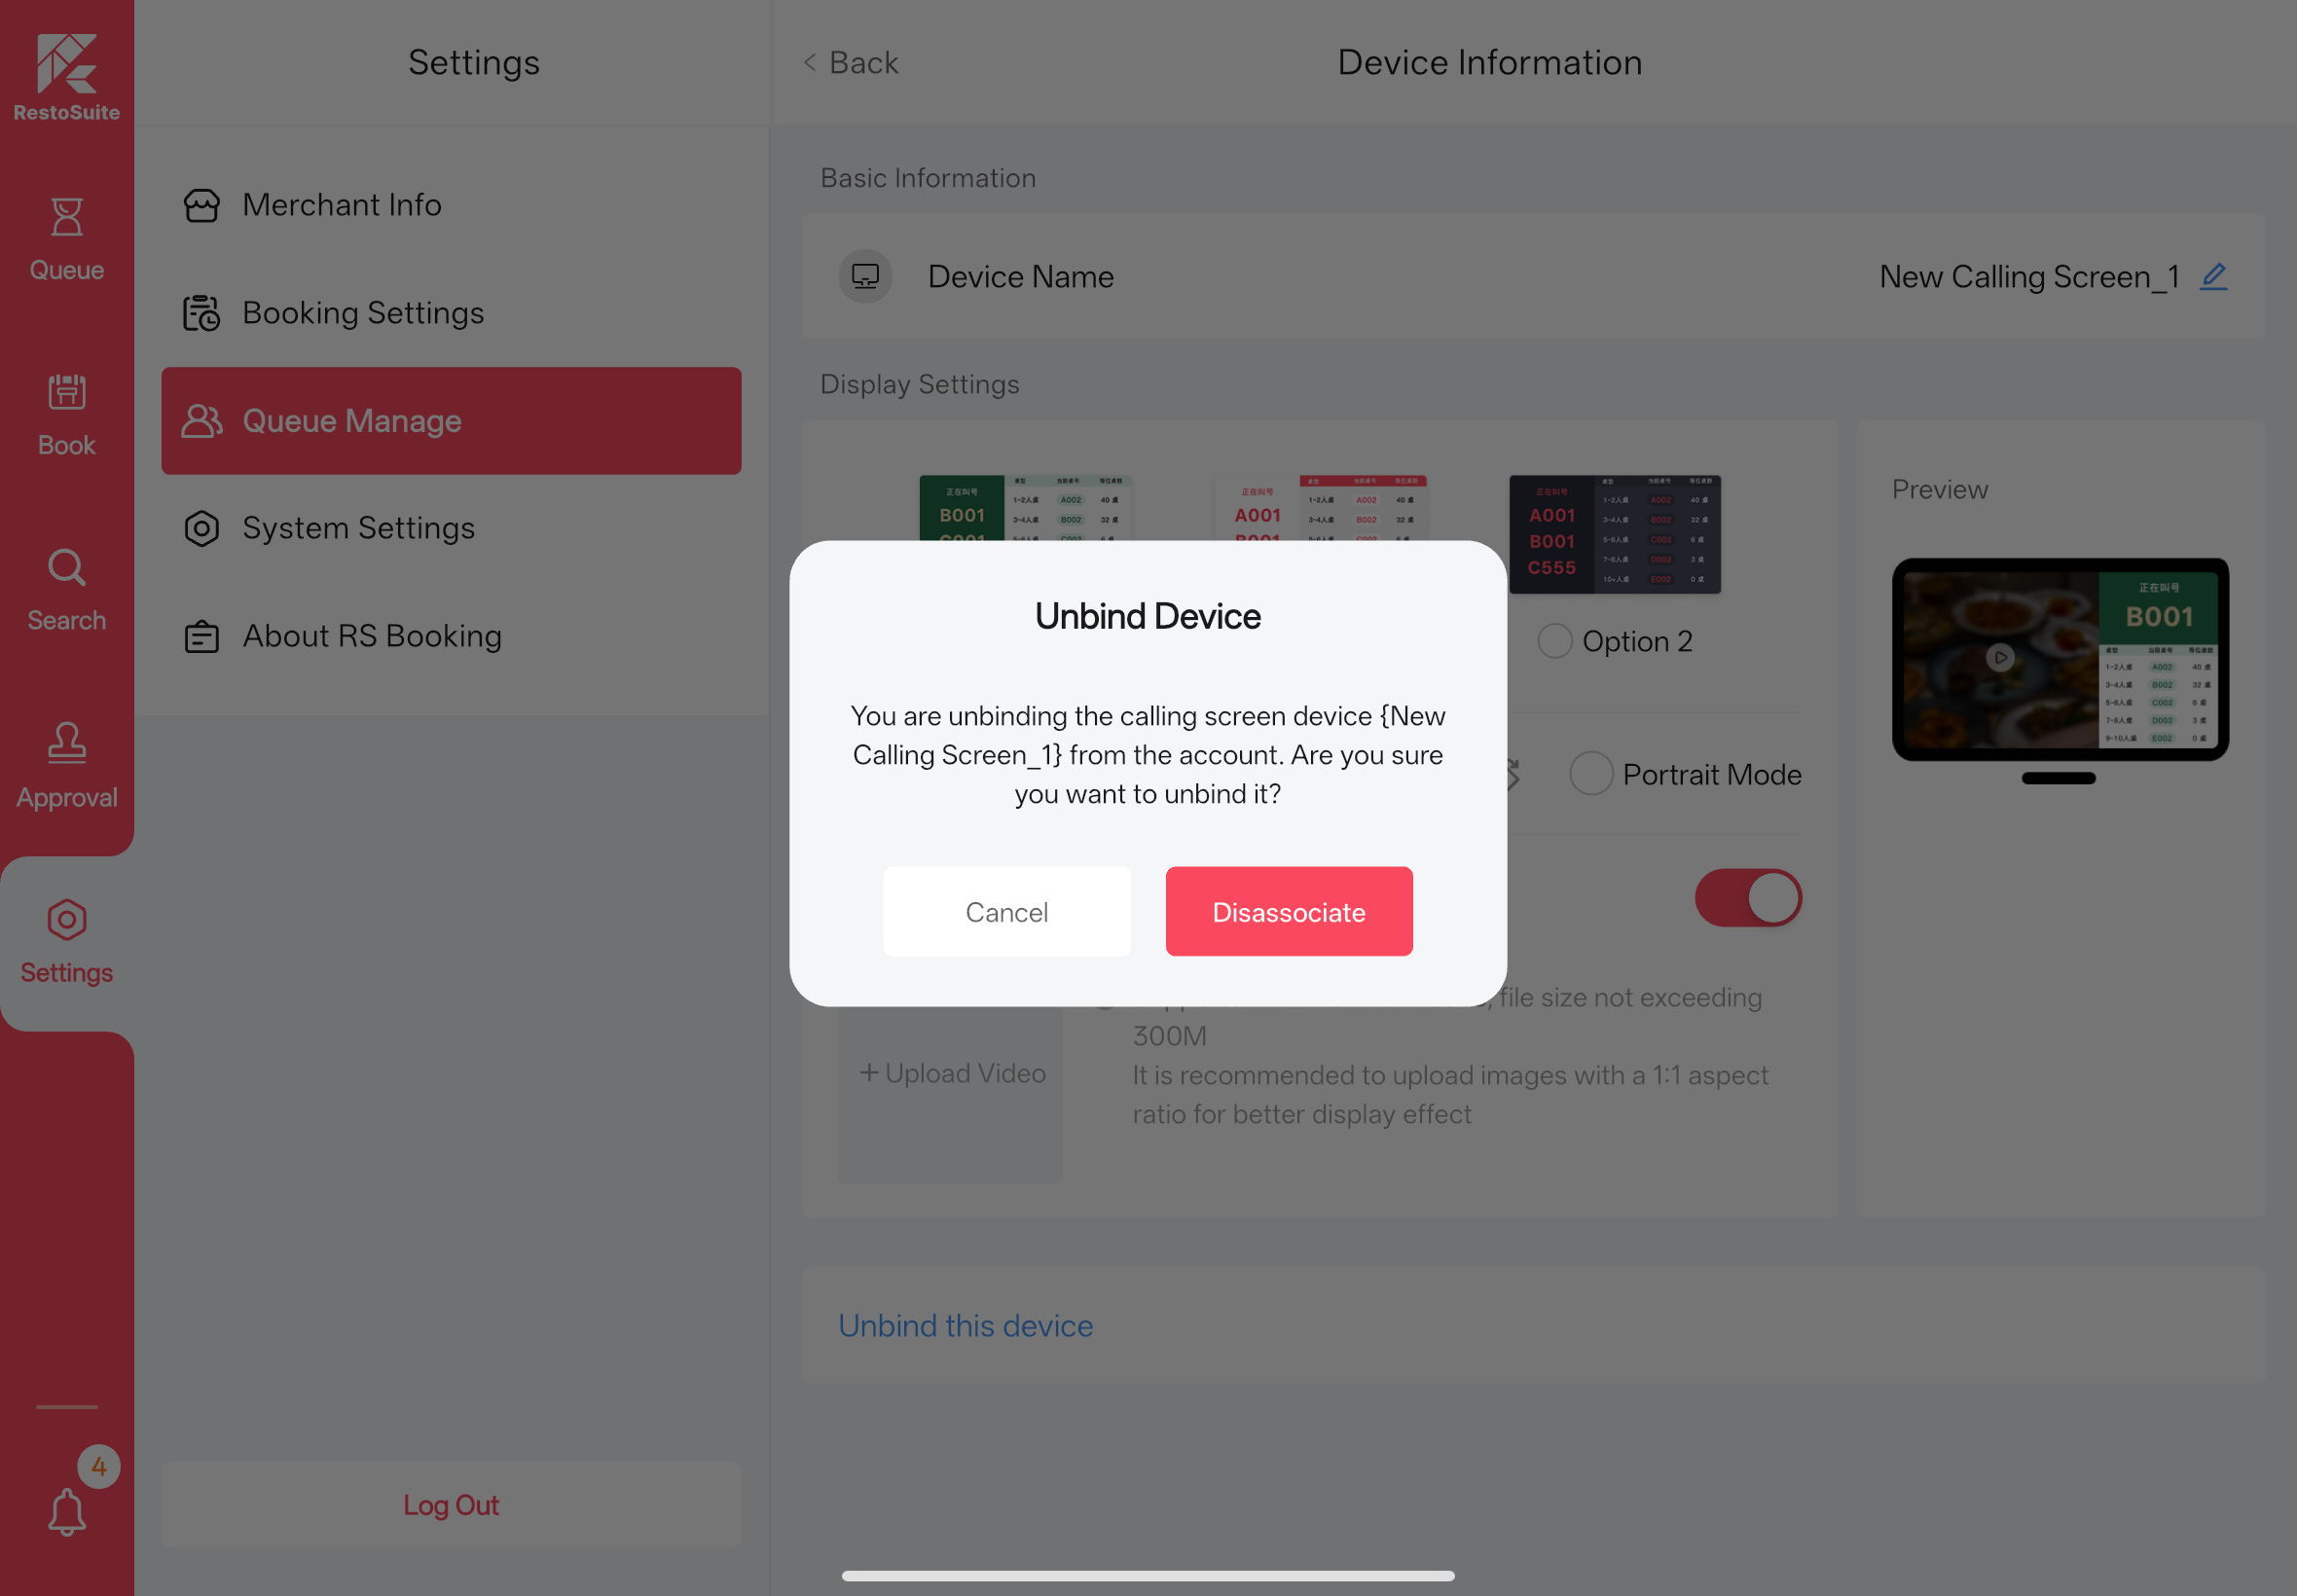
4.3 Unbind the Calling Screen
STEP 1: On the Calling Screen Devices page, click Unbind This Device.
STEP 2: Click Confirm Unbinding on the pop-up window to complete the unbinding process.
5 FAQs
Q1: Can I set reservation limits for different table types?
A: Yes. For each table type, you can set the number of available tables per time slot independently. Inventory is deducted only when a table is assigned to a reservation. Reservations without assigned tables will not affect the inventory.
Q2: Will the table be automatically released if a customer cancels a reservation?
A: Yes. The system will automatically release the table resource and update the inventory. For reservations with auto table assignment enabled, cancelling the reservation will release the table and make it available for new online reservations.
Q3: How to handle malicious queue ticket requests?
A: A queue verification mechanism will be supported in future updates, including mobile phone verification and blacklist identification features. Stay tuned.
Q4: Why does the Reservation Management module show no table resources available even though my store has empty tables?
A: The table inventory data was published before the new reservation service was activated. To resolve this, republish the table resources and log out of the Back Office, then log back in.
Q5: Why is the time displayed in the App different from the time on my tablet device?
A: The Reservation App always uses the local time of the store location. This ensures that regardless of where you access the App from, the time zone and time displayed are consistent with the store’s actual location, making reservation and queue management more convenient.
Note:
We recommend enabling the Auto Time Sync function on all devices to prevent inaccurate device time from affecting the time displayed in the App.
Q6: Why does the H5 page show the latest reservation time as 21:00 even though I set the reservation deadline to 22:00 in the Back Office?
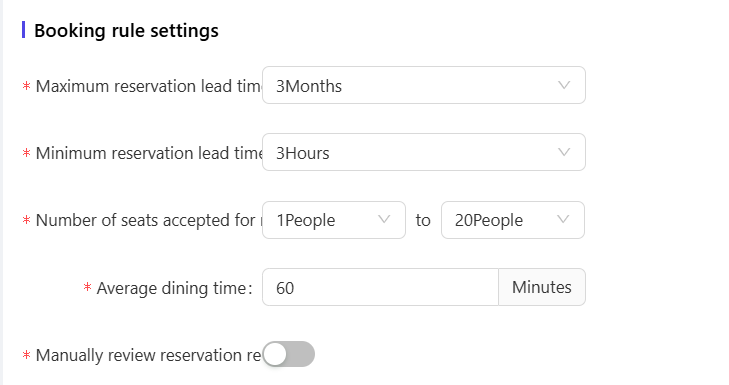
A: If the reservation end time configured in the Back Office is 22:00, the latest reservation time displayed on the H5 page is calculated as 22:00 minus the average dining duration (e.g., 60 minutes in the example), resulting in the latest reservation time of 21:00.

Q8: Why is there no sound when calling queued customers? 🔊
A: The device running the App requires a TTS (Text-to-Speech) engine installed. Most devices come with a built-in TTS engine; alternatively, you can install a third-party TTS engine and switch to it in the settings.
Q9: Why am I not receiving SMS or email notifications for reservations and queues?
A: SMS and email notifications need to be configured in the Message Center from the Group perspective.
Q10: Google Integration: How can my overseas store enable the Reserve with Google button?
Prerequisites (Mandatory)
Before launching Reserve with Google for your restaurant, ensure the following requirements are met:
-
Merchant Information Requirements
- Your store must have a complete and verified profile on Google Maps/Google Business Profile, including store name, address, phone number, and business hours.
- The store address must be a valid, locatable physical address and verified by Google.
-
Restaurant System Requirements
- Your store must be integrated with RestoSuite and have the reservation service enabled to manage reservation orders normally.
-
Inventory and Table Settings
- Table types and maximum capacity (party_size) must be clearly configured, including common sizes such as 2-seat and 4-seat tables.
- Reservation time slots and inventory must be configured clearly and reasonably.
-
Service and Policy Requirements
- Merchants must commit to complying with Google’s Content and Service Policies (e.g., updating inventory in a timely manner and prohibiting false information).
- If your restaurant uses asynchronous reservation confirmation, you must confirm or reject orders within the time limit specified by Google; otherwise, the Reserve with Google function may be suspended.
Activation Steps
-
Verify Store Information Consistency
- Ensure the store information (name, address, phone number) in the RestoSuite system matches the information in your Google Business Profile exactly.
-
Apply for Whitelisting and Enable the Google Reservation Toggle
- To apply, provide the following information:
- Group ID and Store ID
- Screenshot of the Reservation Management page in the RestoSuite Back Office
- Screenshot of store information in the RestoSuite system
- URL of your store’s Google Maps page
- To apply, provide the following information:
-
Official Launch
- Google’s review process takes 8–36 hours (duration may vary by case).
- Once approved, customers searching for your restaurant on Google Maps will see the Reserve Now button.
- Orders placed via Google will be synced to the RestoSuite App in real time; merchants can manage these orders using the RestoSuite App as usual.