Item Attributes Management
1 Introduction
Welcome to the Item Attributes Management Module Guide. This article covers how to configure item sizes, units, modifiers, side dish groups, labels, and mutual exclusion rules, along with multi-level (group, brand, store) management and scheme distribution workflows. It balances centralized standardization and store-level flexibility.
Please start with the Glossary below to gain an in-depth understanding of the core concepts of the module.
2 Glossary
Size: A classification dimension used to differentiate variations of the same item by portion, form, or other attributes (e.g., large/medium/small, ambient temperature/refrigerated). Each size variant can be assigned its own price.
Unit: The standard measurement used to specify the quantity, weight, or volume of items. Units are categorized into weight units (e.g., kilogram, gram) and quantity units (e.g., piece, serving).
Modifier: A configurable option that defines an item’s flavor profile or preparation method, organized in a group-item structure. For example, a Spiciness Group may include options like Mild, Medium, and Extra Spicy, with the ability to set a price premium for certain choices.
Side Dish Group: A curated set of side dishes associated with a main item, featuring configurable selection rules (either optional or mandatory) and quantity limits. For instance, a Steak Side Dish Group might include options like French fries and vegetable salad.
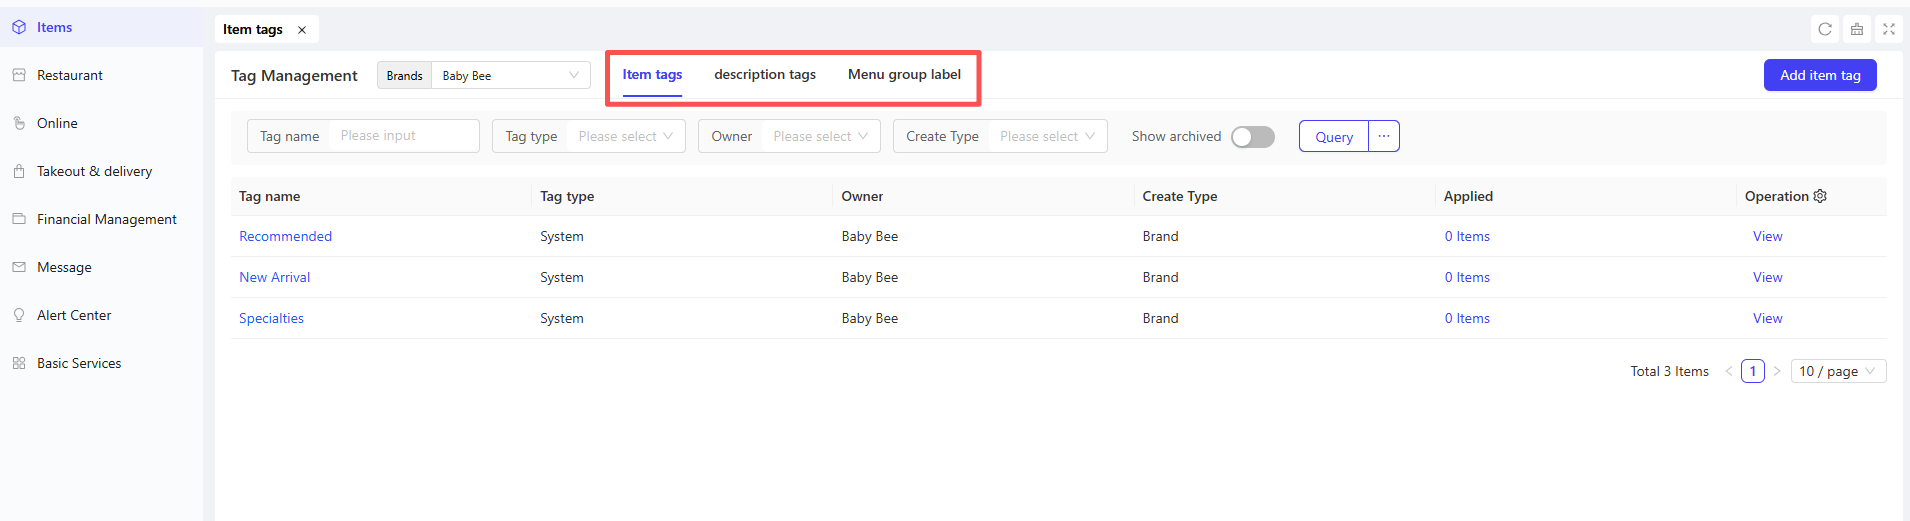
Item Label: An identifier used to tag key characteristics of items or menu groups. It is divided into three categories—item badges, descriptive labels, and menu group labels—to help customers quickly identify item selling points and enable stores to efficiently organize and manage menu catalogs.
Attribute Mutual Exclusion: A rule that prevents customers from selecting logically conflicting item attributes or options during order placement. For example, iced and hot temperature options for beverages are mutually exclusive; the system will prevent customers from selecting both simultaneously. This rule ensures a logical and streamlined ordering process by eliminating invalid attribute combinations and reducing order errors caused by conflicting selections.
3 Size Management
3.1 Adding Item Sizes
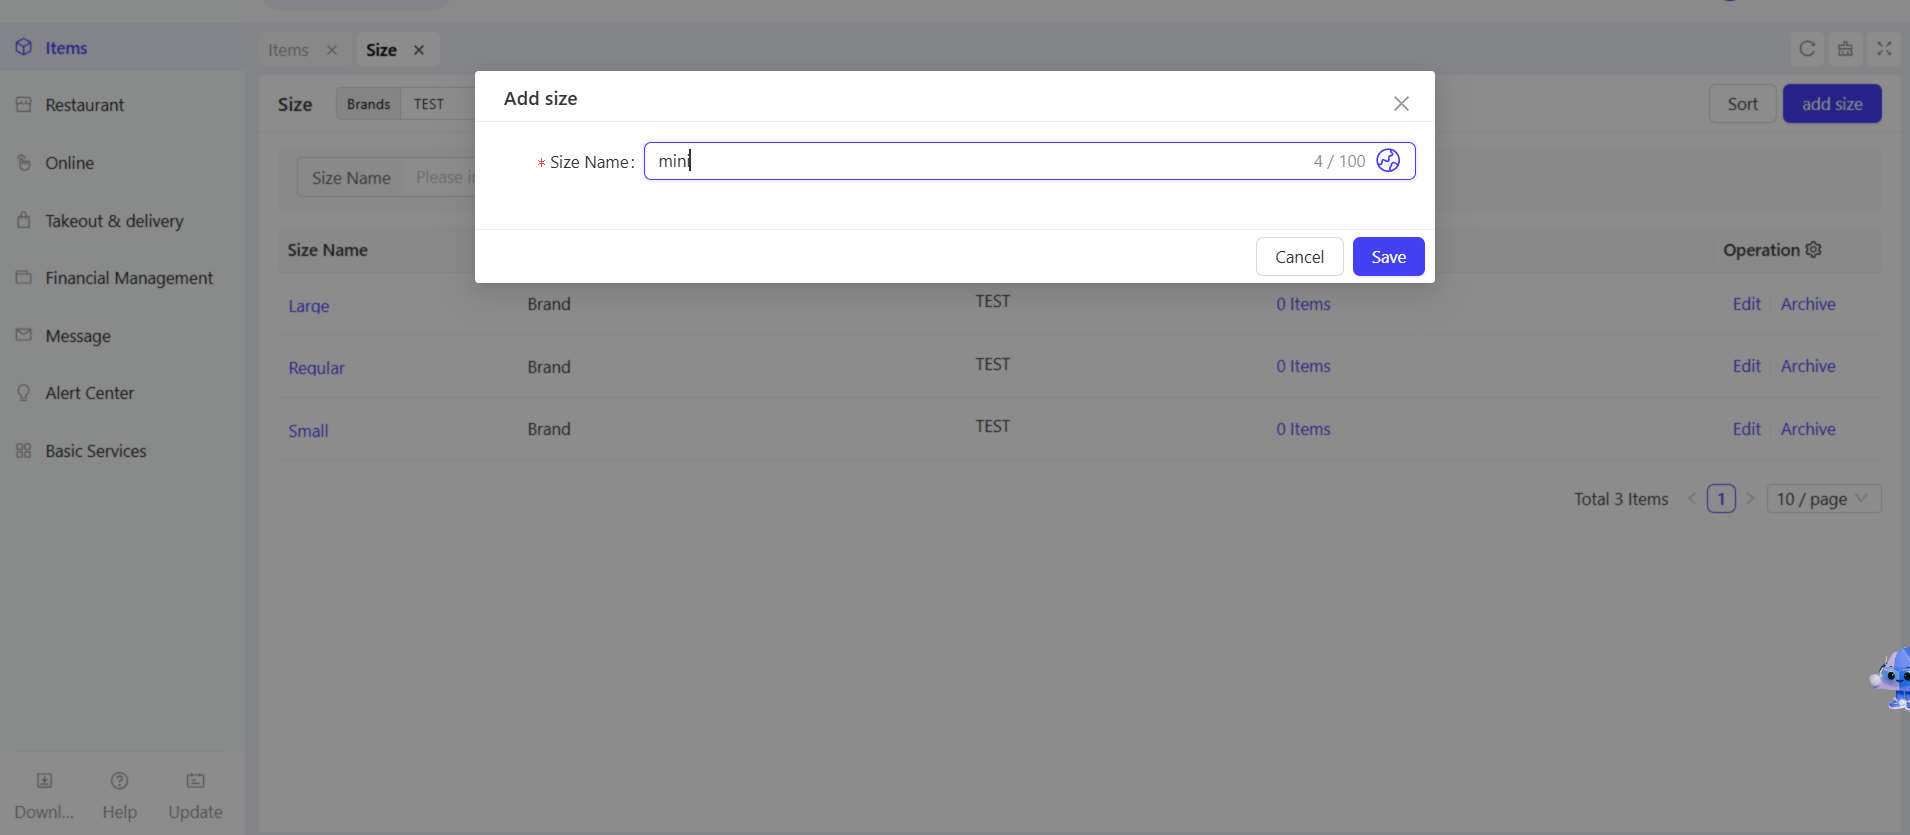
STEP 1: From the corresponding perspective, log in to the Operation Center and click【Item Management】>【Attributes】>【Size】.
STEP 2: Click the【Add Size】button in the upper right corner of the page, and fill in the Size Name in the pop-up window, e.g., large/medium/small size.
STEP 3: Click【Save】to complete the size addition.
Notes:
The added item sizes are used to achieve a refined configuration of individual items, and different sizes of the same item can be independently set with corresponding prices.
Take French fries as an example: the large size is priced at $5, while the medium size is $3.
You can also add sizes directly when creating an item on the Item Management page.
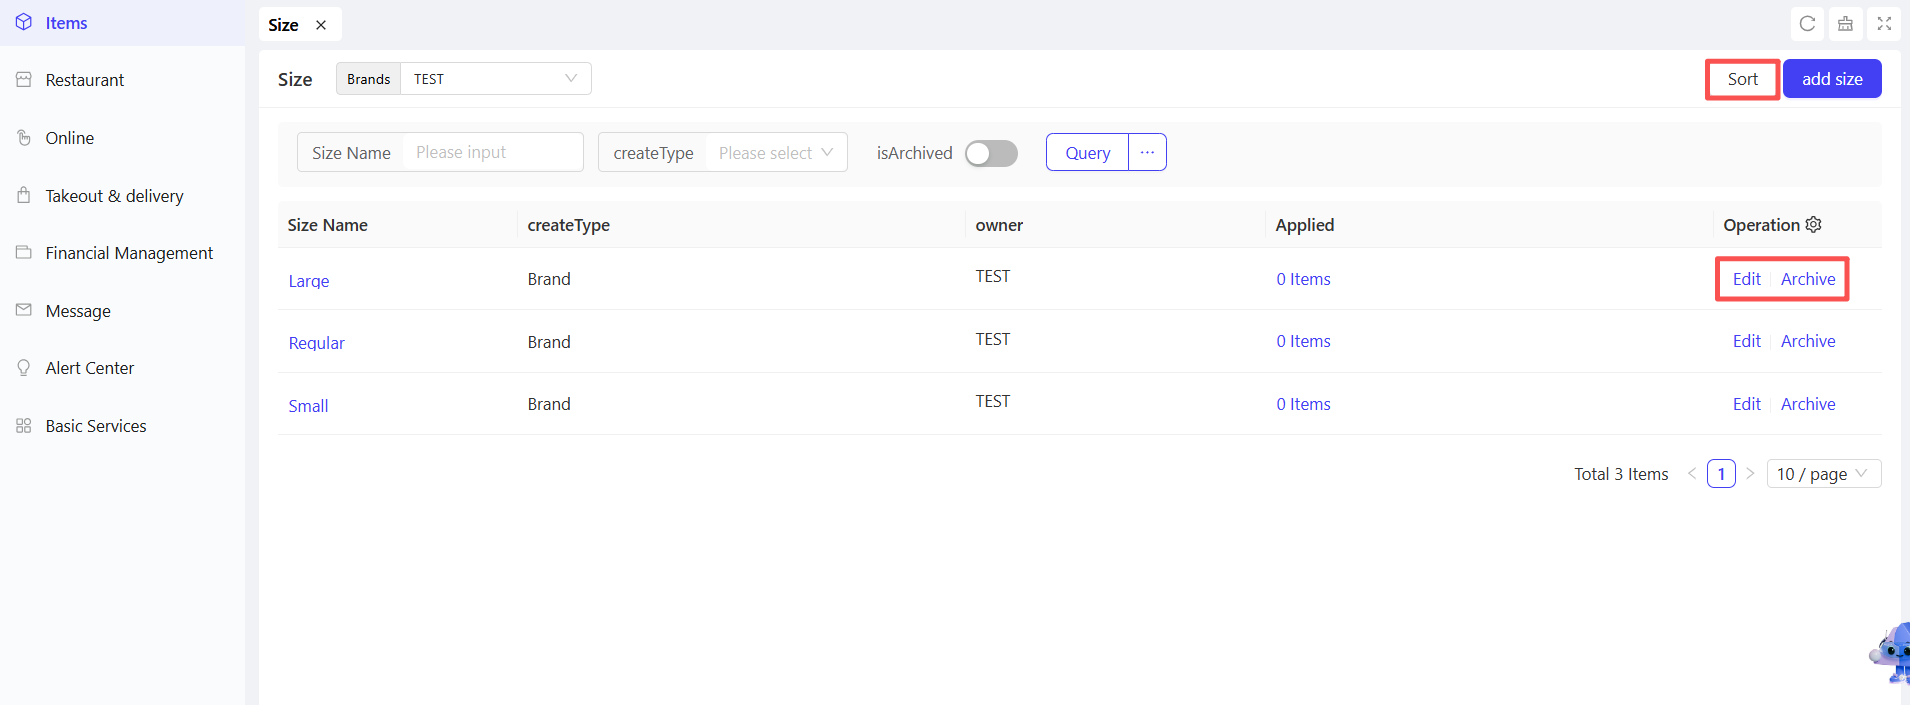
3.2 Size Operations
- Edit: Click to modify the size name and its corresponding multilingual content.
- Archive: Click to remove the size from the current size list while retaining historical records.
- Sort: Click to sort the sizes in the list by dragging and dropping or numbering.
4 Modifier Management
4.1 Adding Modifier Groups
STEP 1: From the group perspective, click【Item Management】>【Attribute Management】>【Modifiers】.
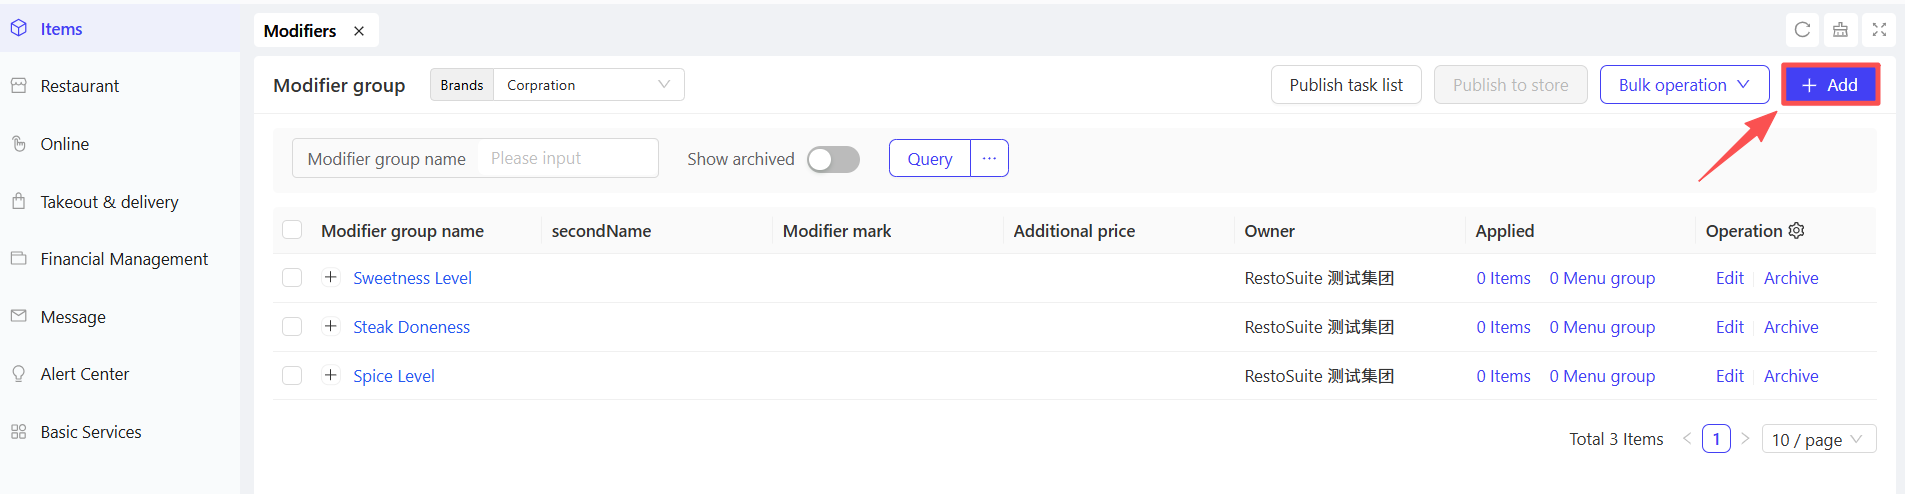
STEP 2: Click the【Add】button in the upper right corner of the page and fill in the following configurations:
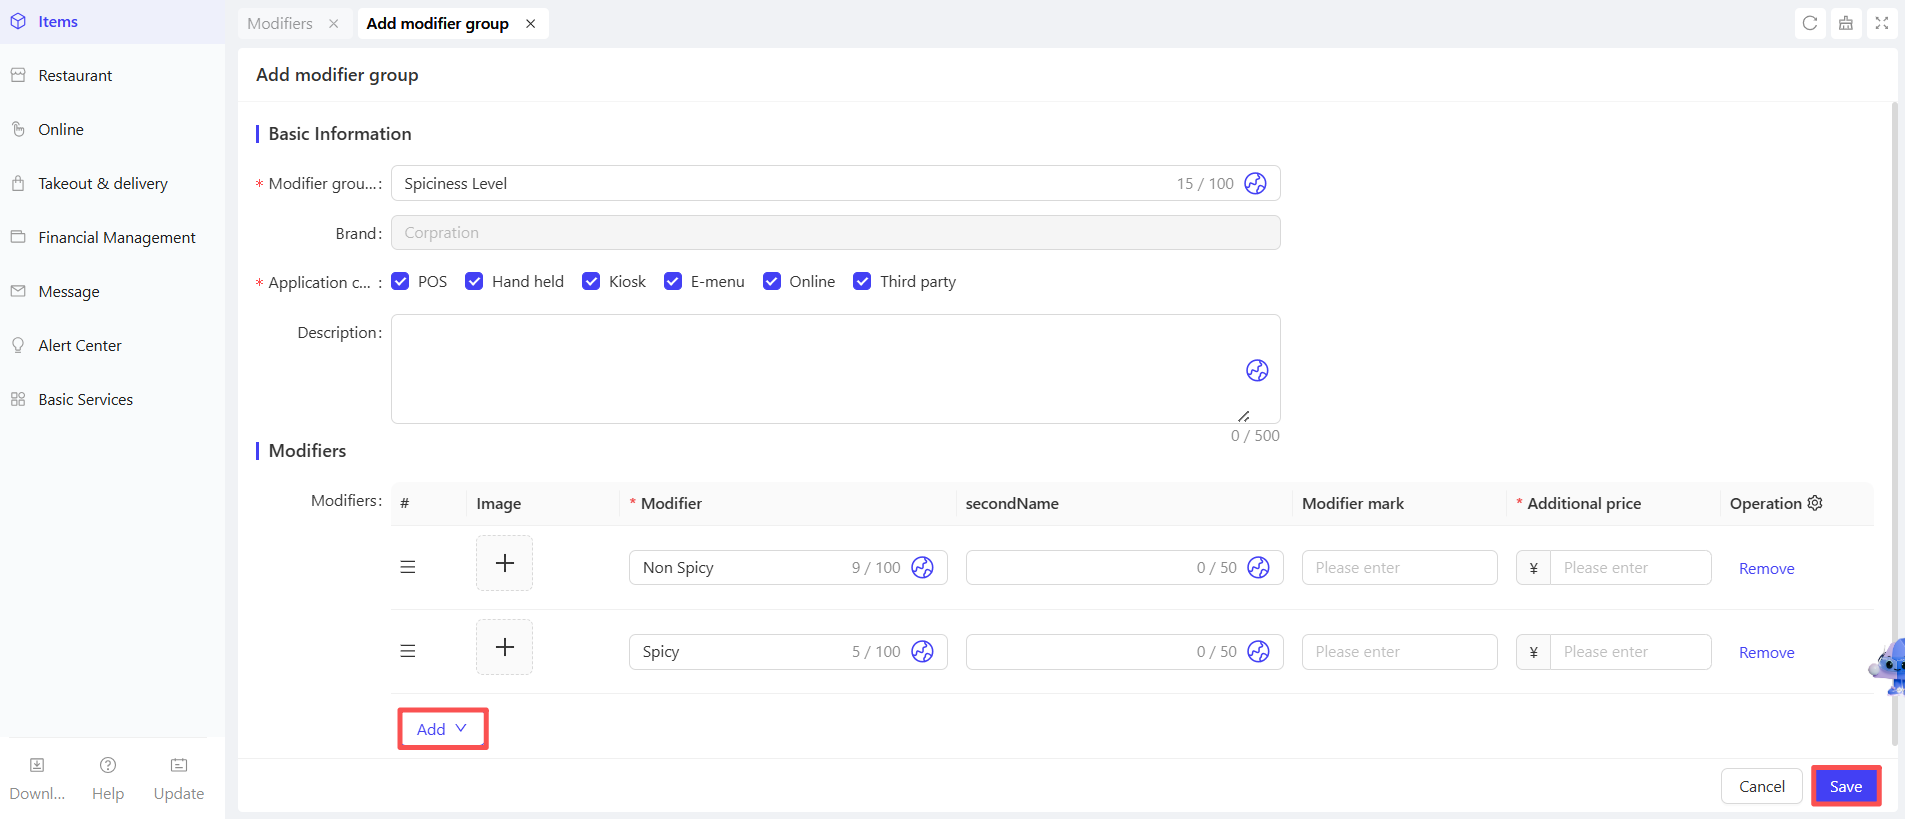
Configuration Item | Configuration Description |
|---|---|
Modifier Group | Enter the name of the modifier group, e.g., Spiciness Level |
Channel Display | Select the terminal for displaying this modifier group, e.g., POS, E-menu, etc. |
Description | Enter a text description for this modifier group |
Modifier Items | Add specific modifier items under this group (multiple items allowed). The required fields are as follows:
|
STEP 3: Click【Save】to complete the creation of the modifier group.
The created modifier group can be flexibly applied to a single item or an entire menu group, with specific examples as follows:
Application to a Single Item: Bind the "Sweetness Level Selection" group (including options: sugar-free, 30% sugar, 50% sugar, full sugar) to the single product "Signature Milk Tea", allowing only this milk tea to support customized sweetness without affecting other beverages.
Application to an Entire Menu Group: Bind the "Spiciness Level Selection" group (including options: non-spicy, mild spicy, medium spicy, extra spicy) to the "Sichuan-Hunan Hot Dishes" menu group. All dishes in this group (e.g., Chopped Chili Fish Head, Spicy Pot, Spicy Chicken) can uniformly support spiciness level selection.
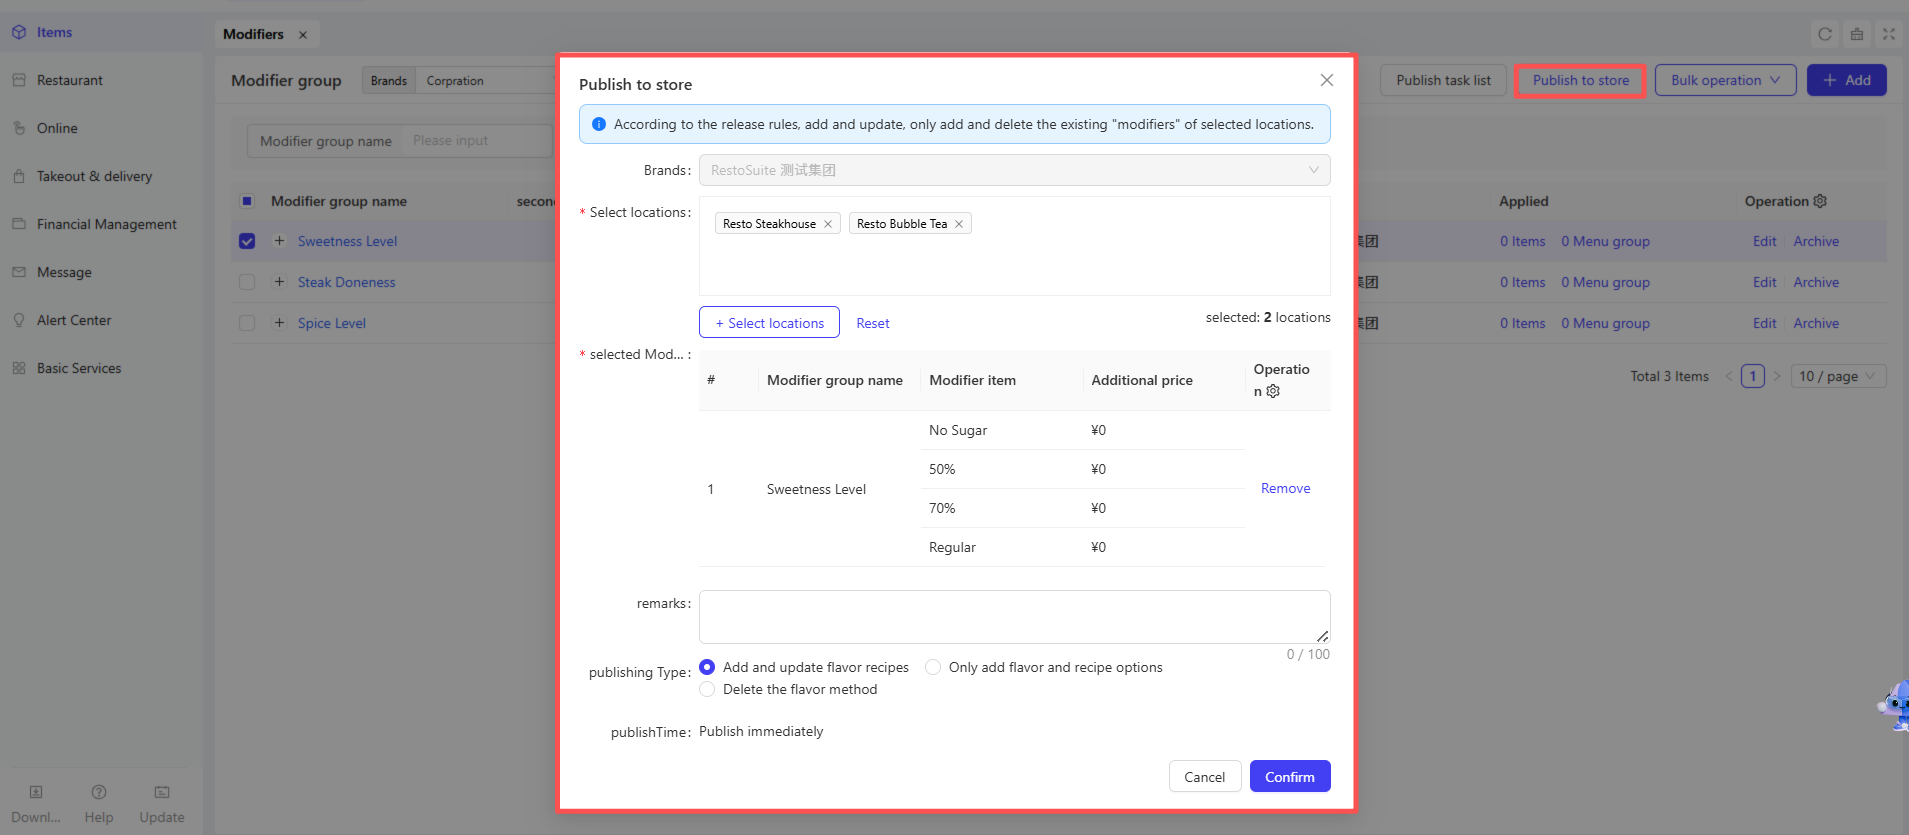
STEP 4: Check the added modifier group in the list, then click the Publish to Stores button. On the pop-up details page, select the target stores and the release type (Add and Update Modifiers / Add Only / Delete Modifiers), then click【Confirm】to complete the distribution.
4.2 Batch Importing Modifier Groups
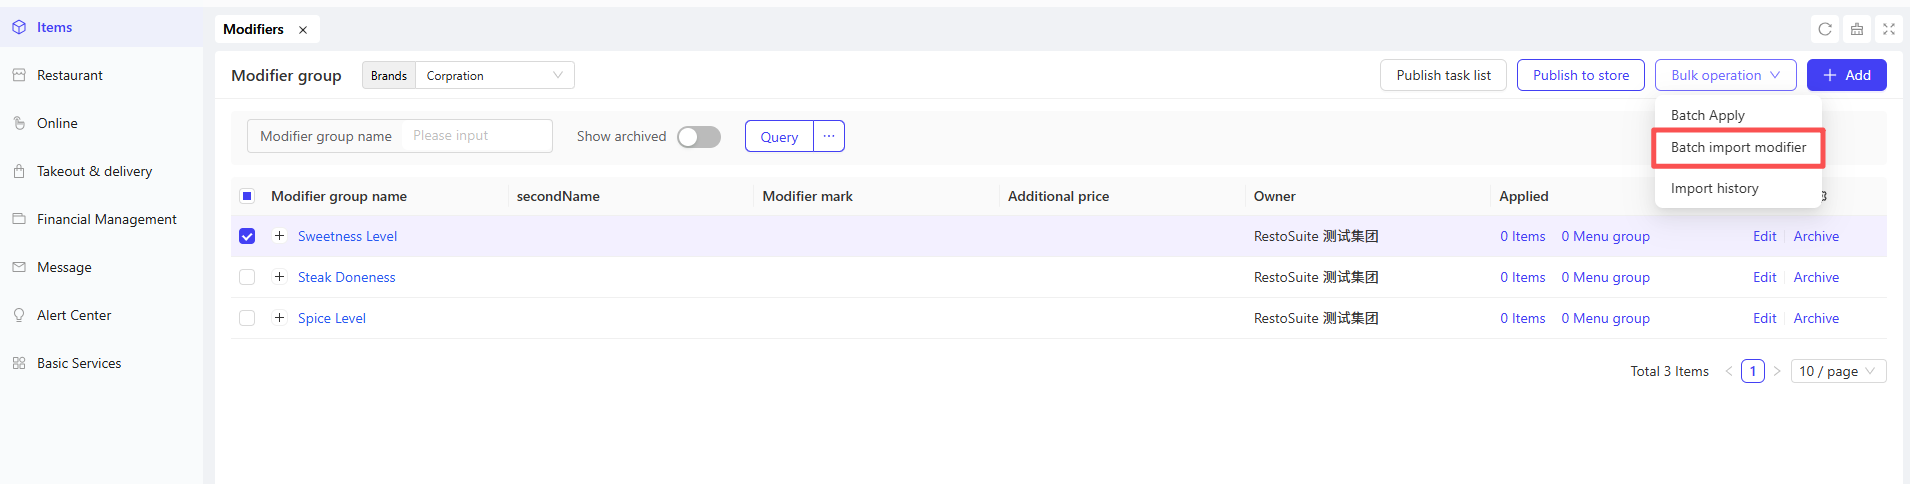
STEP 1: On the【Item Management】>【Attribute Management】>【Modifiers】page, click the 【Batch Import Modifiers】.
STEP 2: Download the item modifier template, fill it in according to the requirements, then upload the file. Select the import type and brand, and click【Continue】.
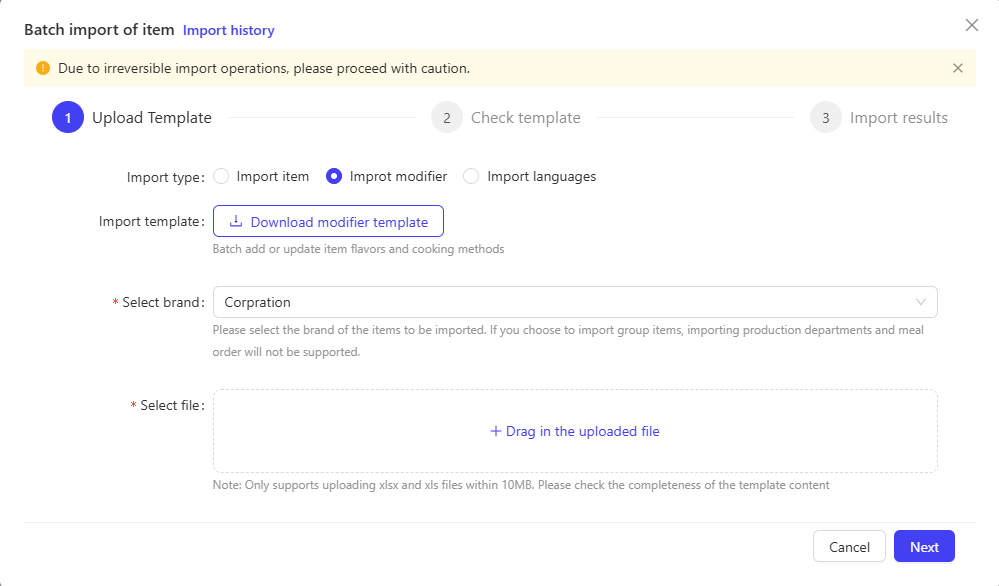
STEP 3: The system will verify the uploaded template file.
- If the verification is passed, click the【Start Import】
- If the verification fails, view the file issues in the Template Verification details page. Modify the file according to the prompts, then click【Return】to re-upload the modified file and start the import after verification is passed.
STEP 4: After the upload is completed, you can view the import results on the Import Results page.
Note: You can view and download imported files from the past 30 days on the Import History Records page.
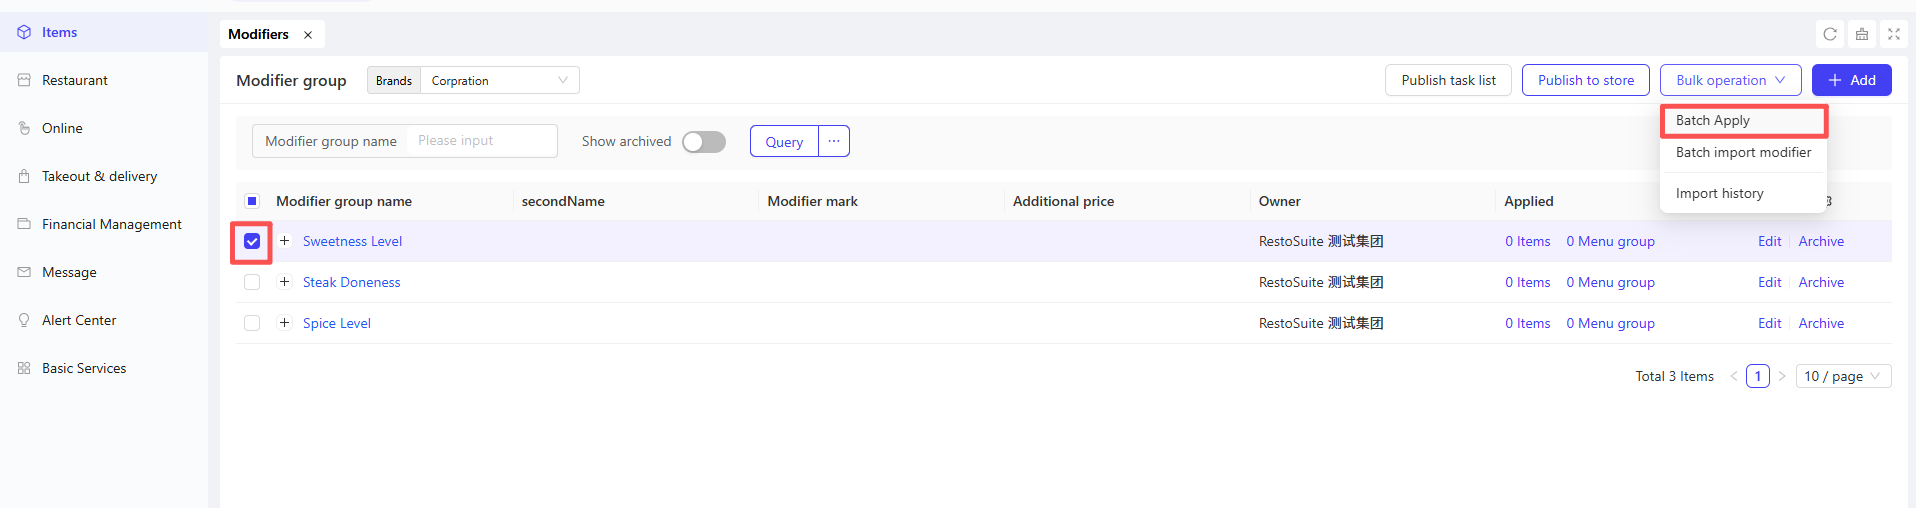
4.3 Batch Applying Modifier Groups
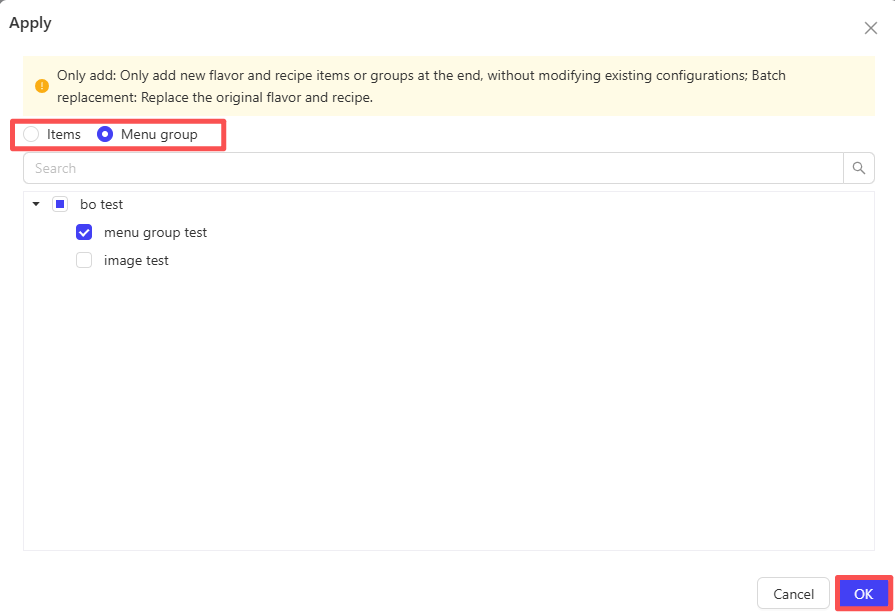
STEP 1: On the【Item Management】>【Attribute Management】>【Modifiers】page, check the modifier groups/items you want to apply, then click the Batch Apply button.
STEP 2: On the pop-up page, select the target items or menu groups, then click【OK】.
4.4 Modifier Group Operations
- Edit: Click to modify the configuration information of the modifier group.
- Archive: Click to remove the modifier group from the current list while retaining historical records.

Note:
If a modifier group/item is applied to any item or menu group, it cannot be archived. You need to first unbind the group/item from the relevant menu groups and items before completing the archiving.
5 Side Dish Group Management
5.1 Adding Side Dish Groups
STEP 1: Log in to the Operation Center, and from the corresponding perspective, click【Item Management】>【Attribute Management】>【Side Dish Groups】.
STEP 2: Click the【Add Side Dish Group】button on the page, and fill in the following information on the configuration page:
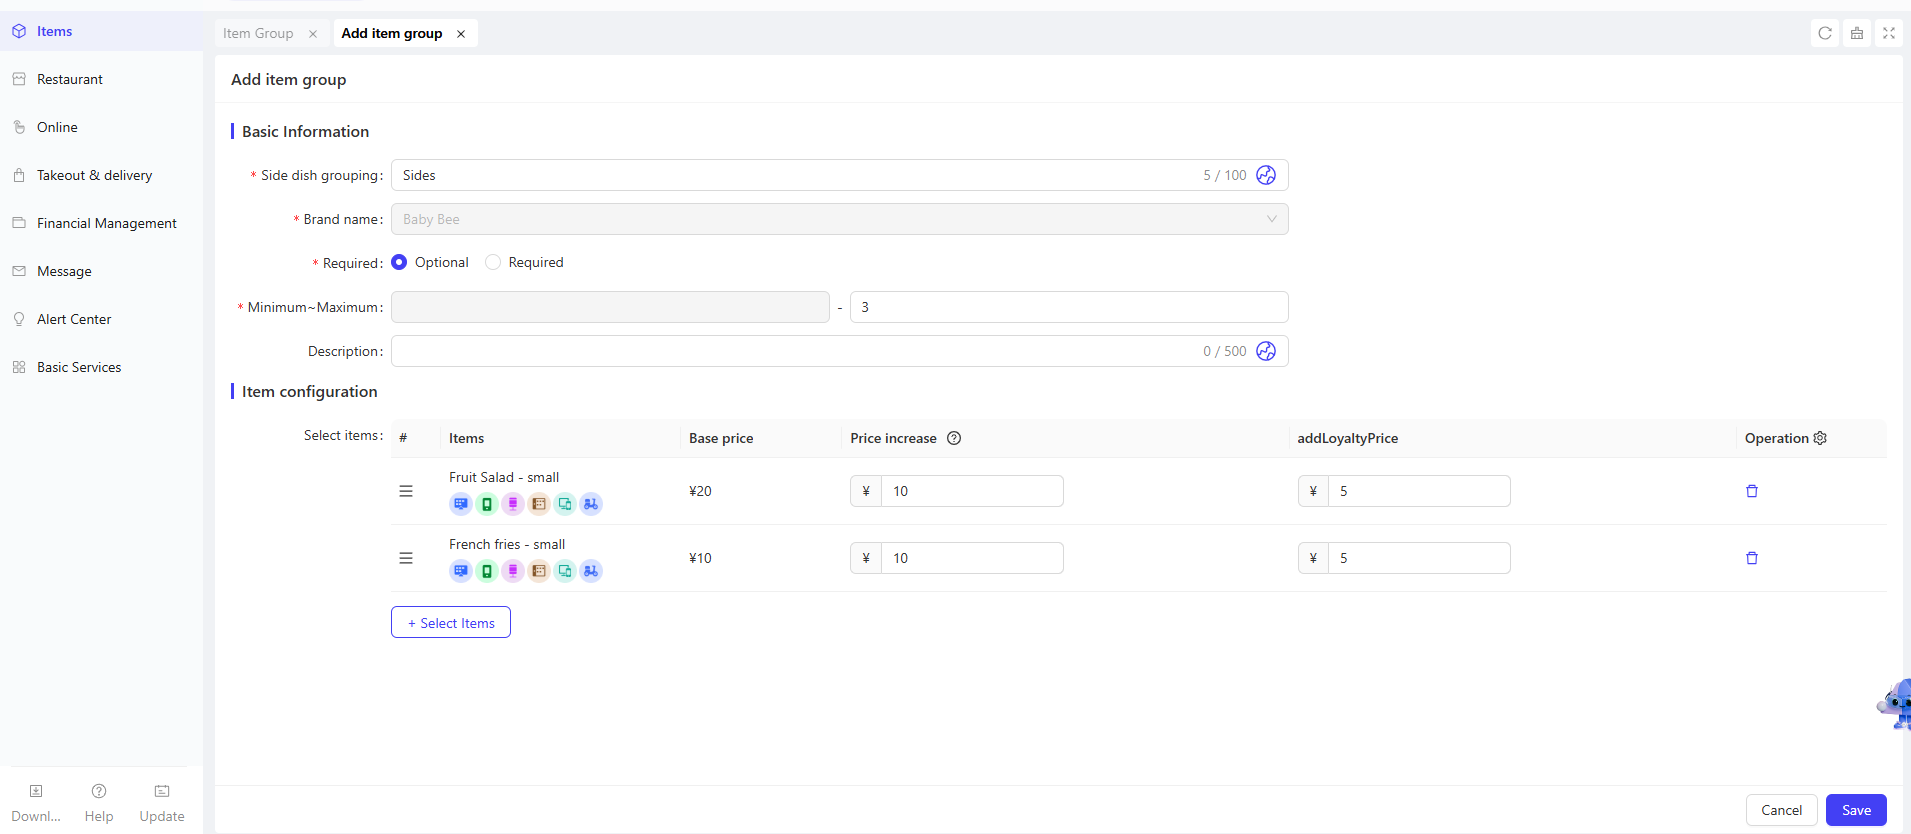
Configuration Item | Configuration Description |
|---|---|
Side Dish Group | Enter the name of the side dish group, e.g., Steak Sides, Milk Tea Toppings, Burger Side Dishes |
Selection Type | Select the type of this side dish group:
|
Minimum Value ~ Maximum Value | Enter the quantity range of side dishes that customers can select from this group, which must match the selection type:
|
Description | Enter supplementary descriptive text for this side dish group, for display on the customer side or reference by store staff |
Item configuration | Select the specific side dish items under this group. |
STEP 3: Click【Save】to complete the side dish group addition.
STEP 4: On the side dish group list page, click the【Edit】button next to the added side dish group. In the details page, you can add target items in the applicable dishes section. You can also add side dish groups when creating or editing items.
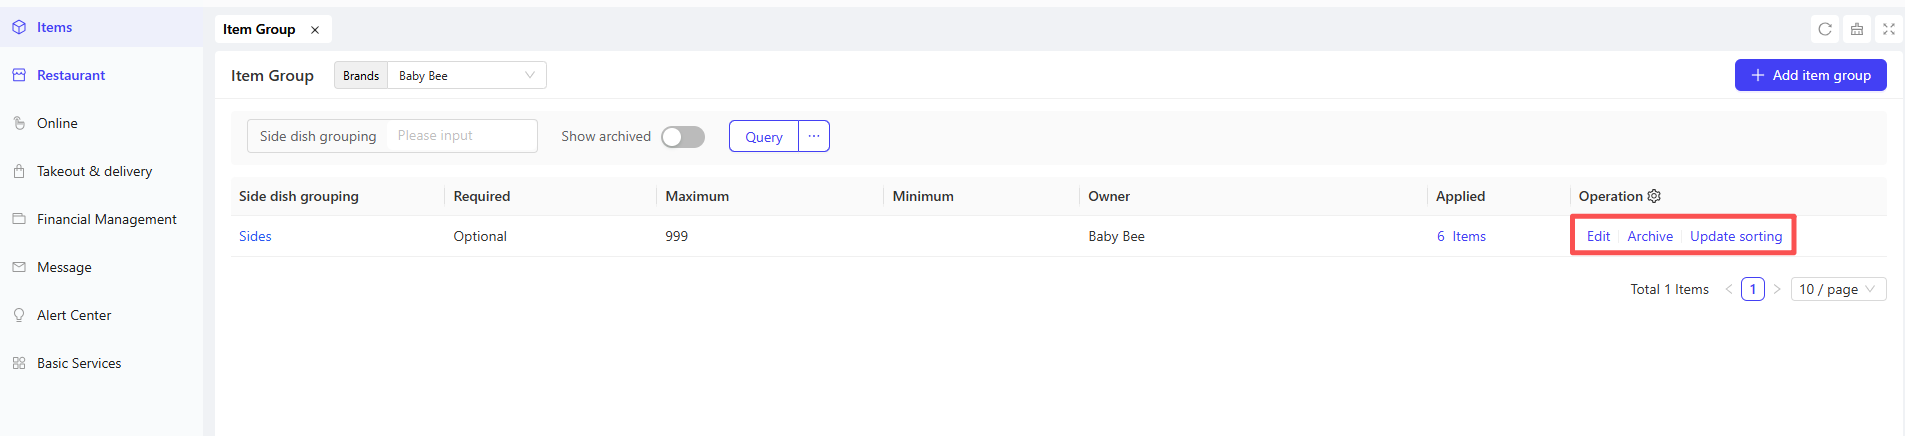
5.2 Side Dish Group Operations
- Edit: Click to modify the configuration information of the side dish group.
- Archive: Click to remove the side dish group from the current list while retaining historical records.
Note:
If a side dish group is applied to any item, it cannot be archived. You need to first unbind the side dish group from the relevant items before completing the archiving.
- Update Sorting: Update the sorting of selected items according to the sorting of item details in the side dish group.
6 Label Management
6.1 Adding Labels
STEP 1: On the【Item Management】>【Attribute Management】>【Label Management】page, click the【Add】button in the upper right corner. You can switch between tabs to add the following three types of labels:
- Item Tags: An identifier prominently displayed on the item display page of the customer side, such as “New Arrival”, “Recommended Dish”, etc., helping customers quickly identify item selling points.
- Description Label: An explanatory label used to supplement item attributes or characteristics, such as “Non-spicy”, “Low-fat”, “Handmade”, etc., which can be displayed on the item details page to enrich item information.
- Menu Group Label: A label used to classify or mark menu groups, such as “Breakfast Special Zone”, “Afternoon Tea Set”, “Member Exclusive”, etc., facilitating store management and customers’ quick search for corresponding menu groups.
STEP 2: On the pop-up page, enter the label name (required) and description.
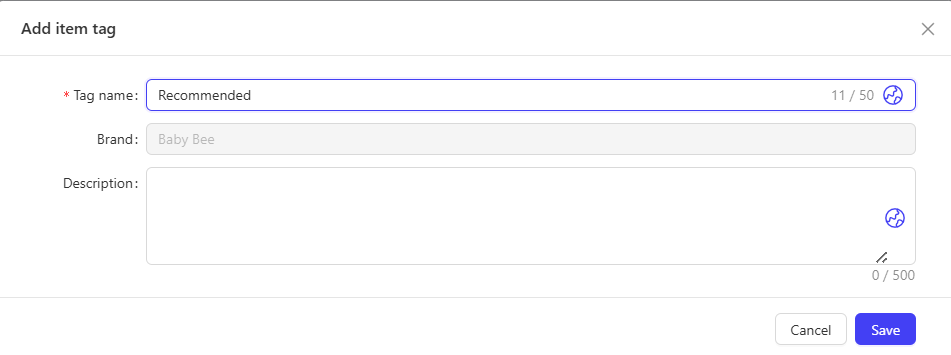
STEP 3: Click【Save】to complete the label addition.
Note:
Item tags and description labels can be applied to items, while menu group labels can be applied to menu groups, all of which can be displayed on different channel terminals.
7 Unit Management
7.1.1 Adding Units
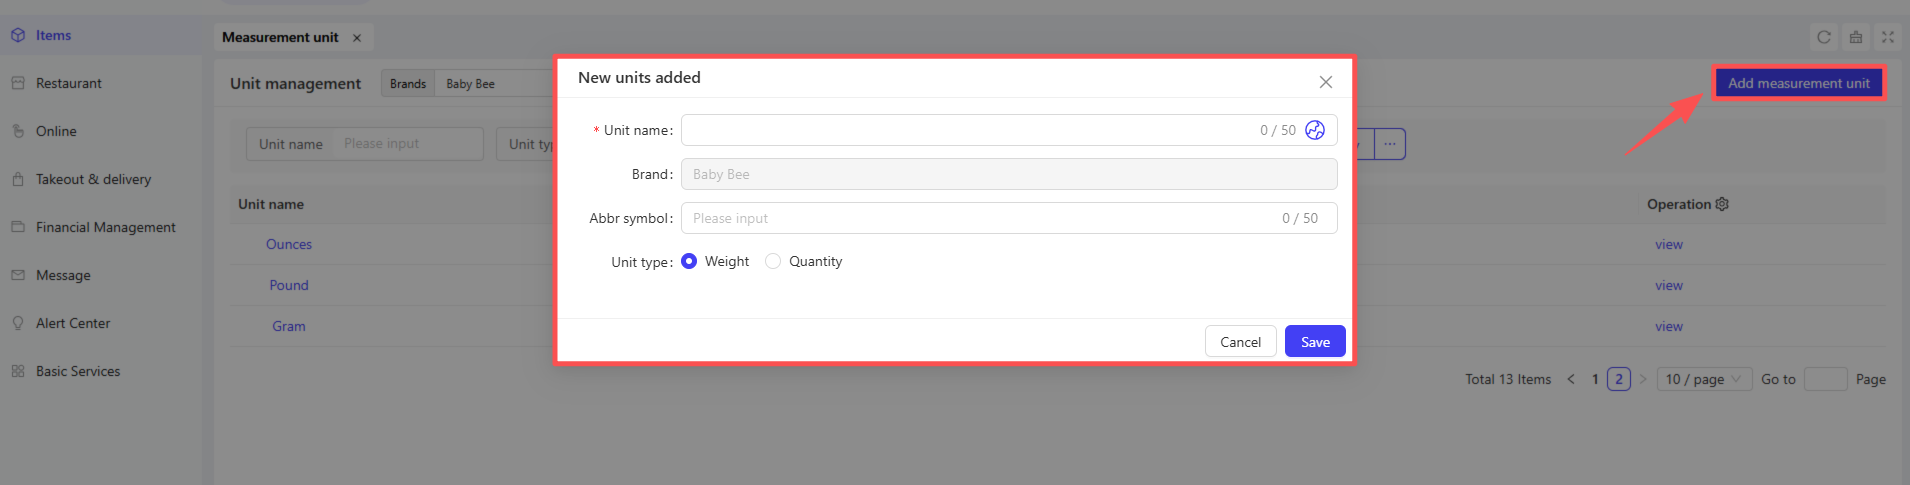
STEP 1: From the corresponding perspective, click【Item Management】>【Attribute Management】> 【Unit Management】.
STEP 2: Click the【Add Unit】button in the upper right corner of the page and fill in the following configurations:
Configuration Item | Configuration Description |
|---|---|
Unit Name | Enter the unit name, e.g., milliliter, kilogram |
Abbreviation | Enter the unit abbreviation, e.g., ml, kg |
Unit Type | Select the unit type:
|
STEP 3: Click【Save】to complete the unit addition.
7.1.2 Unit Operations
- Edit: Click to modify the configuration information of the unit.
- Archive: Click to remove the unit from the current list while retaining historical records.
8 Attribute Mutual Exclusion
8.1 Overview
The attribute mutual exclusion function avoids order conflicts by setting rules for core item attributes (sizes, modifiers, side dishes, business types) to prohibit conflicting selections. Examples include blocking iced/hot combinations for beverages and large/small fry combinations for steak sets. This function eliminates invalid orders upfront, reduces store communication costs, and streamlines accurate online and offline ordering.
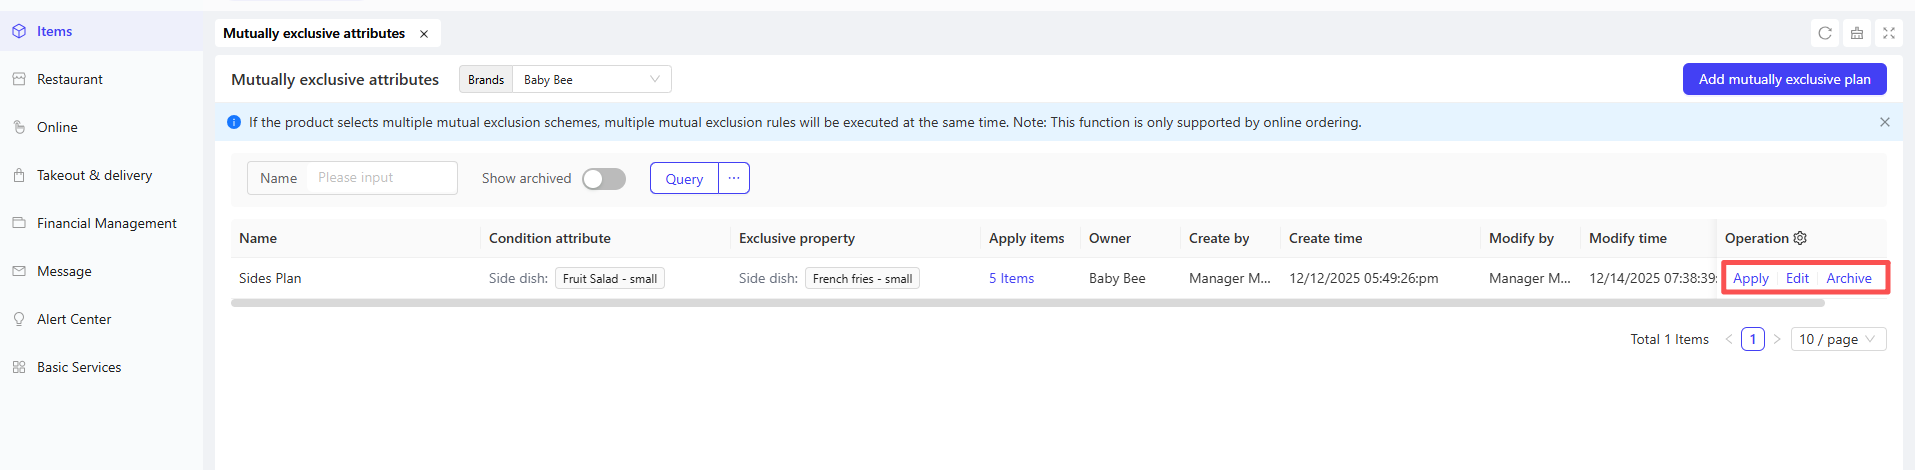
8.2 Adding Mutual Exclusion Schemes
STEP 1: From the corresponding perspective, click【Item Management】>【Attribute Management】> 【Attribute Mutual Exclusion】.
STEP 2: Click the【Add Mutual Exclusion Scheme】button in the upper right corner of the page, and configure the following information on the pop-up page:
Configuration Item | Configuration Description |
|---|---|
Name | Enter a unique name for the scheme to distinguish different mutual exclusion rules, e.g., Beverage Temperature Mutual Exclusion, Dessert Size Mutual Exclusion |
Apply Items | Select the applicable items (multiple selections allowed), e.g., Pearl Milk Tea, Americano |
Mutual Exclusion Rules | Set conflict restriction conditions between item attributes, i.e., specify which attributes cannot be selected at the same time.Mutual exclusion rules can be added for sizes, modifiers, side dishes, and business types. |
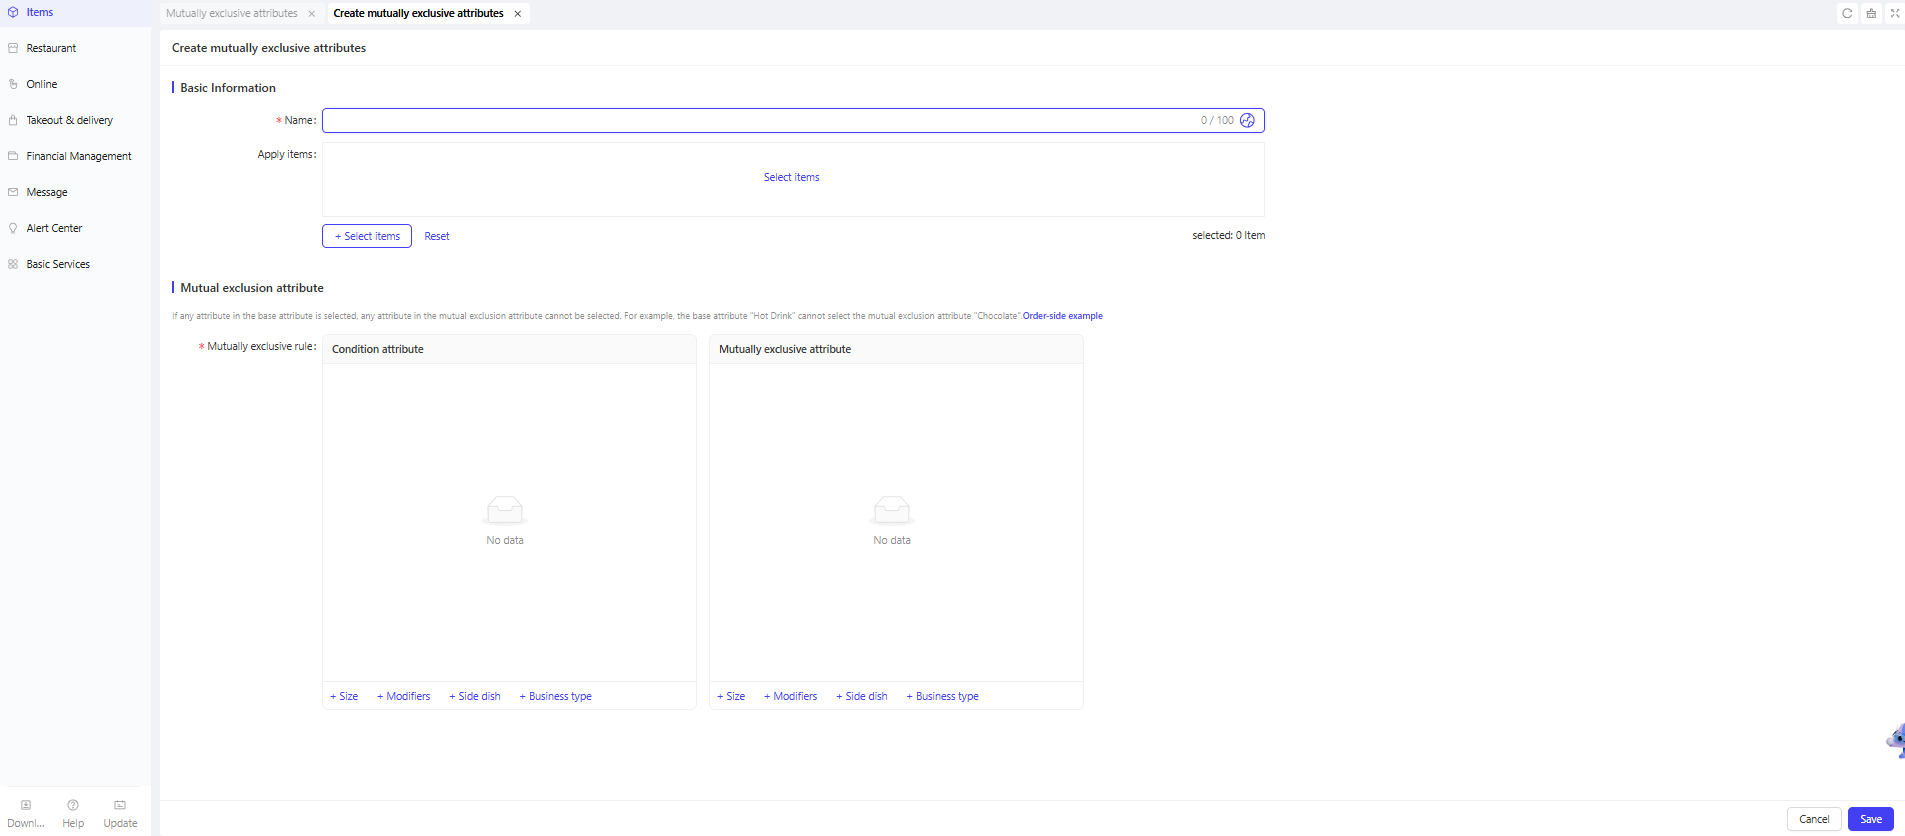
STEP 3: Click【Save】to complete the mutual exclusion scheme addition.
8.3 Mutual Exclusion Scheme Operations
- Apply: Click to edit the items to which this mutual exclusion scheme is applied.
- Edit: Click to modify the configuration information of this mutual exclusion scheme.
- Archive: Click to remove the mutual exclusion scheme from the current list while retaining historical records.