Basic Services
1 Module Introduction
This module provides foundational management services for enterprise groups. It primarily covers core master data management for organizations, stores, and employees. It supports assigning different permissions and operational perspectives by role, enabling fine-grained, position-based access control.
It also includes common service capabilities such as asset management and channel management, providing essential support for overall group operations.
2 Glossary
Operations Management Platform (OM): Short for Operation Management. A digital platform that follows enterprise business management processes to centrally manage control items in operational workflows, including management attributes, responsibilities, authorization, and decision points. As the merchant back-office administration console, it mainly provides group information maintenance, pre-configuration of platform payment information, resource and module definitions, business object and enumeration configurations, etc.
Perspective: A capability that allows employees to perform operations and view data by organization, addressing scenarios where the same employee holds multiple roles and responsibilities across different organizations. Depending on the organization entity type, it includes Group Perspective, Brand Perspective, Store Perspective, etc.
Data Permission: Based on the division of responsibilities, restricts the data scope and field visibility (some fields require masking). It can be assigned across multiple dimensions. Group administrators have full data access by default and do not require additional configuration.
Role Assignment: Classifies employees into corresponding roles based on responsibilities and permission requirements, granting role-based operation permissions to standardize access management.
Access Control: Controls access permissions for employees or systems to ensure employees can only access information and functions required for their work, ensuring data security and compliance.
PIN Code: Personal Identification Number is used to verify employee identity, primarily for fast login scenarios on POS and similar systems.
Tip Management: A process where contributors place a specified amount of tips into a shared tip pool within a defined period. Tips are then distributed to eligible recipients within a defined scope based on preset allocation strategies.
Channel Management: Centrally manages order source channels. Supports built-in channels (e.g., Pad ordering, POS ordering, WeChat self-service, Ele.me, Meituan) and custom channels (e.g., official WeChat account). Once enabled, channels will be displayed when ordering or opening a table on POS.
3 Account Login
-
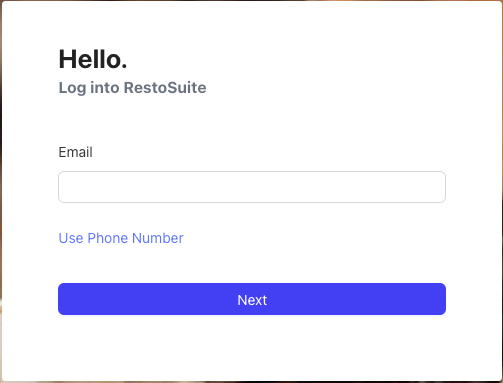
The merchant back office supports email login and mobile number login. The email login page is shown by default. Click “Use mobile number” to switch.
-
First-time login: If no password has been set, you must set a login password before entering the system.
-
Multiple groups linked: If a password is set and the account is linked to employee identities in multiple groups, a group list will be displayed after login. You must select a group to enter.
-
Single group linked: If a password is set and the account is linked to only one group identity, you will enter the home page directly. The default perspective is the last selected one; if none, the first available perspective is shown.
4 Organization Structure
4.1 Group Information Pre-Configuration (OM)
Group information must be configured on the OM platform first to generate the group administrator login credentials. Key configurations include: supported sales channels, sales entity, payee entity, supported countries/regions and currencies, tenant payment configuration, third-party platform configuration, and authorization domain settings.
After completion, the group administrator can log in to the merchant’s back office and proceed with subsequent operations.
Group administrators have full permissions across the group and can access all merchant back-office functions.
4.2 Switch to the group perspective
The group administrator logs in to the merchant background and can switch to the group perspective through the perspective switch in the upper right corner
4.3 Organization Management
- Path: Switch to Group Perspective → Basic Services > Organization Structure > Organization Management. The page displays all configured organizations under the group.
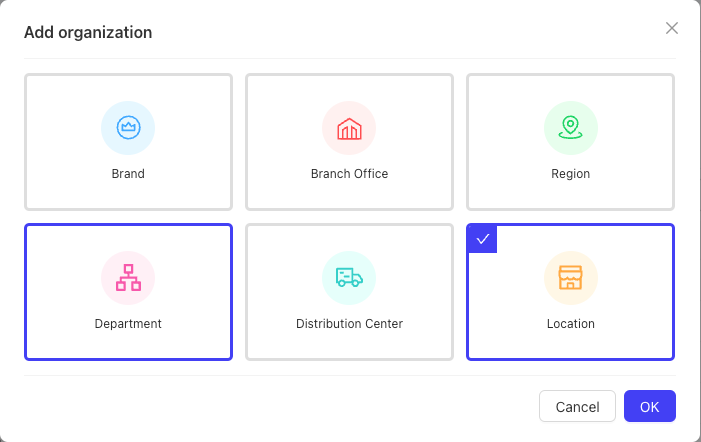
- Add Organization: Click “Add Organization” in the top-right corner. In the dialogue, select an organization type such as Brand, Store, Distribution Center, Branch, Department, Region, etc. (A typical structure is Group → Brand → Store, but you can adapt to actual needs.)
- Add Brand: Select “Brand” to open the creation page. Organization type can be Brand, Region, Department, Branch (same level). Select the business type and click Save.
Note
After adding a brand, switching from Group Perspective to Brand Perspective may not show it immediately. Refresh the browser to display the new brand. Click the brand name to switch to its perspective and manage brand-related items.
- Add Store: Select “Store” to jump to the store creation page (same as adding a store from the Store Profile page). One group can have multiple brands, and one brand can have multiple stores. For details, see the Store Management section.
4.4 Role Management
-
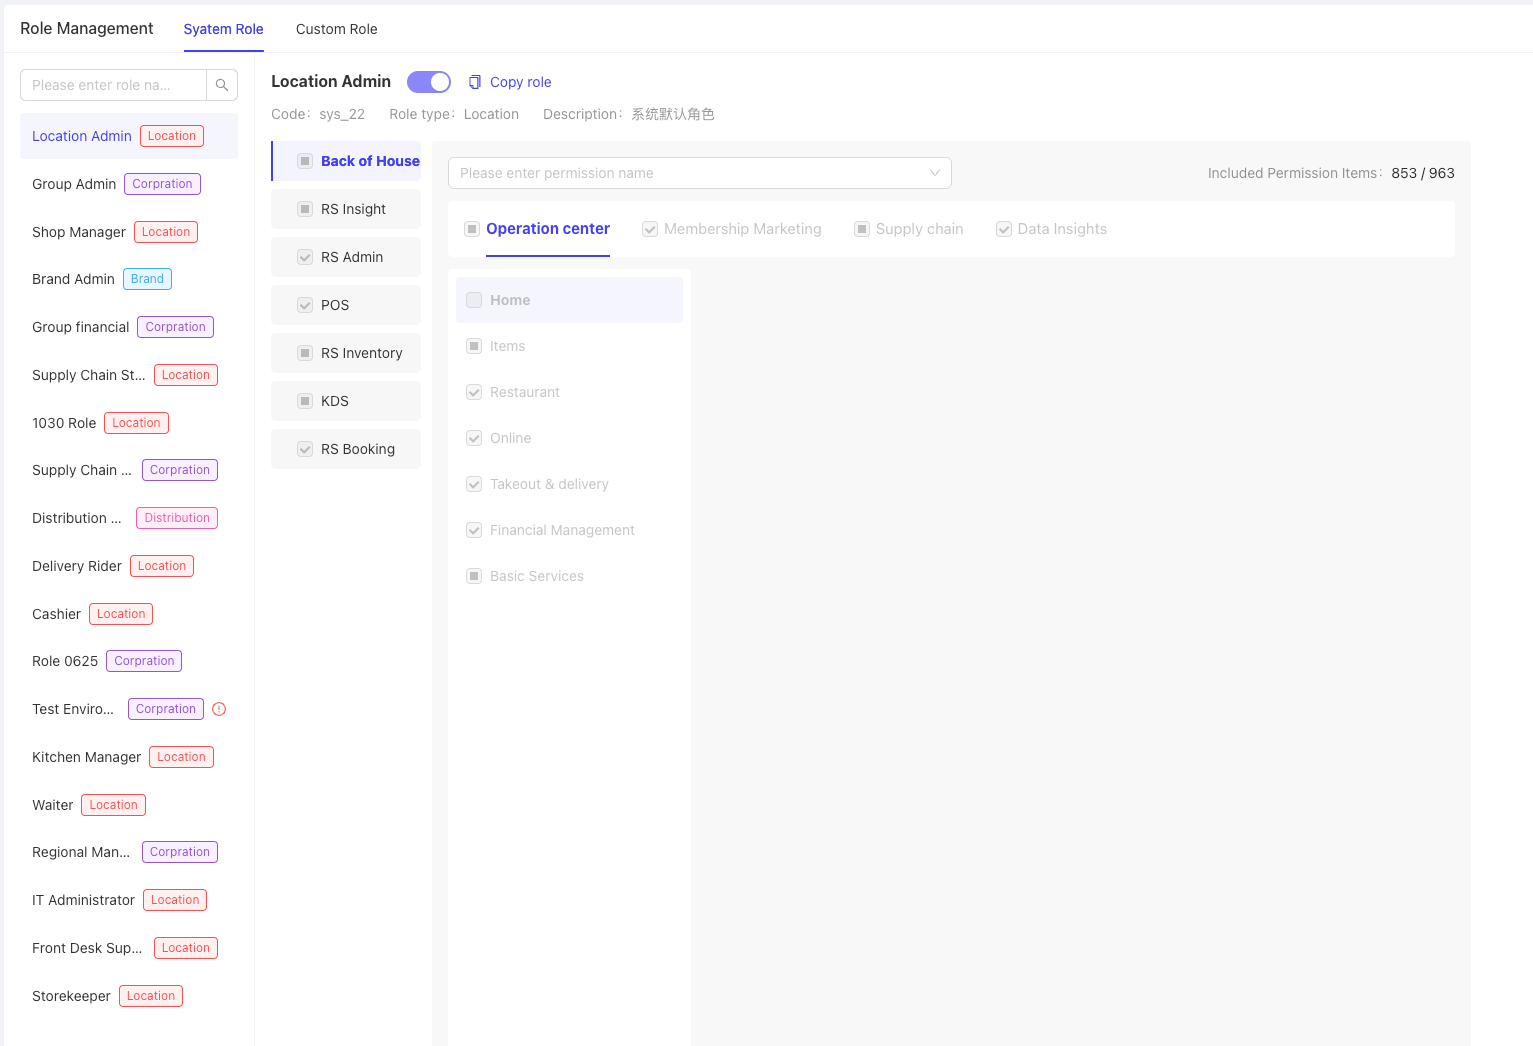
Path: Switch to Group Perspective → Basic Services > Organization Structure > Role Management. The page displays all roles configured in the group.
-
System Roles: The system provides preset roles aligned with common business scenarios, including Group Administrator, Group Finance, Brand Administrator, Distribution Center Administrator, Store Administrator, Store Manager, Cashier, etc. Preset role menu permissions are view-only and cannot be edited.
-
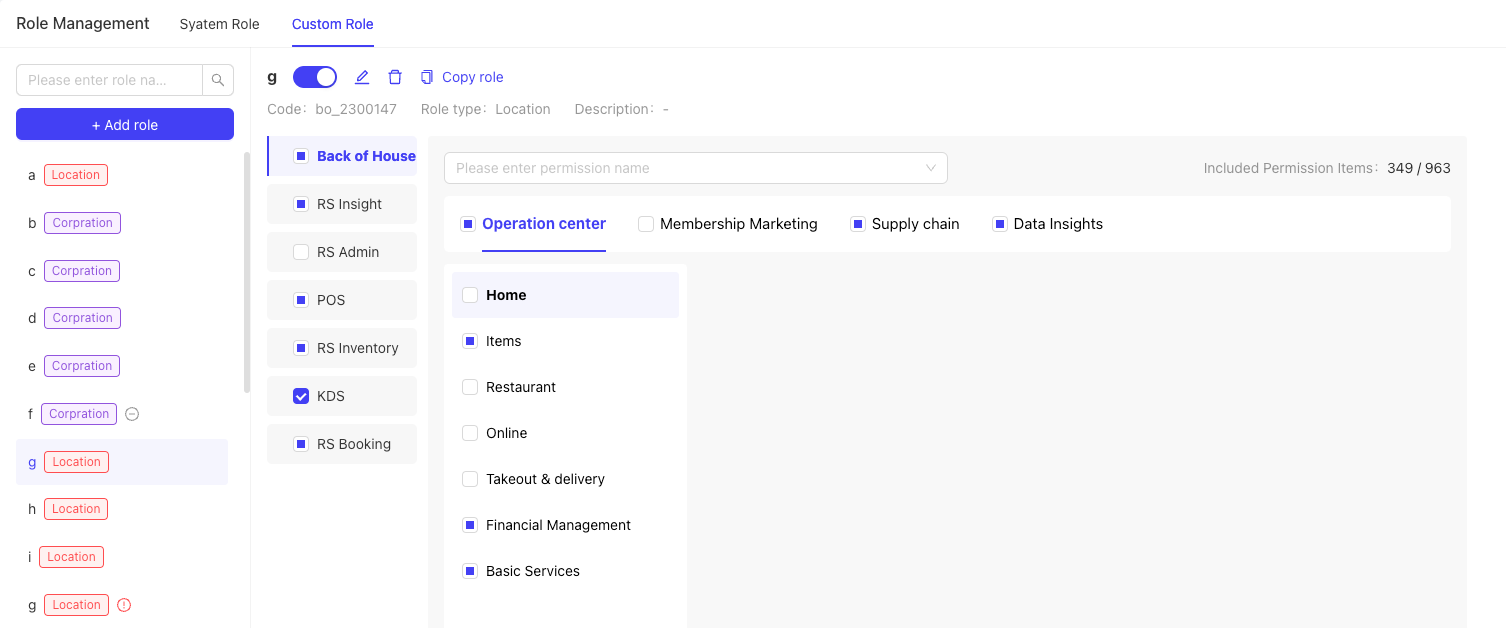
Custom Roles: Switch to the “Custom Roles” tab and click “Add Role”. Choose role type (Group, Brand, Store, Distribution Center), select function permissions as needed, and save. It can be used for special access needs.
-
View Role Bindings: In the role detail page, the “Accounts Bound to This Role” panel (top-right) shows all employee accounts bound to the role (including HQ staff and store staff).
5 Store Management
5.1 Switch to Group Perspective
Group administrators must switch to Group Perspective via Perspective Switch (top-right) to perform store management operations.
5.2 Store Profile
-
Path: Group Perspective → Basic Services > Store Management > Store Profile. The page lists detailed information for all stores under the group.
-
Add Store: Click “Add Store” (top-right) to open the creation page. Complete the key configurations:
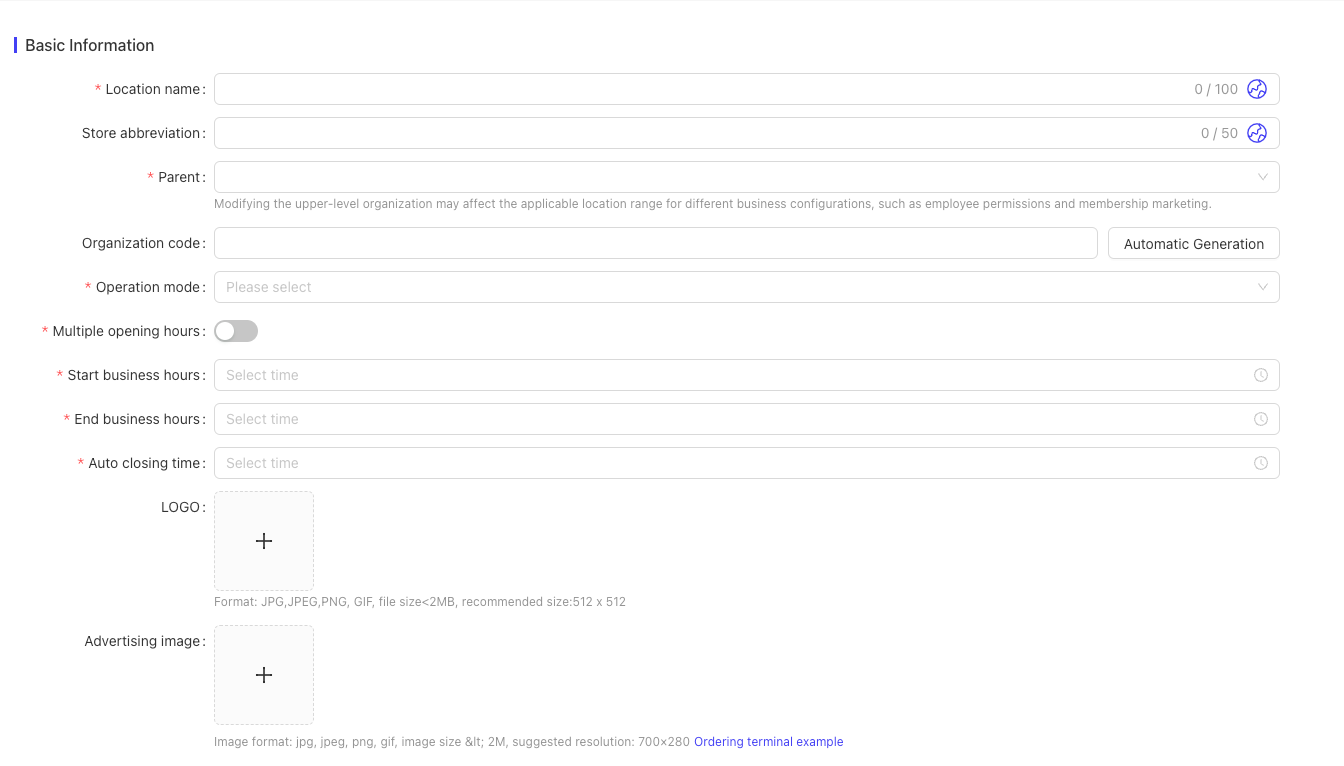
- Basic Information: Store name, short name, parent organization (Group or Brand; rarely Store), business model, business hours.
- Location & Contact: City, street, in-store phone numbers (up to 3 landline/mobile numbers).
- Store Format: Currency/date/time formatting.
- Meal Periods & Shifts: Configure meal periods and cashier shifts (system provides defaults; you can enable/ disable or modify times).
- Business Status: Choose “Open Immediately” (store becomes usable immediately) or “Save as Preparing” (must be opened later before use).
-
Business Hours Notes:
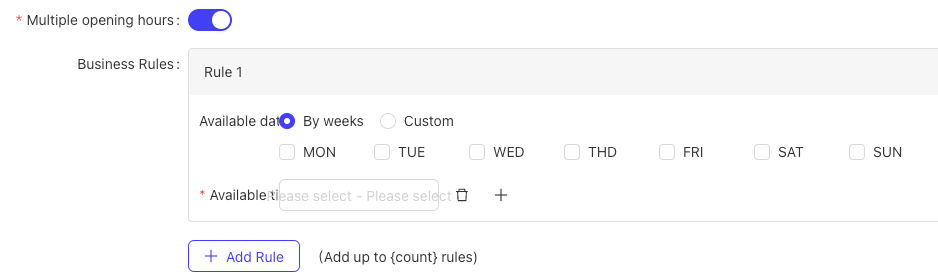
- Standard & Overnight: “Start time” and “End time” control online ordering time windows and support overnight ranges (e.g., 23:00–08:00 next day).
- Multiple schedules: Configure multiple non-overlapping time ranges by week or custom dates. The system supports up to 10 different date-based schedules, each with up to 3 effective time ranges. If custom dates overlap weekdays, custom settings take priority.
-
Day-Close Time: Used for POS daily closing. If POS auto close is enabled, the system will close automatically at the configured time.
- Store Status Management: Store has Operating Status and Business Status, managed independently:
- Operating Status: Preparing, Pending Opening, Operating, Closed.
- If set to Closed or Re-preparing, the store becomes unavailable.
- If Operating Status is Closed, it will no longer show in online ordering lists; POS services will be disabled and POS login will be unbound.
- Business Status: Only available when Operating Status is Operating; includes Open, Busy, Rest.
- If set to Rest, online and third-party channels pause operations, but POS is not affected.
- Operating Status: Preparing, Pending Opening, Operating, Closed.
5.3 Bulk Operations & Grouping
- Bulk Edit: Supports bulk updates for multiple stores (basic info, location, format, meal periods, food safety info, etc.) to improve efficiency.
- Store Grouping:
- Path: Basic Services > Store Management > Store Grouping. The page shows grouping under the default brand.
- Operations: Create groups; add stores to groups; move stores between groups or remove from groups.
- Purpose: After grouping, when system configuration supports group-based settings, selecting a group applies settings to all stores in that group.
6 Employee Management (Group Perspective)
6.1 Employee Accounts
-
Path: Basic Services > Employee Management > Employee Accounts. The page lists all employee accounts under the group.
-
Add Employee:
- Click “Add Employee” (top-right) and enter name, unique code within the group, and select the organization (Group/Brand/Store).
- Login Settings: Configure a login account (mobile or email). After login, the employee receives management permissions for the selected organization. You can use “Copy Permissions” to replicate another account’s permissions.
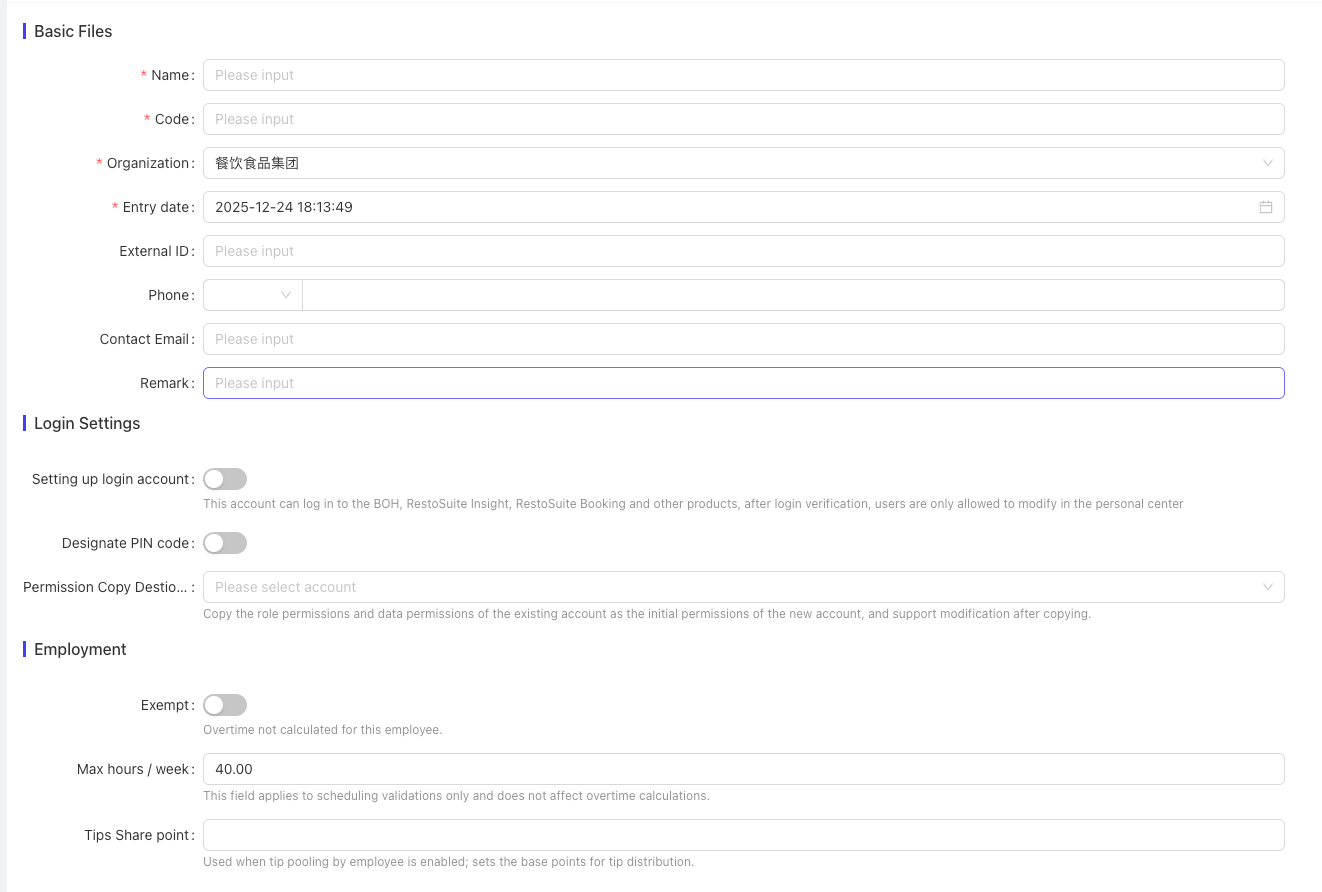
- PIN Setup: After setting a PIN, the employee can use it to log in to POS, handheld ordering devices, etc.
- Permission Assignment: Click “Save and Assign Permissions” to create the employee and then assign roles in the Permission Information tab. If the employee type is Group Employee and not a Group Administrator, you must also configure data permissions.
-
Bulk Operations: Supports bulk add/remove roles and data permissions for multiple employees.
-
Password Reset: For employees who have enabled login and logged in before, you can reset the password via “Reset Password”.
6.2 External Accounts
- Path: Basic Services > Employee Management > External Accounts. The page lists all external accounts.
- Description: External accounts are used by suppliers/customers and other external collaborators. External accounts can log into the platform.
6.3 Employee Commission
- Commission Configuration: Basic Services > Employee Management > Employee Commission. Configure product sales commissions to encourage performance (currently supports product sales commission only).
- Commission Task Management: Basic Services > Employee Management > Commission Calculation Tasks. View task records and execution details. Tasks in “Not Started” or “In Progress” can be terminated (status becomes “Terminated”). You can also create new tasks by entering and selecting relevant information.
7 Employee Management (Store Perspective)
7.1 Switch Perspective
Group administrators can switch to Store Management Perspective via top-right Perspective Switch.
7.2 Store Employee Management
- Path: Basic Services > Employee Management > Employee Accounts. The page lists all employees under the current store.
- Operations: You can add store staff. Store staff do not have a permissions configuration entry; by default they can only operate store-related functions and can only log in to that store’s POS.
- Permission Differences:
- Group Employees: Can be assigned permissions and can log in to POS terminals across stores within their scope.
- Store Staff: Only have permissions for the current store.
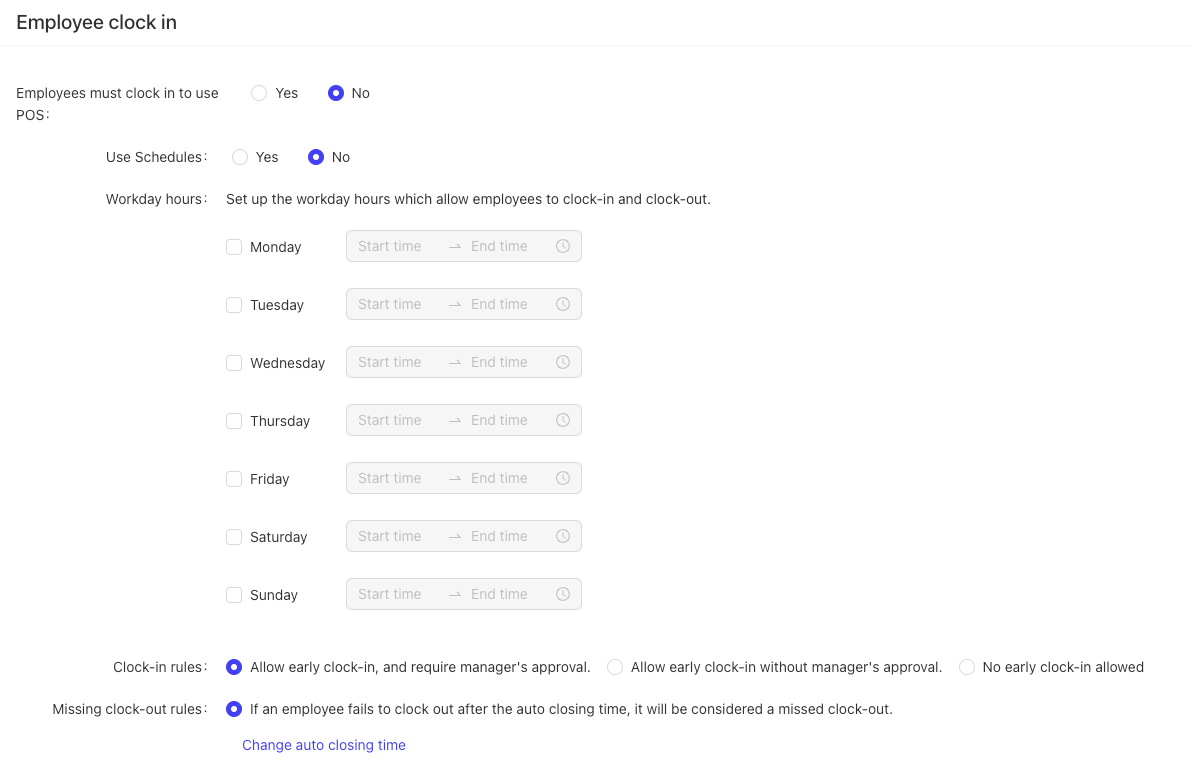
7.3 Employee Clock-in
- Path: Basic Services > Employee Management > Clock-in Settings. Configure clock-in rules to standardize attendance.
7.4 Employee Wage Settings
- Path: Basic Services > Employee Management > Wage Settings. Configure hourly wage rates by store role/job for payroll calculations.
7.5 Scheduling Management
The [Operation Management -> Basic Services -> Personnel Management -> Scheduling Management] page allows scheduling.
7.5.1 Quick Start - Your First Schedule
Step 1: Access the Scheduling System
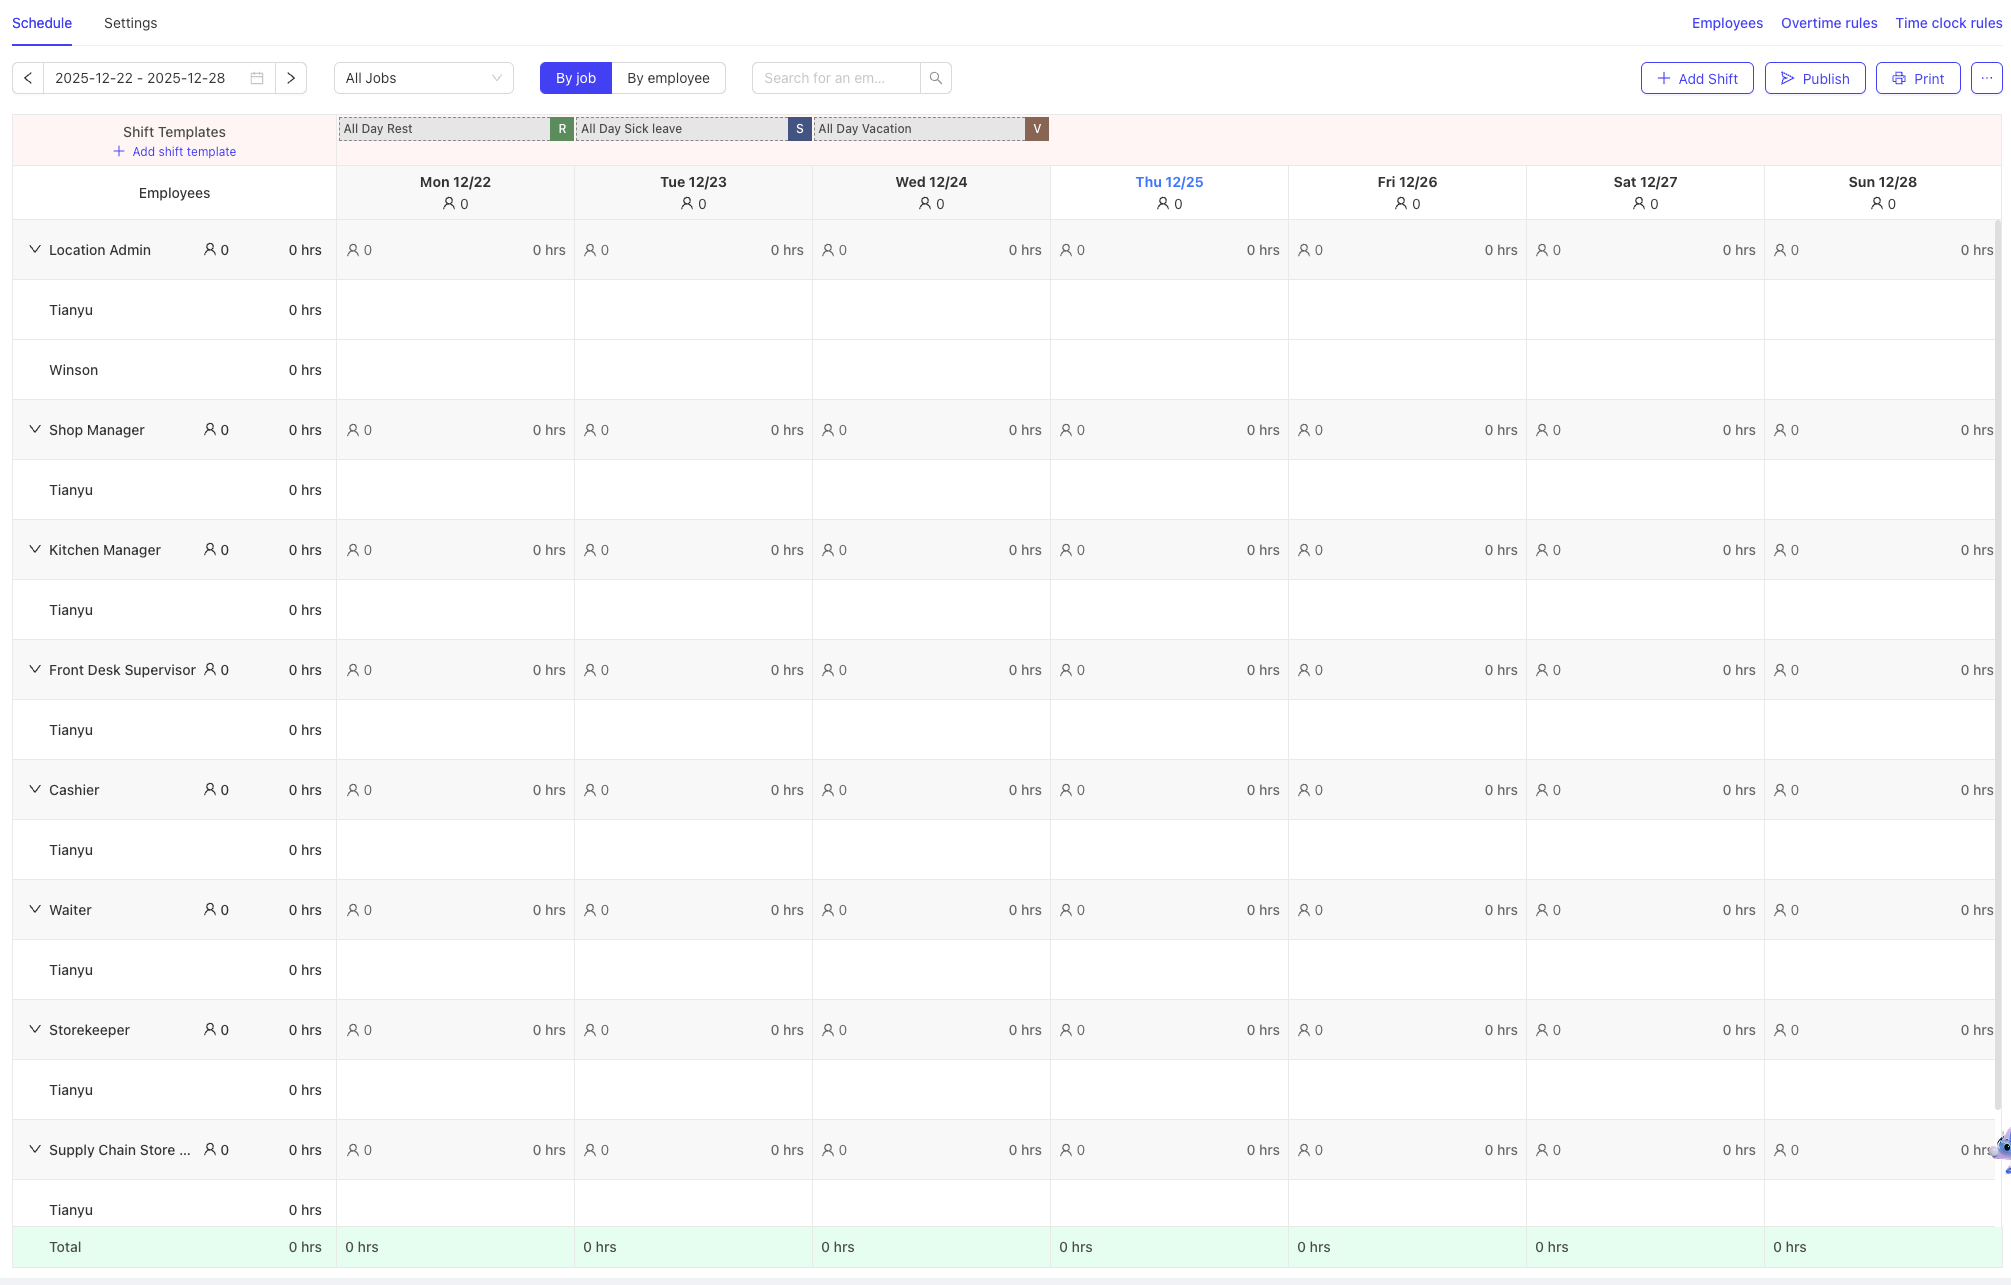
- Navigate to: BO > Basic Services > Employees > Scheduling
- The system defaults to the weekly By Job view of your current store, displaying the current week by default.
Step 2: Understand the Interface Layout
You will see three main areas:
- Title Bar: Page title, quick external links (e.g., employee archives, overtime, attendance, etc.), and full-screen button.
- Toolbar: Core operation area, including settings, week navigation, view switching, search, and operation buttons (Add, Publish, More).
- Business Area: Displays the scheduling table, with a date row at the top, a list of positions and employees on the left, and scheduling cells in the middle.
Step 3: Add a Shift
-
Locate the target employee (e.g., waiter “John”) and click the ”+” button in their corresponding date cell.
-
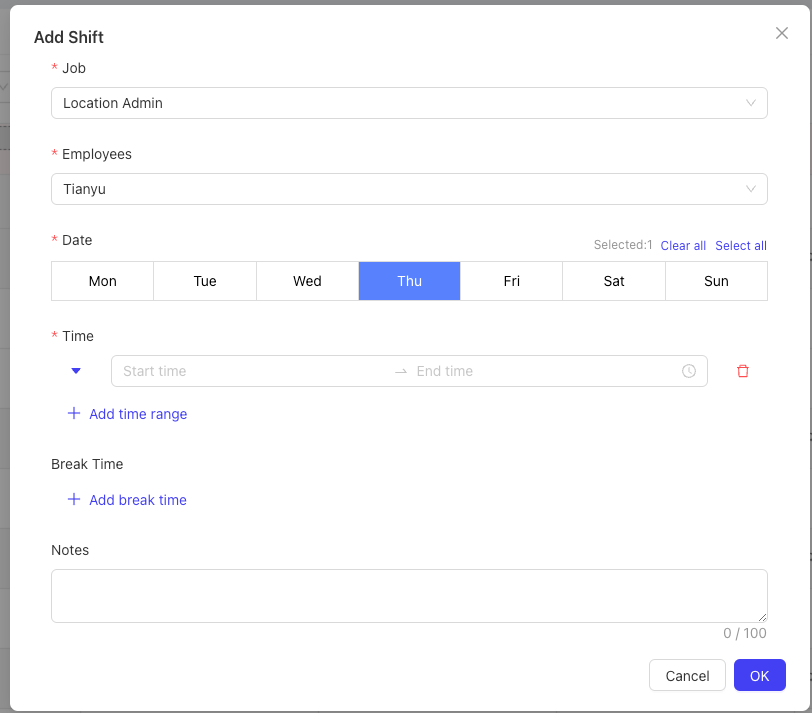
In the pop-up “Add Shift” window, the system automatically populates the employee, position, and date.
- You only need to:
- Enter or select the start and end times of the shift in the “Time” field (e.g., 9:00 AM - 5:00 PM).
- (Optional) Click ”+ Add Break Time” to add a break for them.
- (Optional) Add notes in the “Notes” field.
- You only need to:
-
Click “Save”. John’s shift will appear in the cell.
Congratulations! You have completed the basic scheduling operation.
7.5.1.1 Weekly View: Detailed Instructions for Adding a Single Shift
-
In the scheduling table (weekly view), click the cell where the target employee and target date intersect.
-
The system will pop up an “Add Shift” window.
-
Fill in or confirm the following information:
- Job (Required): Usually locked to the currently selected employee’s position; can be switched.
- Employees (Required): Usually locked to the currently selected employee.
- Date (Required): Check multiple dates in the week.
- Time (Required): Enter the start and end times of the shift.
- Preset templates can be used to quickly add times (see Section 6.2).
- Break (Set break times in “Employee Check-in Settings”):
- Click ”+ Add Break Time” to add a break period for the shift.
- Select the break type from the drop-down menu (derived from employee break rule settings).
- Enter the start time of the break.
- Validation Rules: Break time must fall within the shift time range (shift start time ≤ break start time < break end time ≤ shift end time), and multiple break periods within the same shift are not allowed to overlap. Violations will be marked as “Invalid time”.
- Notes (Optional): Enter relevant notes.
-
Click “Save”. After system verification, the shift (and break) will be displayed in the scheduling table.
7.5.1.2 Daily View: Detailed Instructions for Adding a Single Shift
- In the scheduling table (daily view), press and hold the mouse over the target employee and target time range, then drag it to set the shift duration.
- The system will pop up a confirmation window for “Add Shift”.
Content cannot be displayed outside Lark documents
-
Job (Required): Usually locked to the currently selected employee’s position; can be switched for employees with multiple positions.
-
Employees (Required): Usually locked to the currently selected employee.
-
Time (Required): Drag to adjust the time; the pop-up window for this field is similar to Section 6.1.1 when clicked.
-
Break (Set break times in “Employee Check-in Settings”):
- Click ”+ Add Break Time” to add a break period for the shift.
- Select the break type from the drop-down menu (derived from employee break rule settings).
- Enter the start time of the break.
- Validation Rules: Break time must fall within the shift time range (shift start time ≤ break start time < break end time ≤ shift end time), and multiple break periods within the same shift are not allowed to overlap. Violations will be marked as “Invalid time”.
-
Notes (Optional): Enter relevant notes.
Click “Save”. After system verification, the shift (and break) will be displayed in the scheduling table.
Content cannot be displayed outside Lark documents
7.5.2 Core Function Explanation
7.5.2.1 Multiple Views - Meet Different Management Scenarios
- By Job (Weekly View) - Default View
- Best for: Planning overall manpower coverage for each position.
- View Features: Grouped by position, collapsible/expandable, clearly displays schedules for all employees under each position.
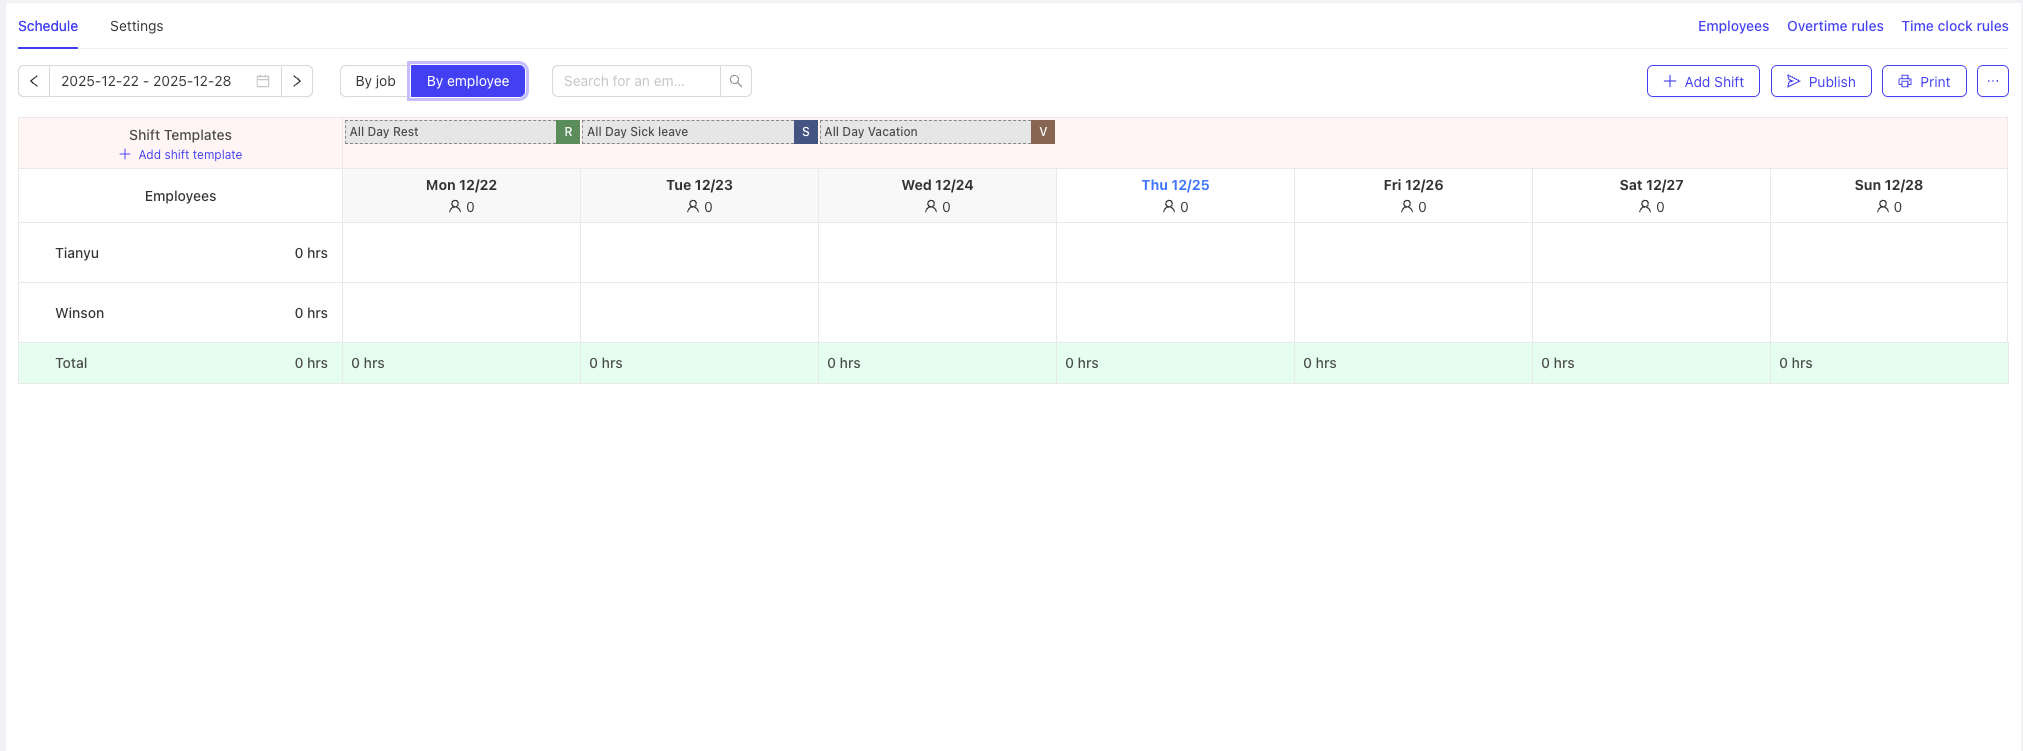
- By Employee (Weekly View)
- Best for: Viewing the entire week’s shift arrangements for a specific employee.
- How to Switch: Click the “By Employee” button in the toolbar.
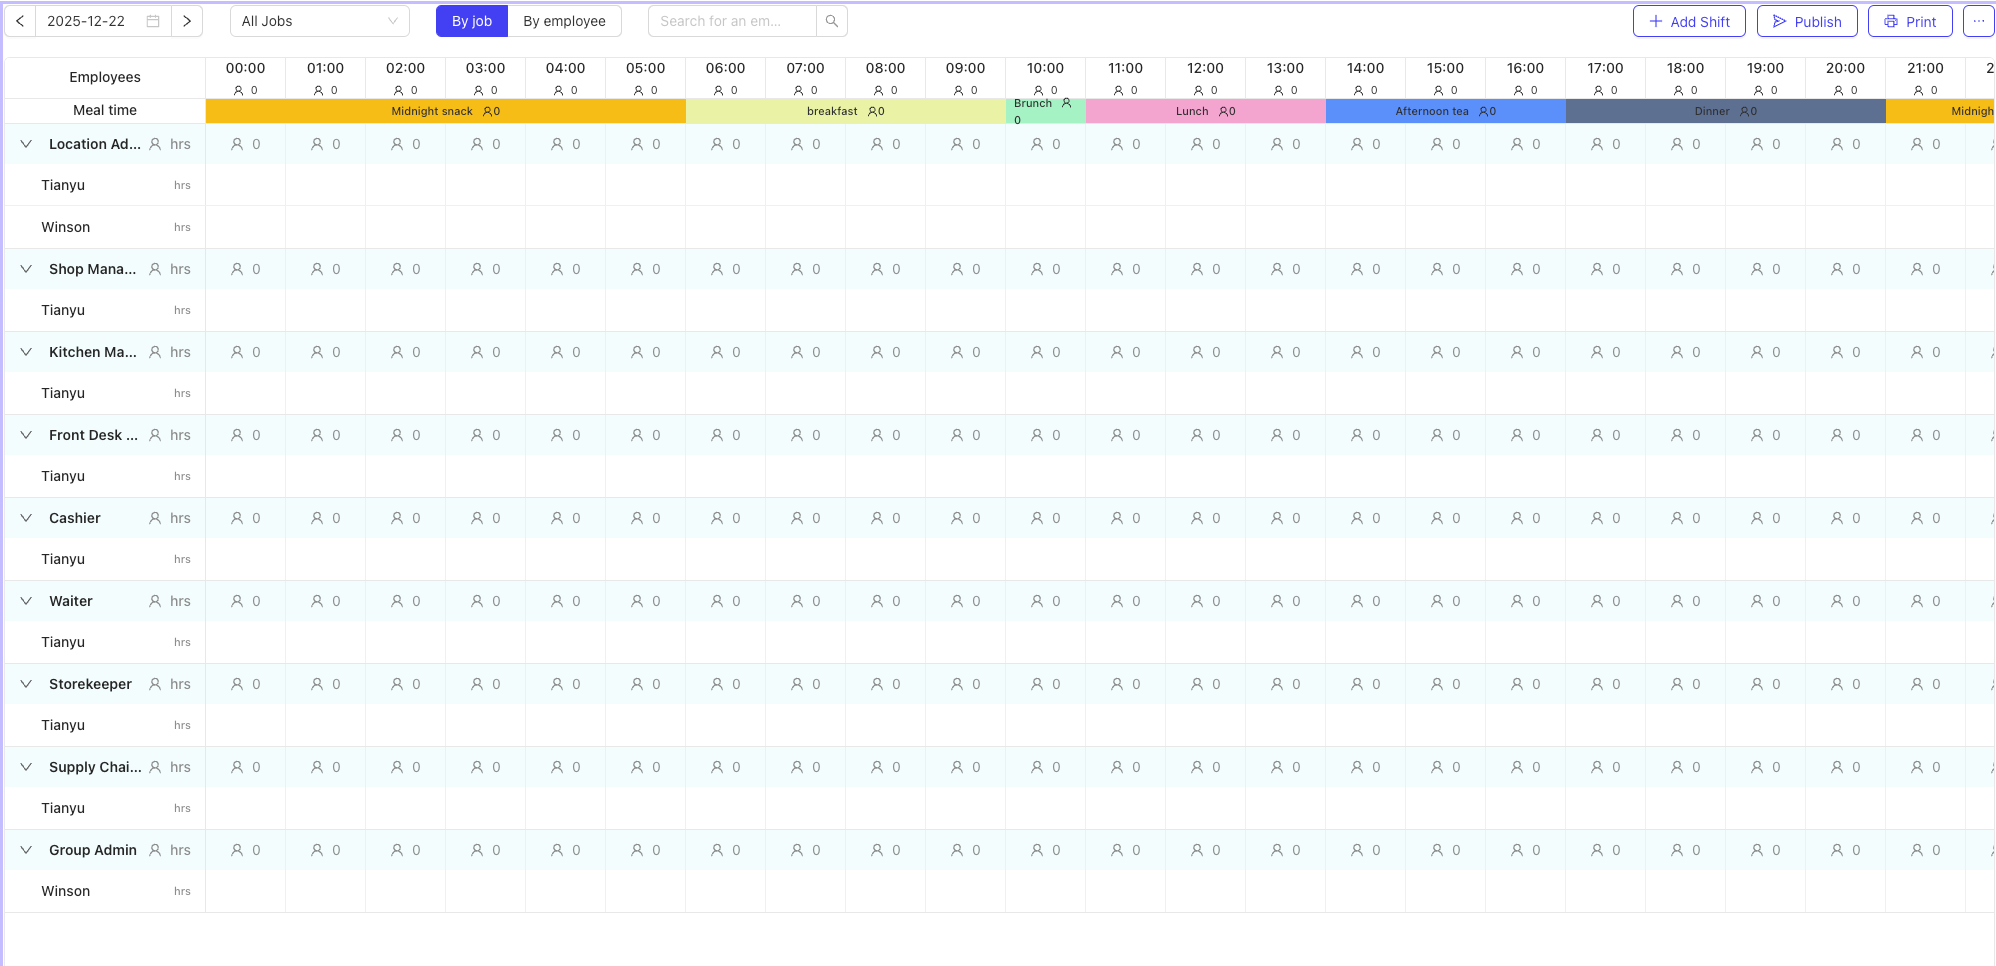
- Day View (Daily View)
- Best for: Refined management of daily manpower, checking hourly on-duty personnel count, and scheduling based on peak dining hours.
- How to Access: Click the header of any date in the weekly view, or select “Day view” from the “More” menu.
- View Features: 24-hour timeline, intuitively displays shift overlaps and personnel density.
7.5.2.2 Efficient Scheduling Operations
- Batch Add Shifts
- Click “Add Shift” in the toolbar.
- Select a position → 1 employee → multiple dates → set one or more shift times/shift break times.
- Create multiple different shifts for the same employee across multiple days at once, greatly improving efficiency.

- Copy and Move
- Copy to Future: Use More > Copy Schedule to copy the entire current week’s schedule to a future week.
- Drag-and-Drop Clone:
- Press and hold the Shift key while dragging an existing shift to quickly clone it to different dates for the same employee.
- Drag a template shift from the top to a specified employee to quickly clone the shift.
- Drag-and-Drop Move: Directly drag a shift to different dates for the same employee or the same date for different employees to quickly adjust schedules.

-
Drag-and-Drop Scheduling in Daily View
- Extend/Shorten Shifts: Hover the mouse over the shift bar until forward/backward icons appear, then press and hold to extend the daily shift forward or backward.
- Quick Time Adjustment: Move the entire shift block to a new start time.
- Quick Copy: Press and hold the Shift key while dragging the shift to an employee’s name.
-
Use Shift Templates
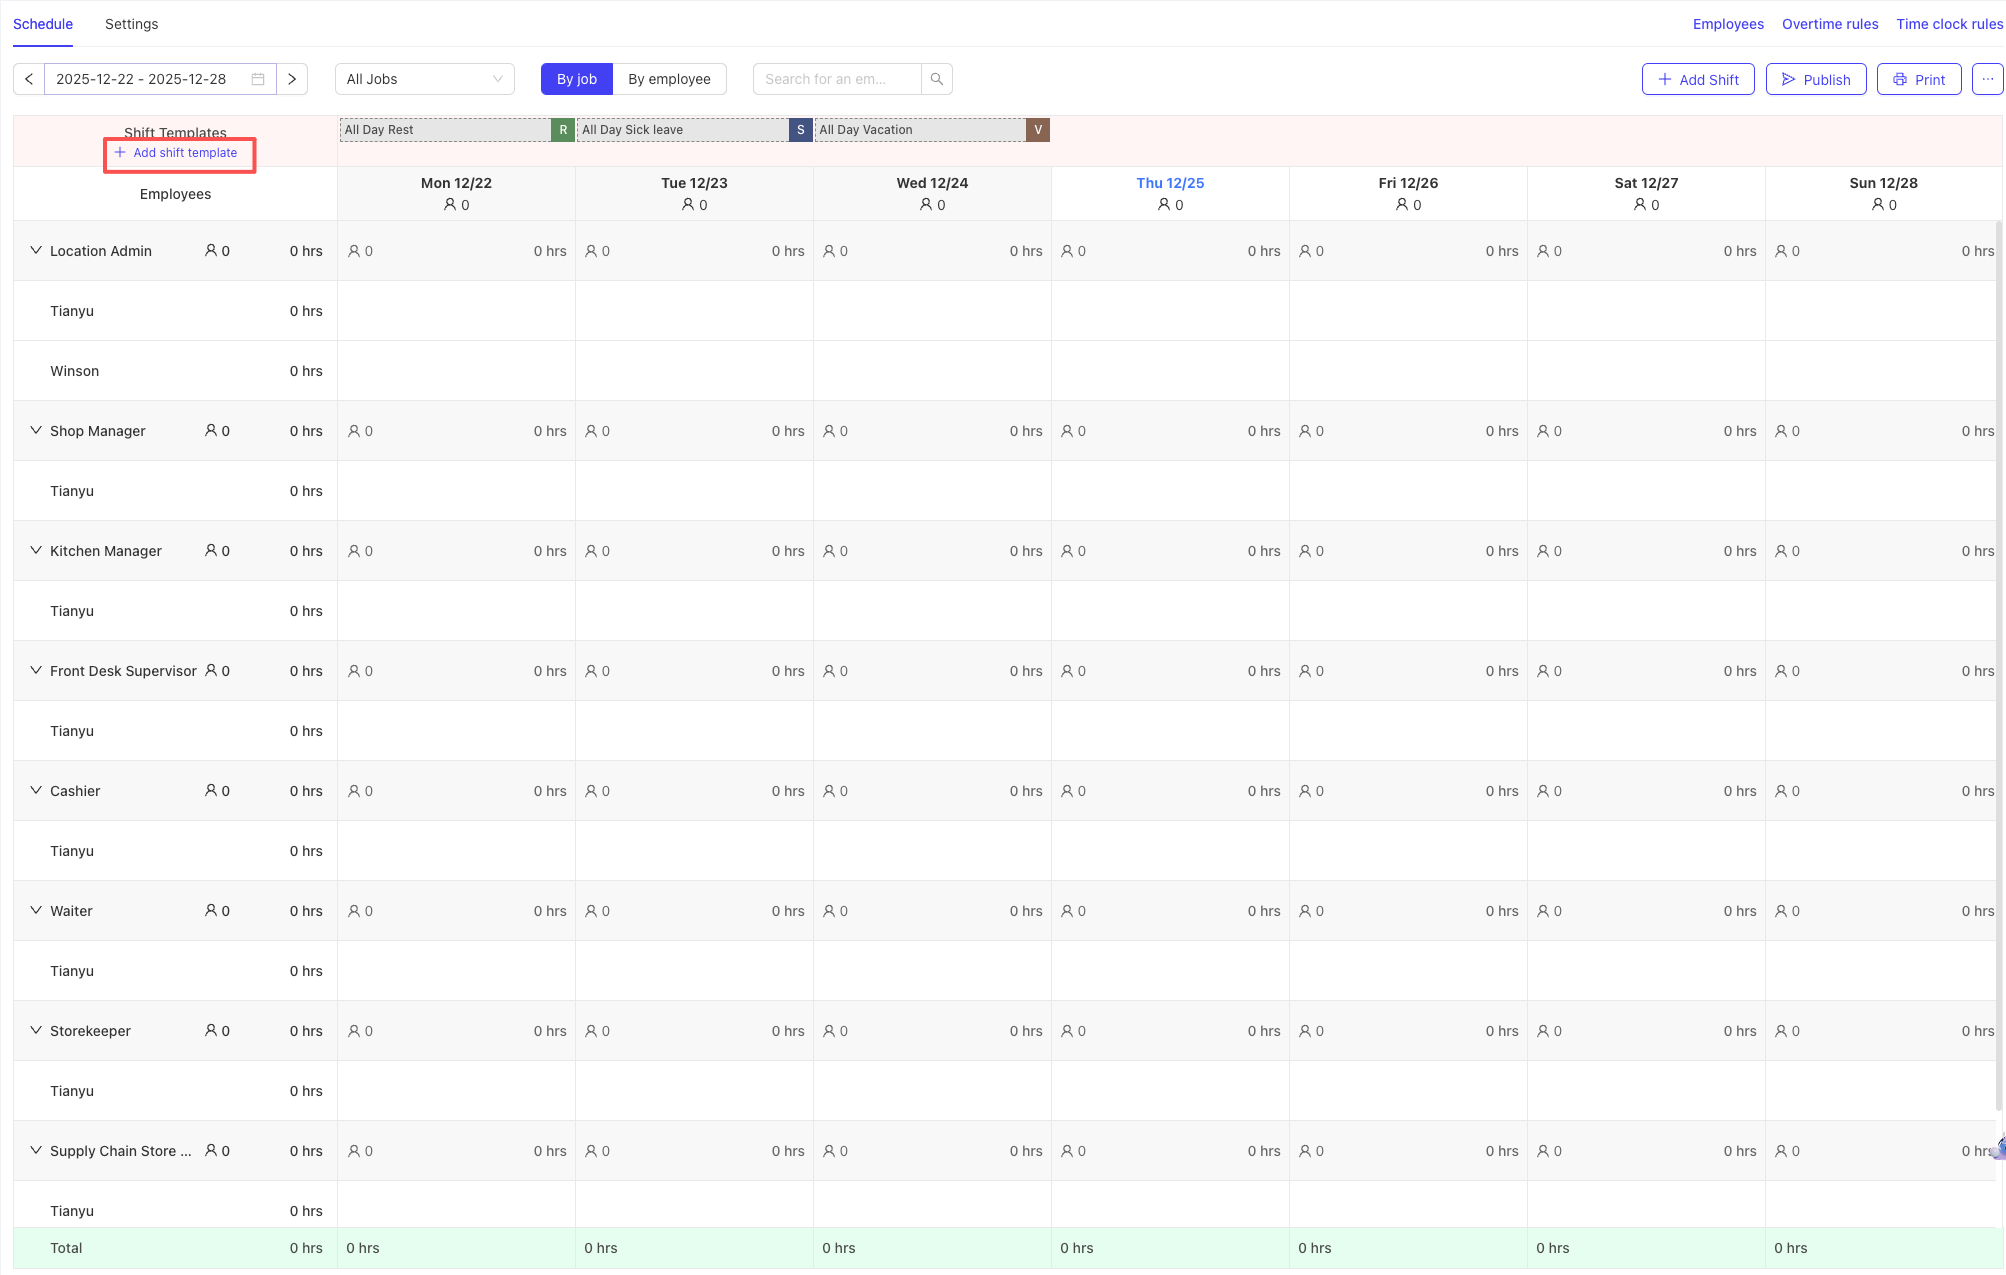
- Add Templates:
- On the main scheduling page, click the “Add Shift Template” button.
- In the pop-up window, fill in the following information:
- Time (Required): Set the start and end times of the template.
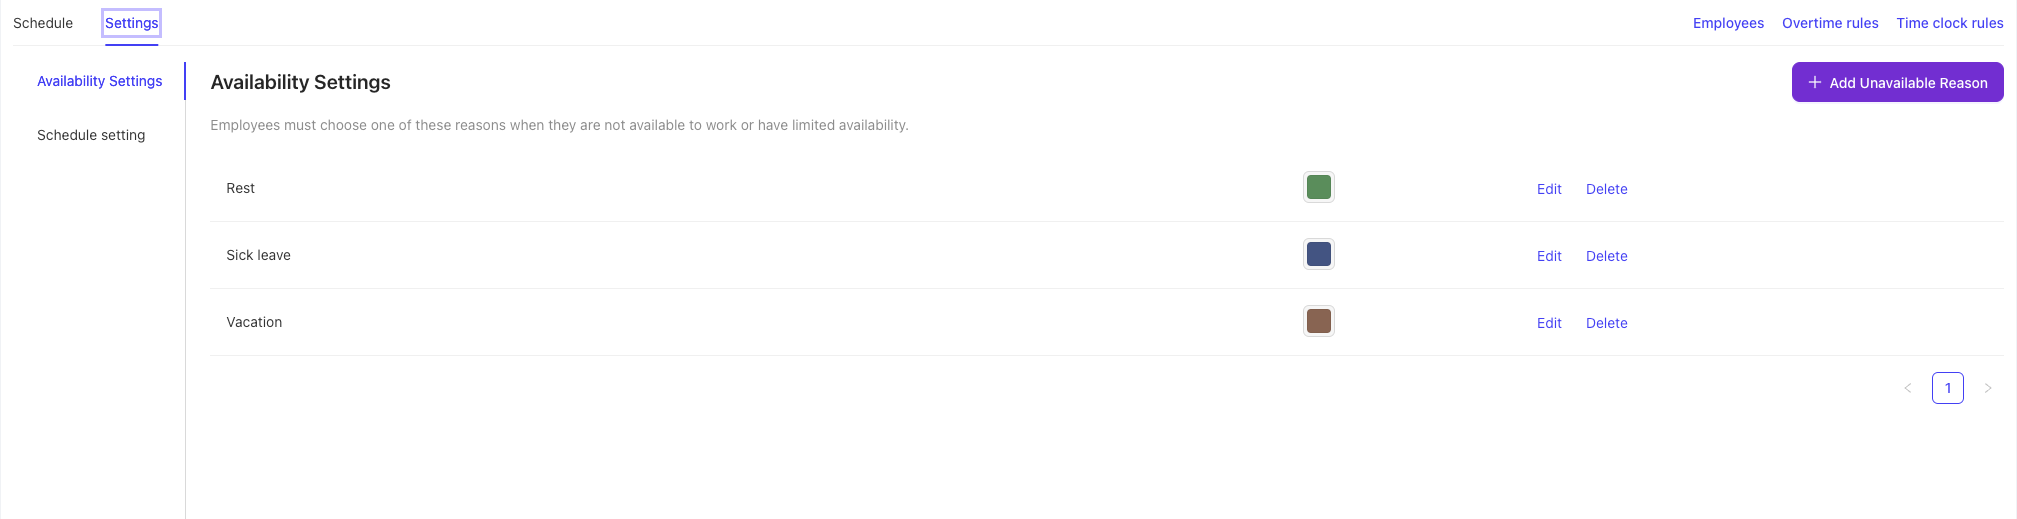
- Type (Required): Select the template type, including Shift, Rest, Vacation, Sick Leave, or custom types (add custom types in settings).
- Notes (Optional): Enter up to 100 characters of notes, which can be viewed by hovering over the template entry.
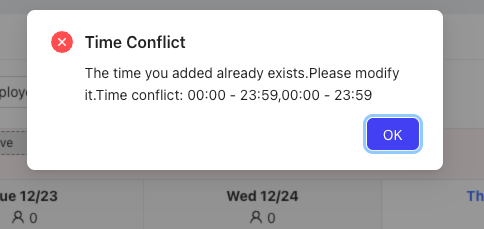
- Click “Save”. The system will verify time validity (end time must be later than start time) and check for conflicts with existing Shift-type templates.
- Add Templates:
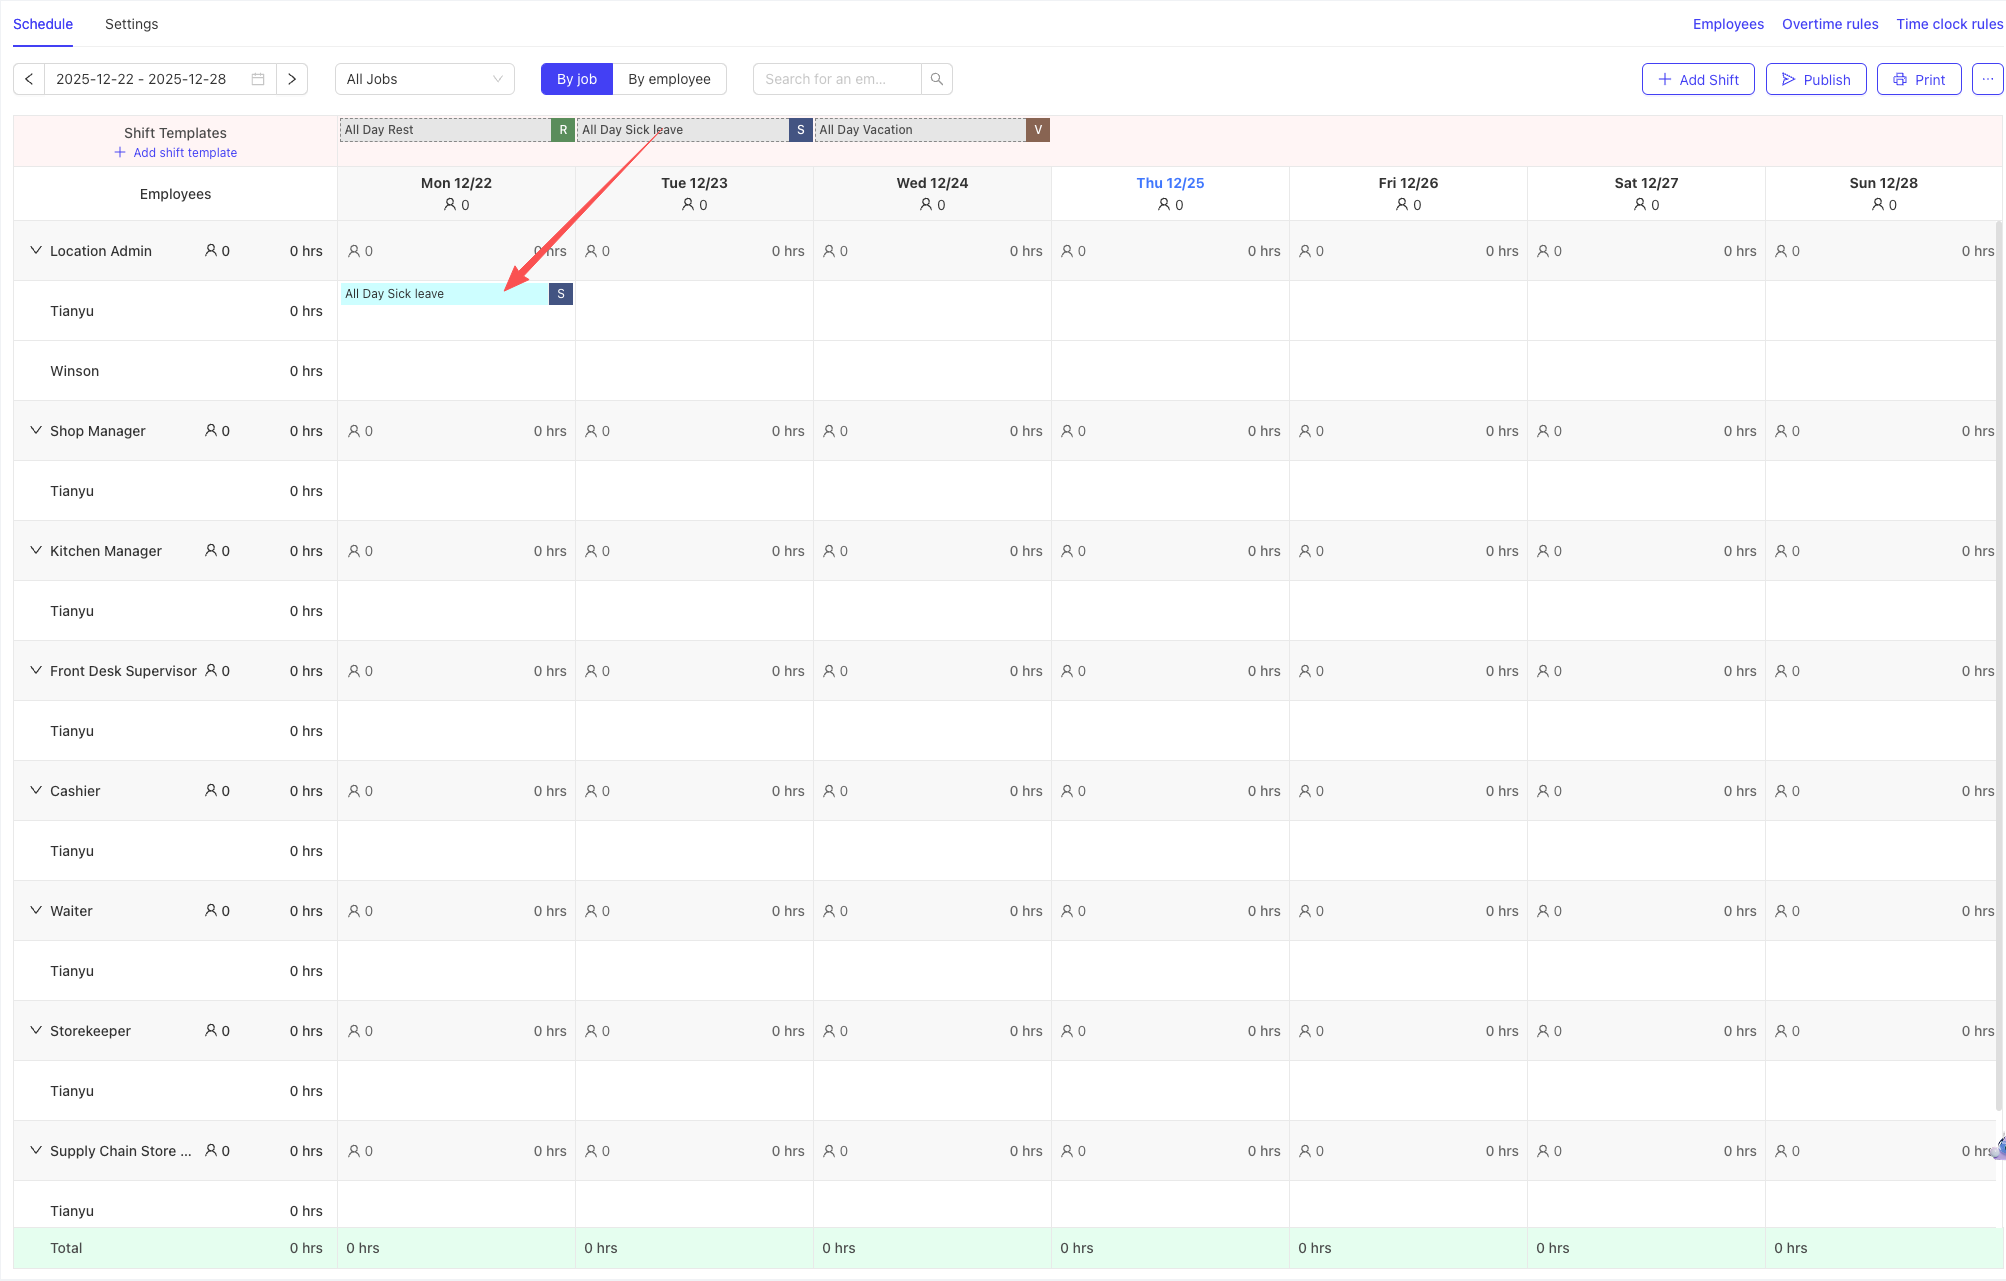
- Use Templates:
- In the add shift pop-up window, you can either manually enter times or directly select pre-created template time periods.
- On the scheduling management page, you can directly drag templates from the template box at the top to use them.
7.5.2.3 Intelligent Verification and Prompts
- Conflict Check
- Same Position Conflicts: The system blocks scheduling multiple shifts for the same employee in the same time period for the same position.
- Cross-Position Conflicts: The system prompts overlapping shift times for an employee across different positions but allows saving (suitable for scenarios where employees hold multiple roles). Conflicting shifts are highlighted in orange.
- Overtime Alerts
- The system automatically calculates an employee’s total weekly working hours based on the overtime rules set for the store.
- If an employee works overtime for a week, an overtime marker is displayed next to their name, and the shift bar is highlighted accordingly.
Overtime Rule Settings:
On the settings page, locate the "Overtime Rules" section.
Configure the following rules:
- Workweek start time
- Consecutive working days (Optional)
- Daily working hours: Set the maximum daily working hours for an employee (e.g., 8 hours). Time exceeding this limit is counted as overtime.
- Weekly working hours: Set the maximum weekly working hours for an employee (e.g., 40 hours). Time exceeding this limit is counted as overtime.
- Consecutive work verification: Set thresholds for consecutive work (e.g., more than 12 consecutive hours or 7 consecutive days).
Save the configuration. All subsequent scheduling operations will be verified against these rules.
7.5.3 Advanced Management and Settings
7.5.3.1 Manage Eligible Scheduling Positions and Employees
- Path: Settings > Schedule Settings
- You can:
- Toggle Controls: Determine which positions or employees participate in scheduling. Disabled positions/employees will not appear in the scheduling list.
- Custom Sorting: Adjust the display order of positions and employees in the scheduling table via drag-and-drop to prioritize important information.
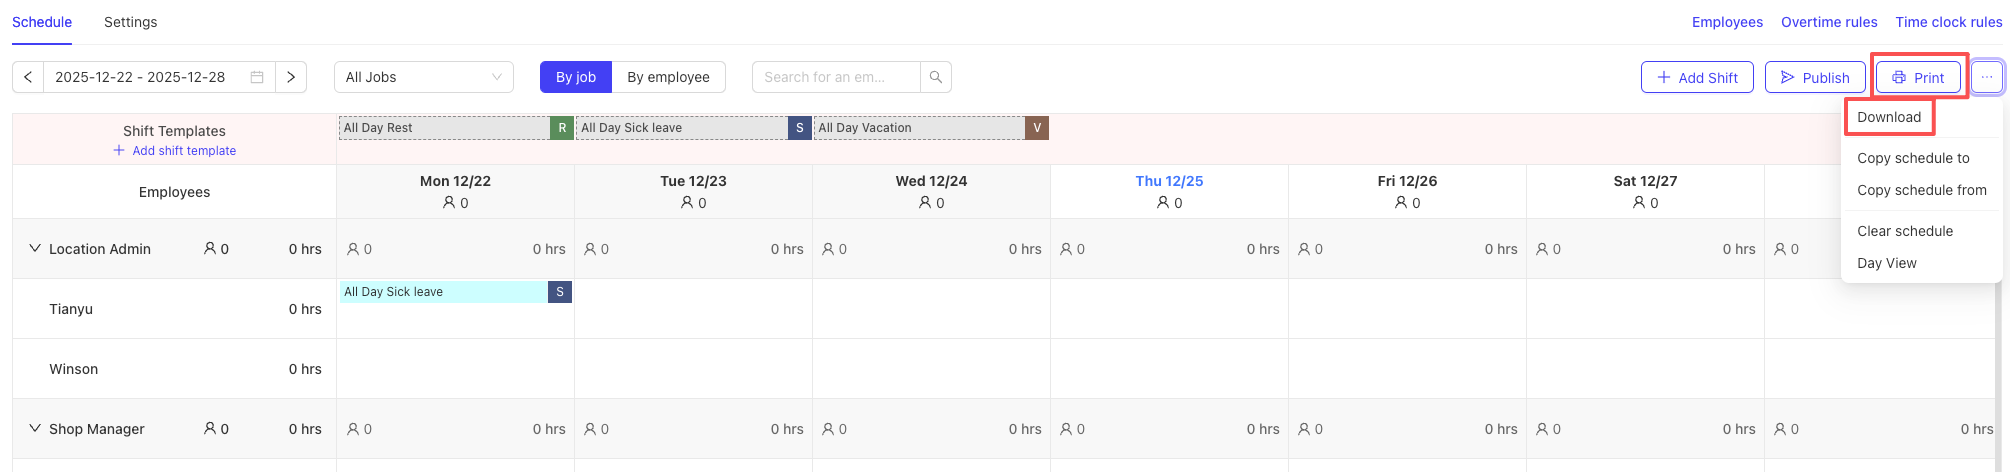
7.5.3.2 Export and Print
-
Export: More > Export to export as a CSV file for data backup or further analysis.
- Click the ”…” More button in the upper right corner of the scheduling page.
- Select the “Export” option.
- The system generates and downloads a schedule file in CSV or Excel format. The file name typically includes the store name and week start date for easy archiving and viewing.
-
Print: More > Print to generate a clear, formatted schedule for posting announcements. Supports filtering by position and selecting whether to include unscheduled employees.
7.5.3.3 Publish Schedules
After the scheduling plan is finalized and verified, click the “Publish” button to send the schedule to employees.
7.6 Tip Management
7.6.1 Overview
This module focuses on collecting and distributing service tips in the restaurant industry. It standardizes and digitizes tip management to improve customer payment experience, employee satisfaction, and store management efficiency.
The system supports configurable tip collection methods (percentage, fixed amount, custom), and distributes tips based on enterprise rules to eligible roles (servers, kitchen, cleaning, etc.). Administrators can adjust rules and track distribution; employees can view earnings details and submit discrepancy claims.
7.6.2 Glossary
- Tip Management: Within a defined period, contributors deposit a portion of their tips into a shared pool, which is then distributed to recipients according to a defined strategy.
- Tip Pool: A virtual account that holds shared tips and records inflows/outflows and balance.
- Tip Sharing Rules: Rules that distribute shared tips by defined ratios and order.
- Contributor: Roles whose tips must be contributed to the pool (e.g., servers).
- Recipient: Roles eligible to receive distributions (e.g., server, chef, dishwasher).
- Share: Contributing tips to the pool (with recipient roles and ratios).
- Distribute: Allocate pool totals to roles and then to employees.
7.6.3 Configure Your Tip Pool
Step 1: Enter Tip Management
- Navigate to: BO > Basic Settings > Employee Management > Tip Management ImageImageImage
Step 2: Create a Tip Pool
-
Click “Add Tip Pool”.
-
Fill in:
- Basic Info
- Tip Pool Name
- Status (default Off; turn On after configuration)
- Order Types (source filter)
- Tip Pooling Period (daily or by shift)
- Shift (optional; for shift-based pooling)
- Contribution Rules (Where money comes from)
- Add contributor rule: Job, Percentage, Source (category/tip—cash/non-cash/service fee)
- Distribution Rules (Where money goes)
- Add recipient rule: Job, Percentage (total should equal 100%)

- Add recipient rule: Job, Percentage (total should equal 100%)
- Basic Info
-
Click Save.
Best Practice: Create separate pools for different shifts (morning/late) or different scenarios (dine-in/delivery).
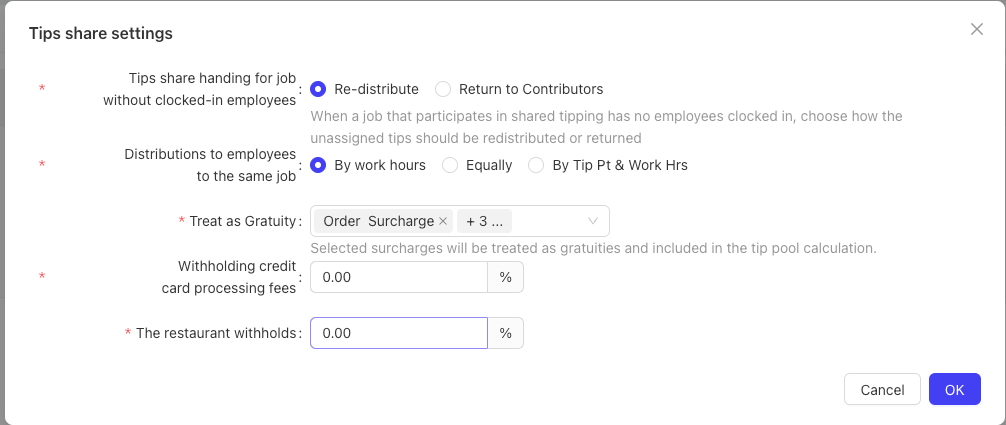
Step 3: Global Sharing Settings From the tip pool list page, click “Modify Tip Sharing Settings”:
-
Redistribution Method
- Redistribute (recommended)
- Return to Contributor (special cases)
-
Distribution Method
- By Work Hours
- Evenly Distributed
- By Tip Pt & Work Hrs
-
Credit Card Processing Fee Deduction (percentage)
-
Restaurant Reserve (percentage)
7.6.4 Tip Reports
Navigate to: Data Insights > Employees > Tip Reports
- Store Tip Summary: View total tips by type (cash/non-cash) for a time range. ImageImageImage
- Employee Tip Details: View per-employee details including hours, pre-redistribution tips, post-redistribution earnings, pool contribution, deductions, pool receipt, etc. Formula: Employee Tip Income = Pre-pool Tips – Pool Contribution – Deductions + Pool Receipt
7.6.5 Common Questions (Selected)
- What is a tip pool and why use it? A shared pool to redistribute tips for fairness and teamwork.
- Contributor vs Recipient: Contributors deposit tips; recipients receive distributions; a role can be both.
- Does changing rules apply immediately? Yes for new orders; historical allocations are not affected.
- No data in reports? Check pool status (On), report date range, and whether eligible orders/tips exist.
8 Customer Management
8.1 View Customer List
- Path (Group Perspective): Basic Services > Customer Management. Shows all customers. Currently supports on-account (tab) scenarios; may expand later.
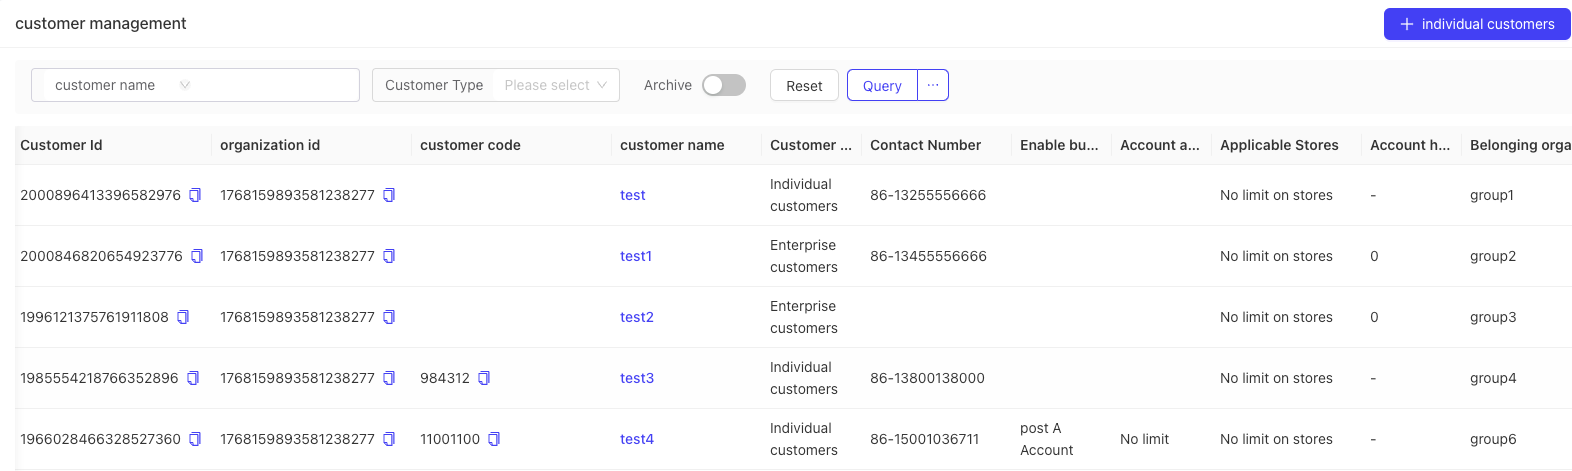
8.2 Add Customer
- Add Individual Customer: Click “Add Individual Customer”, fill in details, select applicable stores, enable “On Account” and configure rules, then save.
- Add Corporate Customer: Click “Add Corporate Customer”, fill in details, select stores, enable “On Account”, configure rules and account holders. Multiple account holders can have dedicated limits and discount plans.
9 Audit Log
9.1 Operation Logs
- Path (Group Perspective): Basic Services > Audit Logs > Operation Logs. Shows all employee operation records.
- Purpose: Trace actions across menus for troubleshooting and compliance.
9.2 Login Logs
- Path: Basic Services > Audit Logs > Login Logs. Shows login account, time, IP, etc., for security monitoring.
10 Resource Management
10.1 Asset Center
- Path (Group Perspective): Basic Services > Resource Management > Asset Center. Shows all image assets.
- Upload assets via “Upload Asset” for system display scenarios.
10.2 Product Authorization
- Access Path: Open the menu [Basic Services > Resource Management > Product Authorization], and the page displays all purchased products and their authorization information under the group by default, including only “Device License” and “Point License” products purchased through the sales subsystem.
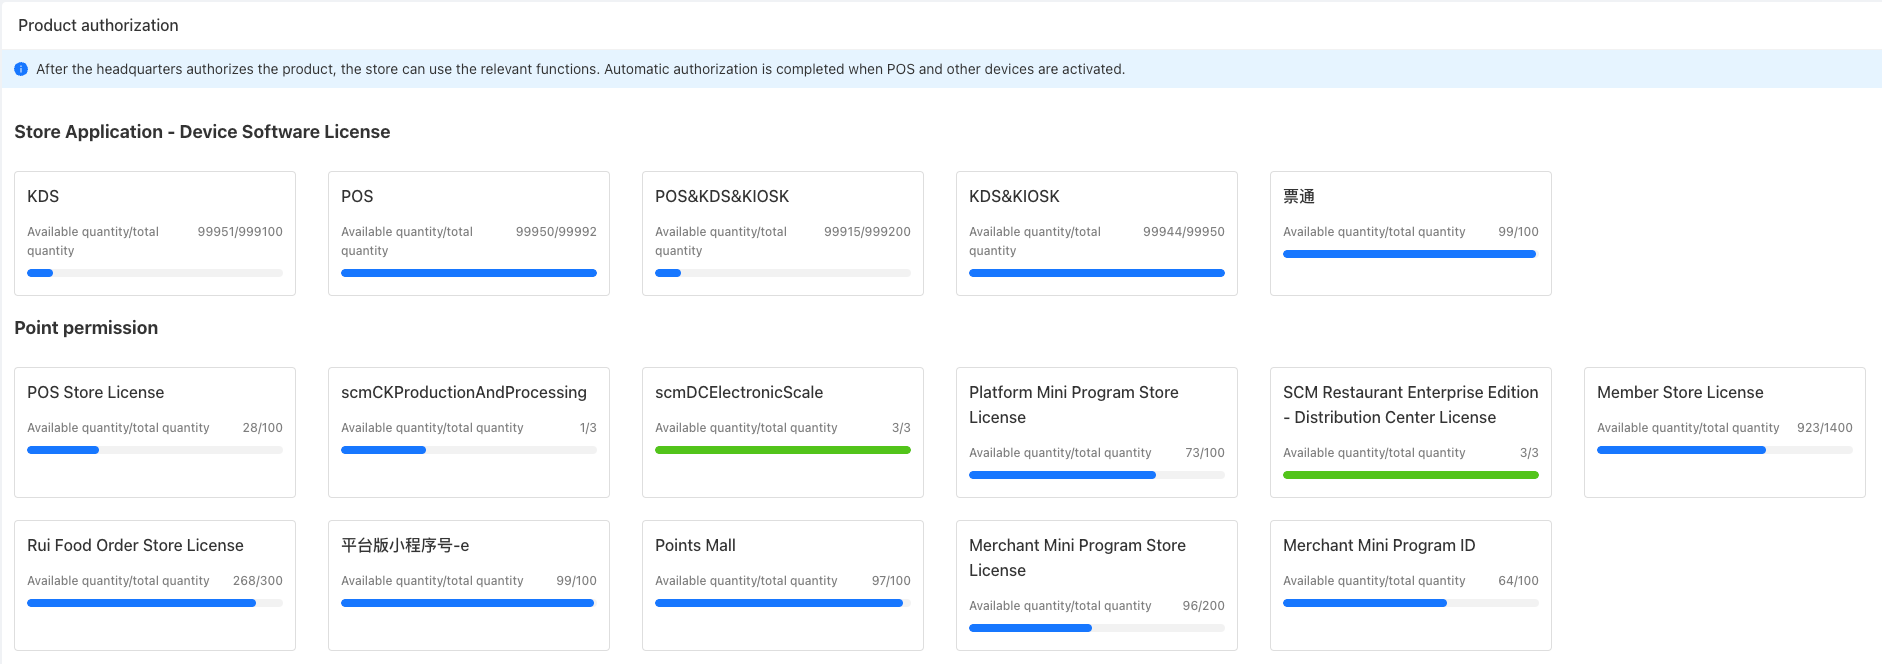
-
License Description:
- Point License: Refers to the total number or seats available for the product. The “License” is the usage right obtained by the authorized object (such as a store); when a store obtains a license, it occupies one authorized point and consumes one available authorization quantity.
- Device License: Refers to the number of specific terminal devices authorized for use. Each device used by a store occupies one point; this type of license supports multiple distributions for the same store. The sum of the quantities of multiple valid authorizations at a certain time is taken as the upper limit of the maximum number of simultaneous online devices in the store.
-
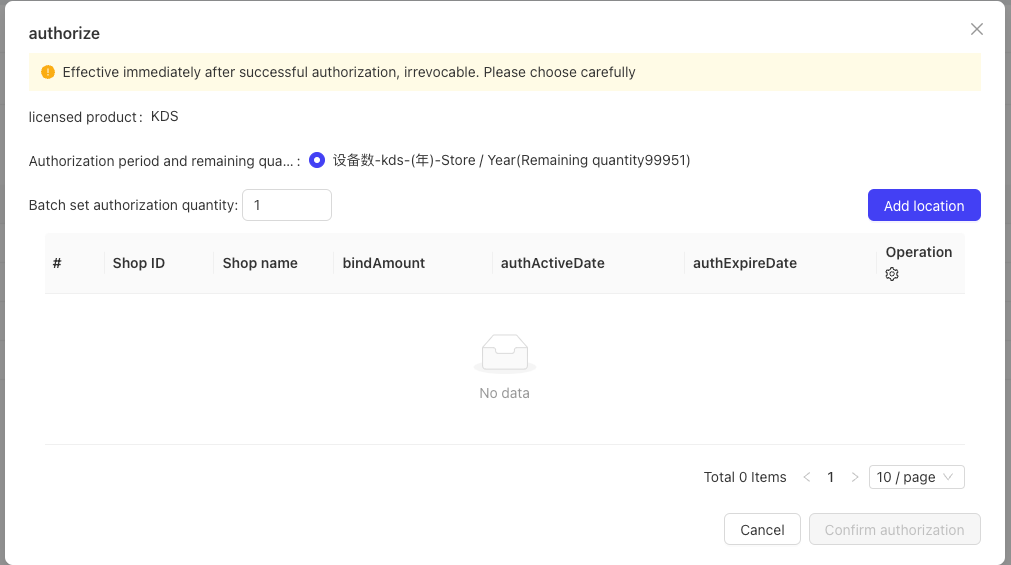
Authorization Operations:
- Click the product card to be redirected to the product details page to perform operations such as authorization binding and renewal.
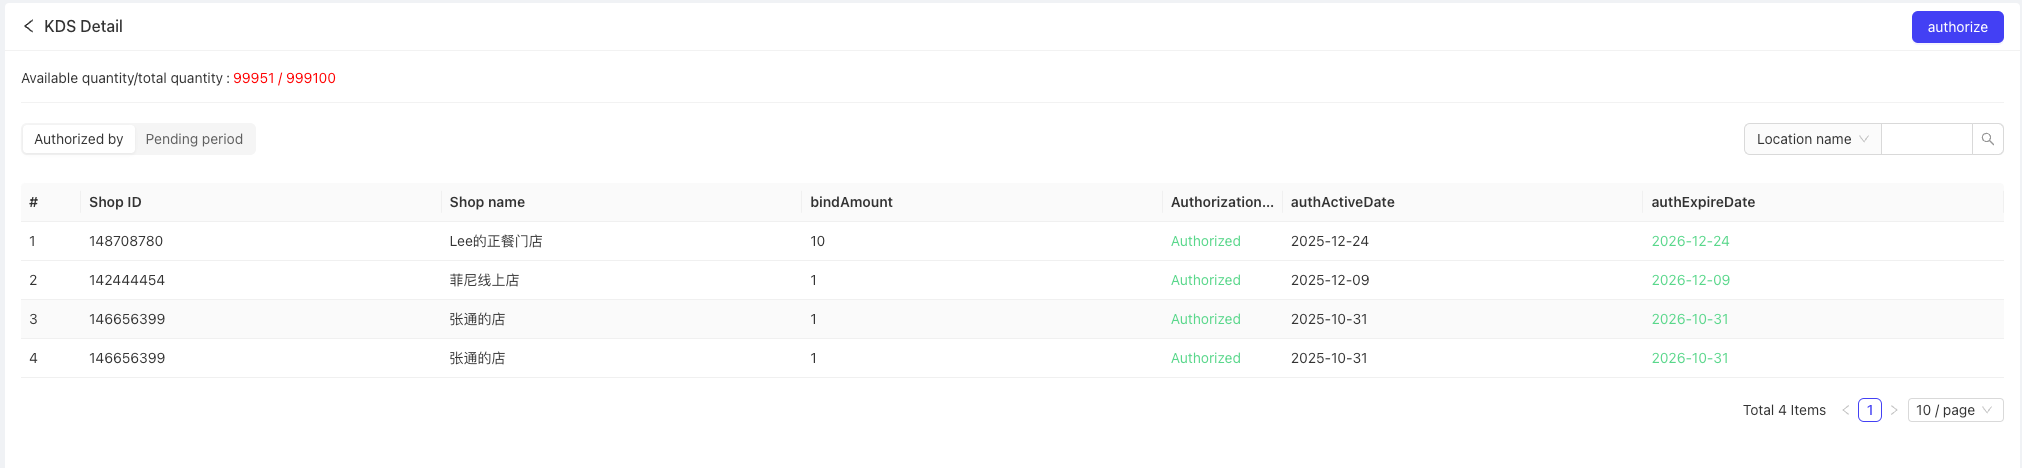
- Authorization Binding: Click “Authorize” in the upper right corner of the details page to pop up the authorization dialog box; click “Add Store” in the upper right corner of the dialog box to pop up the store list, select the target store and click “Confirm Authorization” to complete the authorization binding.
- Click the product card to be redirected to the product details page to perform operations such as authorization binding and renewal.
- Authorization Impact: If a store under the group does not obtain the corresponding product authorization, it cannot use the function menu or software and hardware of the product, and needs to complete the authorization distribution before use.
11 FAQs
- How can an employee obtain a perspective for an organization? In Employee Accounts, configure perspectives on Group/Brand/Store organizations. If an employee has any role under that organization type, they will have that organization’s perspective.
- If an employee has a role under a group or brand, will they automatically have perspectives for subordinate stores? No. Perspectives are organization-specific. Without store-level roles, the employee will not have that store perspective. They should view store-related data from a Group/Brand perspective instead.