Online Ordering
1 Module Introduction
The Online Ordering System Module is a multi-functional platform serving catering merchants and customers, with core functions covering three major sections: customer-side ordering services, merchant-side operation management, and page UI customization:
- Convenient Ordering for Customers
Supports three dining modes: dine-in, self-pickup, and delivery. It integrates full-process functions including menu browsing, dish selection, order placement, and payment. Equipped with order management and address management tools to ensure order fulfillment, the system also leverages intelligent technology to provide personalized recommendations based on customers’ historical orders and preferences, optimizing the dining experience.
- Efficient Operation for Merchants
Enables merchants to monitor sales data in real time, flexibly adjust menus and promotional activities, and improve operational efficiency and profits.
- Independent UI Design & Customization
Merchants can independently design and customize the page UI of the online ordering platform according to their brand image and style, including theme colors, layout structure, font style, etc. They can flexibly adjust page elements to highlight featured dishes or promotions, enhancing users’ visual experience and purchase desire. In addition, the system provides a rich library of UI templates and materials for merchants to reference and select, helping them quickly build an attractive and professional online ordering platform.
2 Glossary
Mini Program: A platform for application development and usage provided by WeChat and Alipay. Users can directly use mini programs within WeChat or Alipay to perform operations such as ordering food without downloading and installing the apps separately.
Multi-person Collaborative Ordering: Supports multiple people ordering simultaneously in the dine-in scenario, avoiding duplicate payments and improving the dining experience.
Authorization Quota: Each successful device authorization in the system consumes one unit of quota. No further authorization operations can be performed when the quota is insufficient.
3 New Site Creation
Step 1: Switch to Group Perspective
- The group administrator logs in to the merchant backend and switches to the Group Management Perspective via the perspective switch button in the upper right corner.
Step 2: Navigate to the menu path: Operation Management > Online Ordering > Website Management. The page has no default site configuration initially. On the welcome page, you need to click Add Site to create a new site.
Prerequisite: The group must have purchased Mini Program related services. If not, a purchase reminder will pop up when attempting to add a site.

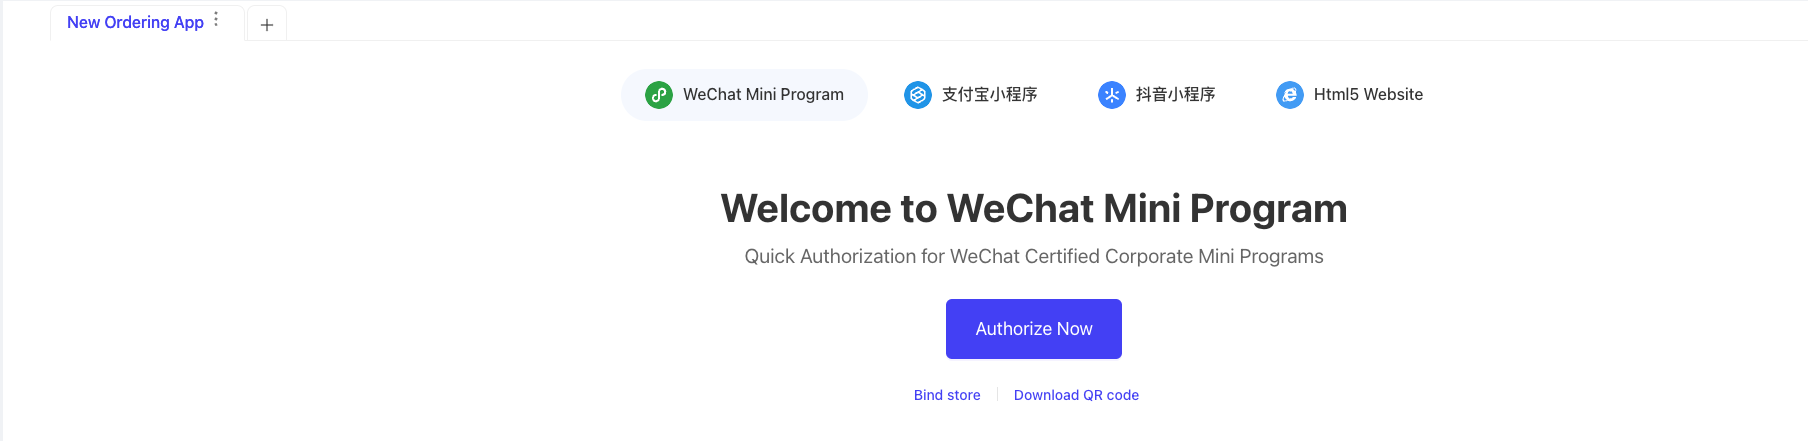
Step 3: An application will be generated after creation, which consumes one unit of merchant-version mini program authorization quota. A set of applications includes WeChat Mini Program, Alipay Mini Program, Douyin Mini Program, H5 Website, and APP. By default, all mini programs are in an unauthorized state and require clicking Authorize Now to redirect to the external official platform for account authorization (e.g., the WeChat Mini Program can only be used after successful authorization on the WeChat official platform). The H5 Website and APP are proprietary to RS and can be used immediately after creation.
4 Mini Program Settings
Step 1: Switch to Group Perspective
- The group administrator logs in to the merchant backend and switches to the Group Management Perspective via the perspective switch button in the upper right corner.
Step 2: Navigate to the menu path: Operation Management > Online Ordering > Website Management. For groups that have added a website, the mini program settings interface is displayed by default. The interface includes the following functions:
- Update Button: When a system mini program update is available, it needs to be submitted to the corresponding mini program official platform for filing. The new version can be officially launched for users only after approval.
- QR Code Download: Provides QR codes for system maintenance personnel to test and experience. The test mini program does not need to be submitted to third-party official platforms, and the latest effect can be viewed immediately after UI customization. It is used exclusively for debugging by operation and maintenance personnel.
- Link Path: Displays the relative path address of each mini program function, also used for debugging by operation and maintenance personnel.
- Bind Stores: Displays the stores that the mini program has been bound to and can be used for. Only bound stores are available for selection during ordering on the mini program. Stores can be unbound on this page, and the store binding/unbinding settings are universal for all types of mini programs and H5 websites.
Note: A store can only be displayed in the Bind Stores list for selection if it has been authorized in the Product Authorization - Merchant-version Mini Program Store License page.
- Membership Settings: Configures the membership card schemes applicable to the mini program and sets a default membership card scheme. New members added by the group will be associated with the default scheme, and the group can support multiple different membership card schemes. Members accessing the mini program will be automatically issued a membership card under the corresponding scheme.
- Payment Account: This setting allows merchants to apply for payment permissions for the mini program, but only displays the setting status. For detailed configurations, you need to go to Financial Management > Payment Configuration.
- Points Mall: Allows selecting a points mall application created by the group for use in the mini program.
- Basic Settings: Displays the current status information of the mini program, supports re-authorization, and unbinding from the WeChat Official Account.
- Application Settings: Configures payment agreements and privacy agreements.
- QR Code Download: Supports downloading various types of QR codes. Multiple stores can be selected and a QR code template specified for batch QR code download.
5 Mini Program UI Customization
Step 1: Switch to Group Perspective
- The group administrator logs in to the merchant backend and switches to the Group Management Perspective via the perspective switch button in the upper right corner.
Step 2: Navigate to the menu path: Operation Management > Online Ordering > Website Management. For groups that have added a website, the mini program settings interface is displayed by default. Click Go to Customize to redirect to the UI customization page. The system provides basic components, business components, marketing components, basic elements, etc., for operators to use in customization. The customizable content includes:
- Homepage: Configure page background, carousel images, and header styles; set the display of the personal information bar for logged-in and non-logged-in users; adjust containers and page layouts.
- Navigation: Set the bottom navigation bar information.
- Dine-in Ordering:
- Ordering Interface: Configure the interface style for dine-in ordering, including the header, advertisement banner, product section, shopping cart, and other areas.
- Dish Details Page: Set the display of regular dishes and set meals.
- Diner Count Page: Customize guide text and child count selection options; enable or disable this page (if disabled, users skip directly to the next page during ordering).
- Order Success & Payment Success Pages: Configure the details pages displayed after order confirmation and payment completion.
- Order Confirmation & Order Details Pages: Set carousel images, advertisements, and other information.
- Self-pickup & Delivery: Page configuration is similar to Dine-in Ordering, with the difference being the configuration of the store list page and dining mode selection page.
- Personal Center: Mainly configure the display of personal information and my functions related to membership. Clicking the Link Address field on the personal information page will pop up a link list, providing various link functions for selection and use.
- Membership: Configure the display styles of the membership details page, membership top-up page, coupons, membership QR code, etc. The My Coupons page supports subscribing to system-configured events.
- Other pages: Configure the login page, splash screen, order page, loading animation, etc.
- Marketing Activity Bar: Configure the display styles of various marketing activities on the mini program.
Step 3: The system pre-configures a variety of templates for merchants to choose from. Merchants can directly use a template if no special customization is required.
Step 4: During customization, drafts can be saved, and a temporary mini program QR code can be generated via the preview function to scan and view the customized effect. After finalizing the design, click Publish to launch the customized version online.
6 H5 Website Settings
The configuration of the H5 website is basically the same as that of the mini program. The key difference is that the access link of the H5 website is displayed on the page and can be customized independently.
Accessing this link in a browser will redirect to the H5 interface, where users can log in to use the ordering-related functions.
7 Smart Restaurant
It is a new type of site configuration, basically the same as the original website configuration. The only difference is that it uses the platform-version mini program, while the old version uses the merchant-version mini program. Details are not repeated here.
8 Store Online Ordering (Store Perspective)
Step 1: Switch to Store Perspective
- Switch to the Store Management Perspective via the perspective switch button in the upper right corner.
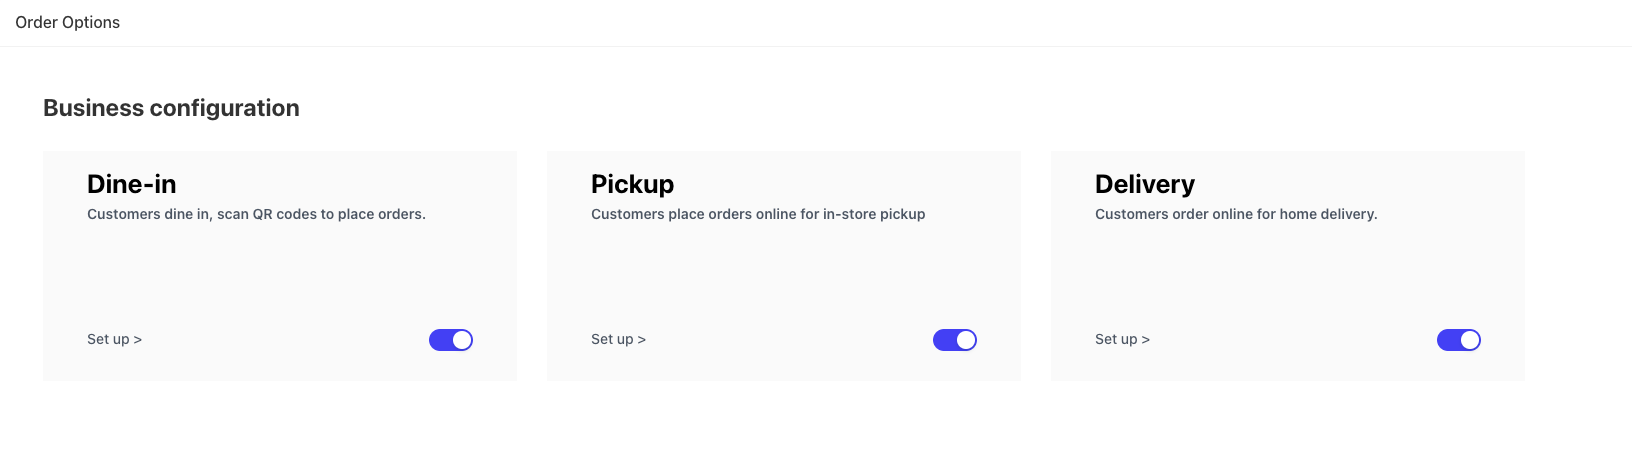
Step 2: Navigate to the menu path: Operation Management > Online Ordering > Ordering Business Settings. By default, dine-in, self-pickup, and delivery functions are all disabled on the page. This serves as the master switch for the store’s online ordering services, and each function needs to be enabled separately through configuration.
8.1 Dine-in Settings (Store Perspective)
On the dine-in settings page, customers scan the QR code to place orders in the store:
-
Ordering Modes:
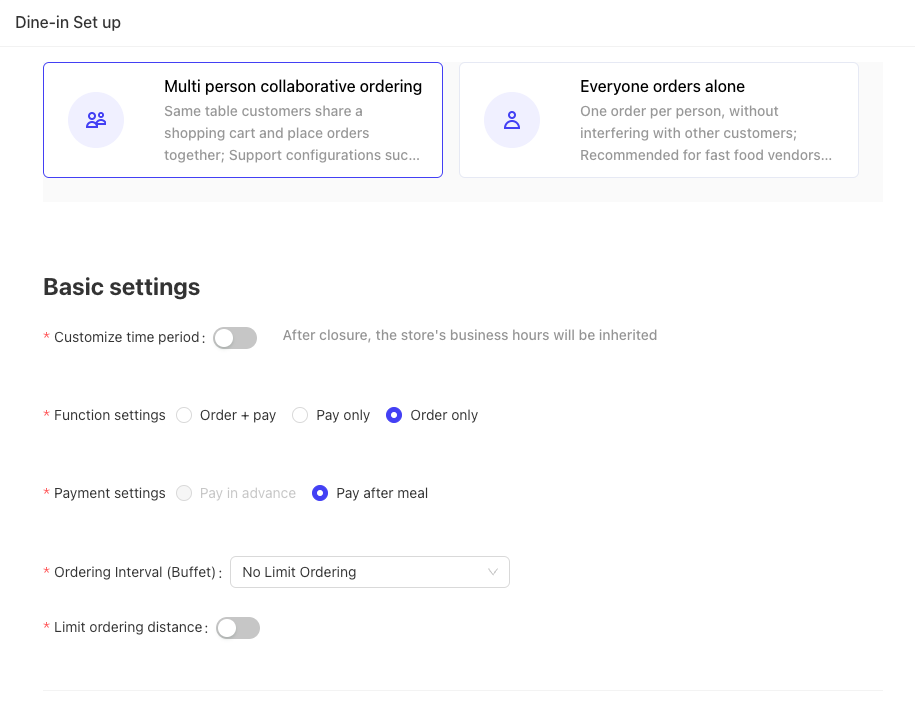
- Multi-person Collaborative Ordering: Multiple diners at the same table share one shopping cart and place orders together; supports configurations such as pre-payment and post-payment, suitable for full-service restaurants.
- Individual Ordering: Each diner gets an independent order even if they scan the same table QR code, without interfering with other customers, suitable for fast-food restaurants.
-
Basic Settings:
- Custom Time Period: If disabled, the store inherits the business hours configured in Basic Services > Store Profile > Details > Multiple Business Hours. If enabled, the business hours set here take priority.
- Single Business Hour: Set the start and end time, which applies to every day; online ordering is available during these hours.
- Multiple Business Hours: Set different business time periods separately for each day of the week, with a maximum of three periods per day.
- Custom Time Period: If disabled, the store inherits the business hours configured in Basic Services > Store Profile > Details > Multiple Business Hours. If enabled, the business hours set here take priority.
-
Function Settings:
- Ordering + Payment: Payment options include Pre-checkout Payment and Post-checkout Payment.
- Payment Only: Only Post-checkout Payment is available.
- Ordering Only: Only Post-checkout Payment is available.
-
Ordering Distance Limit: Customers cannot place orders if their location exceeds the set distance from the store.
-
Payment Methods: Supports Online Payment Only, Cashier Payment Only, and Online + Cashier Payment. You can also set whether mandatory registration and login is required for cashier payments.
-
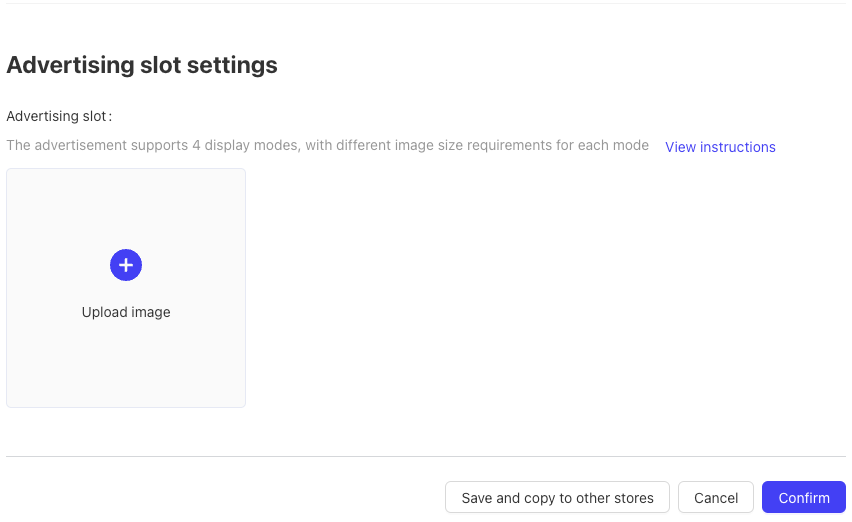
Advertising Space Settings: Upload advertisement banner images. Save the settings after submission, and the configuration can be copied to other stores for reuse.
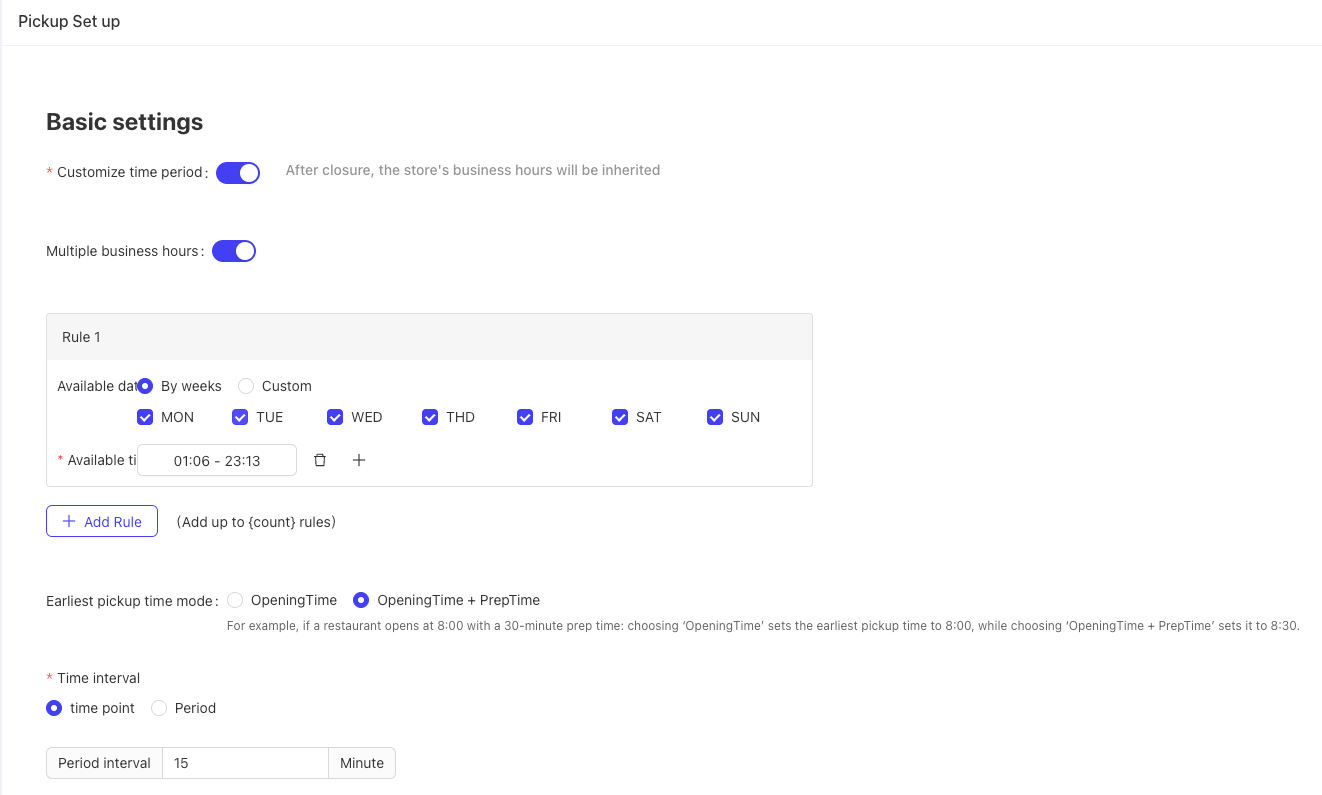
8.2 Self-pickup Settings (Store Perspective)
On the self-pickup settings page, customers place orders online and pick up the food in the store:
-
Basic Settings:
- Custom Time Period: Similar to the dine-in settings, details are not repeated.
- Earliest Pickup Time: Options include Store Opening Time and Store Opening Time + Meal Preparation Duration. For example, if the store opens at 8:00 and the preparation duration is 30 minutes: selecting Store Opening Time sets the earliest pickup time to 8:00; selecting Store Opening Time + Meal Preparation Duration sets it to 8:30.
- Reservation Time Interval: Defines the selectable time interval for customers to make reservations. The system supports reservation intervals by time points or time periods.
- Payment Methods: Defaults to Online Payment Only, with additional options: Cashier Payment Only and Online + Cashier Payment.
- Store List Label Image & Background Image: Upload images to be displayed in the store list during ordering.
-
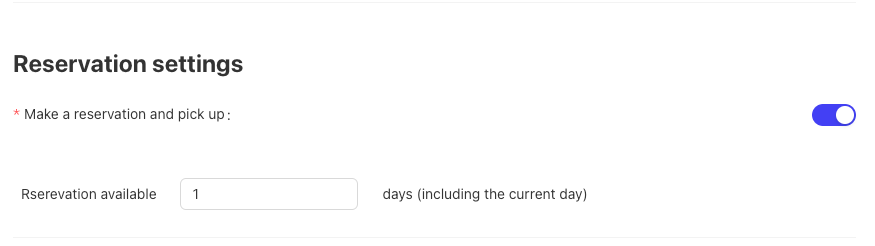
Reservation Settings:
- Advance Reservation Switch: If disabled, customers can only reserve for the current day; if enabled, reservations can be made for multiple days in advance, allowing customers to select a future date on the mini program to place orders.
- Advance Reservation Switch: If disabled, customers can only reserve for the current day; if enabled, reservations can be made for multiple days in advance, allowing customers to select a future date on the mini program to place orders.
-
Advertising Space Settings: Upload advertisement banner images. Save the settings after submission, and the configuration can be copied to other stores for reuse.
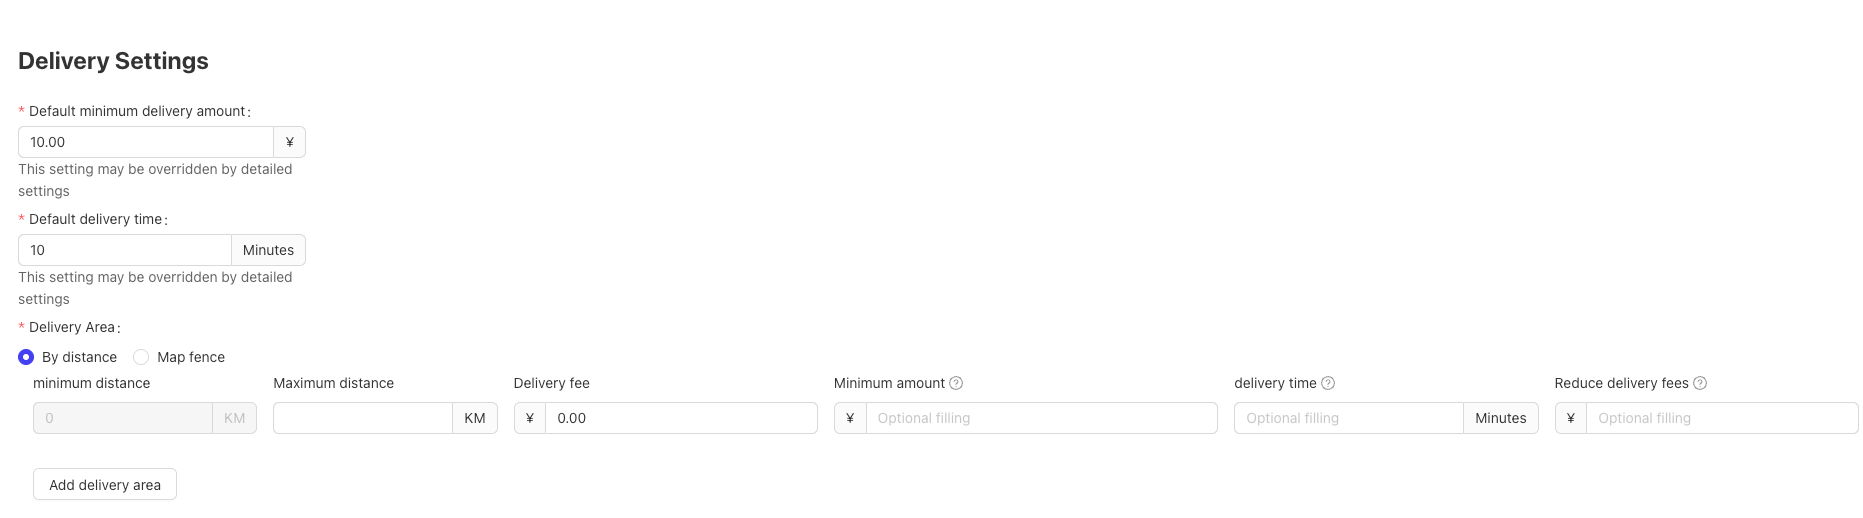
8.3 Delivery Settings (Store Perspective)
On the delivery settings page, customers place orders online and get the food delivered to their door:
-
Basic Settings:
- Custom Time Period: Similar to the dine-in settings, details are not repeated.
- Earliest Pickup Time and Time Interval: Similar to the self-pickup settings, details are not repeated.
-
Delivery Settings:
- Minimum Order Amount: Orders are only prepared and delivered if the amount exceeds this threshold.
- Estimated Delivery Time: Predicted time required to deliver the order to the customer.
- Delivery Range:
- By Distance: Set the maximum delivery distance; customers beyond this range will receive a reminder when placing orders. Configure different delivery fees and late-delivery fee discounts for different distance tiers, and add multiple delivery ranges.
- Map Fence: Draw fence areas on the map to define delivery ranges, with a maximum of 5 areas supported. Set different delivery fees for areas sorted from nearest to farthest.
-
Reservation Settings: Similar to the self-pickup settings, details are not repeated.
-
Advertising Space Settings: Upload advertisement banner images. Save the settings after submission, and the configuration can be copied to other stores for reuse.
9 Frequently Asked Questions (FAQs)
- Q: The store is in an open state, but it cannot be found in the Select Existing Stores list under Website Management > Bind Stores to a Mini Program.
A: The store is not displayed due to the authorization mechanism. You need to add mini program usage authorization for the store. Go to Group Perspective > Basic Services > Resource Management > Product Authorization, click Merchant-version Mini Program Store License (MPLC) > Batch Authorization > Add Stores, and confirm the authorization. The authorized store will then be displayed in the mini program store list.
- Q: When customers scan the store’s table QR code directly to order food on WeChat, a prompt appears: “Sorry, online ordering is temporarily unavailable due to network instability” (Note: The store and online configurations are enabled, and the store has obtained the mini program license).
A: The store’s POS system is offline. The POS must be online to receive online orders for customers to place orders successfully.
- Q: The store has configured multiple business hours in the BO store profile and is closed on a specific day, but customers can still place immediate delivery orders on the mini program and select the closed day as the pickup time.
A: This issue is caused by conflicting settings in Online Ordering > Ordering Business Settings. In the BO system, navigate to the corresponding ordering type settings (e.g., self-pickup) under ordering business settings and check if the Custom Time Period switch in Basic Settings is enabled. If enabled, the online ordering hours follow this configuration; disable it to inherit the business hours from the store profile.
- Q: There is no logout option on the interface after members log in to the WeChat Mini Program.
A: Go to BO Group Perspective > Online Ordering > Website Management > Go to Customize. On the mini program customization page, navigate to Personal Center > My Functions > Function Settings > Add Item, and a Link Address field will appear. Click Select Link to open the Bind Link page, then select Settings under the Business tab. The Settings function will then be displayed on the mini program interface, and users can log out by clicking it.