Printer Management
(For Cashiers / Waitstaff / Store Managers)
1 Introduction
This guide covers printing management in the POS system, including rule configuration, template design, printer management, and daily operations for efficient handling of various printing tasks.
2 Basic Print Knowledge (For Employees)
2.1 Core Receipt Types & Applicable Scenario
Receipt Type | Applicable Scenario | Example | Print Timing |
|---|---|---|---|
Front Desk Receipt | Customer settlement, pre-settlement, refund | Dine-in/Takeaway Receipt | Automatically print after payment completion, pre-settlement, or refund completion (configurable) |
Kitchen Receipt | Food preparation, dish return, dish dispatch | KOT/ Void Ticket | Automatically print after order success, dish return, or dish dispatch confirmation |
Label Receipt | Cup stickers, food labels | Bubble tea cup stickers, dine-in meal labels | Automatically print after order success (according to production department rules) |
Special Receipt | Card payment/refund, member top-up/purchase card | Card transaction receipt | Automatically print after card payment success, top-up completion, or card purchase payment completion |
2.2 Core Printing Concepts
Key Terms:
Default Printer: When no printer is manually specified, the system automatically selects a USB printer directly connected to the POS or an all-in-one built-in printer.
Designated Printer: A dedicated printer for receipts manually bound in BO/POS settings (e.g., EPSON TM-88V for the hot dish section in the kitchen).
Backup Printer: A backup device that automatically takes over print tasks when the main printer fails (requires pre-configuration).
Print Template: A template controlling the layout of receipt content (system preset/customizable, supports font and component position adjustments).
Failover: A feature where the system automatically transfers print tasks to the backup printer when the main printer encounters an issue.
3 Receipt Application Guide
3.1 Lobby Receipts
3.1.1 Customer Payment Receipt (Dine-In)
- Receipt Definition: A receipt for orders classified as "dine-in."
- Usage Scenarios:
Scenario 1: A receipt printed when the waiter completes a dine-in order settlement in either full-service or quick-service mode at the POS.
- Steps:
- Template Setting: Enable the necessary template in【Restaurant Management → Receipt Template → Lobby Receipt → Payment receipt (Dine-in)】
- Print Rule Setting: Configure print rules for different sites in【Restaurant Management → Print Management → POS Site Print Settings】(associate printer, select print language, set auto-print, print copies, and image printing).
- Print Rule Publication: After setting rules, publish them in【Print Management → Publish】, synchronizing print rules, template information, and printer information locally.
- POS Opening: Open a bill in either table or quick-service mode, choosing【dine-in】as the order type.
- Print Timing: The receipt prints upon completing the payment at the POS.
Scenario 2: Printing the Customer Receipt for Dine-In Orders
This explains how receipts are printed when a "Dine-In" order is placed and paid for.
For Orders via Table QR Code:
Suppose a customer places an order by scanning a QR code on their table. In that case, the receipt will print automatically on the kitchen or section printer assigned to that specific dining area.For Orders via a Server's Handheld Device:
When a server places an order using a handheld device in "Quick-Service" mode, the customer receipt will print on the main POS printer at the central cashier station.If the Handheld Device Has a Built-in Printer:
If the server's handheld device is equipped with its own printer and the feature is enabled in the device settings, the receipt will print directly from the handheld device. It can be handed to the customer immediately.
- Steps:
- Template Setting: Enable the necessary template in【Restaurant Management → Receipt Template → Front Desk Receipt → Payment receipt (Dine-in)】
- Print Rule Setting: Configure print rules for different partitions in【Restaurant Management → Print Management → Partition printing settings】
- Print Rule Publication: Publish the rules in【Print Management → Publish】to synchronize locally.
- Ordering on Order Pad/Customer Scanning: Open a bill in table/quick-service mode, selecting “dine-in.”
- Print Timing: The receipt prints upon completing the payment.
3.1.2 Takeaway Receipt
Receipt Definition: A receipt for orders classified as "Pickup."
- Usage Scenarios:

Scenario 1: Printing the Receipt for "Pickup" Orders
A pickup receipt is automatically printed after payment for any "Pickup" order. This applies when the order is created in several ways:
In the POS system under "Full-Service" or "Quick-Service" mode.
Via the "Manual Order Entry" function for delivery orders that are later changed to pickup.
- Steps:
- Template Setting: Enable the necessary template in【Restaurant Management → Receipt Template → Lobby Receipt → Pickup Receipt】
- Print Rule Setting: Configure print rules for different sites in【Restaurant Management → Print Management → POS Site Print Settings】
- Print Rule Publication: Publish the rules in【Print Management→Publish】to synchronize locally.
- POS Opening: Open a bill in either table or quick-service mode, choosing “pickup” as the order type.
- Print Timing: The receipt prints upon completing the payment at the POS.
Scenario 2: Printing Receipts for "Pickup" Orders Started on a Handheld Device
This applies when a server starts a "Pickup" order using a handheld device. The receipt printing location depends on the device and mode:
If a table is assigned: The receipt prints on the kitchen or section printer for that table's area.
If in "Quick-Service" mode: The receipt prints on the main POS printer at the cashier station.
If the handheld has a built-in printer: Once enabled in settings, the receipt prints directly from the handheld device.
- Steps:
- Template Setting: Enable the necessary template in【Restaurant Management → Receipt Template → Lobby Receipt → Pickup Receipt】
- Print Rule Setting: Configure print rules for different partitions in【Restaurant Management → Print Management → Partition printing settings】
- Print Rule Publication: Publish the rules in【Print Management → Publish】to synchronize locally.
- Ordering on Order Pad: Open a bill in table order mode, choosing “pickup” as the order type.
- Print Timing: The receipt prints upon completing the payment.
Scenario 3: Auto-Printing for External Pickup Orders
For "Pickup" orders that come from third-party apps or your own mini-program, the system works as follows:
The order is set to "Auto-Accept".
Once the customer completes their payment, the system automatically prints a pickup receipt.
- Steps:
- Template Setting: Enable the necessary template in【Restaurant Management → Receipt Template → Lobby Receipt → Pickup Receipt】
- Print Rule Setting: Configure print rules for different partitions in【Restaurant Management → Print Management → Order reception printing settings】
- Print Rule Publication: Publish the rules in【Print Management → Publish】to synchronize locally.
- Third-Party Platform Ordering: Customer places a takeaway order on a third-party platform, configured for auto-acceptance by the merchant. The POS automatically accepts the order.
- Print Timing: The receipt prints upon completing the payment.
4 Print Rule Configuration (For Administrators)
4.1 Basic Print Rule Settings (BO / Location Perspective)
4.1.1 Lobby Receipt Print Rules (e.g., Payment Receipt, Pre-bill)
- Access Configuration Page: Admin logs into the BO system (or POS main menu【Settings → Print Management → Print Rules】), and selects 【Lobby Receipt Rules】
- Select Receipt Type: Check the receipts to configure (e.g., “Dine-In Receipt”, “Pickup Receipt”), and set three core parameters:
- Auto Print: Enable automatic printing after payment/pre-settlement completion. Disable for manual print.
- Print Copies: Default is 1 copy, adjustable to 2-3 copies (e.g., customer copy + merchant copy).
- Exclude Order Source: Option to exclude specific channels (e.g., exclude third-party takeaway orders).
- Bind Printer: Select designated printer for receipts (e.g., lobby cashier printer) and set backup printer (optional). Click【Save】to activate.
4.1.2 Kitchen Receipt Print Rules (e.g., Preparation Receipt, Void Receipt)
- Access Configuration Page: Enter【Print Rules → Kitchen Receipt Rules】, selecting production departments (e.g., Hot Dish Department, Cold Dish Department).
- Set Split Method:
- One Dish One Slip: Print one slip per dish (suitable for fast food, tea shops).
- Multiple Dishes One Slip: Combine dishes from the same order into one slip (suitable for full service).
- One Portion One Slip: Split set meals by portion (e.g., 3 burger sets into 3 receipts).
- Bind Printer: Bind each department to a dedicated printer (e.g., hot dish department to kitchen printer 1), enable【Auto Print】and click【Save】
4.1.3 Label Receipt Print Rules (e.g., Cup Sticker, Food Label)
- Access Configuration Page: Enter【Print Rules → Label Receipt Rules】, selecting label types (e.g., “Dine-In Label”, “Cup Sticker”).
- Core Parameter Settings:
- Size: Choose label paper size (e.g., 30mm×40mm, 58mm×80mm).
- Auto Print: Enable to auto-print on order success.
- Image Print: Support custom images (e.g., brand logo, ≤80K, resolution within 600×600).
- Bind Printer: Choose a dedicated label printer (e.g., EPSON TM-L90), and click【Save】
4.2 Special Scenario Rule Configuration
4.2.1 Failover Settings
- Access Backup Printer Configuration: Enter【Settings → Print Management → Printer List】, select the main printer (e.g., “Lobby Cashier Printer”).
- Bind Backup Printer: Under【Backup Printer】, choose an available device (must match the main printer type, e.g., both are 80mm receipt printers) and click【Save】
- Activation Logic: If the main printer disconnects/lacks paper, the system prompts “Main printer failure, switched to backup printer,” seamlessly transferring the print task.
4.2.2 Card Receipt Print Rules
- Access Configuration Page: Enter【Print Rules → POS Site Print Settings, checking【Card Payment Receipt (Customer Copy / Merchant Copy)】and【Card Refund Receipt (Customer Copy / Merchant Copy)】
- Parameter Settings:
- Auto Print: Default is off. Enable for auto-print on card payment/refund success.
- Print Copies: Customer copy 1, merchant copy 1 (default), adjustable to 2 copies (e.g., retention copy + bookkeeping copy).
- Image Print: Default is off (does not support images).
- Save to Activate: Click【Save】and the receipt prints according to the rules after card operations.
5 Print Template Design (For Administrators)
5.1 Template Types and Acquisition
Template Source | Characteristics | Applicable Scenarios |
|---|---|---|
System Preset | No design needed, defaults to common scenarios (e.g., 80mm receipt) | Quick activation, no need for a custom layout |
Custom Template | Supports component, font, and color adjustments (e.g., add brand logo) | Need personalized receipt layout (e.g., special cup sticker) |
Cross-Template Copy | Modify existing templates to reduce repetitive work | Similar layouts for multiple receipts (e.g., settlement → pre-settlement) |
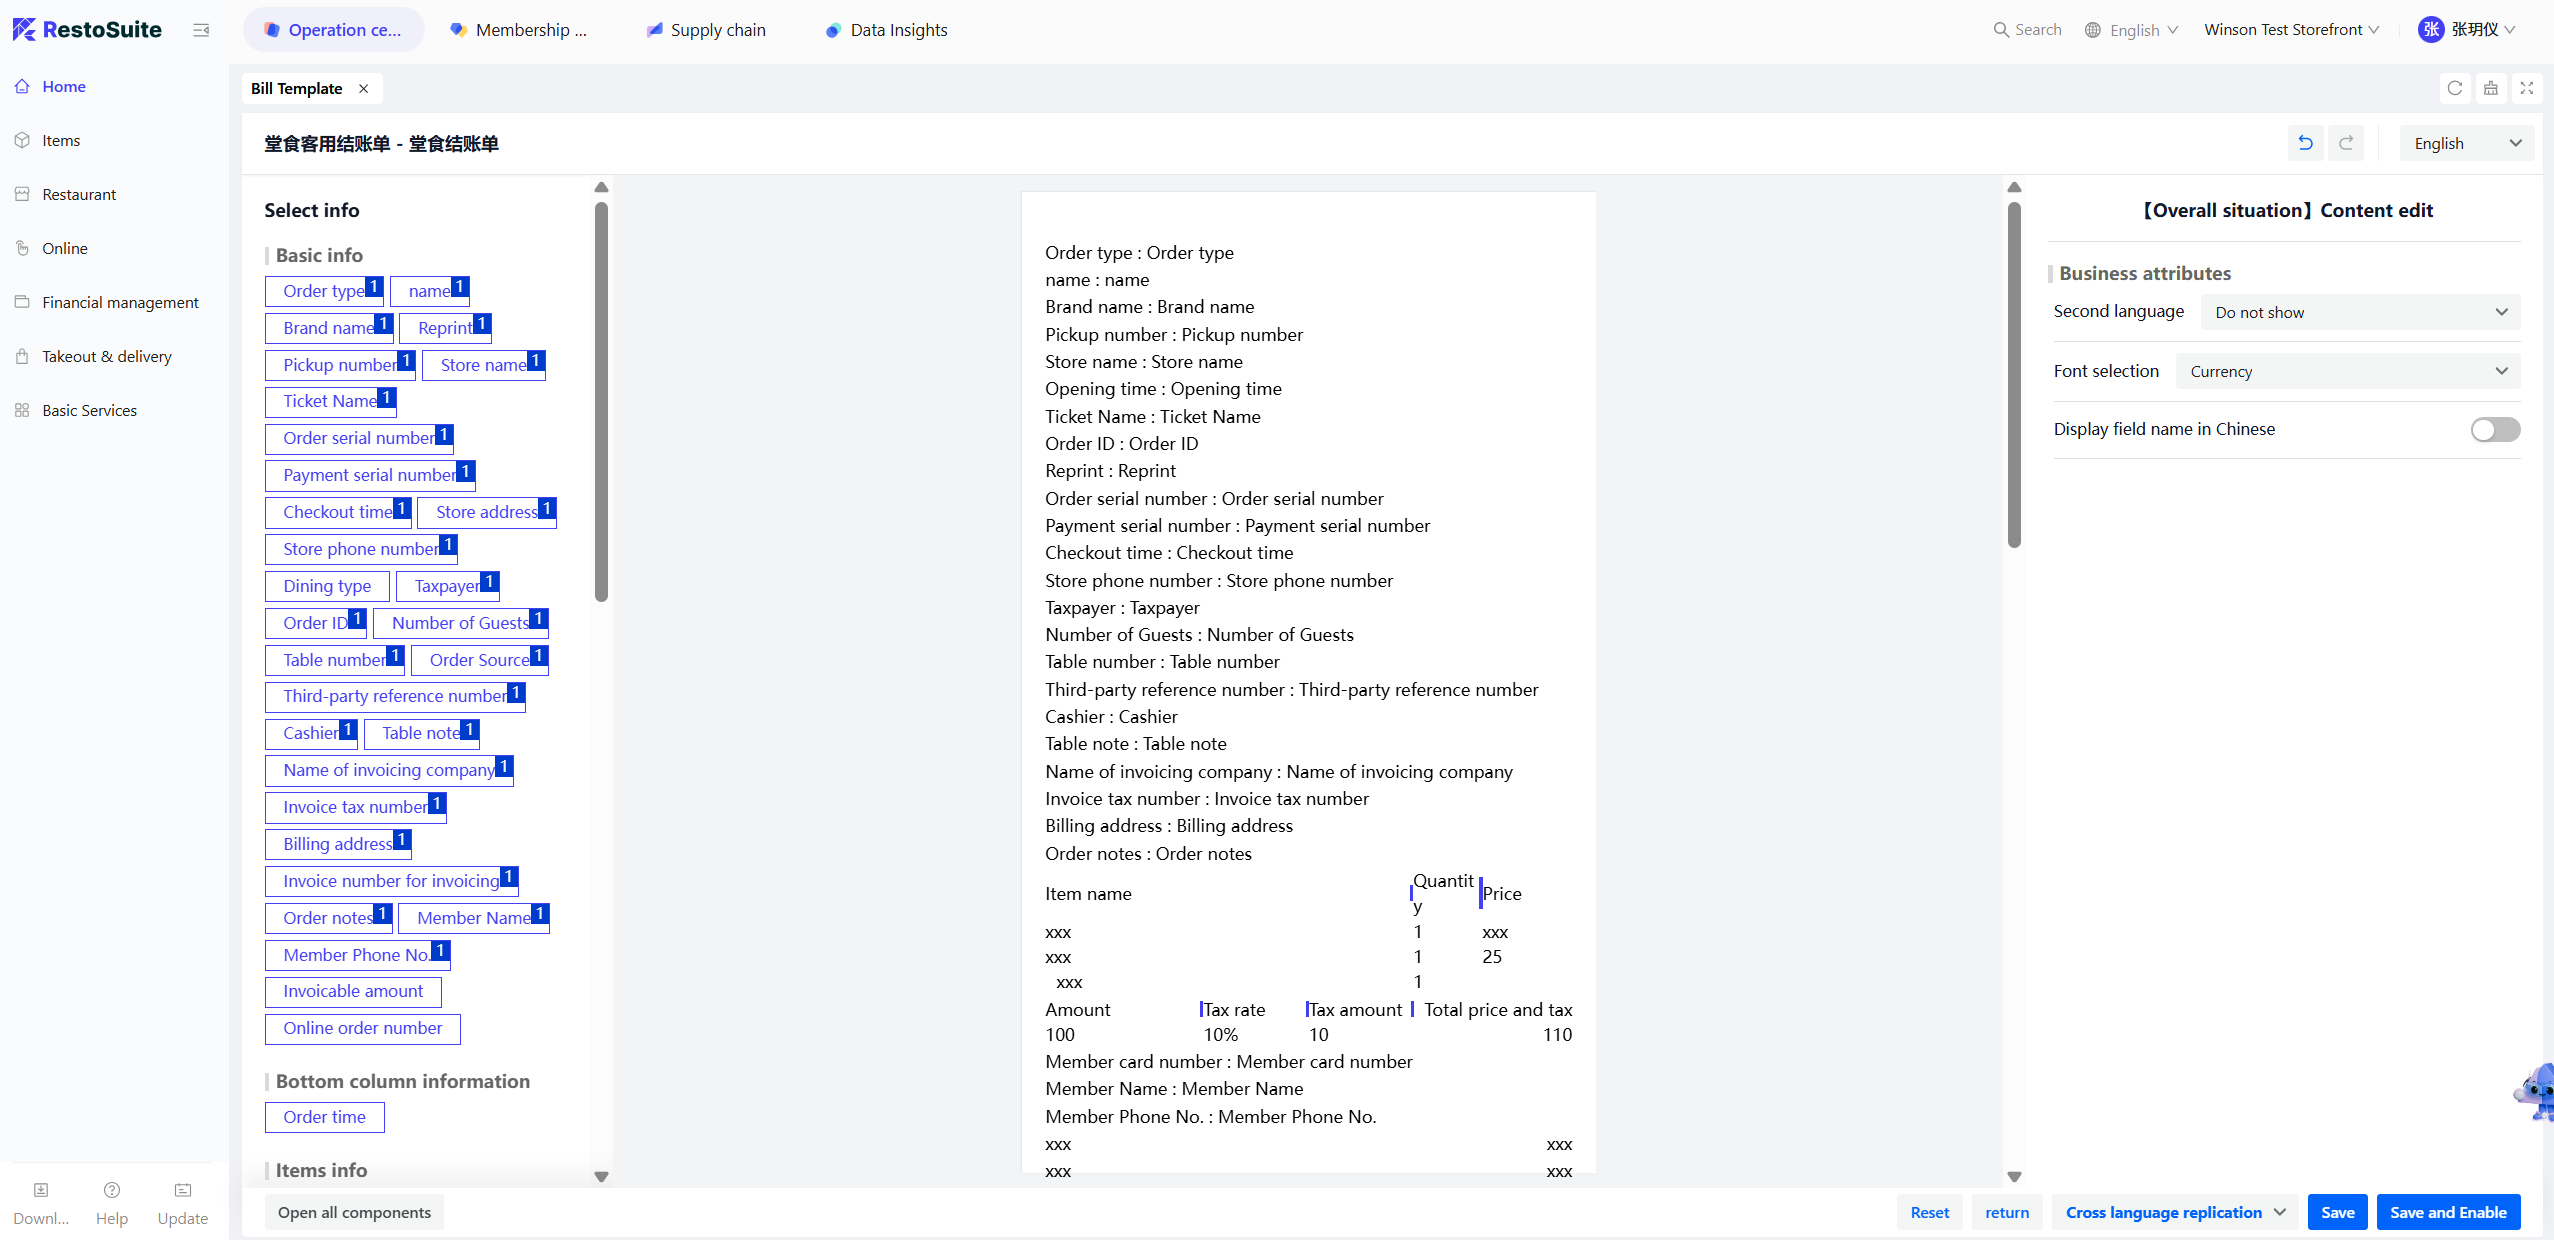
5.2 Custom Template Design Steps

-
Enter Template Management Page: Log into the BO system (or POS【Settings → Print Management → Template Management】), and select【Add Receipt Template】
-
Basic Information Configuration:
- Select Receipt Type: (e.g., “Dine-In Receipt”).
- Select Size: (58mm/80mm, label receipts need corresponding size).
- Input Template Name: (e.g., “2024 Dine-In Receipt_v1”).
-
Component Editing: Drag components from the right side to the template area, adjusting content and style:
- Basic Components: Store name, order number, payment time (required).
- Settlement Components: Payment methods, discount details, change amount (add as needed).
- Member Components: Membership card number, stored value balance (required for member orders).
- Style Adjustment: Font (Microsoft Yahei / universal font), size (1 / 2), color (black on white / white on black, supports individual component styles).
-
Preview and Save: Click【Preview】to view the receipt effect. Once confirmed, click【Save and Activate】, making the template effective immediately.
5.3 Template Optimization and Update
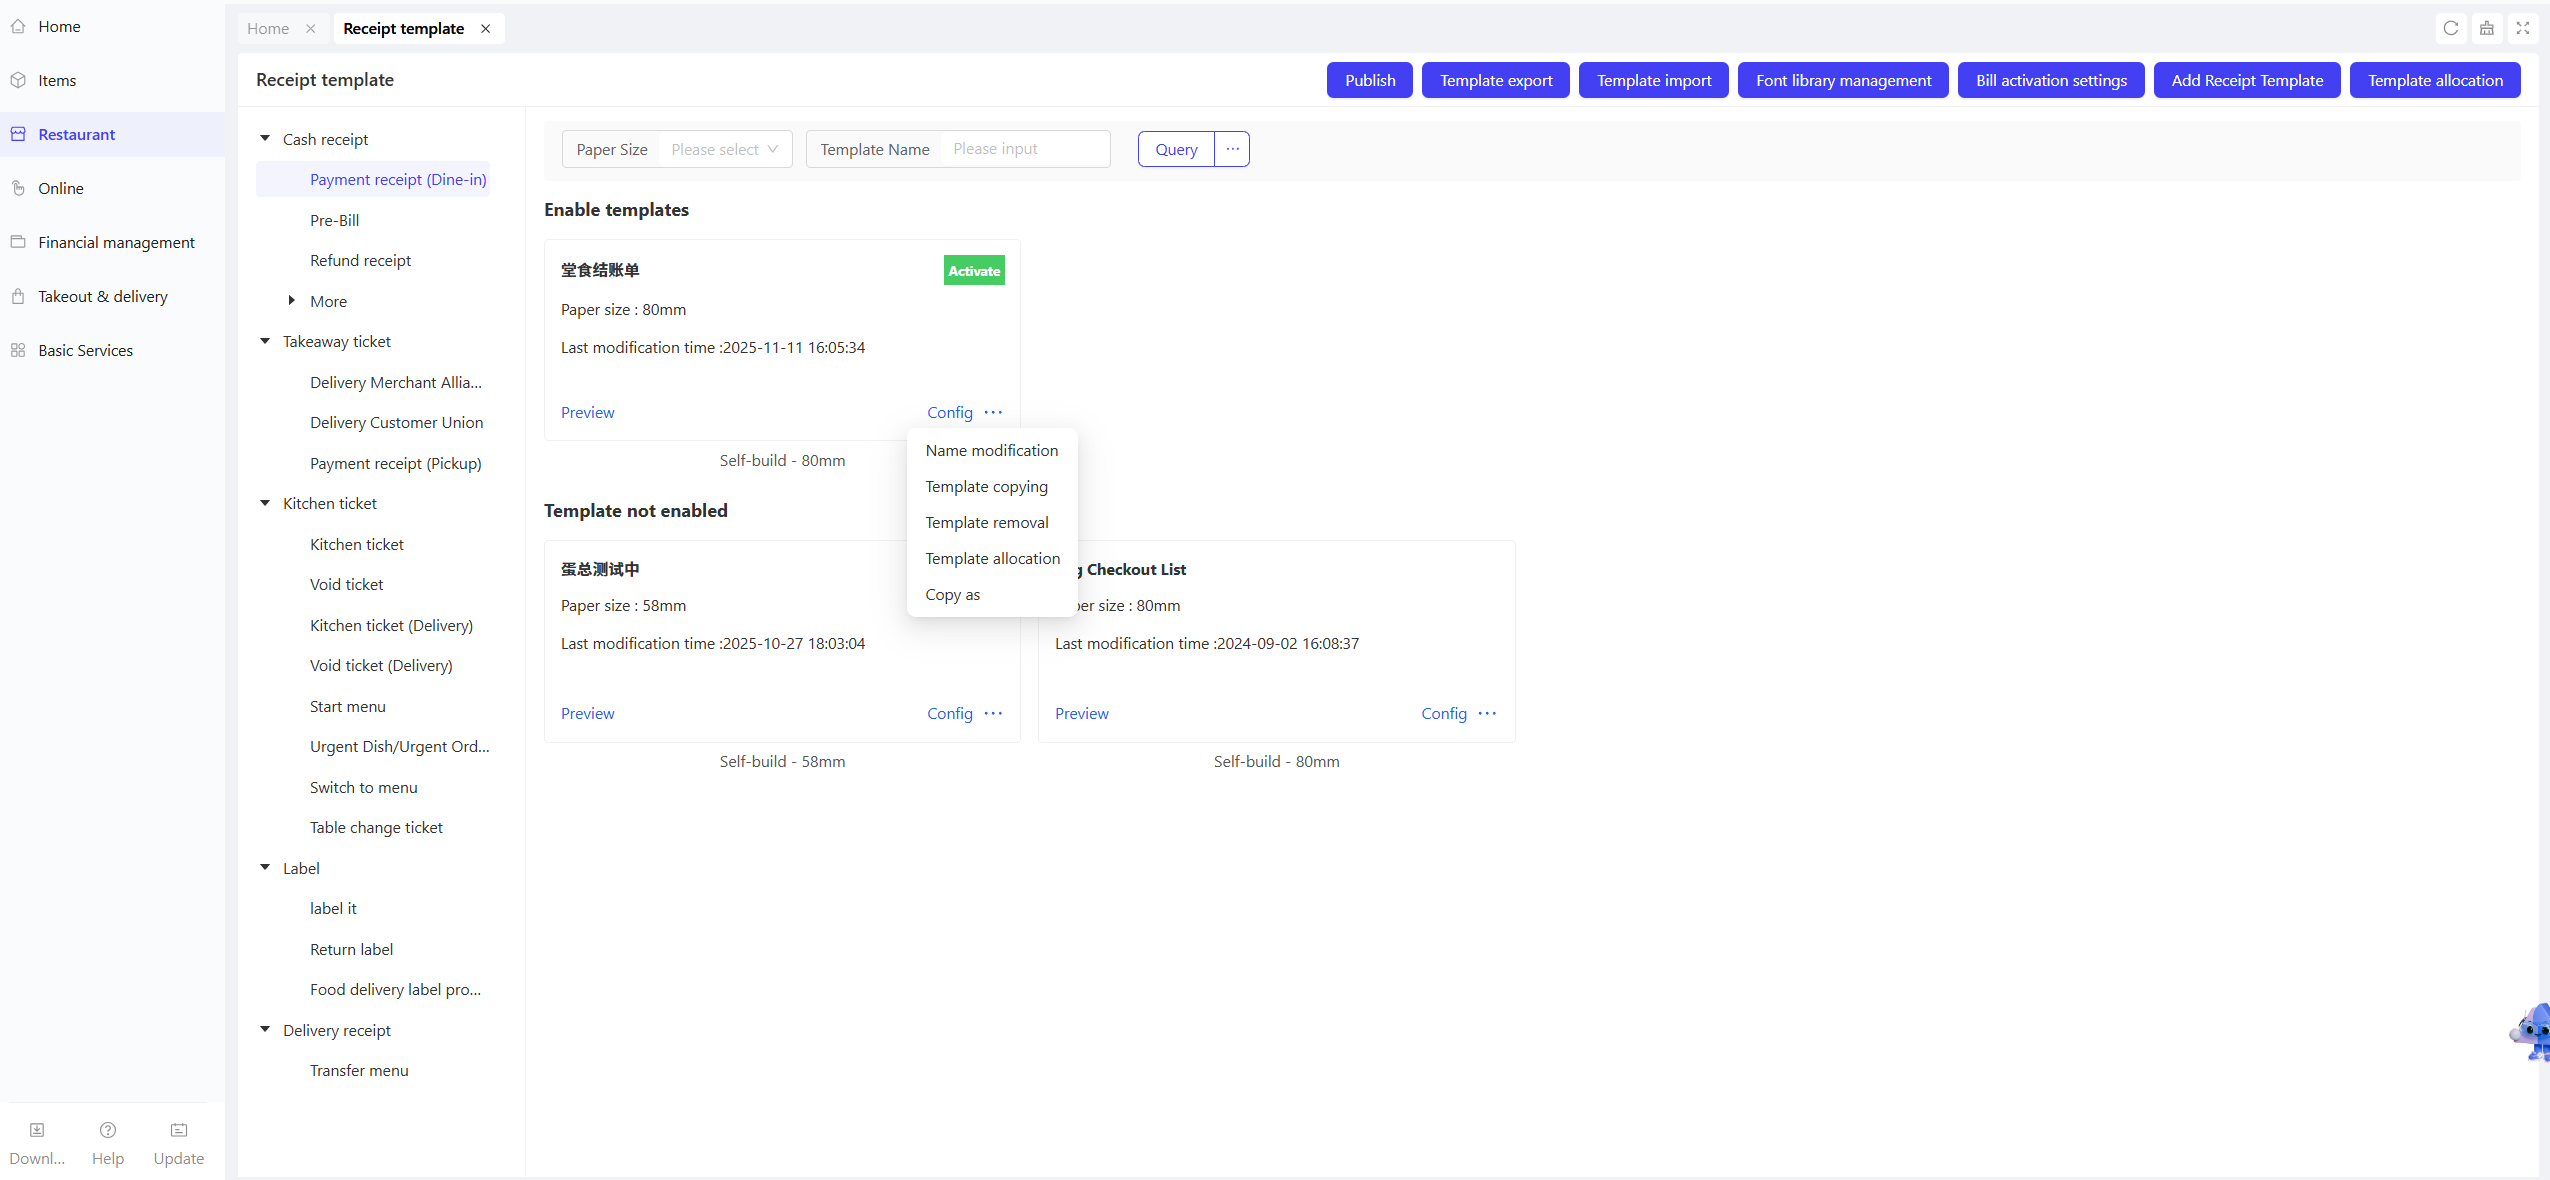
- Template Copy: Click “Copy As” on an existing template, choose the target receipt type (e.g., copy “Dine-In Receipt” to “Takeaway Receipt”), modify, and save as a new template.
- Template Update: When the system preset template updates, a “Update” button appears on the template card. Click to sync the latest version (custom content is not overwritten).
- Bilingual Settings: Front desk receipts/label receipts support bilingual display (e.g., Chinese + English). In the template editing page, check “Second Language,” choose the language (e.g., English), and the system automatically adds bilingual content below dish and component names.
6 Printer Adaptation and Management
6.1 Common Printer Adaptation (For Administrators)

6.1.1 Regular Printers (e.g., EPSON TM-88V, Flynger FP-N80WC)
-
Hardware Connection:
- USB Connection: Connect the printer to the POS via USB, and the system auto-detects.
- Network Port Connection: Enter【Settings → Print Management → Printer → Add】, input printer IP (e.g., 192.168.1.121), and choose model (e.g., “EPSON TM-88V”).
-
Parameter Configuration:
- Paper Size: Select the corresponding size (e.g., 80mm receipt printer choose “80mm”).
- Print Language: Default is Chinese, supports switching to English, Spanish, etc.
- Test Print: Click【Print Test Page】to confirm clear print content (including Chinese, English, and enlarged font samples).
-
Flynger Cloud Printer Adaptation (Special Steps):
- Enter【Add Printer】, choose【Flynger FP-N80WC】, input SN code and Key (found on device label).
- Call Flynger API for registration, and test print to confirm cloud communication is normal.
6.1.2 Printer Renaming and Synchronization
- Local Rename: In【Printer Management】, click printer name, input new name (e.g., “Kitchen Cold Dish Printer”), and system auto-syncs to BO.
- BO Synchronization: If printer info is modified in BO, POS auto-fetches the update (or manually click 【Sync Printer Info】).
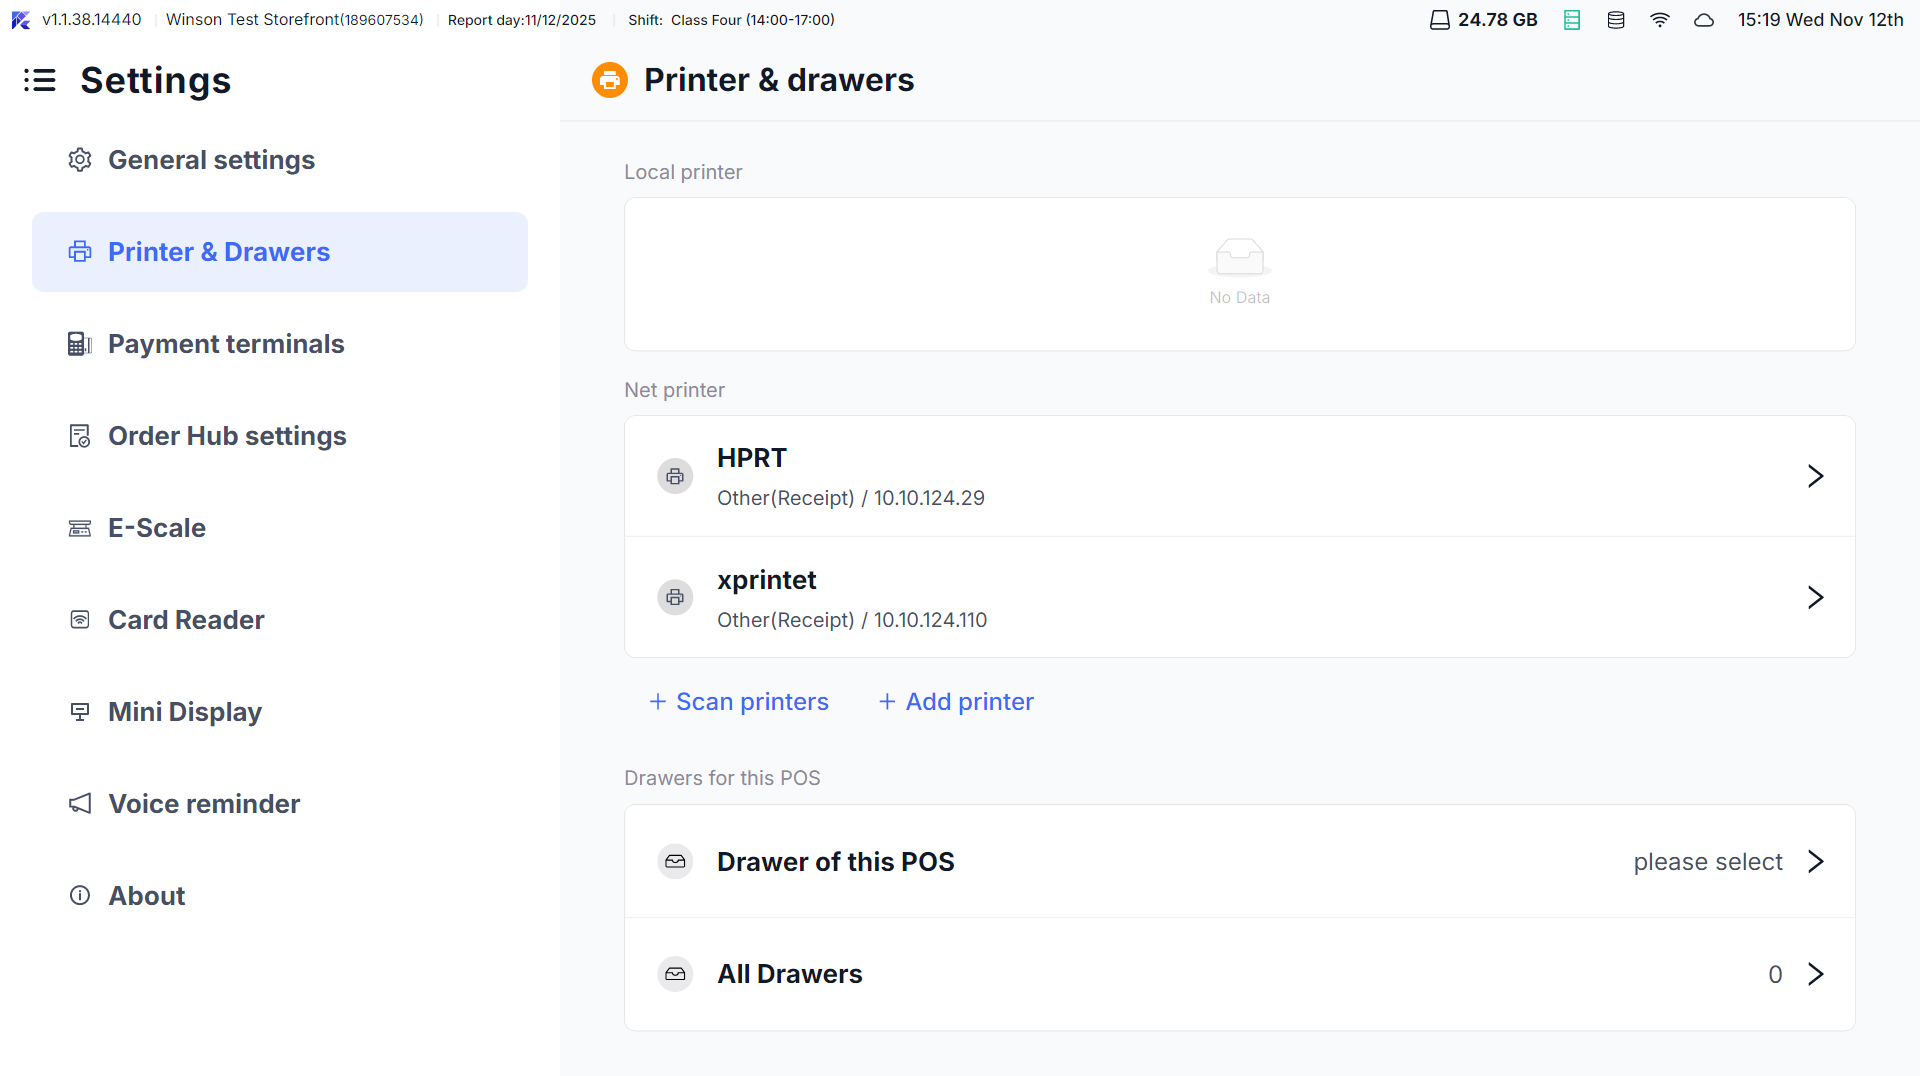
6.2 Printer Status Viewing (For All Employees)
-
Enter Status Page: Click the POS status bar【Printer Icon】to view all printer statuses (normal/error).
-
Status Interpretation:
- Normal: Displays printer name, IP/port, and last update time.
- Error: Highlights error reasons (e.g., “Out of Paper,” “Network Disconnected,” “Cover Open”).
-
Quick Operations:
- Test Print: Select a normal printer, click【Print Test Page】to verify the device.
- Switch Printer: Besides error printers, click【Switch Printer】to choose a backup device for tasks.
7 Daily Print Operations (For Employees)
7.1 Automatic Printing (Default Scenario)
No manual operation needed; the system automatically prints according to preset rules:
- After Payment Completion: Automatically print settlement receipt (e.g., dine-in receipt, showing payment methods and change amount).
- After Order Success: Automatically print kitchen preparation receipts (split by production department, e.g., hot dish preparation receipts).
- After Refund Completion: Automatically print refund receipts (marked with “Refund,” amounts displayed as negative).
7.2 Manual Printing (Reprint/Special Scenario)
-
Reprint Receipt:
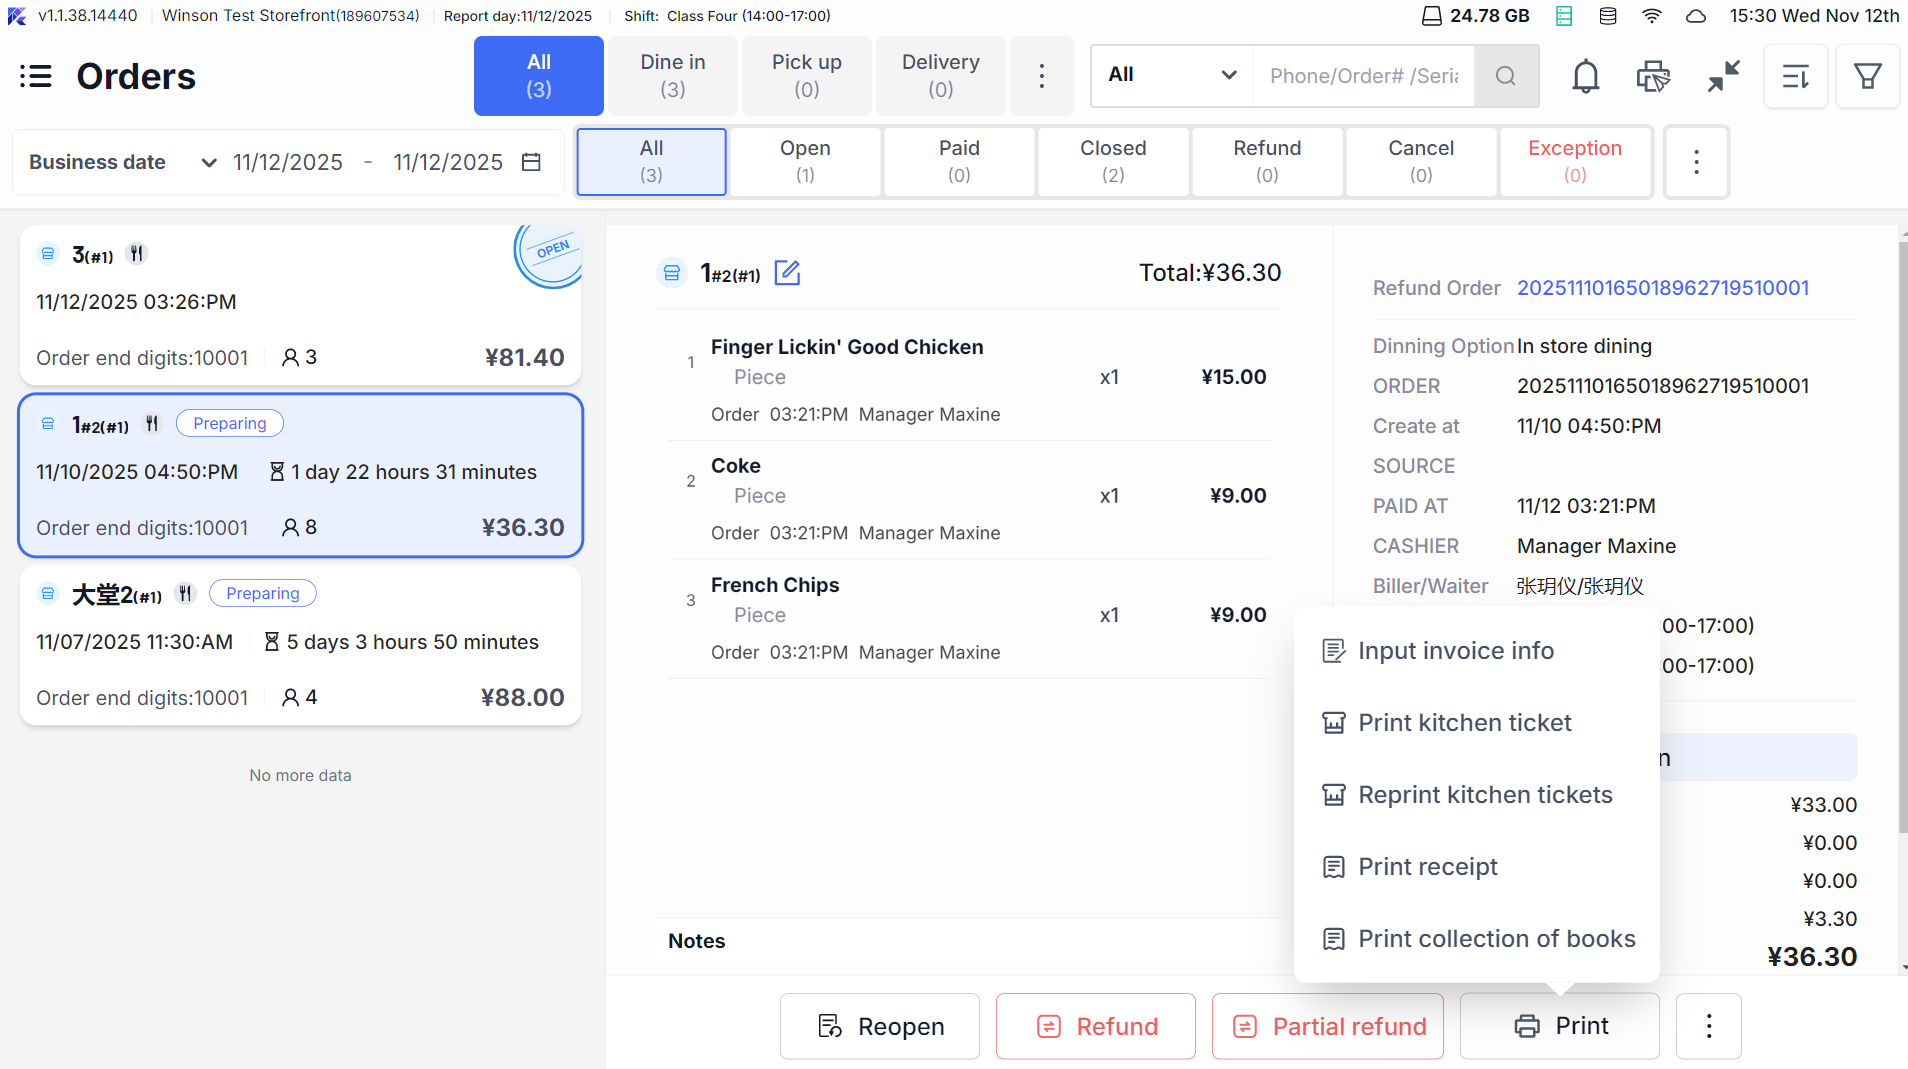
- Enter【Orders】: Locate the target order, click【Print】and choose the receipt to reprint (e.g., “Payment Receipt,” “Kitchen Order Ticket”).
- Reprint Mark: Title shows “Re” (English) or “补” (Chinese) for print times >1, aiding differentiation.
-
Manually Trigger Print:
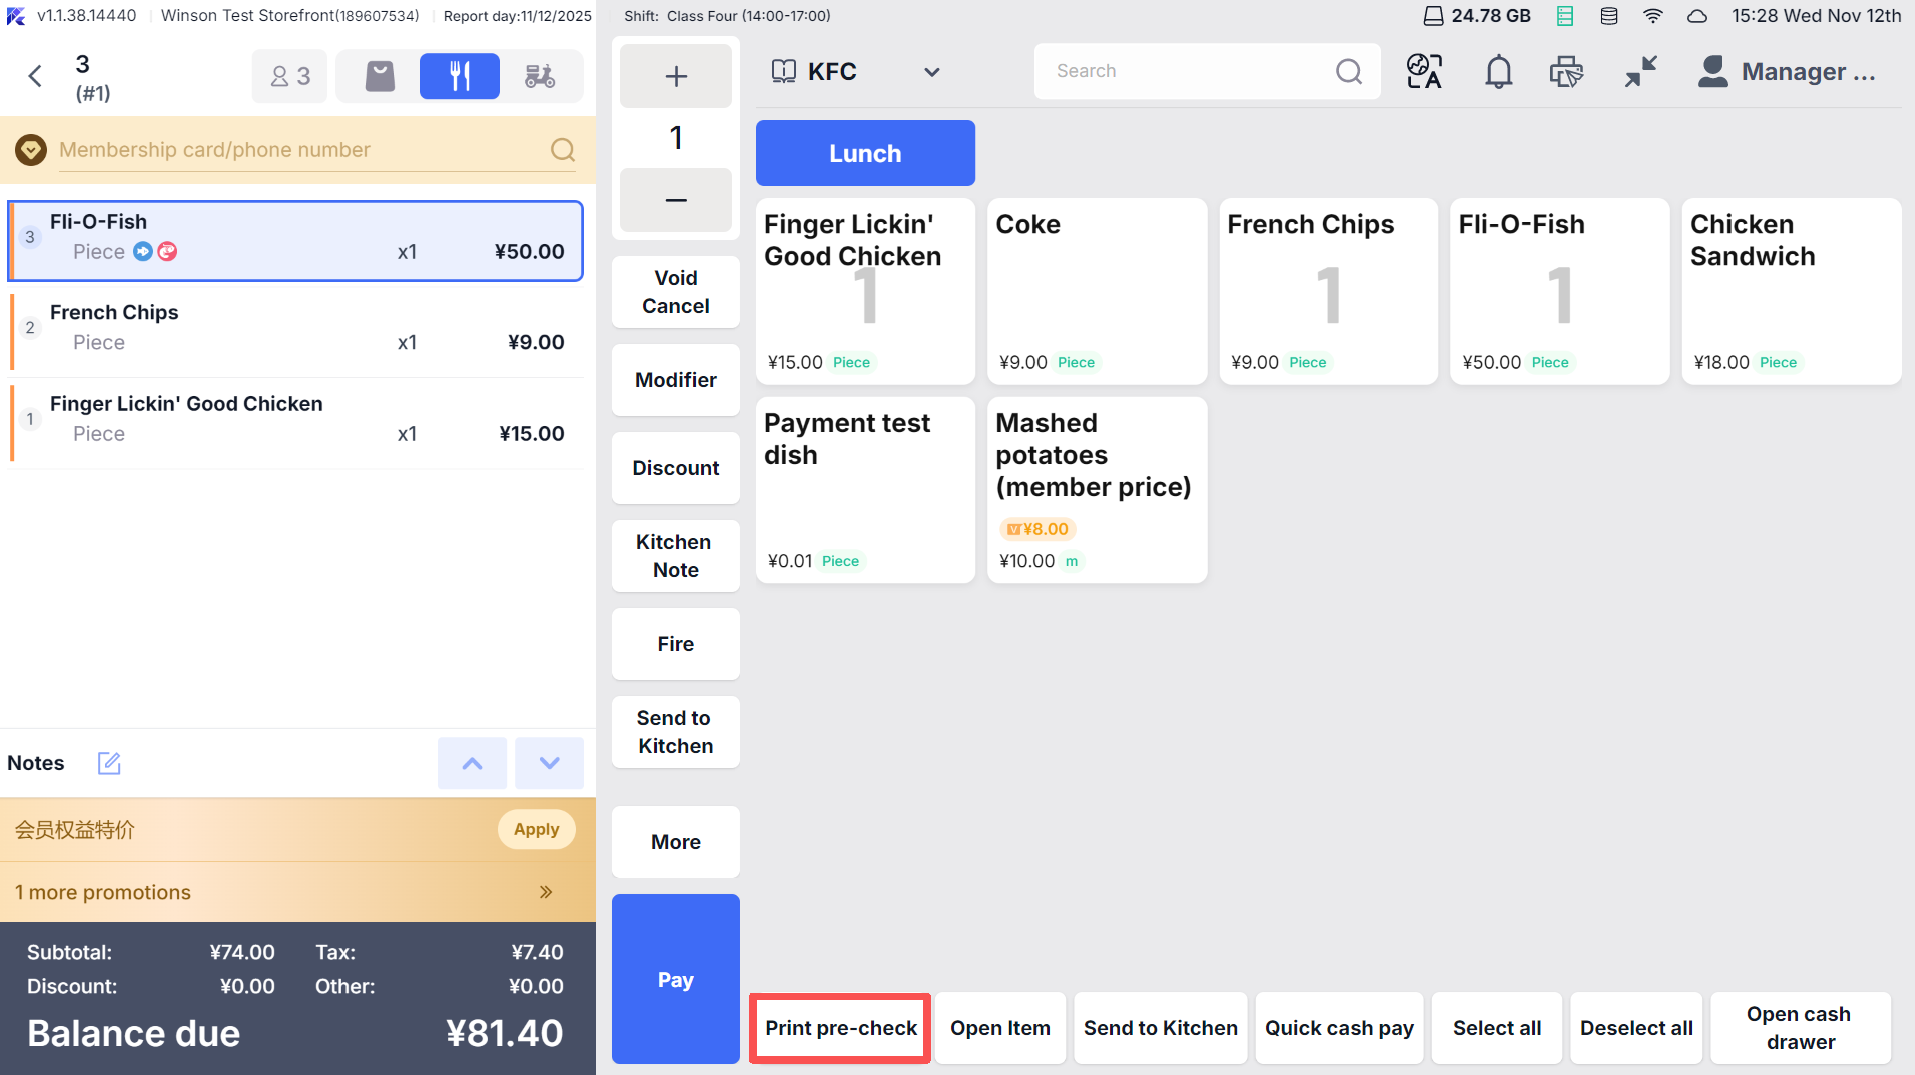
- Pre-bill: Click【Pre-Check】on the table page, manually select【Print Pre-Check】
- Label Receipt: In【Order Details】click【Print Label】and choose the label type (e.g., cup sticker).
7.3 Print Task Management
- Enter Task Page: Click【Printer Icon → Print Tasks】to view print tasks from the past 3 days (reverse chronological order).
- Task Filtering: Filter by date, printer, order number, and receipt type (e.g., find “2024-10-01 Kitchen Order Ticket”).
- Error Handling:
- Print Error: Click【Retry】and choose a normal printer for reprinting.
- Cancel Task: Select unprinted tasks and click【Batch Mark as Not Printed】to prevent redundant printing.
8 Print Error Handling
8.1 Common Error Scenarios and Solutions
- Error Scenario: Printer Not Printing
- Solution Steps:
- Check printer power/connection (re-plug USB/check network IP reachability).
- View printer status (check paper and close the cover properly).
- Click【Print Test Page】; if it fails, restart the printer.
- If the issue persists, switch to the backup printer.
- Error Scenario: Printing Incomplete/Misaligned
- Solution Steps:
- Confirm template size matches printer paper in【Receipt Template】 (e.g., 58mm receipt uses 58mm template).
- Adjust template font size (too large can truncate content).
- Click【Print Test Page】; if it fails, restart the printer.
- Re-print the test page to confirm the format.
- Error Scenario: Main Printer Failover Not Working
- Solution Steps:
- Confirm backup device configured in【Print Rules → Backup Printer】
- Check backup printer status (must be online).
- Manually transfer current print task to backup printer, restart main printer.
- Error Scenario: Reprint Receipt Lacks “Reprint” Mark
- Solution Steps:
- Confirm template includes “Reprint Mark” component in【Receipt Template】
- Check print count > 1 (only shows if printed multiple times).
- Re-select “Reprint” to verify mark display.
8.2 Error Messages and Response Dialog
Error Message | Response Measures |
|---|---|
"Printer Not Found" | Check printer connection, re-plug USB/configure network IP, or manually specify available printer. |
"Main and Backup Printer Failure" | Urgently activate a backup POS printer, contact technical support for equipment repair. |
"Template Not Found or Not Enabled" | Enter【Receipt Template】, enable the corresponding receipt template, or reselect an available template. |
"Flynger Printer Registration Failed" | Verify SN code and Key, check network connection (requires internet for registration), and retry registration. |
9 FAQs
9.1 Template Related
-
Custom Template Not Effective:
- Ensure the template is “Saved and Enabled” (templates not enabled won’t be used).
- Go to “Print Rules” and confirm the receipt is bound to the template.
- Restart the POS to sync the template configuration.
-
Template Component Not Displaying (e.g., Member Card Number):
- On the template editing page, verify the【Member Card Number】component is added.
- Check if the order is associated with a member (non-member orders will not display member components).
- Adjust component positioning to avoid overlap with other components.
9.2 Printer Related
-
Network Printer Frequently Disconnects:
- Check and replace the network cable to ensure a stable connection.
- Ensure the router is stable (avoid IP conflicts by fixing the printer IP).
- Increase the connection timeout in【Printer Settings】(e.g., from 10 seconds to 30 seconds).
-
Label Printer Prints Blurred:
- Clean the printer head using specialized cleaning paper.
- Verify if the label paper has expired, as outdated paper may result in uneven printing.
- Adjust the print density in【Printer Settings → Density】to a higher level.
9.3 Receipt Content Related
-
Settlement Receipt Missing Discount Details:
- Go to【Template Management → Payment Receipt Template】and enable the【Discount Details】switch.
- Confirm the order includes discounts (if not, no details will be shown).
- Reprint to verify the discount details are correctly displayed.
-
Takeaway Receipt Displays Incorrect “Contact Person”:
- In【Template Management → Pickup Receipt Template】, replace the【Contact Person】component with【Pickup Person】
- Similarly, update【Contact Details】to【Pickup Person Contact Details】
- Save and activate the template, then reprint to ensure accuracy.
10 Need Help?
This manual aims to provide clear guidance for operating the POS ordering system’s print management features, ensuring efficient and accurate receipt printing. For further assistance, please contact your technical support team.