RS BOH
1 How to log into the BO portal?
Login: You can use your email or phone number. For the first-time email login, you need to get a verification code from your inbox.
- China (CN): https://bo.restosuite.cn/login
- Singapore (SEA): http://bo.sea.restosuite.ai/login
- North America (US): https://bo.us.restosuite.ai/login
- Europe (EU): https://bo.eu.restosuite.ai/login
2 How to sort item categories and items?
2.1 Item Category Sorting:
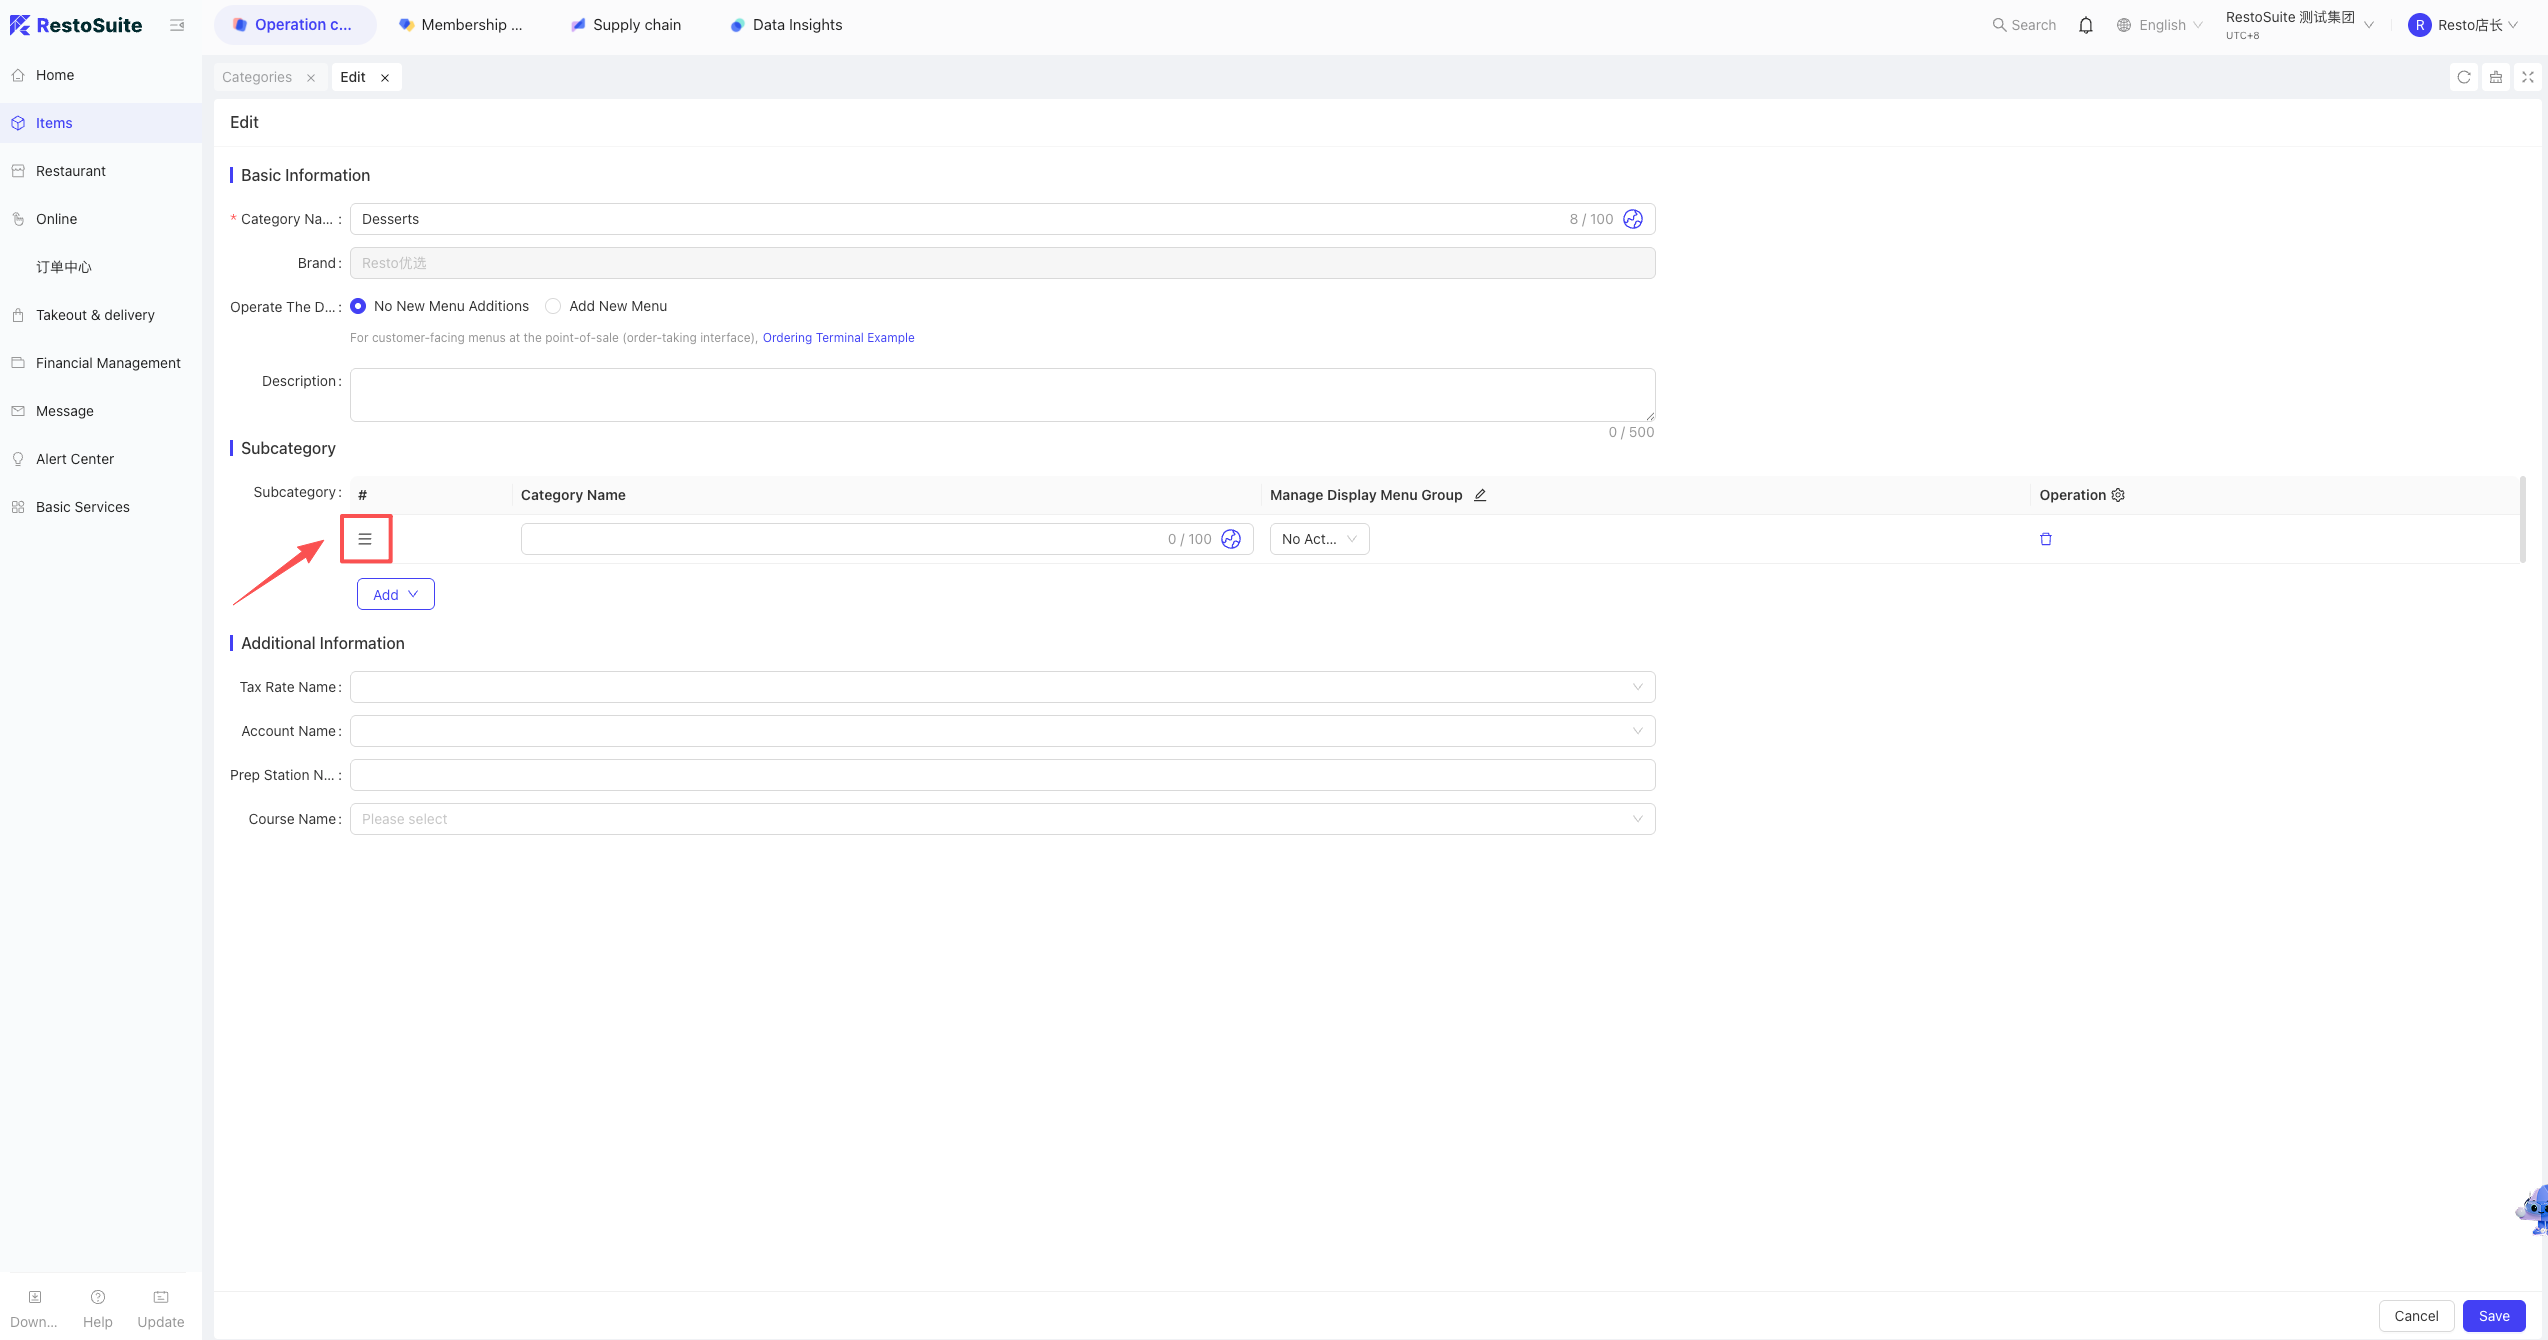
- Log into the BO system, go to the corresponding perspective -> Click Item Management -> Click Item Category -> Edit the corresponding group name.
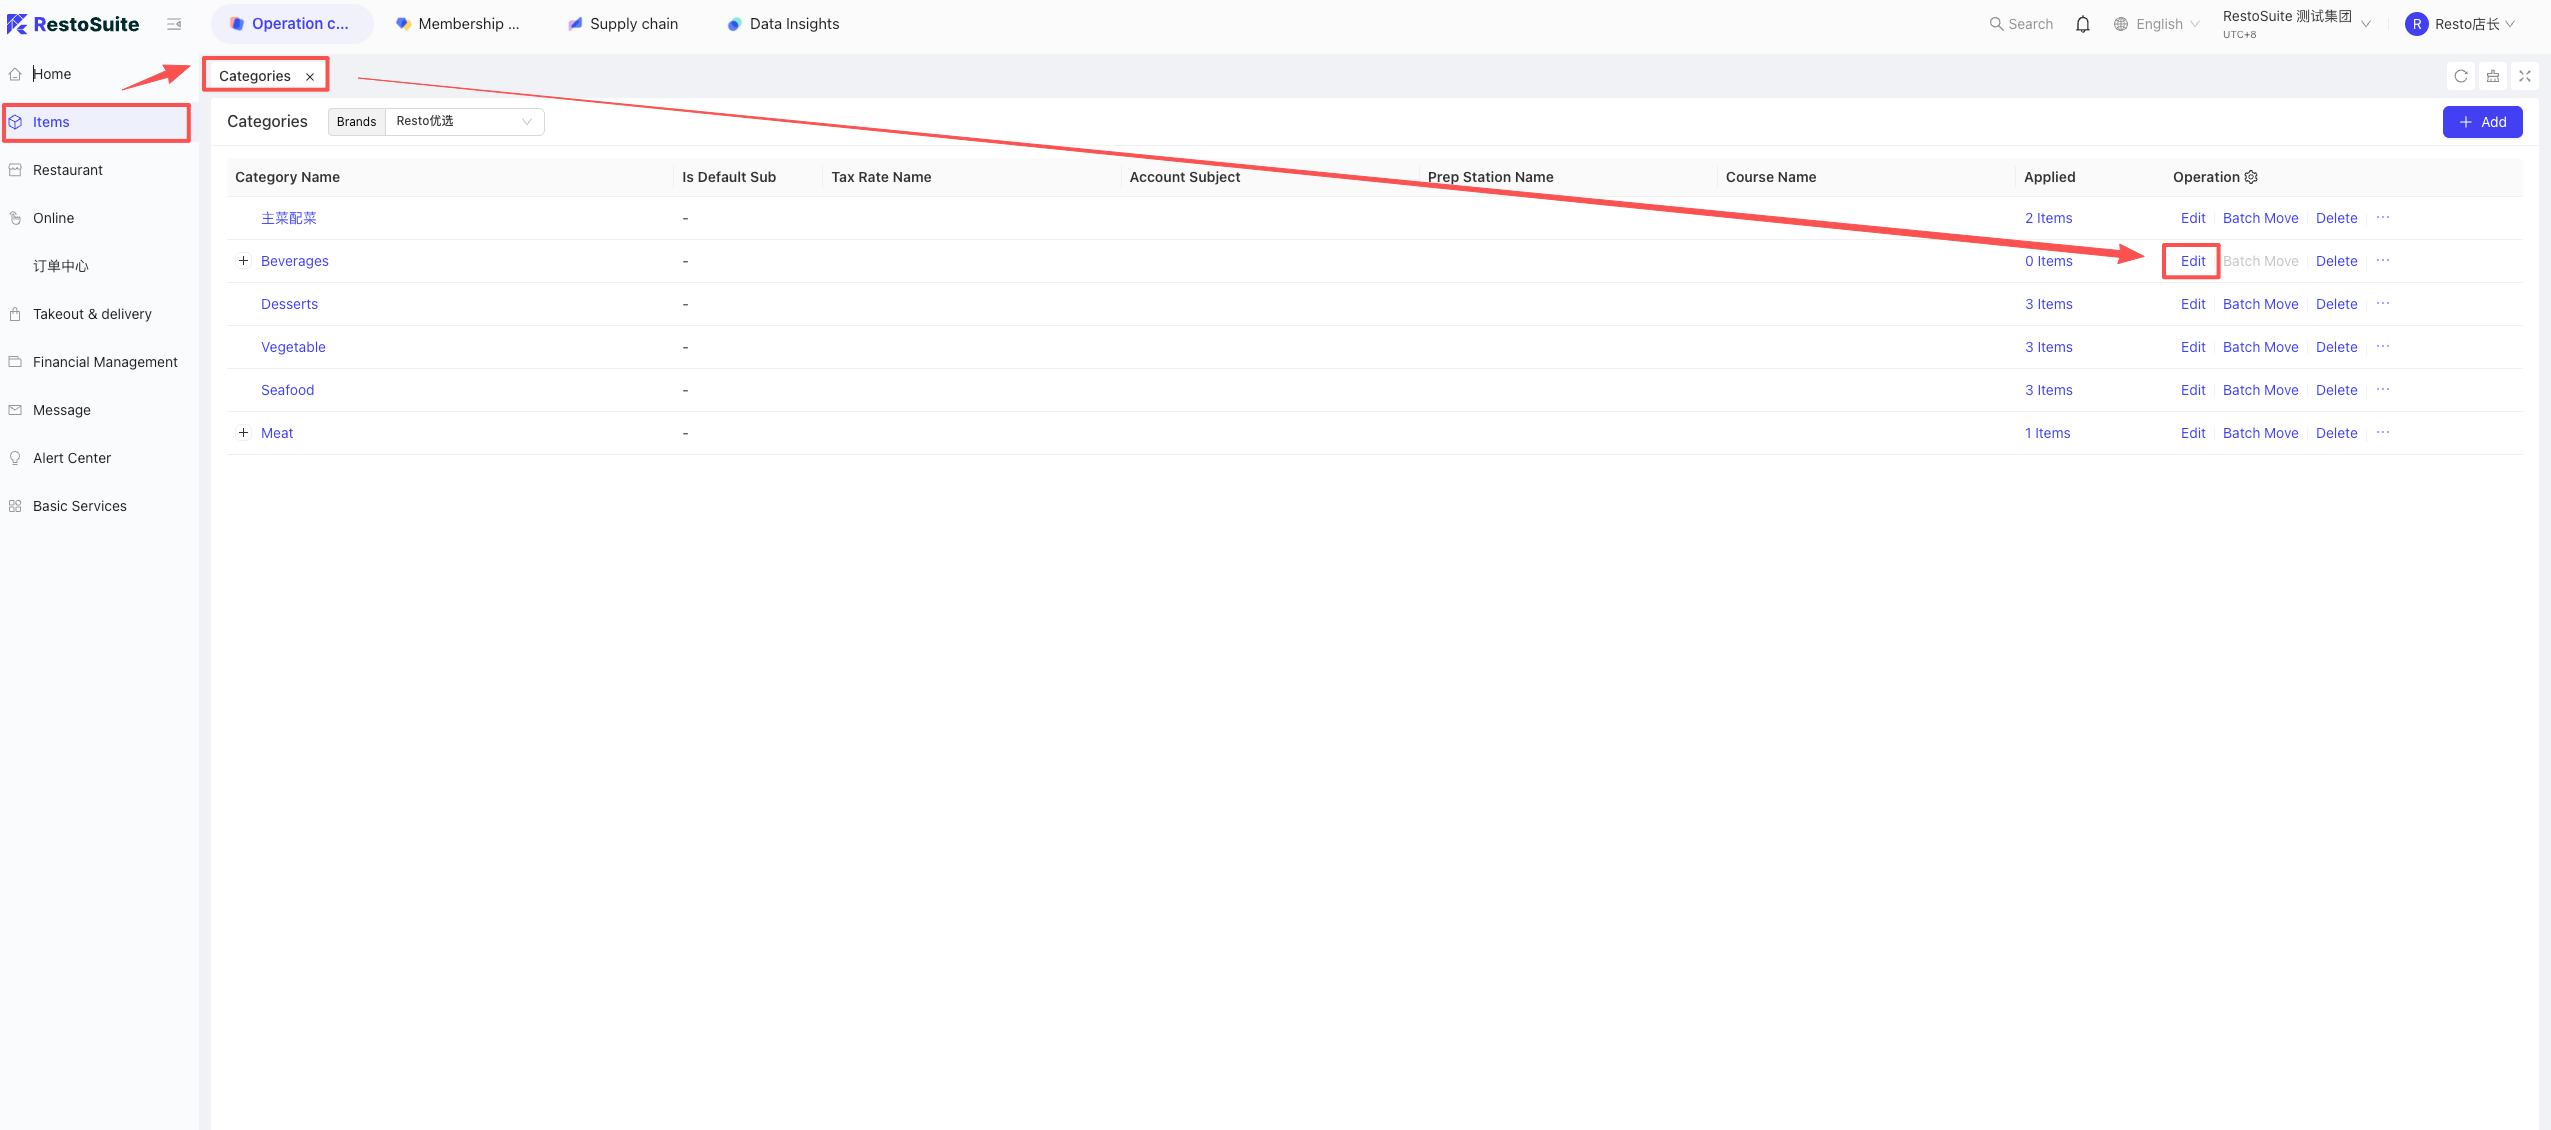
- In the edit interface, click and hold the three horizontal lines in front of the category to drag it up or down to adjust the order.
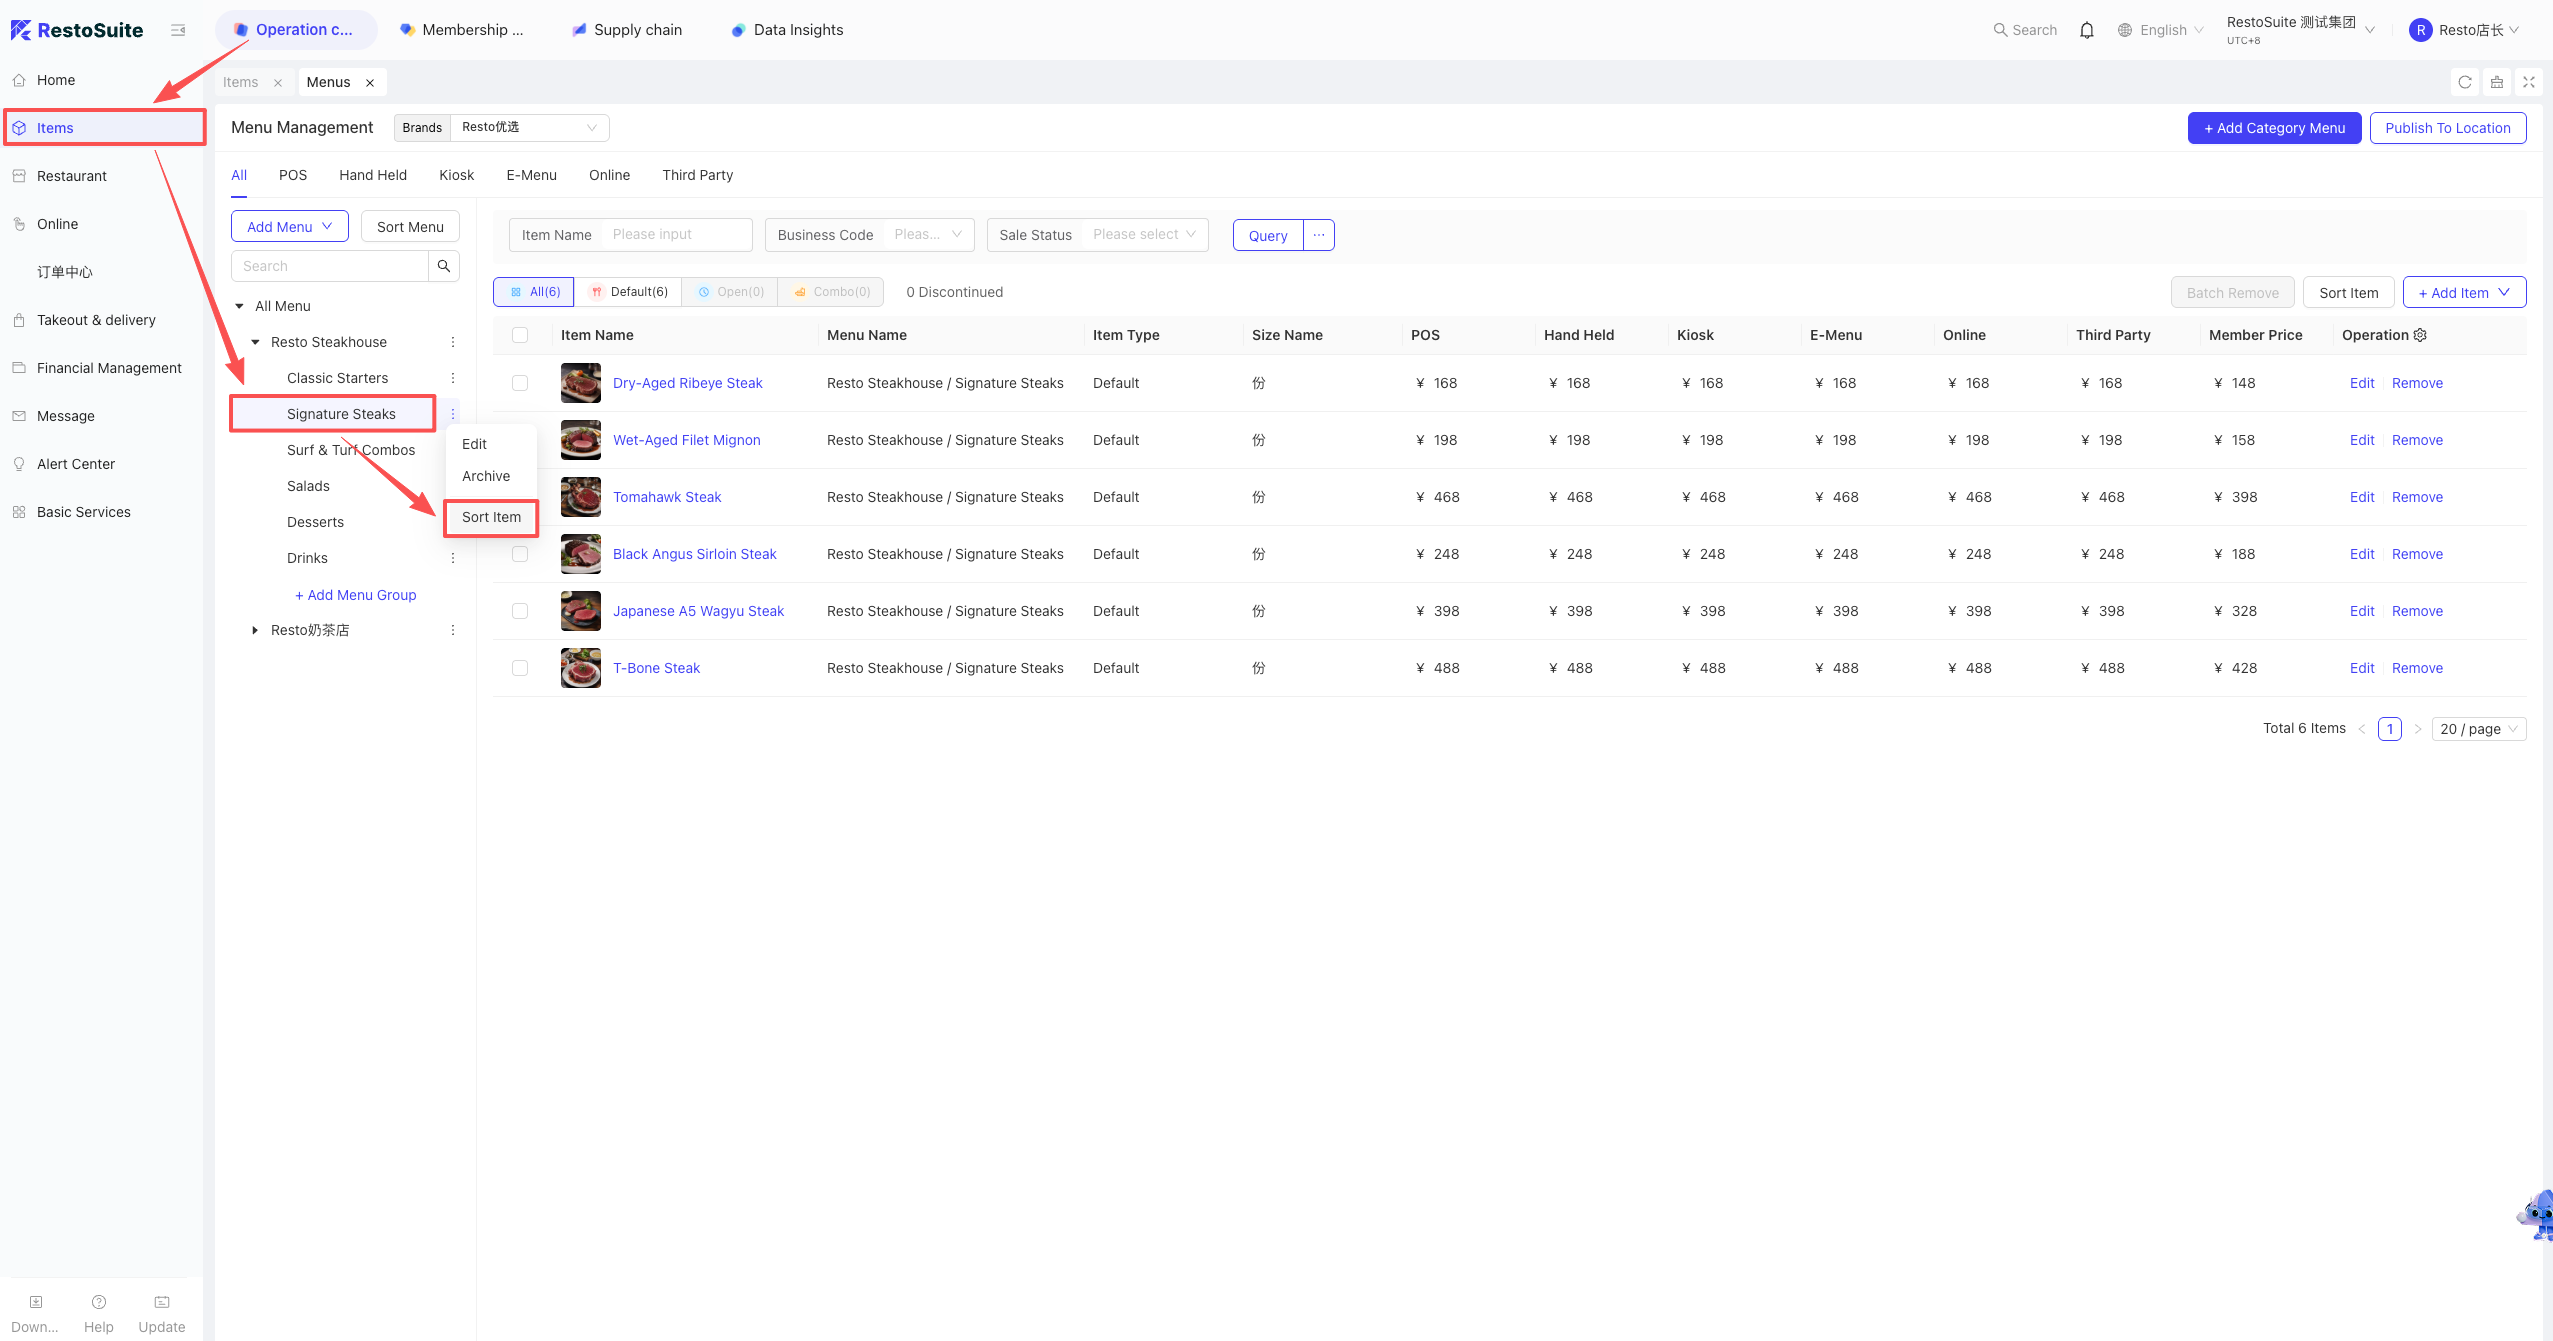
2.2 Item Sorting:
Note:
Items must be sorted within the Menu; direct sorting in Item Management is not supported.
- Log into the BO system -> Item Management -> Menu Management -> Find the corresponding menu, expand the category, and select the category you want to adjust.
- Click the three dots next to the category or click Item Sorting in the upper right corner, then enter the corresponding sequence number to change its position.
3 How to dispatch group items to stores?
Note:
The Group level centrally manages store items. Any additions or modifications must be uniformly dispatched by the Group level.
Path: Create Group Item -> Create Group Menu -> Create Group Menu Change Scheme & select items to dispatch -> Dispatch to stores.
- Create Group Item: BO System -> Operation Center -> Item Management -> Item Management -> Add Item.
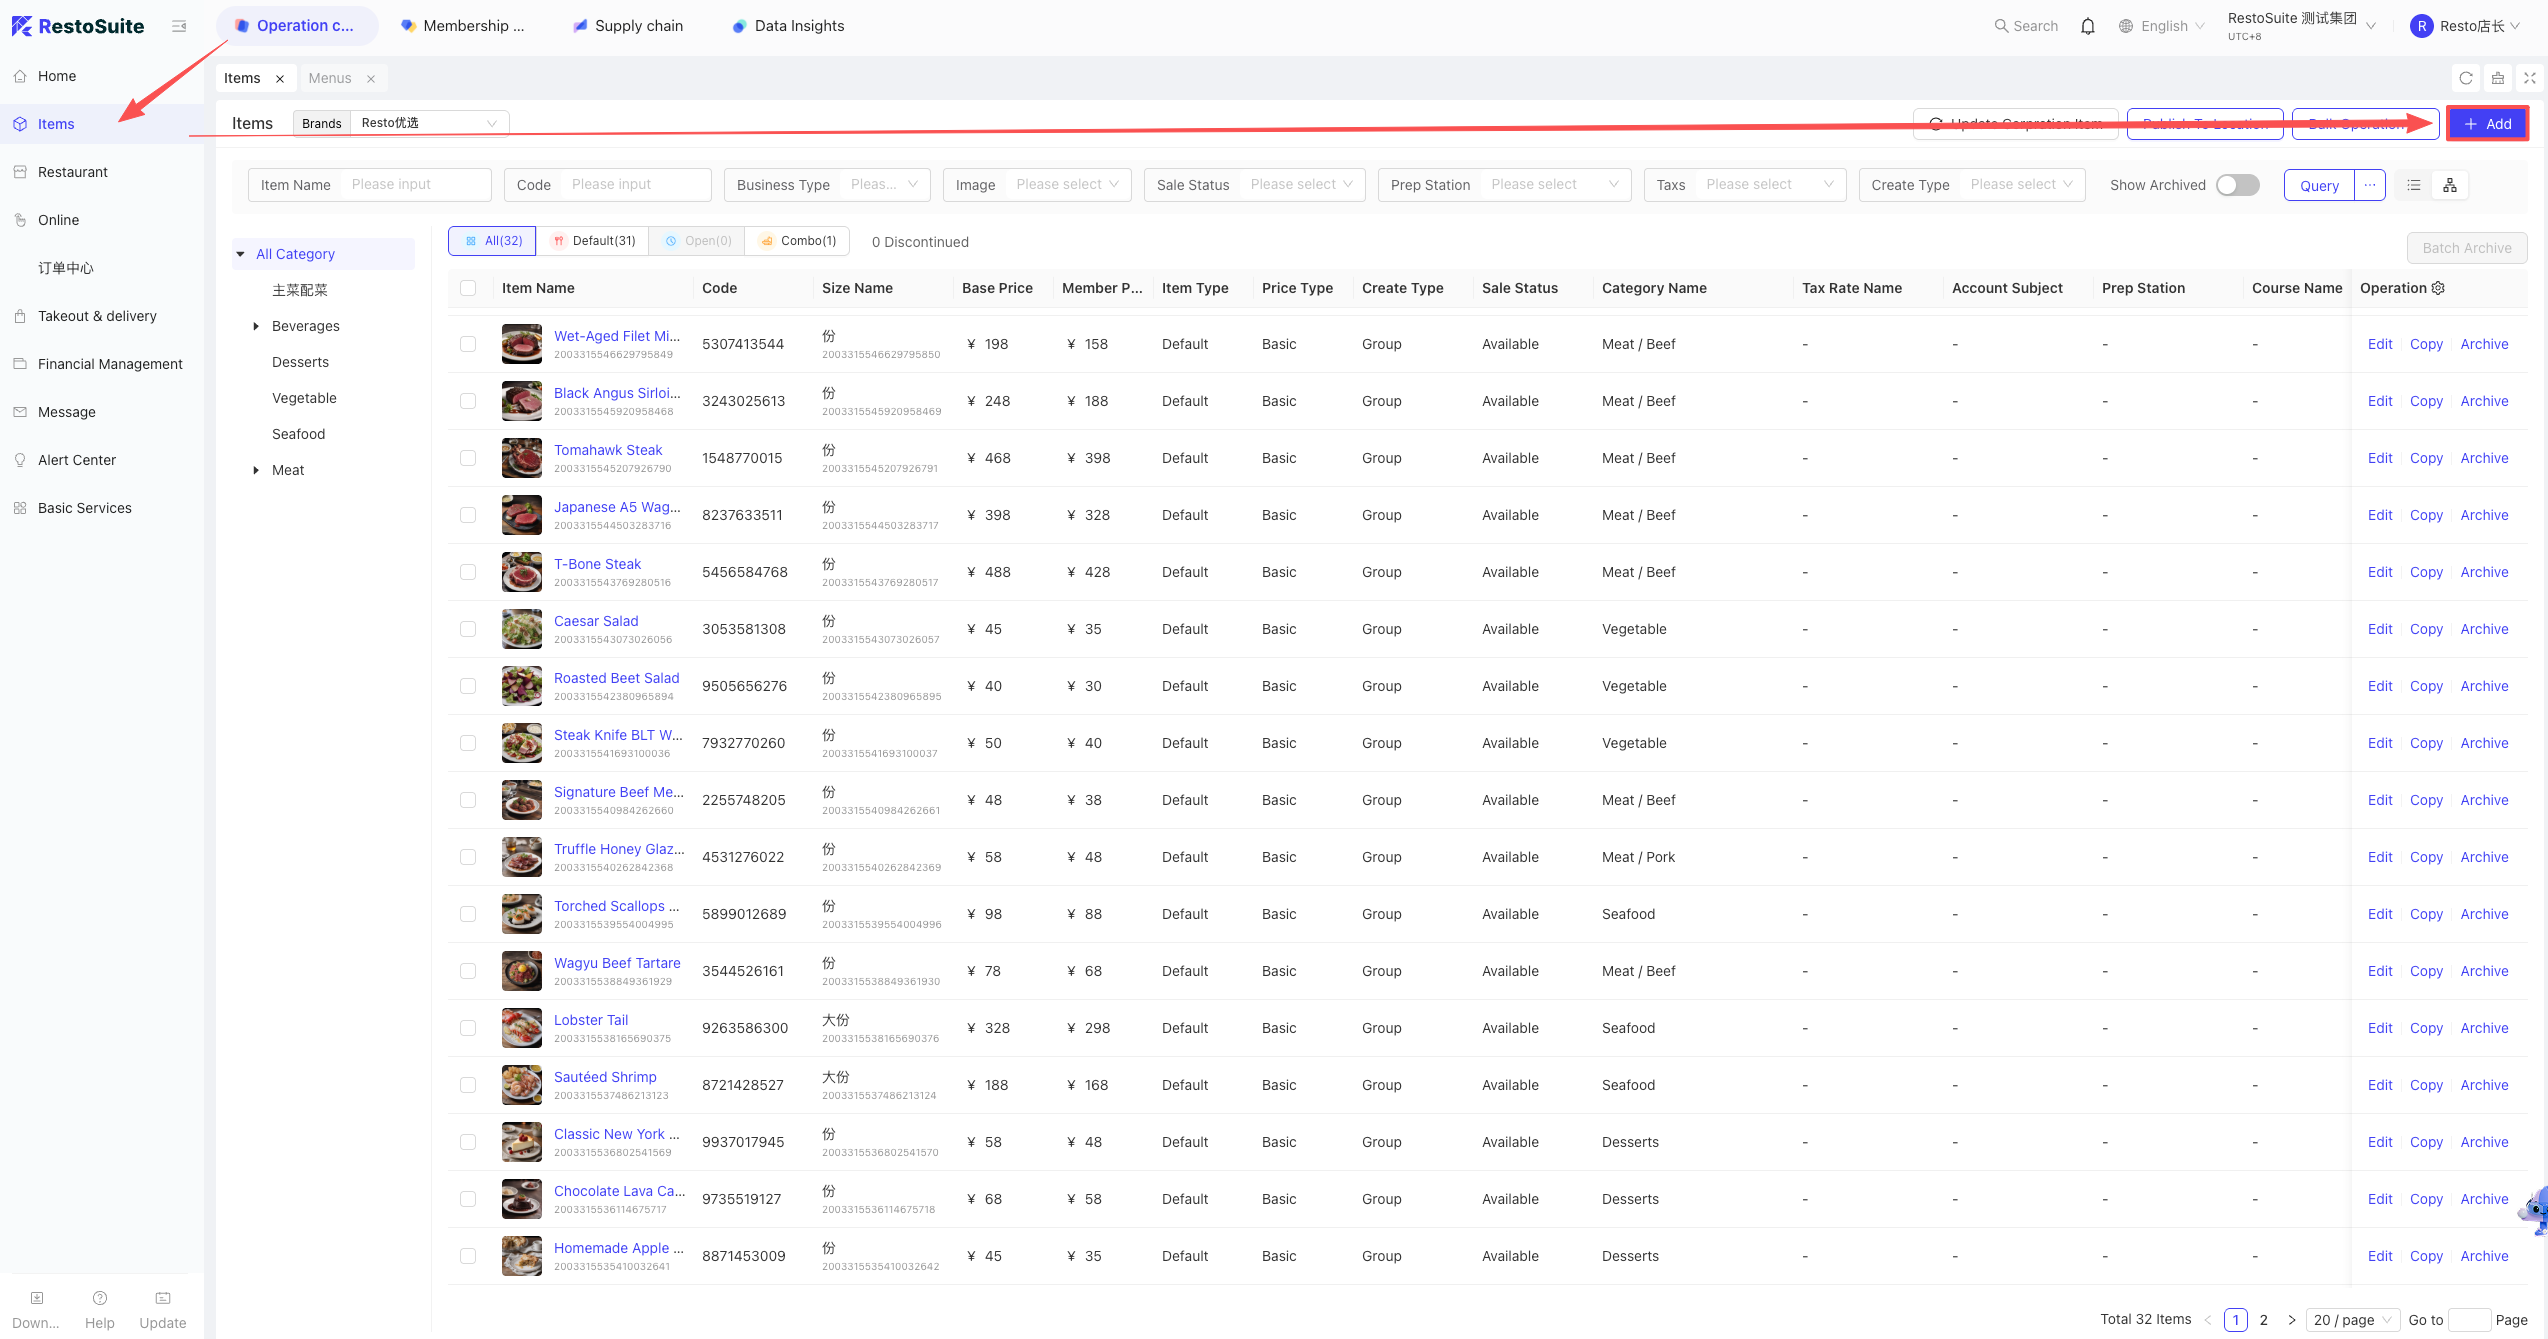
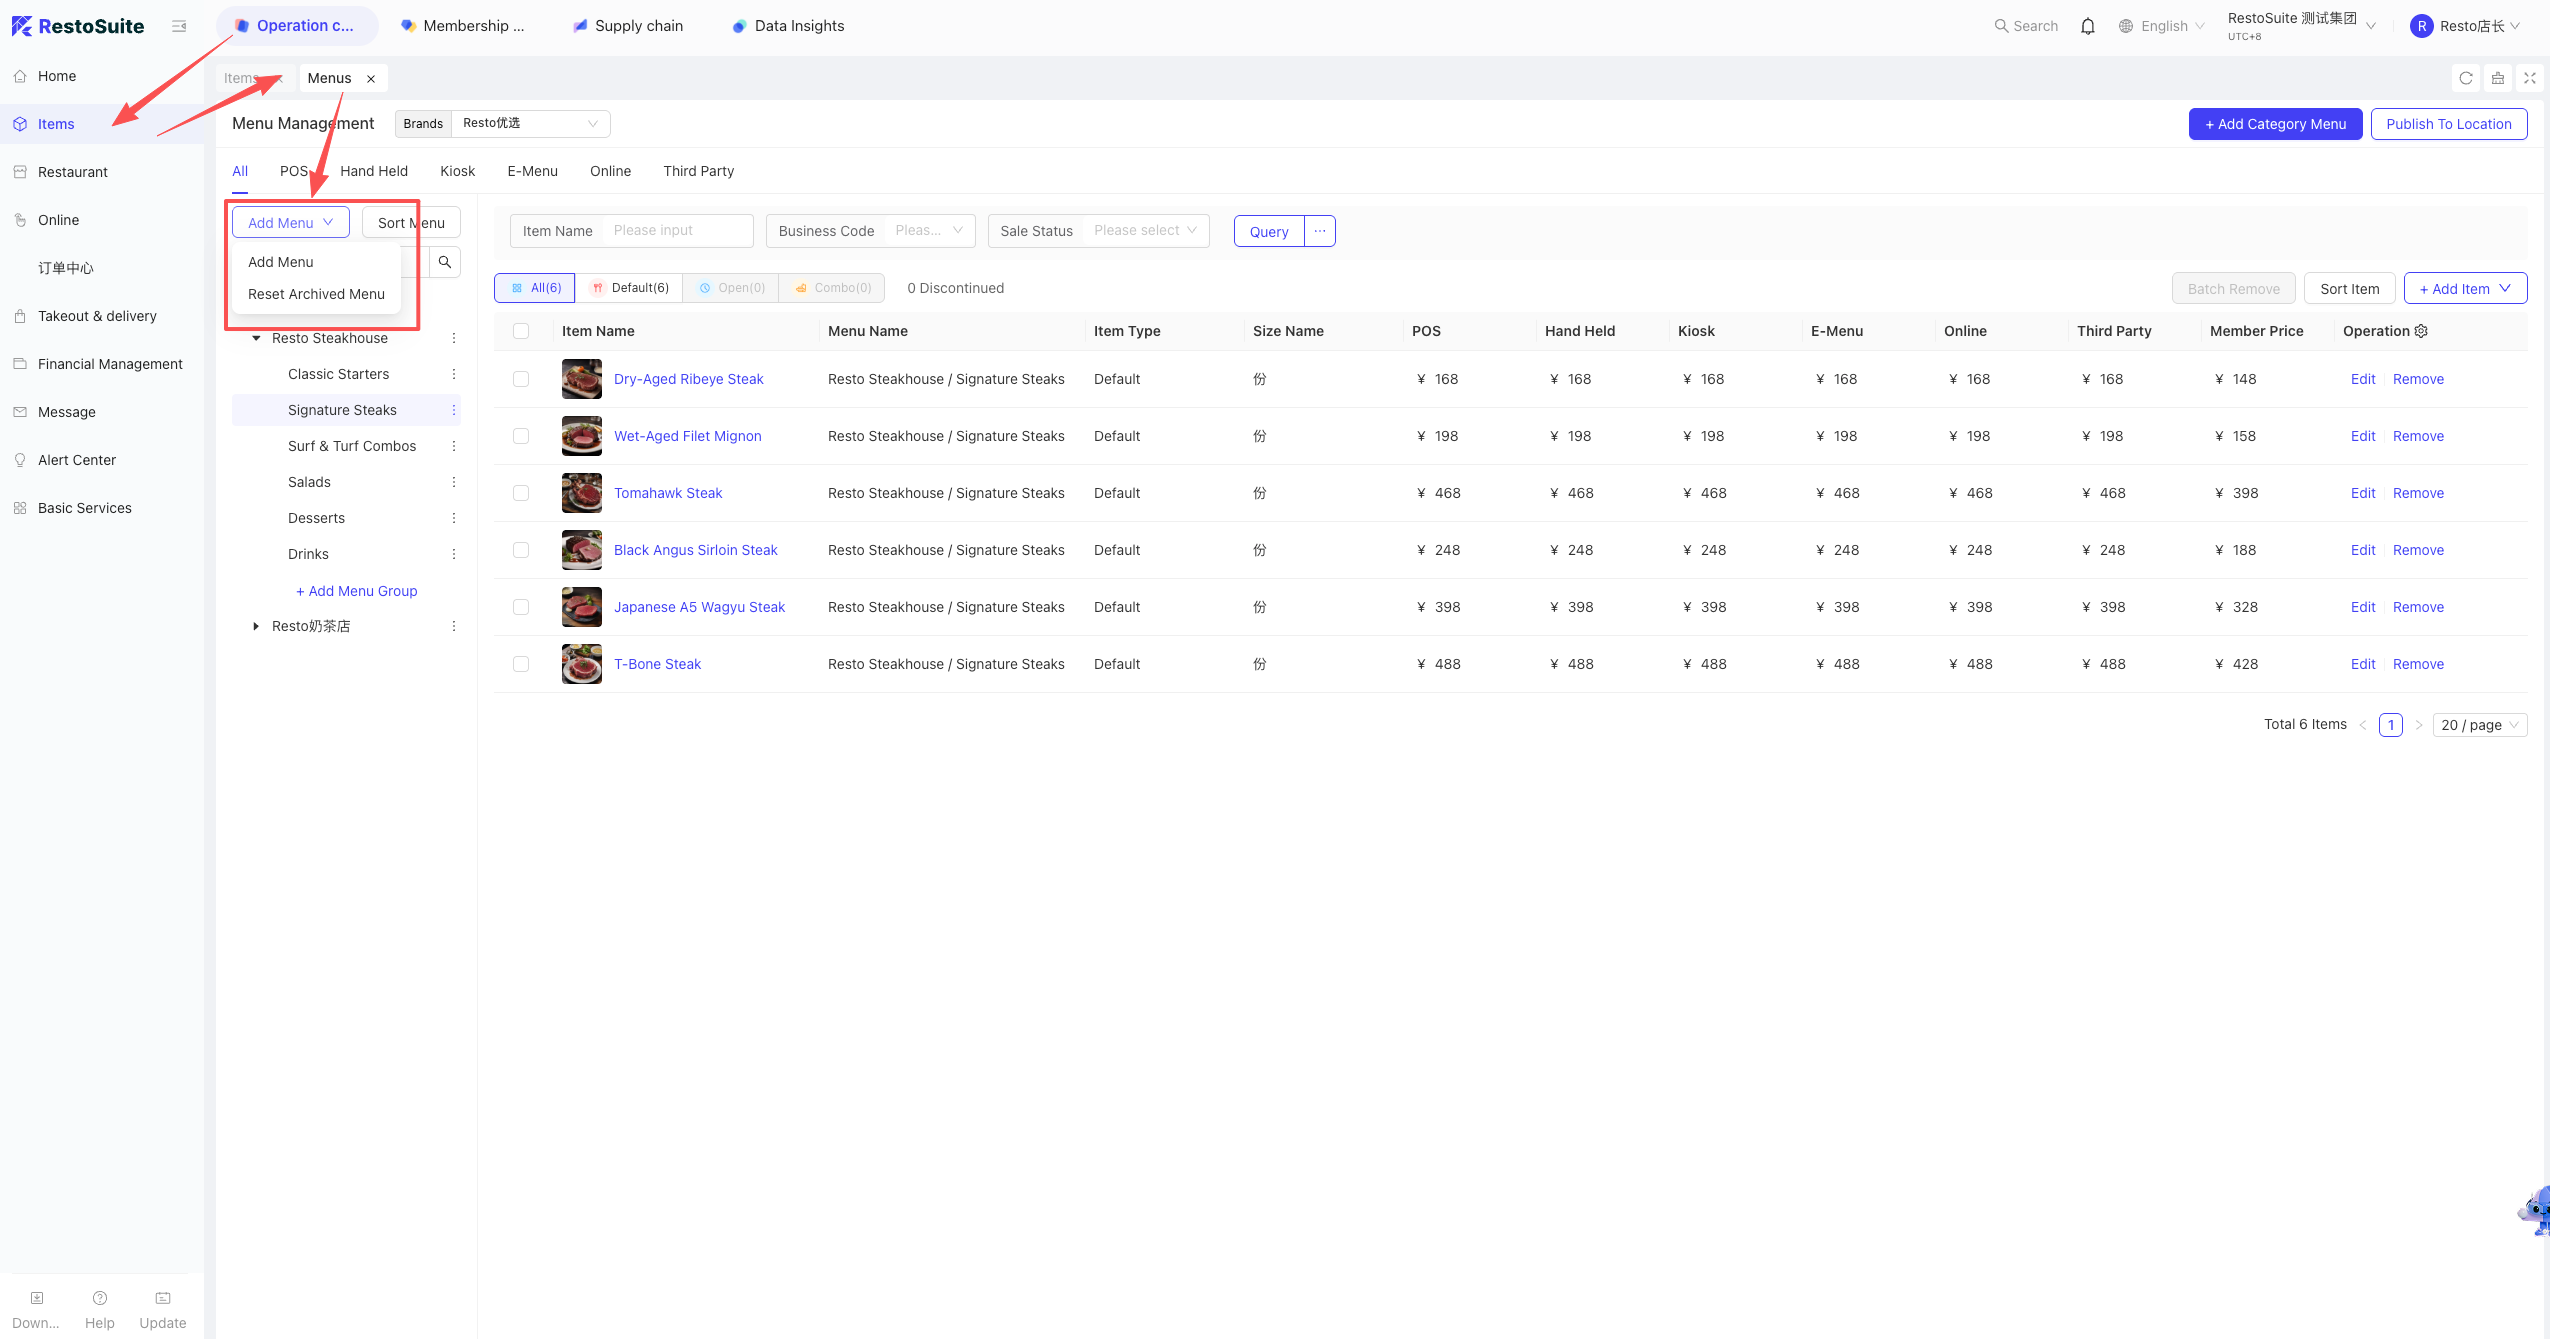
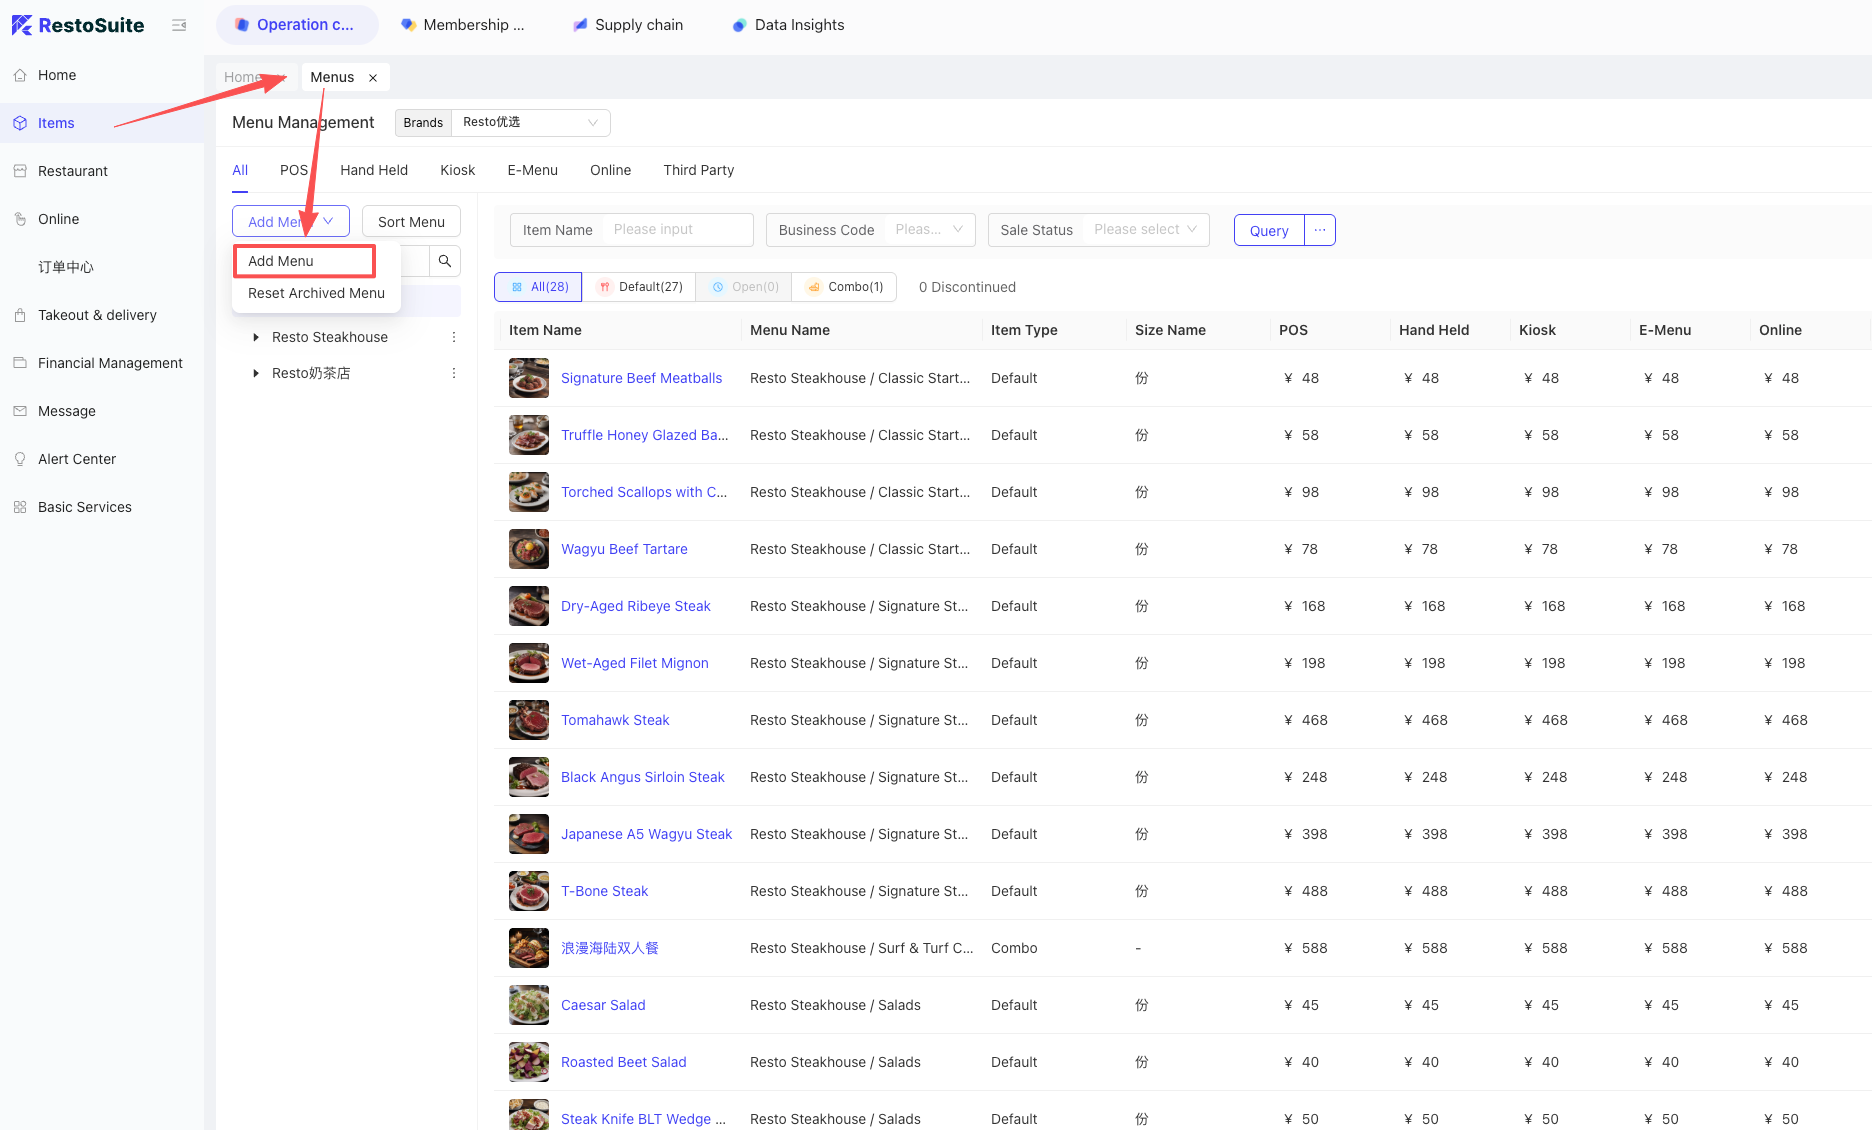
- Create Group Menu: BO System -> Operation Center -> Item Management -> Menu Management -> Add Menu and select the corresponding items.
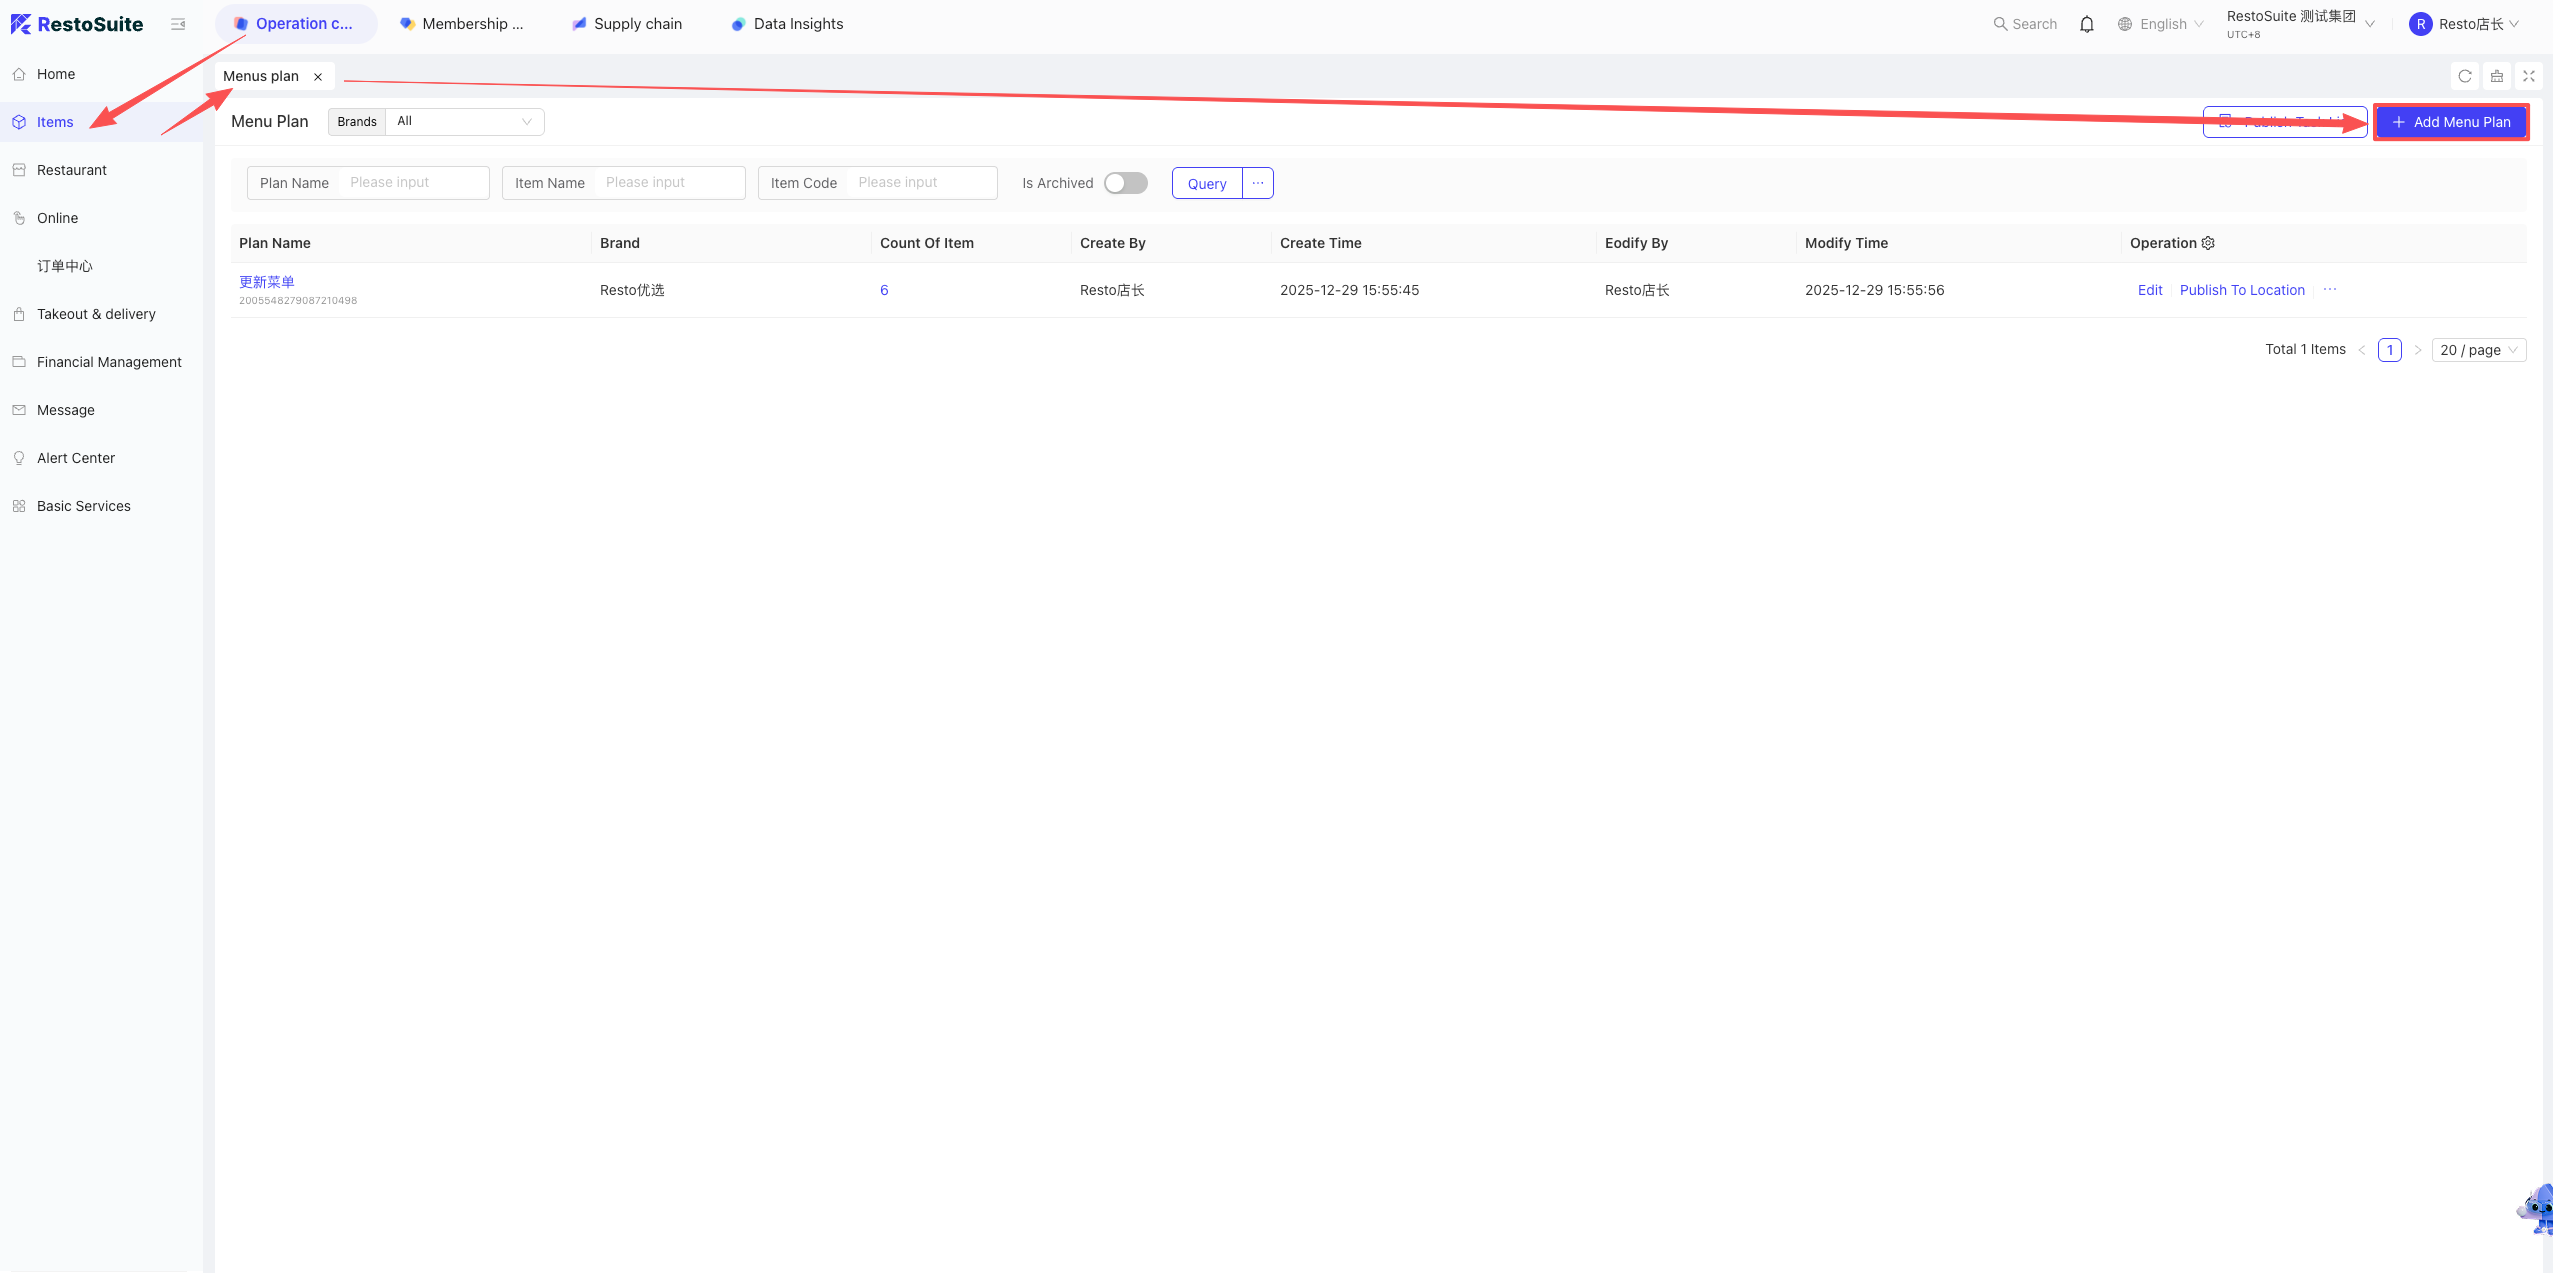
- Group Menu Change Scheme: BO System -> Operation Center -> Item Management -> Menu Change Scheme -> Create New and select items.
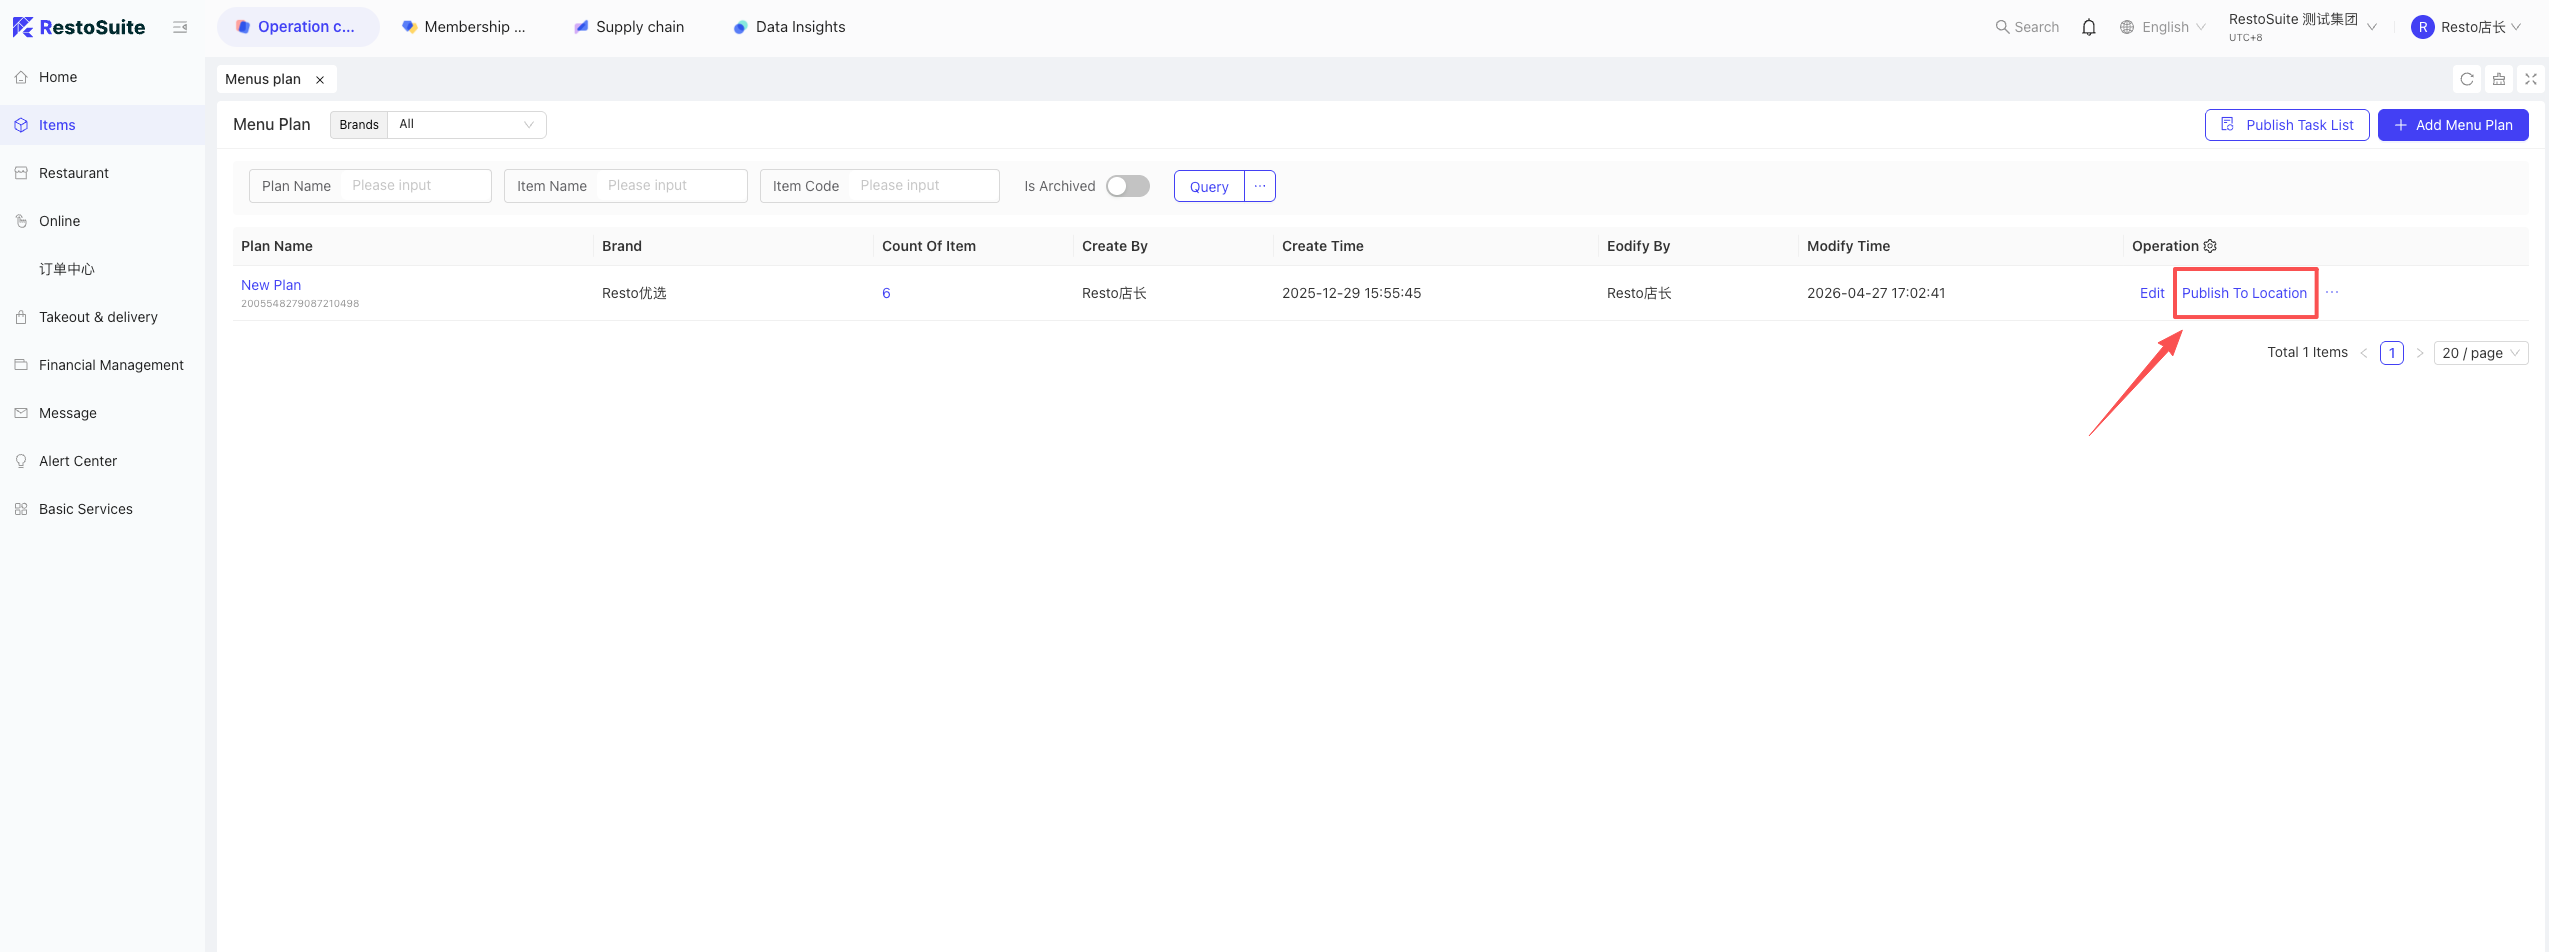
- Publish Menu to Corresponding Stores: Click the Publish button, select the publish type, select the applicable stores and the publish time to execute.
4 How to dispatch group-controlled items from the Group level to stores?
4.1 Scenario:
The Group level has unified control. All store items must be managed (added, edited, deleted) by the Group level. Stores do not have permission to manage items themselves.
When an item is edited at the Group level, it must be re-dispatched to the stores.
4.2 Setup Steps:
Create Group Item Category -> Create Group Item Library -> Create Menu -> Create Menu Change Scheme -> Select the scheme and dispatch to the corresponding stores.
- Create Group Item Category:
- Log into the BO system. Under the Group perspective -> Operation Center -> Item Management (left menu) -> Item Category. Select whether you are creating a Group Category or a Brand Category.
- Click Add Group in the upper right (*Level-1 Category).
- Enter the category name and add sub-categories (*Level-2 Category).
- You can drag the three lines to adjust the order.
- Click Save.
-
Create Group Item Library: BO system -> Group perspective -> Operation Center -> Item Management -> Item Management. Select the brand or group, and click the upper right to add a single item or batch imported items.
- Single Add: You can add combos or standard items. Fields with an * are mandatory.
- Batch Import: Note that Combos cannot be imported.
-
Create Group Menu: BO system -> Operation Center -> Item Management -> Menu Management. Select the brand, and click the upper right to create a category menu. Select the categories you want to include and click Confirm.
-
Create Menu Change Scheme: BO system -> Group perspective -> Operation Center -> Item Management -> Menu Change Scheme. Select the brand, click the upper right to add a new scheme. Enter the scheme name, select the brand and currency symbol, and confirm. Once created, click “Add Existing Item” to add items from the menu.
-
Dispatch the scheme to stores: Select the publish type to dispatch.
- Add Menu and Item: For new arrivals; adds or replaces attributes of already dispatched items.
- Update Published Menu and Item: Updates existing store items (name, price, sizes, descriptions, etc.).
- Replace Menu and Item: Deletes all current store menus/items and entirely replaces them with the template. Use for major overhauls.
- Delete Specified Item: Removes discontinued items from the store menu. Use with caution as it may affect combos and side dishes.
5 How to create items in the BO system and publish them to POS?
Note:
Items can be created individually or batch imported (importing combos is not supported).
Path: Create Item -> Create Menu -> Publish Menu -> Check Status.
For multiple languages, click the globe icon when creating individually. For importing, download the template for that specific language and upload it under the same language, ensuring the item codes match.
5.1 Individual Creation:
-
Standard Item Creation:
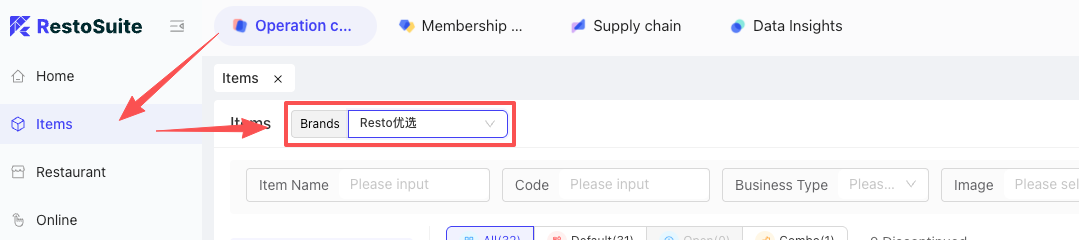
- Log into the BO system -> Corresponding perspective -> Operation Center -> Item Management -> Item Management. Click Add in the upper right, select Standard Item.
- Basic Info: * indicates mandatory fields. Check applicable business types (Dine-in/Delivery/Pickup). Check if it’s a member-exclusive item. Set prep time (minutes/seconds).
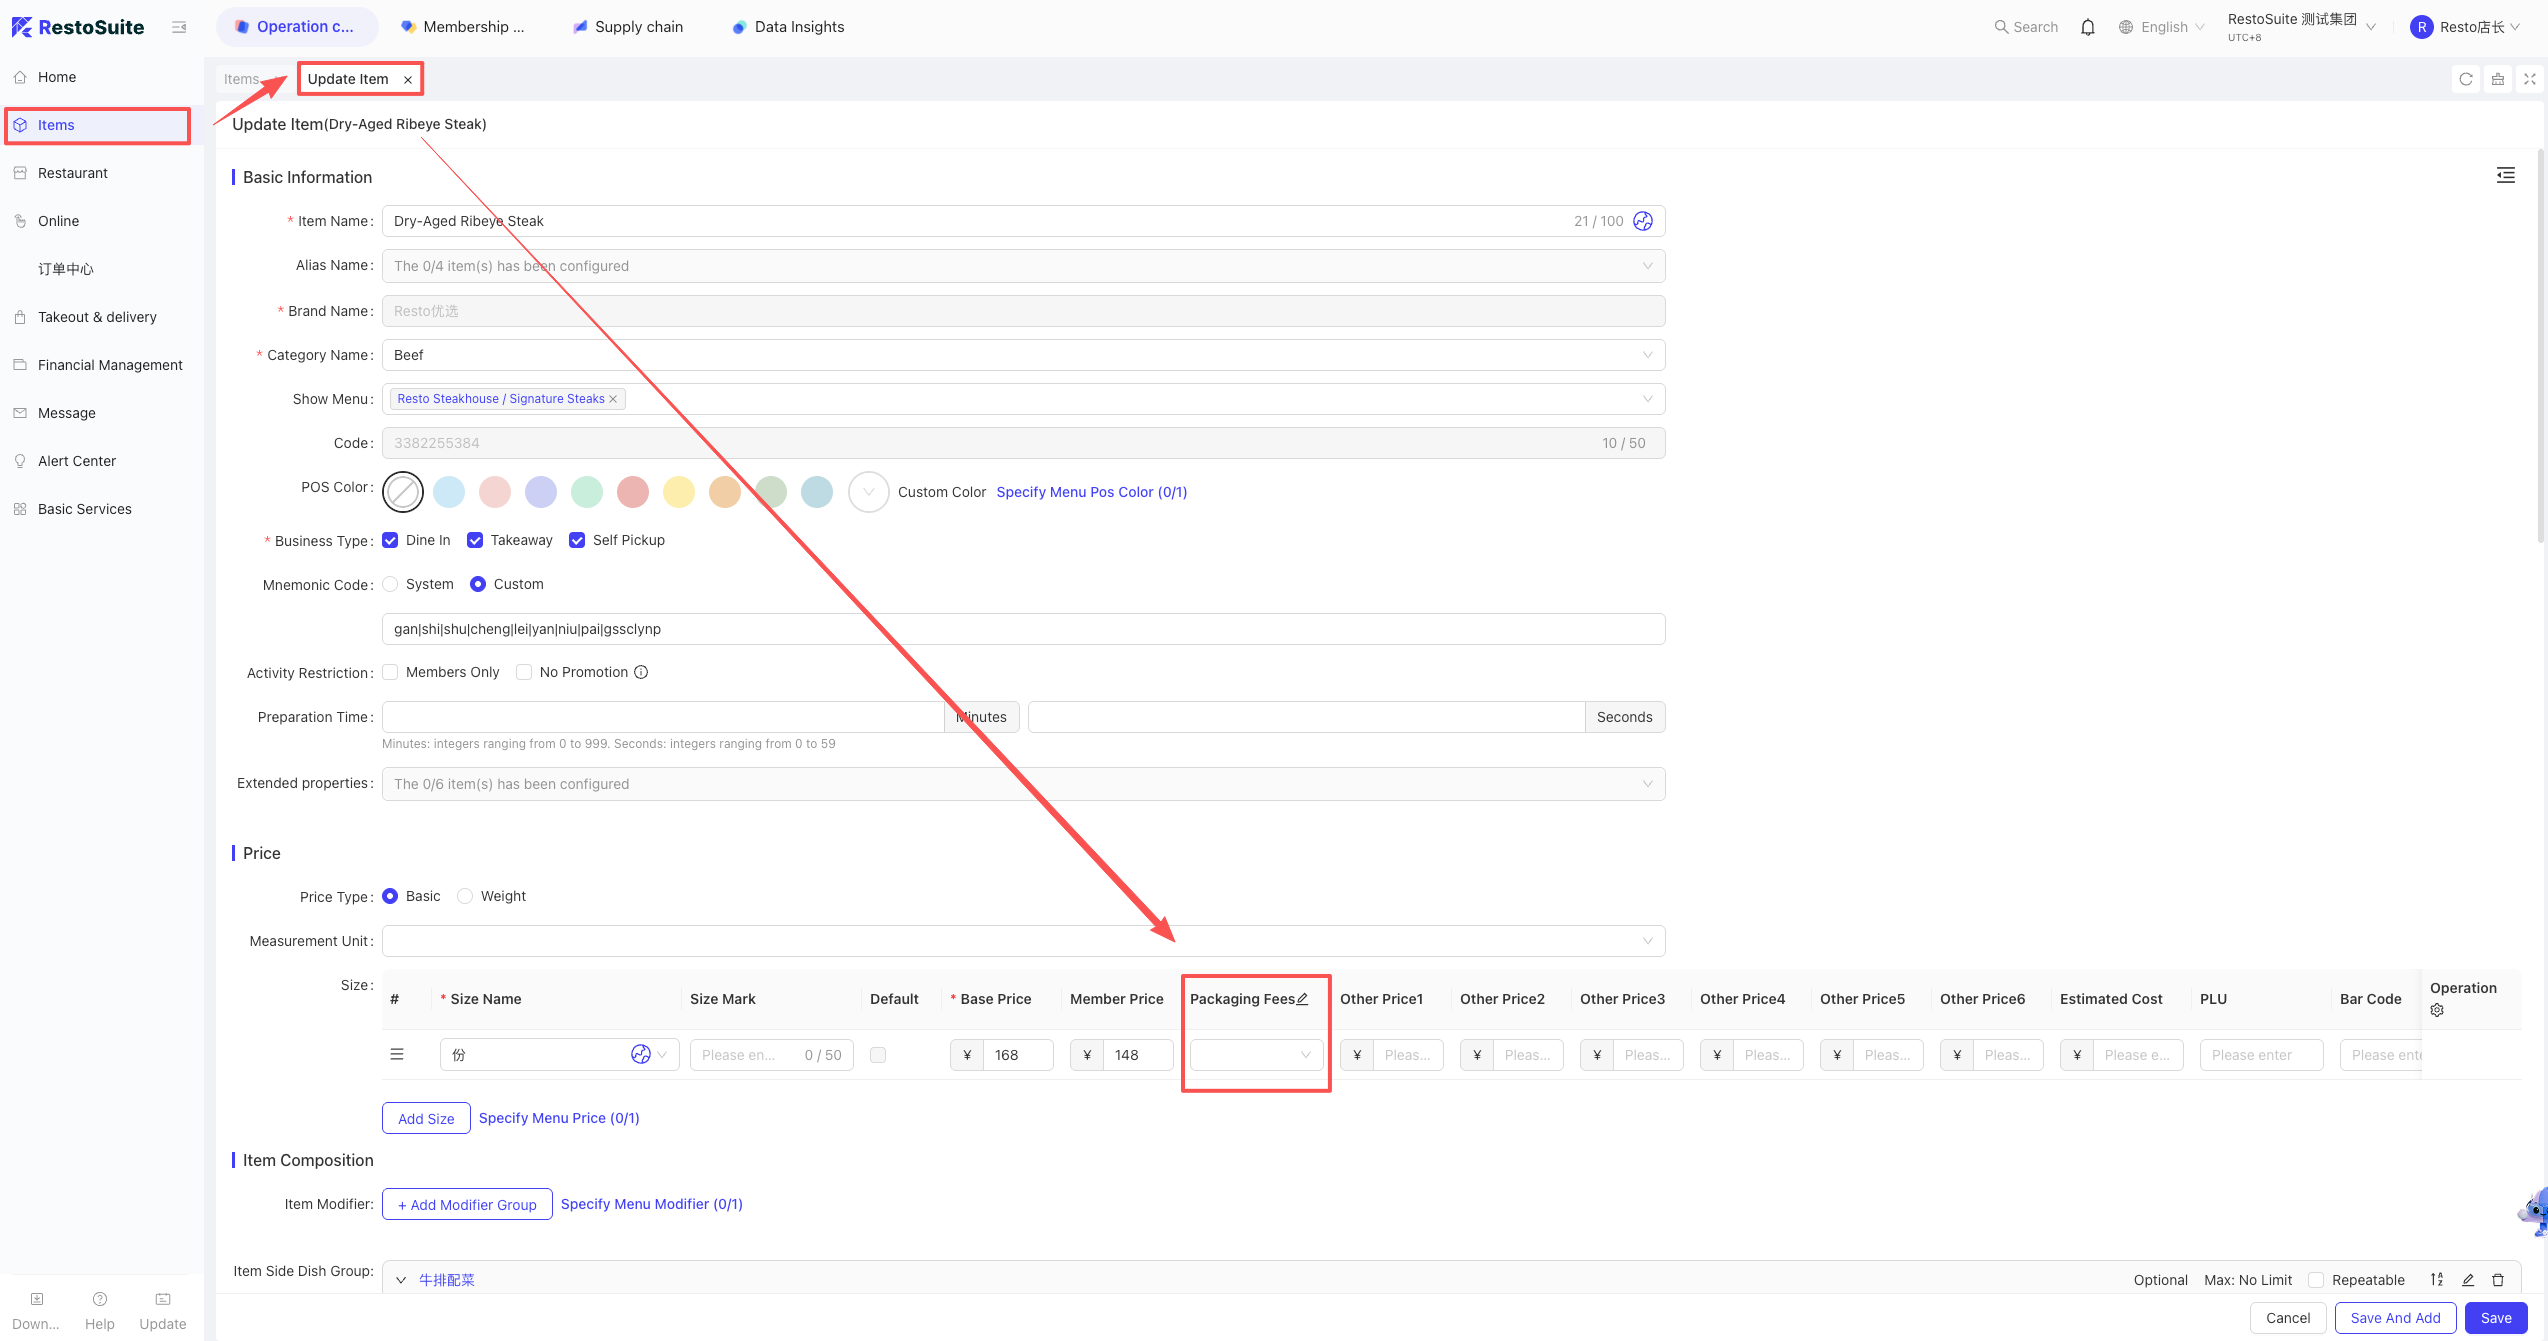
- Price Attributes: Base Price (fixed), Open Price (modifiable on POS), or Weight Price (for scales). Set Unit, Size/Portion, Base Price, Member Price, and Packaging Fee (added via Surcharges). Set Daily Sales Limit. Click “Add Size” for multiple sizes (e.g., Large/Small).
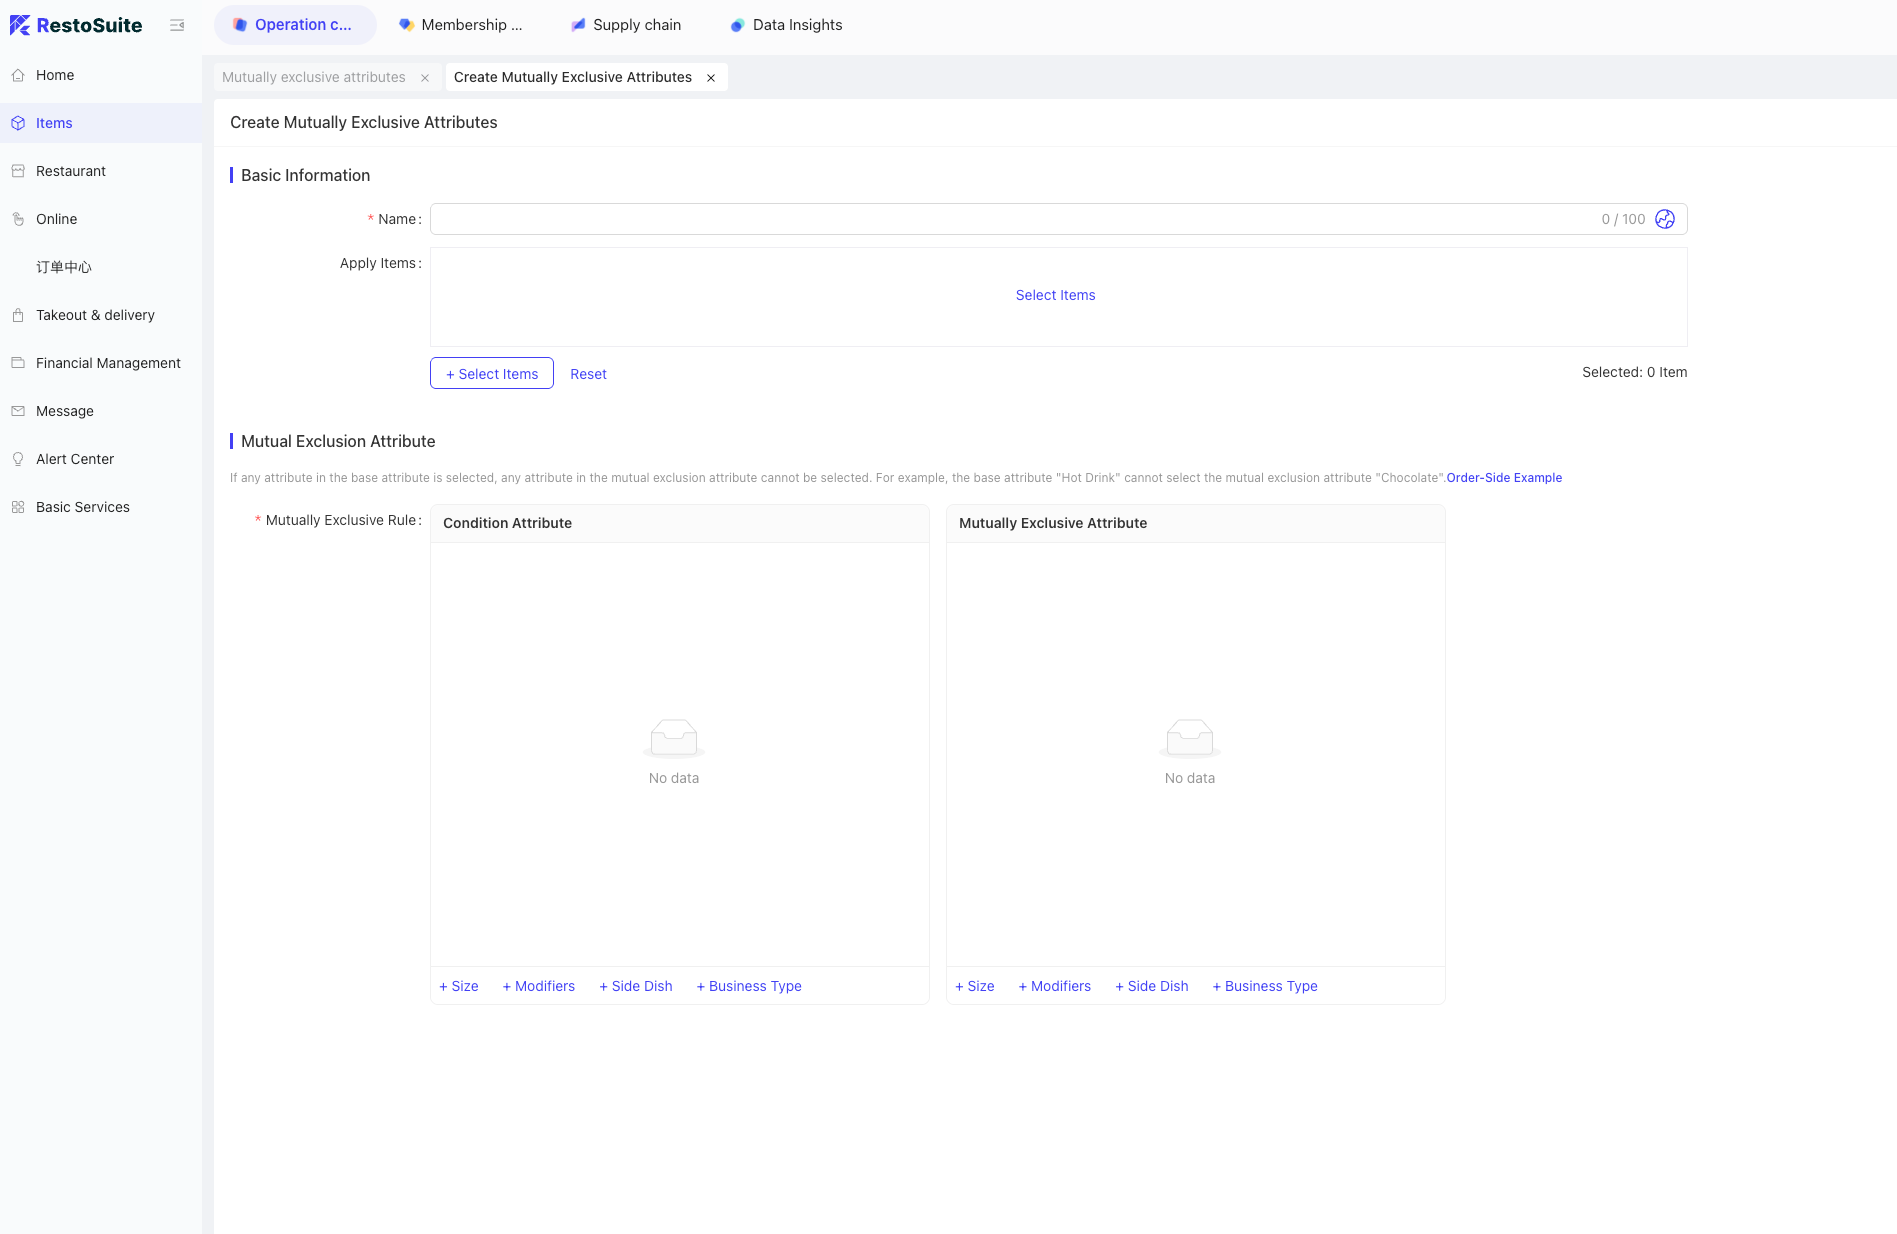
- Item Customization: Tastes/Prep Methods (e.g., mildly spicy, steamed). Side Dish Groups. Mutually Exclusive attributes. Default POS Pop-up toggle (forces staff to select modifiers).
- Selling Info: Status (On Sale/Off Sale). Selling Channels (POS, Handheld, Kiosk, Online, etc.). Effective Date/Time. Minimum/Incremental order quantities. Purchase limits per order/person.
- Extra Info: Tax, Accounting subject, Prep station, Serving sequence settings (can inherit from category or be set individually).
- Ordering App Display: Upload main images and detail images (<2M). Set Allergens, Alcohol content, Spiciness level, and Calories.
-
Combo Item Creation:
- BO system -> Operation Center -> Item Management -> Item Management -> Add -> Combo Item.
- Basic Info: Standard fields.
- Business Attributes: Dine-in/Delivery/Pickup, Member exclusive.
- Price Attributes: Combo Base Price and Member Price.
- Combo Group: Fixed combos or Choice combos (e.g., pick 2 out of 3). Set Reference Price and Add-on Price.
- Selling Info & Extra Info: Similar to standard items.
- Ordering App Display: Upload images.
5.2 Batch Import:
Navigation: Item Management → Batch Operation → Batch Import Items.
- Download the template for the specific language.
- Fill in the item details. Important: For multi-language support, the Item Code must remain identical across different language templates.
- Upload the file and click Next for a system check. Once passed, click Import.
5.3 Item Image Upload & Import
5.3.1 1. Individual Upload
Edit an item and upload it under the Ordering Terminal Display section.
- Format: JPG, JPEG, PNG, GIF (< 2MB).
- Detail Images: Up to 20 images for the online store carousel.
5.3.2 2. Batch Import Images
Navigation: Item Management → Batch Operation → Batch Import Images.
- Images must be compressed into a .zip file (< 100MB).
- Crucial: The image filename must exactly match the Item Name.
5.4 Modifying Item Attributes:
- Individual Edit: Find the item in Item Management and click edit.
- Batch Edit: Item Management -> Batch Operations -> Batch Modify Price / Multiple Selections / Other Info.
5.5 Publishing Items to the Store POS
If the store creates the item, they must create a store menu and publish it. If dispatched by Group/Brand, the menu is published directly.
- Store Menu Creation & Publishing:
- Store perspective -> Operation Center -> Item Management -> Menu Management -> Add Menu -> Select Items.
- Click the blue Publish button. Check the Publish Records to see if it took effect (a green “Completed” icon on the latest record means it’s active; otherwise, restart the POS device).
6 How to add Modifiers to the BO system?
Scenario: Modifiers are notes for items, like “Steamed” or “No Spice”. They can be added at the Group, Brand, or Store level.
- If required, enable the “Default POS Pop-up” setting for the item.
- Modifiers must be published via the menu to take effect.
-
Add Modifier: BO system -> Operation Center -> Item Management -> Tastes & Prep Methods. Add a group and detailed items. Set applicable channels, images, backend print names, and extra charges (e.g., +$2).
-
Link to Items:
- Single Item: Edit the item -> Item Customization -> select the modifier group.
- Batch Link: In the Tastes & Prep Methods page, expand the group, click “Apply” next to the modifier, and select the target items.
-
POS Display: If pop-up is enabled, it prompts automatically. If not, staff must click “Modify” on the order screen.
7 How to add side dishes to items in the BO system?
Scenario: For dine-in, main dishes often come with sides (e.g., Grilled Fish comes with 2 sides).
- Setup: BO system -> Operation Center -> Item Management -> Side Dish Group. Add a group, set it to Mandatory/Optional, set Max/Min limits, select the items serving as sides, and set any extra charges.
- Link to Items: Edit the main item -> Item Customization -> Link the Side Dish Group. (Changes to the side dish name must be done in the Side Dish Group page).
- POS Display: Works with the “Default POS Pop-up” toggle. Prompts automatically if on; requires clicking “Modify” if off.
8 How to add Table Areas for Dine-in?
A: Dine-in restaurants often have multiple service areas (e.g., VIP rooms, Main Hall).
-
Setup:
- BO system -> Store perspective -> Operation Center -> Restaurant Management -> Service Area.
- Click Add. Set the Name, Online Payment rules (Pre-pay/Post-pay), Default POS Business Type, and Service Fee (must be added in Surcharges first).
-
Publish: After creating, click Publish. The POS needs to log out and log back in.
9 How to add tables in Dine-in mode?
Tables can be added manually or imported.
- Manual Add: BO system -> Store perspective -> Operation Center -> Restaurant Management -> Table Management. Click Add Table. Enter Name, Code, Service Area, Seating Capacity, and Minimum Spend (often used for VIP rooms).
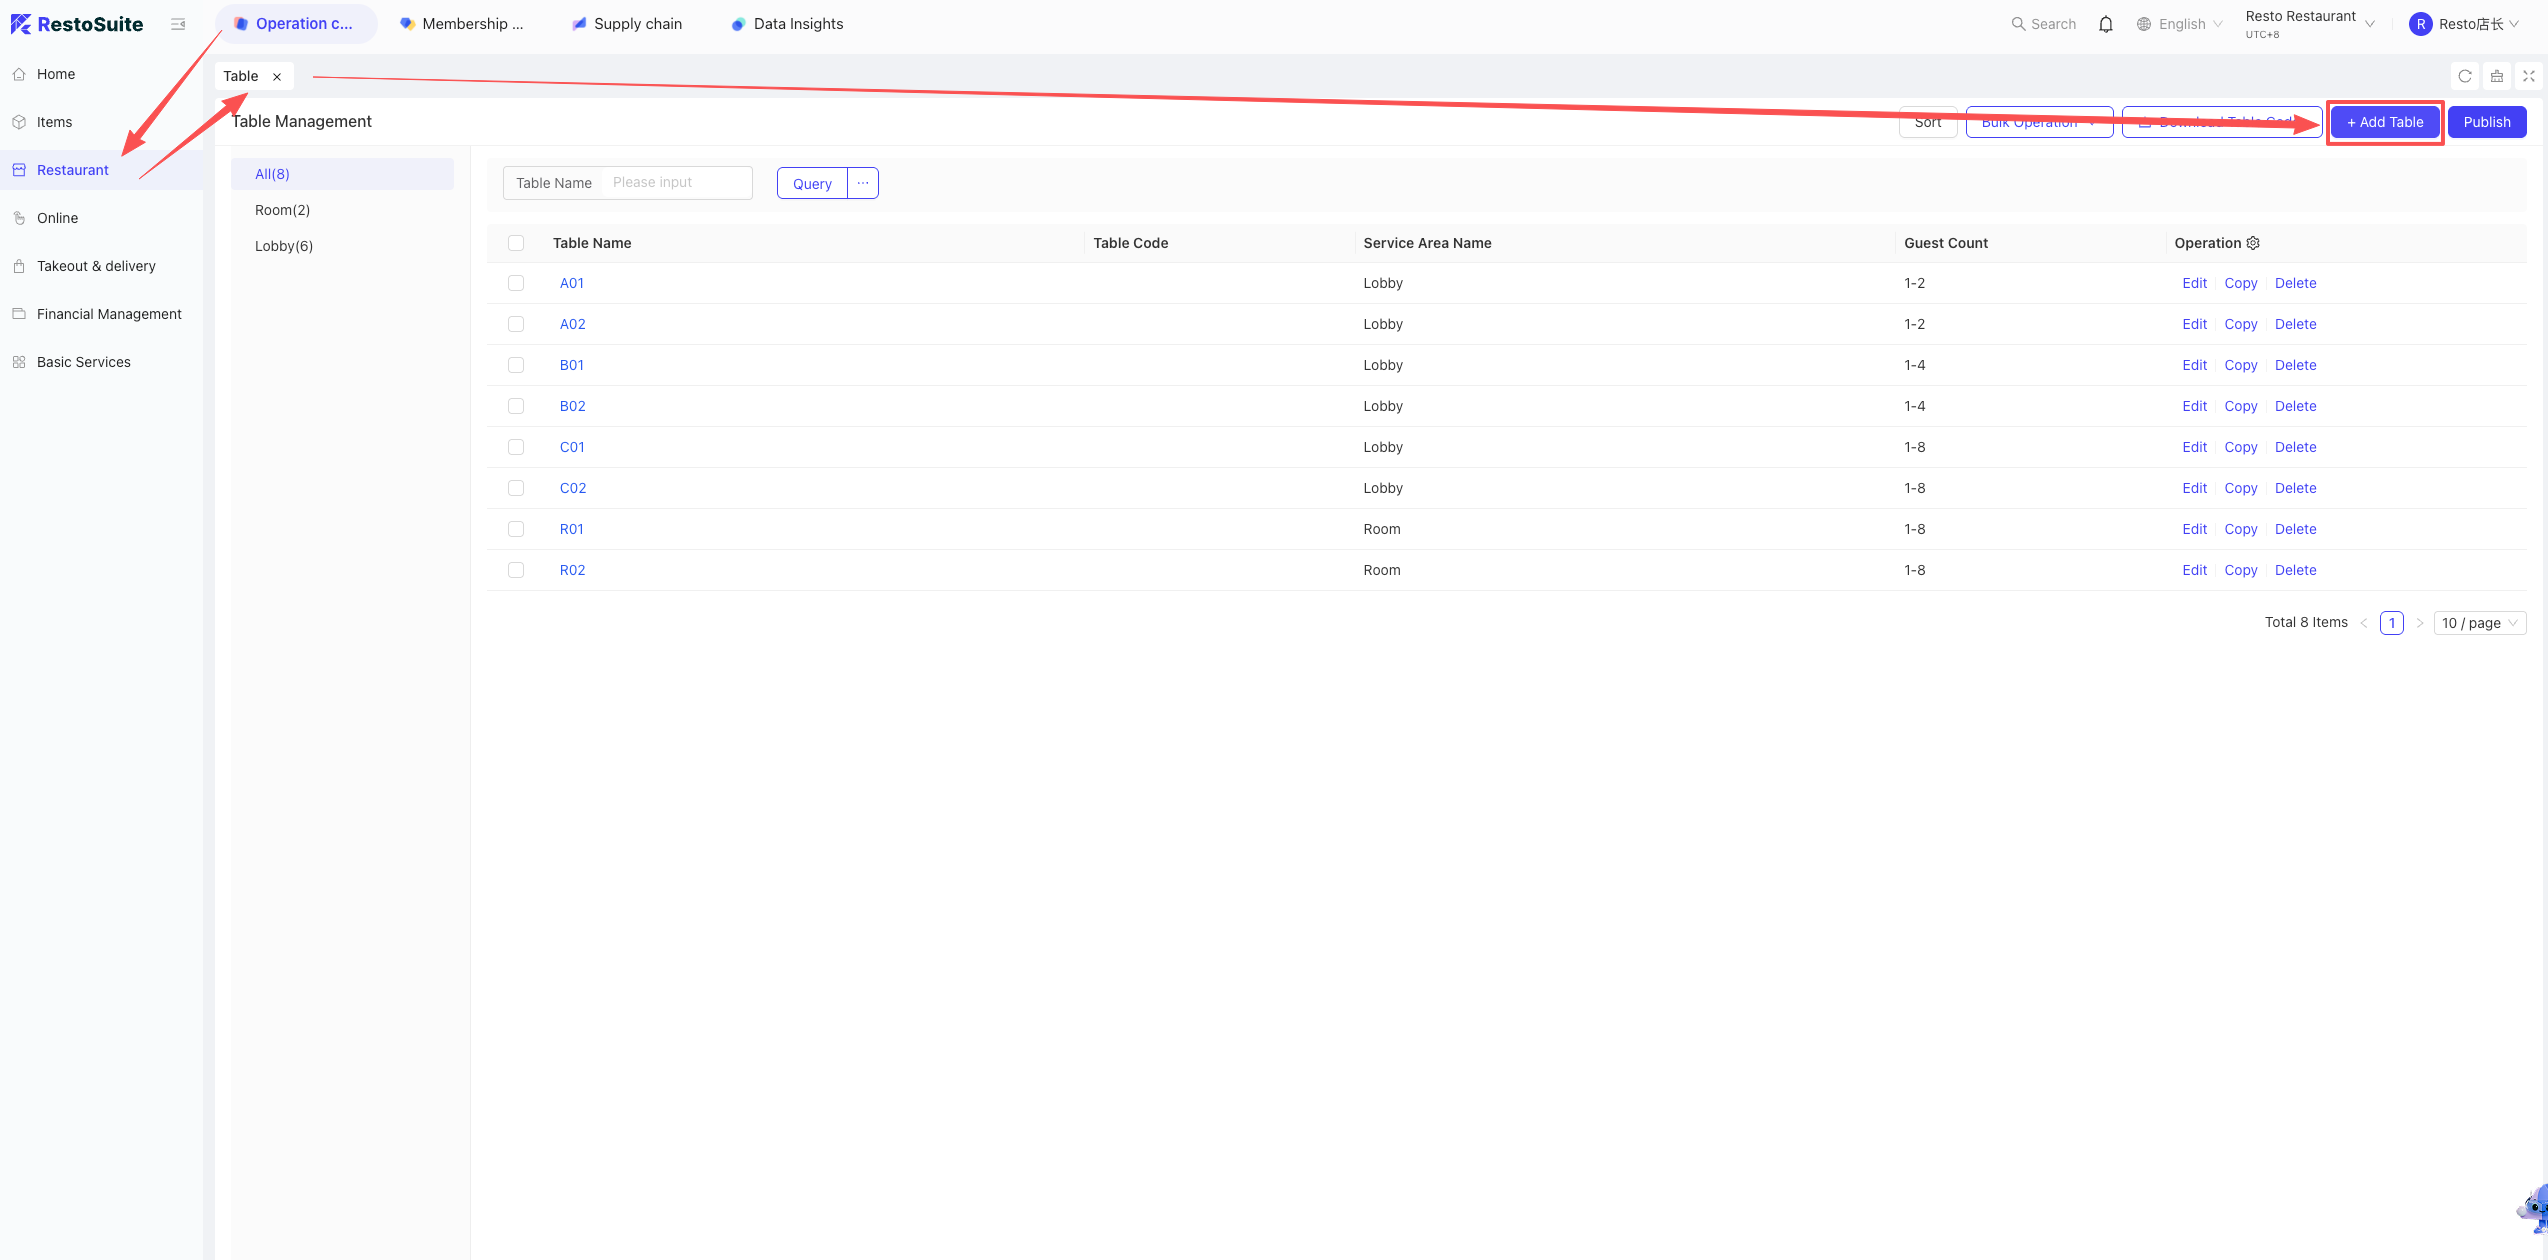
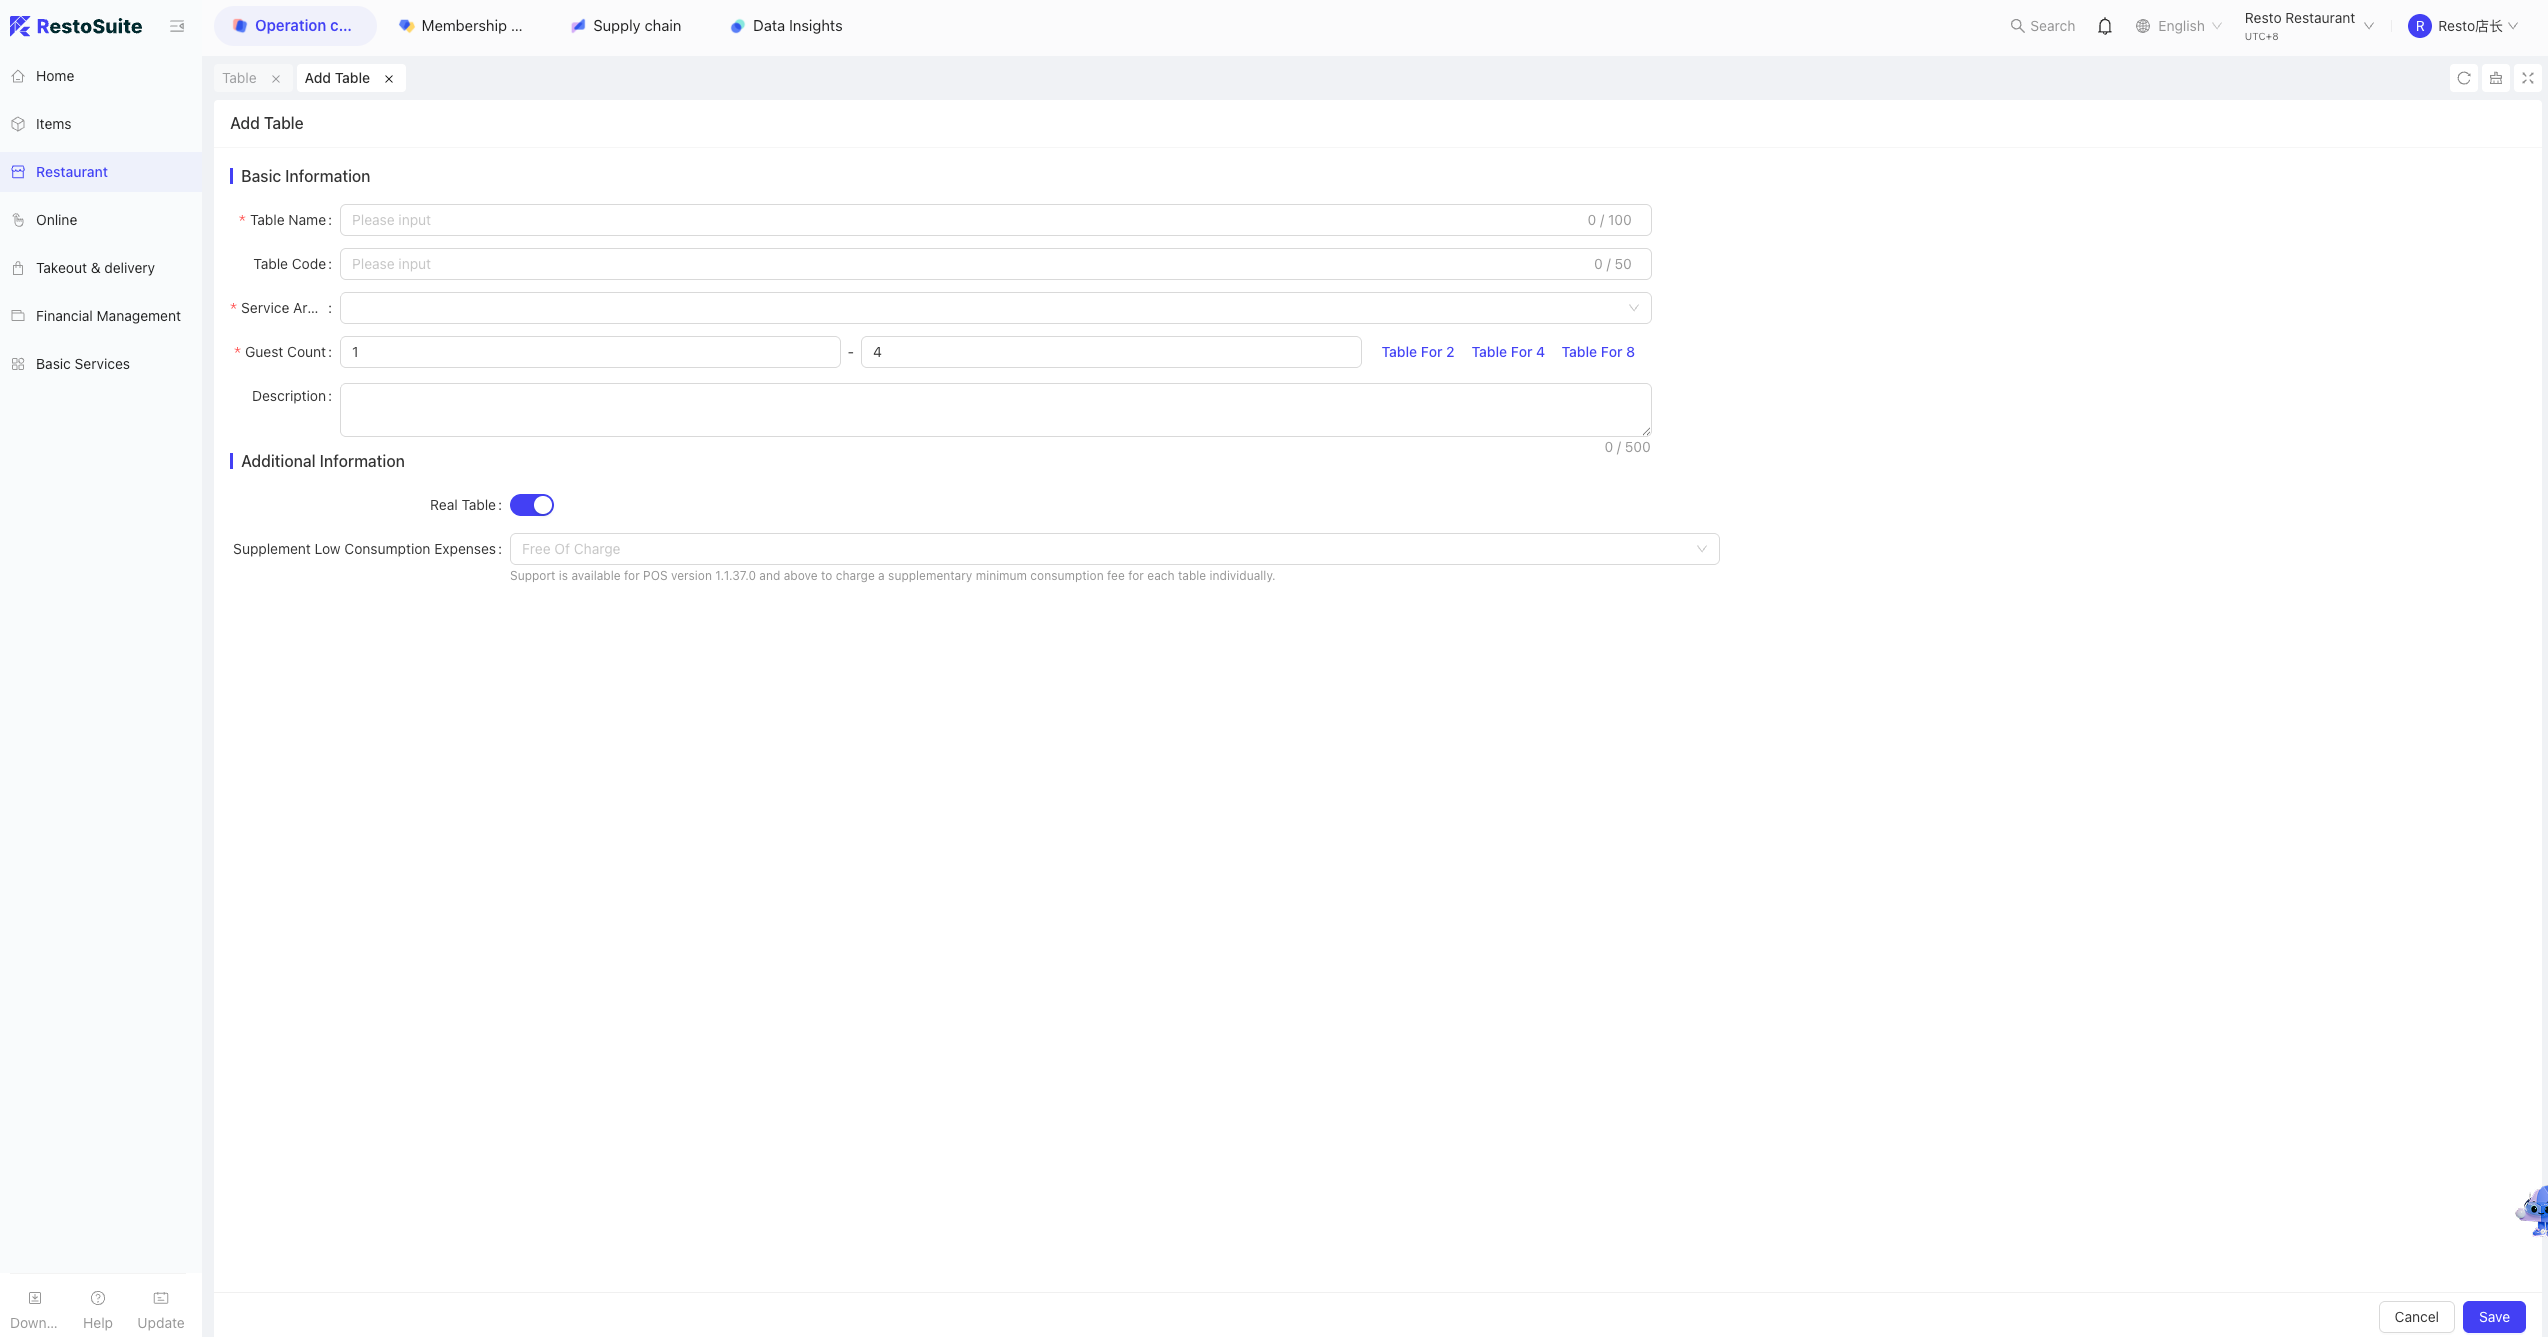
- Publish: Click Publish. The POS needs to log out and log back in.
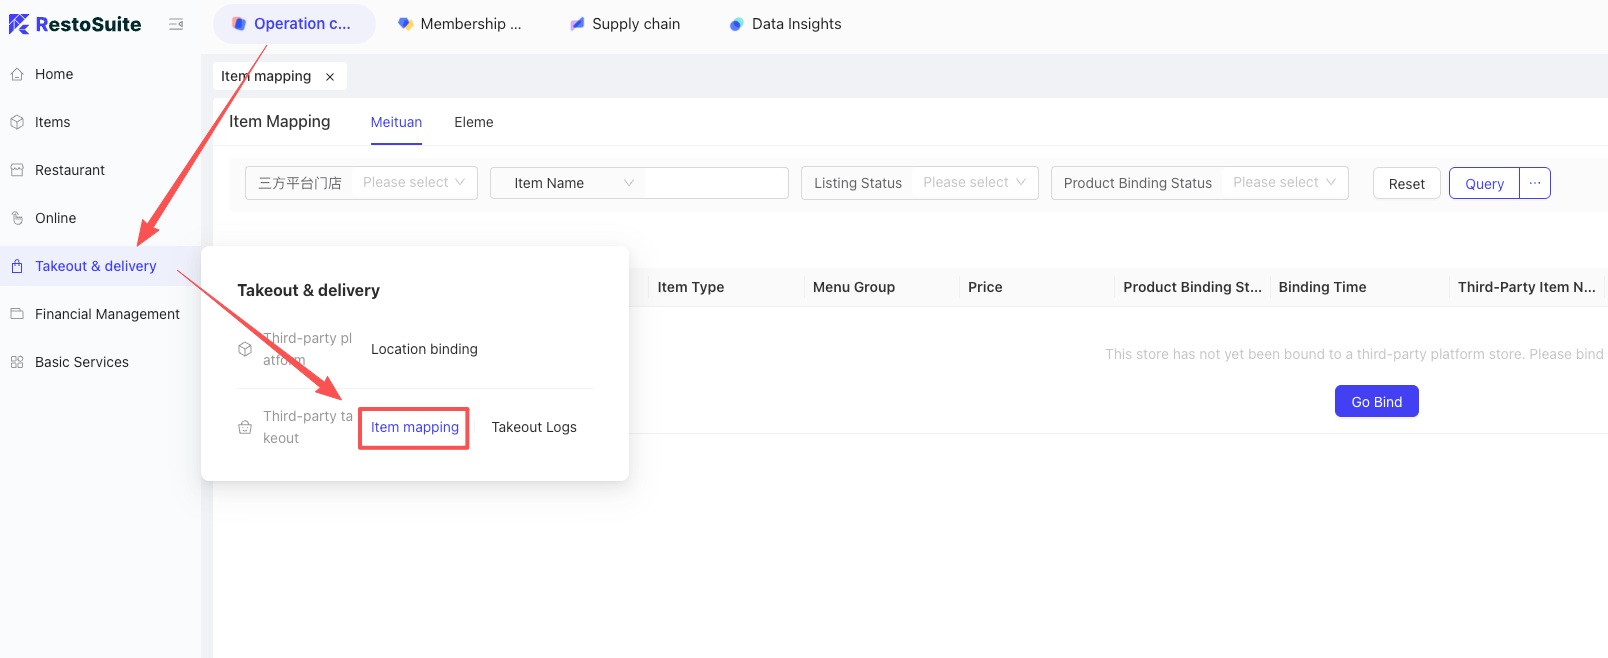
10 How to handle newly added third-party delivery items not showing up during item mapping?
Cause: The “Sync Delivery Items” button was not clicked.
Solution: BO system -> Store perspective -> Operation Center -> Delivery & Dispatch -> Item Mapping. Click “Sync Third-Party Items” in the upper right corner.
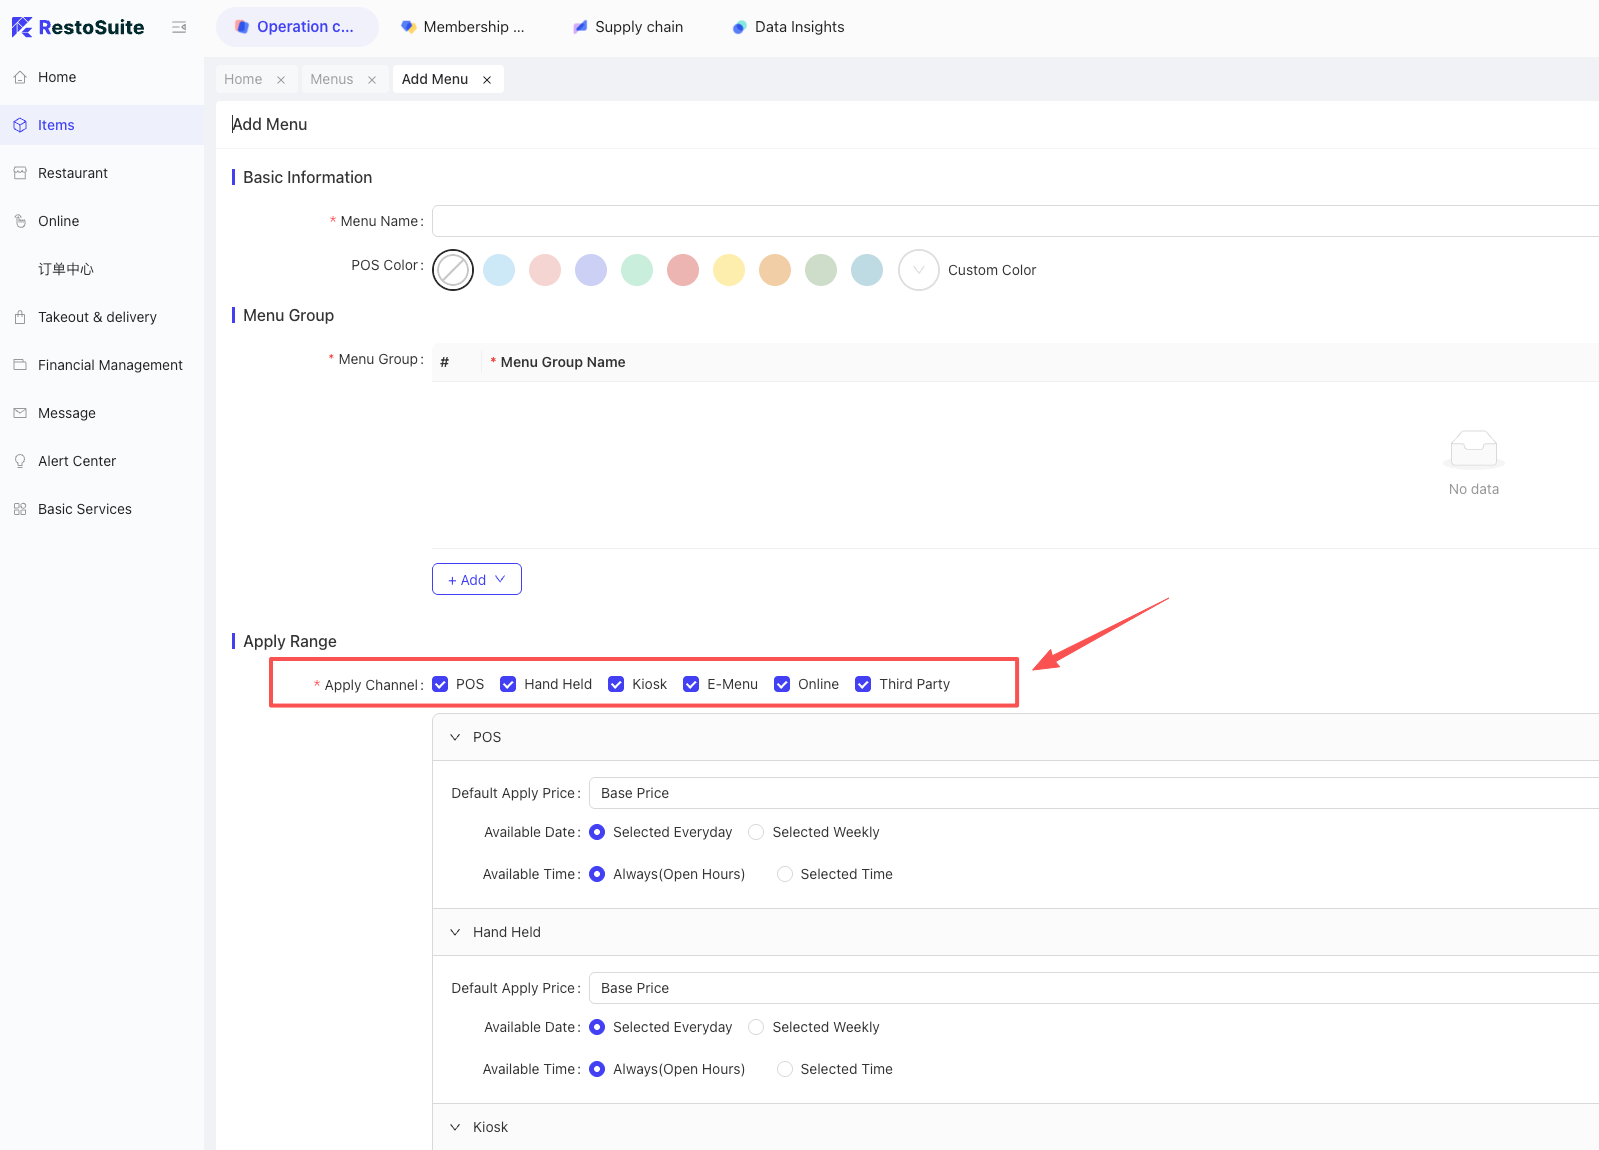
11 How to set applicable channels for a menu group?
Description: You can display different menu groups across different channels (POS, Kiosk, Online, etc.).
Setup: BO system -> Operation Center -> Item Management -> Menu Management. During menu creation or editing, check the boxes for the applicable channels.
12 How to set Recommended Items?
Note: Recommended items work with the Mini-Program and can only be configured at the Group level and then dispatched to stores.
Setup: BO system -> Group perspective -> Operation Center -> Item Management -> Recommended Items.
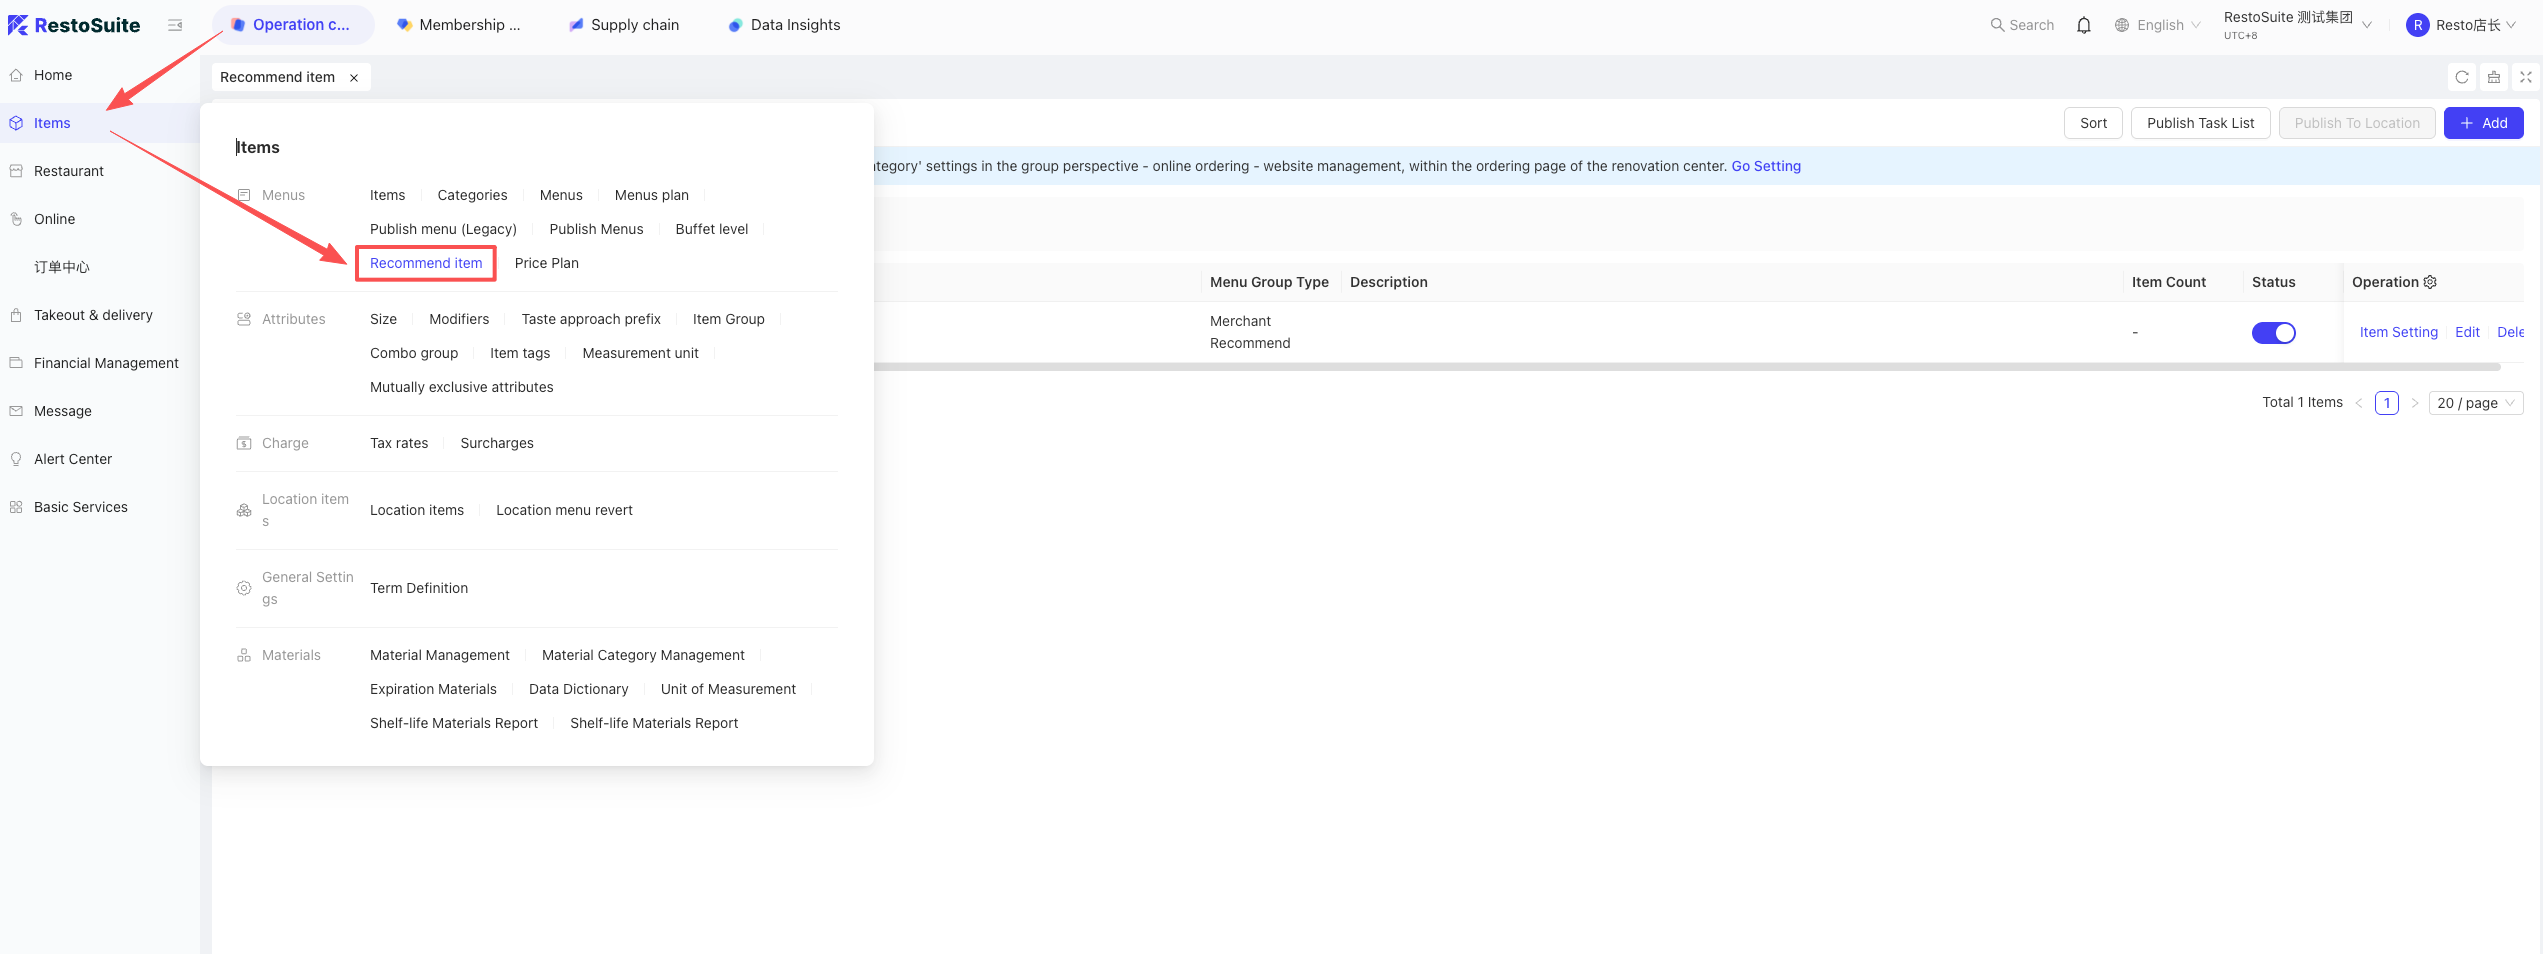
Add a menu group, click Item Settings, select the items, check the group, and dispatch to stores.
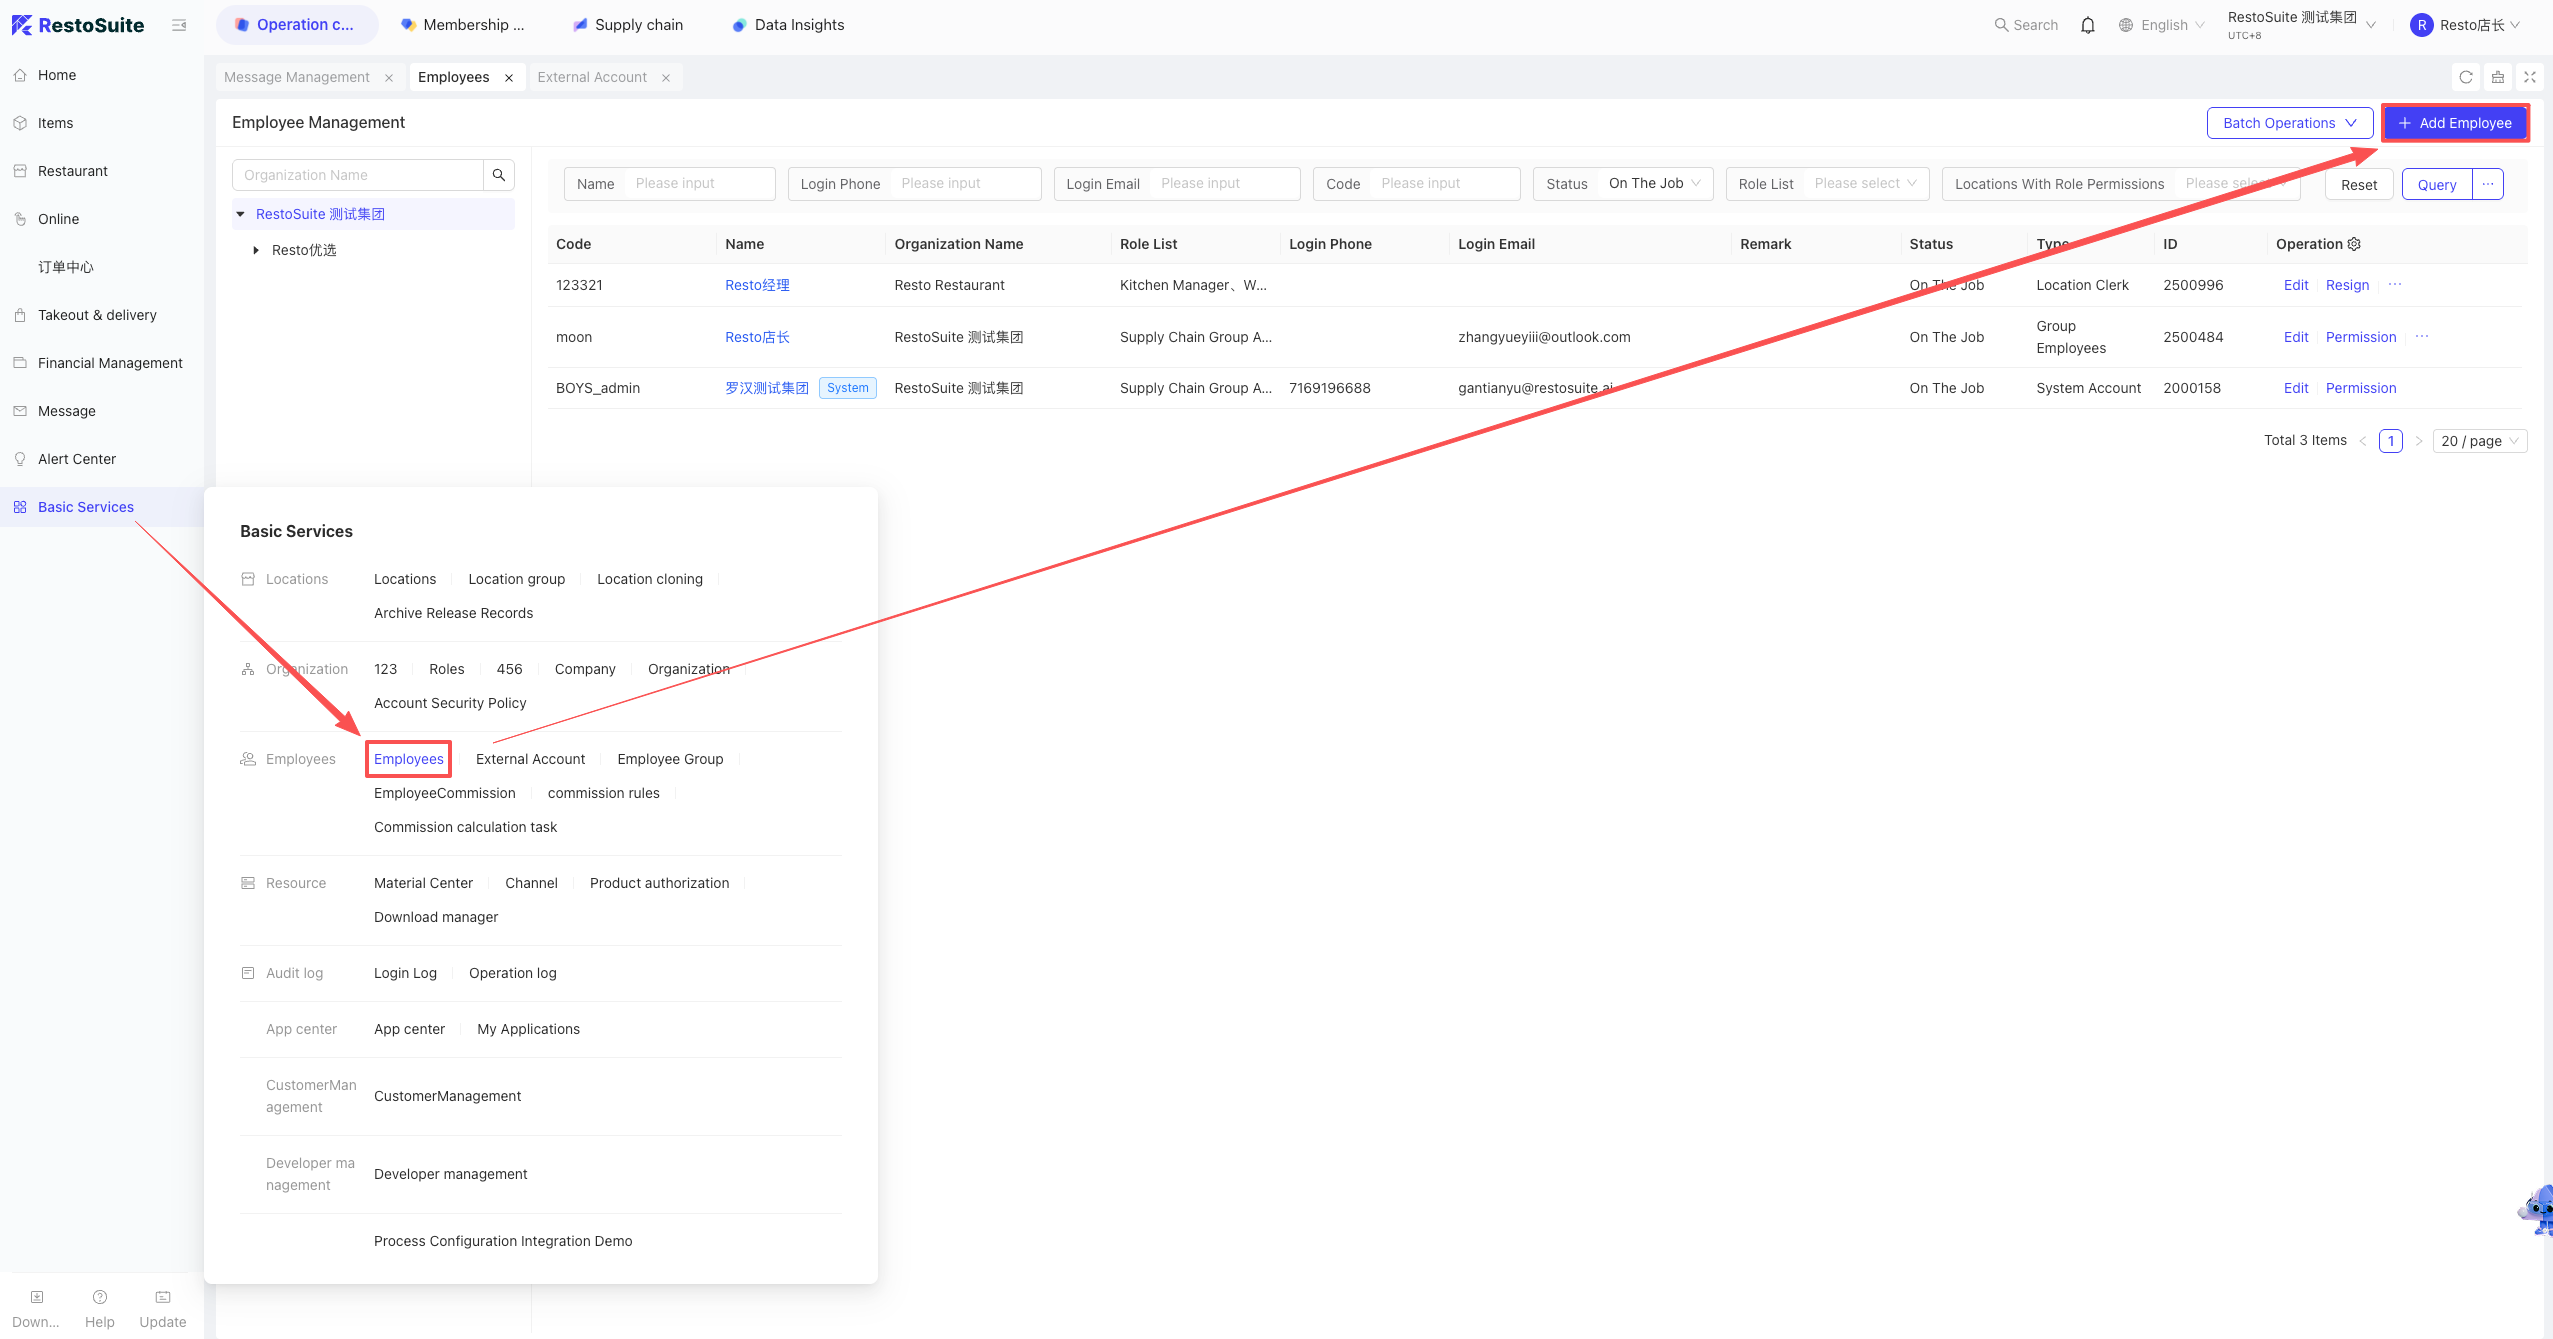
13 How to create login accounts in the BO backend?
A: Log into the BO backend -> Group perspective -> Operation Center -> Basic Services -> Employee Accounts. Click Add Account.
After creation, click “Permission Info” to assign roles.
Note:
A PIN code can be used to log into multiple stores (if group permissions are granted) or restricted to a single store.
14 Is there a report to calculate the estimated cost of items?
A: No corresponding report is available currently.
15 How many characters does one sent SMS contain?
- Chinese (Unicode) SMS: Up to 70 characters = 1 message. Over 70 characters: Length divided by 63 (rounded down) + 1 = number of billed messages.
- English (ASCII) SMS: Up to 160 characters = 1 message. Over 160 characters: Length divided by 153 (rounded down) + 1 = number of billed messages.
16 How to Integrate E-Invoicing?
16.1 Account Opening Process
Merchants complete registration on the Piaotong official website and bind the service provider to RestoSuite’s service provider account on Piaotong.
16.1.1 Merchant applies for a Piaotong account (can be applied by implementation staff)
- Open the URL in a browser:Piaotong (http://www.fpkj.vpiaotong.com/ )
- Click Register
- Fill in the registration information.Invitation code is mandatory: 056FWD
16.1.2 Apply for and activate Piaotong invoice channel with review
Contact the channel manager or channel technical support to apply for Piaotong e-invoicing activation.
The email must include:
- Enterprise ID
- Enterprise name (multiple names allowed)
Note: If a group applies to multiple enterprises, multiple enterprises can be sent in one email.You may also apply one by one (complete Step 1 for each, then activate it one by one).
16.1.3 Wait for Piaotong review and activation
Generally, it takes 1–2 working days.
16.2 Piaotong Account Rebinding Process
16.2.1 Scenario
If the merchant has previously applied for a tax number on Piaotong but the bound service provider is not RestoSuite, follow these steps to migrate the tax number to the RestoSuite service provider.
16.2.2 Ask the customer to fill out and stamp the change application form
- Send the scanned document to the RestoSuite & Piaotong E-Invoice Communication group.If not in the group, contact Dong Bo.
- After Piaotong completes the service provider migration, business integration can begin.
If issues occur, the service provider may not be bound in the migration backend and will need to be verified.
16.3 Piaotong Renewal Process
Scenario:If the Piaotong account has been used for one year and requires renewal, contact Dong Bo for assistance.
Please provide:
- Enterprise name
- Taxpayer identification number
16.4 Configuration in BO Backend
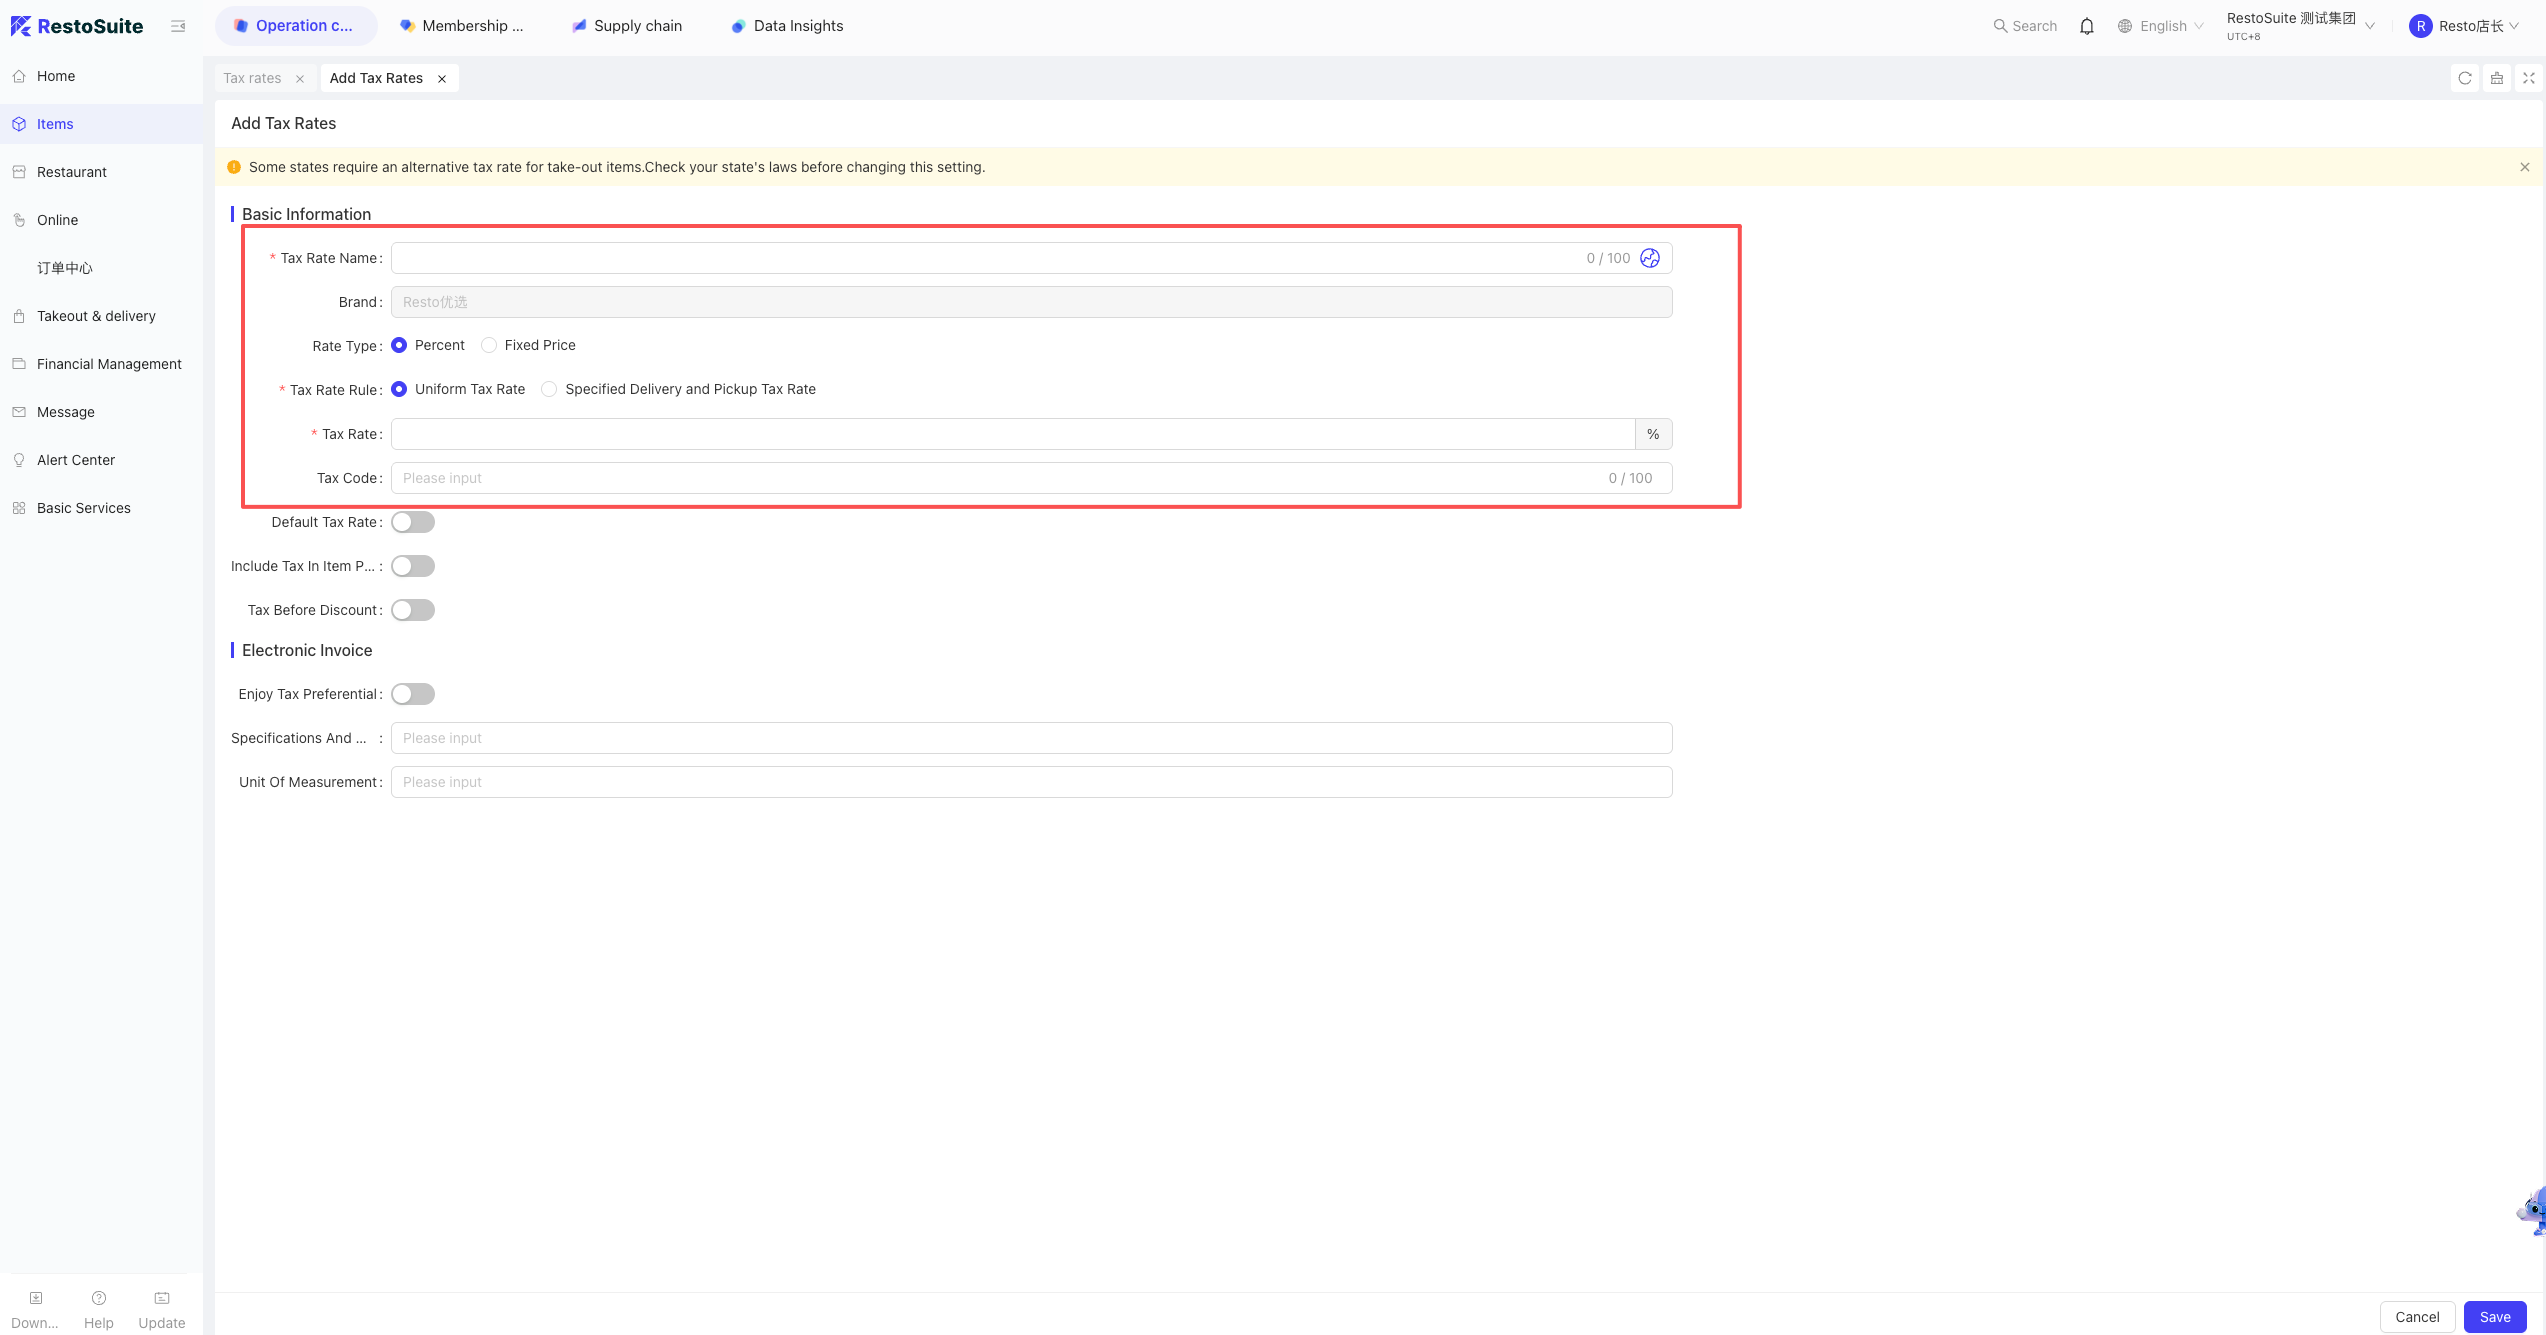
16.4.1 BO Backend Settings – Add Tax Rate
Group View → Item Management → Tax Rate
16.4.1.1 Add New Tax Rate
Reference tax code for meal expenses: 3070401000000000000Subject to actual conditions.
Notes:
a) Ensure the brand belongs to the group.
b) Tax code is mandatory and must be correct with no spaces.
16.4.2 Fill in Invoice Issuing Subject Information
Group View → Restaurant Management → Taxable Entity
This step requires Resto approval before the Piaotong entry is displayed.(Currently only Piaotong is supported.)
16.4.3 Bind Taxable Entity to Stores
Group View → Restaurant Management → Tax Number Settings
Configure related sales item information,as well as the invoice issuer, reviewer, and payee information.
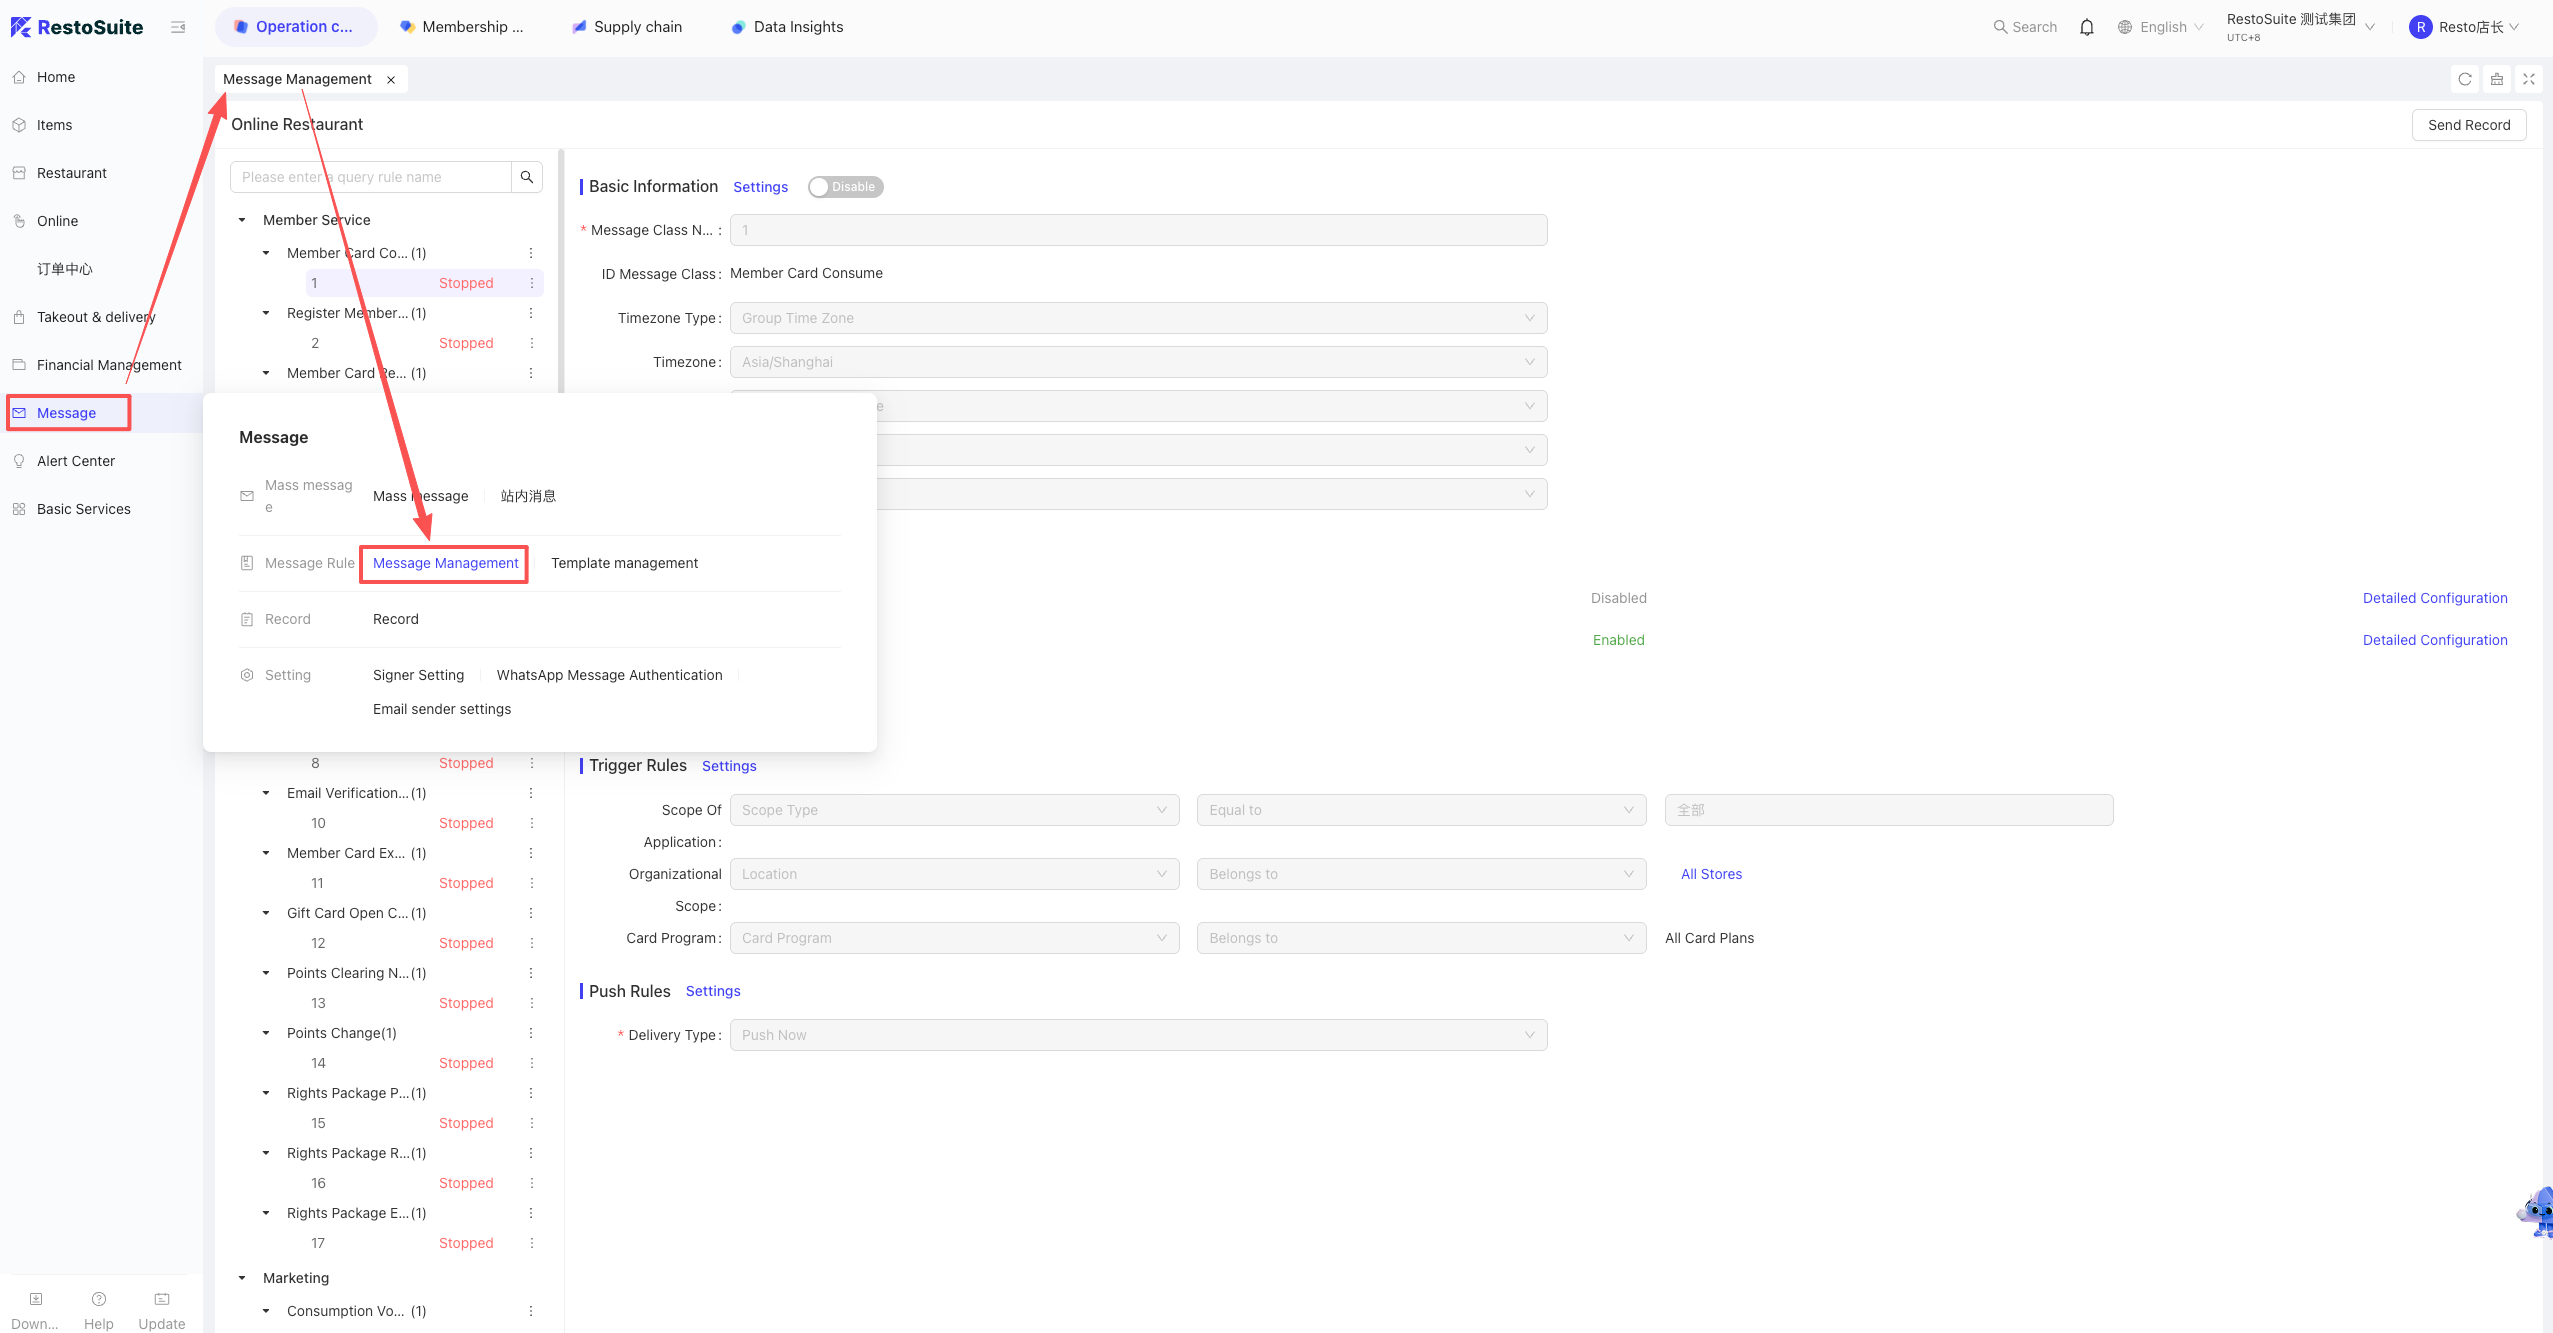
17 How to configure SMS templates in the BO?
A: Log into the BO backend -> Group perspective -> Operation Center -> Message Center -> Message Management.
18 What is the difference between employee accounts and Store Clerk accounts?
- Employee Accounts: Manages both HQ staff and store clerks via roles. PIN codes can be enabled for POS login. The PIN is unique across the Group group, allowing one employee to log into multiple authorized stores with one PIN.
- Store Clerk Accounts: Used when clients prefer copying clerk profiles and only need the PIN to be unique within that specific store. Different stores can use the same PIN. These accounts can only log into the POS, not the BO.
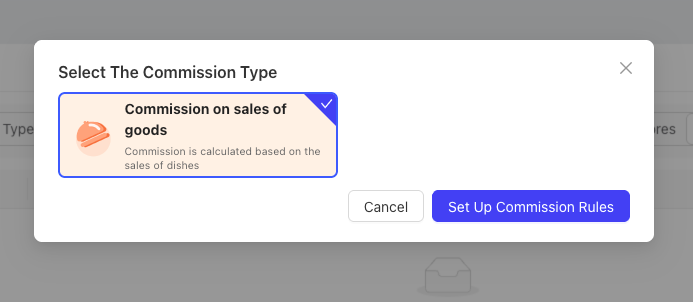
19 How to set up dish commissions?
A: BO backend -> Store perspective -> Basic Services -> Commission Rules -> Set Dish Commission.
- Can be set by: Table Opener, Order Taker, Store Manager, or Area Server.
- Can be set by specific item or item category.
- Can include or exclude combo sub-items and complimentary items.
Note:
Commission reports are generated after 11:00 AM the following day.
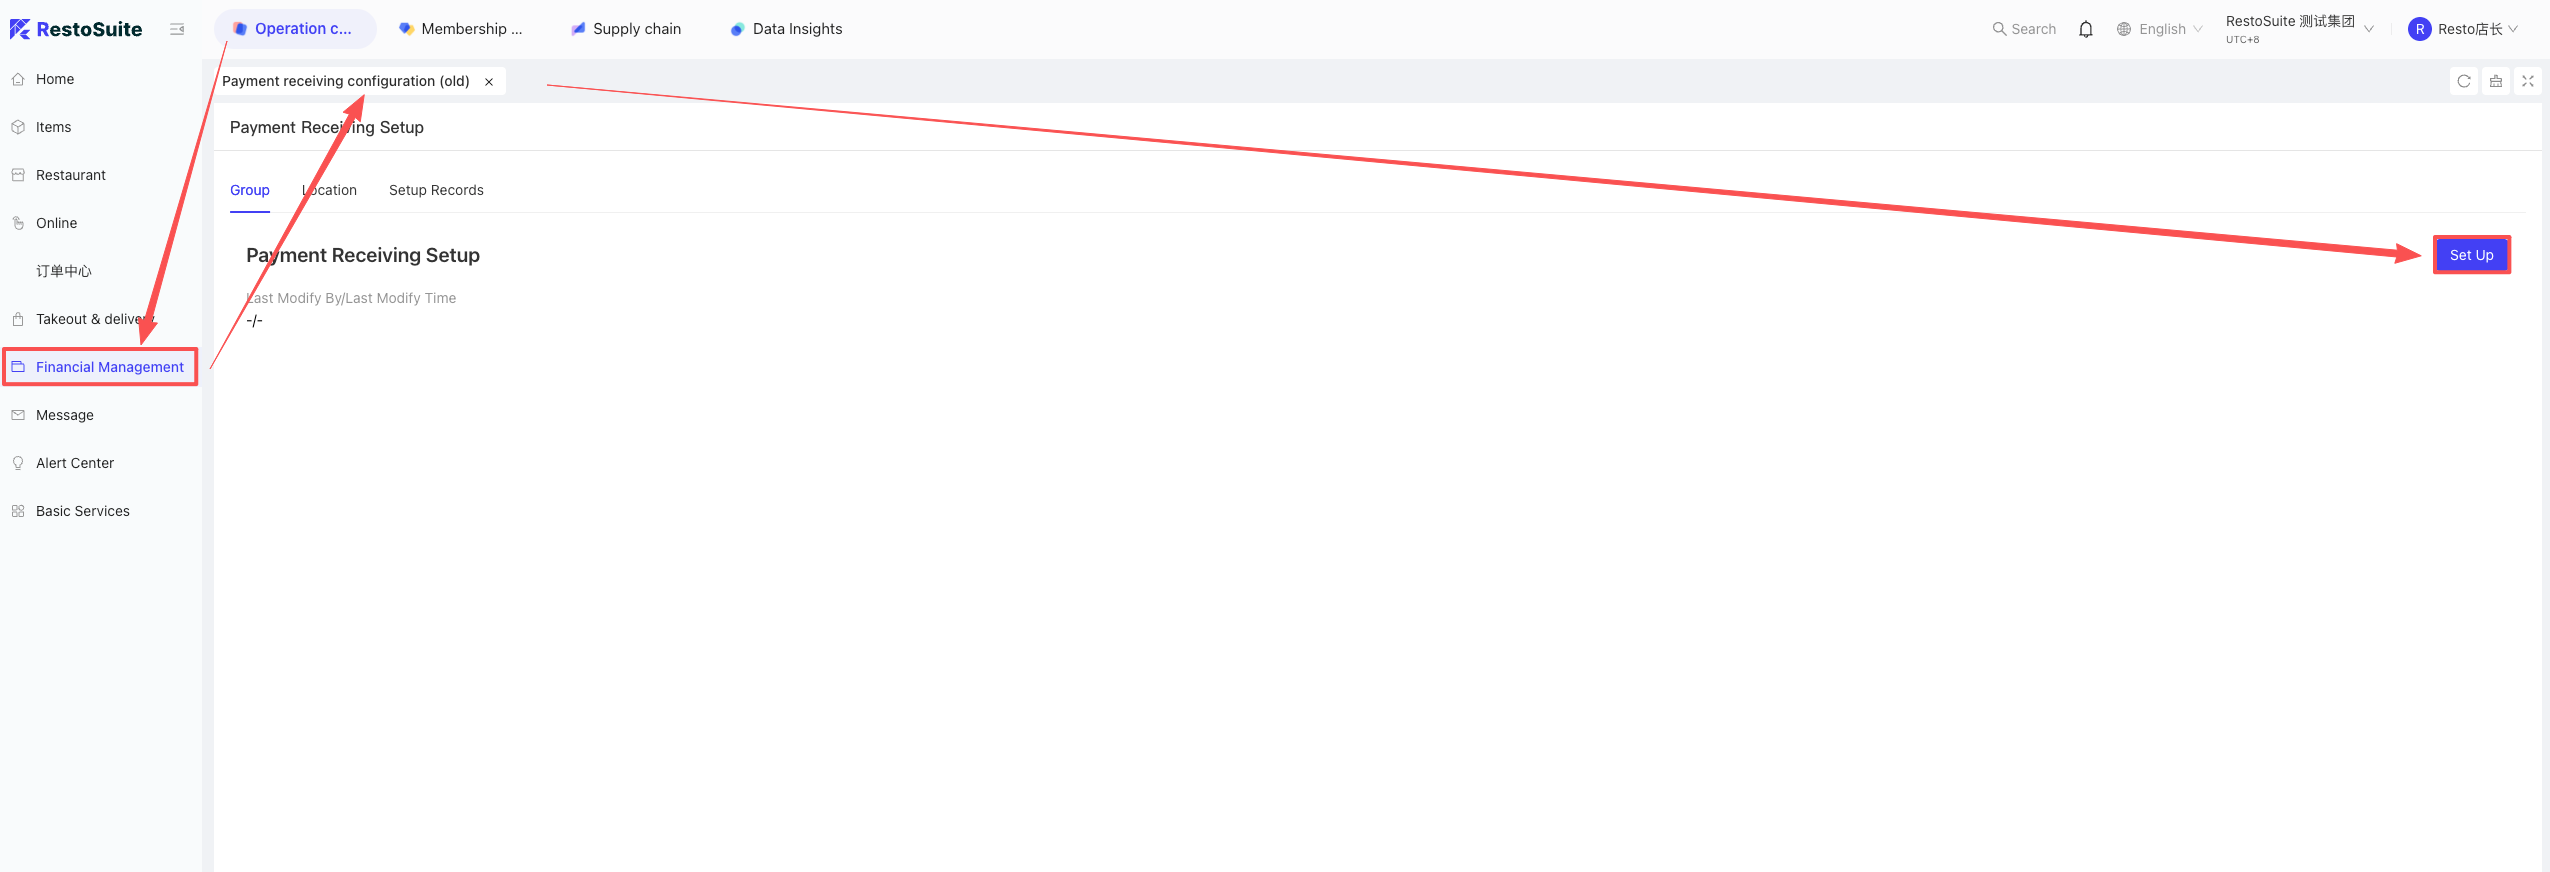
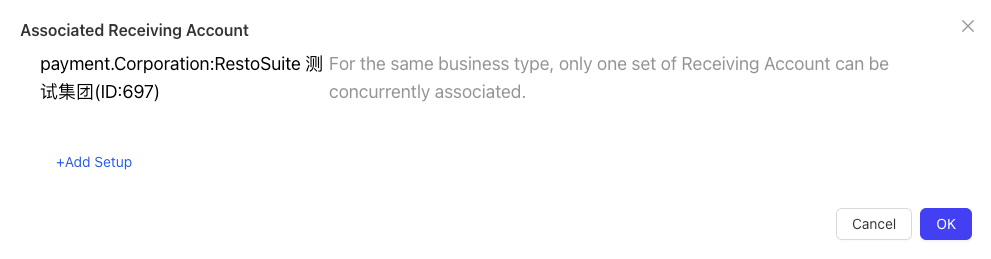
20 How to bind a payment collection entity to a store in the BO backend?
A: Log into the BO backend -> Group perspective -> Operation Center -> Financial Management -> Collection Configuration. Select the store and check the corresponding financial entity.
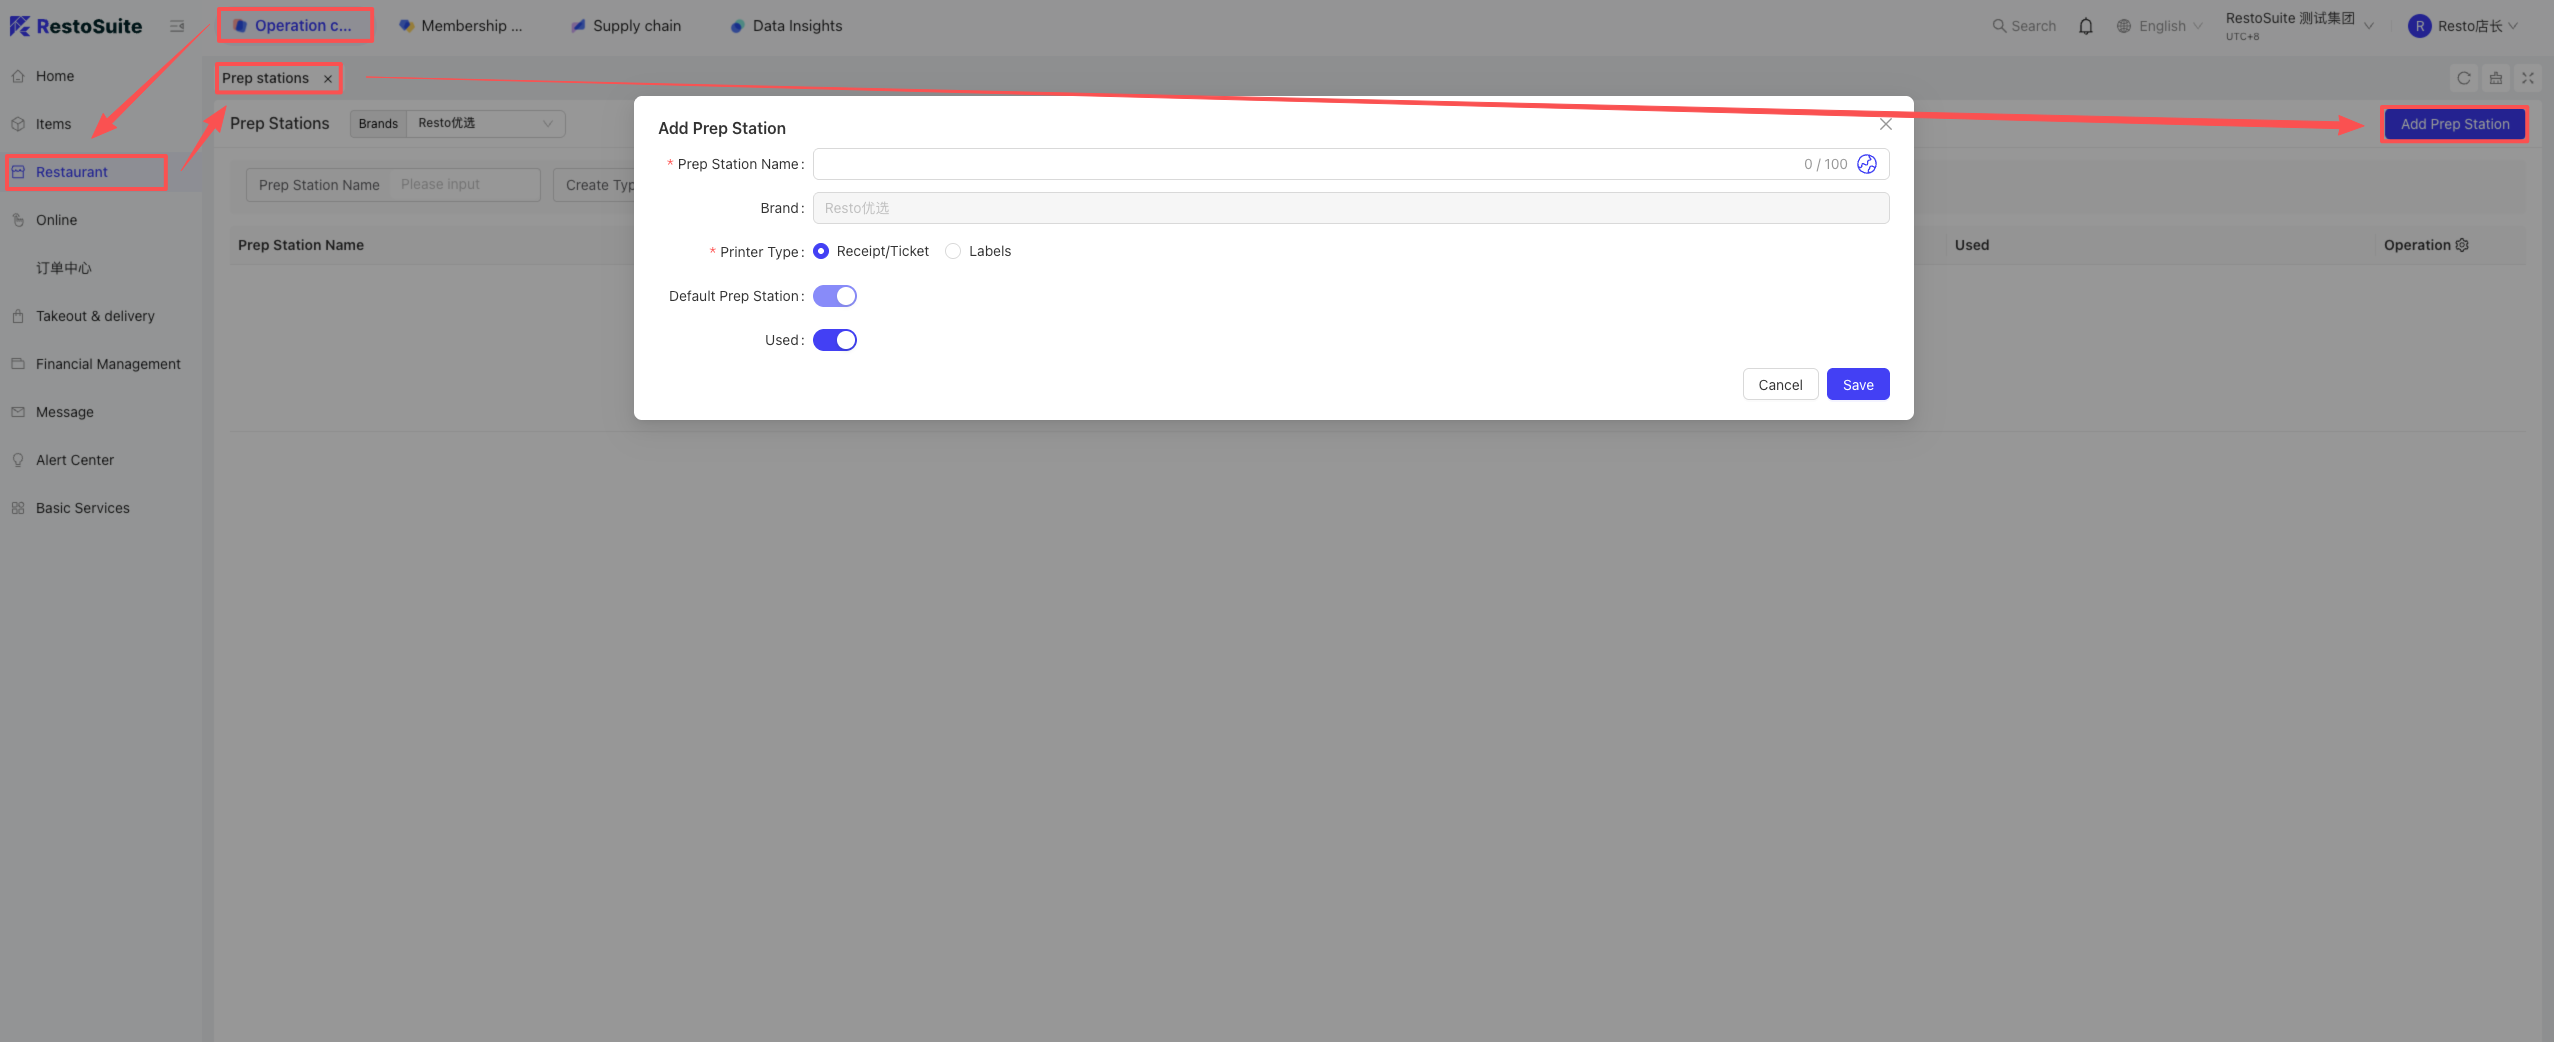
21 How to create a prep station?
A: They are divided into labels and receipts.
BO backend -> Operation Center -> Restaurant Management -> Production Department. Click Add, enter the name, select the print type, and set the status.
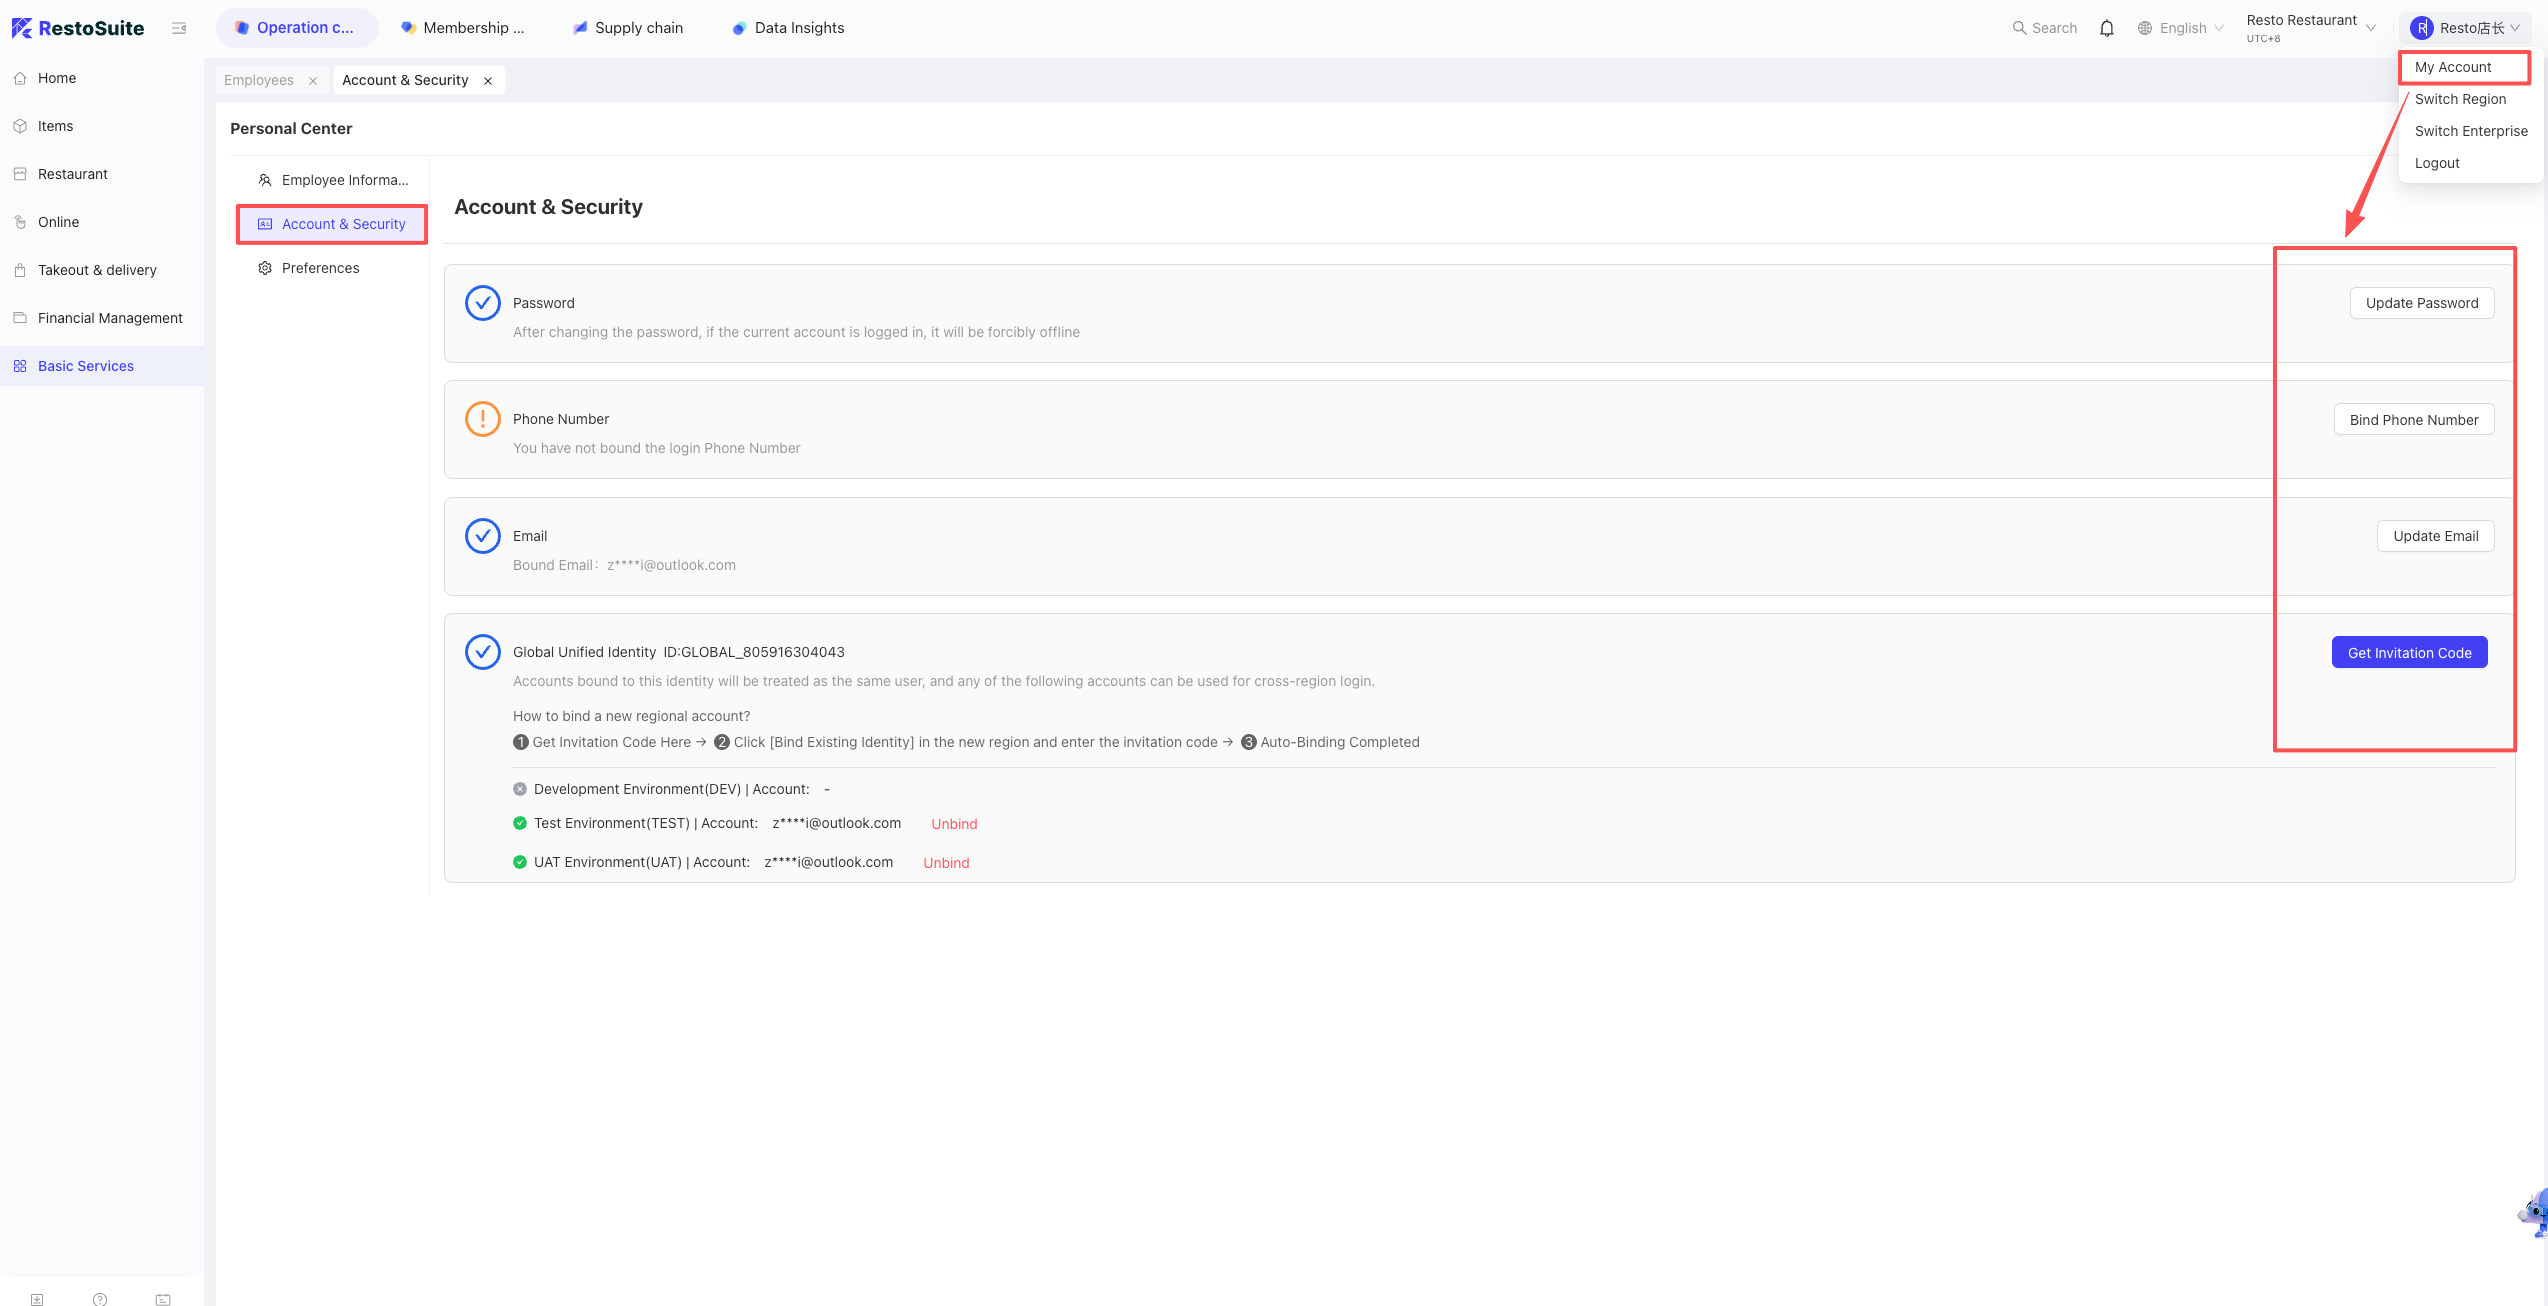
22 How to modify the bound phone number/email of a BO backend login account?
A: Log into the BO backend, click the Personal Center in the upper right corner, and modify it there.
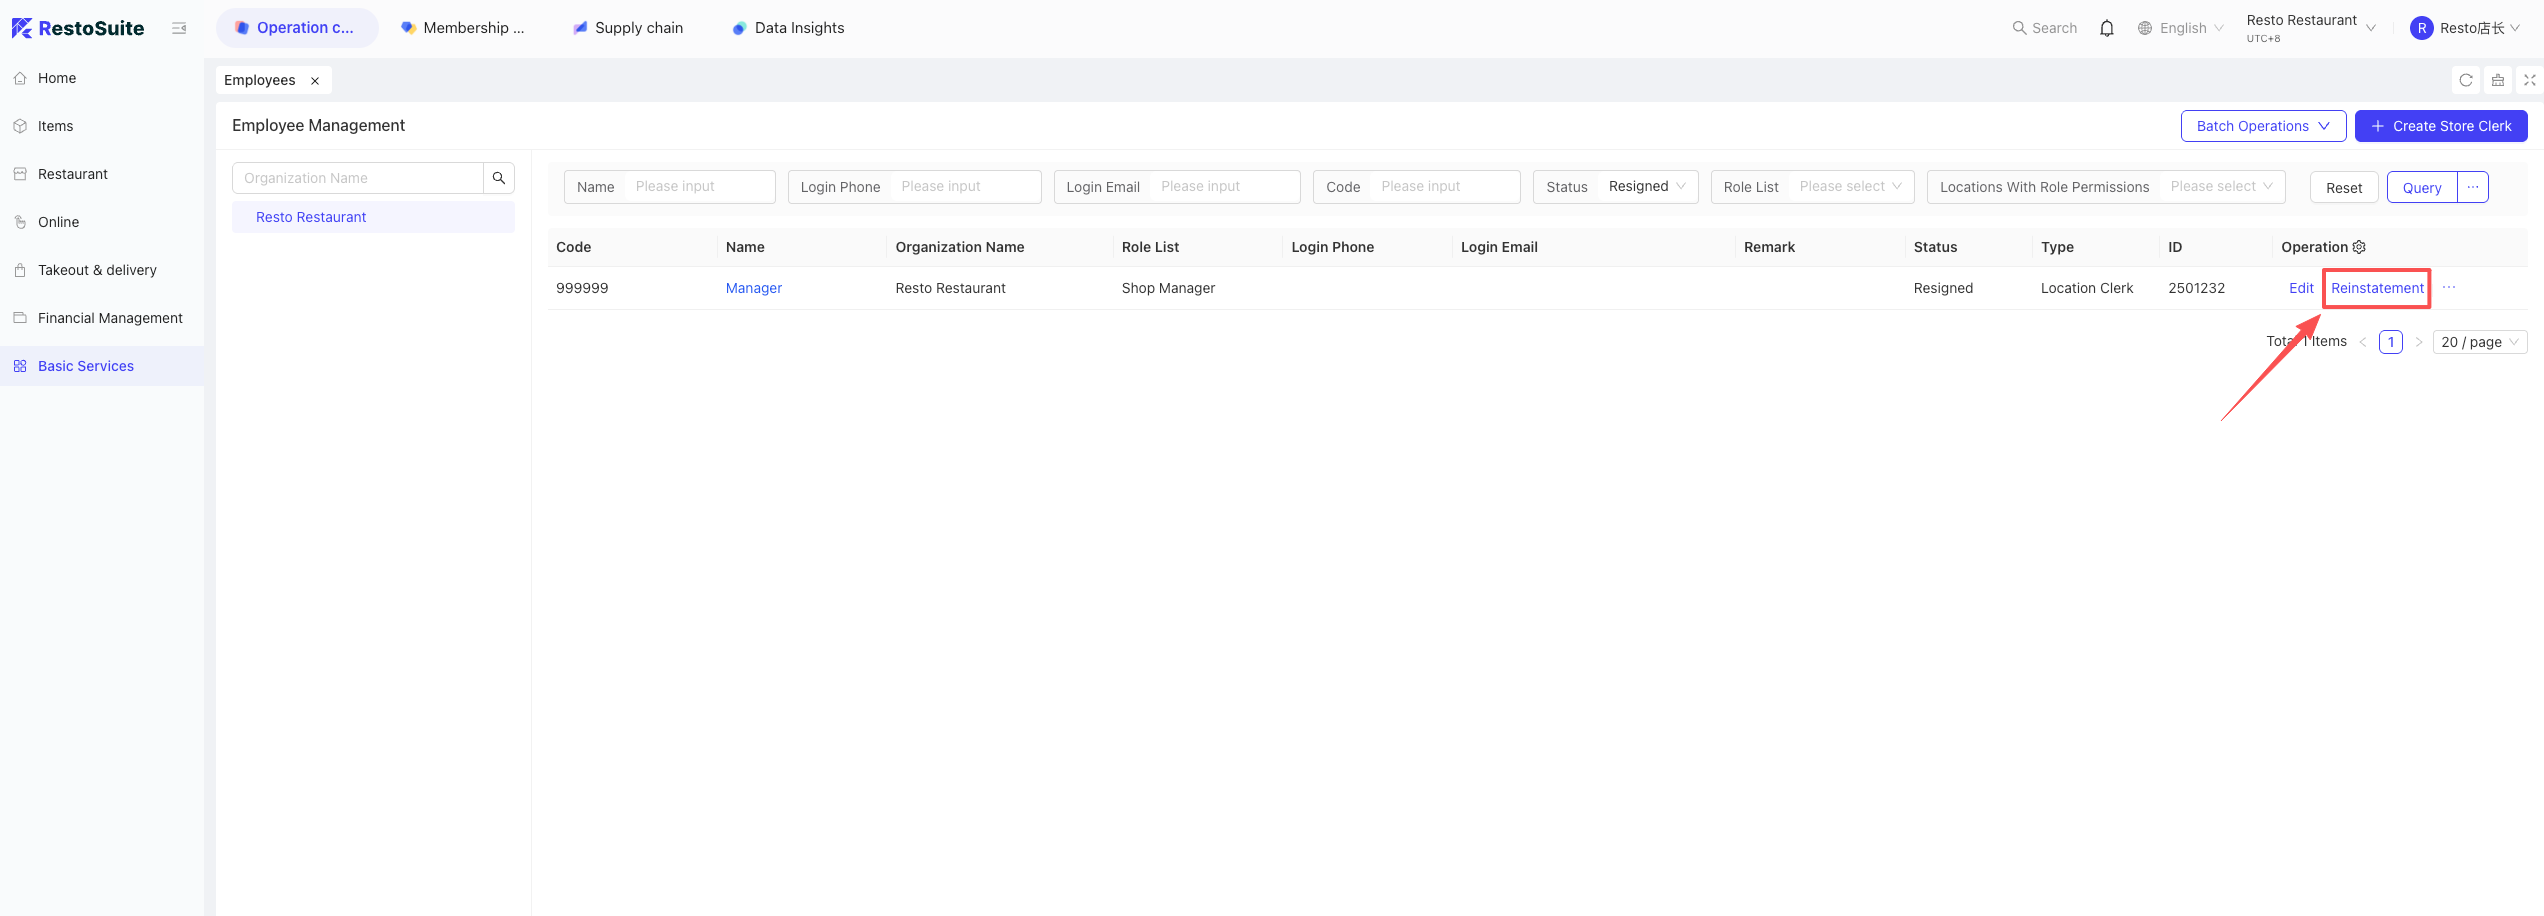
23 What should I do if logging into the BO backend with a bound phone/email prompts “Account does not exist”?
A: Check if the account is bound in the BO. If you can’t find it under default search conditions, clear the account status filter to see if the employee associated with that account has been marked as “Resigned”. If so, click the three dots next to the account to reinstate them.
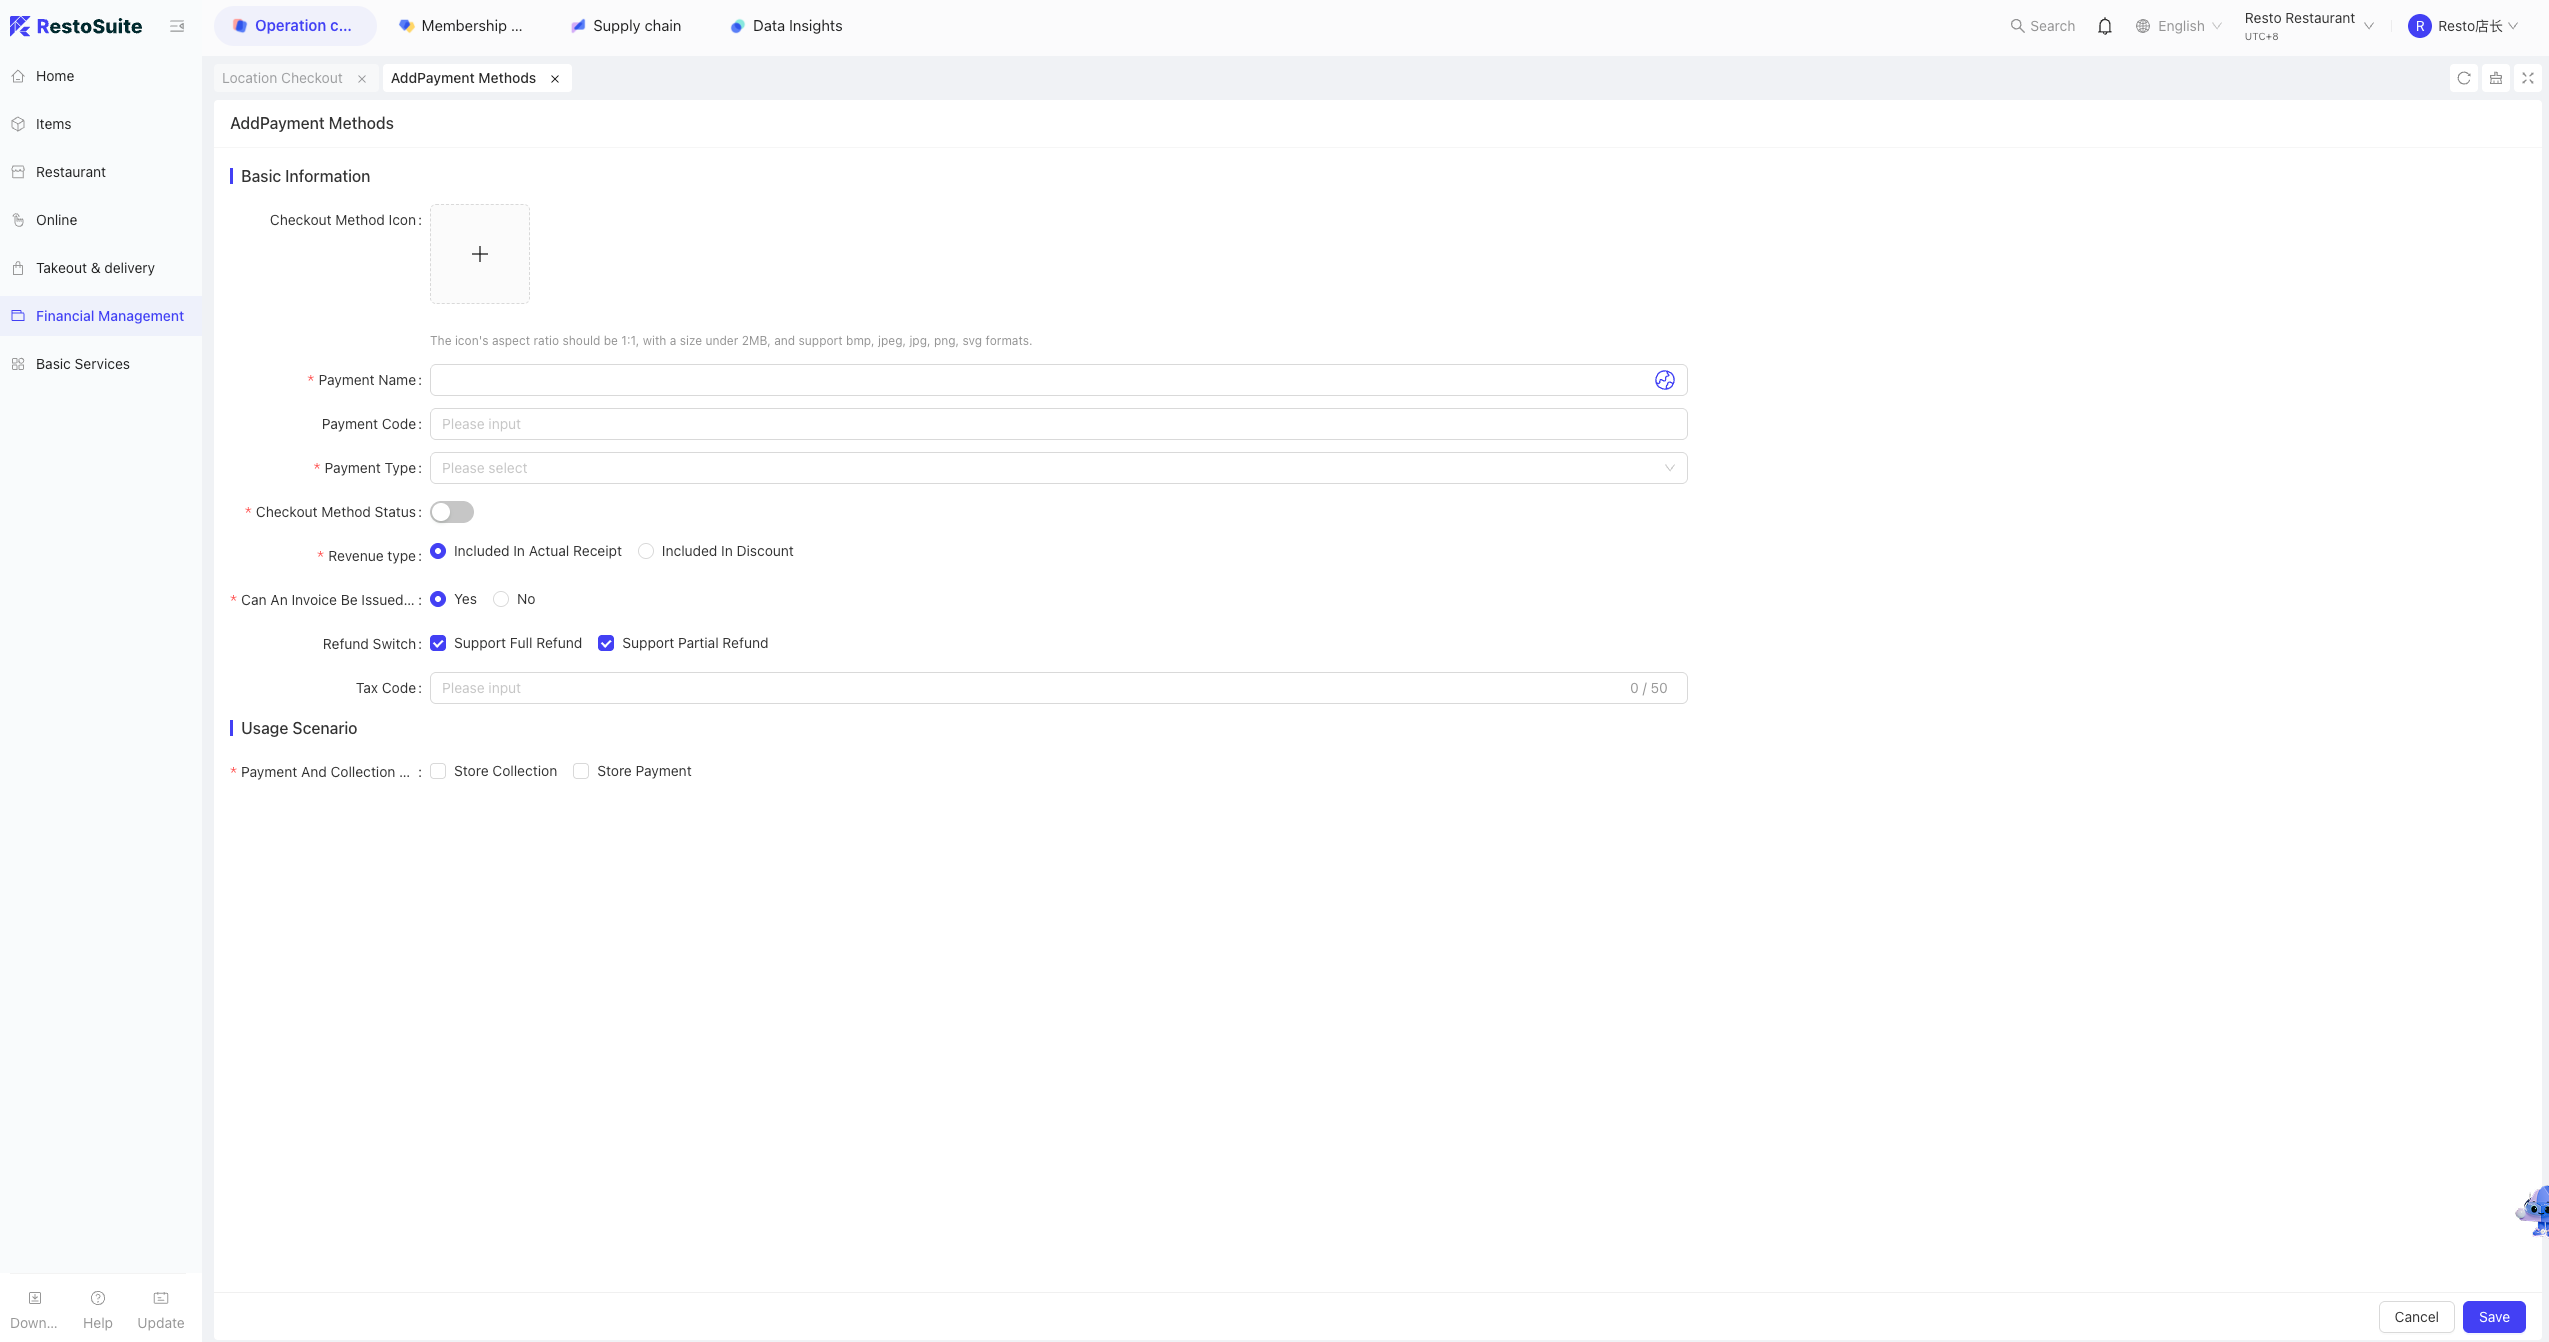
24 How to add payment methods?
BO backend -> Operation Center -> Restaurant Management -> Store Payment Methods. Click Add.
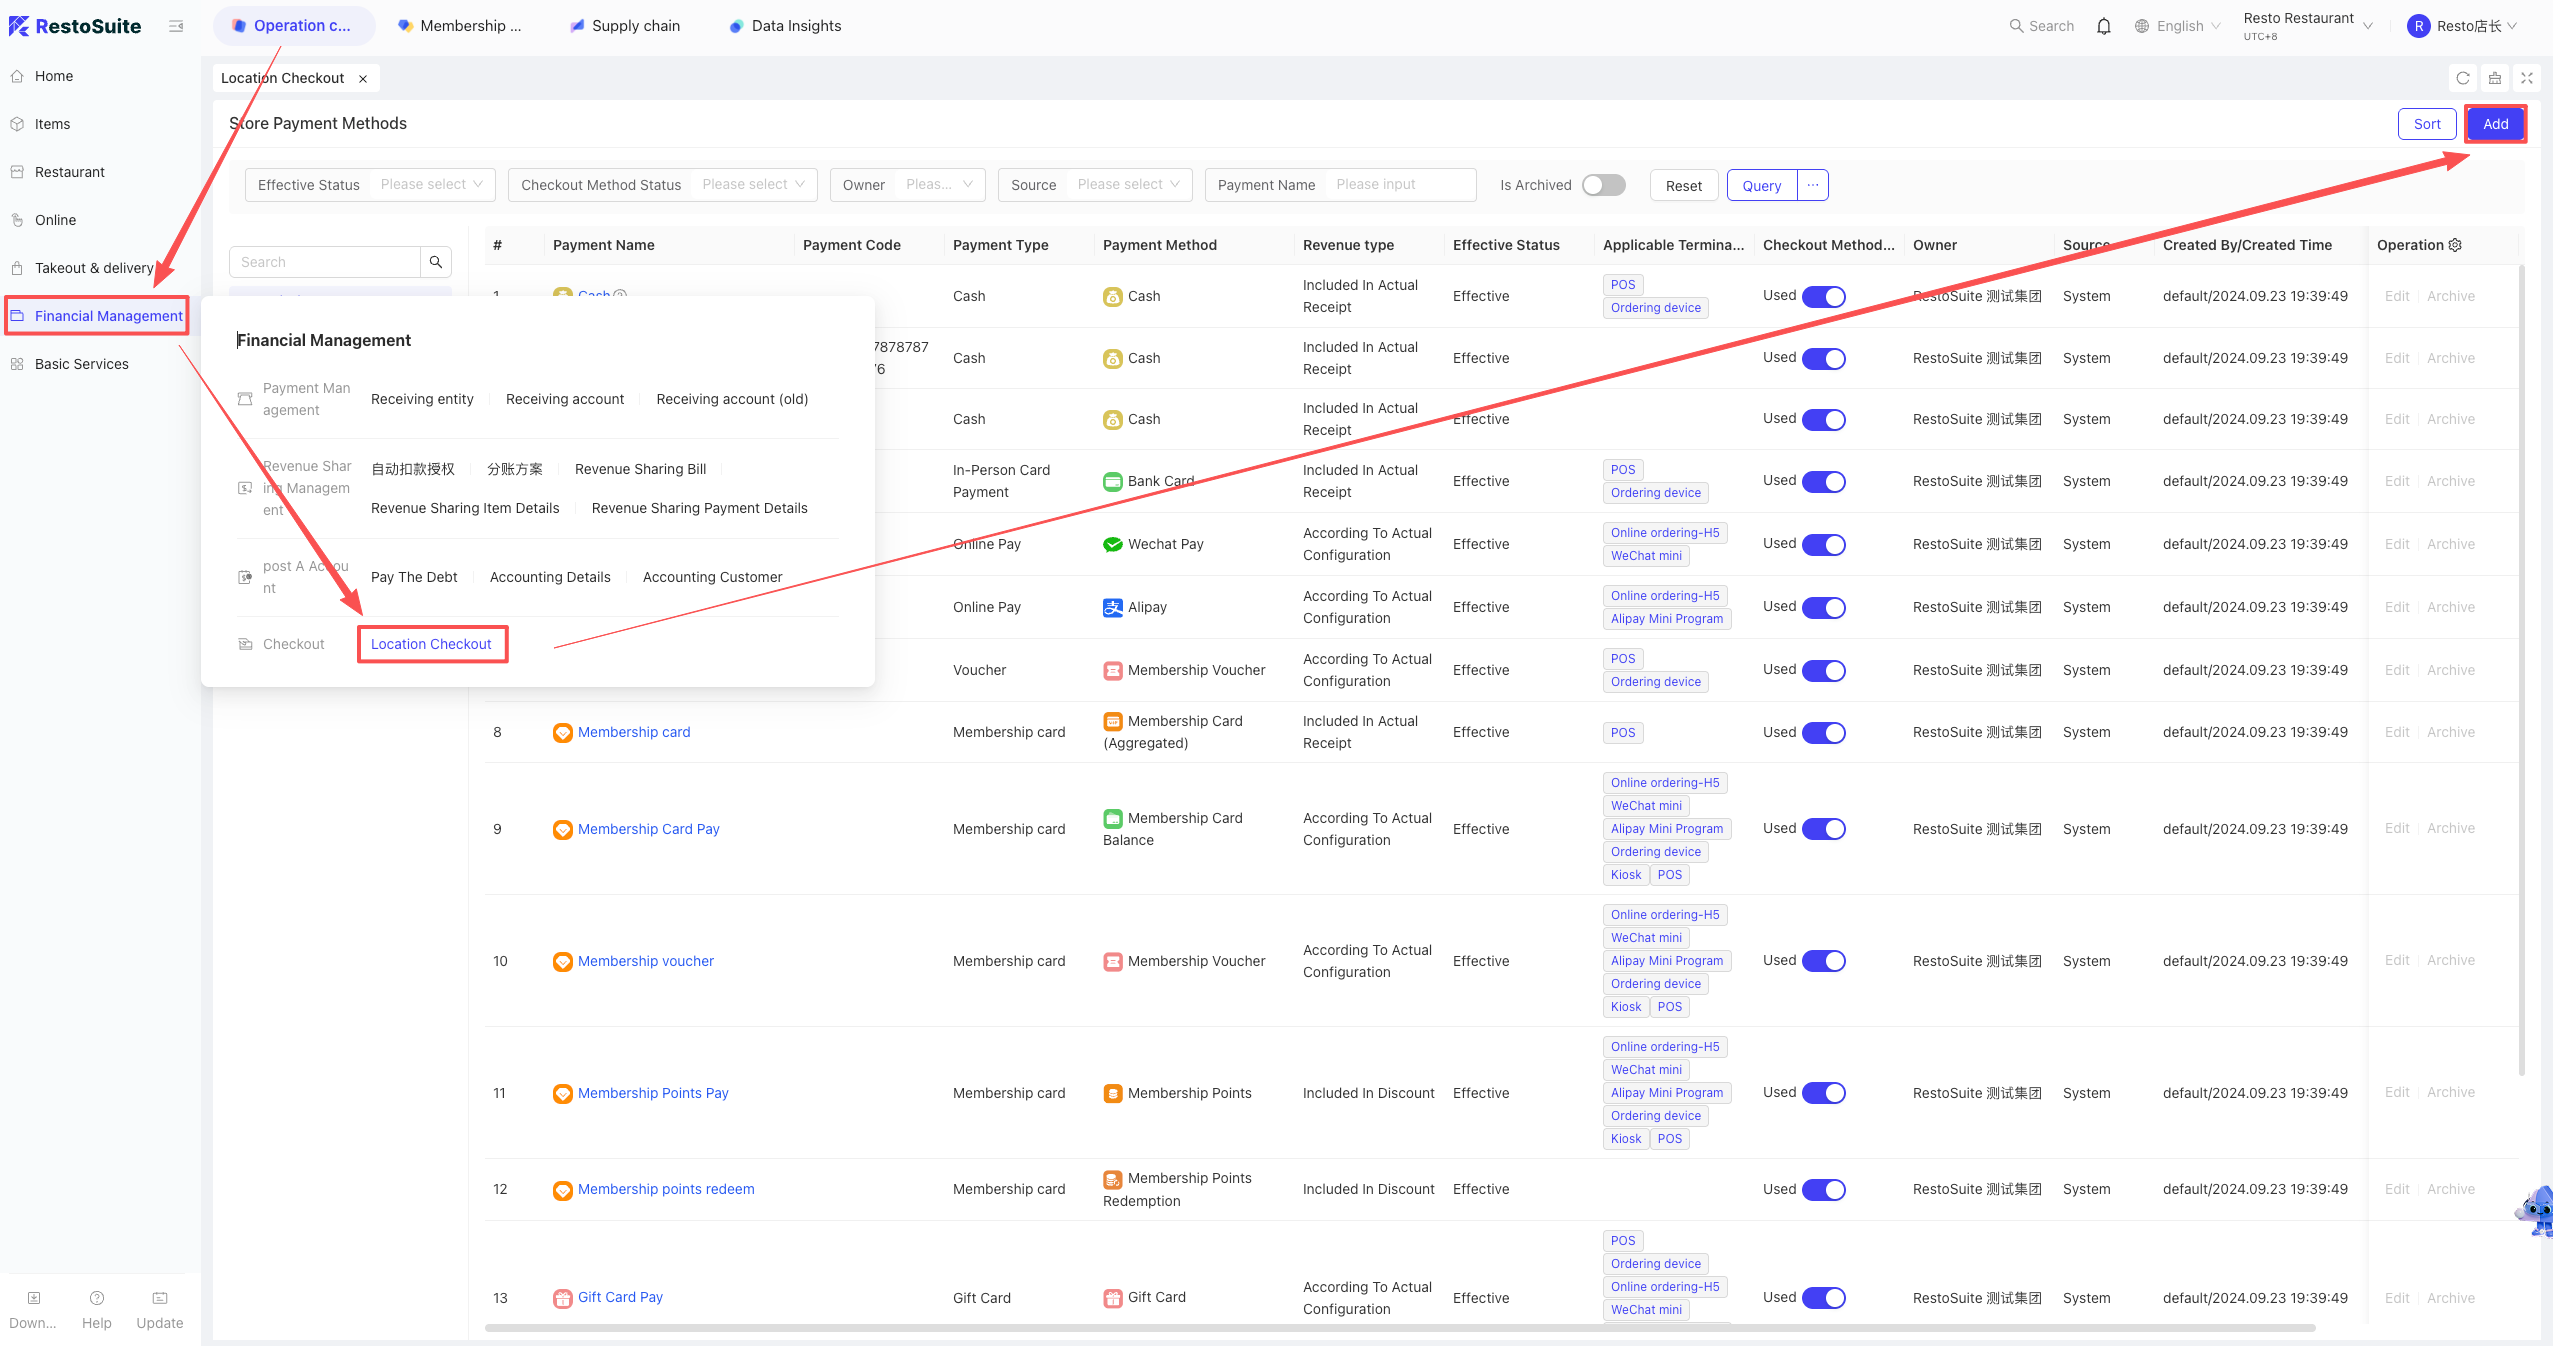
Fill in Name, Code, Type, Status, Income Rule, and whether it supports invoicing. Set applicable channels (POS/Handheld/PC), business types, cash drawer behavior, and accounting subjects.
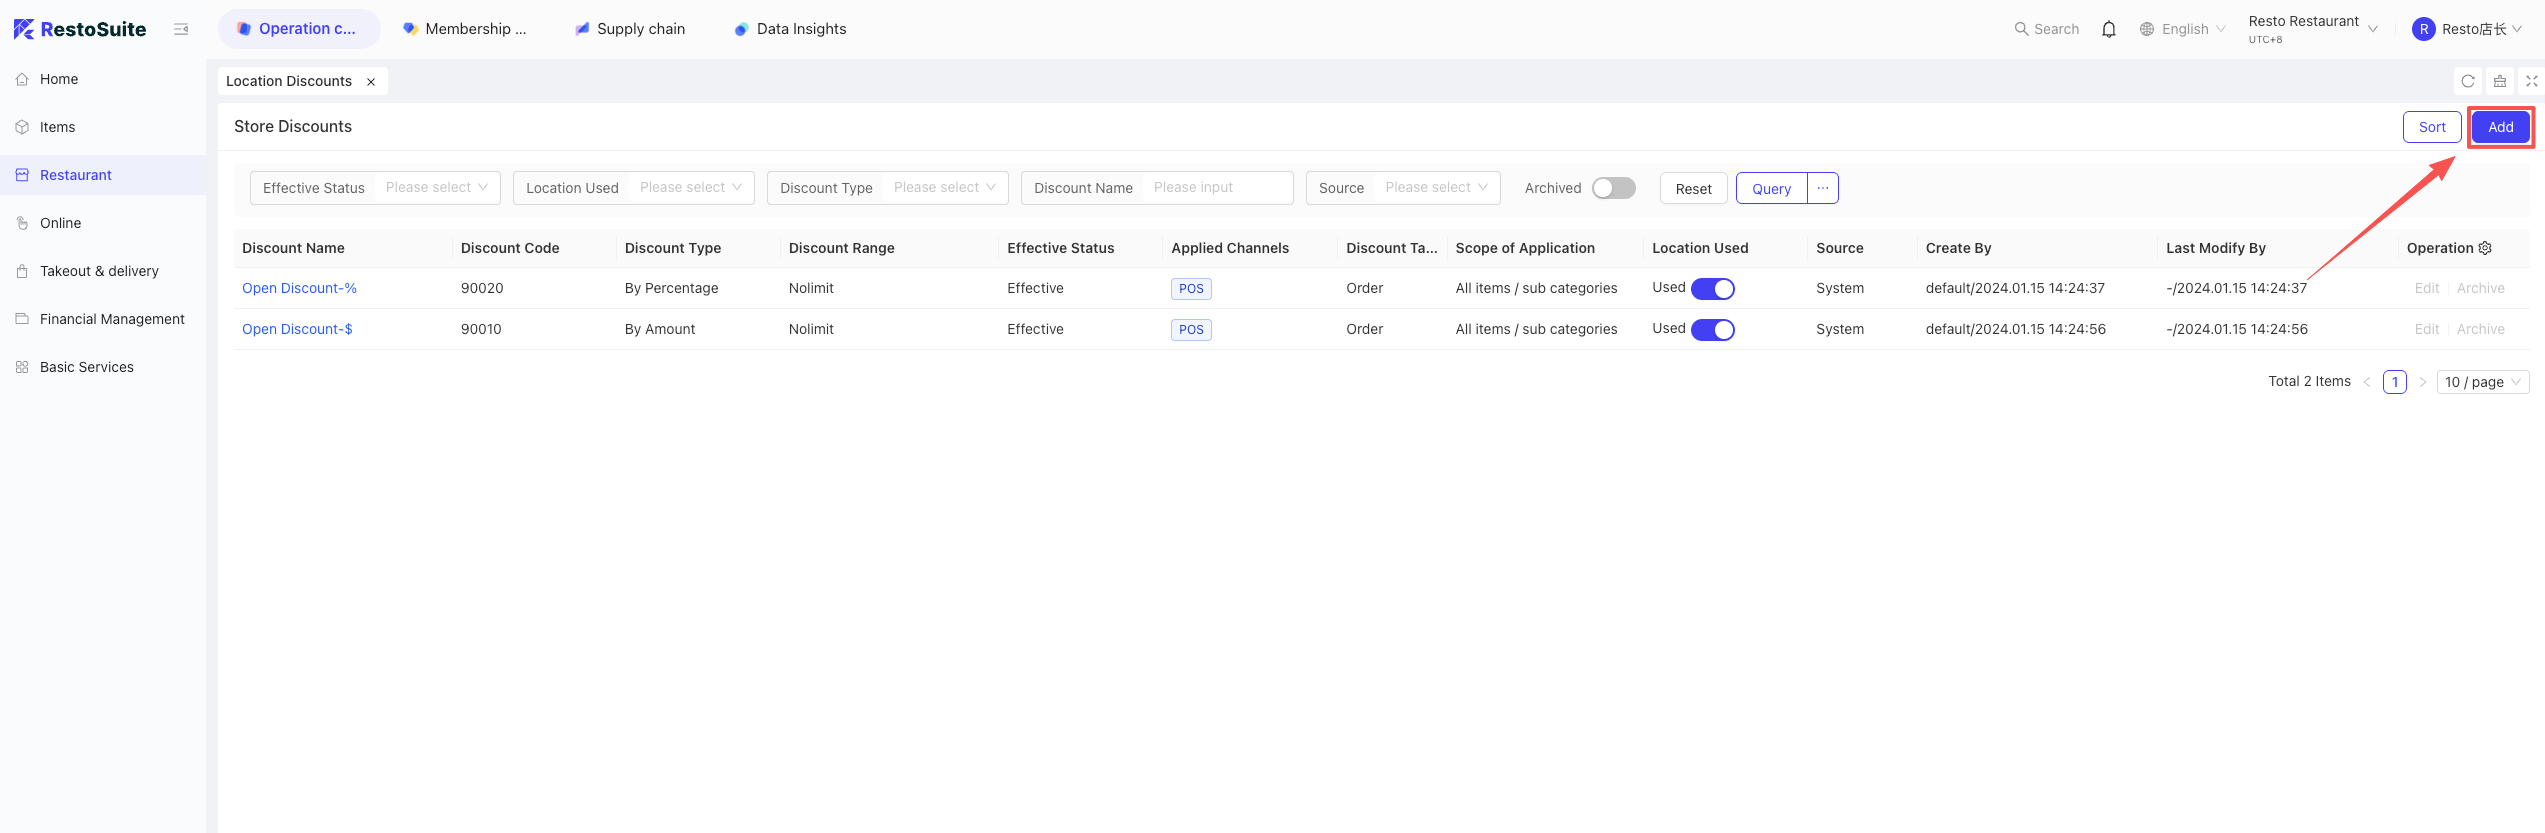
25 How to add a store discount scheme?
BO backend -> Operation Center -> Restaurant Management -> Store Discount Scheme.
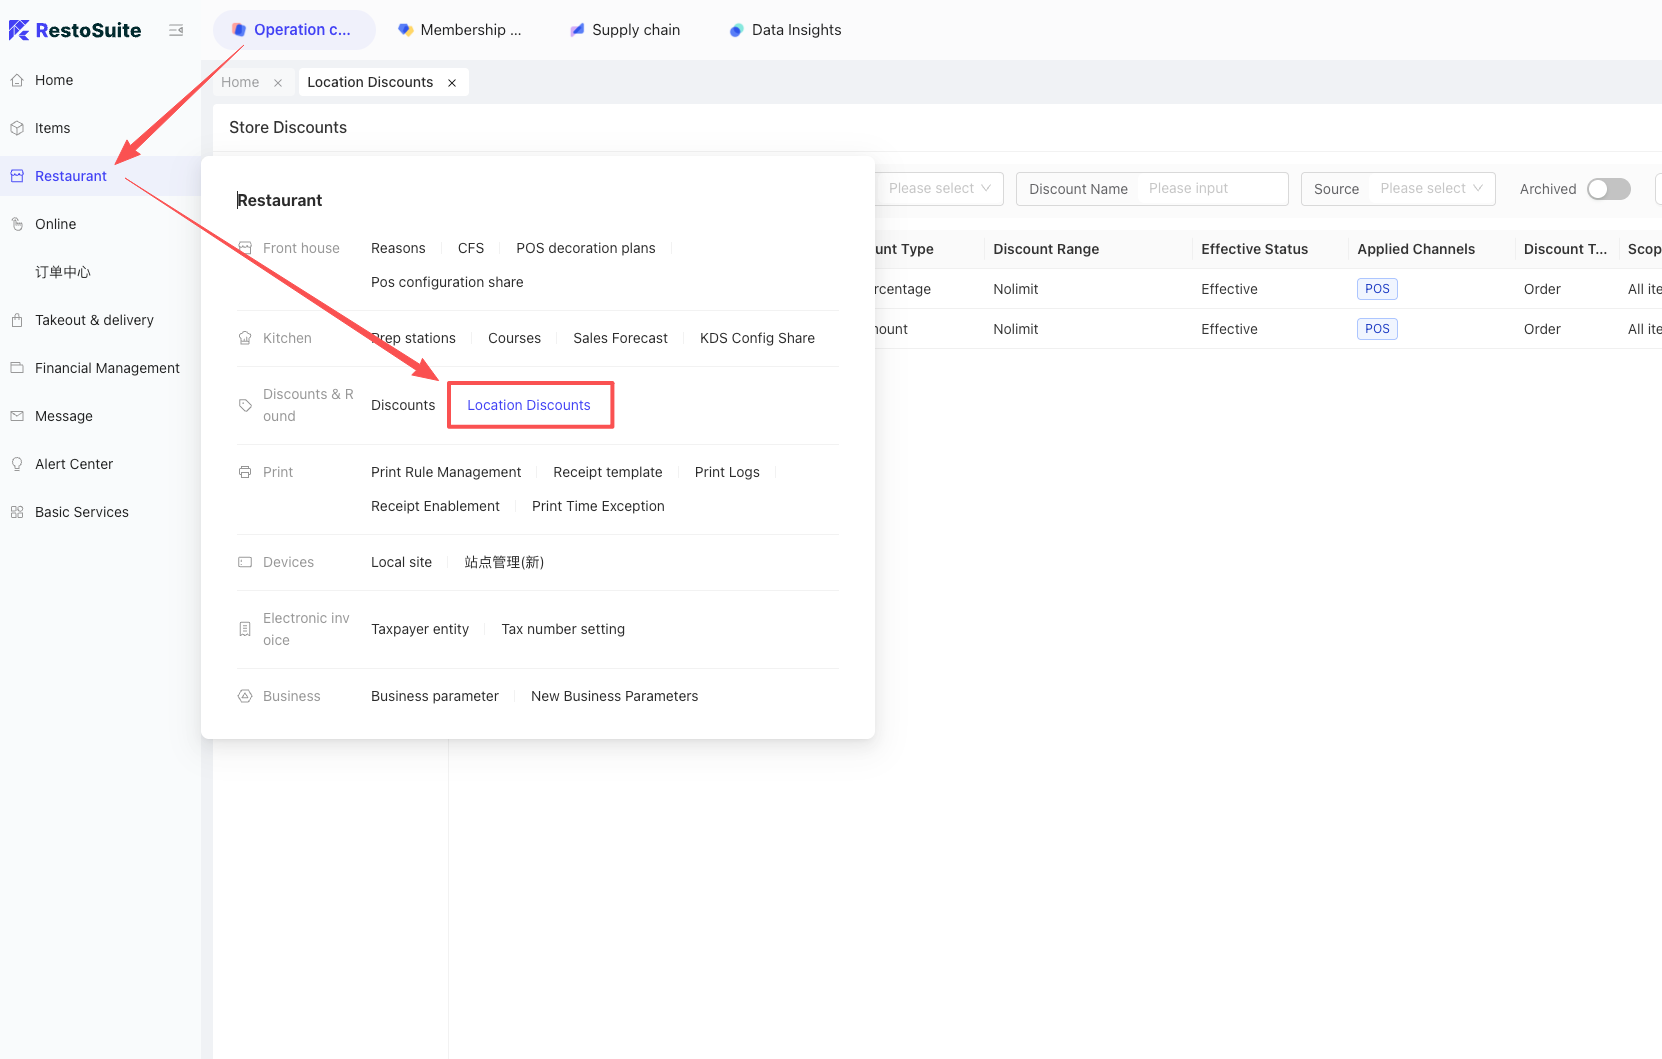
Click Add. Set Type (Ratio/Amount), Scope (Fixed ratio/amount), if a reason is required, applicable items (Whole Bill or specific items), and allowable user roles.
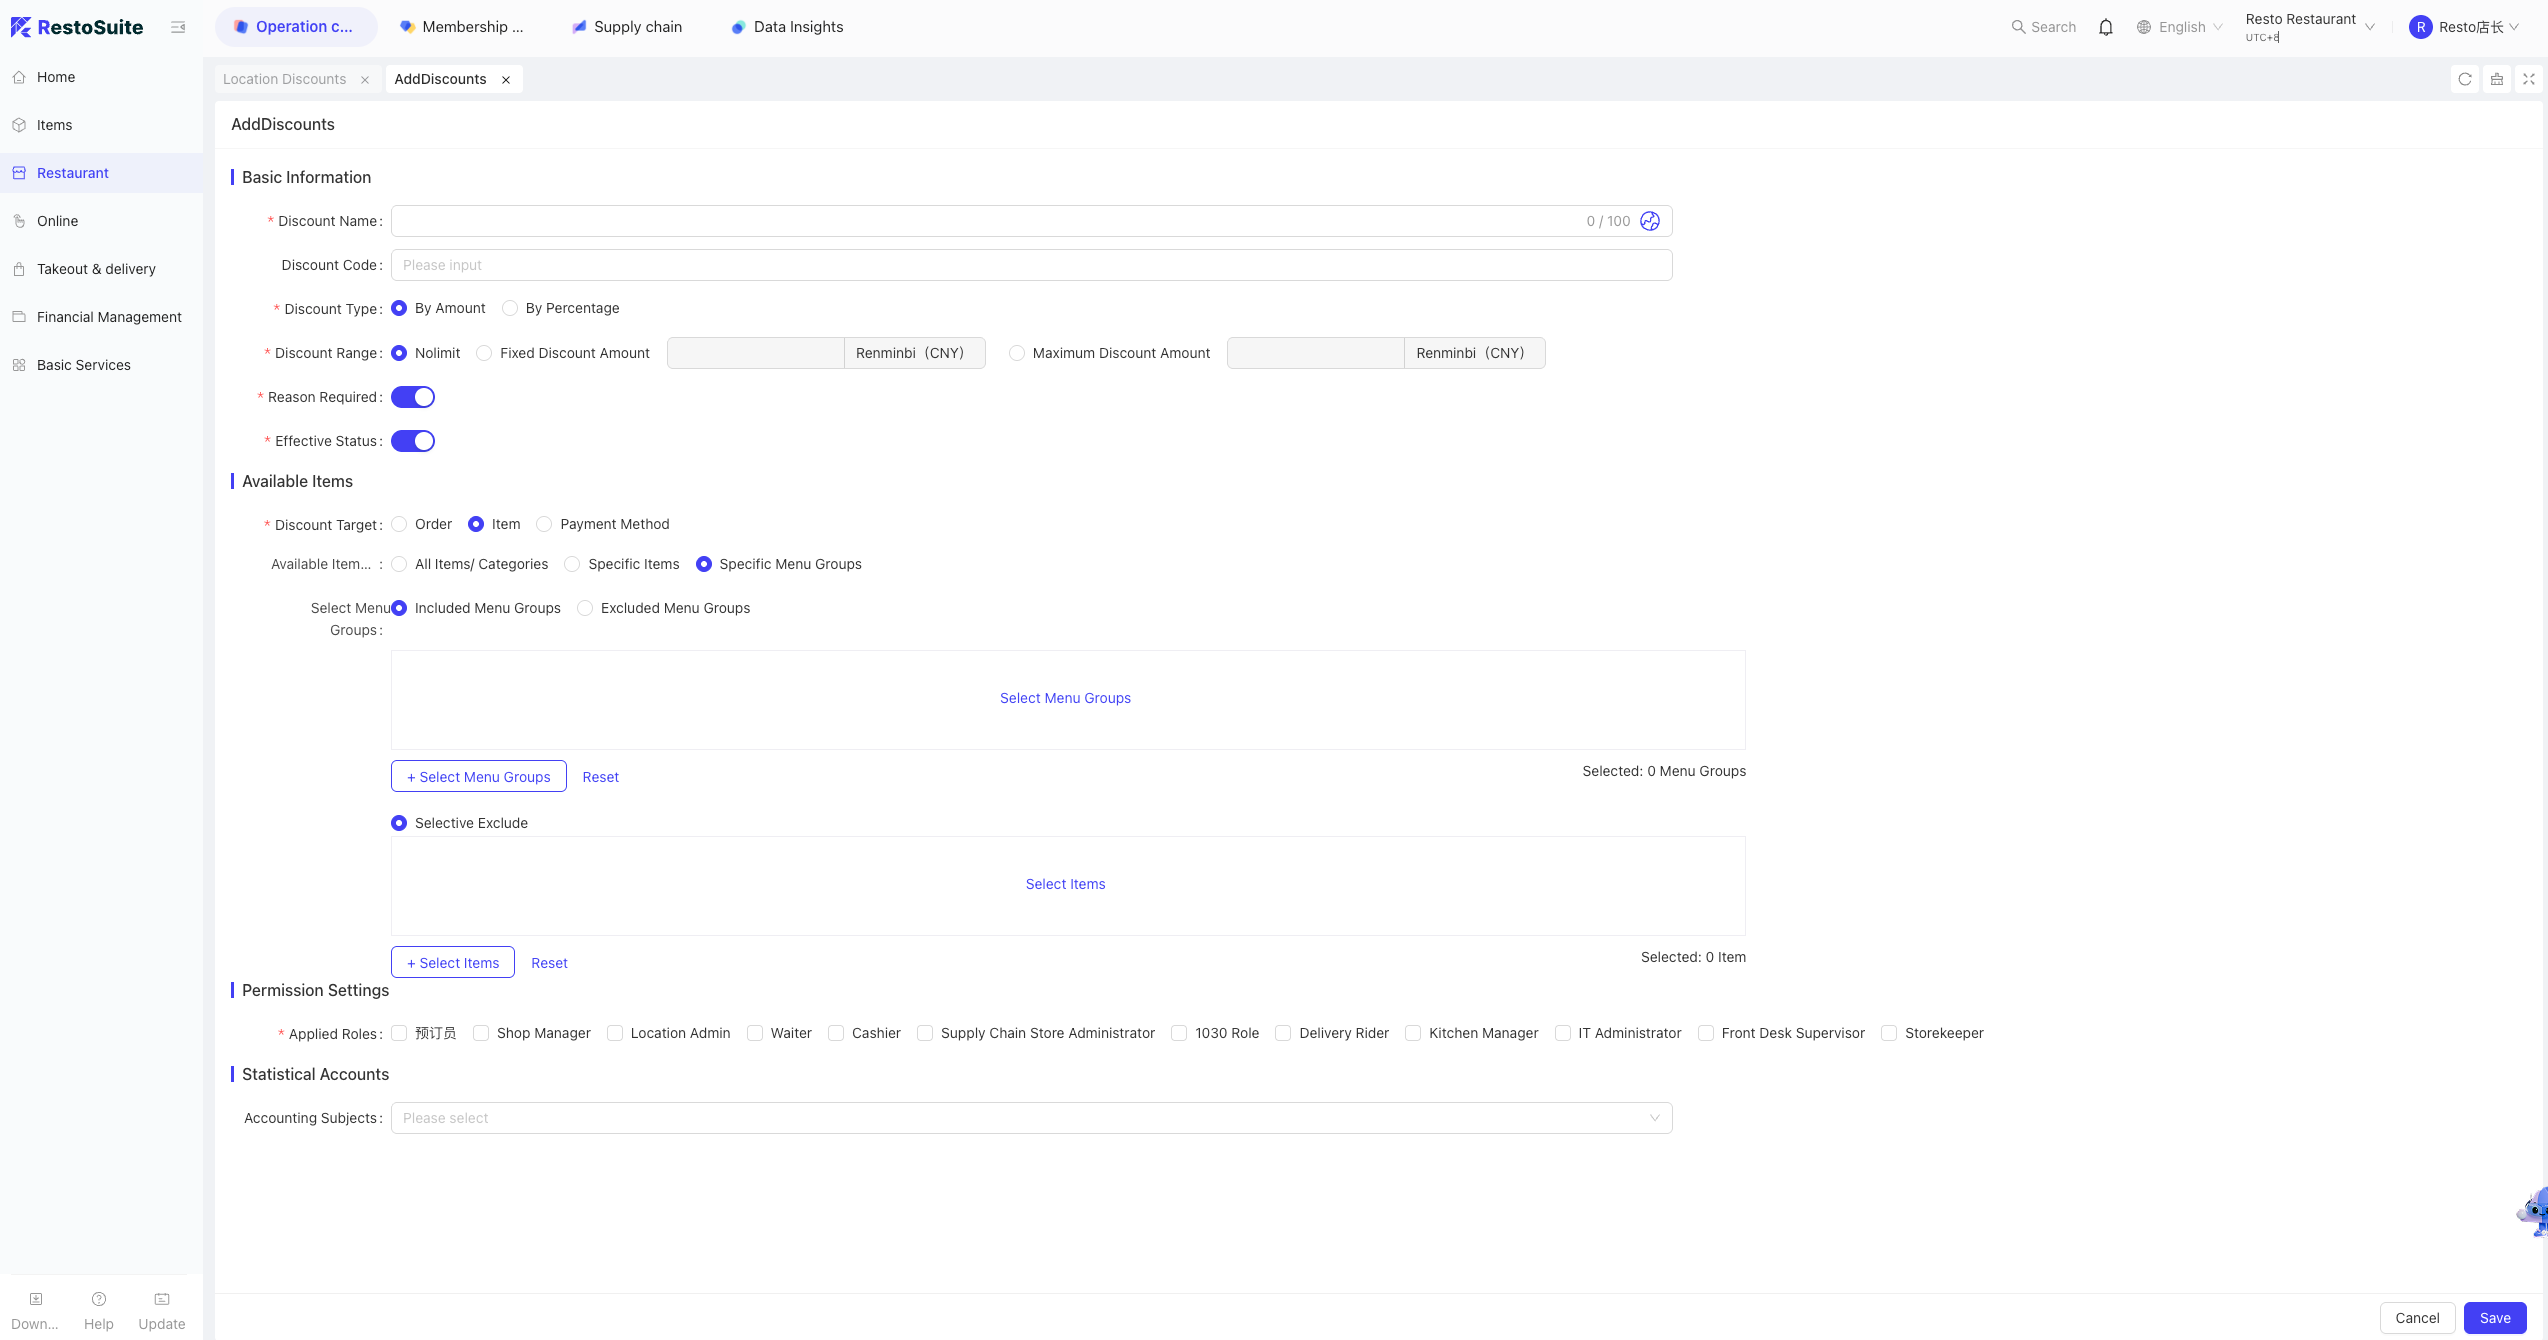
In the POS, it’s used under the “More” -> “Discount” menu.
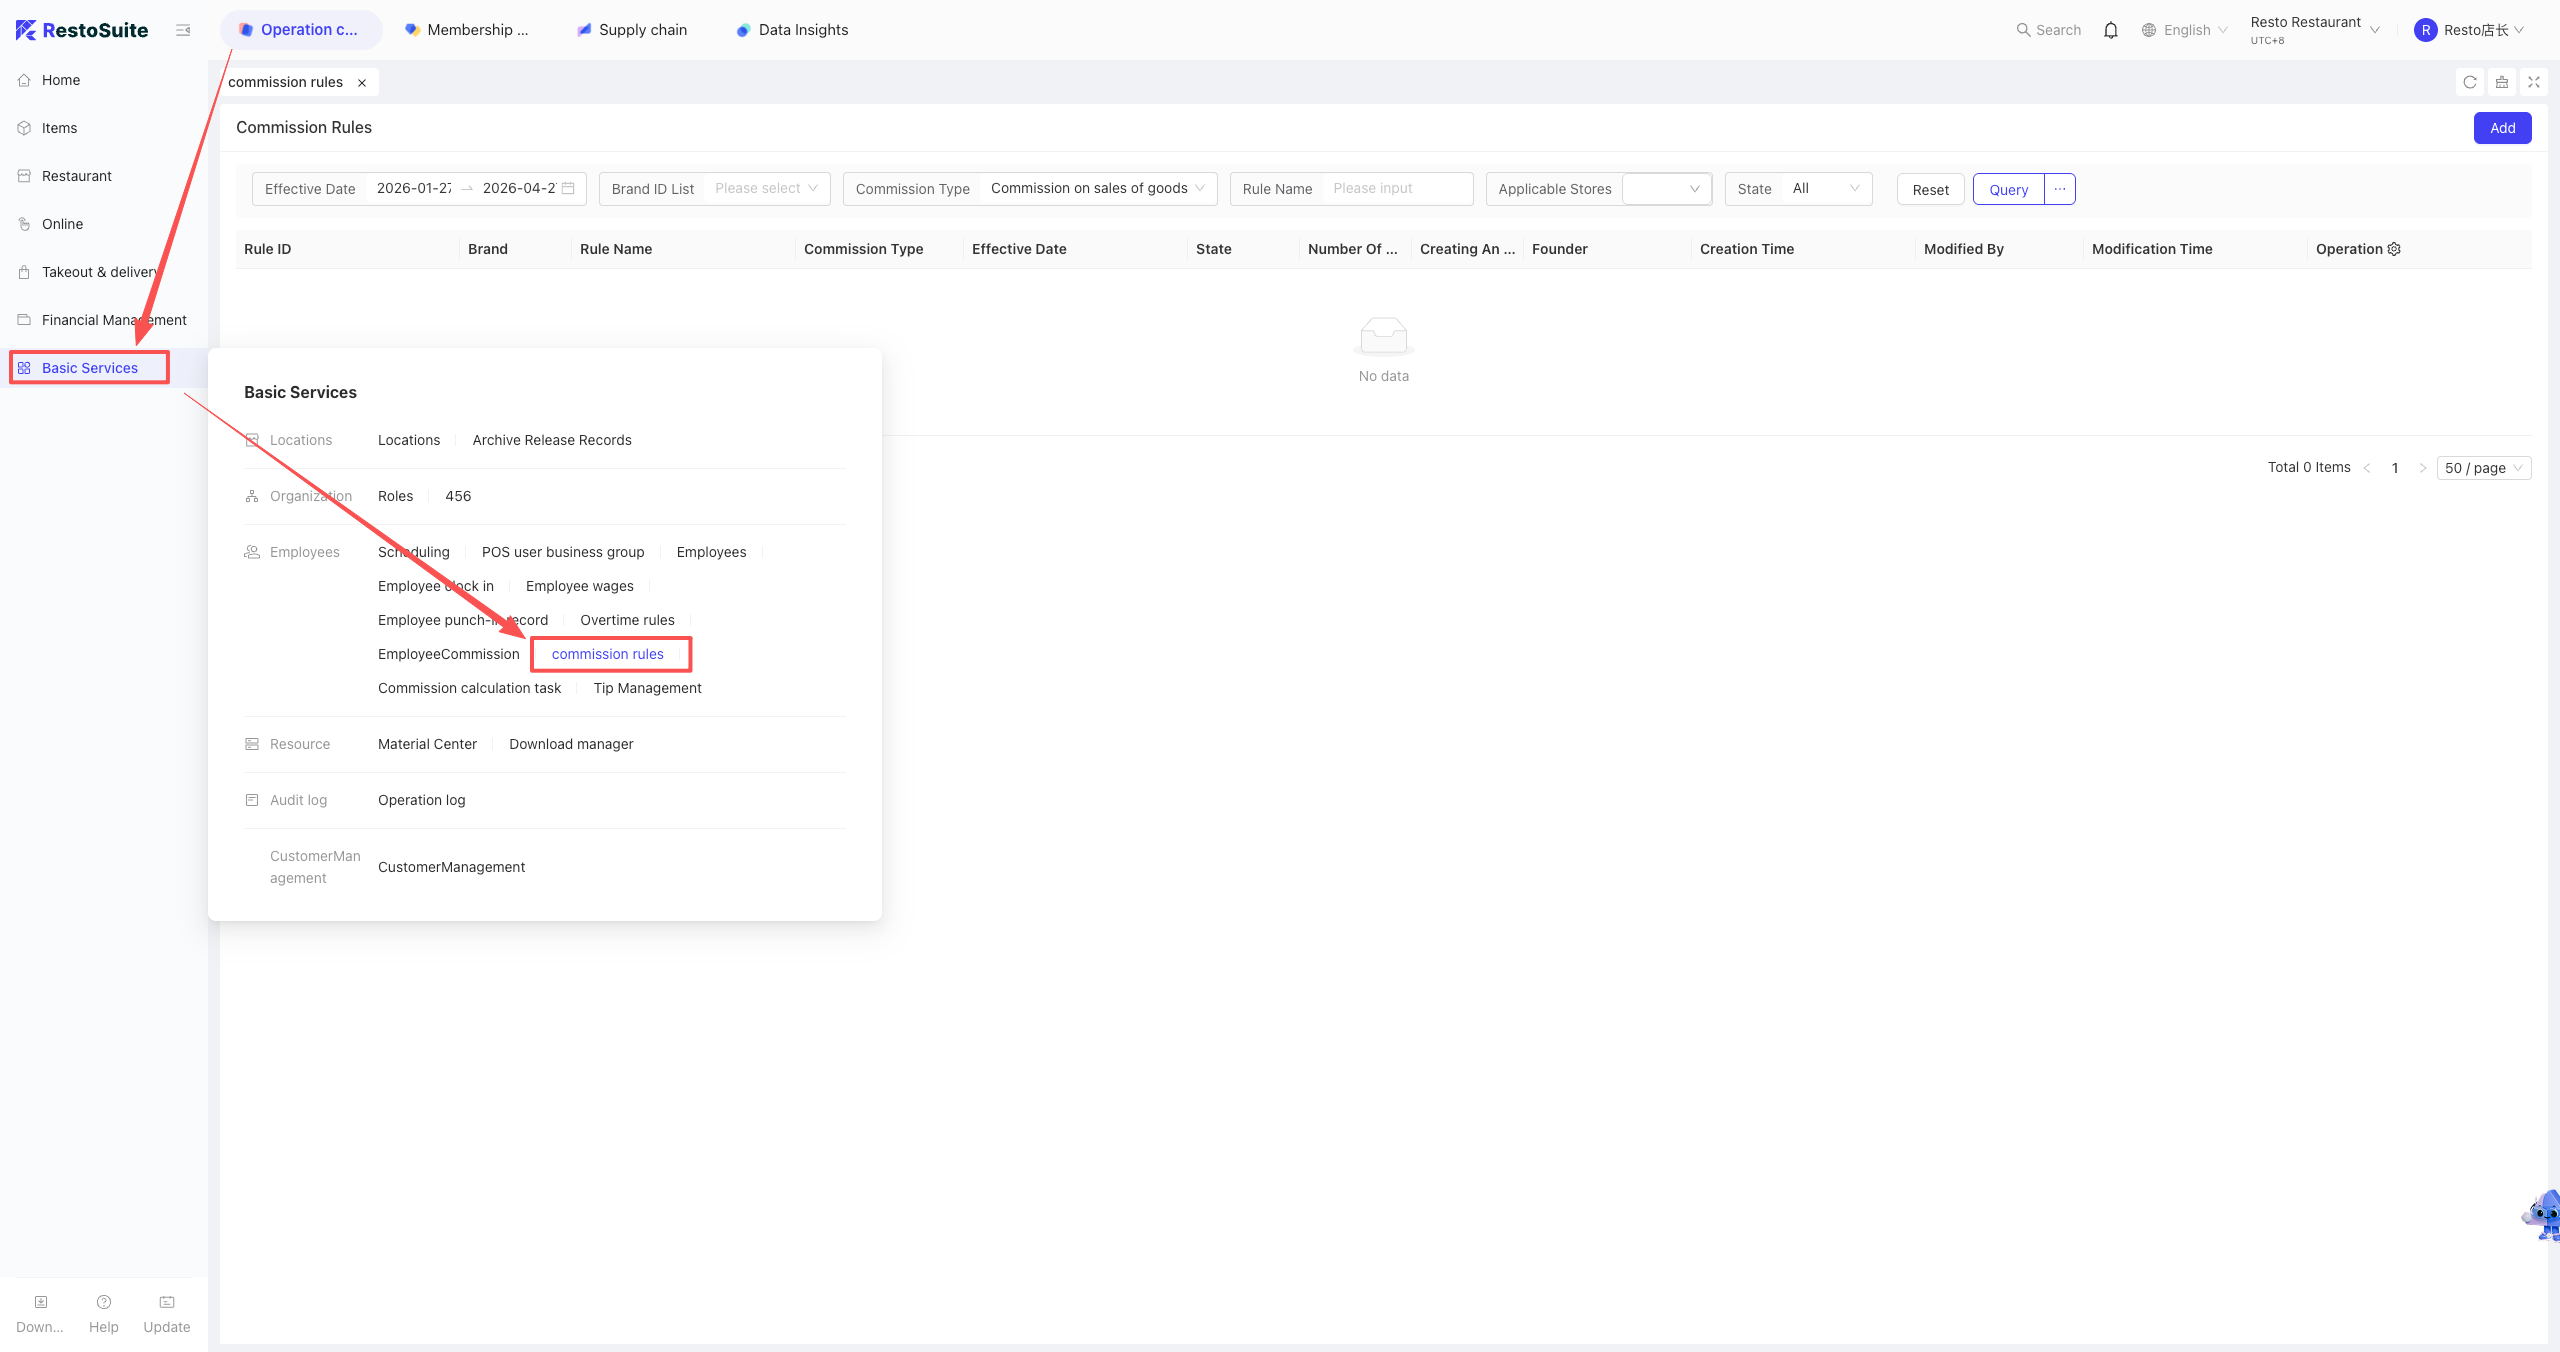
26 How to set up item commissions?
A: Item commissions are set in the Commission Rules.
STEP 1: BO backend -> Operation Center -> Basic Services -> Commission Rules.
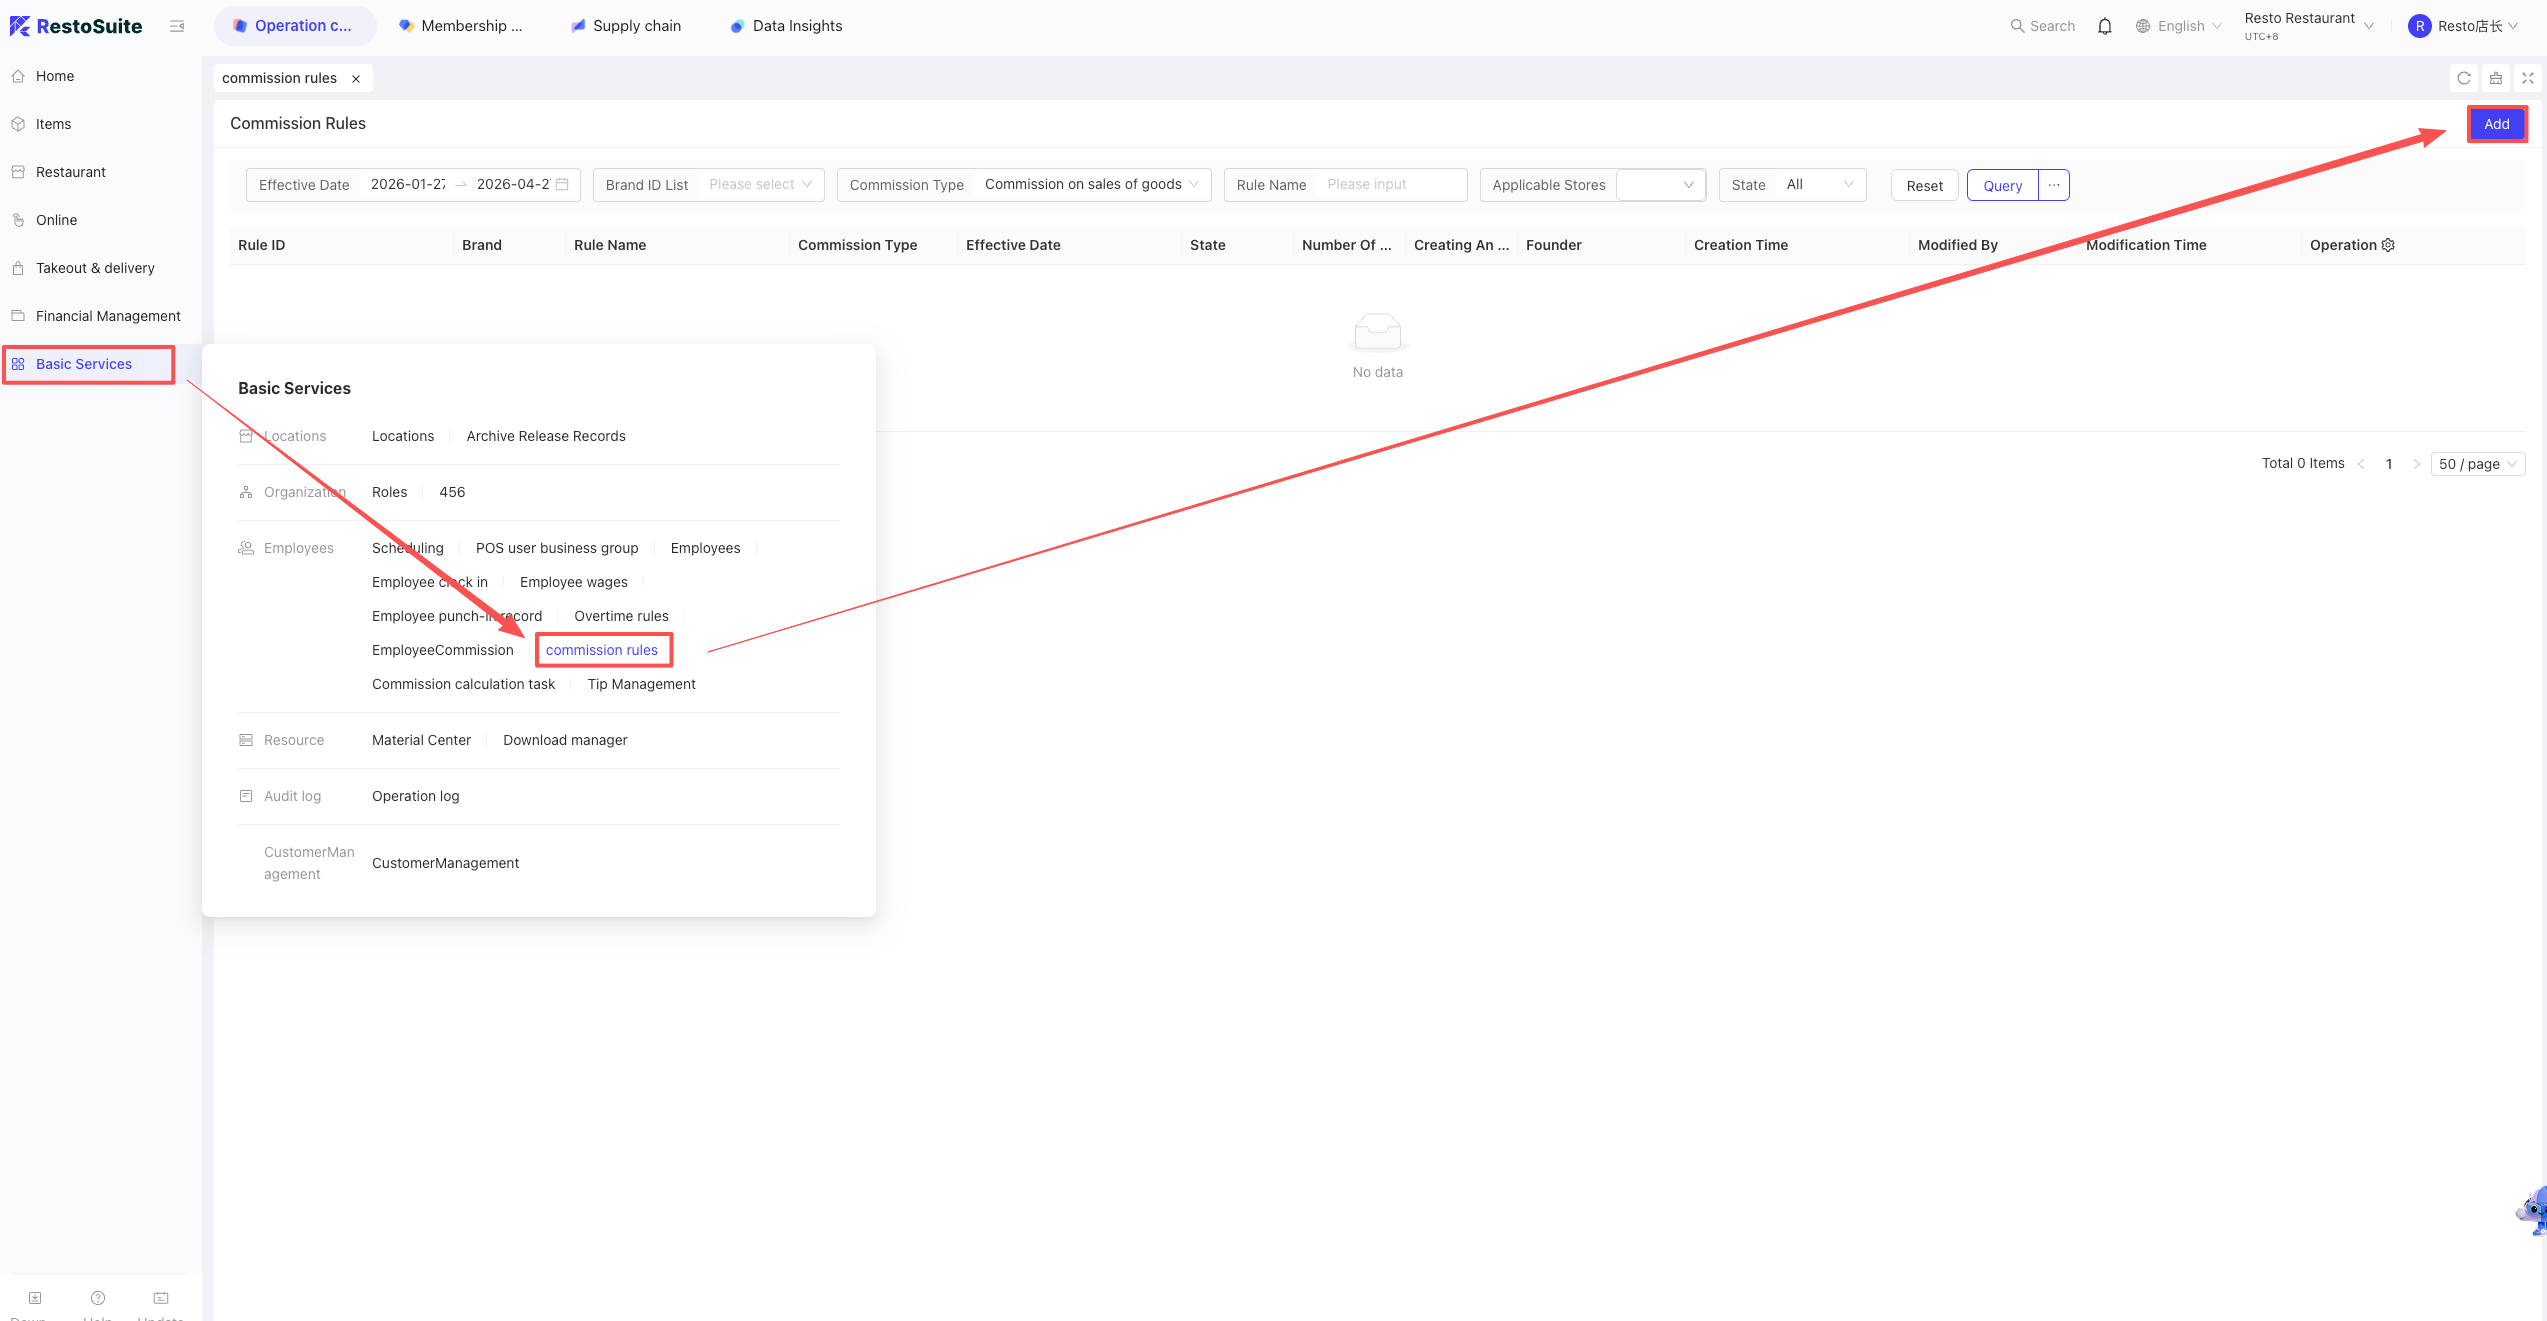
STEP 2: Click Add, enter Rule Name, Brand, Effective Stores, Dates, and Role.
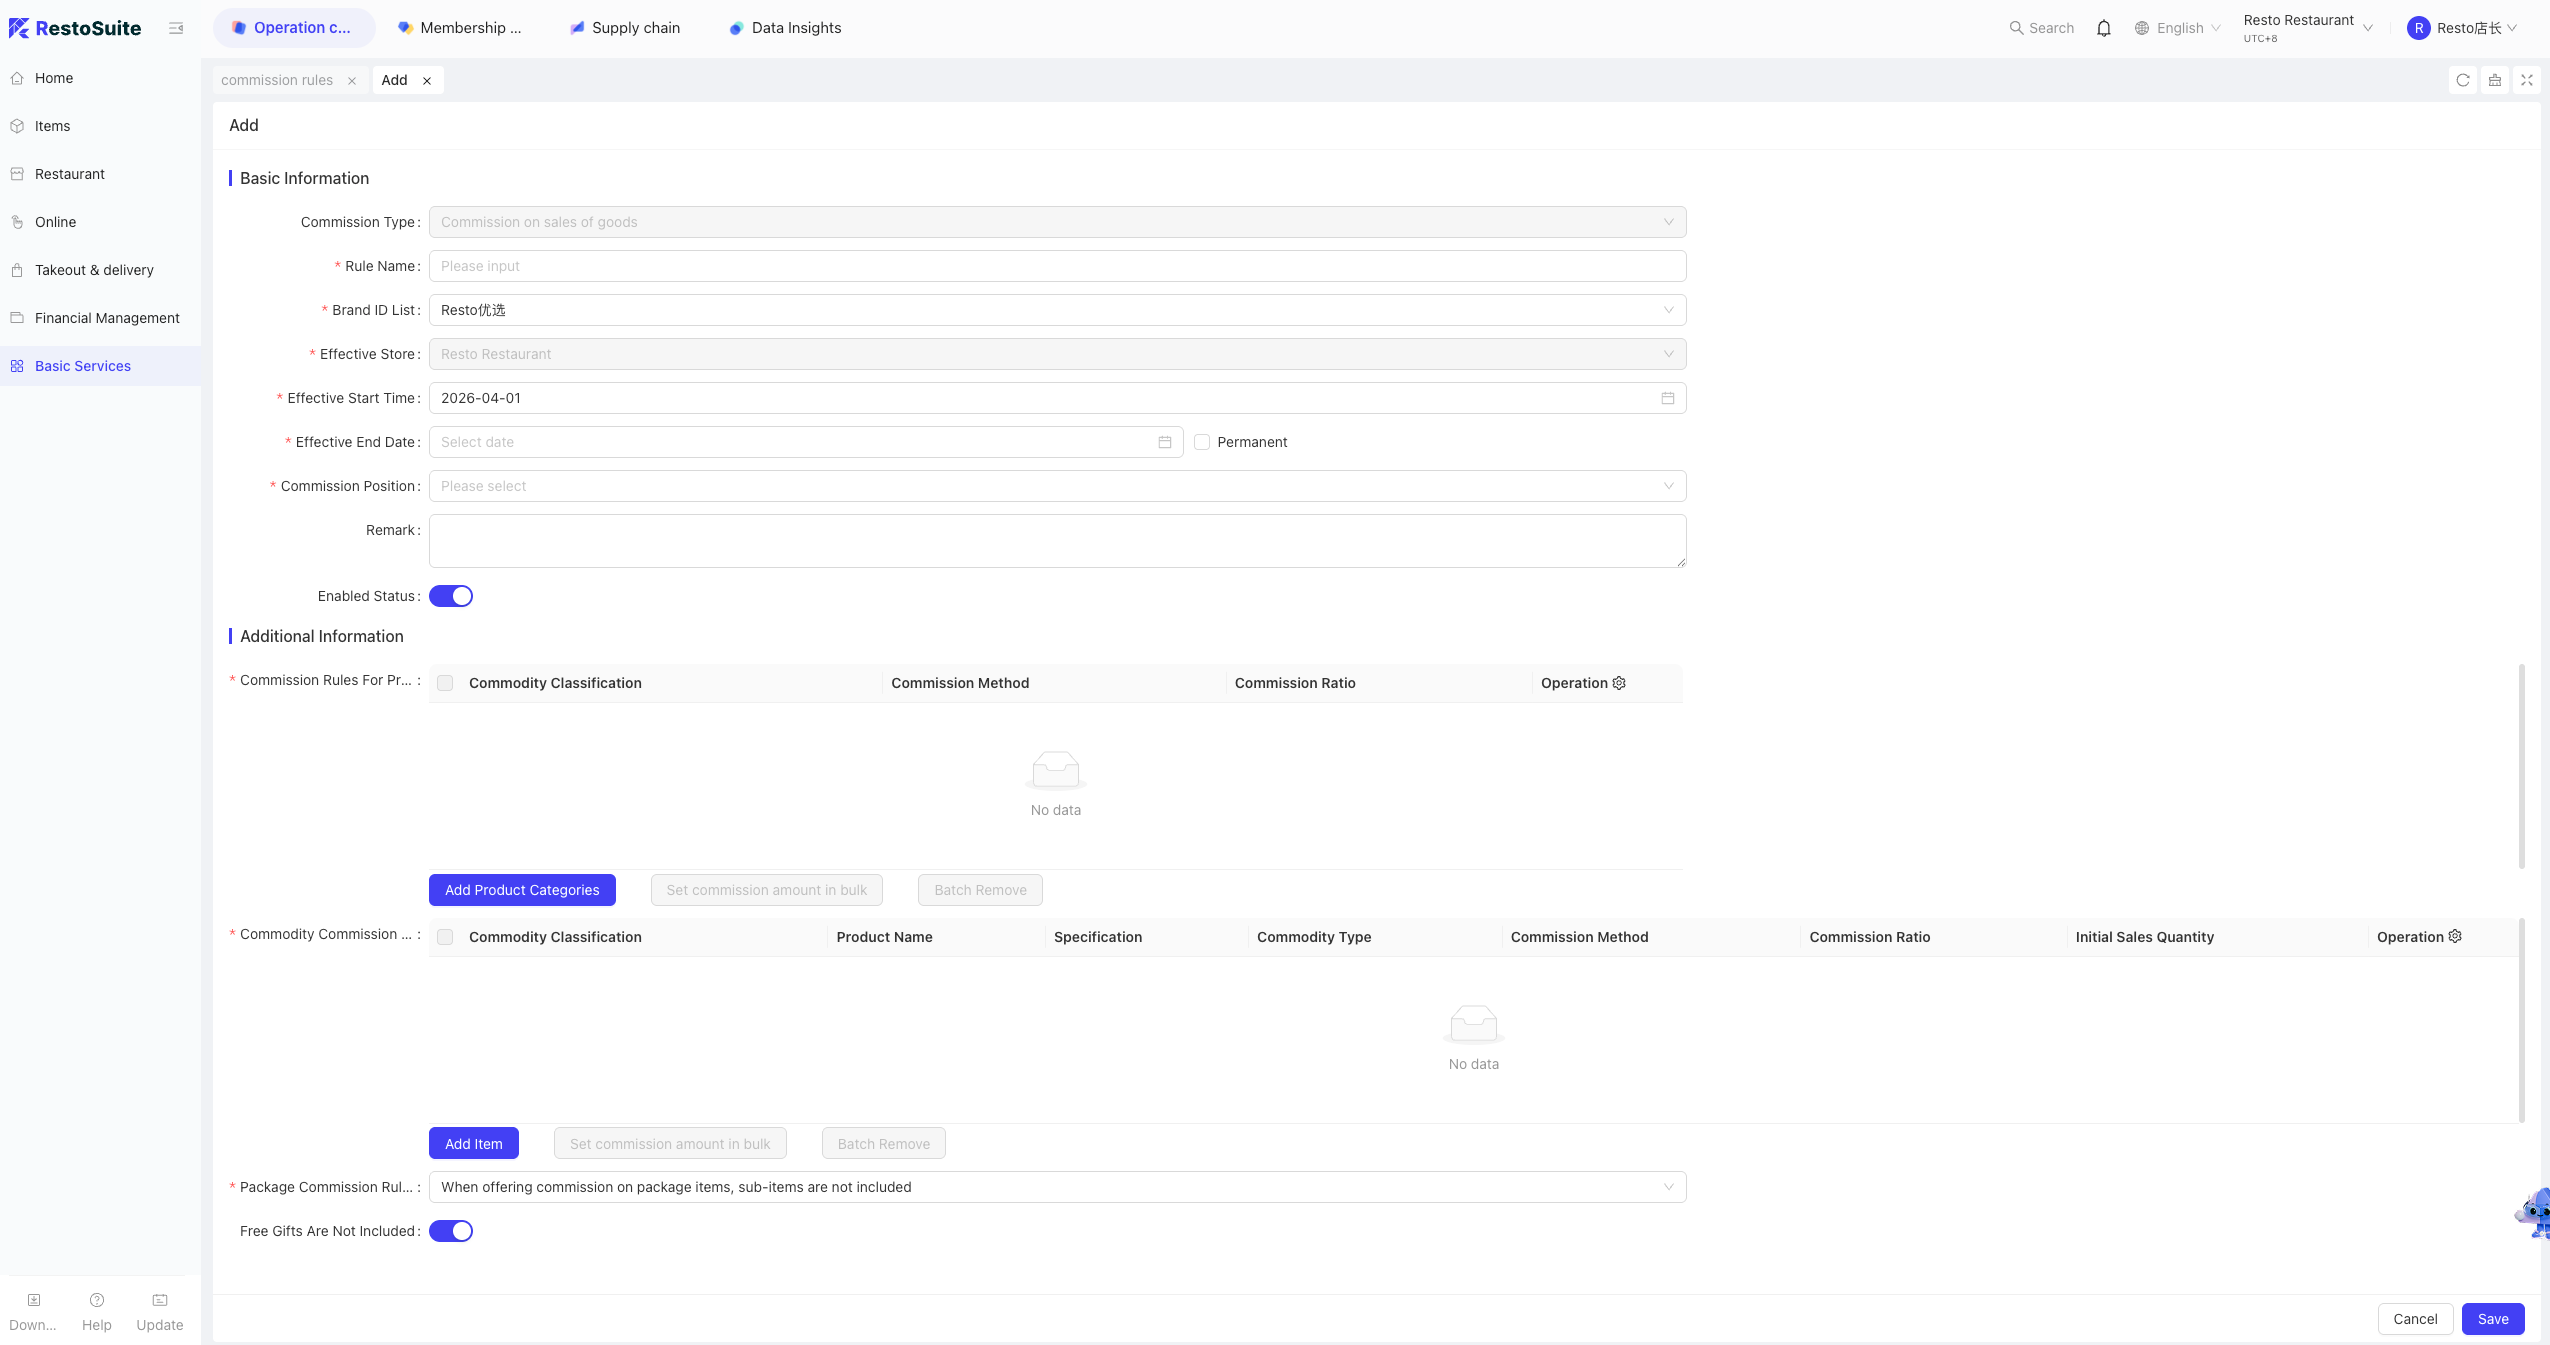
STEP 3: You can set commissions by item category or specific items.
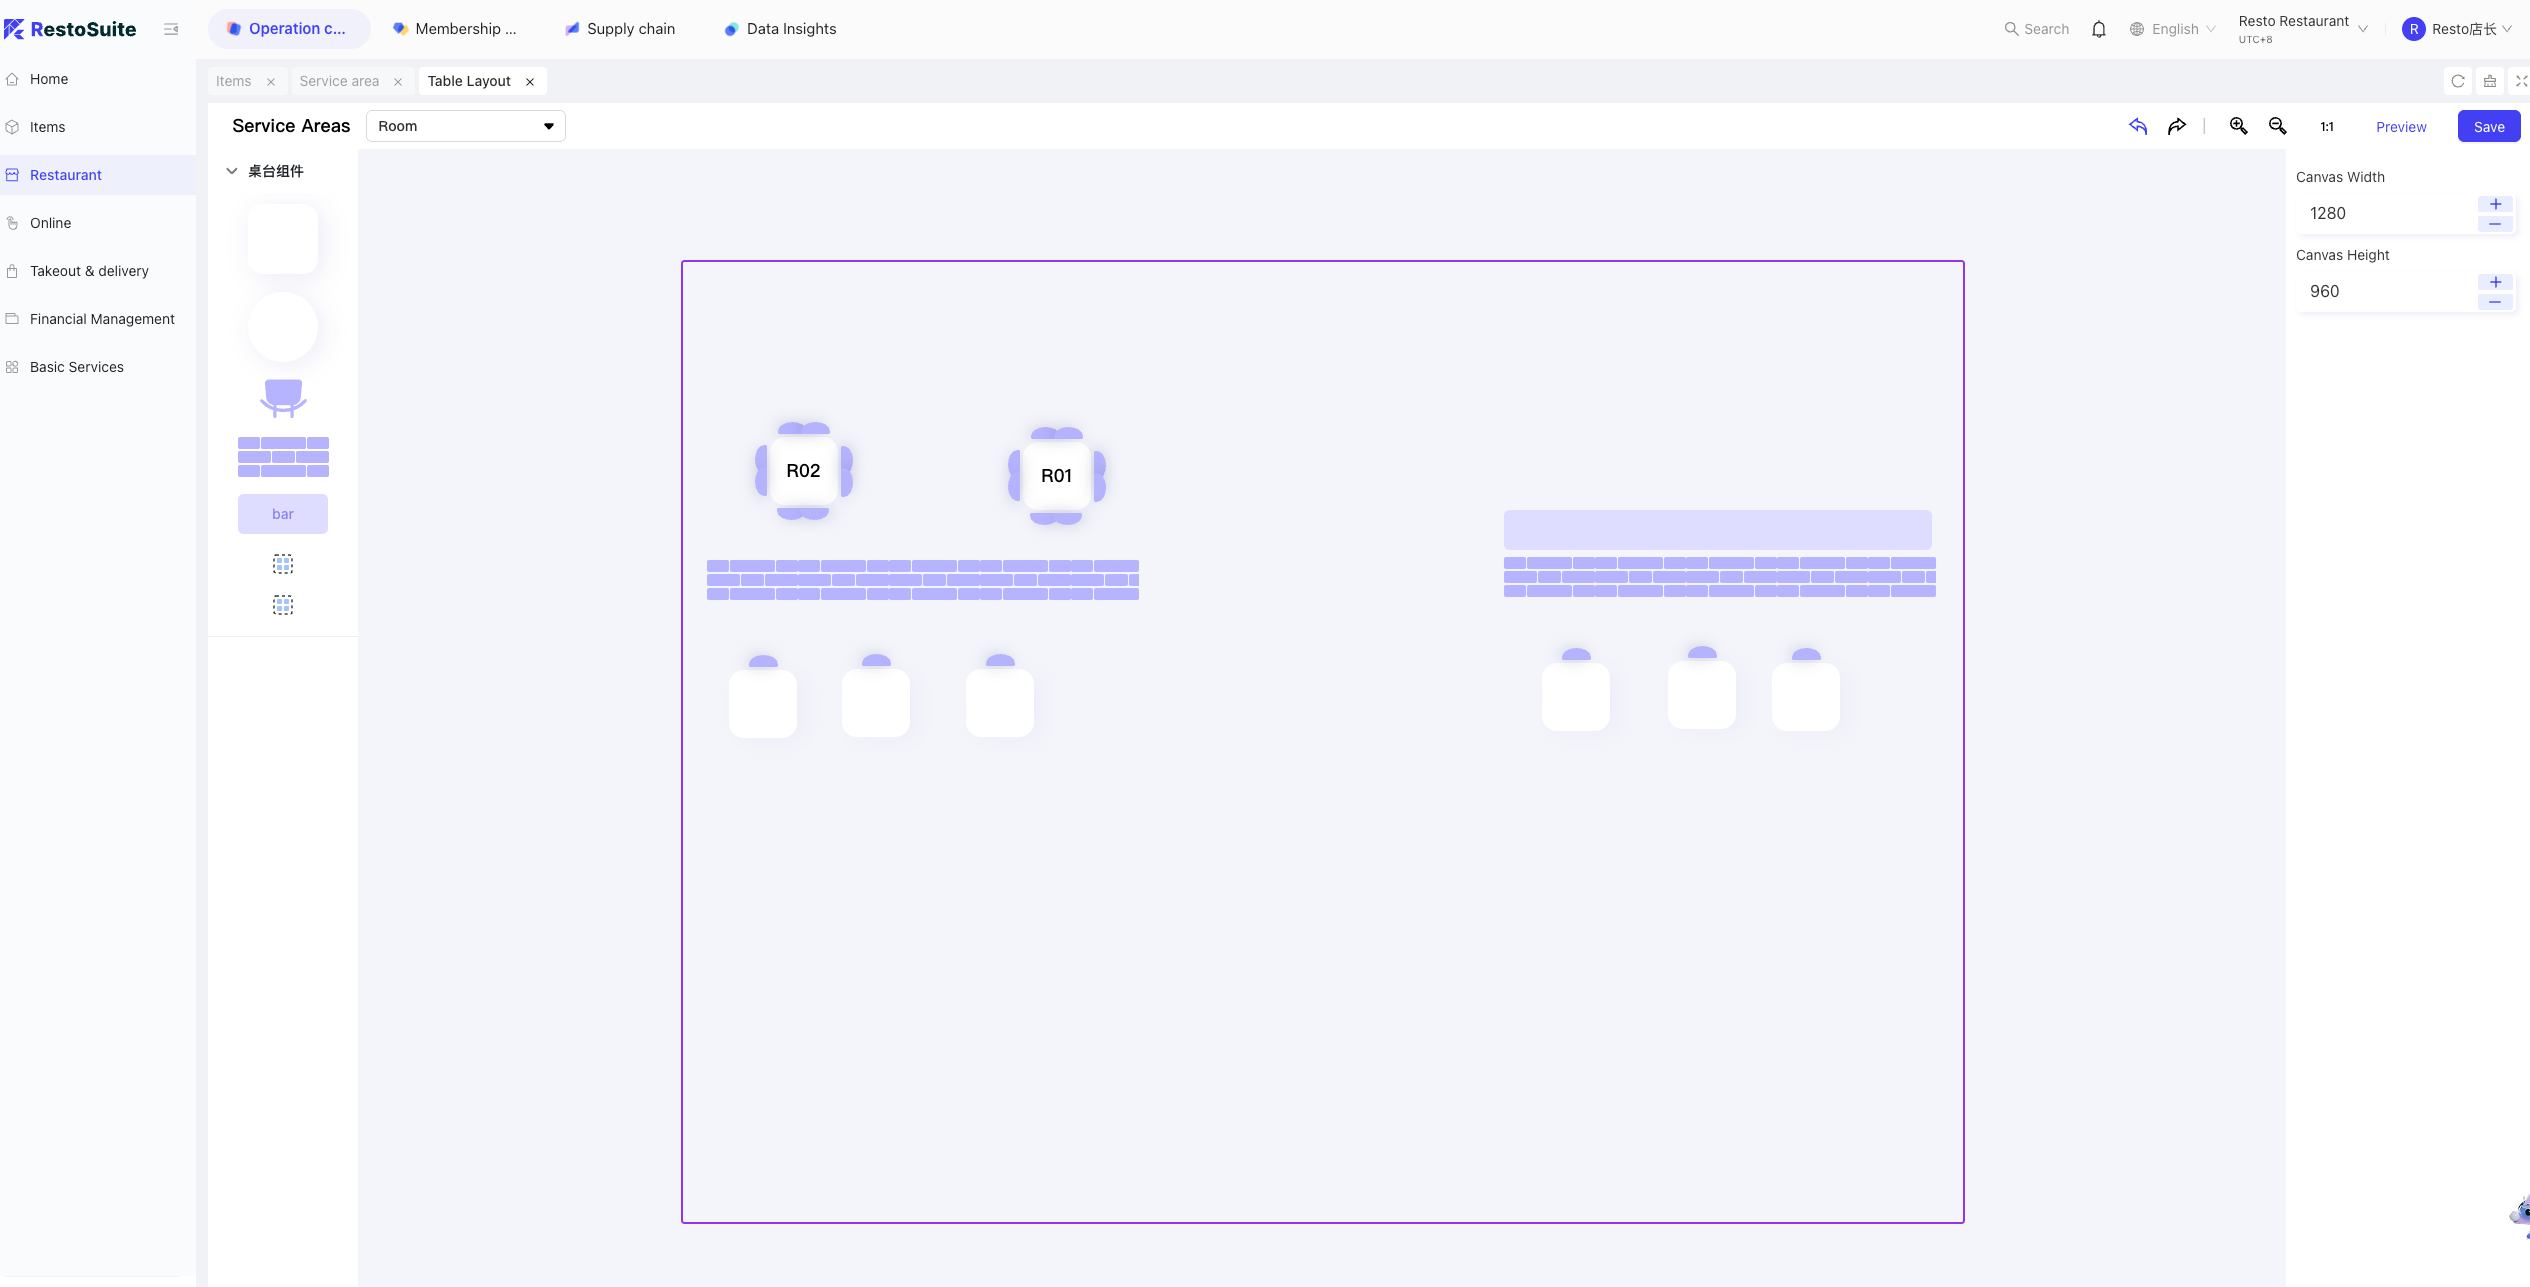
27 Can tables on the POS system be arranged according to the actual store layout?
A: Yes. BO backend -> Store perspective -> Operation Center -> Restaurant Management -> Service Area.
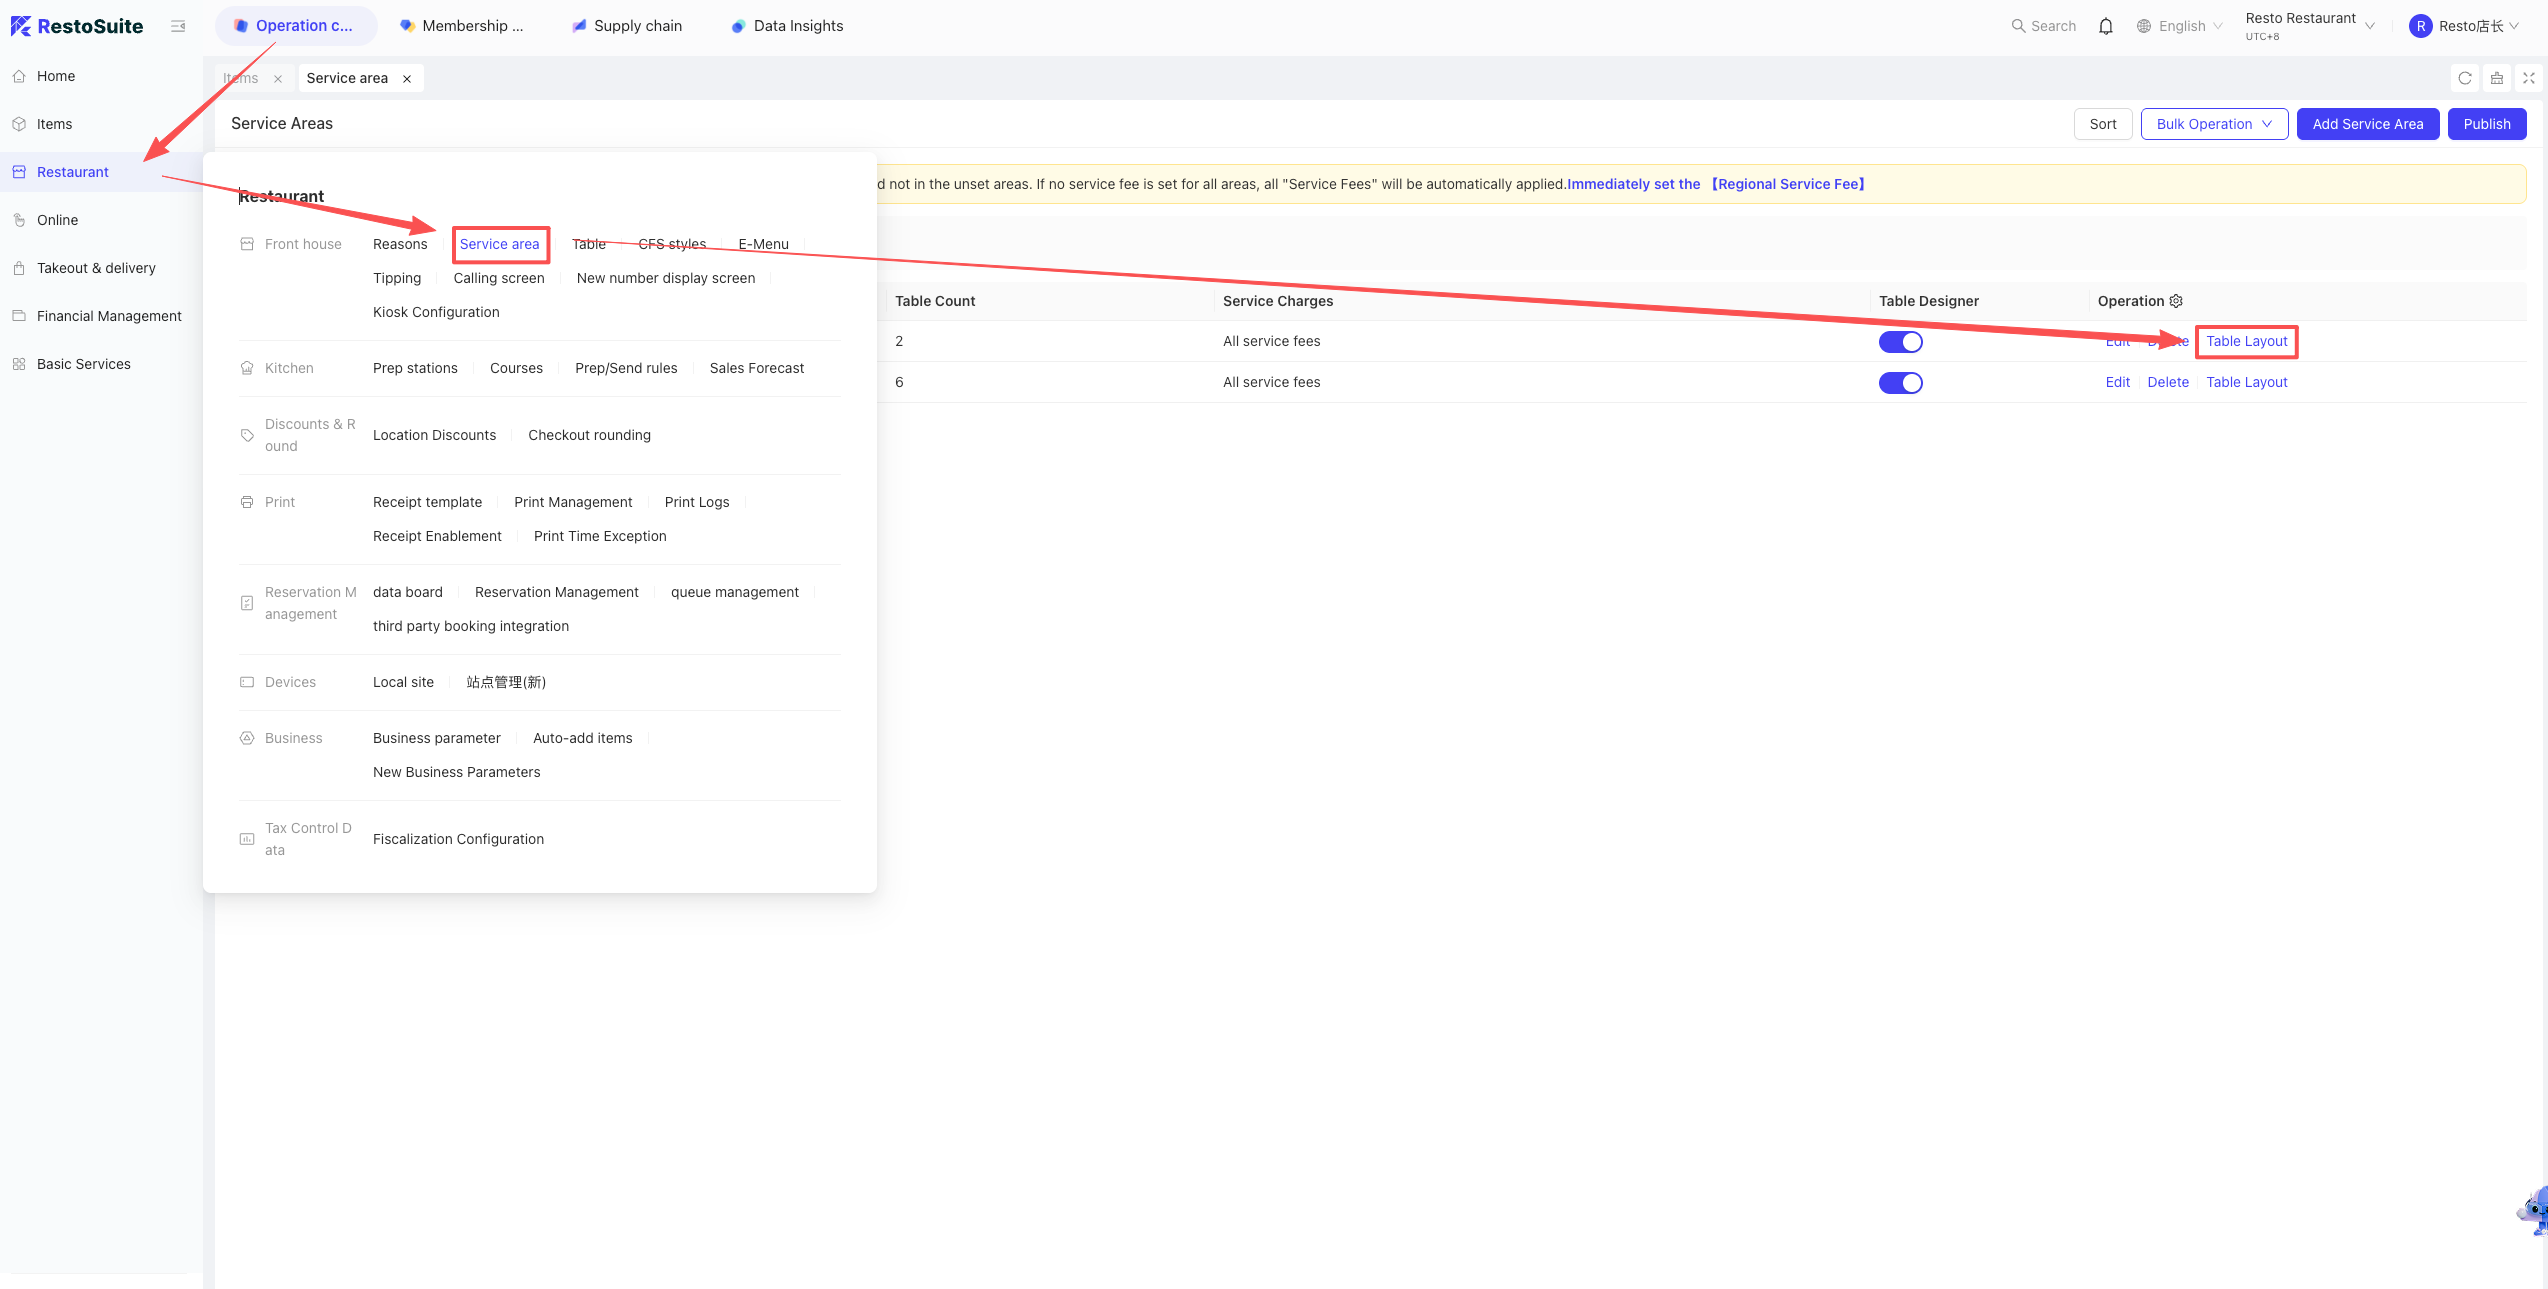
Find the area, enable “Table Design”, click “Table Layout”, and arrange them visually.
28 How to sync group items to a brand in the BO backend?
A: BO backend -> Group perspective -> Operation Center -> Item Management -> select the specific Brand. Click Sync Group Items in the upper right and select the items.
29 How to handle the “Maximum retries exceeded, account locked, please try again later” error when logging into the BO backend?
A: This is caused by entering the wrong password too many times. Wait 10 minutes and try again with the correct password.
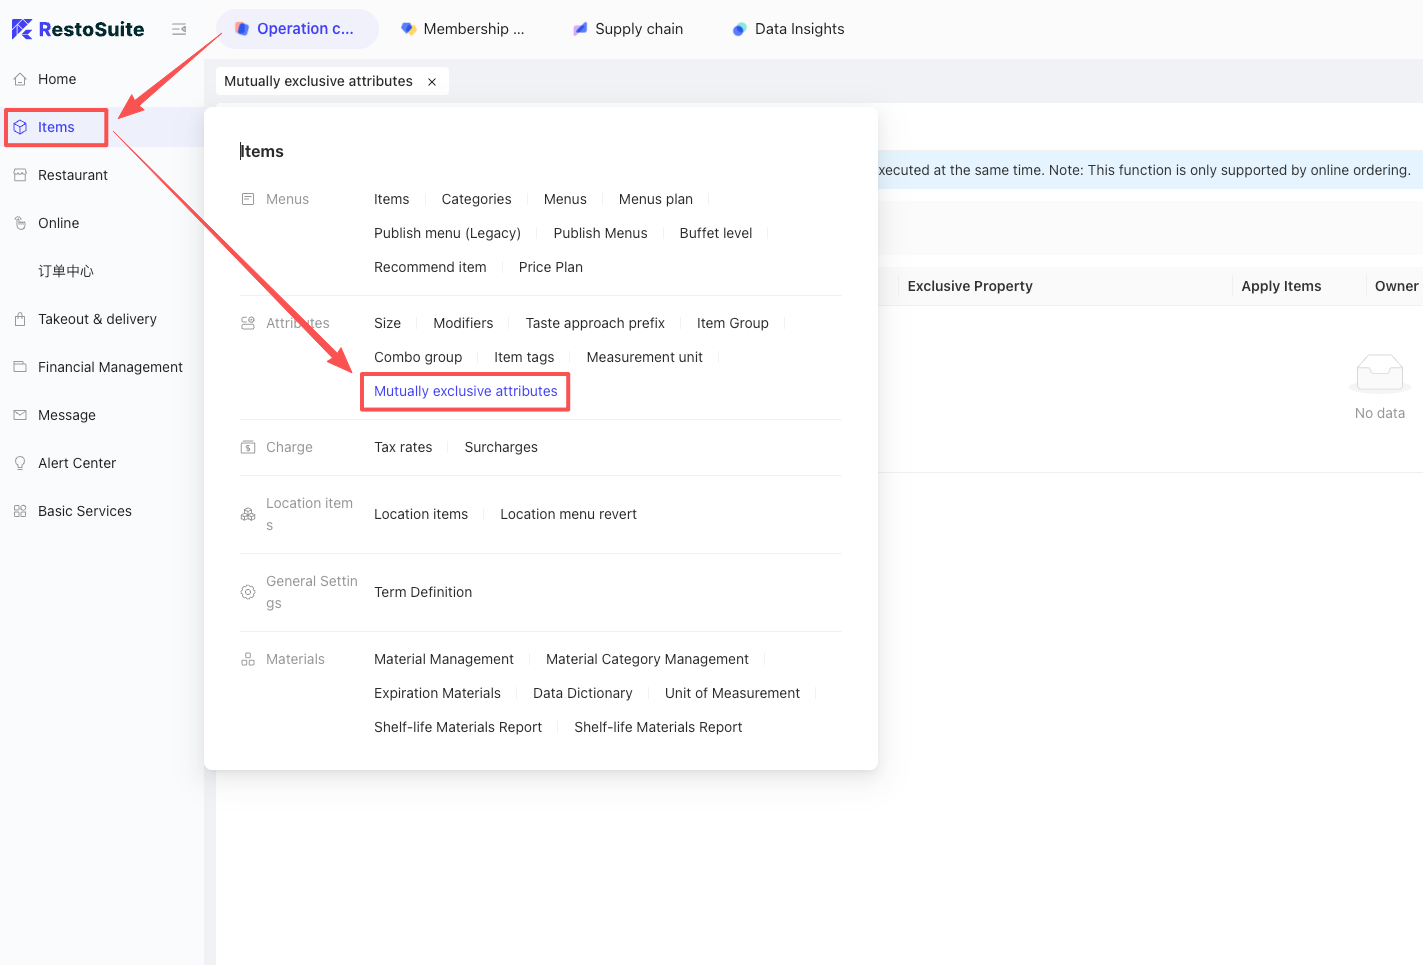
30 How to create mutually exclusive item attributes?
A: BO backend -> Operation Center -> Item Management -> Attribute Mutually Exclusive. Click Add to create rules.
31 How to handle newly added delivery menu items not showing up during delivery item mapping?
A: Newly added items must be published and become active before they appear in the delivery mapping.
32 How to sync the system’s menu to third-party delivery platforms?
A: BO backend -> Delivery & Dispatch -> Item Mapping. Select the delivery menu and click the Publish button in the upper right.
33 How to set item tax rates?
A: Tax rates are divided into Tax Inclusive and Tax Exclusive.
Path: BO backend -> Operation Center -> Item Management -> Tax Rate. Click Add.

- Tax Inclusive: Turn the toggle ON (tax is included in the item price).
- Tax Exclusive: Turn the toggle OFF (tax is added on top of the item price).
- Calculate tax before discount: Applies to all discounts.
34 Which types of SMS are currently free?
A: H5 login/registration verification codes and BO backend login codes are free. All other SMS messages incur charges.
35 Why are some packaging fees under item surcharges set as “open price”?
A: The system defaults to “open price”. If you create it manually, it will be a fixed price.
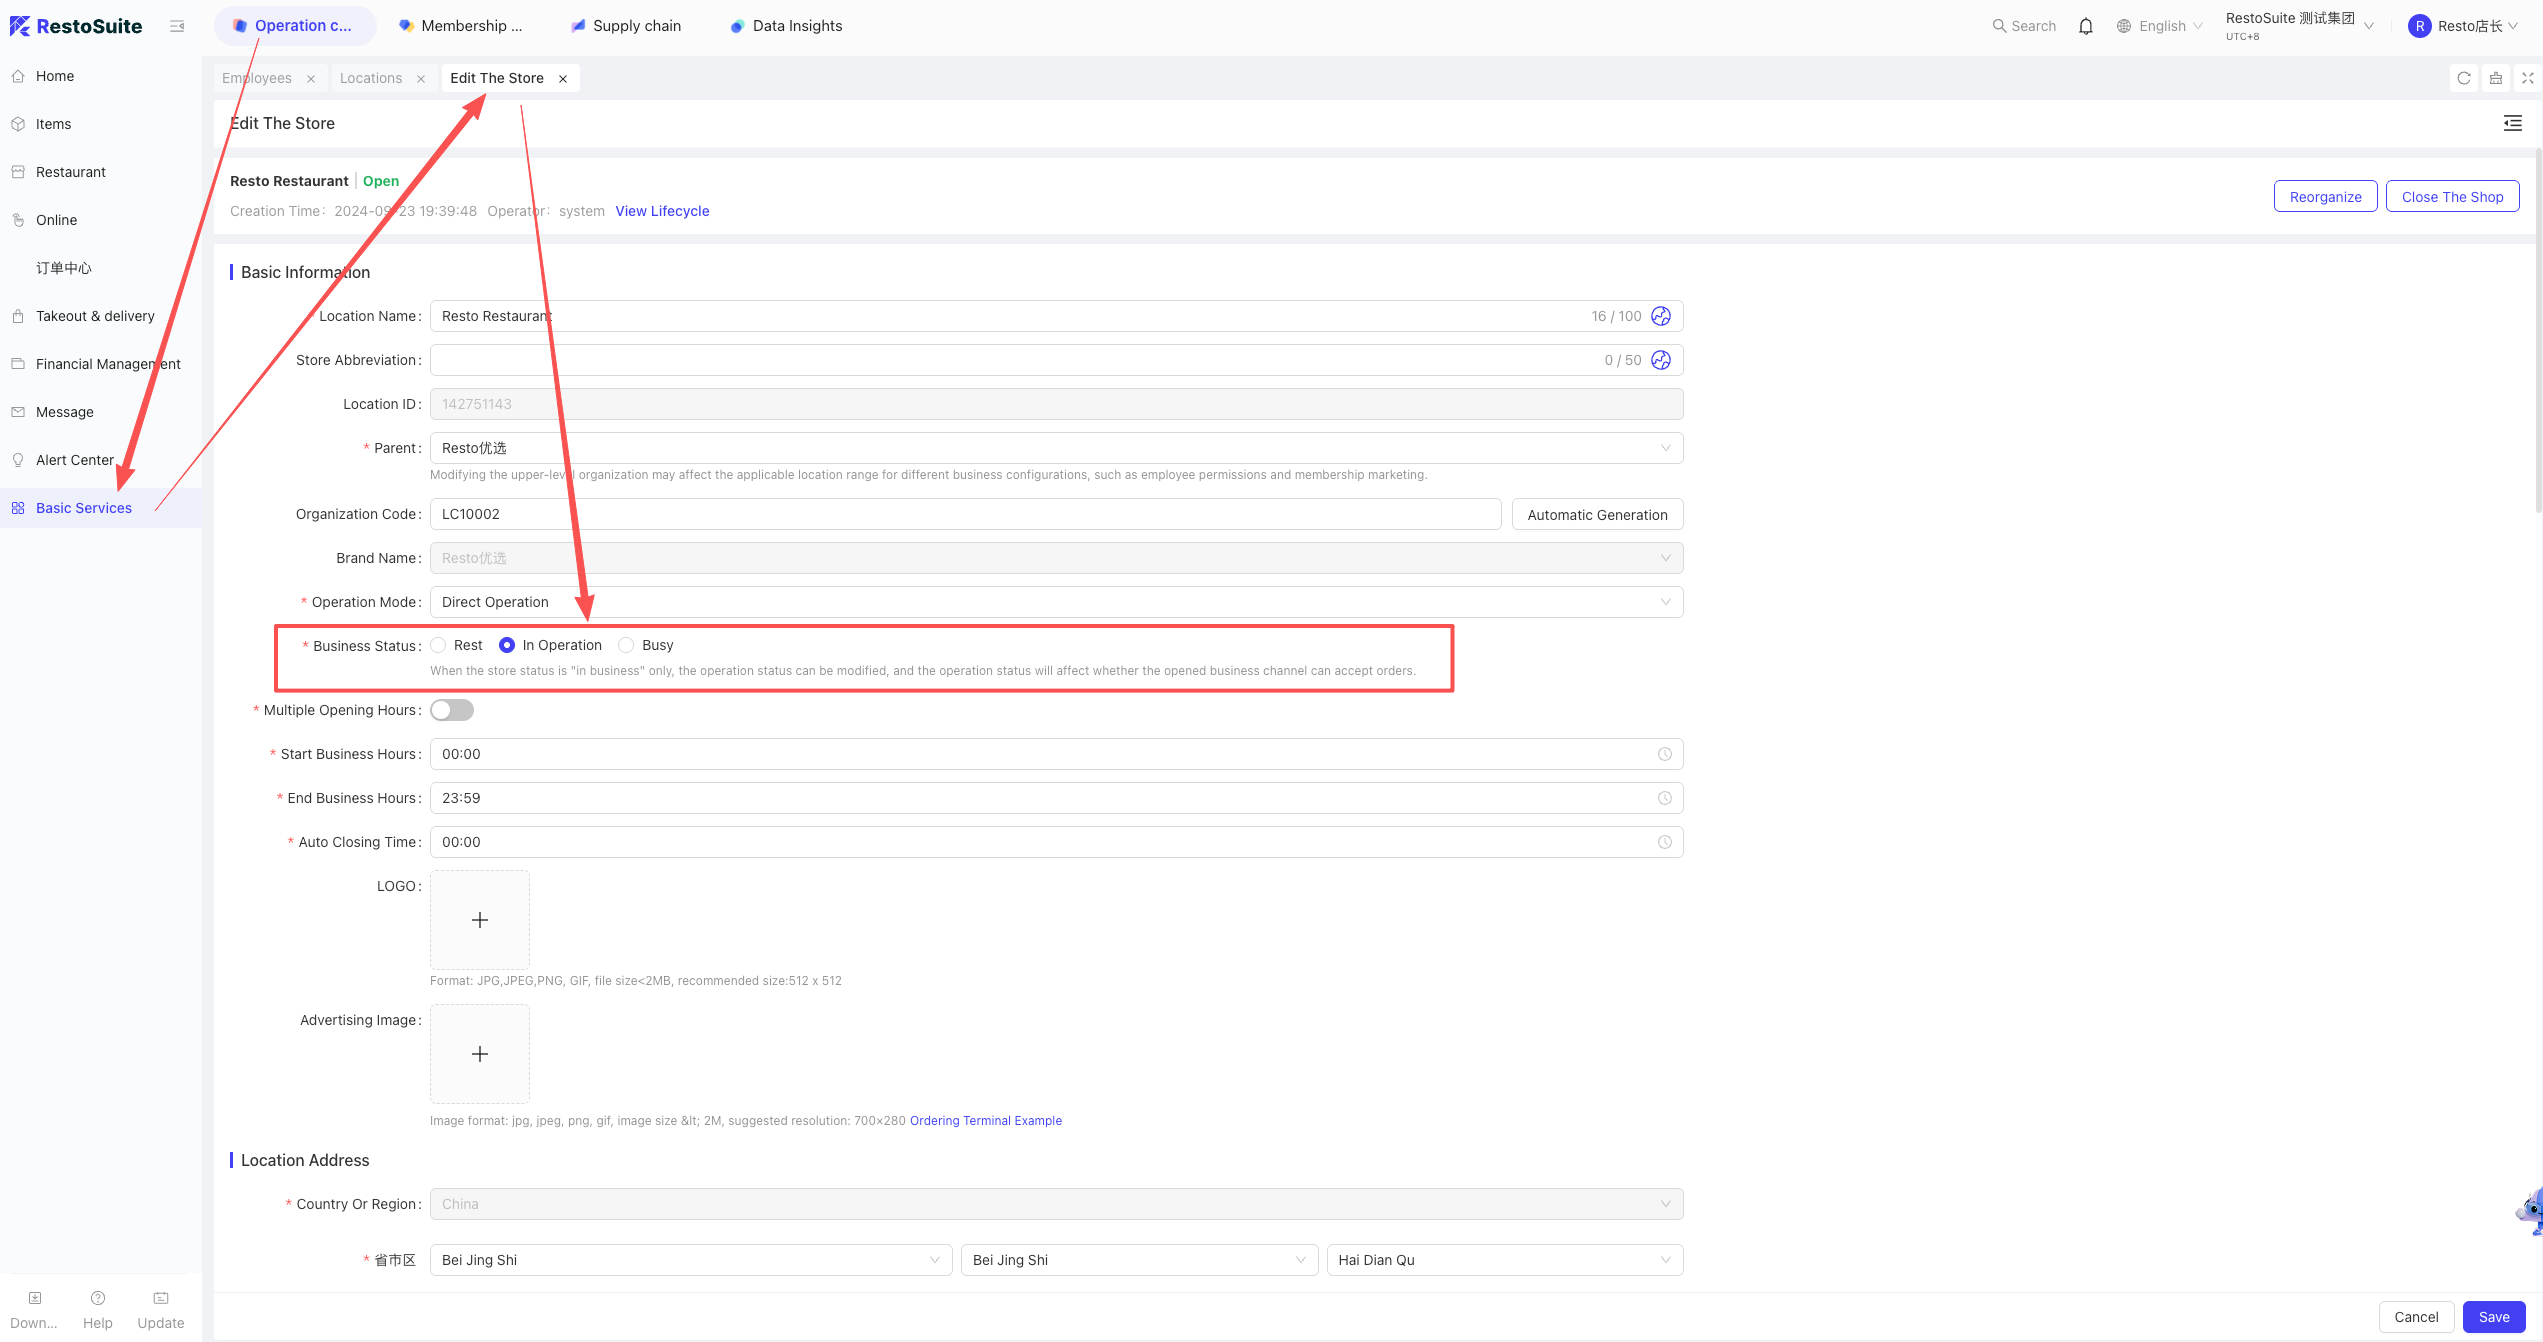
36 How to set the store to closed status in the backend?
A: BO backend -> Store perspective -> Operation Center -> Basic Profiles -> Store Profile. Edit the store and set the operating status to “Resting”.
37 How to troubleshoot when the Uber Eats menu is not updated in the Uber backend after publishing?
A: Uber supports multiple menus. Check your Uber backend to see which menu is currently active. Look for the menu name that matches the one you published from RestoSuite.
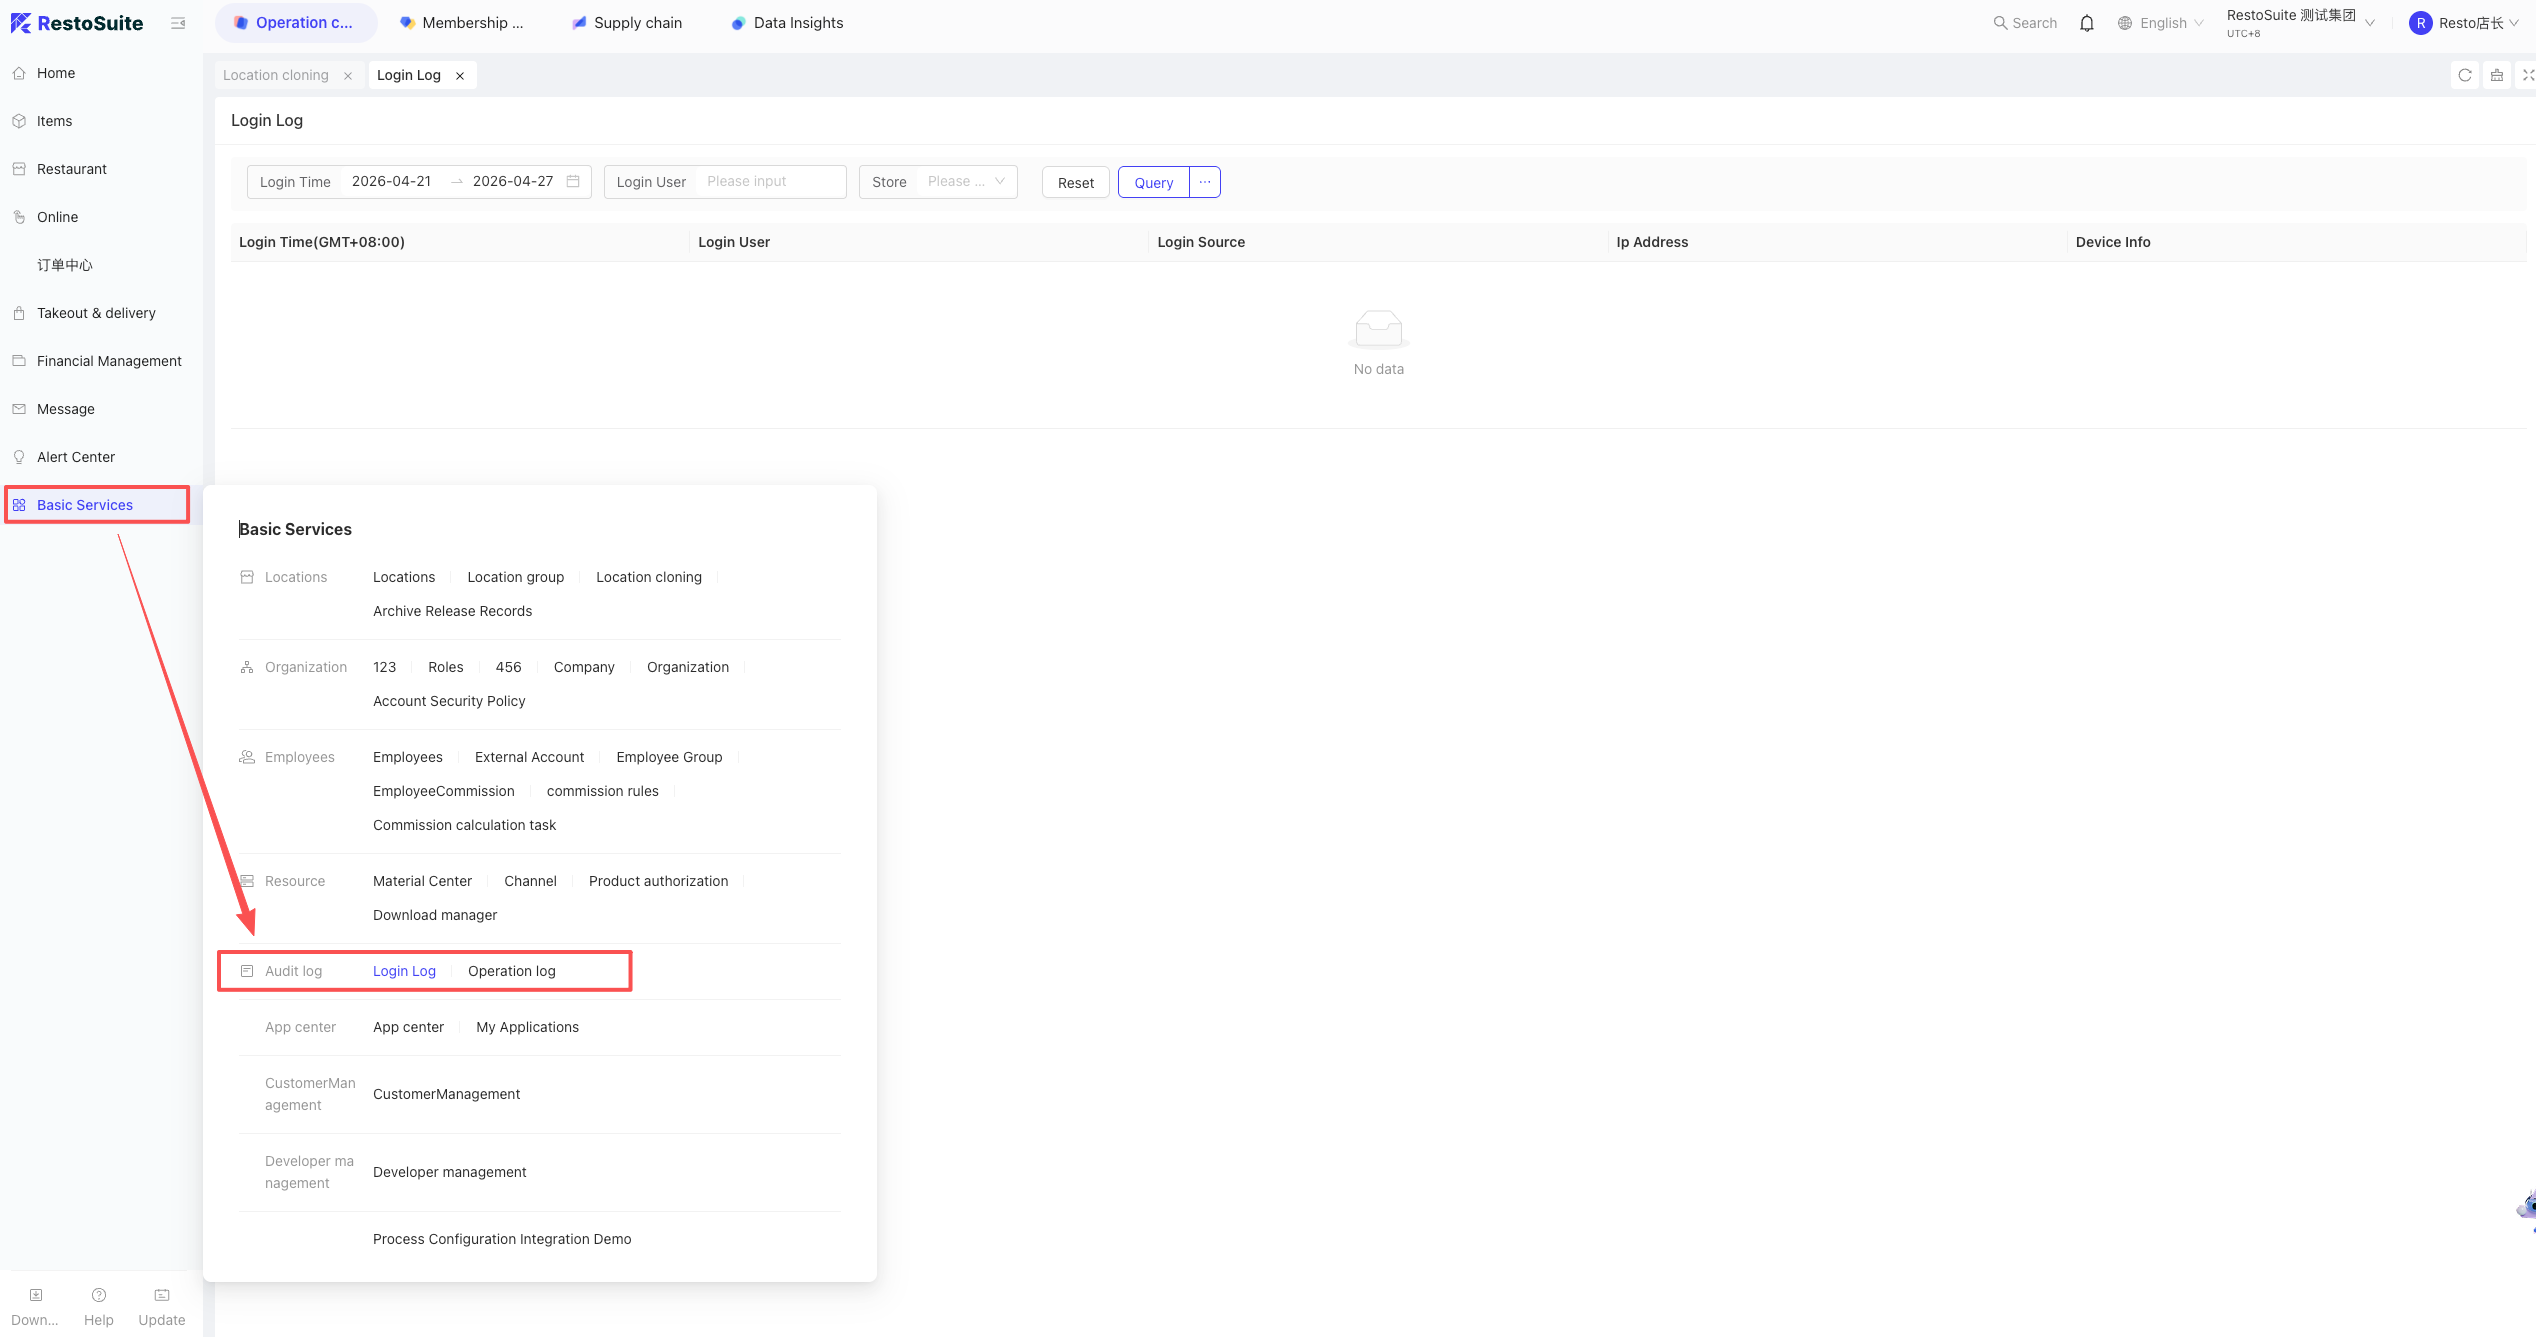
38 Why is the Operation Log feature missing in BO Basic Services?
A: Only users with the “Auditor” role can view logs. Add the Auditor role to the login account.
39 In third-party delivery item mapping, what is the purpose of setting an item category for unbound third-party platform items?
A: If no category is set, it falls back to the default category. If the unbound third-party item is later bound to a local item, its category will be updated to match the local item’s category.
Default rule: If an unbound third-party item is ordered and doesn’t auto-match a local item, it is processed under this assigned category.
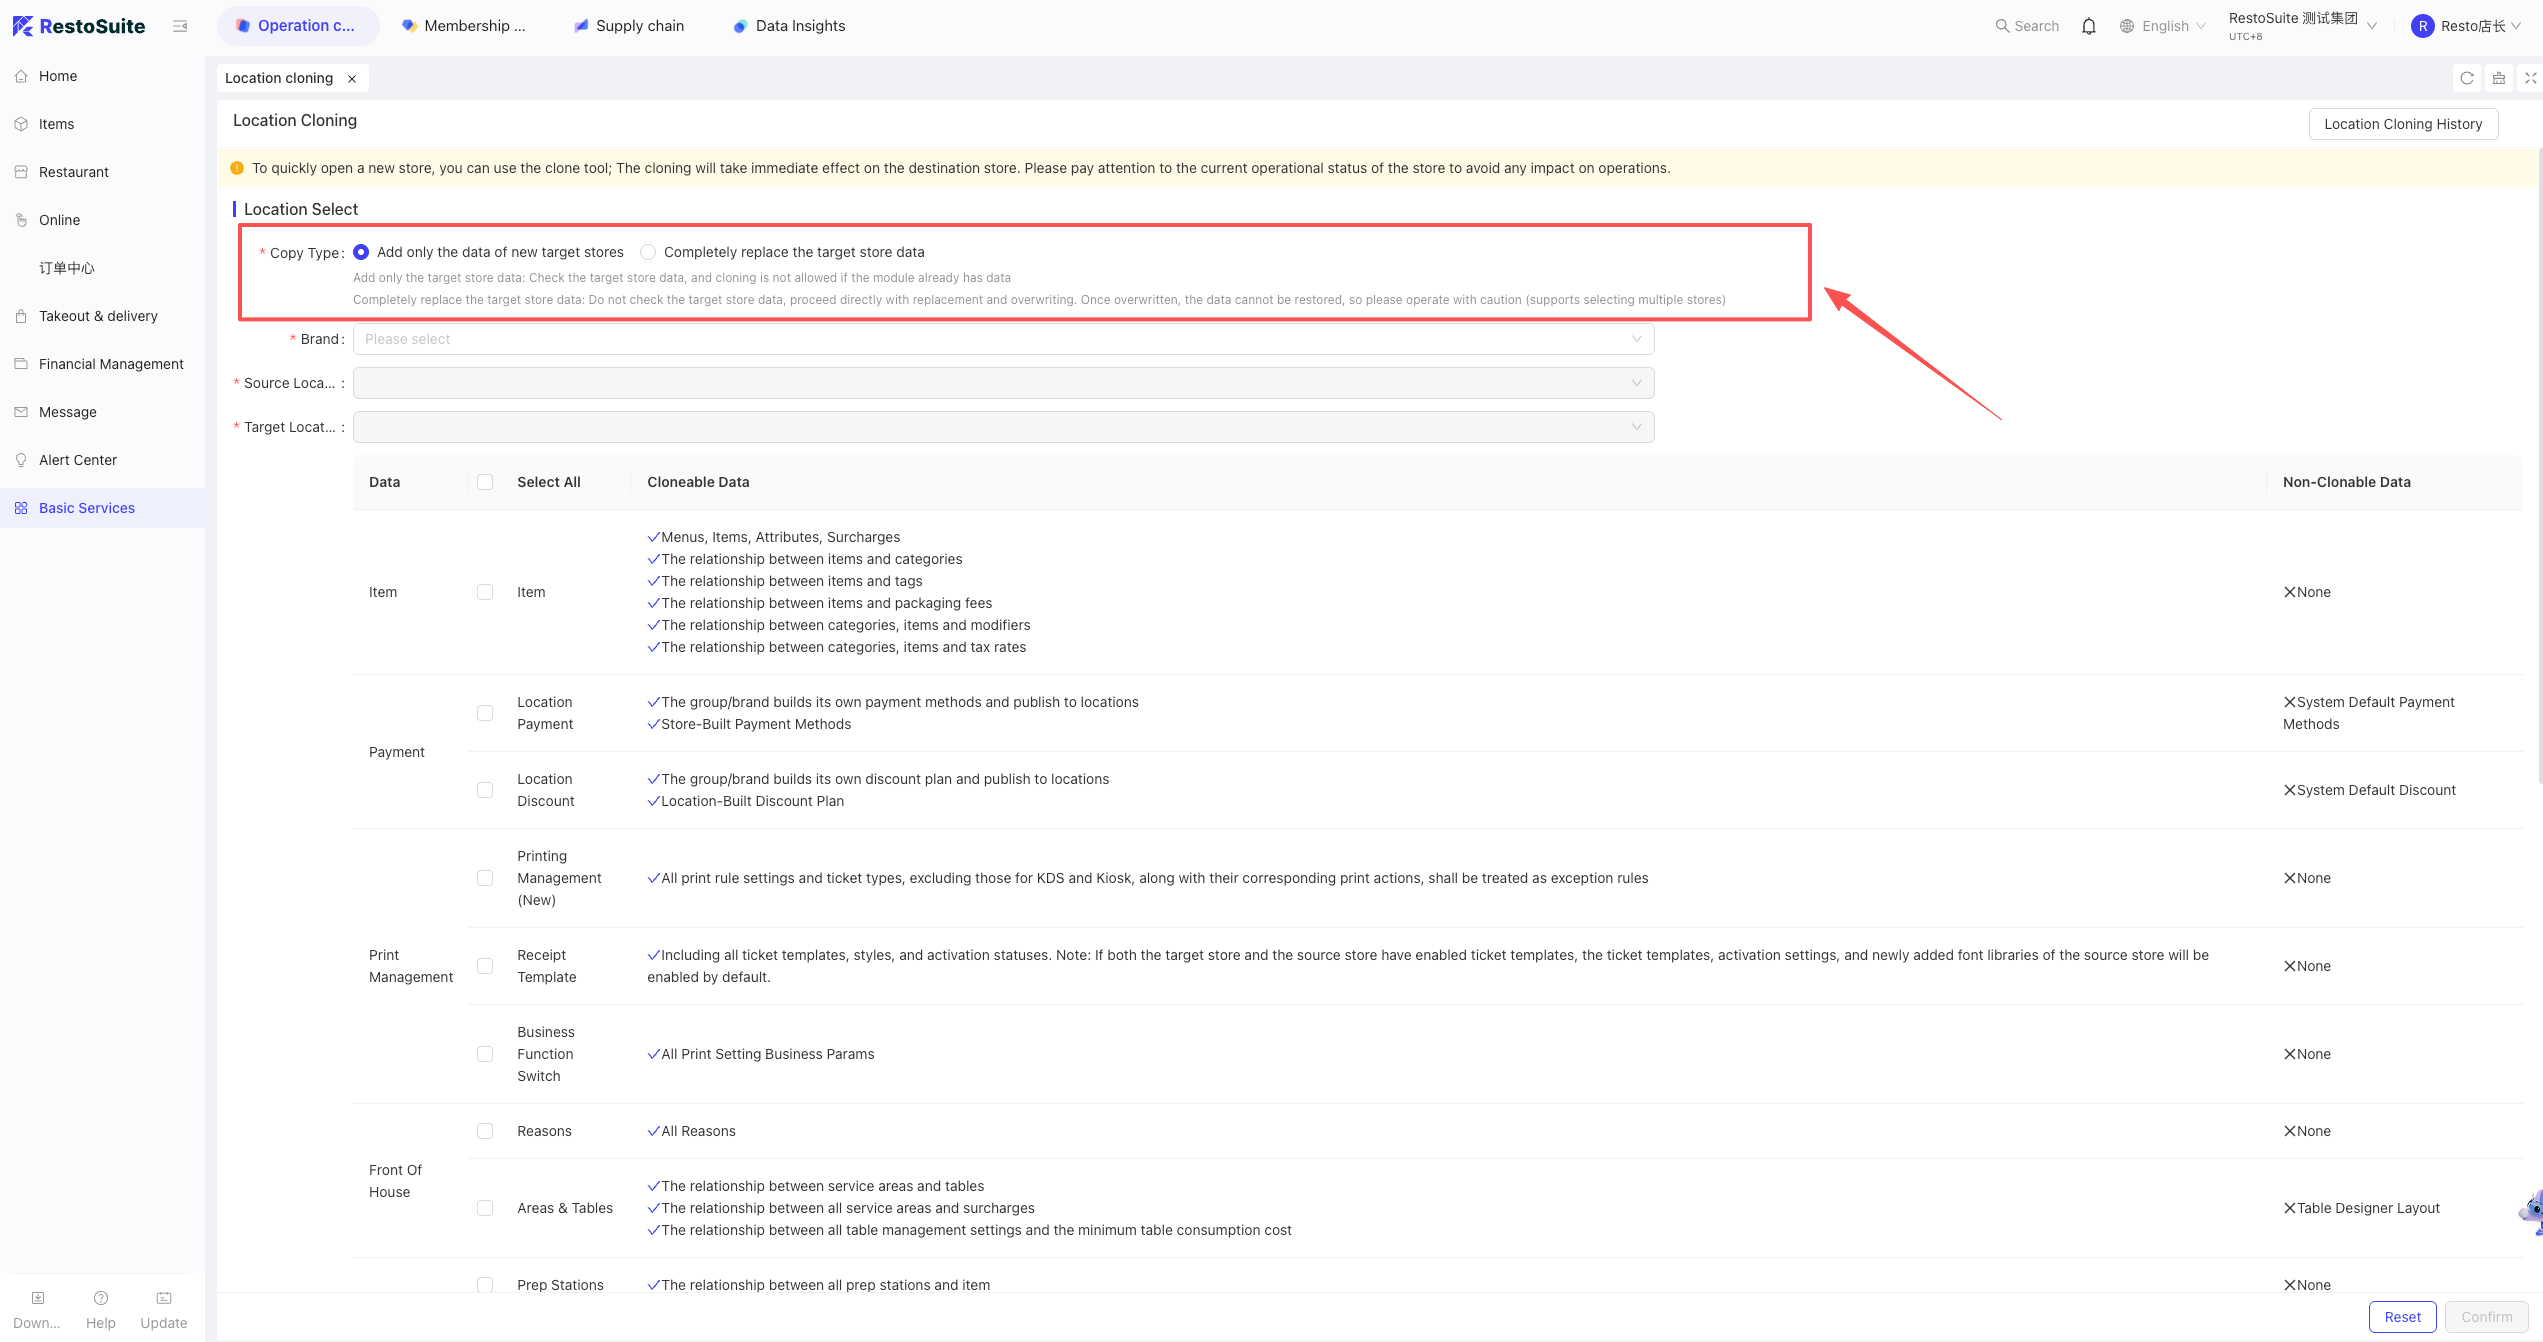
40 Cloning store information
Path: Group perspective -> Operation Center -> Basic Services -> Store Clone.
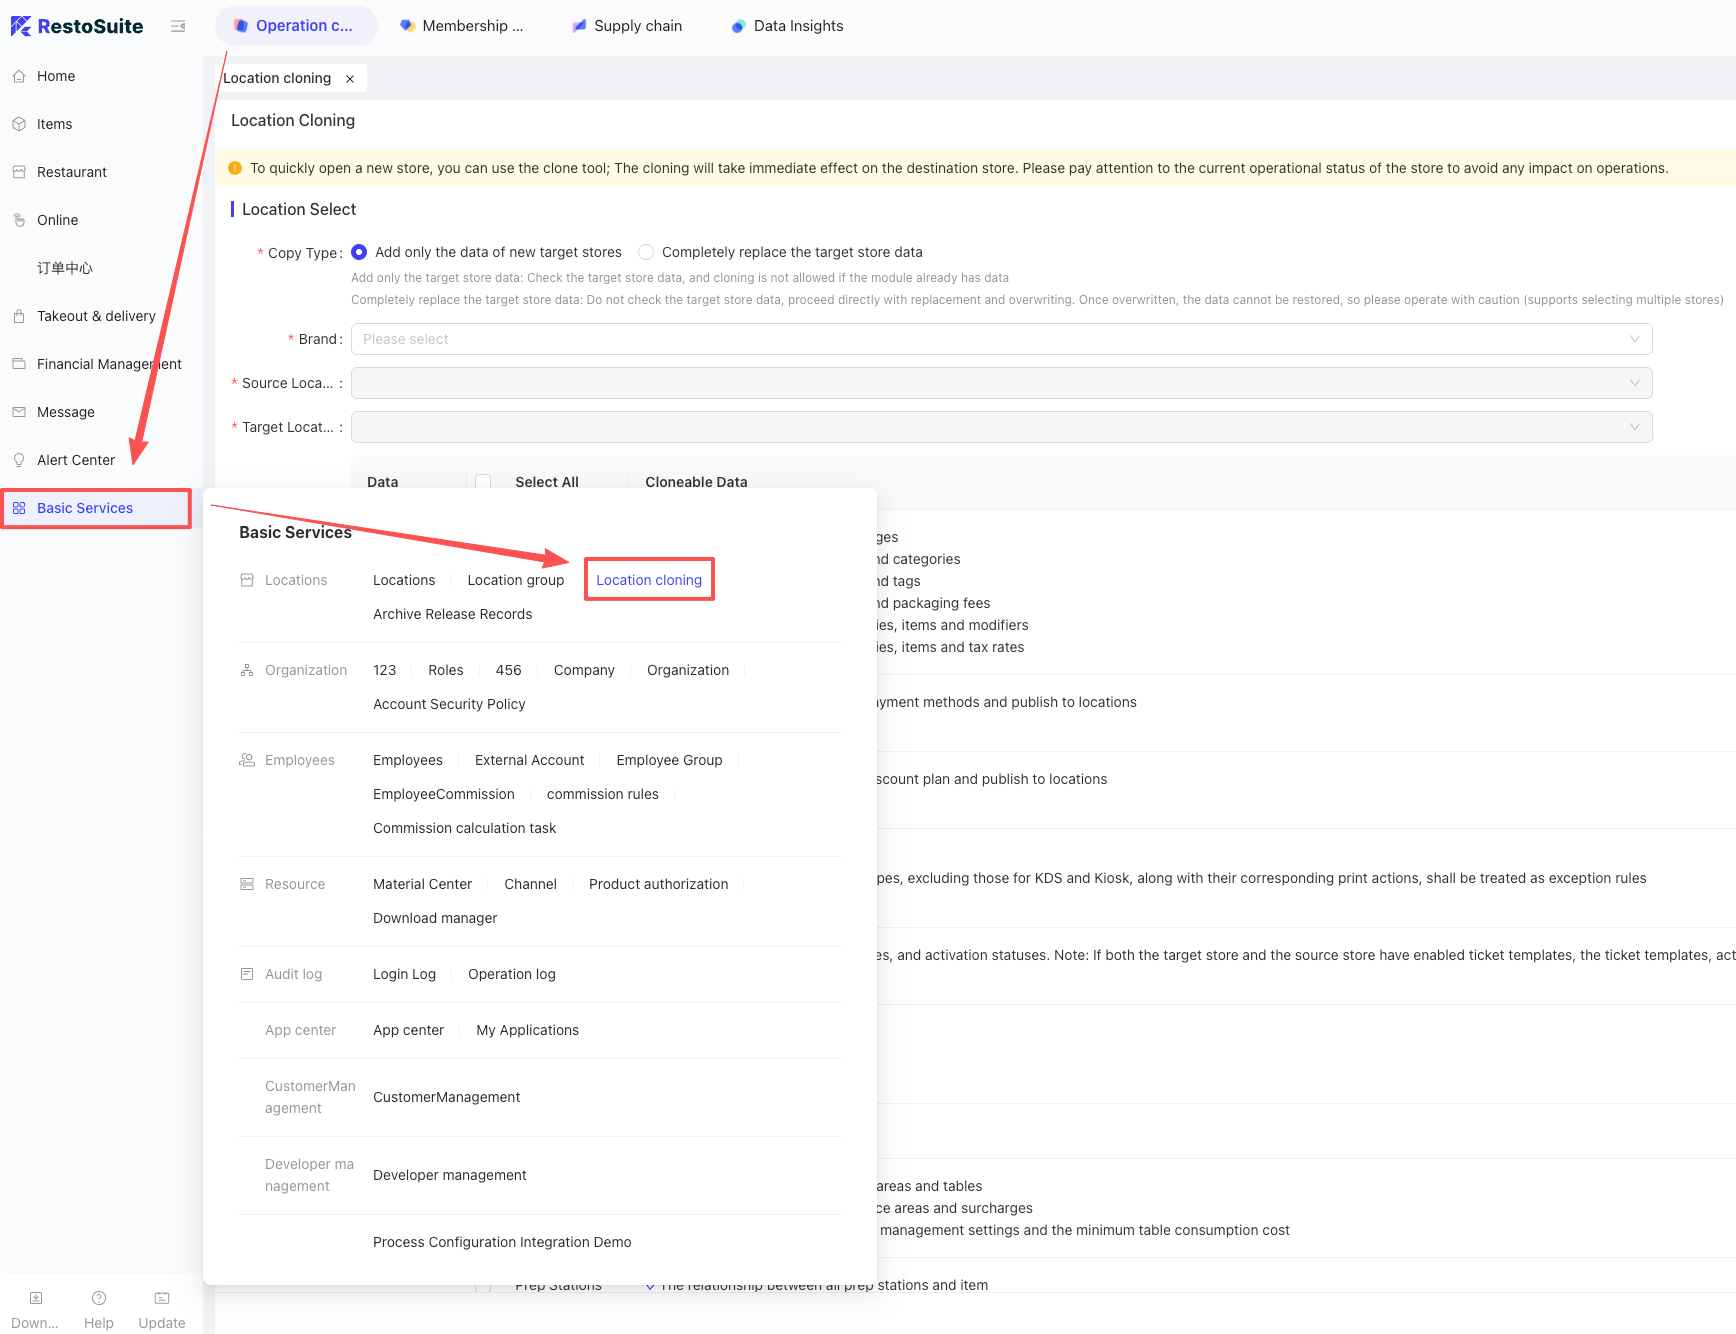
Note: Stores must be under the same brand to be cloned.
Function: Adds to or overwrites data in the target store.
41 What is the purpose of the packaging fee configuration in item settings, and in what scenarios is it used?
A: When the order type is Delivery or Pickup, setting a packaging fee in the item details ensures that when customers order this item via the Mini-Program, the packaging fee is automatically added to the cart.