Financial Management
1 Module Introduction
This module is mainly used for group finance-related functions, including the maintenance of payment methods, receipts and refunds, accounting subjects, etc. It thereby provides system support for financial and operational personnel in handling all fund-related business processes.
2 Payment Methods
-
Switch to Group Perspective
- Log in to the Merchant Backend as a group administrator, then switch to the Group Management Perspective via the perspective switch button in the upper right corner.
-
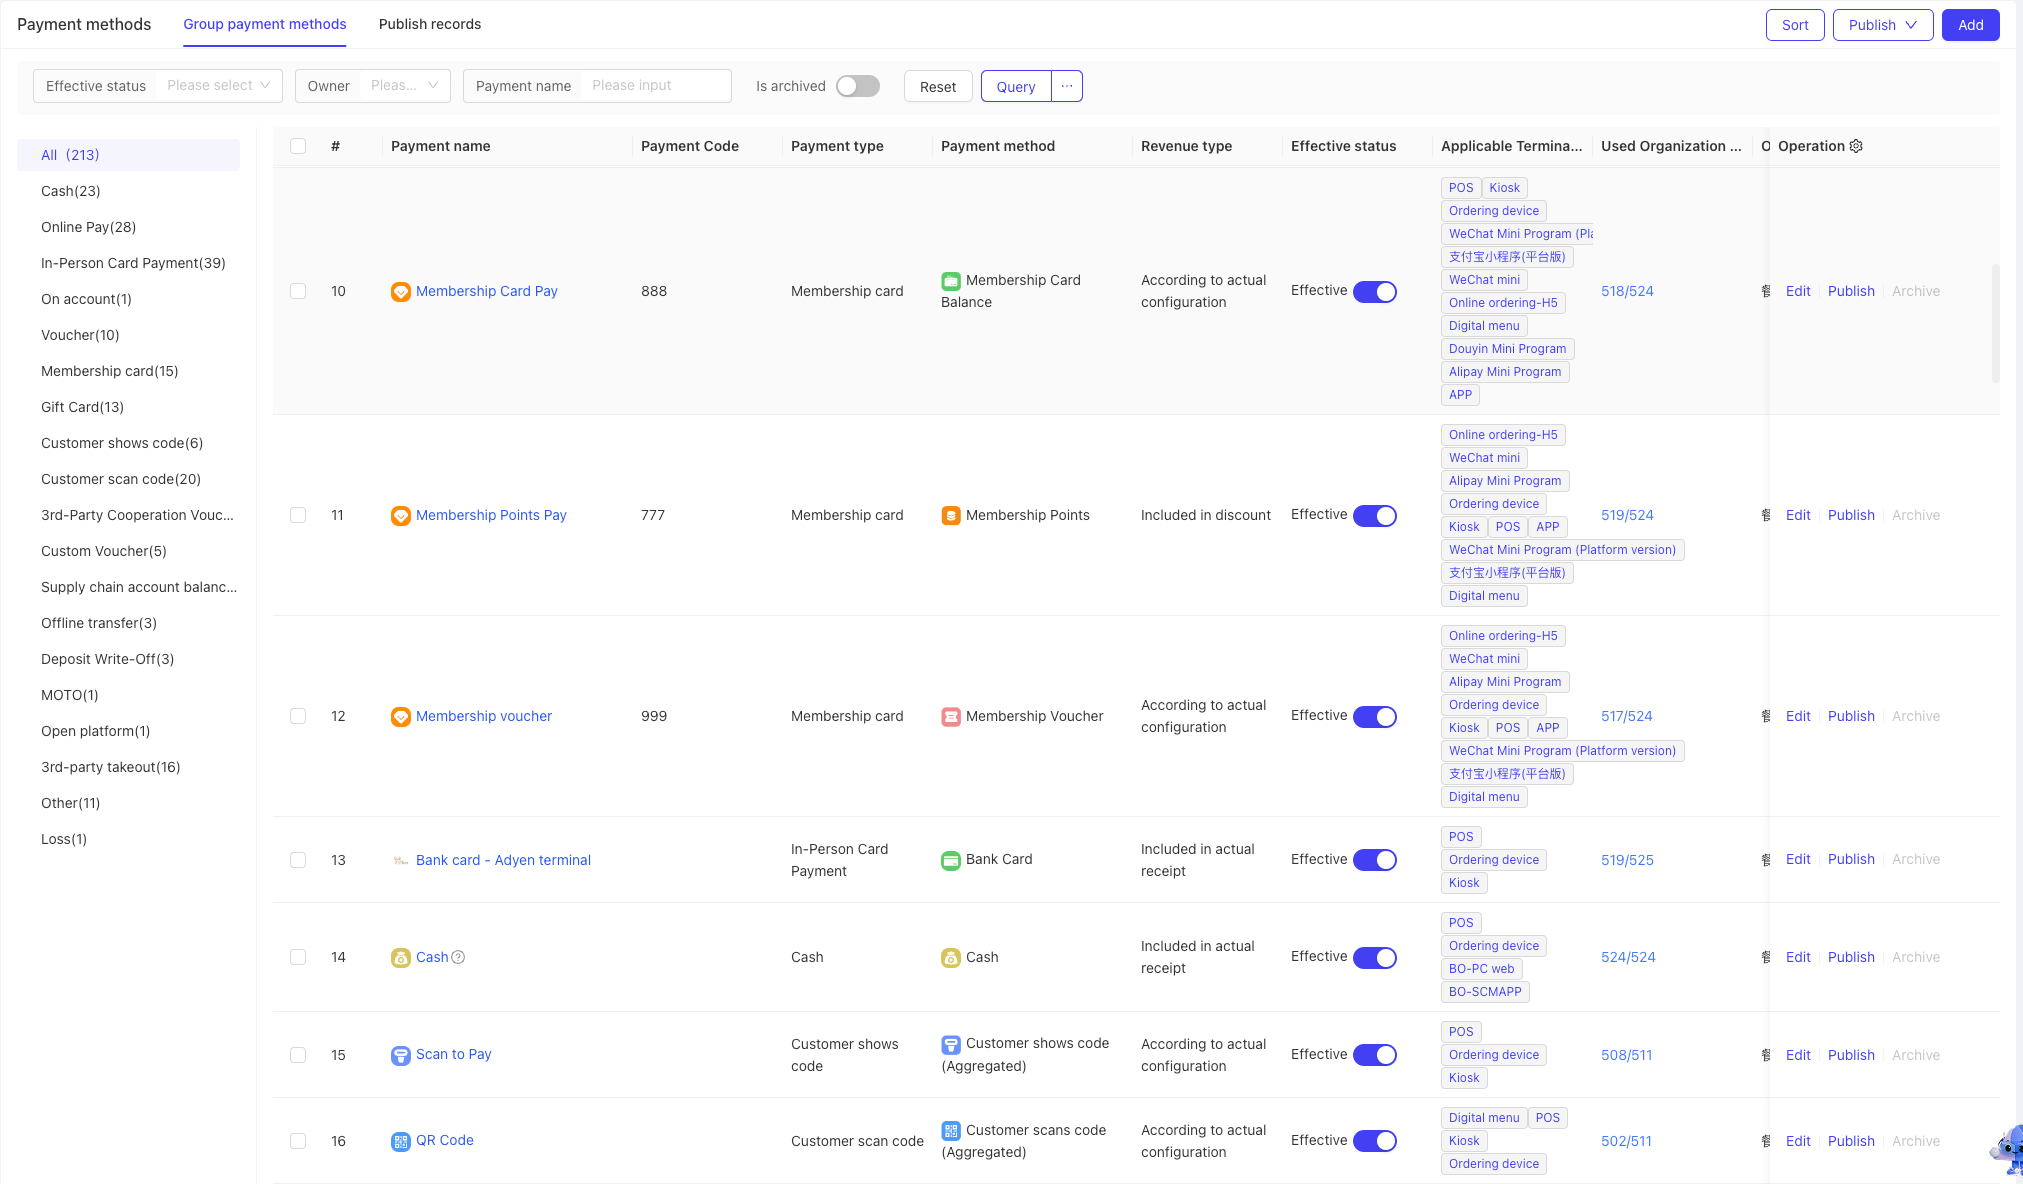
Navigate to the menu path: Operation Management > Financial Management > Payment Methods > Payment Method Management. This page displays all payment methods supported by the group, which are generally pre-configured by the system for the group.
-
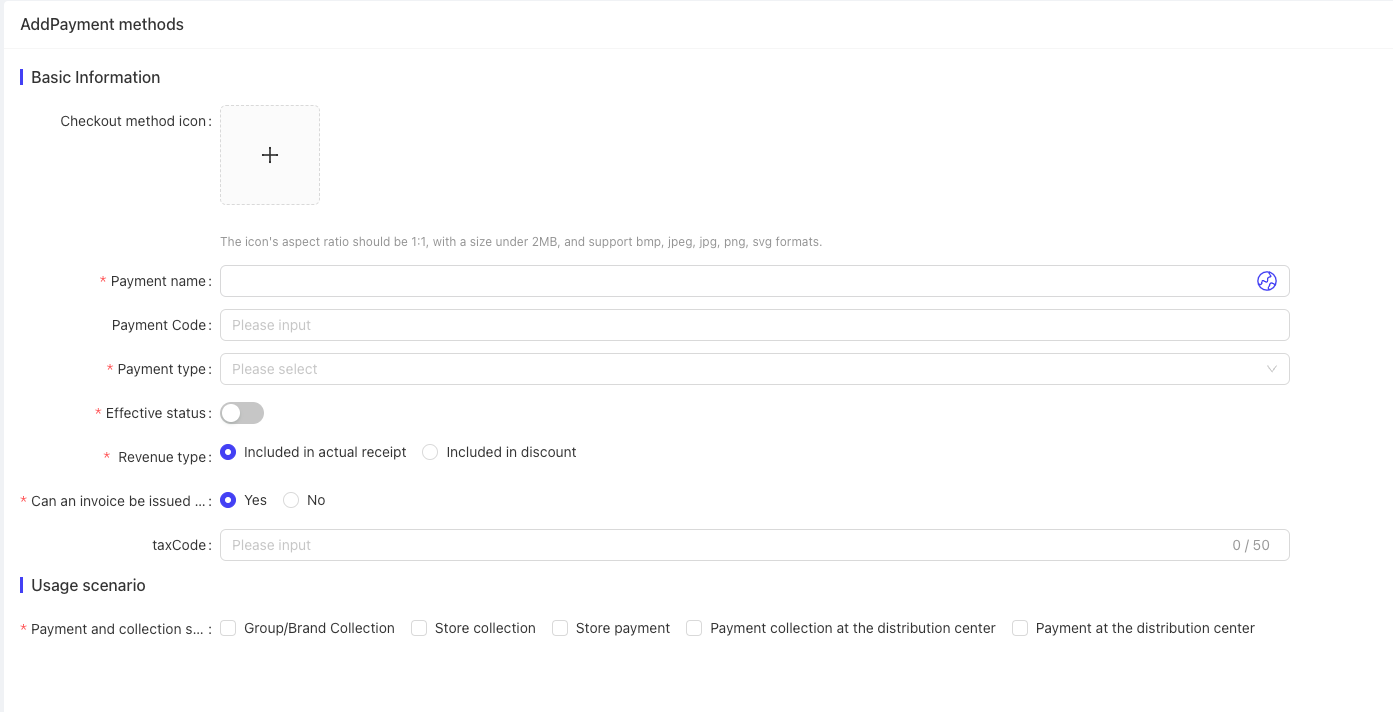
Click the Add button in the upper right corner to open the Add Payment Method interface:
- In the Basic Information section, select one payment type from the Payment Type dropdown, such as voucher, card payment, bank transfer, or cash. Configure additional settings including Active Status, Revenue Recognition Rules, and Invoice Eligibility for Actual Receipts.
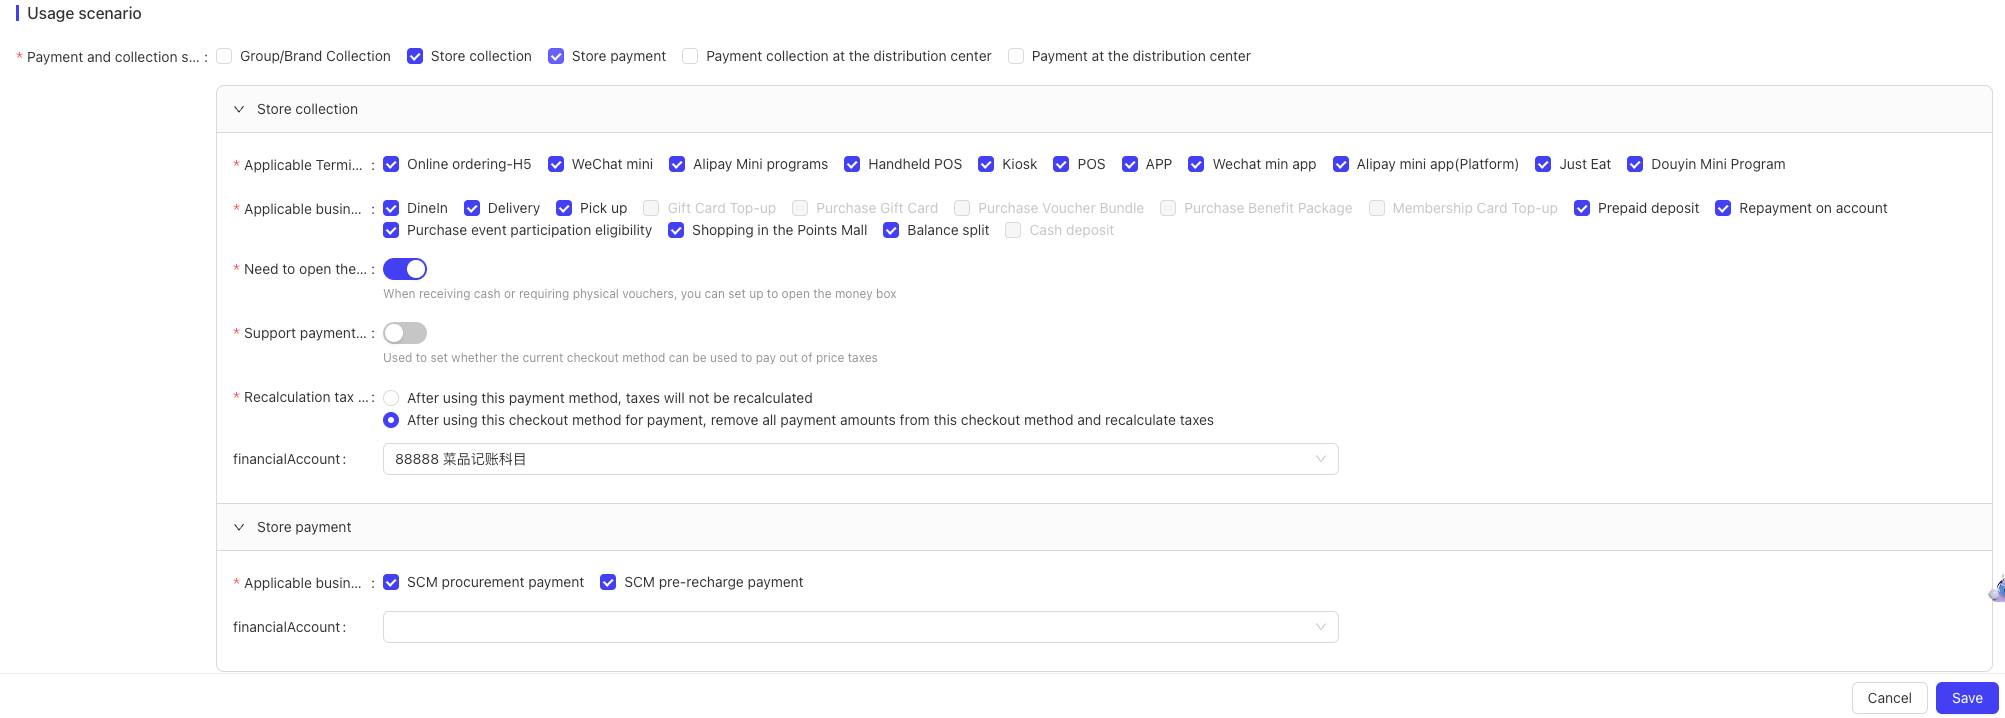
- In the Applicable Scenarios section, select scenarios such as Group/Brand Collection, Store Collection, Distribution Center Collection, or Distribution Center Payment. When a scenario is selected, you need to configure Applicable Terminal Channels, Applicable Business Types, Cash Drawer Requirement, and Accounting Subject. Note that configurable items vary by scenario, with options tailored to the specific use case. Multiple scenarios, channels, and business types can be configured simultaneously.
-
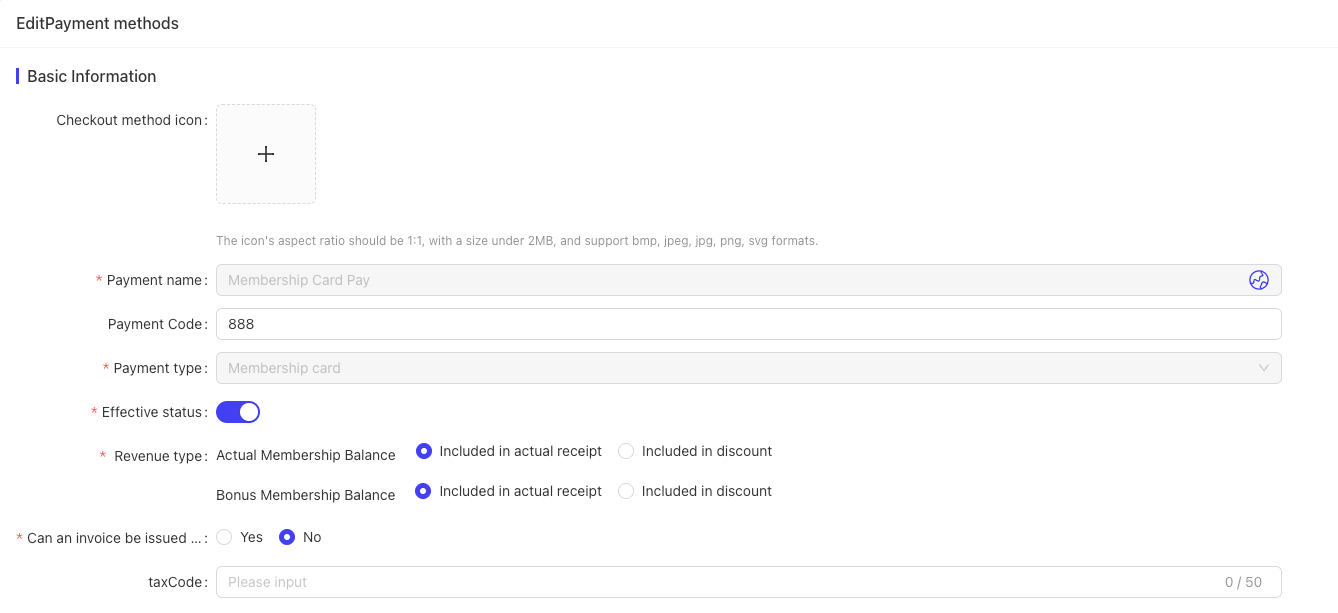
Click the Edit button next to an existing payment method to open the edit interface:
- Modify settings in the Basic Information section (e.g., active status, revenue recognition rules, invoice eligibility) and reconfigure applicable scenarios as needed.
- Modify settings in the Basic Information section (e.g., active status, revenue recognition rules, invoice eligibility) and reconfigure applicable scenarios as needed.
-
After configuring payment methods, non-system-integrated payment methods (i.e., methods used only for accounting purposes) are marked with a question mark icon in the list. Hovering over the icon displays relevant prompts. You can use the Distribute function to push payment methods to stores or distribution centers. Note: Only payment methods owned by the current perspective or its upper-level perspectives can be distributed.
- Groups: Can only distribute payment methods owned by the current group.
- Brands: Can distribute payment methods owned by the affiliated group and the current brand.
- Franchisees: Can distribute payment methods owned by the affiliated group, affiliated brand, and the current franchisee.
-
The system allows merchants to create custom payment methods, such as Cash, Offline Card Payment, or Third-Party Cooperative Voucher. Custom payment methods default to the Resto Payment Method type—these methods have a payment type assigned but no sub-type, and they do not go through the platform payment system; instead, they are processed via other platform systems or used only for accounting.
-
The Payment Method field in the payment method configuration specifies the Resto payment method used by RestoSuite to initiate payments. This is a pre-configured payment method in the OM environment, corresponding to the actual payment method returned by third-party payment gateways.
-
Operation Permissions by Perspective (Payment Method List Page) For each payment method entry, operation buttons are displayed in the right-hand column only if the user has corresponding permissions; otherwise, no buttons are shown. Authorized operations include View Details and Toggle Active Status.
-
Navigate to Operation Management > Financial Management > Payment Methods > Store Payment Methods to view all payment methods configured for stores under the group. This page is view-only—all configurations must be performed in the Payment Method Management page.To add a payment method for a specific store:
- Switch to the Store Perspective.
- The Add button will now be visible. Enter or select the required information: Payment Method Name, Payment Type, Revenue Recognition Rules, Payment/Collection Scenarios, and related configurations.
- Submit to complete the creation. The new payment method will be owned by and applicable only to the current store.
-
Navigate to Operation Management > Financial Management > Payment Methods > Distribution Center Payment Methods to view all payment methods configured for distribution centers under the group. This page is view-only—all configurations must be performed in the Payment Method Management page.
-
Payment Process in Cashier SystemWhen an order is generated and enters the cashier system, the system displays available online payment methods (e.g., WeChat Pay, Alipay, Corporate Transfer, Bank Card) based on the order details and payment method parameters.
- Select a payment method, check the Agree to Terms box, and click Pay Now.
- The system calls the payment gateway interface. If successful, it redirects to the third-party payment interaction page.
- The user enters payment credentials (e.g., password) and submits the payment.
- The cashier system displays the payment result based on the status returned by the payment gateway.
- After successful payment, the cashier system automatically redirects to the business-side success page (e.g., Order Success Page, Order List Page, or Order Details Page), as determined by the business module.
3 Collection Accounts
-
Switch to Group Perspective
- Log in to the Merchant Backend as a group administrator, then switch to the Group Management Perspective via the perspective switch button in the upper right corner.
- Definition: A collection account is a merchant account activated through a third-party payment gateway for receiving funds. To create a collection account:
- Submit the required documentation to apply for account activation via the platform’s partnered payment gateways.
- Once approved and signed by the payment gateway, the collection account becomes active.
- Both enterprise and sole proprietorship accounts are supported.
-
Navigate to Operation Management > Financial Management > Collection Management > Collection Accounts to view collection account information across different payment platforms.
-
Two Account Activation Methods:
- Redirect Method (e.g., Alipay): Users are redirected to the external Alipay platform to complete the signing process.
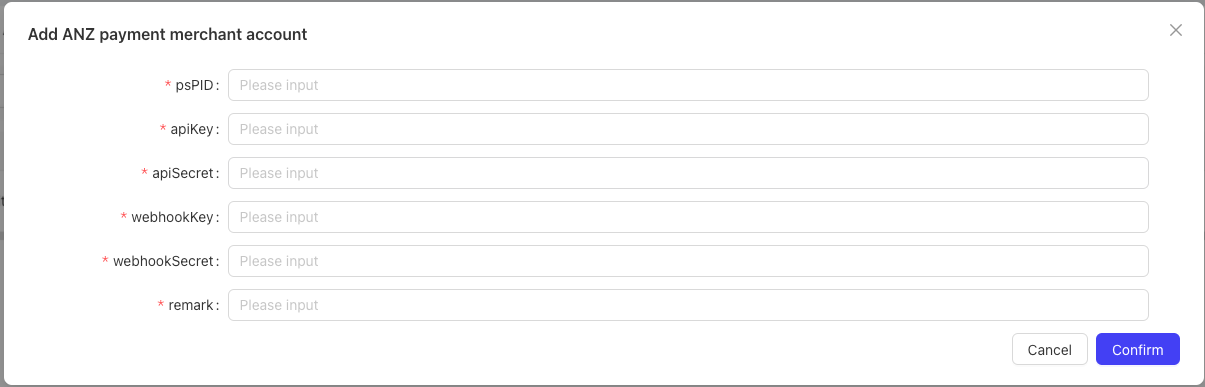
- Direct Configuration Method: Users enter account credentials (e.g., Account ID, API Key, Merchant Number, Token) directly on the platform, which are then submitted to the external payment system for signing.
-
Relationships and Configuration Logic:
- Collection accounts have no direct association with RestoSuite organizations (groups, brands, stores, distribution centers) or business modules. They must be linked to specific business scenarios of an organization via the Collection Configuration function.
- For overseas collection configuration: Currently, business modules are directly linked to collection accounts. After the system upgrade, the logic will be updated to link business modules to collection principals, which will then route payments to the corresponding collection accounts.
- Current Support: Merchants can directly add or apply for activation of direct-connected collection accounts and Adyen accounts in the Collection Accounts page. For SunPay and WeChat Pay, accounts must be added and activated via the Collection Principal page.
4 Collection Principals
-
Switch to Group Perspective
- Log in to the Merchant Backend as a group administrator, then switch to the Group Management Perspective via the perspective switch button in the upper right corner.
-
Navigate to Operation Management > Financial Management > Collection Management > Collection Principals to view all collection principals configured for the group.
-
Add and Configure Collection Principals:
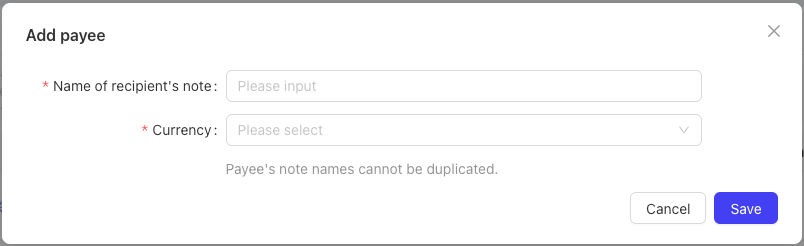
- Click Add Collection Principal in the upper right corner. Enter a Remarks Name, select a Currency, and click Save.
- After creation, you need to bind a payment gateway. Click the payment gateway to start binding—the Collection Account dropdown in the binding dialog will display merchant accounts configured in the Collection Accounts page. Select an account and confirm to complete binding.
- Binding can be removed in the list on the Collection Principal Details page. The details page also allows configuring payment gateway priorities.
-
Real-Name Authentication Requirements:For payment gateways requiring real-name authentication (e.g., SunPay, WeChat Pay), users must first complete the authentication process via Collection Principal Real-Name Authentication:
- Submit documentation consistent with the mini-program’s principal information (principal types: Micro Merchant, Individual Merchant, Enterprise, Qualification Reuse).
- Enter business license information and other required documents in the Principal Real-Name Authentication page.
- Submit the information to the external authentication system. Only after approval can the payment gateway be bound.

-
Preconfigured Principals:Click Preconfigure Principal in the upper right corner—the system will automatically generate a SunPay collection principal. This type of principal is non-editable and is pre-authenticated for SunPay, WeChat Pay, and Alipay. It becomes active immediately after preconfiguration.

-
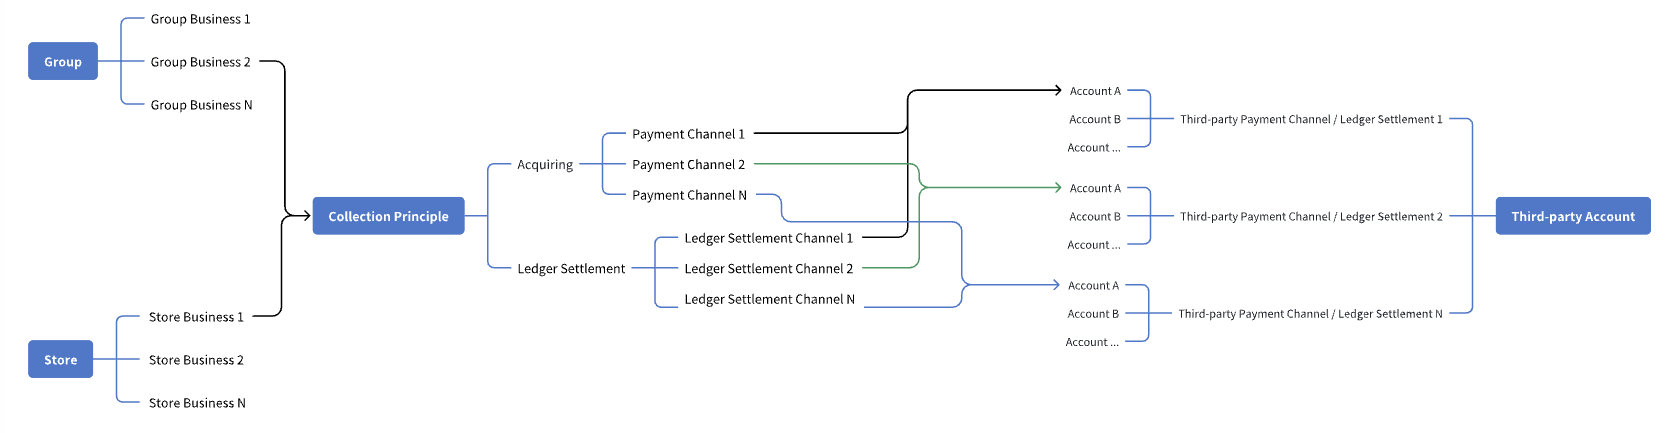
Relationship Diagram: Group (Store), Collection Principal, and Third-Party Account
5 Collection Configuration
-
Switch to Group Perspective
- Log in to the Merchant Backend as a group administrator, then switch to the Group Management Perspective via the perspective switch button in the upper right corner.
-
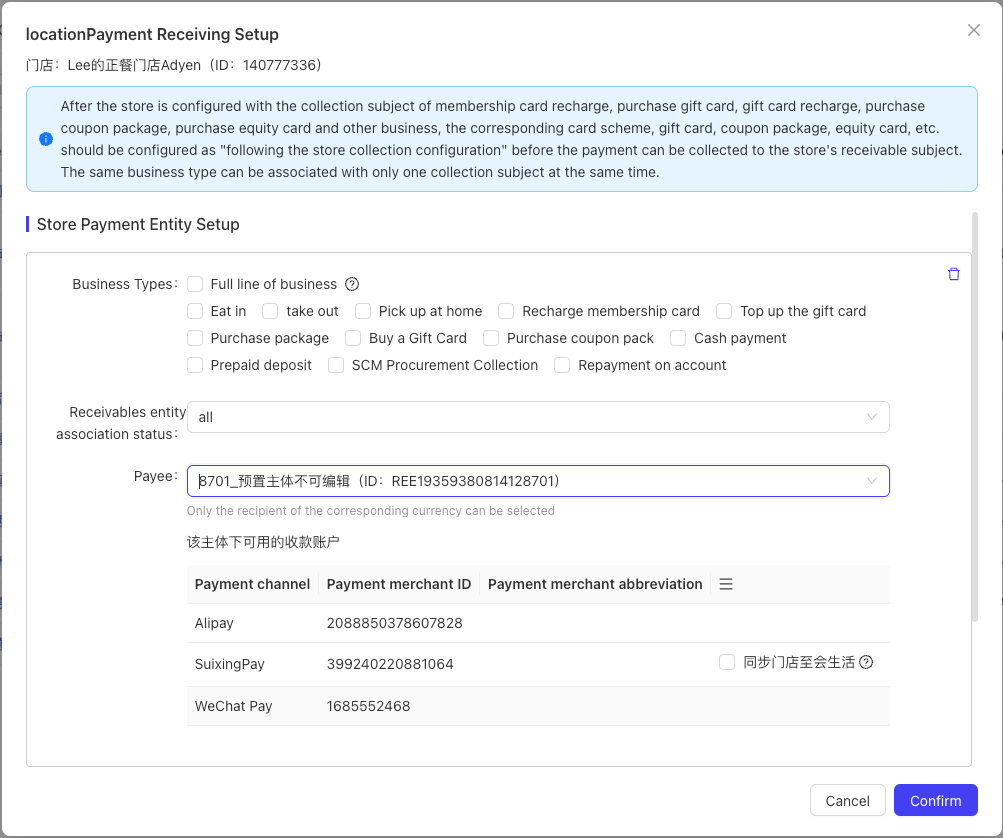
Navigate to Operation Management > Financial Management > Collection Management > Payment/Collection Configuration to view the association between business types and collection principals configured for the group.
-
The platform supports collection configuration for all fund-related scenarios, including: Group, Store, Card Scheme, Gift Card, Benefit Package, Voucher Package, Points Mall, Paid Activity, Distribution Center, and Supplier.
-
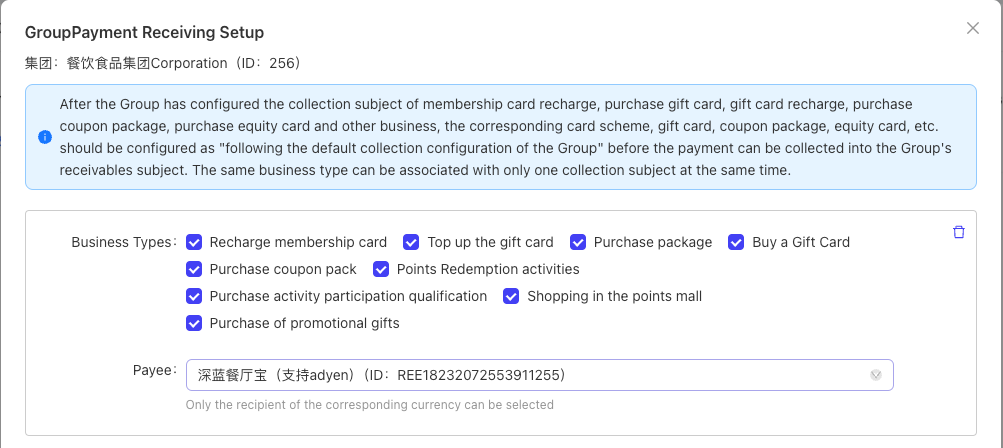
Group-Level Configuration:Supported business types include: Gift Card Recharge, Gift Card Purchase, Voucher Package Purchase, Benefit Package Purchase, Membership Card Recharge, Activity Participation Qualification Purchase, Activity Gift Purchase, Points Redemption Activity, and Points Mall Shopping.
- You can configure a separate collection principal for each business type, or use the same collection principal for all business types.
-
Key Notes for Group Configuration:After configuring collection principals for business types such as Membership Card Recharge, Gift Card Purchase, or Voucher Package Purchase, the corresponding card schemes, gift cards, voucher packages, and benefit cards must be set to Follow Group Default Collection Configuration to ensure funds are received by the group’s designated collection principal. Only one collection principal can be associated with a single business type at any time.
-
Store-Level Configuration:Supported business types are store-specific scenarios, including: Dine-In, Takeaway, and Self-Pickup.
- Key Notes: After configuring collection principals for store-level business types, the corresponding card schemes, gift cards, voucher packages, and benefit cards must be set to Follow Store Collection Configuration to ensure funds are received by the store’s designated collection principal. Only one collection principal can be associated with a single business type at any time.
-
Store-Level Configuration - Ledger Principal Section:
- Select a Ledger Principal—the system will automatically display available collection accounts under this principal.
- Click Batch Configure in the upper right corner to open the batch configuration dialog. Select multiple stores, multiple business types (or All Businesses), a collection principal, and a ledger principal, then save the configuration.
-
Configuration for other business types follows the same logic and will not be repeated here.
-
Post-Configuration Effect:When a fund transaction occurs under a configured business type, the cashier system will display available payment methods based on the collection principal configuration. Post-payment, transaction data will be aggregated and reported according to the configuration.
6 Configuration Example
Relationship Diagram: Payment Gateway & Payment Method Association
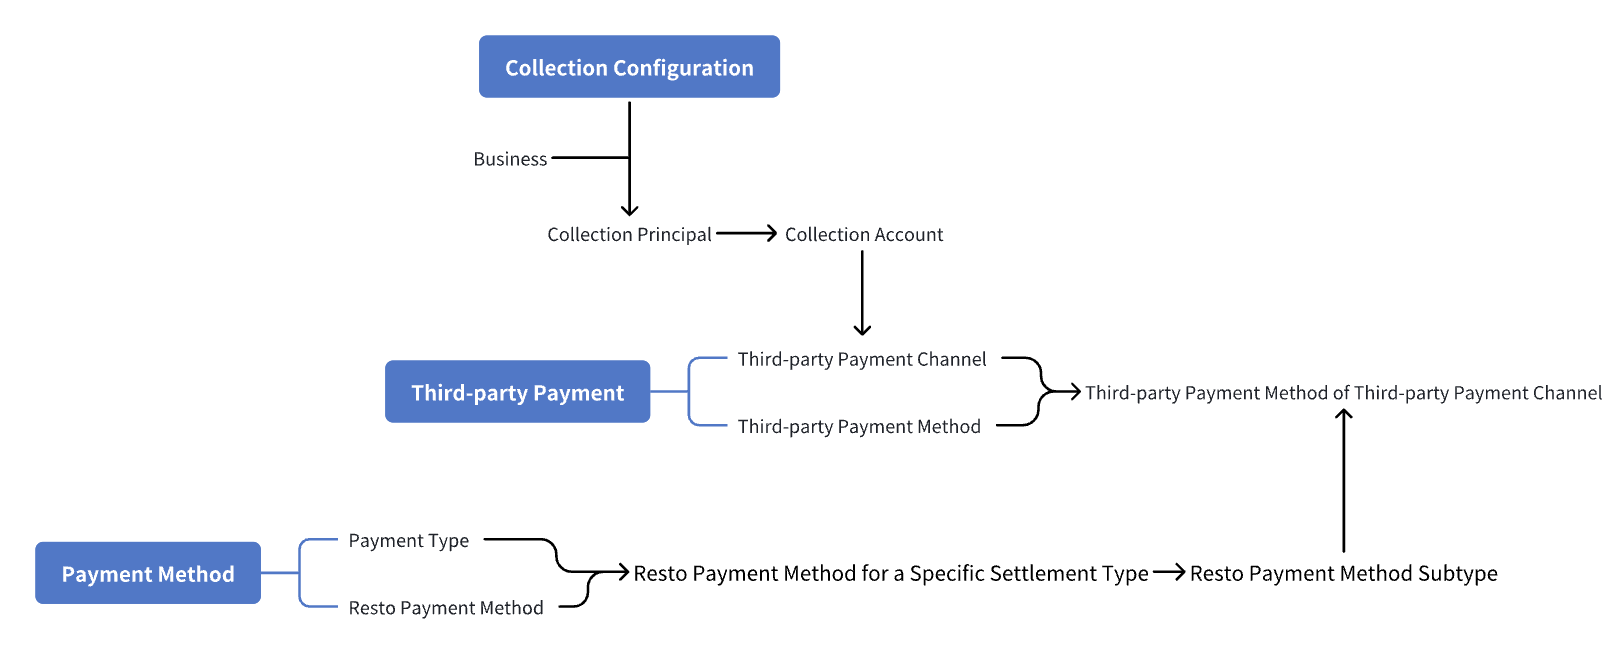
Configuration Steps for SunPay Support:
- First, add a SunPay-type collection account in Financial Management > Collection Management > Collection Accounts.
- Then, in Financial Management > Collection Management > Collection Principals, create a new collection principal and bind the SunPay collection account in the Merchant Direct-Connected Collection Account section (this establishes the association between the collection account and the collection principal).
- Finally, in Financial Management > Collection Management > Payment/Collection Configuration, switch to the Store Collection Configuration tab, locate the target store, and click Configure in the list to open the Collection Configuration dialog. Select the collection principal corresponding to the business type (Dine-In, Takeaway, Self-Pickup). After configuration, payments for the selected business types will be processed via SunPay.(Logic: Collection Principal is bound to SunPay payment gateway → Store business scenarios are bound to the Collection Principal)
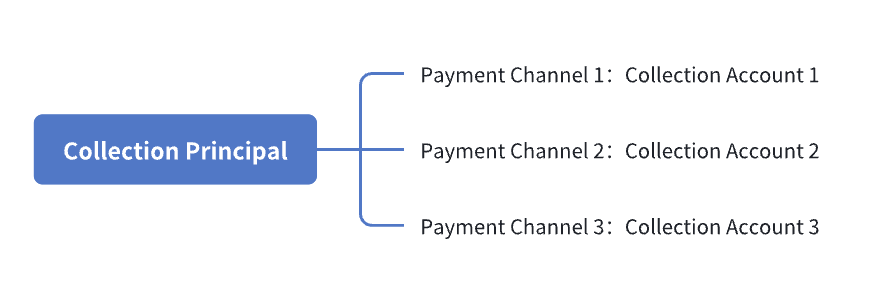
- Relationship Diagram: Collection Principal & Collection AccountPayment gateways are divided into two types:
- Collection Accounts (accounts activated via application or authorization)
- Merchant Direct-Connected Collection Accounts (accounts bound to existing merchant accounts)
7 Payment Terminals
-
Switch to Group Perspective
- Log in to the Merchant Backend as a group administrator, then switch to the Group Management Perspective via the perspective switch button in the upper right corner.
-
Navigate to Operation Management > Financial Management > Collection Management > Payment Terminals to query payment terminal information, including: Payment Gateway, Terminal Model, Terminal SN, Terminal Number, Allocation Status, Store, Collection Principal, WIFI Information, Ethernet Information, Cellular Network, Bluetooth, Firmware Version, and Activity Time.
-
Supported operations include Update, Configure, and Cancel Allocation. During configuration, select a store and a collection principal. Cancel Allocation will unassign the terminal from the specified store.
8 Refund Rules
-
Switch to Group Perspective
- Log in to the Merchant Backend as a group administrator, then switch to the Group Management Perspective via the perspective switch button in the upper right corner.
-
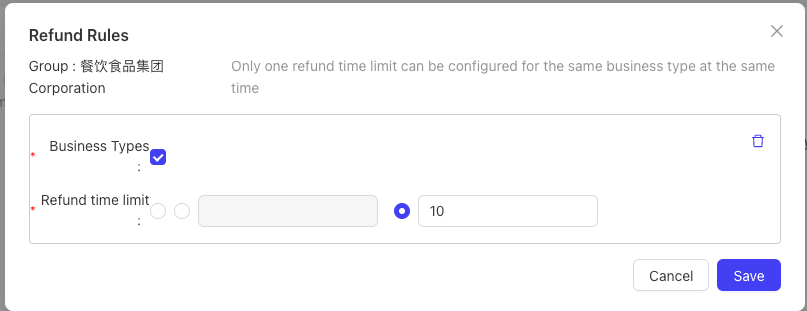
Navigate to Operation Management > Financial Management > Refund Rules > Refund Configuration. Currently, the system only supports configuring refund rules for the Benefit Package Purchase business scenario:
- Set a Refund Validity Period (specified number of days or unlimited).
- Unlimited Validity: No platform-imposed time limits—refund rules follow the third-party payment gateway’s policies.
- Calendar Month/Day: Includes the current calendar month/day. For example, a 1-calendar-month validity means refunds are only allowed within the current month; a 1-calendar-day validity means refunds are only allowed on the transaction day.
-
For other transactions processed via third-party payment gateways, refund validity periods follow the gateway’s policies and do not require configuration on the platform.
9 Financial Archives
-
Switch to Group Perspective
- Log in to the Merchant Backend as a group administrator, then switch to the Group Management Perspective via the perspective switch button in the upper right corner.
-
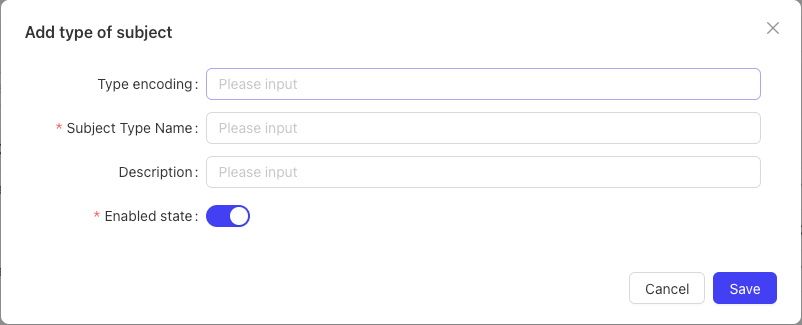
Navigate to Operation Management > Financial Management > Financial Archives > Account Subject Types to add a new account subject type: Enter the Name and Code, then click Save.
-
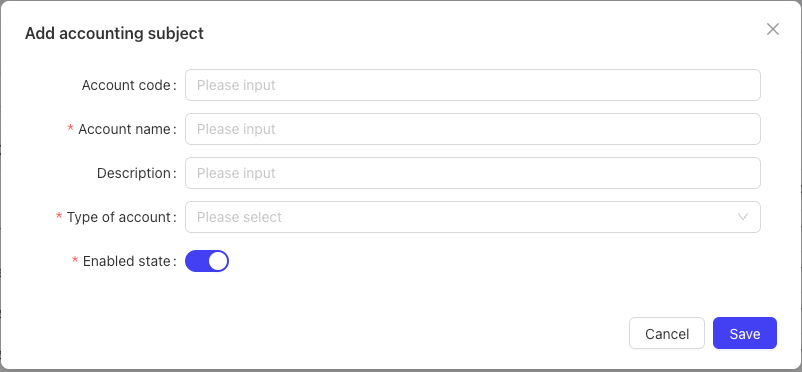
Navigate to Operation Management > Financial Management > Financial Archives > Accounting Subjects to add a new accounting subject: Enter the Subject Name and Code, select an Account Subject Type, then click Save.
-
Usage of Subject Information:Accounting subjects are used for report statistics and can be associated with payment methods or menu items, enabling multi-dimensional financial data analysis (e.g., sales revenue, costs, liabilities).
-
Navigate to Operation Management > Financial Management > Financial Archives > Exchange Rate Settings to add exchange rate information to the rate table:Select the Rate Table, Original Currency, Target Currency, Direct Exchange Rate, Indirect Exchange Rate, Effective Date, and Activation Status. Exchange rates can be maintained for different dates, with the constraint that no duplicate effective dates are allowed for the same currency pair within a single rate table.

-
Deletion Validation Rules for Exchange Rates:When deleting exchange rate information, the system will check for existing references:
- If references exist, a pop-up will notify the user of the referenced relationships.
- If no references exist, the system will check if the exchange rate details are in use:
- If in use: A prompt will appear: Exchange rate details are in use. Cannot delete the current rate table.
- If not in use: A prompt will appear: Deletion successful.
10 Ledger Management
-
Module Purpose:Enables self-service or manual fund ledger settlement between stores and the group (or vice versa), based on business transaction data (bank support is required for this function).
-
Scenario Examples:
- A headquarters and its franchisee agree on a revenue share based on store transaction data. For example, on the 10th of each month, the system calculates the total revenue of the previous month and automatically transfers 3% of the revenue from the store’s account to the headquarters’ account as a service fee.
- The headquarters controls store funds—membership recharge funds from franchise stores are paid to the headquarters’ account. The group then periodically transfers a portion of the funds back to the store’s account based on member consumption data at the store.
-
Switch to Group Perspective
- Log in to the Merchant Backend as a group administrator, then switch to the Group Management Perspective via the perspective switch button in the upper right corner.
-
Navigate to Operation Management > Financial Management > Ledger Management > Fund Item Management to manage funds subject to ledger settlement. You can add new fund items with the following configurations:
- Fund Item Type: Supports Membership Recharge Consumption Settlement, Revenue Settlement, Payment Transaction Flow, and Voucher Redemption Settlement.
- Settlement Direction: Store to Headquarters or Headquarters to Store.
- Applicable Currency.
- Settlement Rule Configuration (varies by fund item type):
- Voucher Redemption Settlement: Supports settlement for cash vouchers, discount vouchers, product exchange vouchers, and buy-one-get-one-free vouchers. Select coupons under the group and set the settlement method to Proportional or Fixed Amount.
- Membership Recharge Consumption Settlement: Configure settlement ratios for Recharged Amount Consumption and Bonus Amount Consumption for different card schemes.
- Membership Recharge Consumption Settlement: Differentiate by business day or settlement day, business type, and settlement scope. Tiered settlement rules are also supported.
- Payment Transaction Flow: Settle transaction flows by payment type, such as Dine-In, Takeaway, or Self-Pickup.
-
Navigate to Operation Management > Financial Management > Ledger Management > Ledger Settlement Plan to create settlement plans by associating fund items with stores. To add a new plan:
- Select the Currency and Headquarters Settlement Account.
- Select the target transaction stores.
- Set the Bill Generation Timing.
- Select Settlement Fund Items (configured in Fund Item Management).
- Choose the Settlement Method: Automatic or Manual.
- Set the Billing Cycle, Effective/Expiry Date, and Auto-Debit Settings (Auto-Debit, Debit Method, Daily Debit Cap).
- Save the plan after completing all configurations.
- The corresponding ledger account can be selected and associated in the Collection Principal function. Ledger accounts are also displayed in the Payment/Collection Configuration details page for settlement calculation and reconciliation after activation.
-
Navigate to Operation Management > Financial Management > Ledger Management > Ledger Bills to view bills generated automatically or manually by the settlement plan. A separate bill is created for each store in the plan per batch. Supported operations include Issue Bill to Store, Batch Recall, Batch Debit, Confirm Payment/Receipt, Create Bill, and Supplement Bill. When a bill is issued to a store, it becomes visible in the store perspective.
-
Detailed Operations:
- Batch Issue: Available for bills in the Unissued status. Issues accounts receivable/payable bills to stores.
- Batch Recall: Recalls issued bills. Unissued or fully reconciled bills cannot be recalled.
- Batch Debit: Debits funds for issued but unreconciled bills.
- Confirm Payment/Receipt: Valid only if:
- Bill type matches the store type.
- Business type matches the bill type.
- Total unreconciled amount matches the requested reconciliation amount.
- Received amount = Bill amount - Allowance amount.Upon confirmation, the system updates the Accounts Receivable/Payable Table, Reconciliation Table, Collection Table, Payment Table, Collection Reconciliation Table, Payment Reconciliation Table, Collection Settlement Table, and Payment Settlement Table.
- Create/Edit Bill: Bills can be edited only if the bill number is unique and the bill status is Unissued.
- Supplement Bill: Used to compensate for missing stores or incorrect billing dates by recalculating bills for the missed scope.
-
Voucher Redemption Settlement Scenario:The headquarters launches a marketing campaign and issues vouchers to customers. After customers redeem vouchers at stores, the headquarters settles with stores based on a fixed amount or the voucher’s discount value. The settlement direction is Headquarters to Store.
-
Navigate to Operation Management > Financial Management > Ledger Management > Bill Batches to query the settlement status of different bill batches and view bill details.
-
Use the Ledger Fund Item Details Report and Ledger Payment Details Report to query detailed settlement records.
-
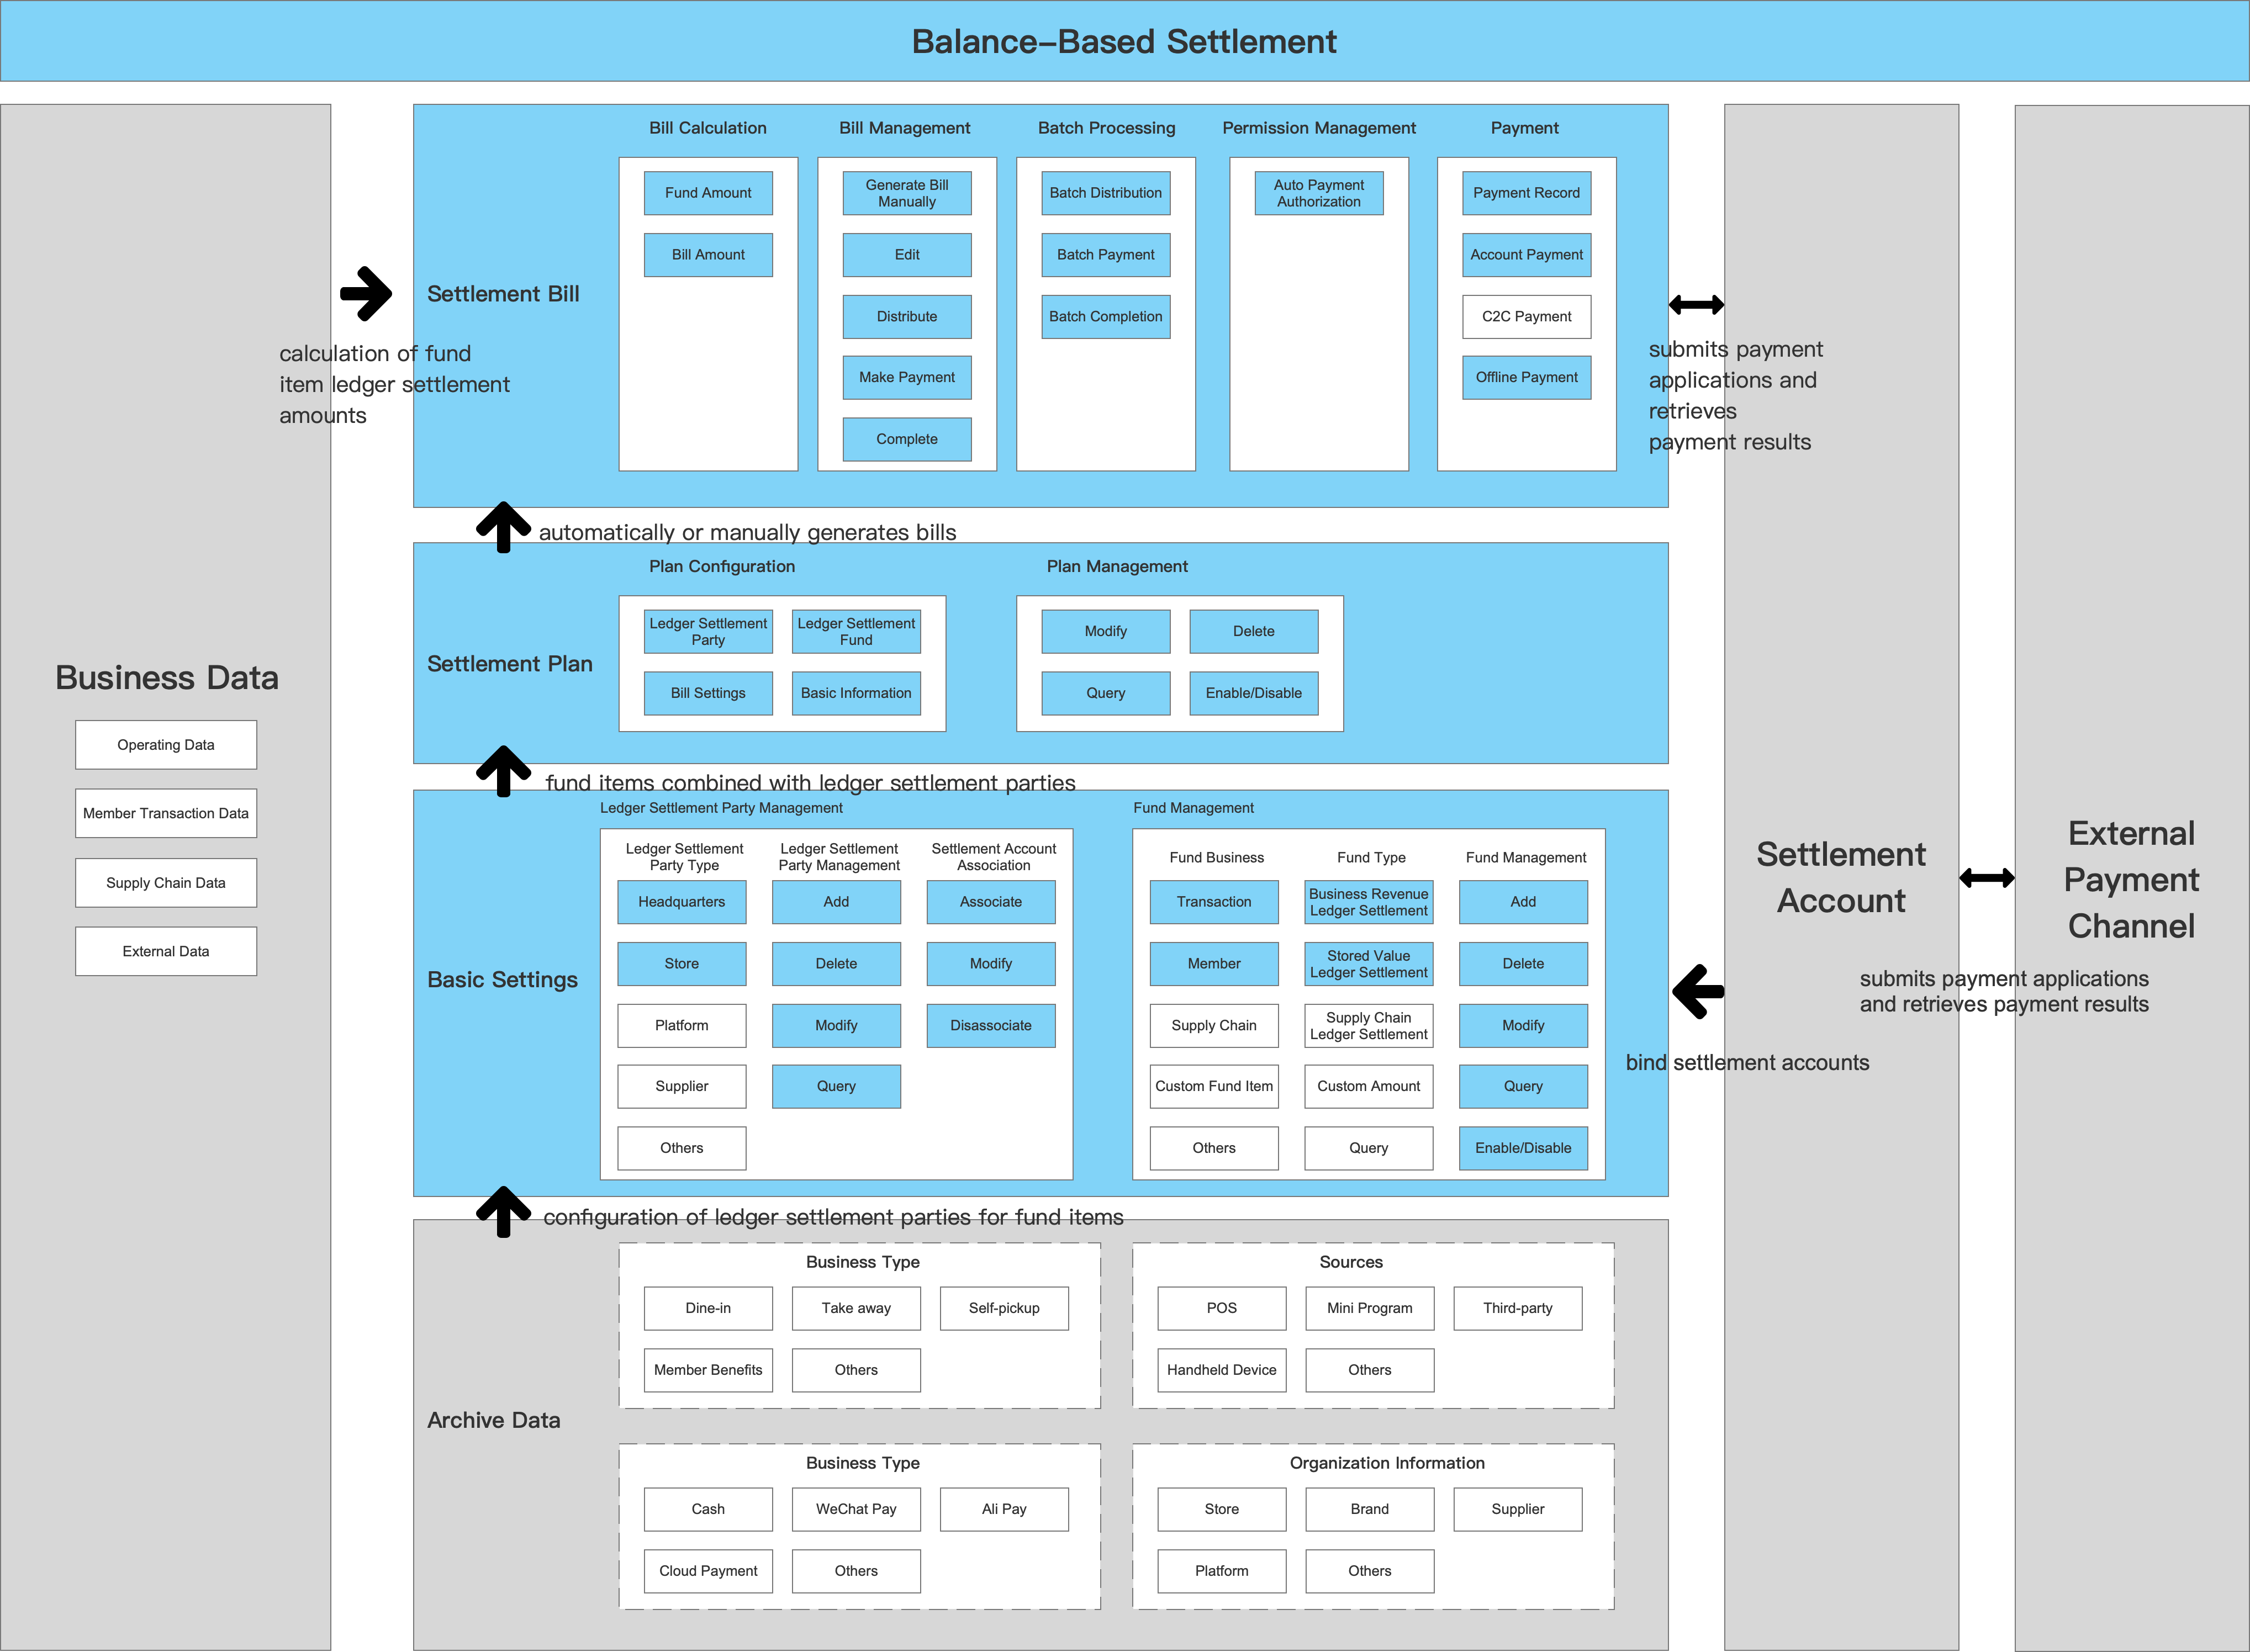
Ledger Product Structure Diagram
11 Credit Management
-
Definition: Credit is a built-in payment method exclusively for POS billing scenarios. As a special payment method, selecting Credit at the POS will automatically calculate discounts after querying the customer or credit account holder.
-
Switch to Group Perspective
- Log in to the Merchant Backend as a group administrator, then switch to the Group Management Perspective via the perspective switch button in the upper right corner.
-
Navigate to Operation Management > Financial Management > Credit Management > Credit Customer Management to add new credit customer information:
- Select the customer type: Enterprise Customer or Individual Customer.
- Enter customer details: Name, Code, ID, Contact Phone Number, Country, and Currency.
- Configure credit rules: Business Start/End Date, Credit Limit, Default Consumption Discount, Auto-Bill Generation Settings, Bill Due Date, and Consumption Scope.
- Record invoicing information, bank details, and discount plans.
- After creation, customers can be edited or deleted.
-
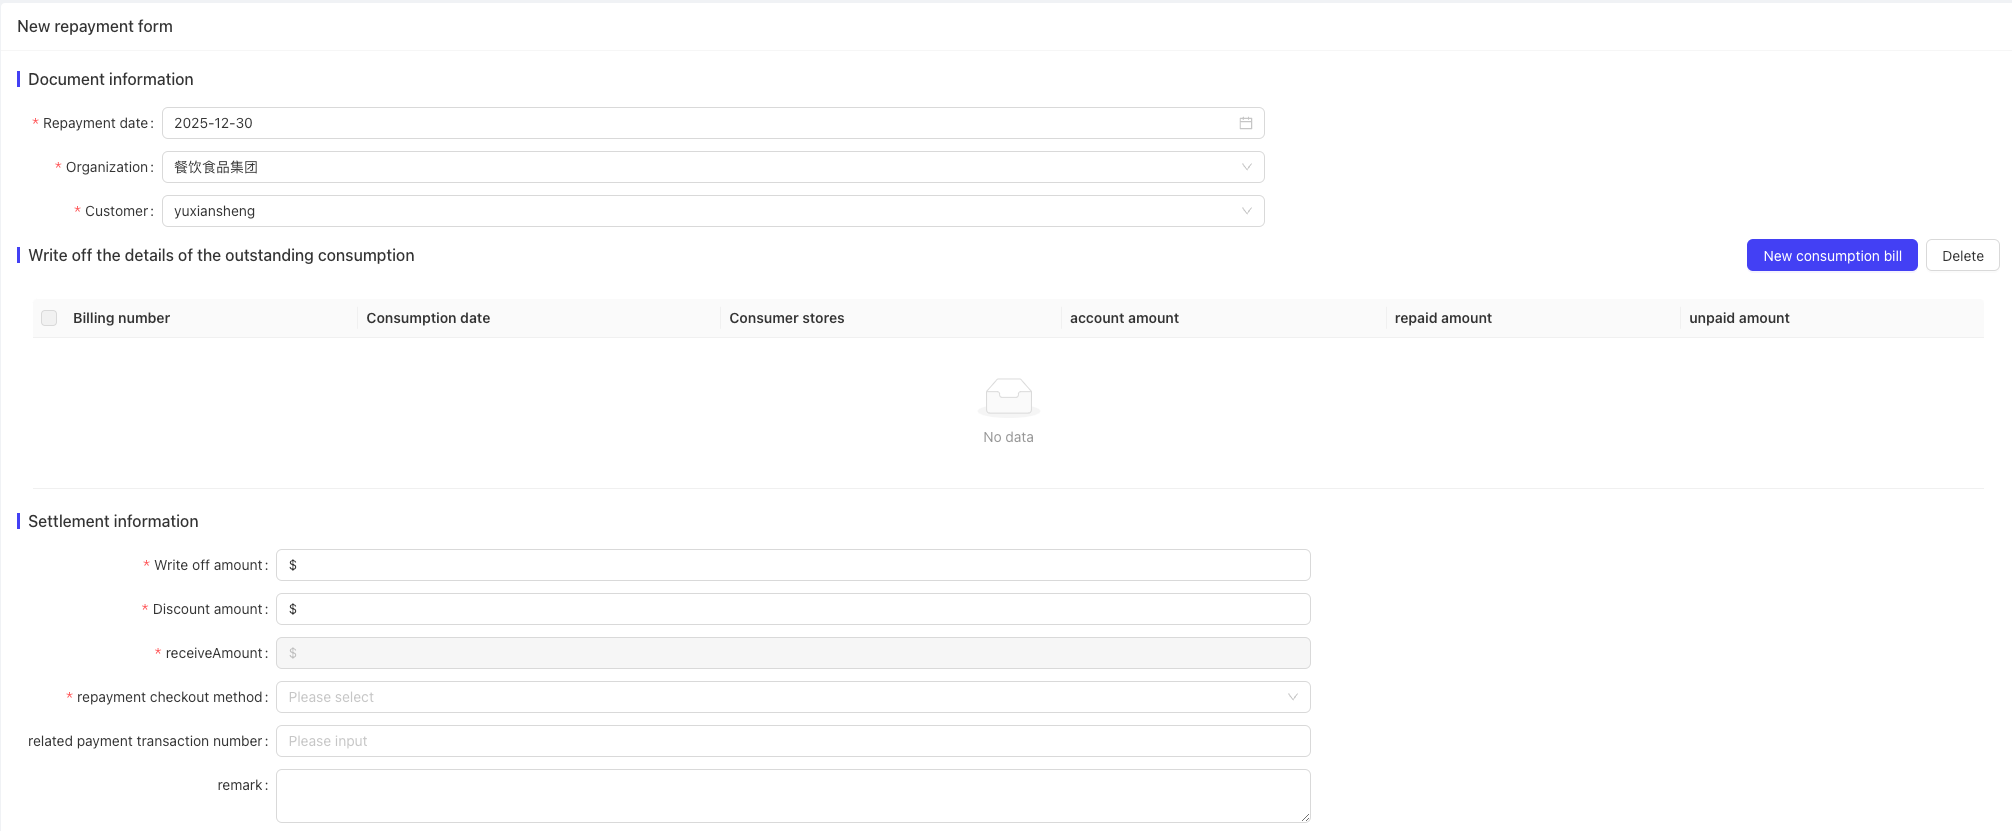
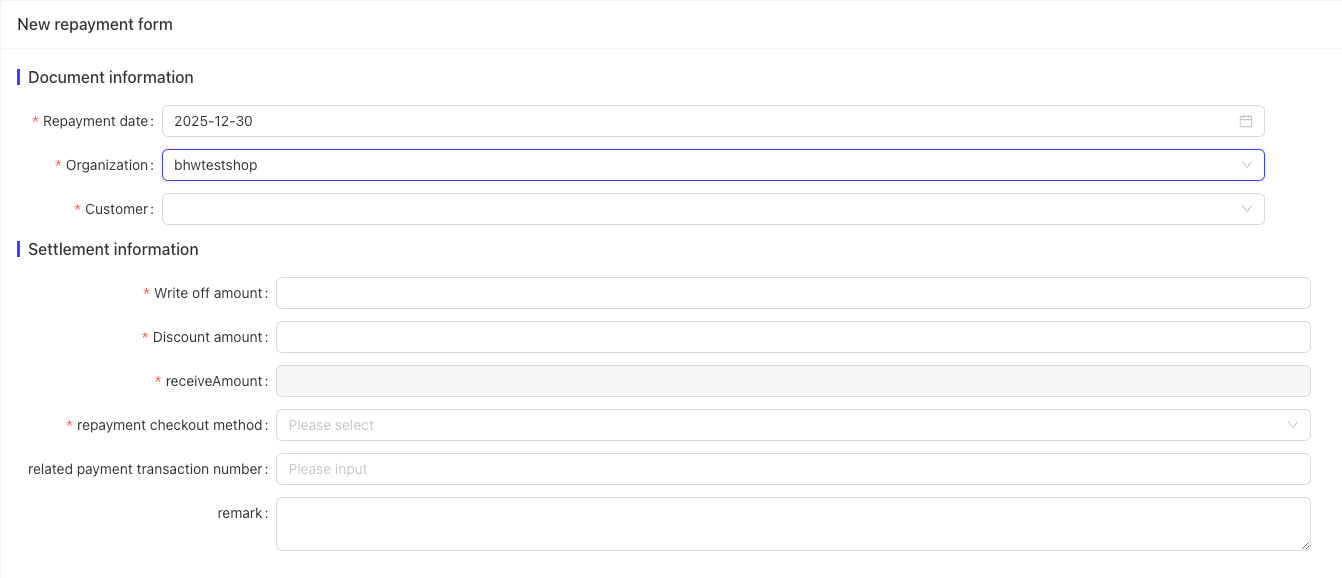
Create Repayment Orders in Credit Customer Management:
- Click to add a new repayment order.
- Fill in Document Information: Repayment Date, Affiliated Organization, and Customer.
- In the Reconcile Credit Consumption Details section, add consumption bills.
- Fill in Settlement Information: Reconciliation Amount, Discount Amount, Received Amount, select a Repayment Payment Method, and enter the Associated Payment Transaction Number.
- Submit to create the repayment order.
-
Navigate to Operation Management > Financial Management > Credit Management > Credit Repayment to add new repayment orders:
- Select the Repayment Date, Affiliated Organization, and Customer—the system will display Reconcile Credit Consumption Details.
- Click Add Consumption Bill in the section to select corresponding bill information.
- In the Settlement Information section, enter the Reconciliation Amount, Discount Amount, select a Repayment Payment Method, and save to generate the repayment order.
-
Credit Repayment Process (System-Automated):The system scans for eligible repayment orders (including POS transactions and backend-created orders) based on scheduled polling rules. If a customer has outstanding dues:
- Click Repay to select pending bills.
- Choose a payment method, enter the repayment amount and allowance amount, and confirm.
- BO Perspective Support: Cross-store repayment is allowed. Repayments are recorded for accounting purposes only and do not involve integrated or aggregated payment methods.
-
Credit Repayment Process (POS Terminal):
- Access Customer Management via the More menu.
- If a customer has outstanding dues, click Repay to select pending bills.
- Choose a payment method, enter the repayment amount and allowance amount, and confirm—the customer’s credit balance will be deducted accordingly.
- Repayments made via cash or other invoice-eligible methods can be invoiced.
-
Cancel Repayment:Unreconciled repayment records can be canceled to reverse the repayment.
-
Navigate to Operation Management > Financial Management > Credit Management > Credit Consumption Details to view changes to repayment order consumption records and check details of original POS credit transactions.
12 Benefit Accounts
-
Switch to Group Perspective
- Log in to the Merchant Backend as a group administrator, then switch to the Group Management Perspective via the perspective switch button in the upper right corner.
-
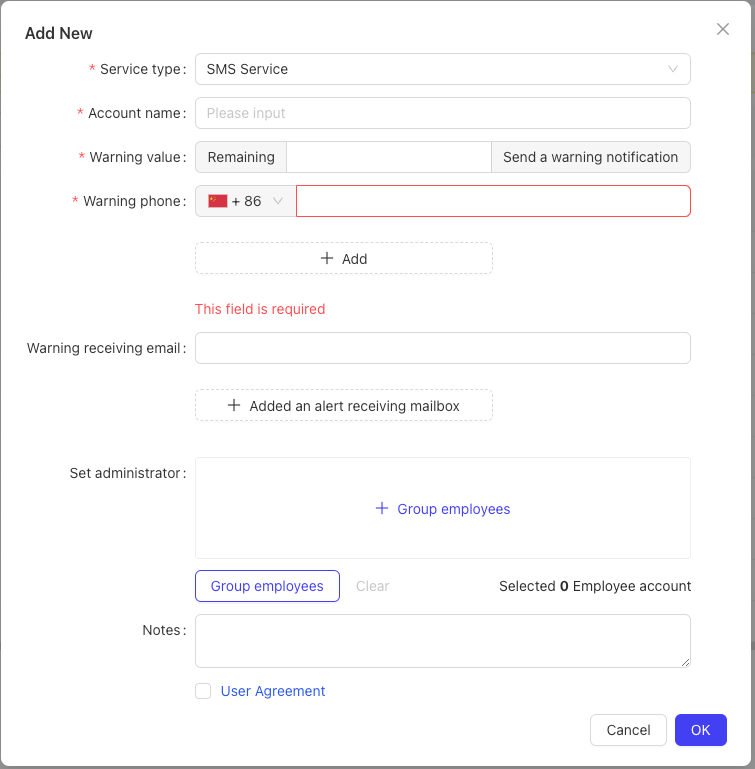
Navigate to Operation Management > Financial Management > Benefit Accounts > Benefit Account Management to view benefit accounts under the group. There are four main types: SMS Service, Third-Party Payment, Third-Party Takeaway, and Application Message.
-
Function Overview:Benefit accounts are a pay-per-use capability for groups using specific platform functions. The platform sets deduction rates for different transactions—for example, each SMS or application message sent will deduct a corresponding number of points from the benefit account.
-
Usage Rules by Type:
- SMS Service and Application Message: Applied at the group level. Usage is charged regardless of the store or billing entity, and no binding is required.
- Third-Party Takeaway: Must be bound to specific stores via the View Binding Relationships page. Points are deducted from the benefit account for each takeaway transaction at the bound store.
- Third-Party Payment: Must be bound to specific collection principals via the View Binding Relationships page. Points are deducted from the benefit account for each payment transaction processed by the bound principal.
-
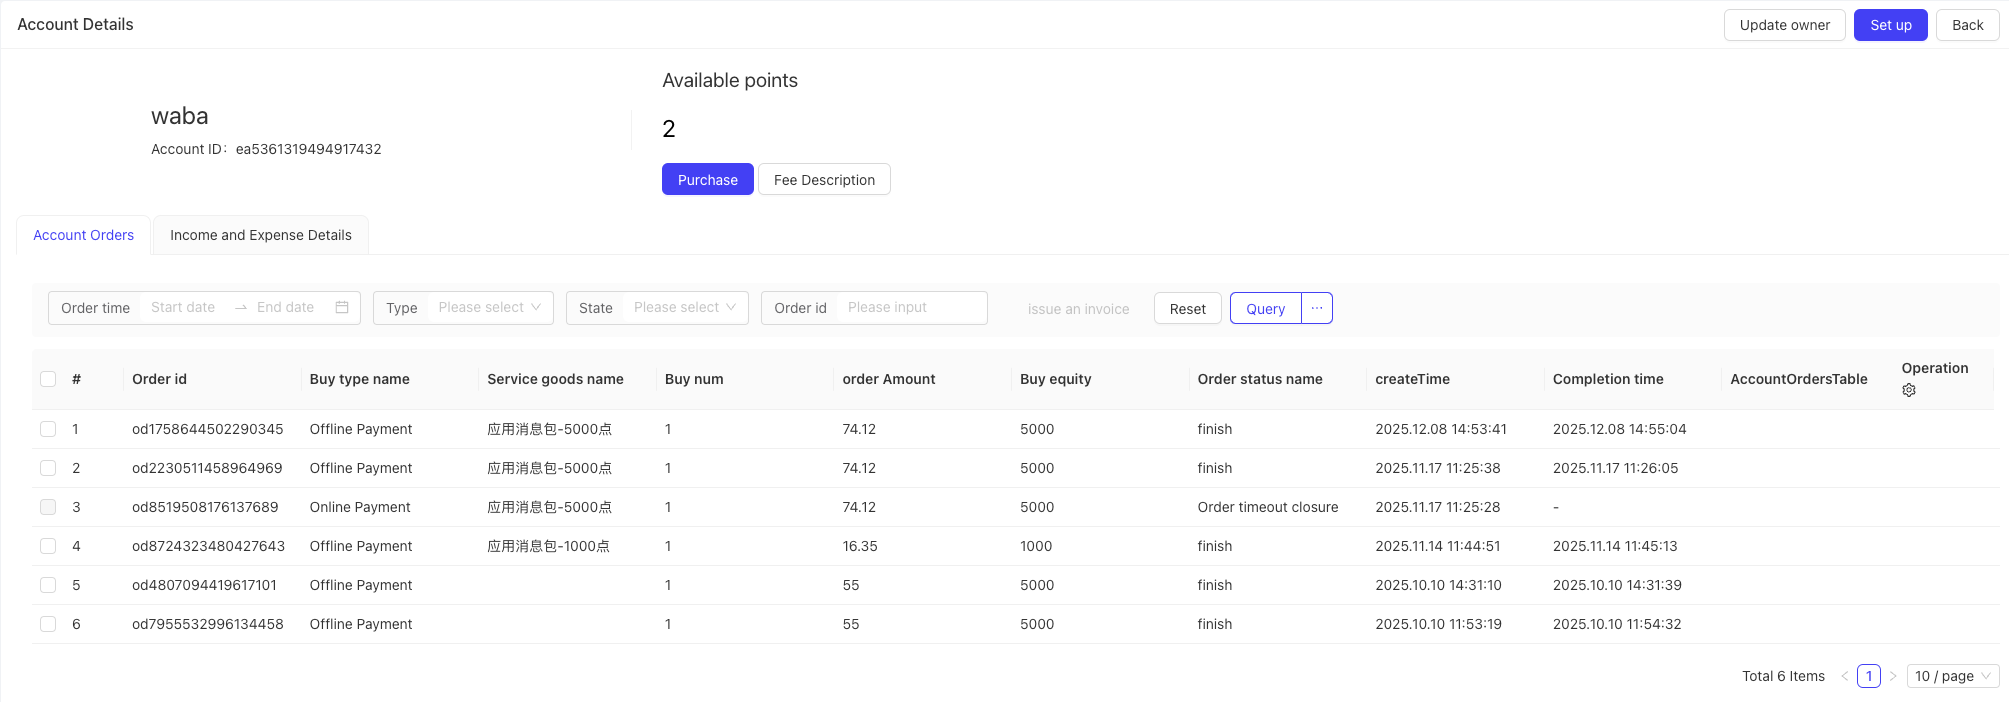
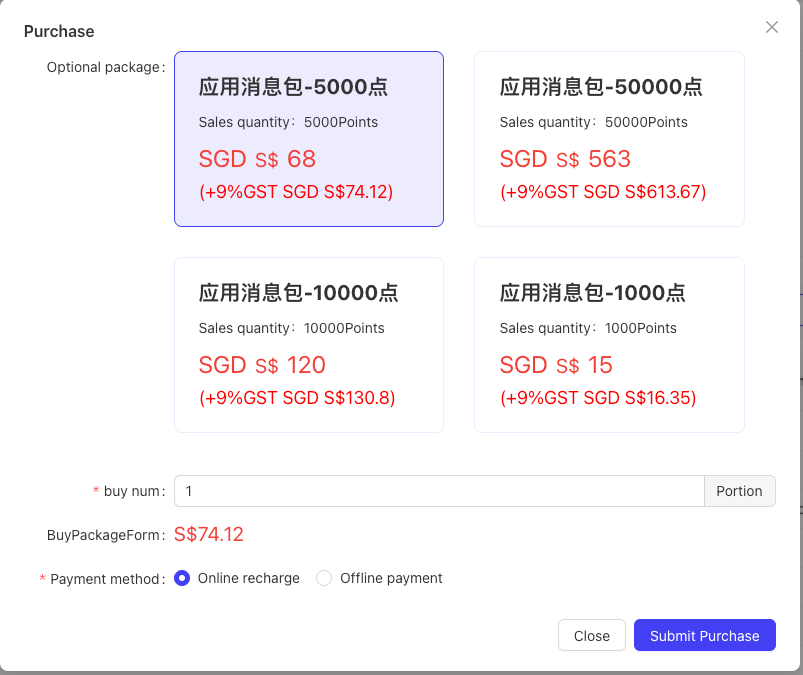
Point Package Purchase and Management:
- The system offers point packages for purchase via online recharge or offline bank transfer. Points are added to the account balance upon purchase.
- Alert Mechanism: The system sends reminders when the point balance is low. If the balance is depleted, corresponding functions will be suspended (e.g., stores cannot use takeaway services) until a recharge is made.
-
Transaction Records:Recharge and deduction records can be viewed in the Account Orders and Income/Expense Details pages. Invoices can be issued for recharge amounts.
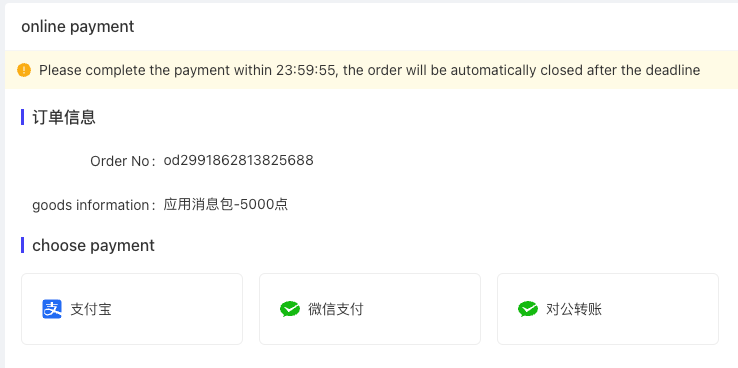
13 BO-Side Online Payment (Platform Collection/Receipt)
-
Payment Process:
- The business module submits an order, which enters the PC online payment cashier system.
- The cashier page displays order information, including: Order Expiry Time, Business Type (Benefit Account Recharge 8001, SaaS Package Purchase 8002), Order Number, Product Information, Amount Payable, and Currency.
- Available online payment methods for the current business type are displayed. Select the payment method, check the Agree to Terms box, and click Pay Now to initiate a payment request.
- The system is called the payment gateway interface. If successful, it redirects to the third-party payment interaction page.
-
Payment Confirmation and Result:
- The user completes payment via the third-party platform (e.g., scan QR code, enter card number and password).
- The third-party platform returns the payment status (e.g., Paid, Payment Failed) and redirects the user to the corresponding order result page.
14 Financial Management in Store Perspective
The Financial Management menu in the store perspective only displays store-specific functions. The configuration process is identical to the group perspective, but users can only configure information for the current store.