POS Decoration Plan
1 Description
The POS UI Customization allows users to design the POS table layout and customize the table detail pages.
2 Entry Point
Log in to the BO (Back Office) system → Group Perspective → Operation Center → Restaurant Management → POS UI Customization.

3 Creating a Scheme
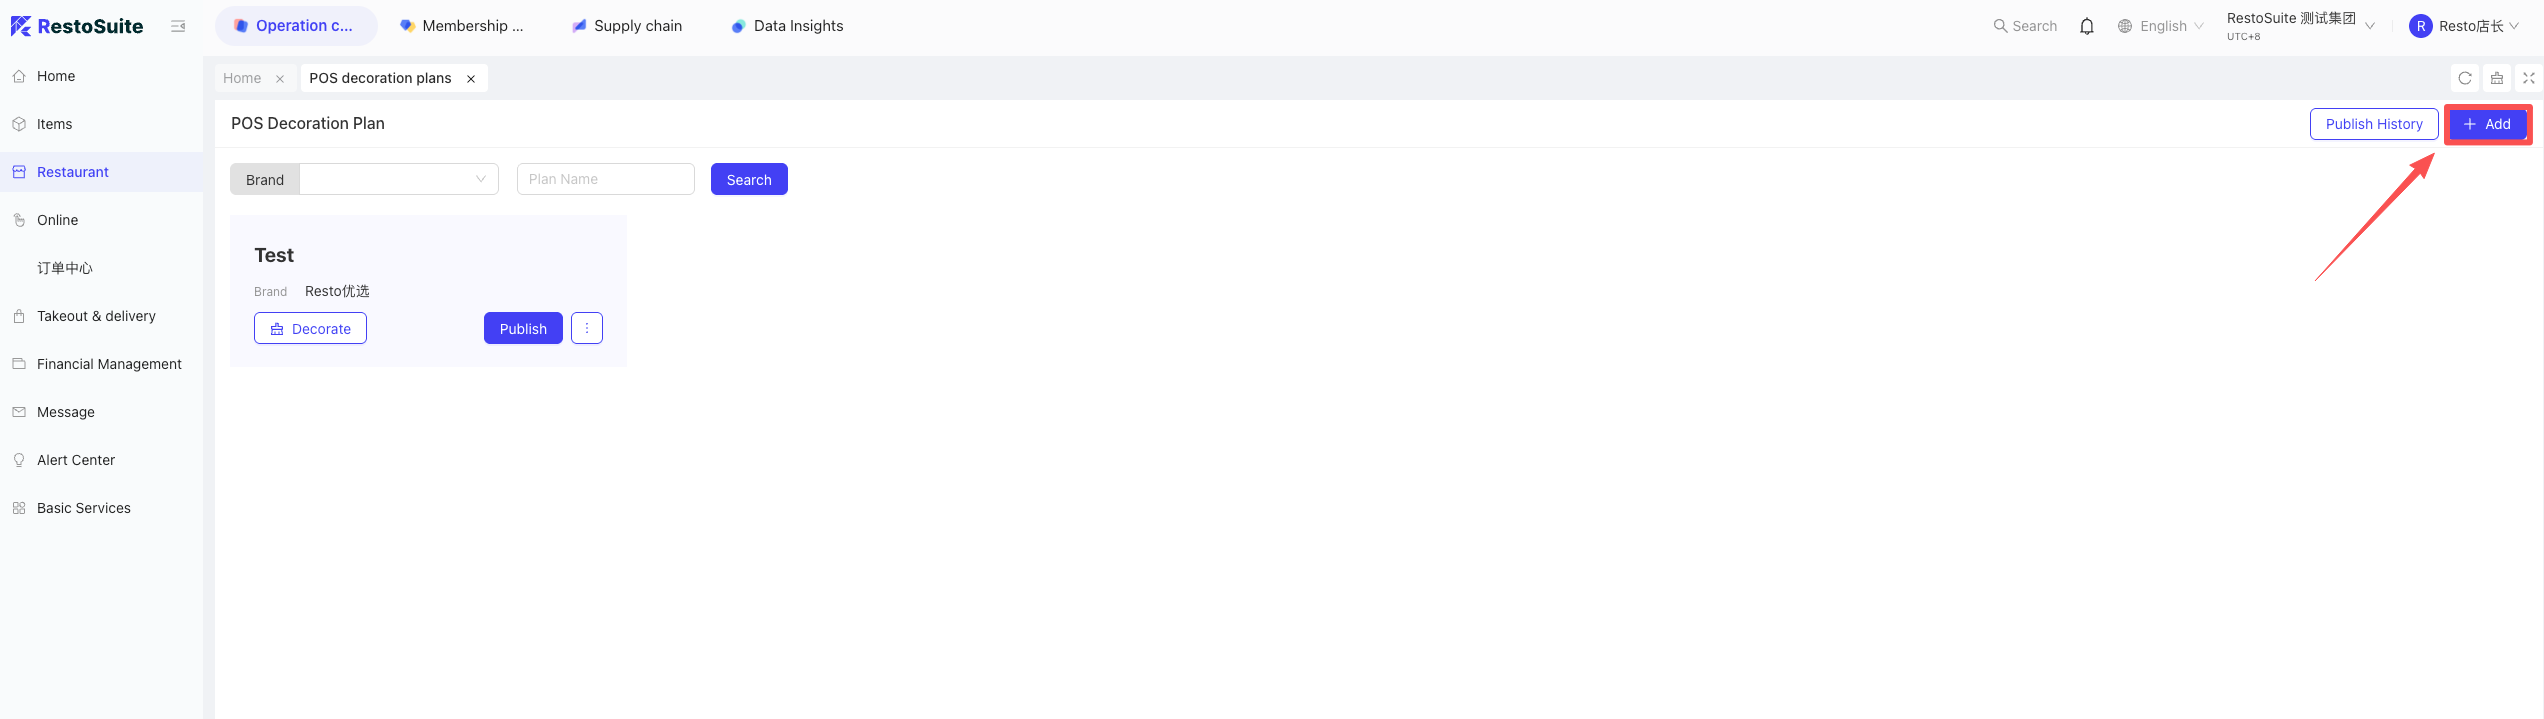
- Click “Add New Scheme” in the top right corner.
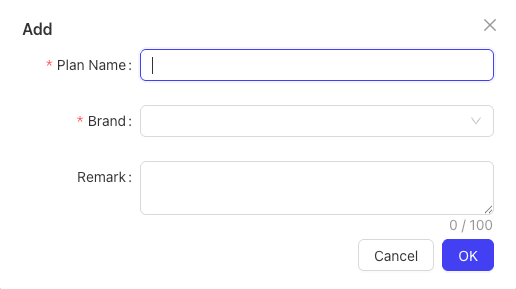
- Enter the Scheme Name, select the Brand, and click OK to complete the creation.
4 UI Customization
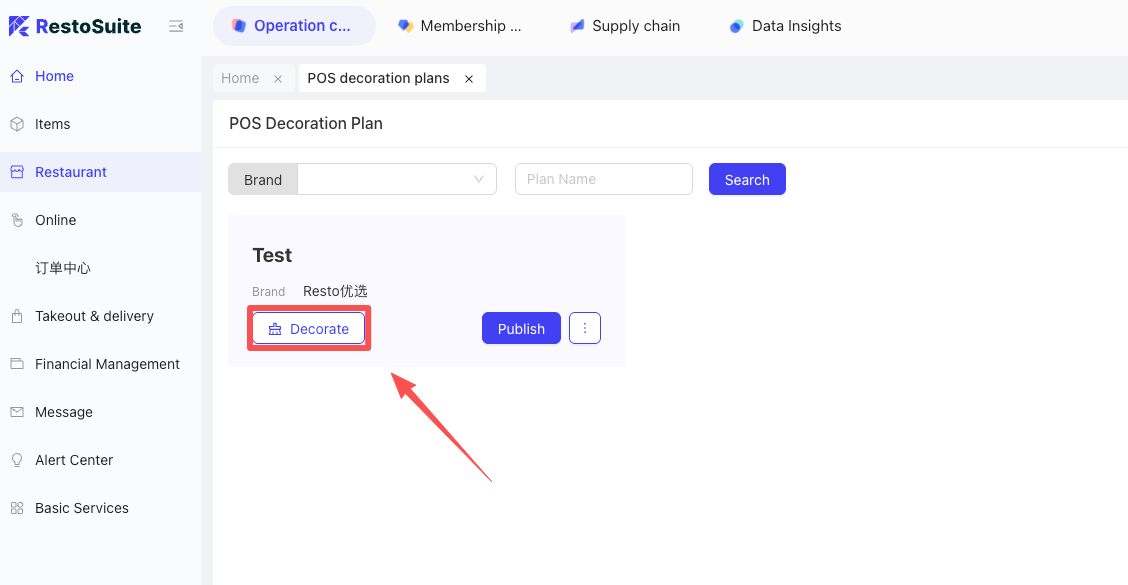
Select a created scheme and click the “Customize” button to enter the design interface for Table Layout and Table Details.
4.1 A. Table Layout Page
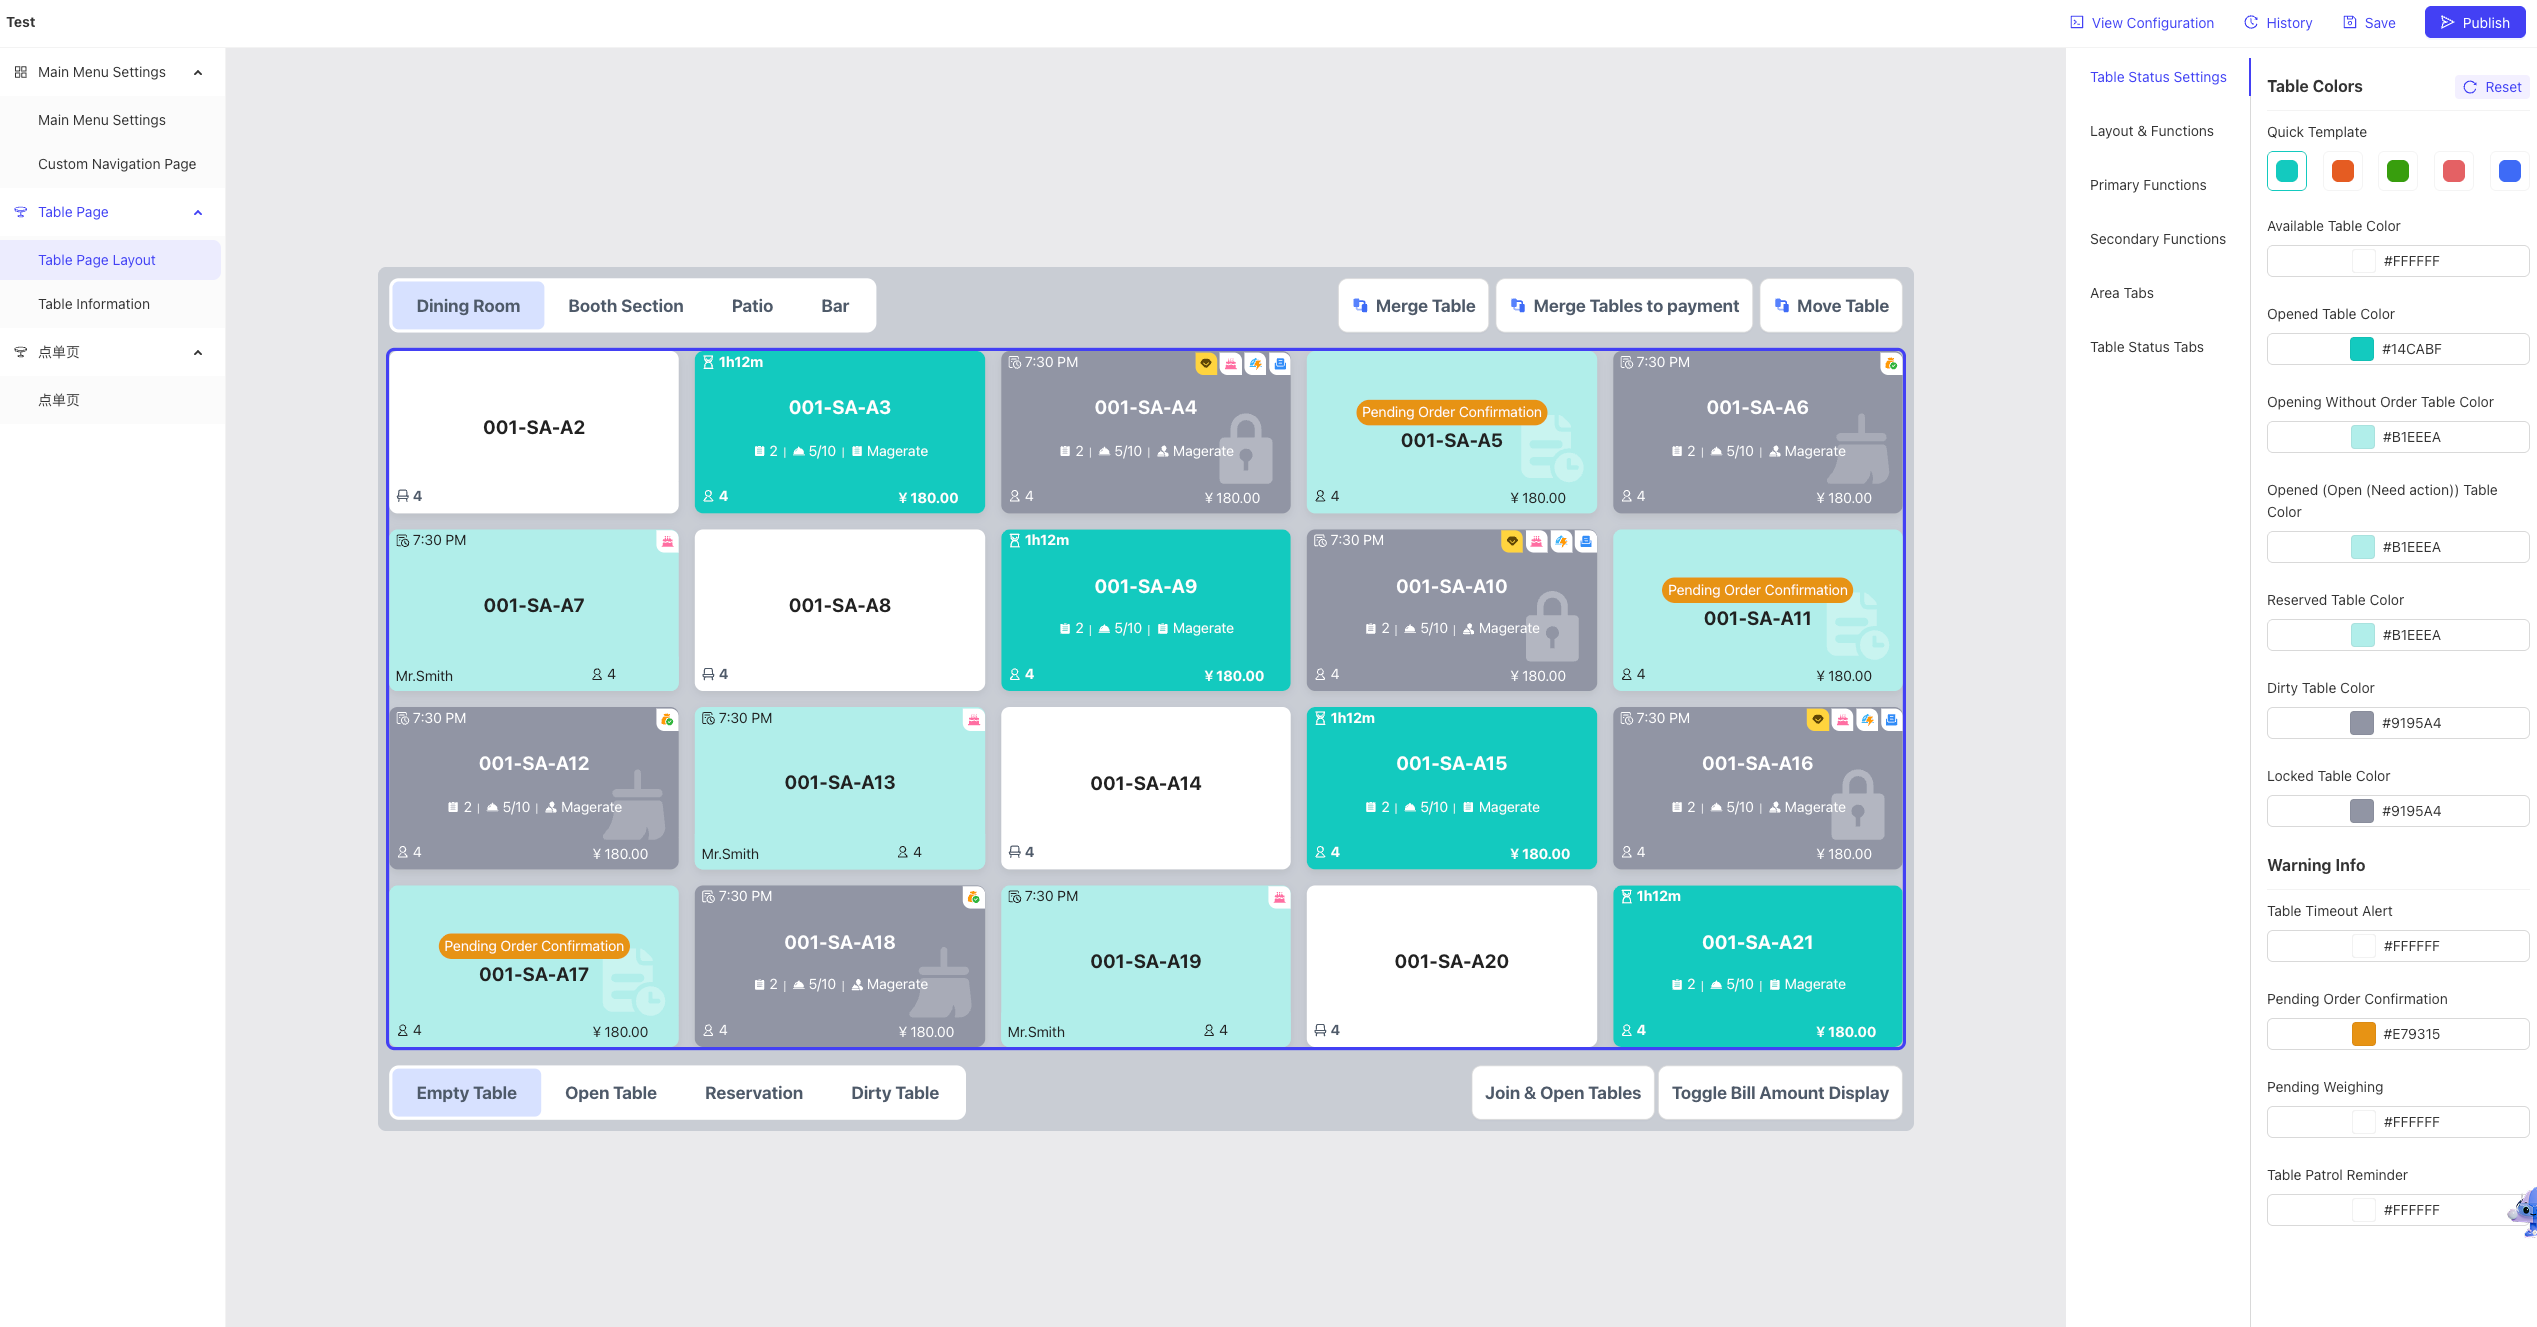
- Table Status Settings: Set different colors for different table statuses for easier management.
- Color Presets:
Quick Templates, Vacant, Occupied (Opened), Pending, Reserved, Dirty, Locked.
- Warning Settings:
Table Overtime Reminder, Order Pending Confirmation, Pending Weighing, Table Patrolling Reminder.
- Layout & Functions:
- Function Zone: Set the functions displayed in the four corners (Top-Left / Top-Right / Bottom-Left / Bottom-Right).
- Grid Layout: Set the number of rows and columns for the table view.
- Rows: Min 1, Max 4.
- Columns: Min 3, Max 7.
- Primary Function Zone:
-
The first 3 keys are displayed; others are hidden under “More.” Use toggles to enable/ disable.
-
Drag the horizontal bars to reorder:
- Combine Tables, Open & Checkout, Transfer Table, Banquet Open, Phone Order, Search Phone Order, Open Cash Drawer.
-
Button Style: Set Font Size (Size/Bold/Italic), Font Color, and Background Color.
- Secondary Function Zone:
- Similar to the primary zone (first 3 displayed).
- Functions: Open Combined Table, Switch Bill Amount Display, Switch Table Name/Bill No., Switch Server Display.
- Area Tab Settings
- Font Size: Size / Bold / Italic
- Font Color
- Background Color
- Table Status Tab Settings
- Font Size: Size / Bold / Italic
- Font Color
- Background Color
4.2 B. Table Information Page (Customized by Status)
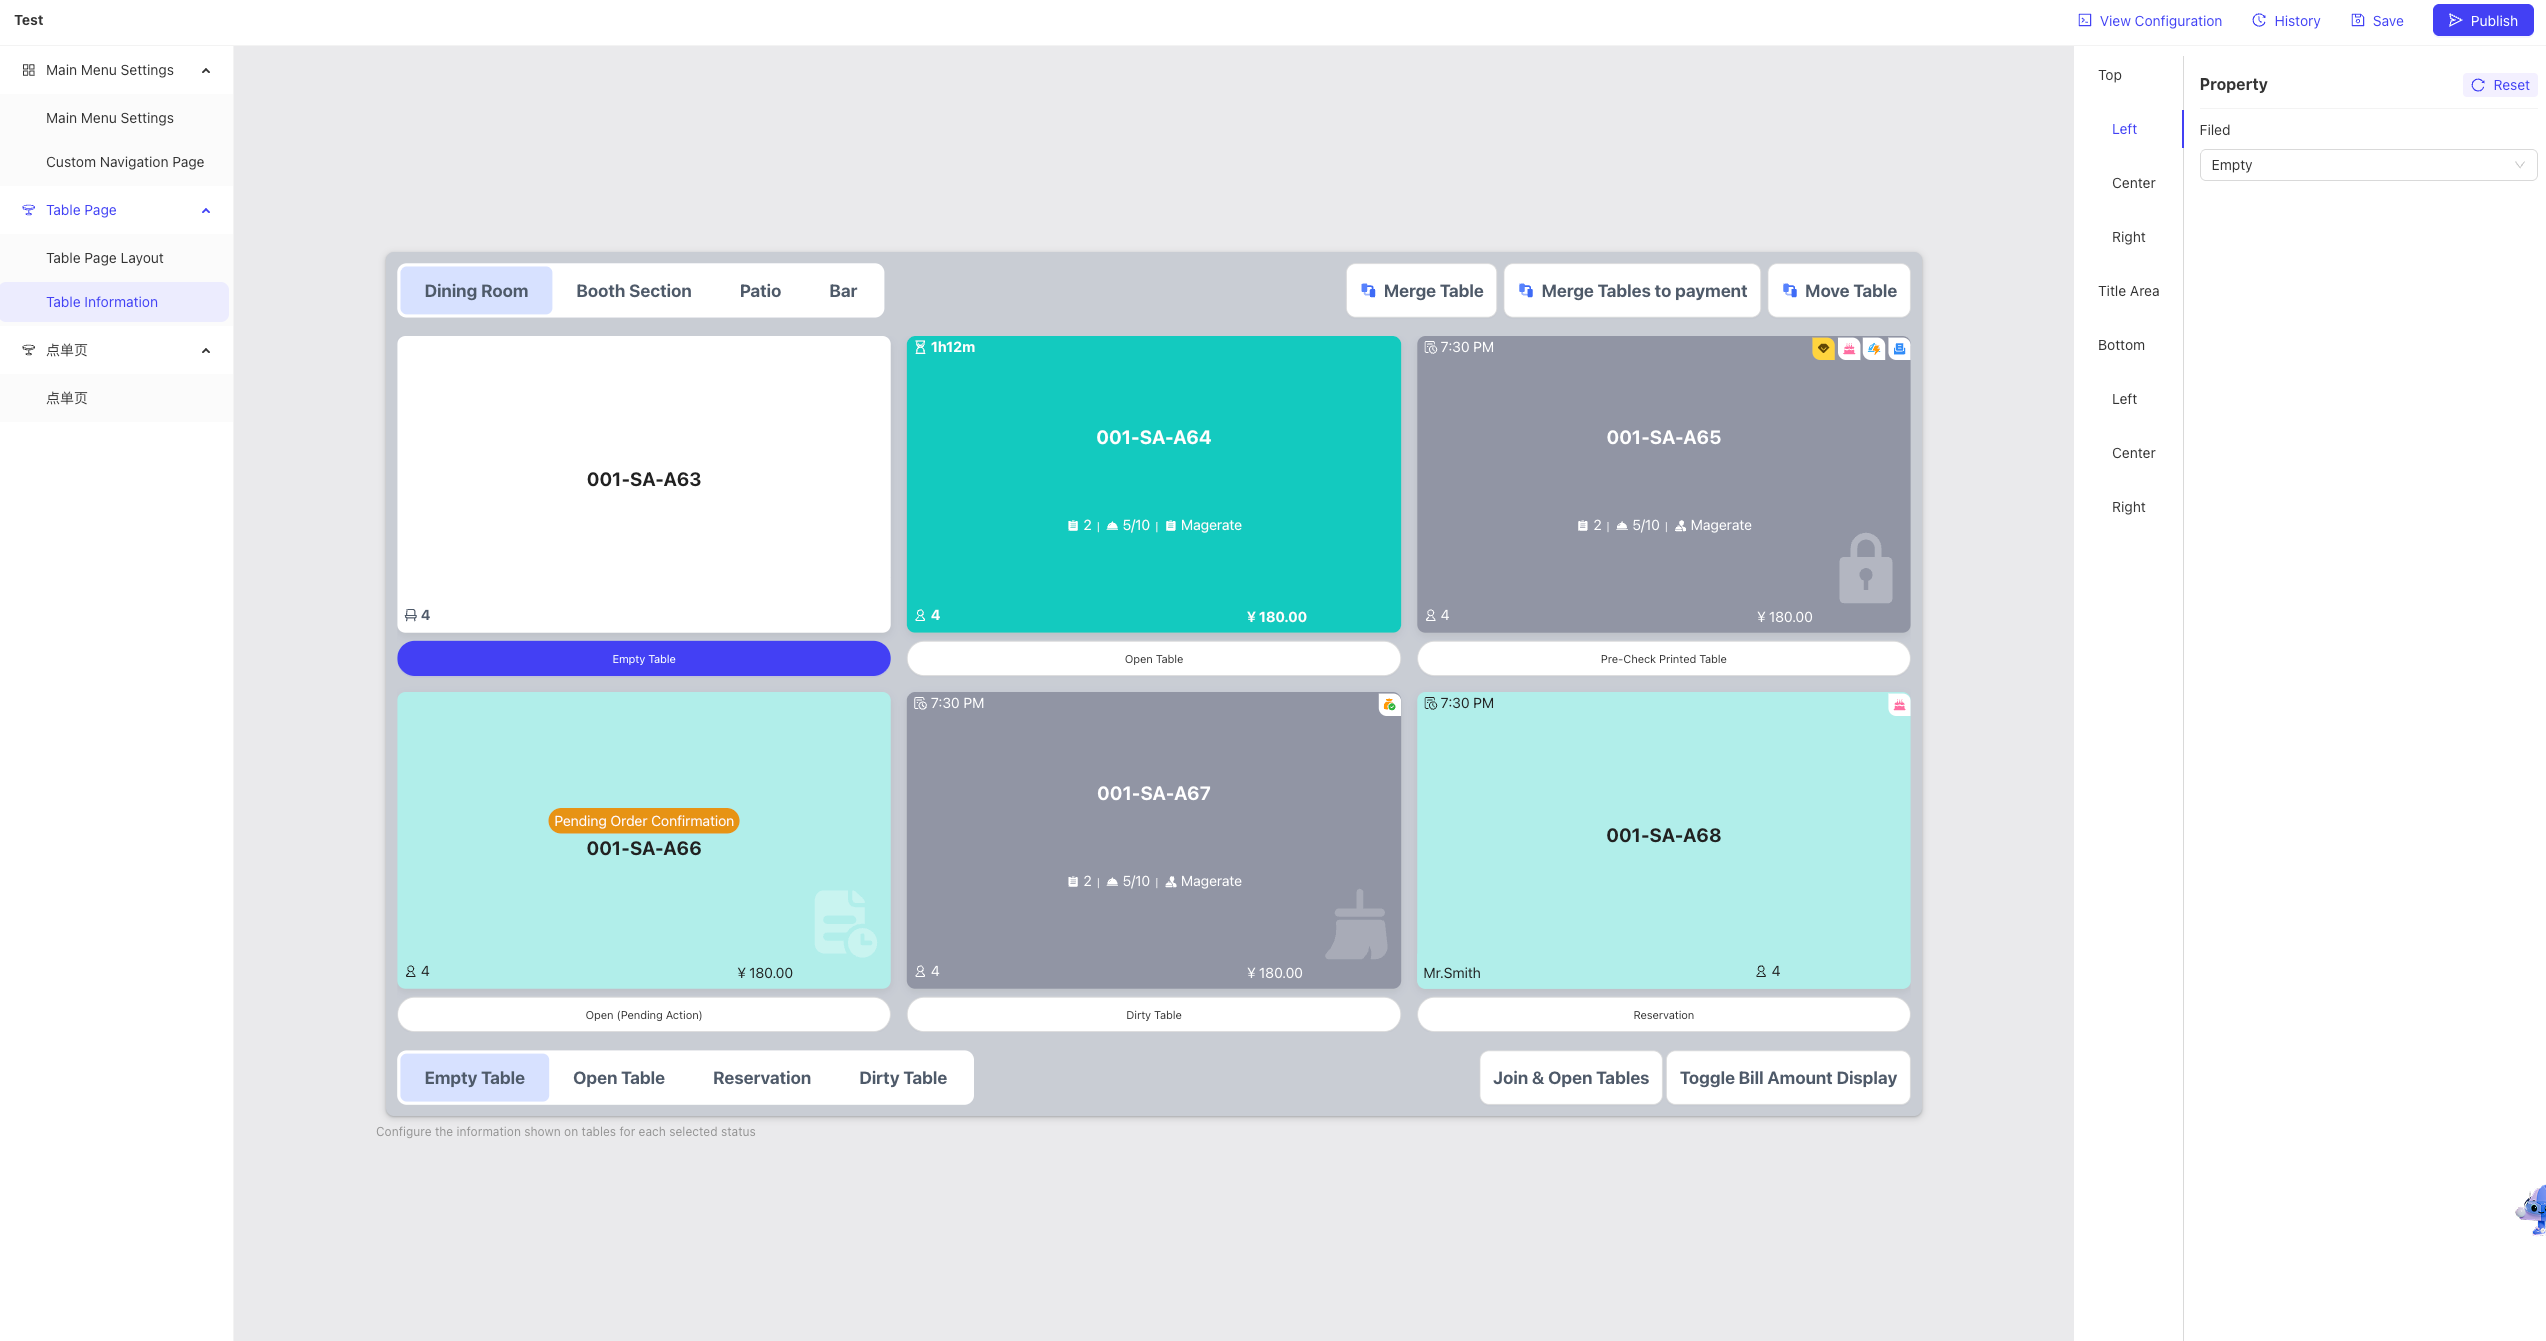
Each table status (Vacant, Occupied, Reserved, etc.) has an independent customization page.
4.2.1 Vacant (Empty Table)
4.2.1.1 Top Section
- Display Options (Dropdown): * None / Table Capacity / Table Owner / Table Name / Table ID
- Layout: Left / Center / Right
4.2.1.2 Title Area
-
Attributes: Toggle switches to enable/ disable. Drag the handle (horizontal line) to reorder.
- Table Name
- Table Code
- Area Name
-
Style:
- Alignment: Left / Center / Right
- Font: Size / Bold / Italic
- Color: Hex/RGB Picker
4.2.1.3 Bottom Section
- Configuration: Set content and font size via dropdown.
- Layout: Left / Center / Right
- Content Options: None / Table Capacity / Table Owner / Table Name / Table ID
- Font Settings:
- Alignment: Left / Center / Right
- Font Style: Size / Bold / Italic
- Font Color: Hex/RGB Picker
4.2.2 Occupied (Opened Table)
4.2.2.1 Top Section
-
Left Side:
- Attributes: Content and Countdown Mode.
- Content: None / Open Time / Status Tag / Bill Amount / Guest Count / Table Capacity / Table Owner / Bill No. / Transaction ID / Table Name / Table ID
- Style: Alignment / Font Size / Bold / Italic / Color
-
Center Side:
- Content: None / Open Time / Status Tag / Bill Amount / Guest Count / Table Capacity / Table Owner / Bill No. / Transaction ID / Table Name / Table ID
-
Right Side:
- Attributes:
- Content: None / Open Time / Status Tag / Bill Amount / Guest Count / Table Capacity / Table Owner / Bill No. / Transaction ID / Table Name / Table ID
- Icons & Order: Toggle switches and drag-to-reorder.
- Birthday Gift / Table Info / Serving Status / Checkout Info
- Custom Icons: Upload custom icons or reset them to default.
- Member / Birthday / Pending Items / All Served / Rushed Items / Deposit Exists / Pre-printed / Paid
- Attributes:
4.2.2.2 Title Area
- Field Config: Toggle to display; drag the handle to adjust sequence.
4.2.2.3 Subtitle Area
-
Field Config: Toggle to display; drag the handle to adjust sequence.
- Bill Count (For shared tables) / Serving Progress / Staff
-
Staff Options (Radio Button): * Auto-switch (Opening/Ordering Staff)
- Server
-
Style: Alignment / Font Size / Bold / Italic / Color
4.2.2.4 Bottom Section
- Left/Center/Right Layouts:
- Content: None / Open Time / Status Tag / Bill Amount / Guest Count / Table Capacity / Table Owner / Bill No. / Transaction ID / Table Name / Table ID
- Style: Alignment / Font Size / Bold / Italic / Color
4.2.3 Pre-checkout (Bill Printed)
4.2.3.1 Top Section
- Left Side: Content (None…Table ID) + Countdown Mode (On/Off).
- Center Side: Content selection.
- Right Side: Content selection + Icon toggles (Member/Birthday/Serving/Checkout).
- Icon Customization: Member / Birthday / Pending / Served / Rushed / Deposit / Pre-printed / Paid.
4.2.3.2 Title & Subtitle Area
- Config: Toggle switches and drag-to-reorder functionality.
- Staff Options: Auto-switch (Opening/Ordering) or Server.
- Style: Alignment / Font Size / Bold / Italic / Color.
4.2.3.3 Bottom Section
- Layout: Left / Center (with Icon toggles & customization) / Right.
- Style: Full font and alignment control.
4.2.4 Pending (Processing)
4.2.4.1 Top Section
- Left/Center/Right: Set display content (None…Table ID).
4.2.4.2 Title & Subtitle Area
- Fields: Table Name / Code / Area (Title); Bill Count / Serving / Staff (Subtitle).
- Controls: Toggle switches and drag-to-reorder.
- Style: Custom alignment and typography.
4.2.4.3 Bottom Section
- Layout: Left / Center / Right content configuration and styling.
4.2.5 Dirty (To be Cleaned)
4.2.5.1 Top/Bottom Sections
- Countdown Mode: Enable/ disable for cleaning tracking.
- Content: Choose from the standard list (Open Time, Capacity, etc.).
- Style: Alignment / Font Size / Bold / Italic / Color.
4.2.5.2 Title & Subtitle Area
- Fields: Standard table info and staff assignment.
- Controls: Toggle switches and drag-to-reorder.
4.2.6 Reserved (Booking)
4.2.6.1 Top Section
-
Left/Center/Right:
- Content: None / Table Capacity / Owner / Name / ID / Reservation Time / Guest Name / Phone / Party Size.
-
Countdown Mode: On/Off.
-
Icon Sequence: Toggle and drag (Birthday / Member / Serving / Checkout).
4.2.6.2 Title & Subtitle Area
- Fields: Table Name / Code / Area; Bill Count / Serving / Staff.
- Style: Alignment / Font Size / Bold / Italic / Color.
4.2.6.3 Bottom Section
- Content: Expanded reservation fields (Name, Phone, Time, etc.).
- Style: Full customization.
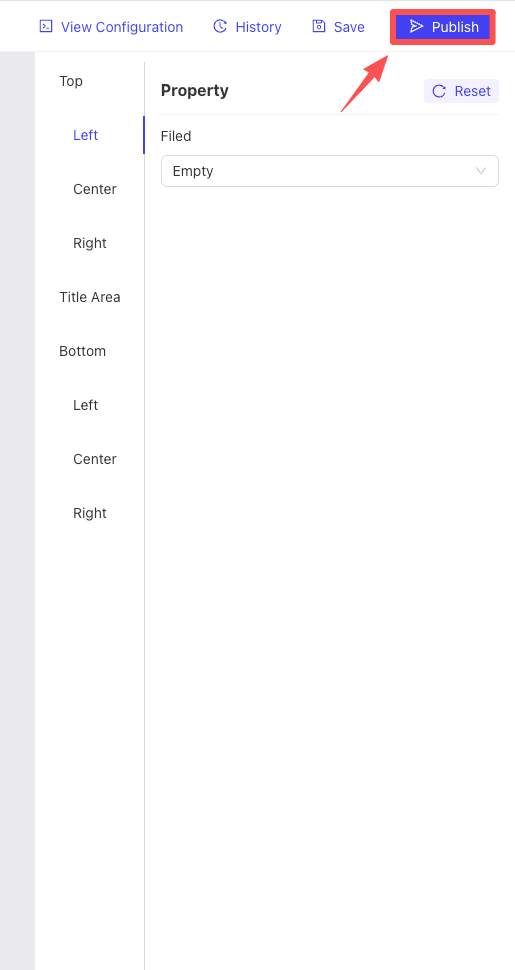
5 Publishing the Scheme
- Click Save in the top right corner, then click Publish.
- Select the Publish Time and the target Stores.
- Activation: The POS terminal needs to refresh, or the user must log out and log back in to receive the updated UI data.
6 Enabling the Scheme on POS
- Path: POS System → Settings → General Settings.
- Action: Locate “Disable UI Customization” and toggle it OFF (to enable the custom scheme).