Ingredient & Supply Management
1 Introduction
Ingredient & Supply Management is a master data module used to centrally manage ingredients and supplies within a catering group. It supports the unified creation and maintenance of master data for ingredients, supplies, kits, and perishable items.
The module enables standardised management and sharing of ingredient and supply information across multiple stores and distribution centers, providing consistent data support for procurement, inventory, cost accounting, and production processes. Centralising master data at the group level improves data accuracy, consistency, and reuse across the organisation.
2 Ingredient & Supply Management
2.1 Key Terms
- Ingredient & Supply: A general term for all ingredients and operational supplies used in catering operations, forming the basic unit of supply chain management.
- Ingredient: Raw food materials directly used in dish production and processing (e.g., vegetables, meat, rice, flour, oil, seasonings), classified as Cost Type in financial accounting.
- Supply: Operational consumables not directly involved in food production (e.g., tableware, paper towels, takeaway boxes, cleaning supplies), classified as Expense Type in financial accounting.
- Kit: A fixed combination of multiple ingredients and/or supplies that can be managed, procured, and cost-accounted as a single item.
- Standard Unit: The system reference and pricing unit for ingredients and supplies, used as the basis for pricing and cost calculation (e.g., kilogram, bottle, pack).
- Distribution Center Procurement Unit: The unit used by distribution centers for bulk procurement from suppliers. (e.g., carton, sack, barrel)
- Store Procurement Unit: The unit used by stores when procuring from distribution centers or suppliers (e.g., catty, box, portion).
- Cost Unit: The unit used for dish costing and store cost accounting, enabling precise cost calculation (e.g., gram, millilitre, slice).
- Statistical Type: The financial classification used for cost and expense calculation, including Cost Type and Expense Type.
- Safety Stock Upper Limit: The maximum inventory threshold used to prevent overstock and inventory loss.
- Safety Stock Lower Limit: The minimum inventory threshold that triggers replenishment alerts.
2.2 Add an Ingredient/Supply
STEP 1: Switch to Group Perspective
- Log in to the Operation Center as a group administrator.
- Click Perspective Switch in the upper right corner, then select Group perspective.
STEP 2: Access the Ingredient & Supply Management Page
- Entry 1:【Operation Center】>【Item Management】>【Ingredient & Supply】>【Ingredient & Supply Management】
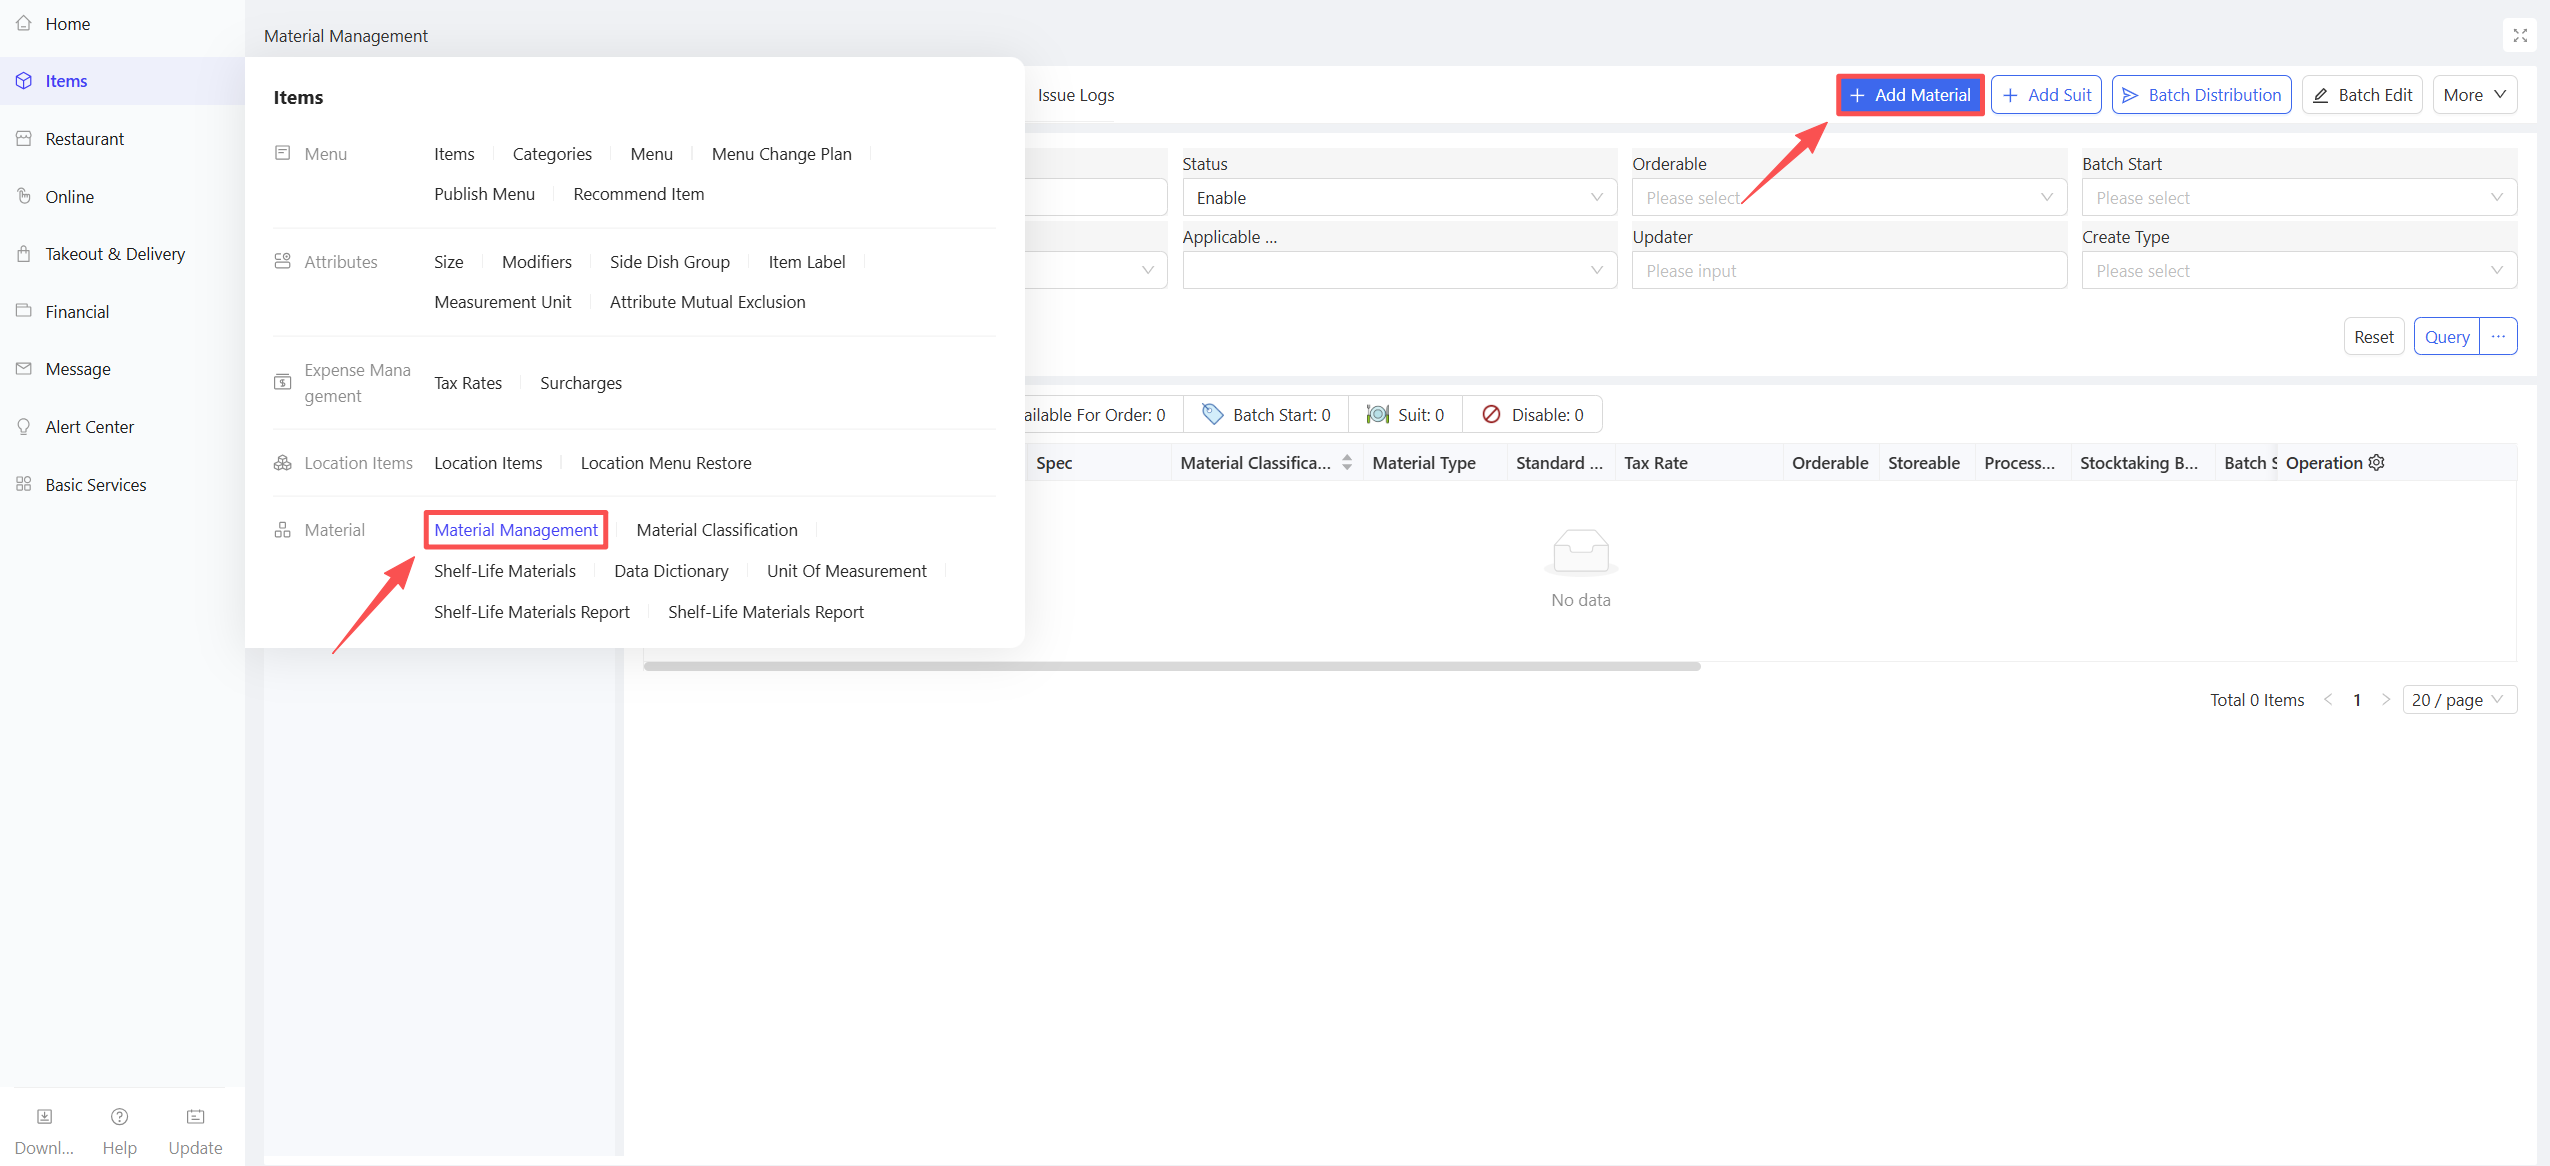
- Entry 2:【Supply Chain】>【File Management】>【Ingredient & Supply Management】
STEP 3: Configure Item Information
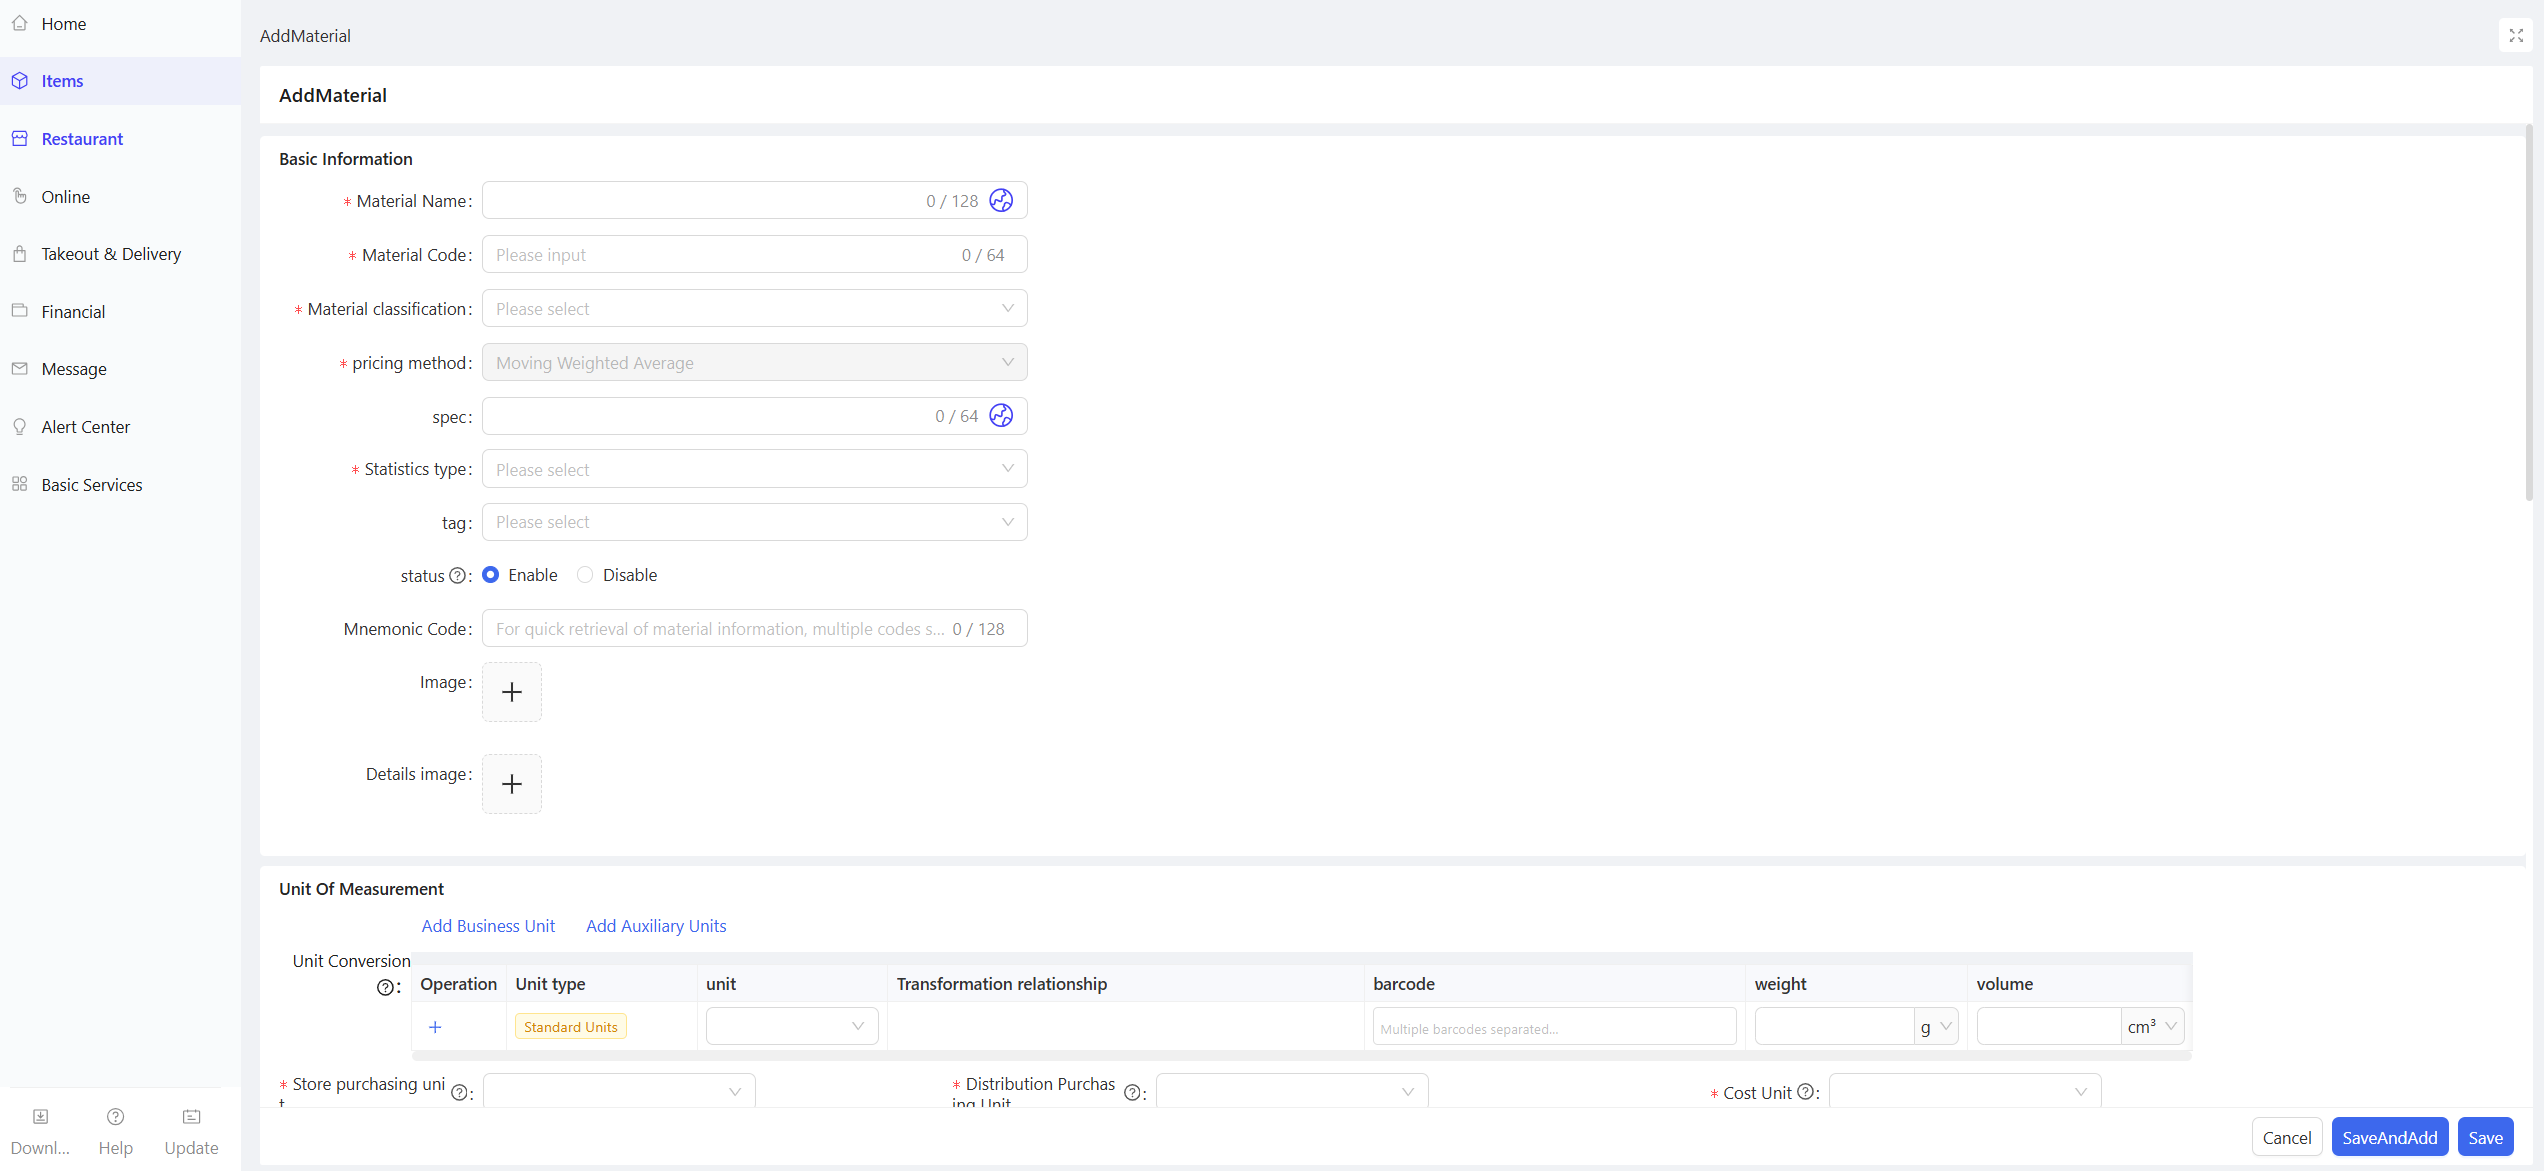
On the Ingredient & Supply tab, click the【Add】button in the upper right corner and configure the following information on the new item page:
-
Basic Information
- Material Name: Enter the standard name of the ingredient/supply, in line with actual catering usage scenarios (e.g., Premium Pork Belly, Biodegradable Takeaway Box).
- Material Code: Enter the unique identification code of the material; it is recommended to formulate a coding rule by classification for easy retrieval.
- Classification: Select the item’s classification from the three-level classification system created.
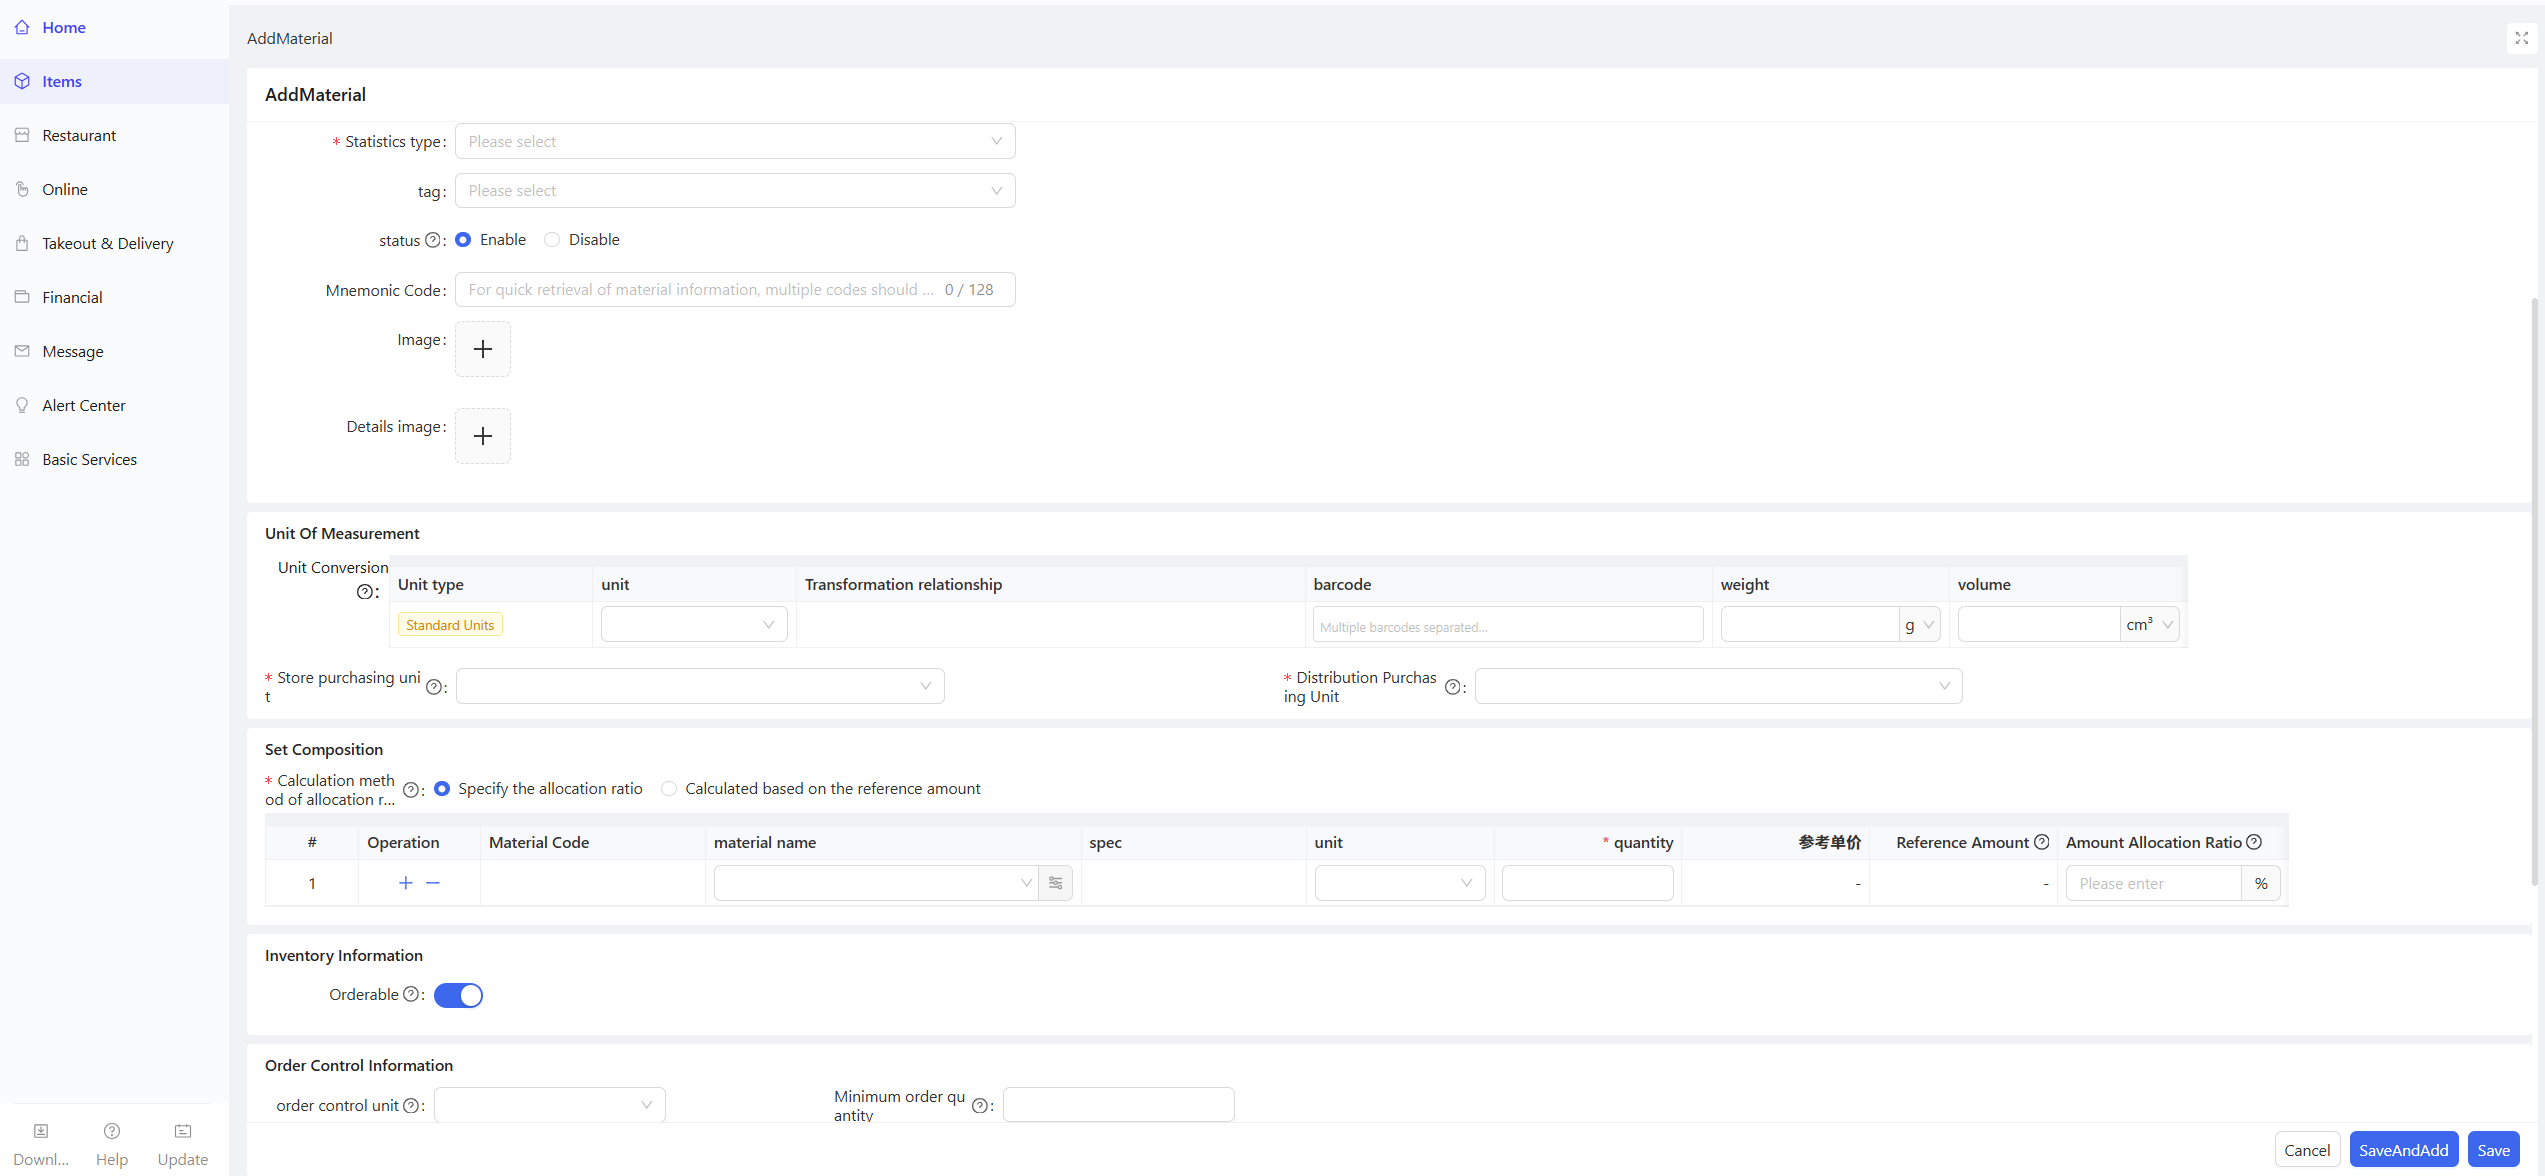
- Statistical Type: Select Cost Type (Ingredient) or Expense Type (Supply) to determine the financial accounting attribute of the item.
- Specification: Enter the specific specification of the item (e.g., 500g/pack, 100 pcs/box).
- Tag: Enter custom tags for the item for quick retrieval (e.g., Perishable Item, Fresh Ingredient, Consumable Supply).
- Status: Select the item status (enabled/disabled); subordinate organizations cannot use disabled items.
- Mnemonic Code: Enter the first letter mnemonic code of the item for quick retrieval.
-
Unit of Measurement
- Unit Conversion: Configure the conversion ratio between multiple units (e.g., 1 carton = 20 packs, 1 pack = 500g), and associate the standard unit, procurement units and cost unit.
- Store Procurement Unit: Select the unit for store item issuing.
- Distribution Center Procurement Unit: Select the unit for bulk procurement by the distribution center.
- Cost Unit: Select the unit for store cost card accounting.
-
Price & Tax Rate (Pricing unit is the item’s Standard Unit)
- Reference Cost: Enter the standard reference cost of the item; the system automatically assigns 0 if there is no corresponding currency/exchange rate.
- Reference Selling Price: Enter the reference selling price for the group to sell to subordinate organizations (stores/distribution centers); the system automatically assigns 0 if there is no corresponding currency/exchange rate.
- Latest Purchase Price: Enter the latest actual purchase price of the item as a reference for cost accounting.
- Tax Rate: Two options - Specify Tax Rate (manually enter the tax rate) / Inherit Classification Tax Rate (adopt the default tax rate of the affiliated item category).
-
Inventory Information
- Allow Stock Count: Enabled by default; if enabled, the item is automatically included in daily/weekly/monthly stock counts; if disabled, it is not automatically included but can be added manually.
- Orderable: Enabled by default; controls whether the item can be sold to stores from the distribution center perspective.
- Receivable: Enabled by default; if enabled, the item can be received and issued from the warehouse.
- Processable: Disabled by default; if enabled, the ingredient can be used as a processing raw material and set as a finished product ingredient in Finished Product Management.
- Batch Management: Disabled by default; configurable when the system parameter Batch Management Enabled is turned on; batch information must be entered for inbound and outbound operations if enabled.
- Shelf Life: Disabled by default; shelf life information must be entered for inbound and outbound operations if enabled (for perishable items).
- Safety Stock Upper Limit: Enter the maximum storage quantity of the item in the warehouse; an inventory alert is triggered when the quantity is exceeded.
- Safety Stock Lower Limit: Enter the minimum storage quantity of the item in the warehouse; a replenishment alert is triggered when the quantity is below the threshold.
- Serial Number: Disabled by default; serial number information must be entered for inbound and outbound operations if enabled; the unit of measurement for serial numbers is synchronized with the Standard Unit.
- Stock Count Frequency: Disabled by default; multiple options are supported (Daily/Weekly/Monthly); the item is compulsorily included in stock counts at the selected frequency if checked.
-
Order Control Information
- Order Control Unit: Select the benchmark unit for order control, which provides the measurement basis for the minimum order quantity, maximum order quantity and minimum order multiple.
- Maximum Order Quantity: Enter the maximum quantity for a single order, which must be greater than the minimum order quantity.
- Minimum Order Quantity: Enter the minimum quantity for a single order, which must be less than the maximum order quantity.
- Minimum Order Multiple: Enter the quantity multiple requirement for procurement orders; the order quantity must be a multiple of this value (e.g., if the multiple = 3, the order quantity can be 3, 6, 9…).
-
Others
- Brand: Enter the brand of the item (e.g., XX Brand Rice).
- Origin: Enter the production/place of origin of the item (for ingredients).
- Storage Condition: Three options - Frozen/Refrigerated/Room Temperature (critical for perishable ingredients).
- Description: Enter supplementary notes for the item (e.g., taste for ingredients, usage scenarios for supplies; optional).
STEP 4: Save the Item
Click the Save and Add New button in the lower right corner of the page to complete the item addition.
2.3 Add a Kit
Precondition
Kits are exclusively created from the group perspective. All independent ingredients and supplies in the kit must be created and configured first, following the same process as adding a single item.
STEP 1: Switch to Group Perspective
- Log in to the Operation Center as a group administrator.
- Click Perspective Switch in the upper right corner, then select Group perspective.
STEP 2: Access the Ingredient & Supply Management Page
- Entry 1: Operation Center > Item Management > Ingredient & Supply > Ingredient & Supply Management
- Entry 2: Supply Chain > File Management > Ingredient & Supply Management
STEP 3: Configure Kit Information
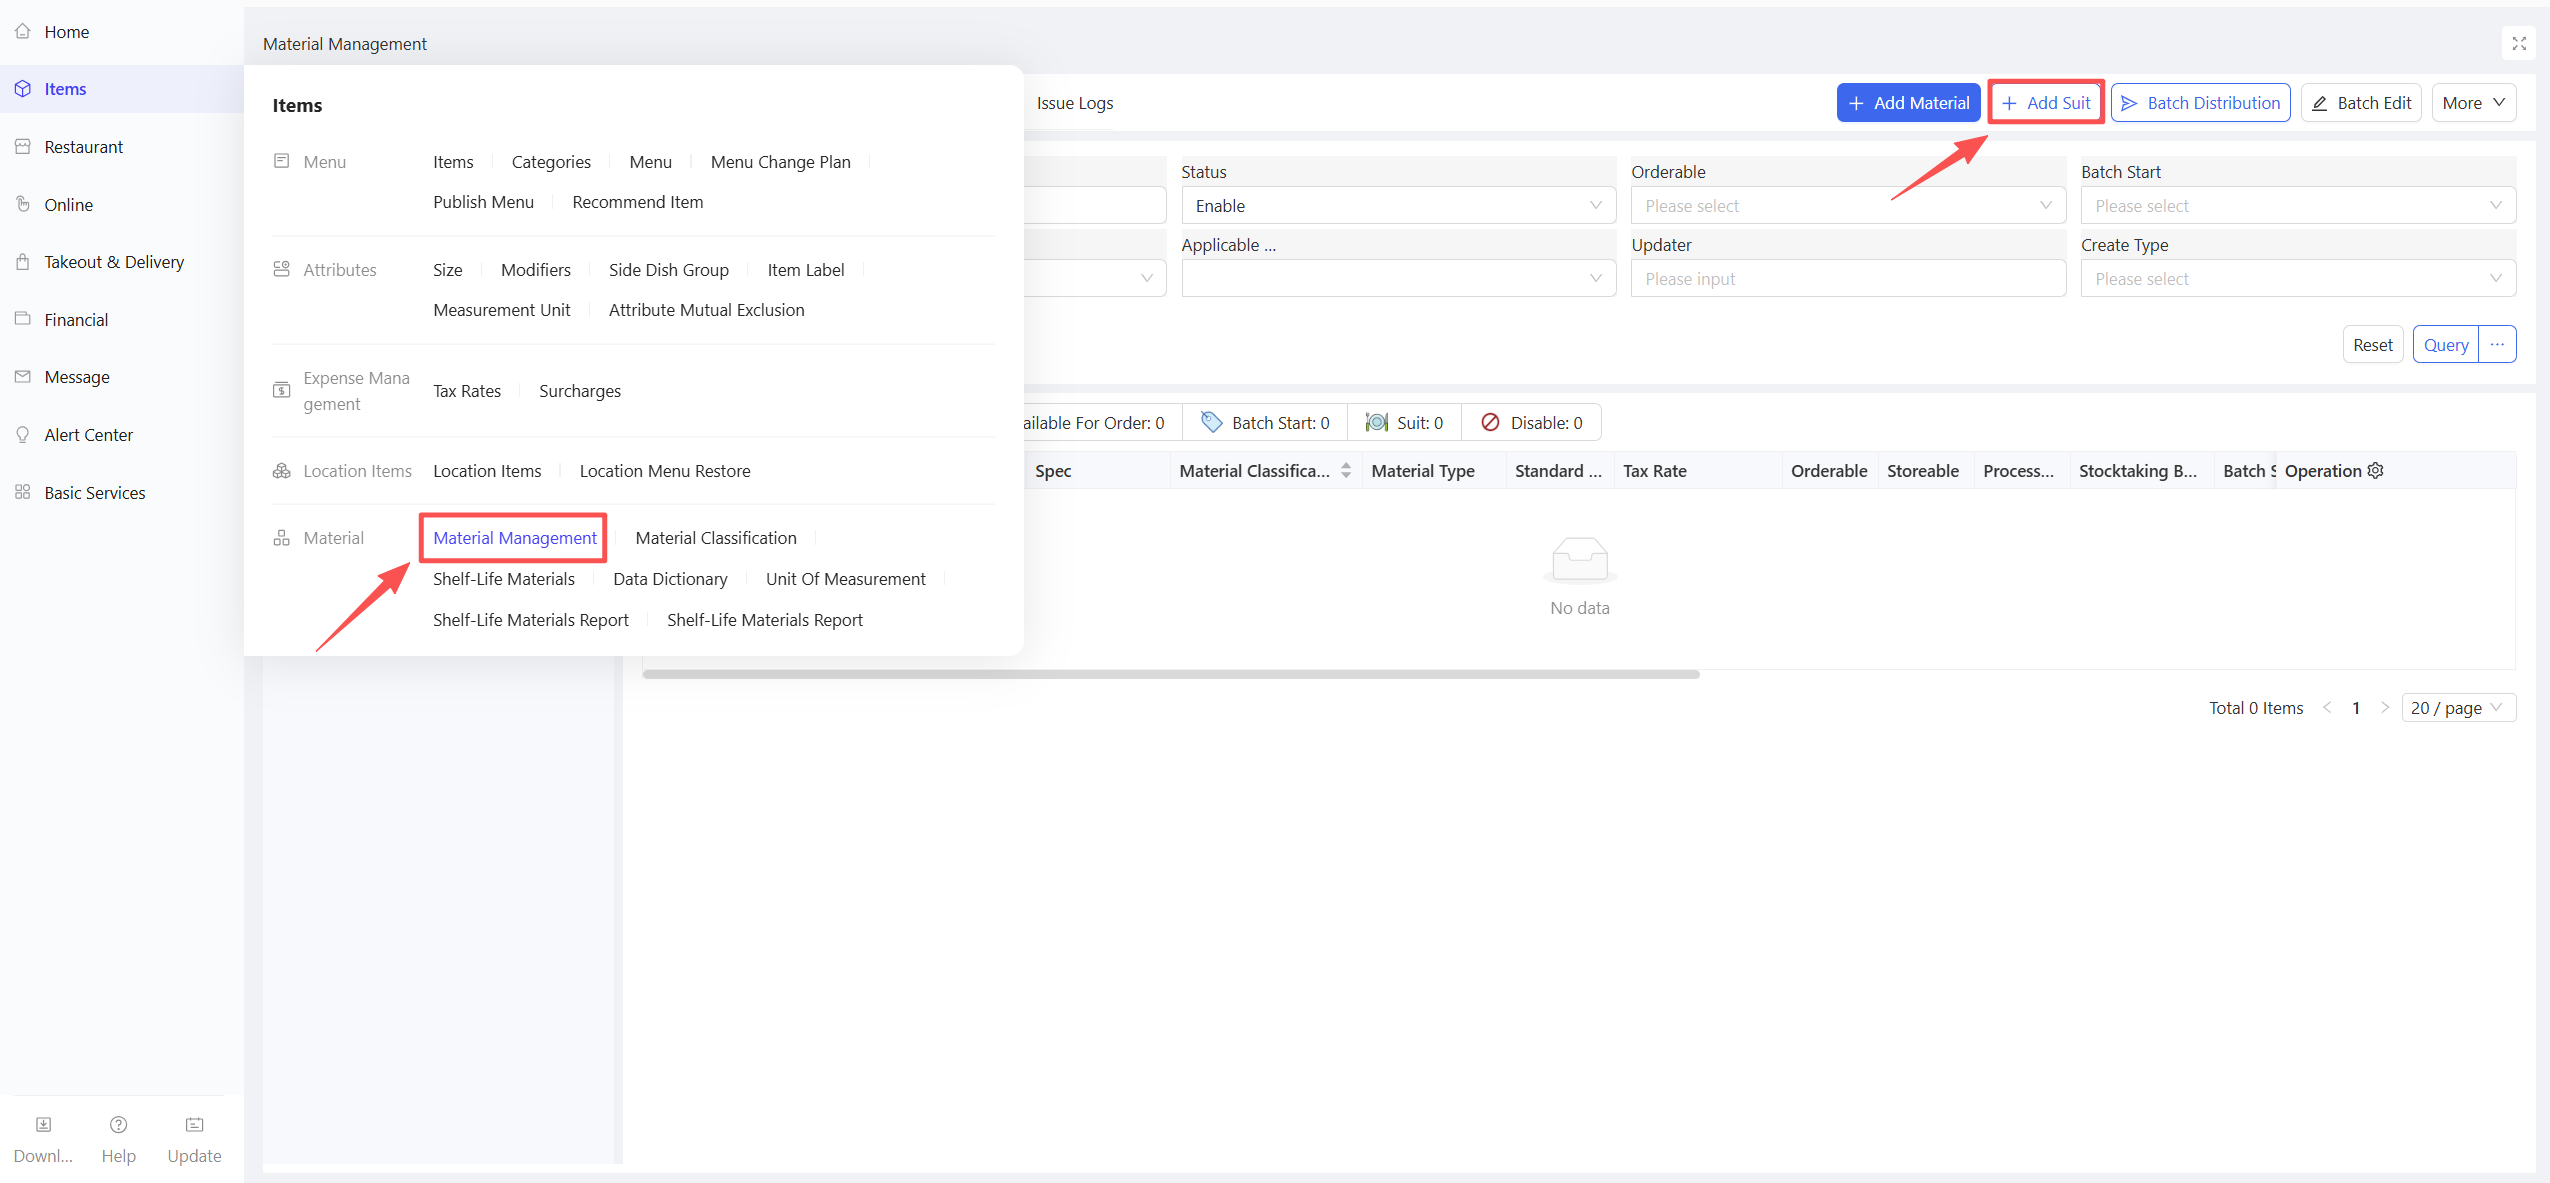
On the Ingredient & Supply tab, click the Add Kit button in the upper right corner and configure the following information on the new kit page :
-
Basic Information
- Kit Name: Enter the standard name of the kit, in line with catering usage scenarios (e.g., Classic Milk Tea Ingredient Kit).
- Kit Code: Enter the unique identification code of the kit; it is recommended to follow the group item coding rule (e.g., classification code + exclusive kit code) for easy retrieval and management.
- Kit Classification: Select the kit’s classification from the created three-level item classification system (it is recommended to create a separate Kit Category for easy distinction).
- Statistical Type: Select Cost Type (Ingredient) or Expense Type (Supply) to determine the financial accounting attribute of the kit (mostly Cost Type for production kits).
- Specification: Enter the overall specification of the kit (e.g., 1 kit/pack, 10 kits/carton), which must match the unit of measurement.
- Tag: Enter custom tags for the kit for quick retrieval (e.g., Production Kit, Milk Tea Special).
- Status: Select the kit status (enabled/Disabled); subordinate organizations cannot use disabled kits.
- Mnemonic Code: Enter the Pinyin/first letter mnemonic code of the kit for quick retrieval.
-
Unit of Measurement
- Unit Conversion: Configure the conversion ratio between multiple units (e.g., 1 carton = 20 packs), and associate the standard unit and procurement units.
- Store Procurement Unit: Select the unit for store kit issuing.
- Distribution Center Procurement Unit: Select the unit for bulk procurement of the kit by the distribution center.
-
Kit Composition (Core Configuration for Kits)
- Cost Allocation Method: Two options - Calculate by Reference Amount / Specify Allocation Ratio
- Add Materials: Select the ingredients and supplies to be included in the kit from the group's created items (multiple items can be added at a time), and enter the following information after addition: - Material Name: Automatically populated after selection, cannot be modified manually; ensure the item status is enabled. - Quantity: Enter the fixed usage quantity of the item per kit (e.g., 50g Black Tea Powder/kit, 100g Non-dairy Creamer/kit for a milk tea kit), which must match the cost unit of the item. - Reference Unit Price: Manually enter the reference unit price of the item when using the Calculate by Reference Amount method. - Cost Allocation Ratio: Automatically generated and unmodifiable when using the Calculate by Reference Amount method; manually entered and must meet the 100% total ratio requirement when using the Specify Allocation Ratio method.💡Notes
Rule Note: The total cost of a kit is the sum of the costs of all ingredients and supplies in the kit. The allocation ratio is used to accurately split the total kit cost for each item, meeting the needs of separate cost accounting.
Calculate by Reference Amount: The system automatically calculates the cost allocation ratio of each item based on the reference amount (reference unit price × item quantity) of ingredients/supplies in the kit; no manual entry is required, and the total ratio is automatically 100%. If the reference unit price/quantity of items is modified later, the allocation ratio needs to be refreshed again.
Specify Allocation Ratio: Manually enter the cost allocation ratio of each item per kit; the sum of all item allocation ratios must be 100%, which is verified in real time by the system, and the kit cannot be saved if the ratio is inconsistent. The reference unit price defaults to the reference cost maintained in the item file and supports manual modification.
-
Inventory Information
- Orderable: Enabled by default; controls whether the kit can be sold to stores from the distribution center perspective.
-
Order Control Information
- Order Control Unit, Maximum Order Quantity, Minimum Order Quantity, Minimum Order Multiple (same configuration rules as adding a single item)
-
Others
- Brand: Enter the brand of the kit (if applicable).
- Storage Condition: Three options - Frozen/Refrigerated/Room Temperature (consistent with the main ingredients in the kit).
- Item Description: Enter supplementary notes for the kit (e.g., applicable production scenarios, matching dishes; optional).
STEP 4: Save the Kit
Click the Save and Add New button in the lower right corner of the page to complete the kit addition.
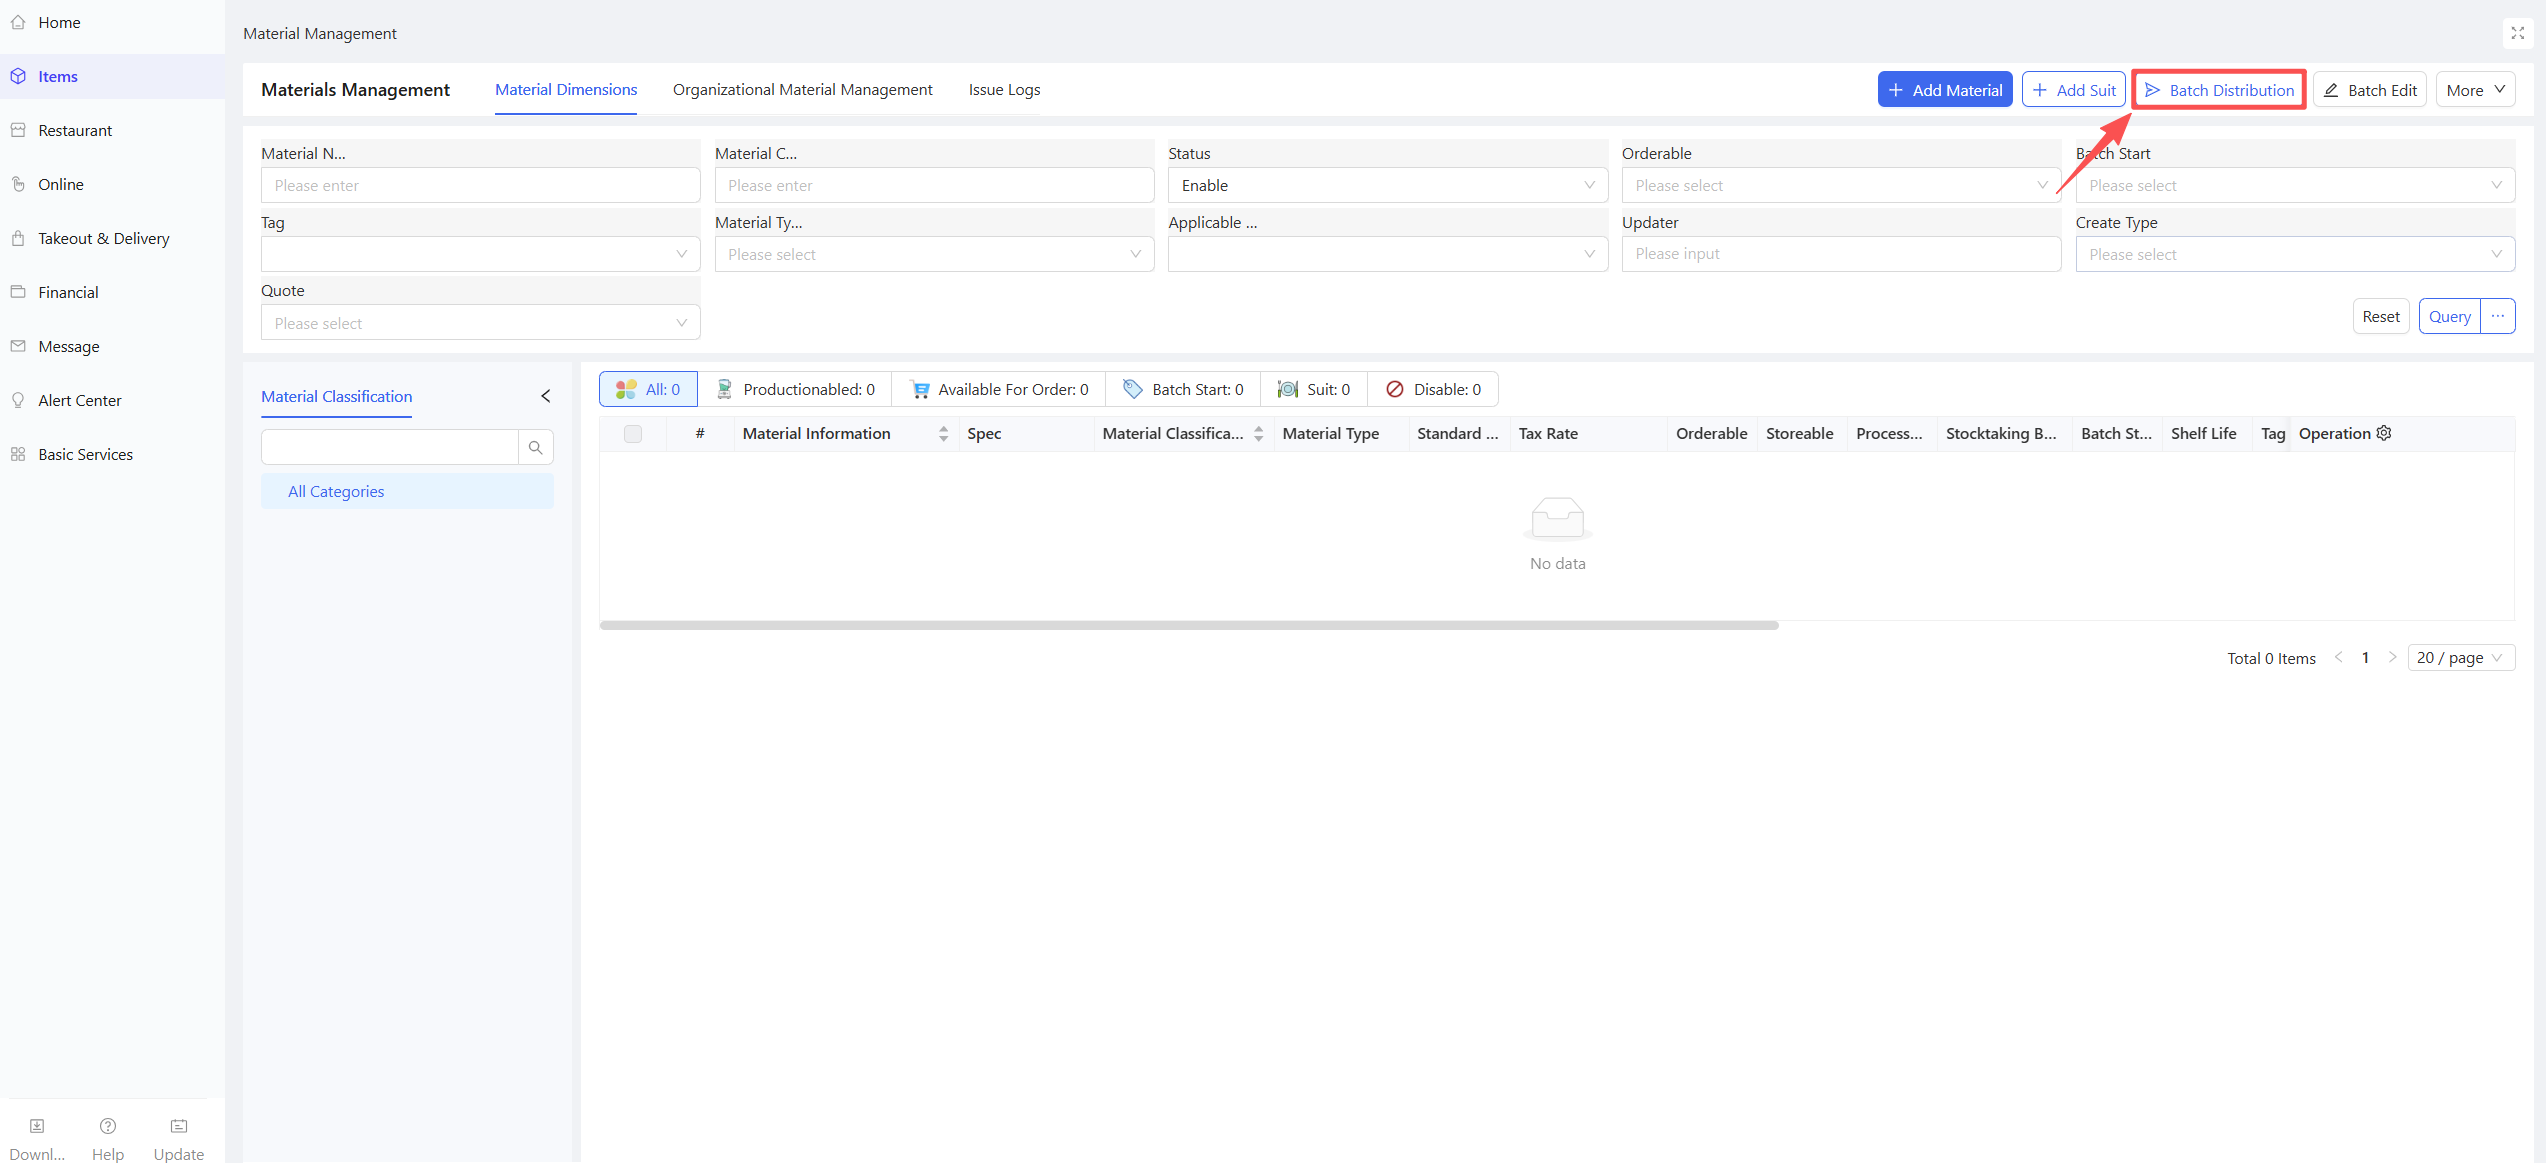
2.4 Distribute Ingredient & Supply
2.4.1 Batch Distributed Items
STEP 1: Switch to the Group Perspective
STEP 2: Access the Ingredient & Supply Management Page
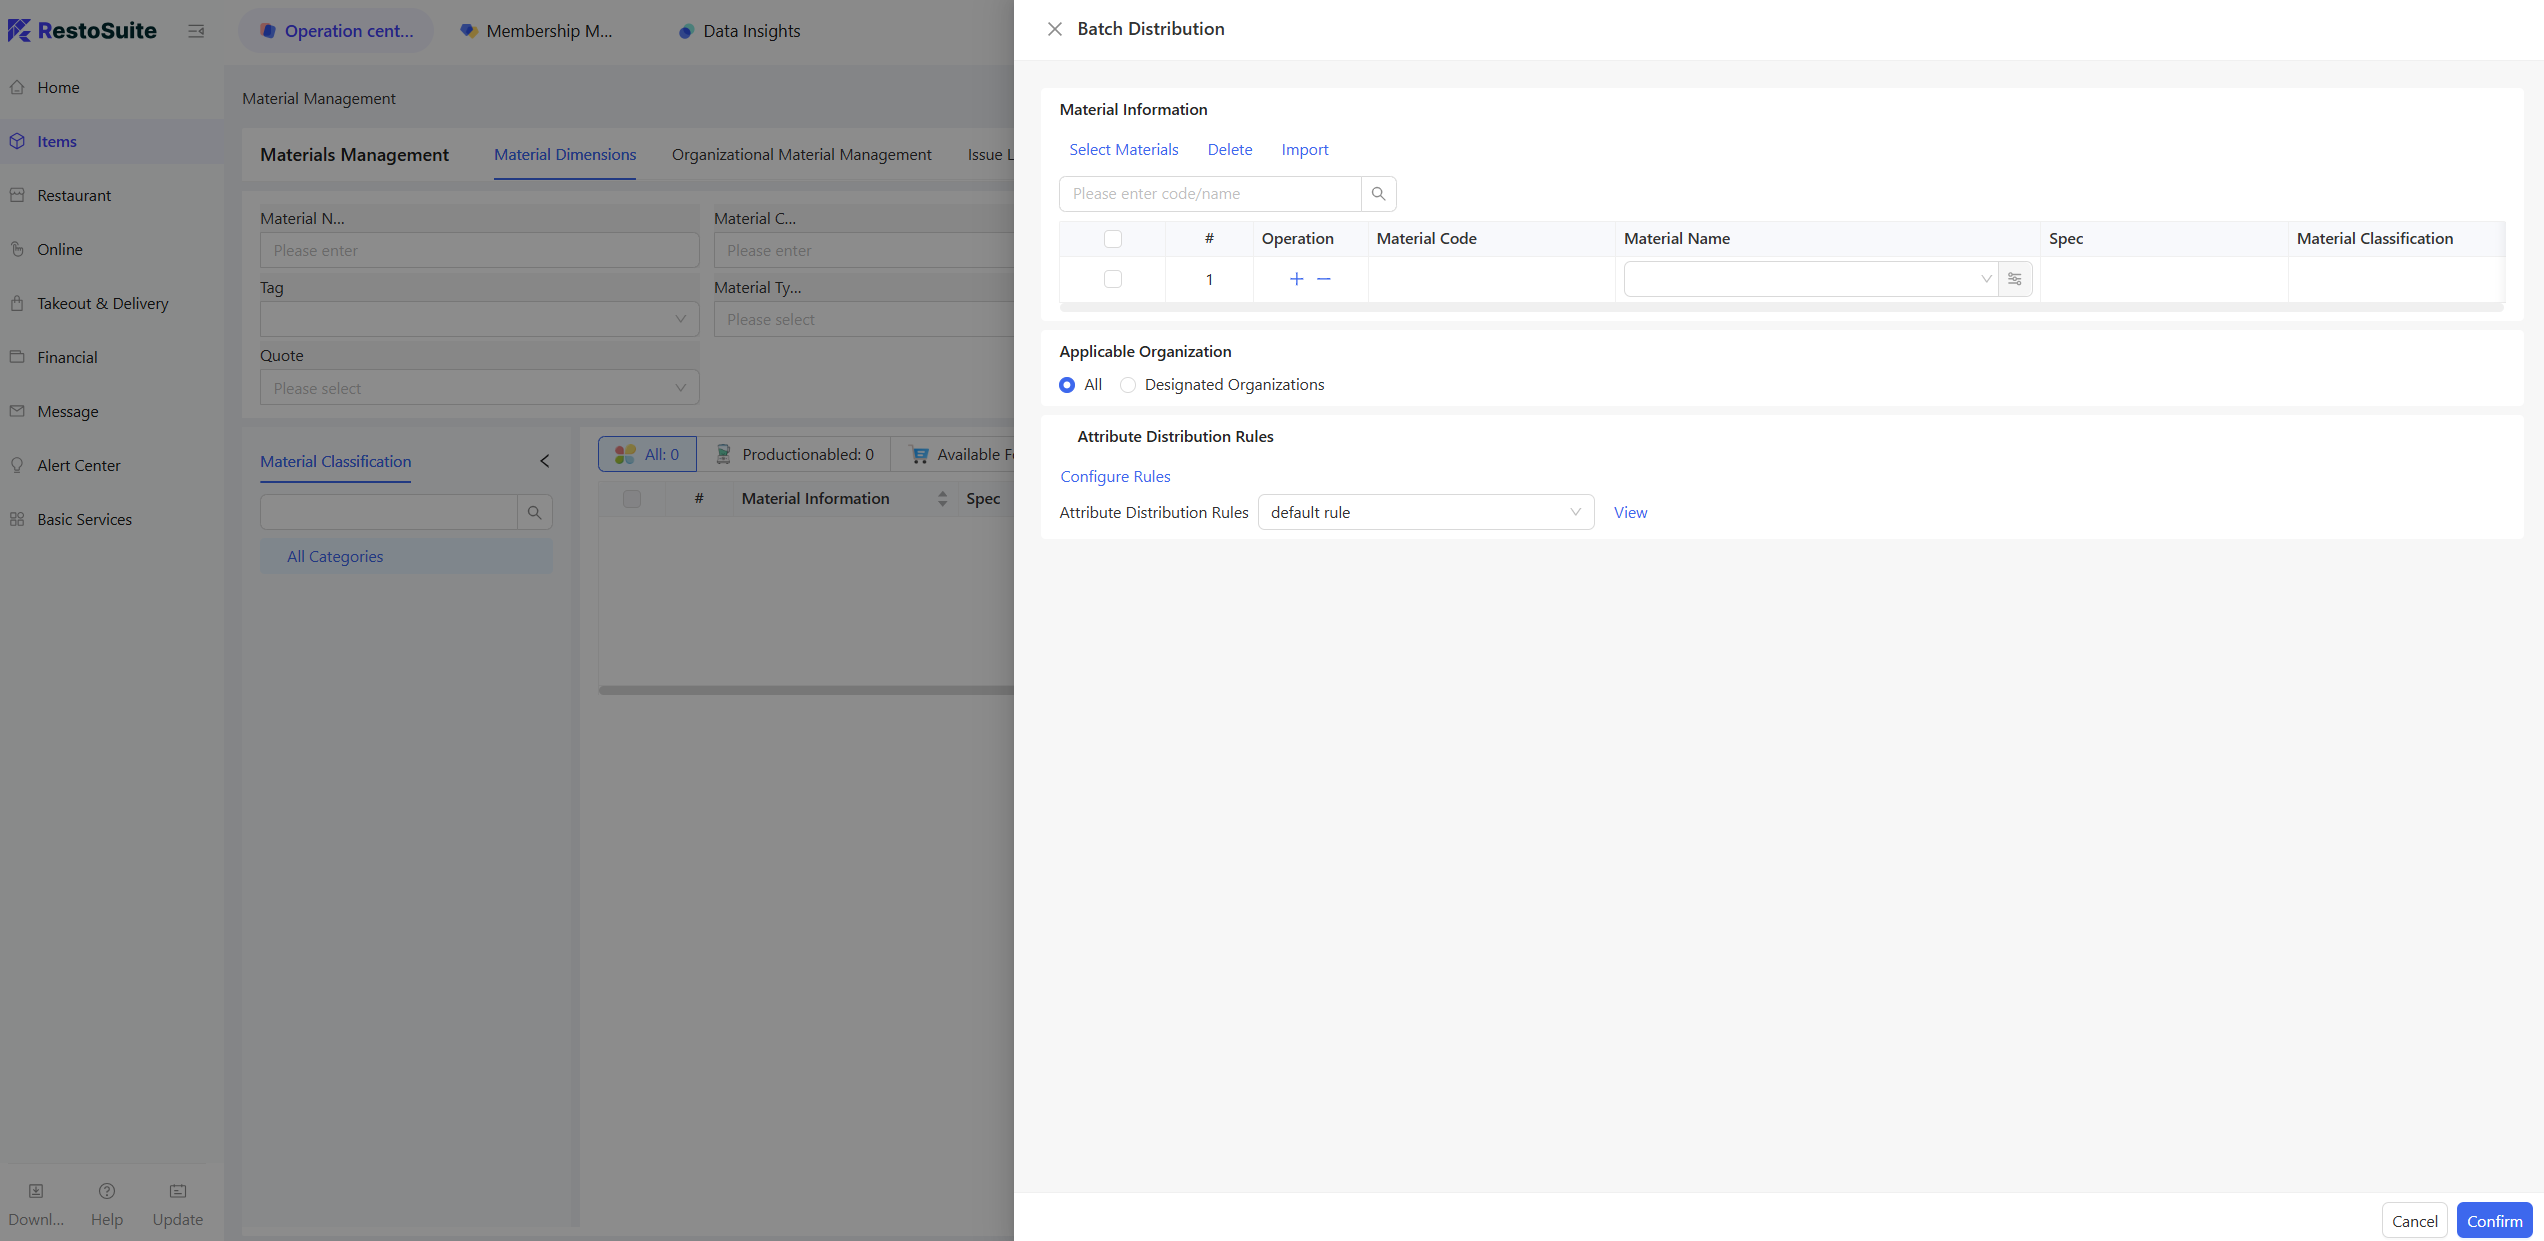
STEP 3: On the Ingredient & Supply tab, click the Batch Distribute Items button in the upper right corner.
STEP 4: Add the items to be distributed, select the applicable organizations, set the distribution rules, and click Confirm to complete the distribution.
2.4.2 Batch Cancel Item Distribution
STEP 1: Switch to the Group Perspective (same as Step 1 of adding an item).
STEP 2: Access the Ingredient & Supply Management Page (same as Step 2 of adding an item).
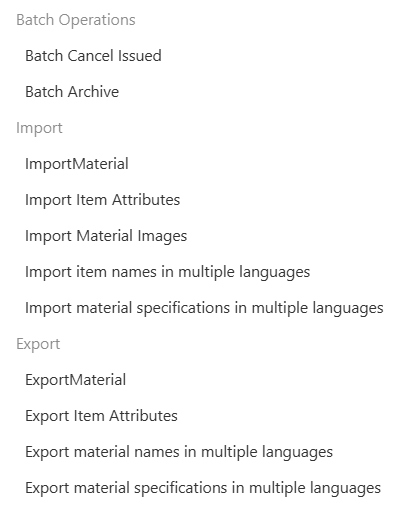
STEP 3: On the Ingredient & Supply tab, click More → Batch Cancel Distribution in the upper right corner.
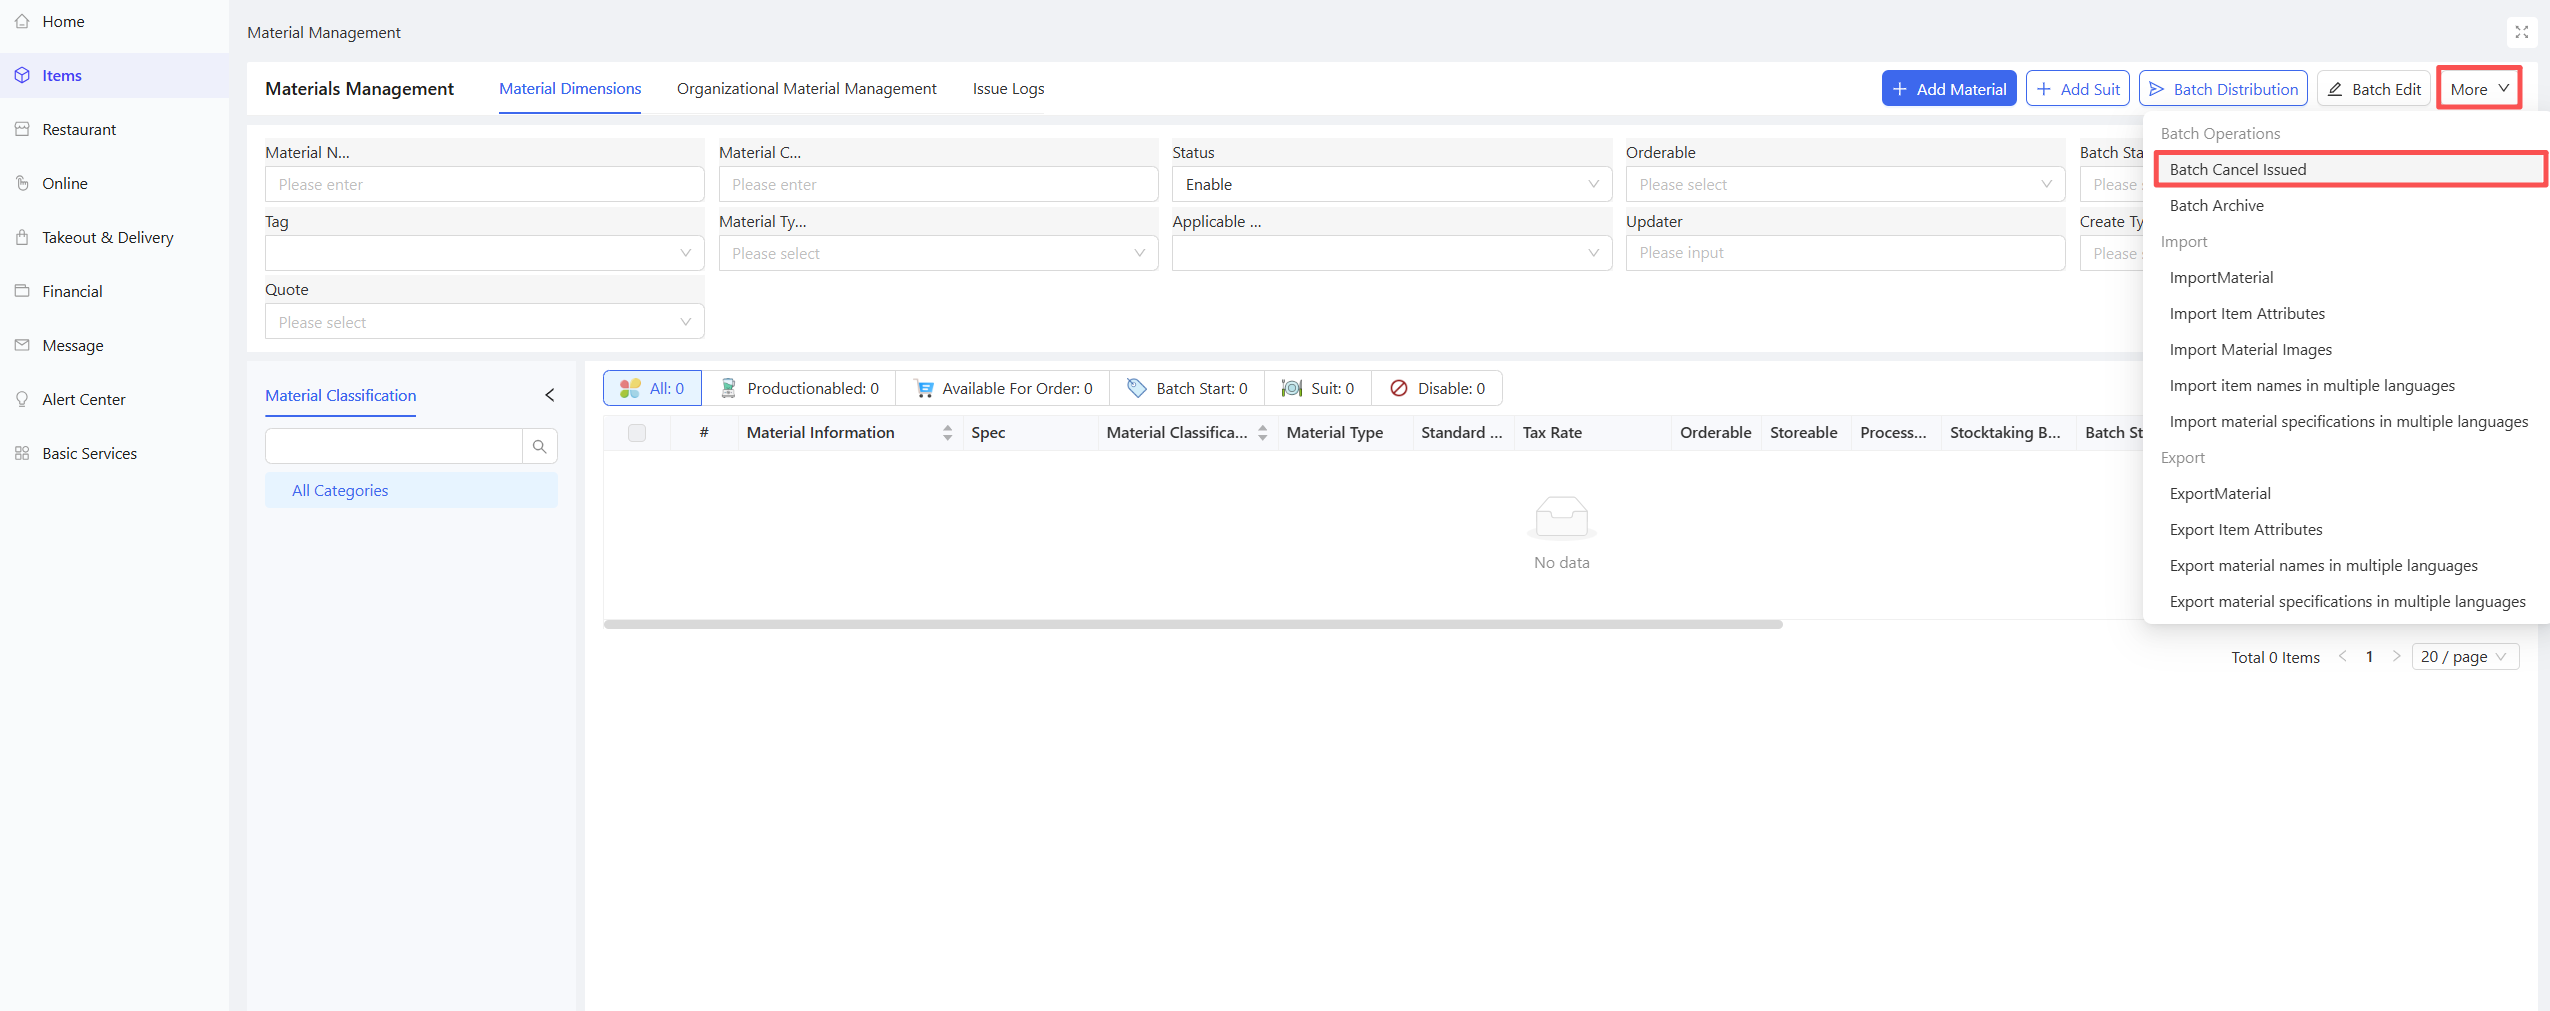
2.5 Batch Operations
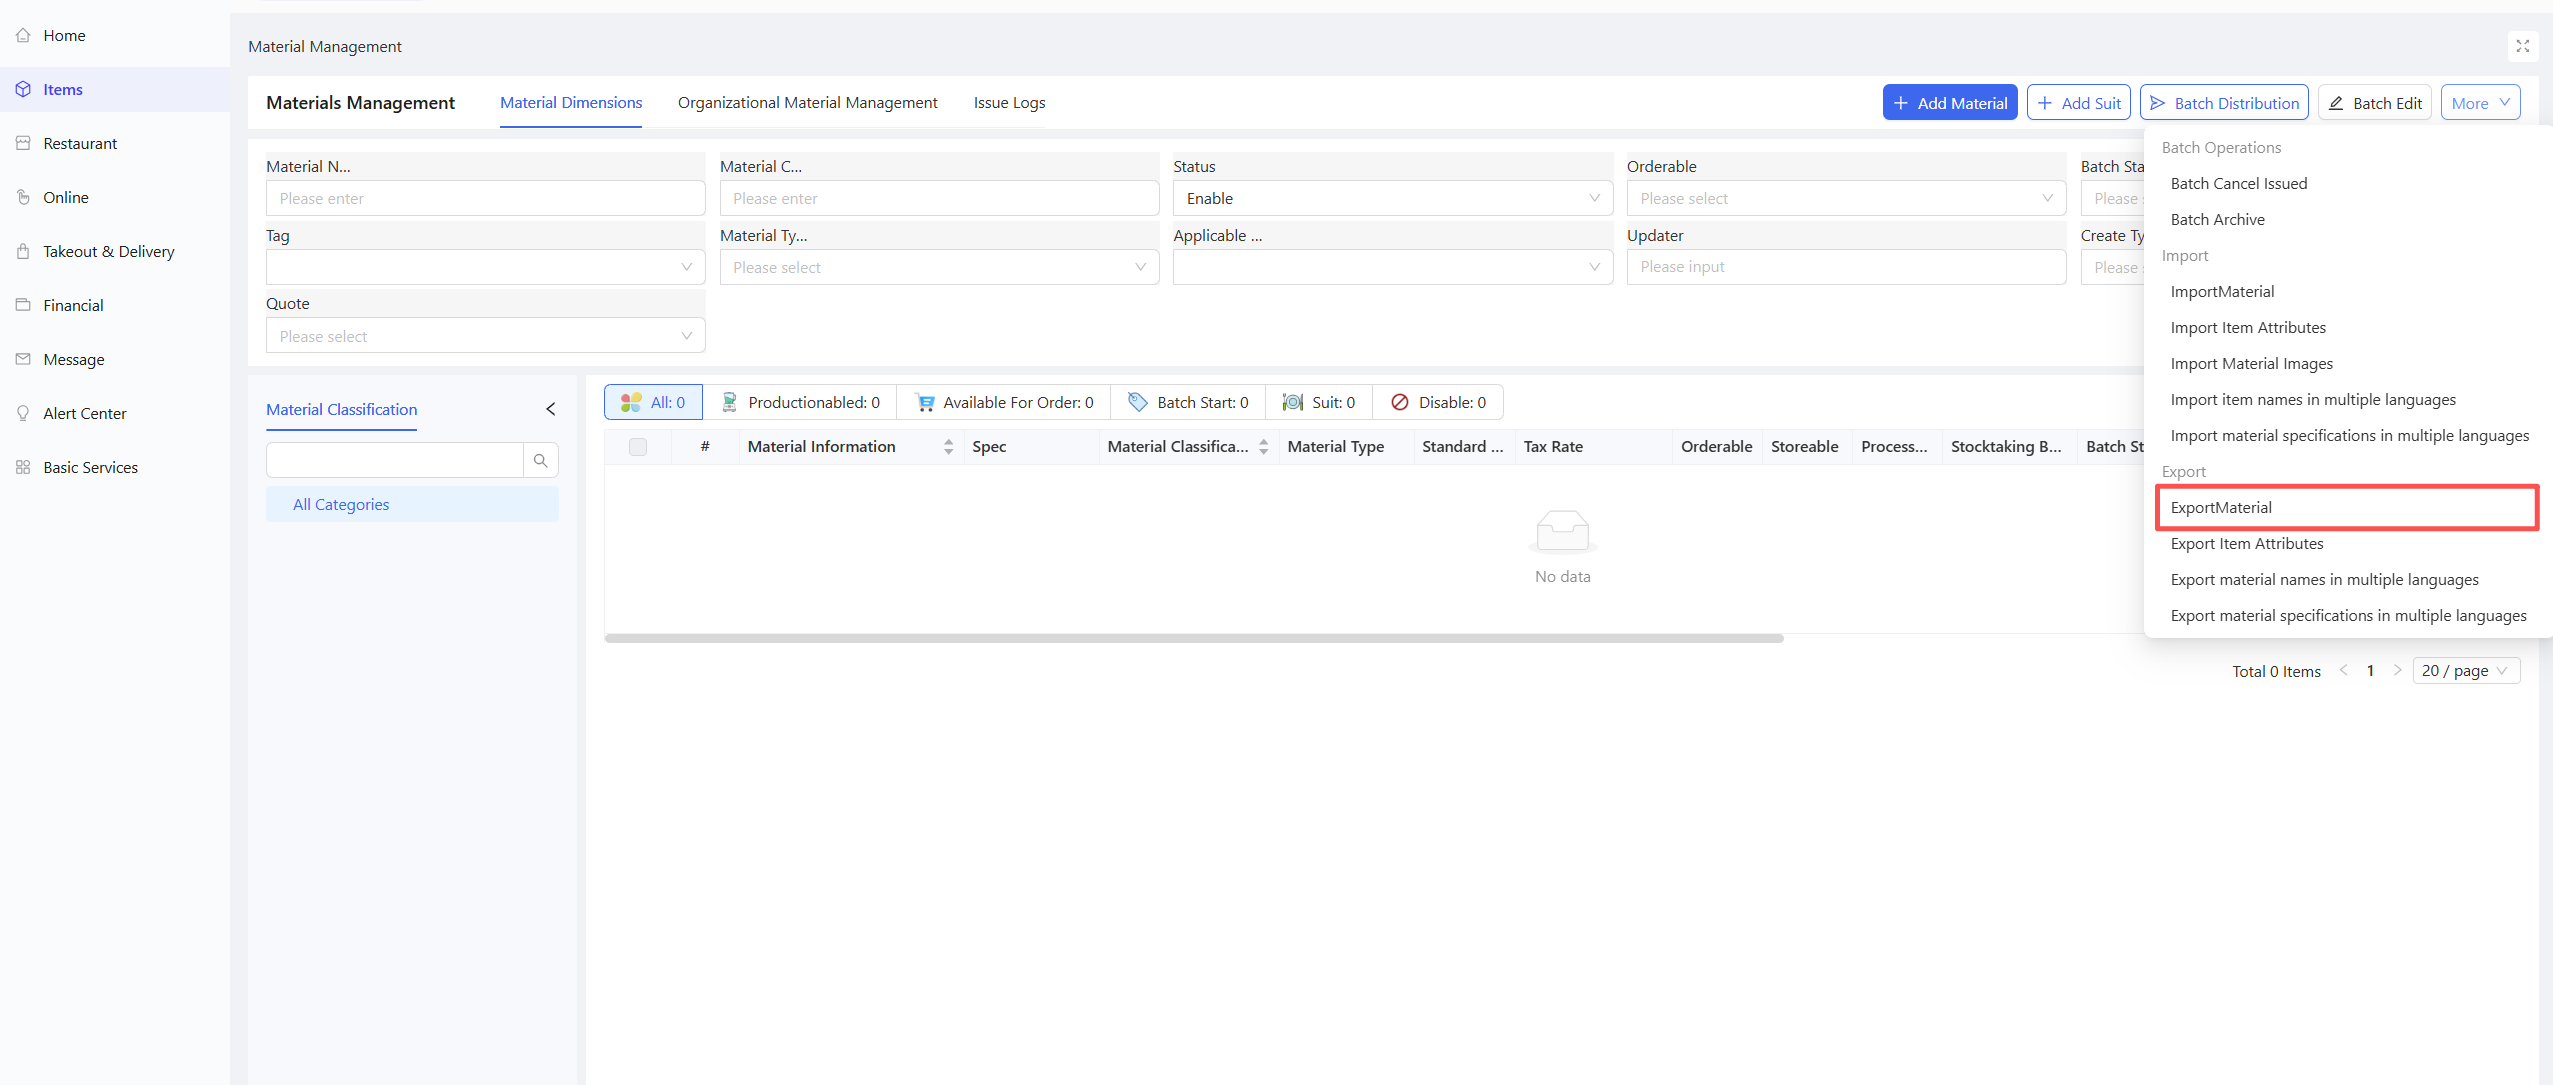
2.5.1 Batch Export Material
STEP 1: Switch to the Group Perspective (same as Step 1 of adding an item).
STEP 2: Access the Ingredient & Supply Management Page (same as Step 2 of adding an item).
STEP 3: On the Ingredient & Supply tab, click More → Export Material in the upper right corner to complete the export.
2.5.2 Batch Import Material
STEP 1: Switch to the Group Perspective (same as Step 1 of adding an item).
STEP 2: Access the Ingredient & Supply Management Page (same as Step 2 of adding an item).
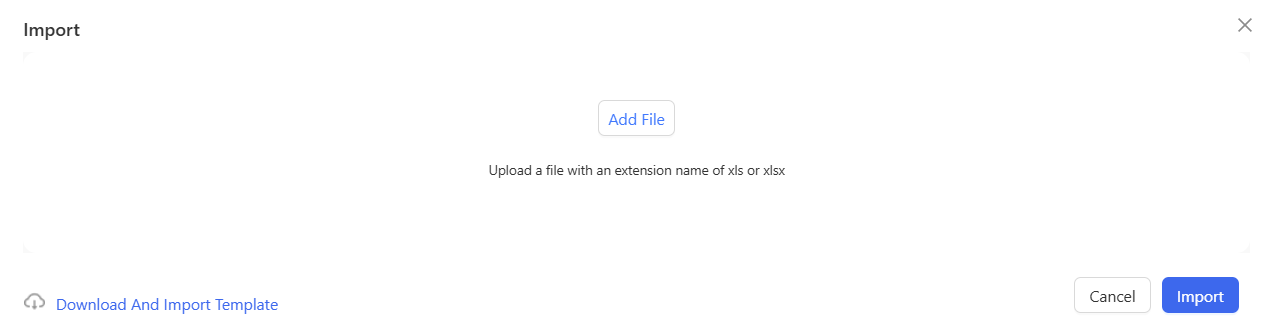
STEP 3: On the Ingredient & Supply tab, click More → Import Material in the upper right corner.
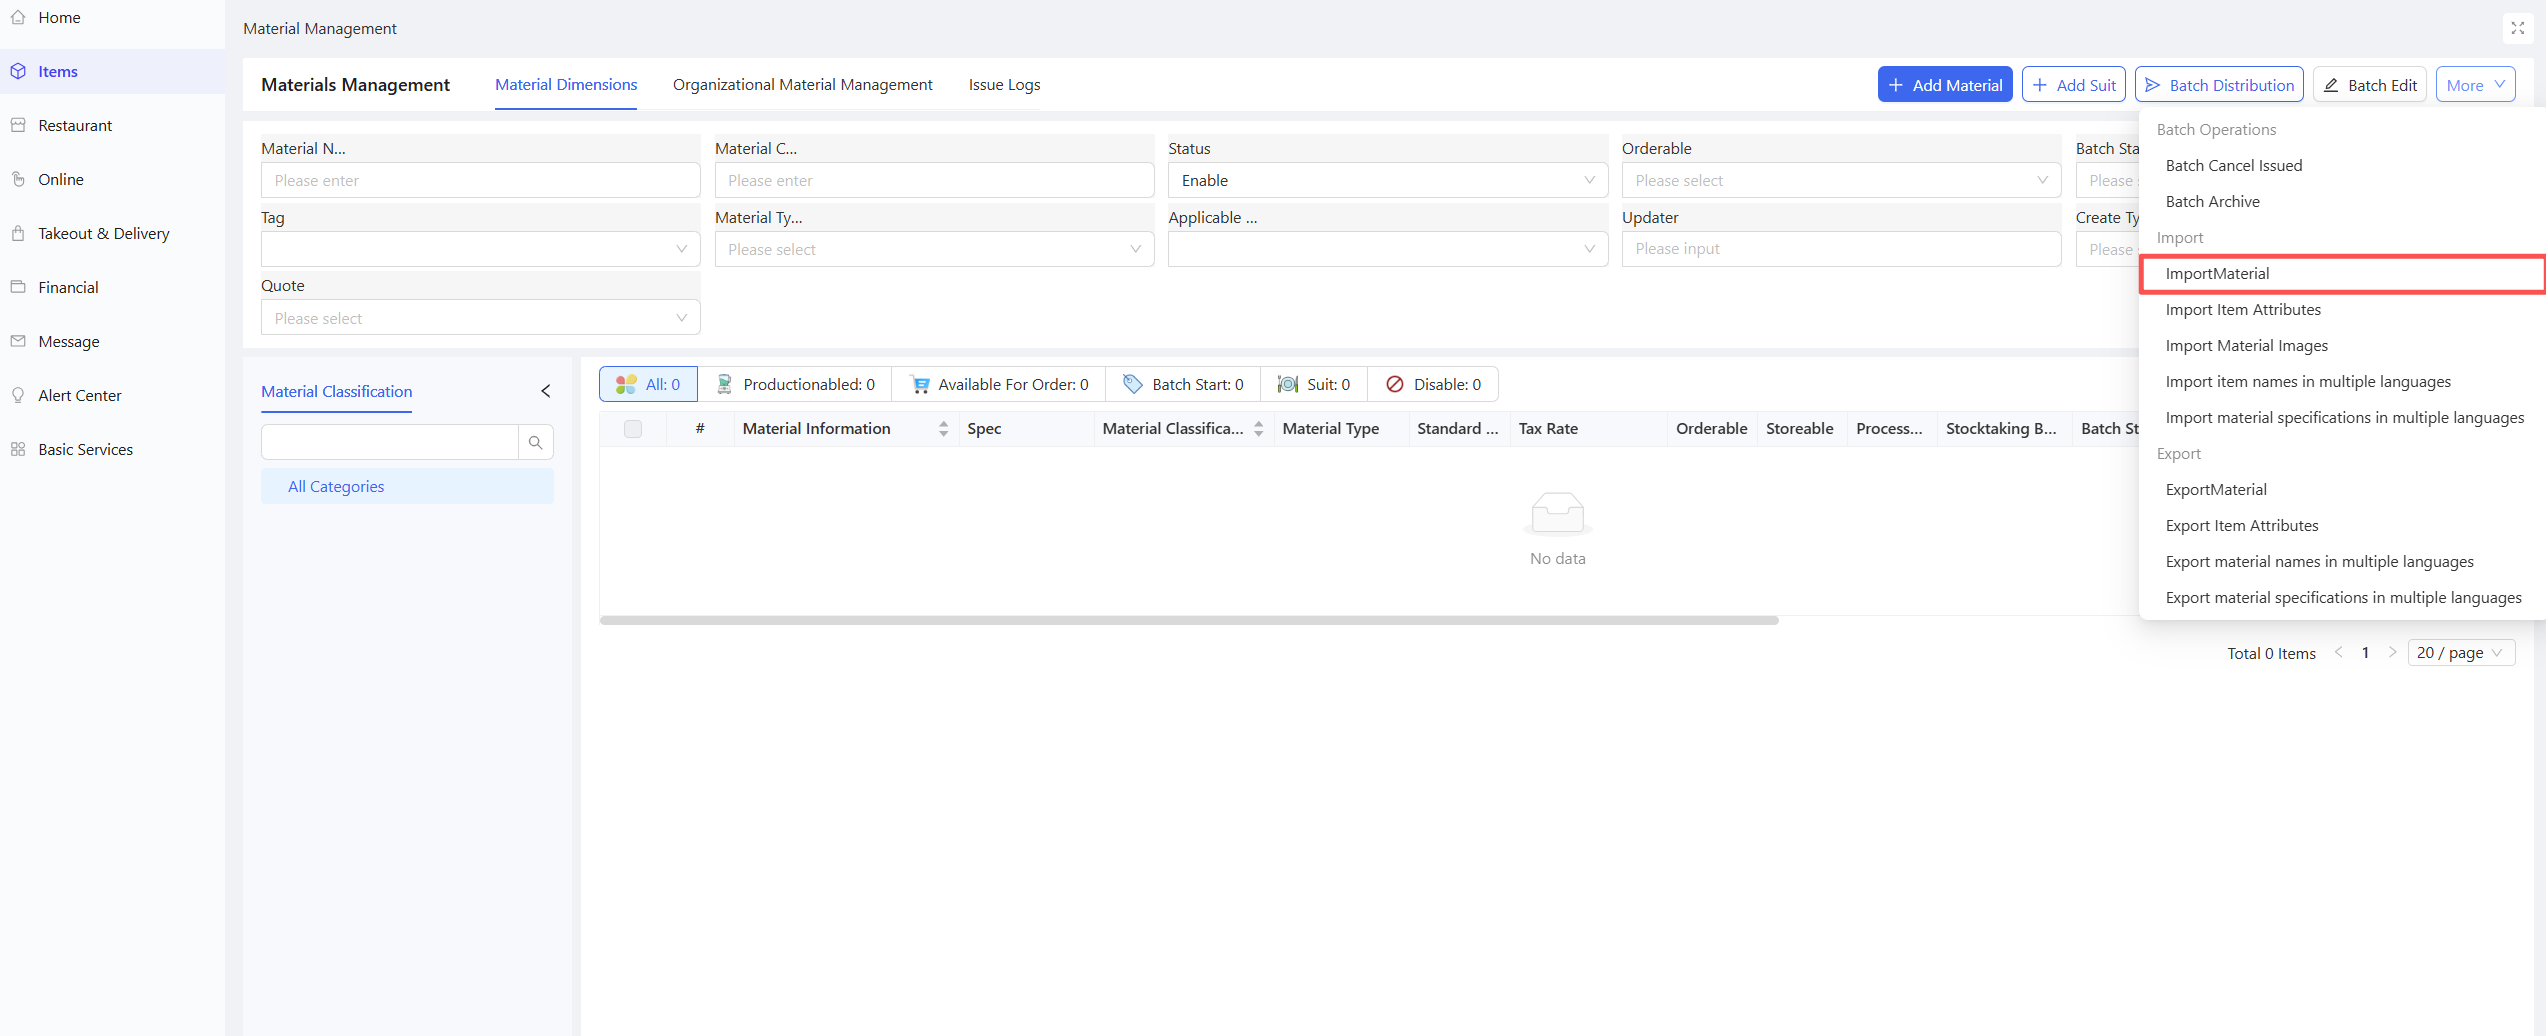
STEP 4: Download the import template, fill in the item information, upload the completed file, and click Import to finish the operation.
2.5.3 Other Batch Operations
In addition to the above commonly used functions, the system also supports other batch operations for materials with similar processes, which will not be elaborated here.
3 Ingredient & Supply Classification Management
3.1 Key Terms
- Ingredient & Supply Classification: A hierarchical category structure for managing ingredients and supplies; the system supports three levels (e.g., Level 1: Ingredient → Level 2: Fresh Meat → Level 3: Pork).
3.2 Add an Item Classification
STEP 1: Switch to Group Perspective
- Log in to the Operation Center as a group administrator.
- Click Perspective Switch in the upper right corner, then select Group perspective.
STEP 2: Access the Ingredient & Supply Classification Management Page
- Entry 1: 【Operation Center】>【Item Management】>【Ingredient & Supply】>【Ingredient & Supply Classification Management】
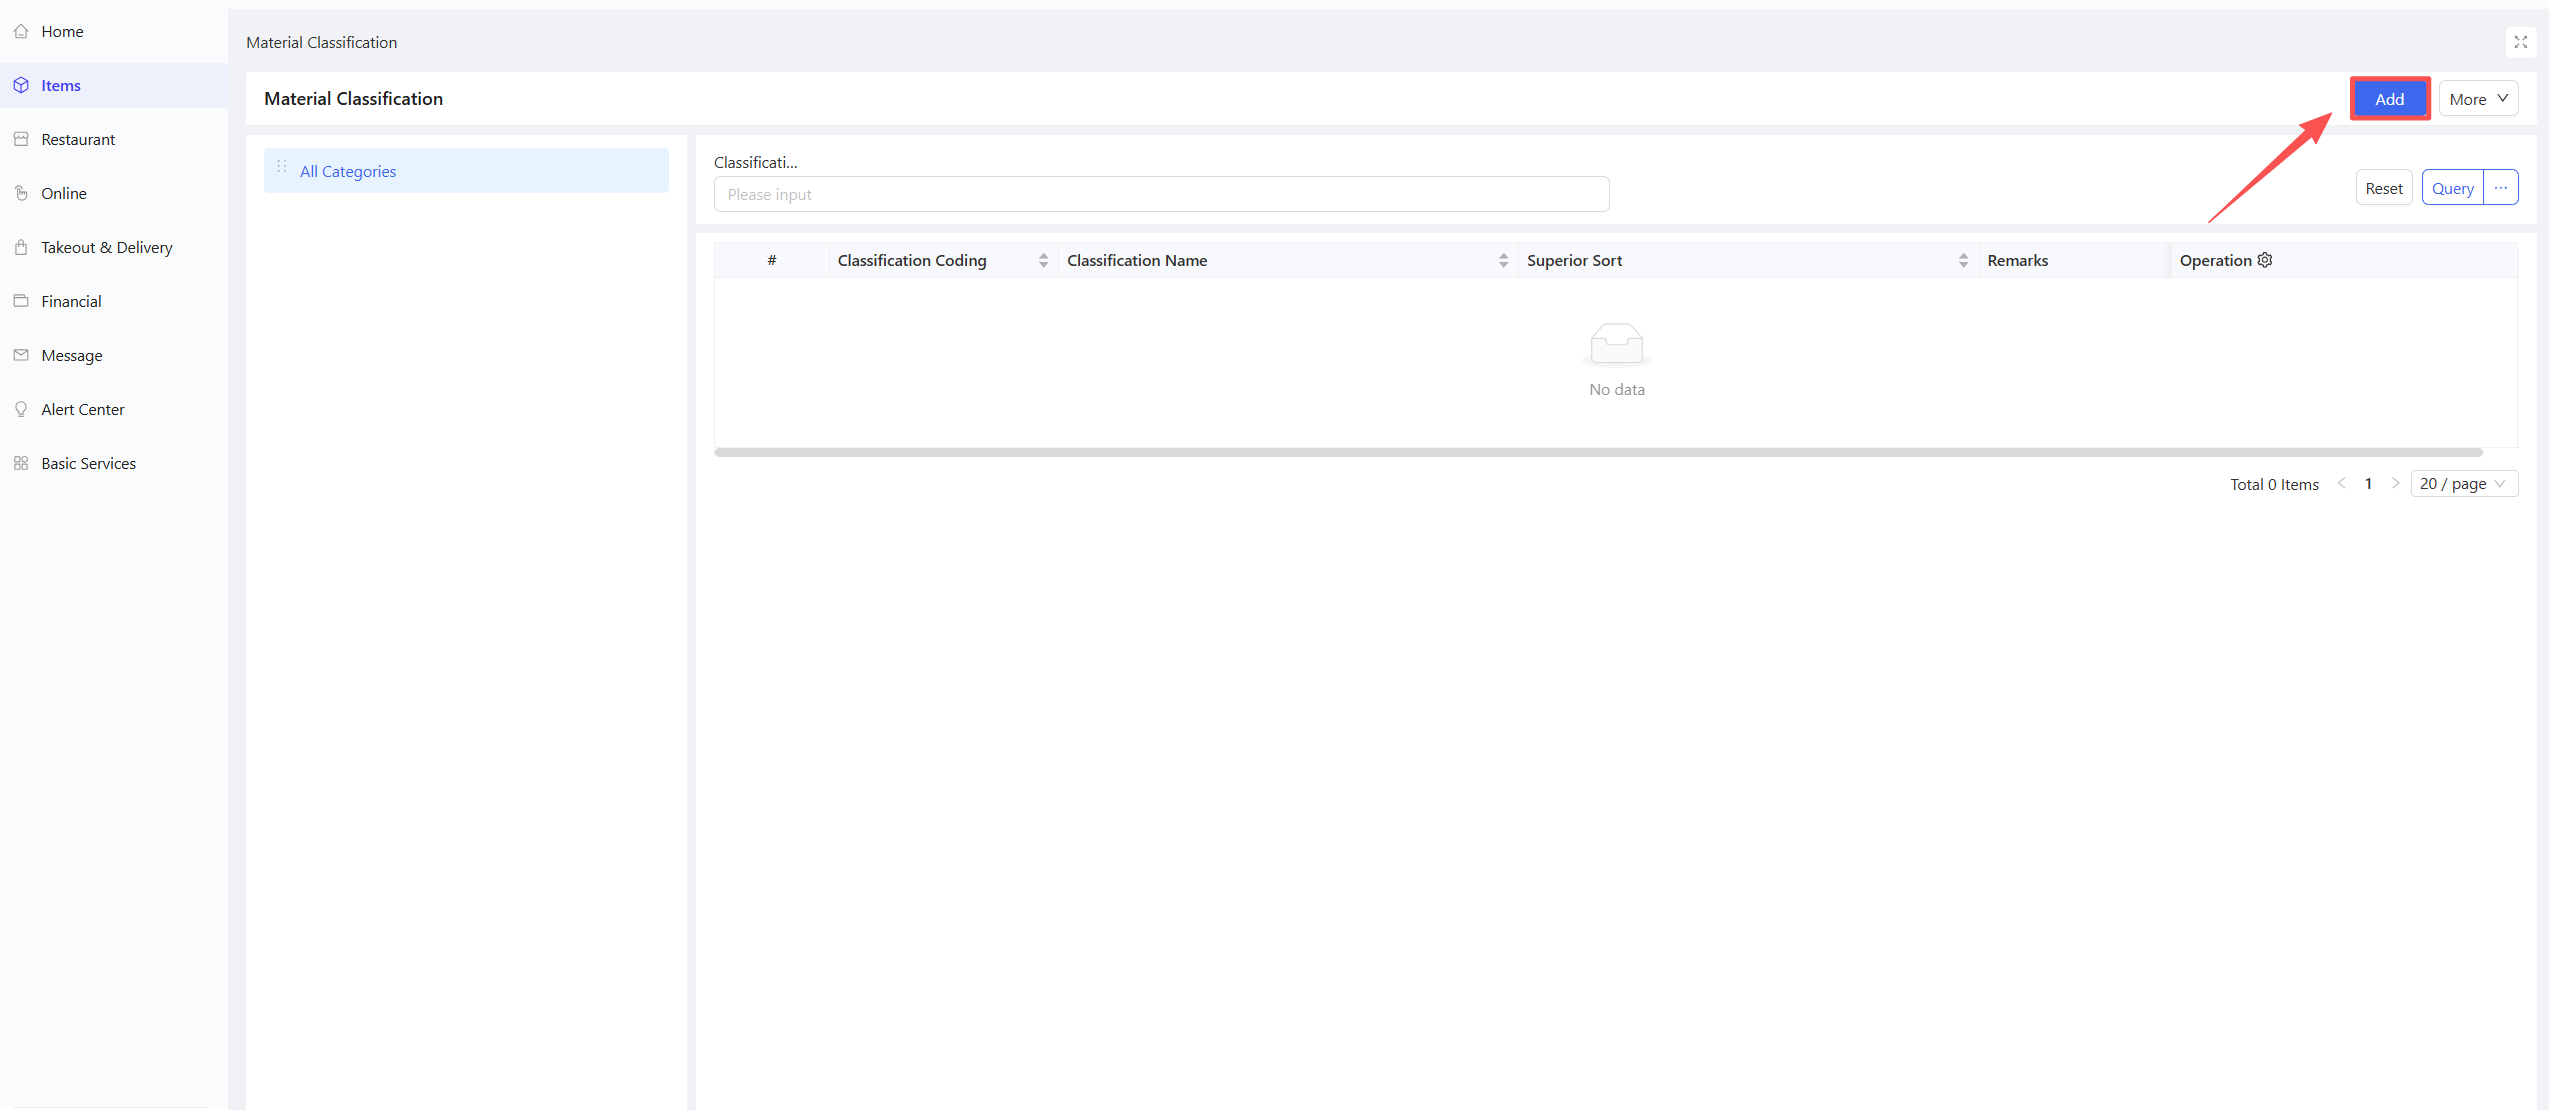
- Entry 2:【Supply Chain】>【File Management】>【Ingredient & Supply Classification Management】
STEP 3: Configure Classification Information
Click the Add button in the upper right corner of the page and configure the following information in the pop-up window:
- Classification Code: Automatically generated, can be edited manually; the unique identification code of the item classification for easy retrieval.
- Classification Name: Enter the name of the item classification (e.g., Fresh Meat Ingredient, Disposable Supply, Kit Category).
- Parent Classification: Select the parent classification of this classification from the drop-down list.
- Remarks: Supplementary notes for the classification (optional).
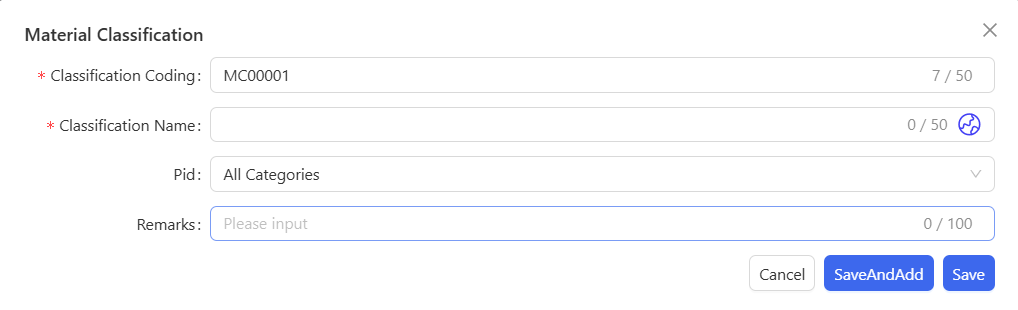
STEP 4: Save the Classification
Click Save and Add New to complete the classification addition.
STEP 5: Sort Classifications
On the left side of the page, drag and drop the sorting button to adjust the order of ingredient & supply classifications.
4 Perishable Item Management
4.1 Key Terms
- Perishable Item: Items with a clear shelf life that require shelf life control, mainly including fresh catering ingredients and semi-finished products (e.g., vegetables, meat, dairy products, prepared dishes). Batch and shelf life information must be entered for inbound and outbound operations, supporting shelf life alerts and refined inventory management.
4.2 Add Perishable Item Rules
STEP 1: Switch to Group Perspective
- Log in to the Operation Center as a group administrator.
- Click Perspective Switch in the upper right corner, then select Group perspective.
STEP 2: Access the Perishable Item Page
- Entry 1:【Operation Center】>【Item Management】>【Ingredient & Supply】>【Perishable Items】
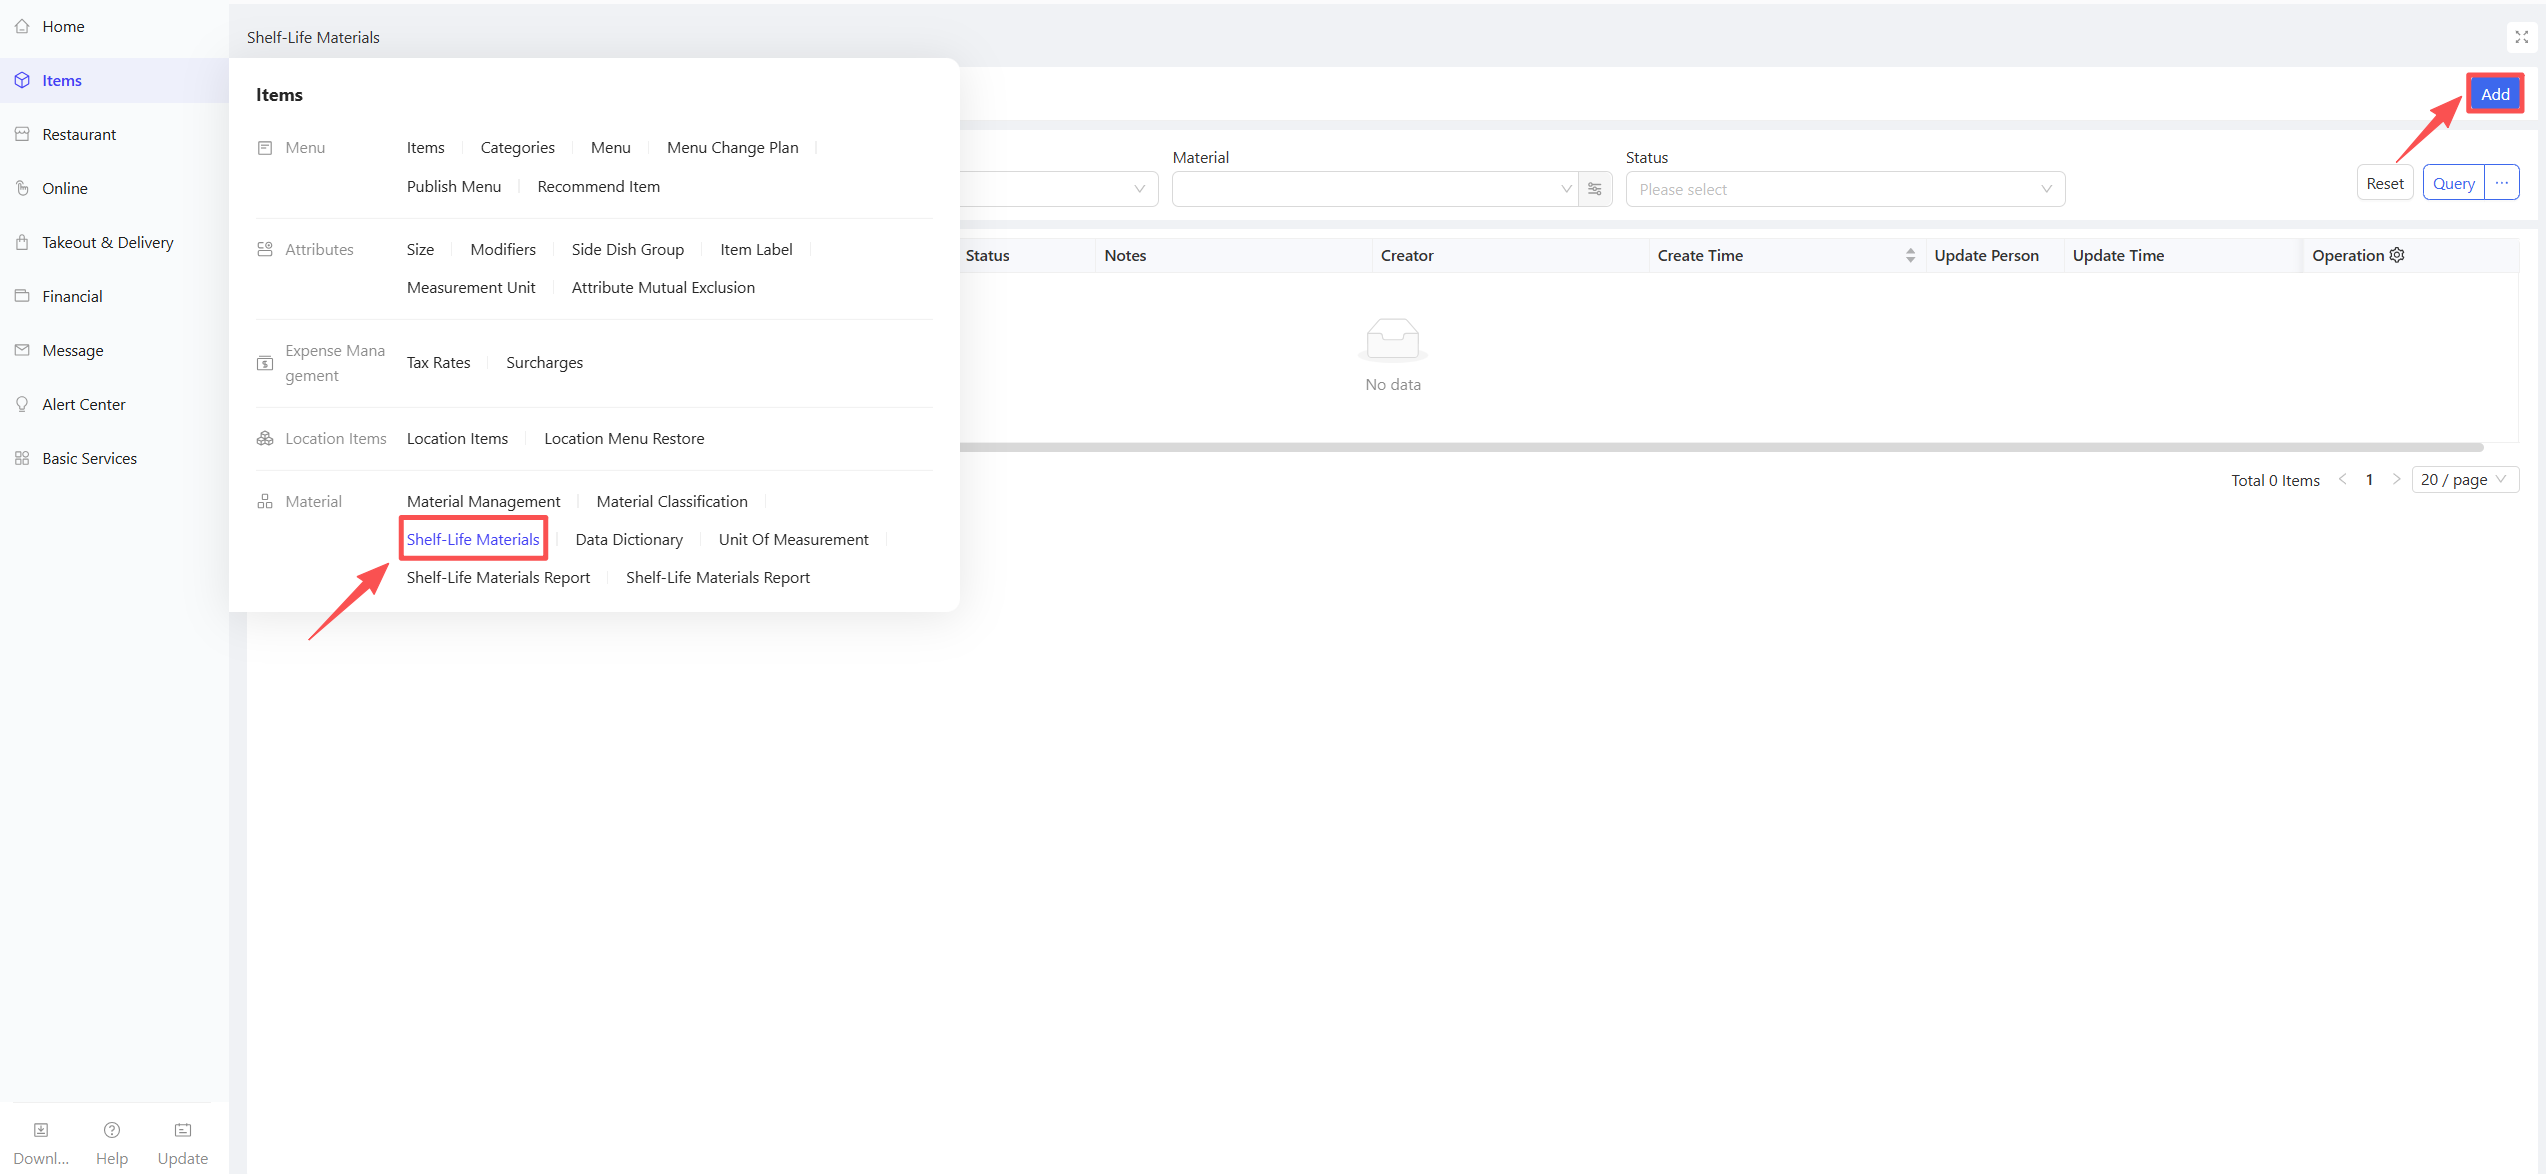
- Entry 2:【Supply Chain】>【File Management】>【Perishable Items】
STEP 3: Select Rule Creation Dimension
Switch between the Rule Dimension and Material Dimension tabs at the top of the page to create perishable item rules, then click the Add button in the upper-right corner.
Dimension Explanation
Rule Dimension:
Create general shelf life rules by shelf life control type/item category (e.g., General Shelf Life Rule for Fresh Meat Ingredient). A single rule can be bound to multiple perishable items with the same attributes, adapted to the unified control scenario of multiple items in the same category, improving rule configuration efficiency.
Item Dimension:
Create exclusive shelf life rules for a single item (e.g., Shelf Life Rule for Opened Homemade Tomato Sauce). A single rule is only bound to one item, adapted to the personalized shelf life control scenario of special perishable ingredients, meeting the needs of precise control.
STEP 4: Configure Perishable Item Rules
-
Basic Information
- Rule Name: Enter the standard name of the rule, in line with the control scenario/item attribute (e.g., Refrigerated Shelf Life Rule for Fresh Meat Ingredient).
- Remarks: Supplementary notes for the rule.
- Status: Enabled by default; the rule takes effect immediately if enabled; if disabled, the rule is retained but not enforced on the store side and can be re-enabled later.
-
Material Information Add the perishable items included in the rule (batch addition supported), then configure the following information for each item:
- Material Name: Automatically populated after selection, cannot be modified manually; ensure the item is a perishable type (e.g., fresh ingredient, semi-finished product, seasoned sauce).
- Unit: Defaults to the cost unit in the item file (e.g., gram, portion), supports manual editing, and must be consistent with the actual measurement of the item.
- Shelf Life After Opening: Accurate to minutes; enter the valid service life of the item after opening (e.g., 7 days 0 hrs 0 mins); enter 0 days 0 hrs 0 mins for unopened non-perishable supplies.
- Alert Time: Enter the alert duration before the item expires (accurate to days/hours/minutes; the system triggers an alert automatically according to the configuration) (e.g., Alert 3 days before expiration); must be less than the total shelf life/shelf life after opening of the item.
- Storage Condition: Three options - Frozen/Refrigerated/Room Temperature; must be consistent with the actual storage requirements of the perishable ingredient.
-
Applicable Organizations
Select the organizations applicable to the rule; all or part of the stores can be selected.
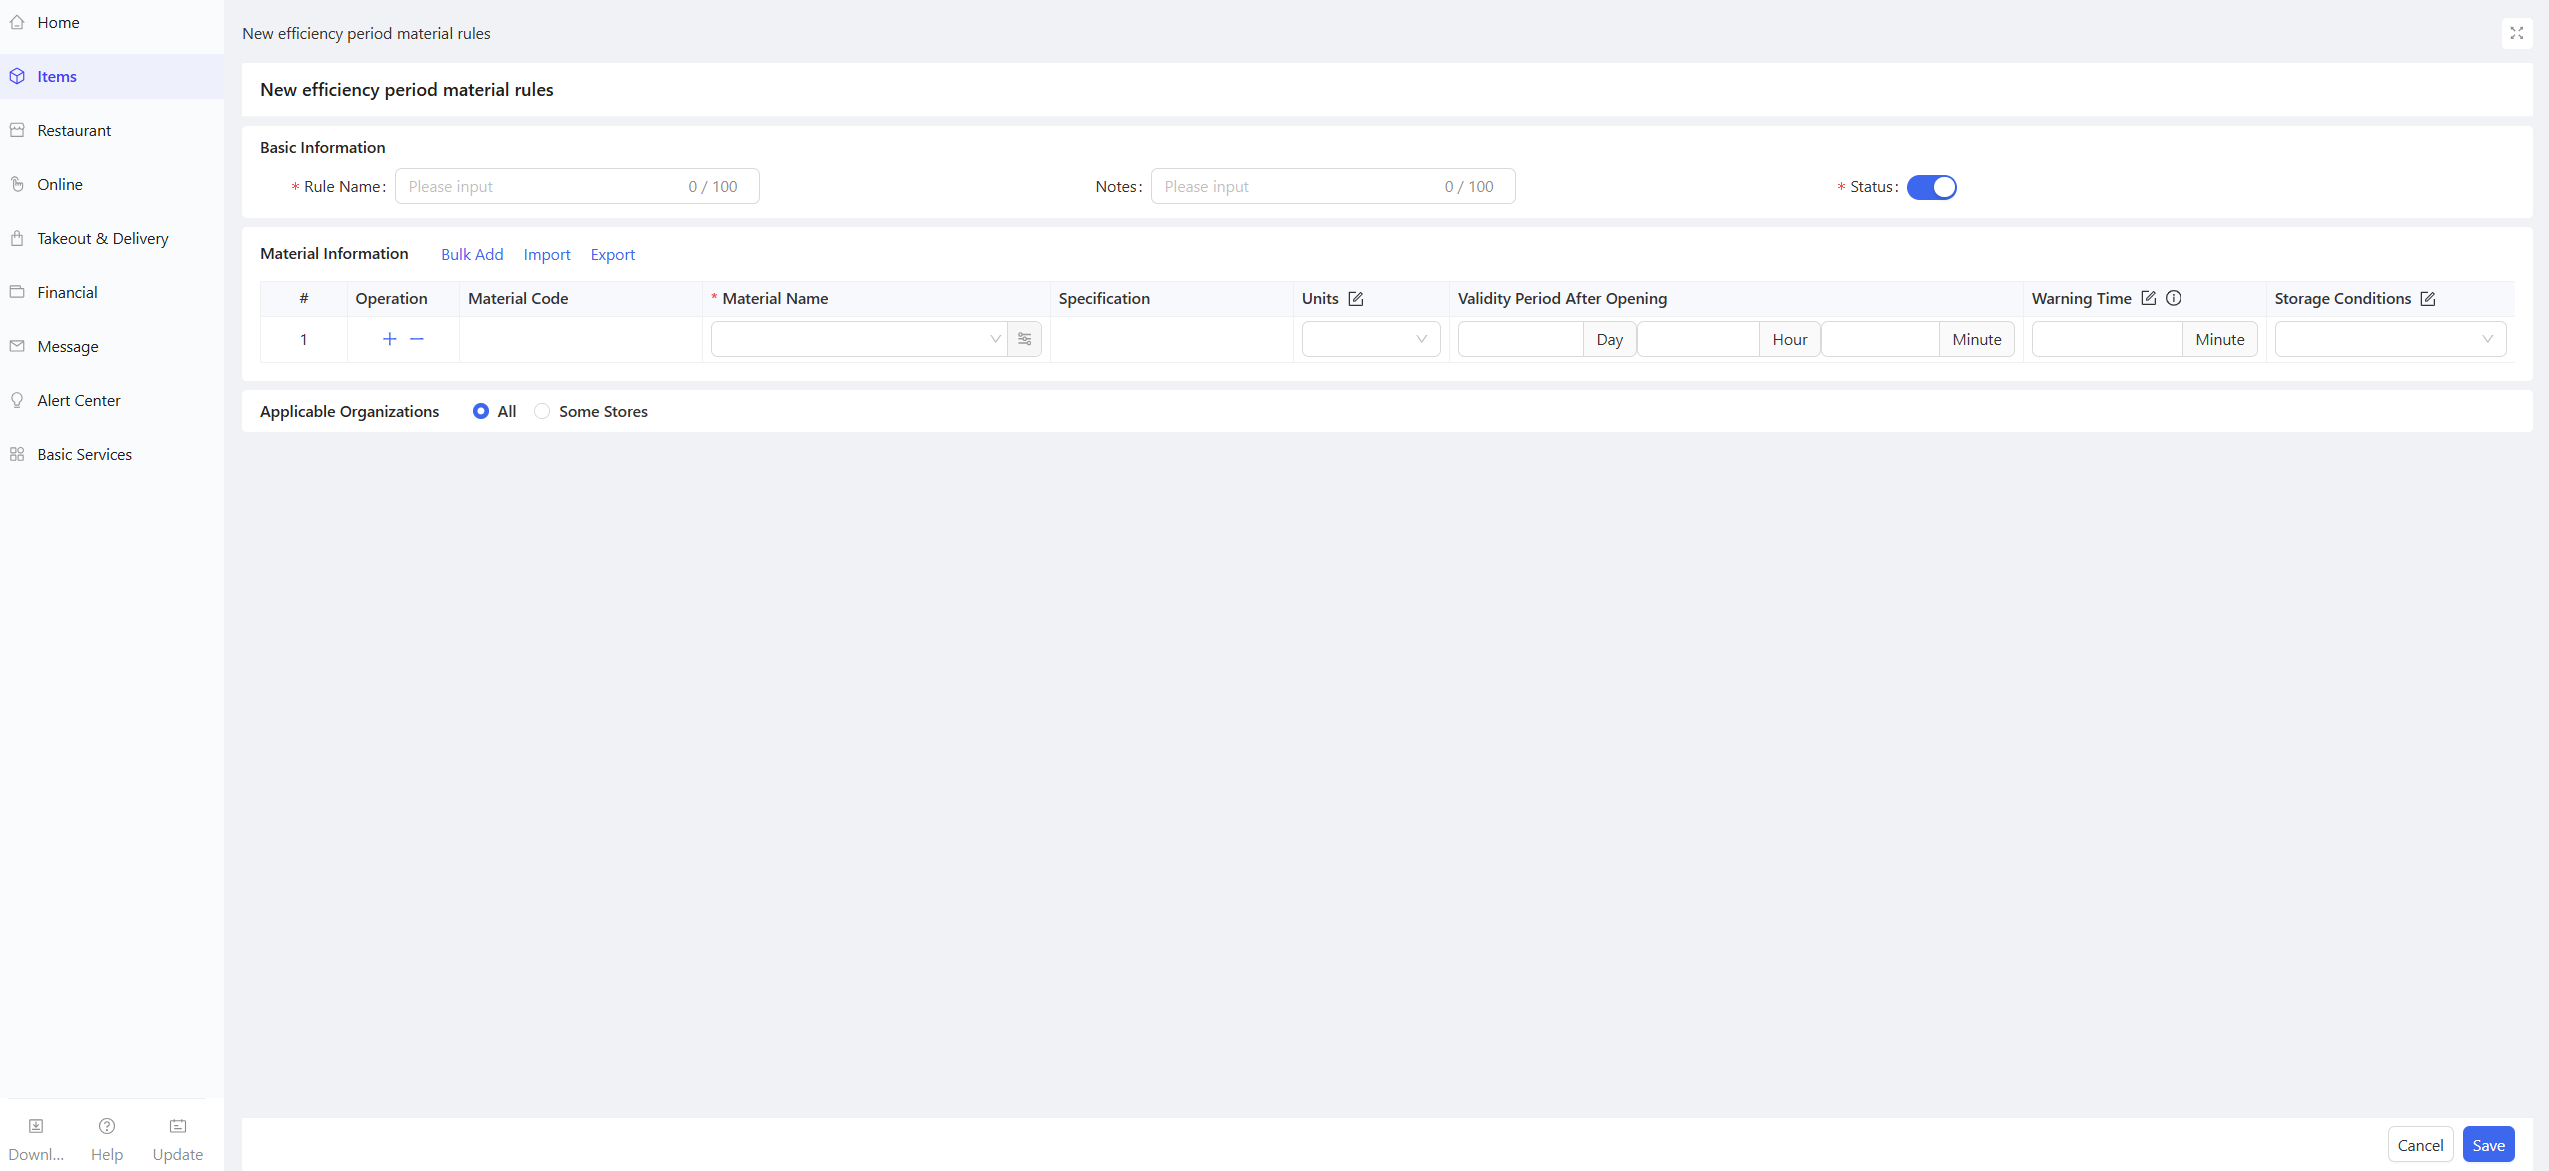
STEP 5: Save the Rule
Click Save to complete the creation of perishable item rules.