Print Management
1 Module Introduction
This module focuses on the core scenarios of print management in the POS Ordering System, covering process operations such as print rule configuration, printer adaptation, and exception handling. It includes print settings for various documents, such as front-desk checkout receipts, kitchen production tickets, and label receipts. The content is organized from the perspective of actual user operations, with streamlined steps and clear logic, helping you quickly complete print parameter configuration and troubleshooting to ensure accurate and efficient document printing in stores.
2 Glossary
Order Splitting Methods:
One Dish per Ticket: Each dish is printed on a separate production ticket (suitable for fast-food restaurants and milk tea shops).
One Set per Ticket: Combo meals are split into tickets based on the number of sub-dishes (e.g., 3 hamburger combos are split into 3 tickets).
Multiple Dishes per Ticket: All dishes in the same order are combined and printed on a single production ticket (suitable for full-service restaurants).
One Table per Ticket: All dishes ordered at a single table are printed on one production ticket.
One Serving per Line: Each serving of the same dish is displayed as a separate line on the same production ticket.
3 POS Terminal Print Settings
After a POS terminal is activated, it will be automatically registered and included in the scope of POS Terminal Print Settings. You can configure print rules for various documents for activated terminals, including but not limited to: dine-in pre-checkout receipts, member consumption receipts, refund receipts, self-pickup checkout receipts, and table reservation receipts.
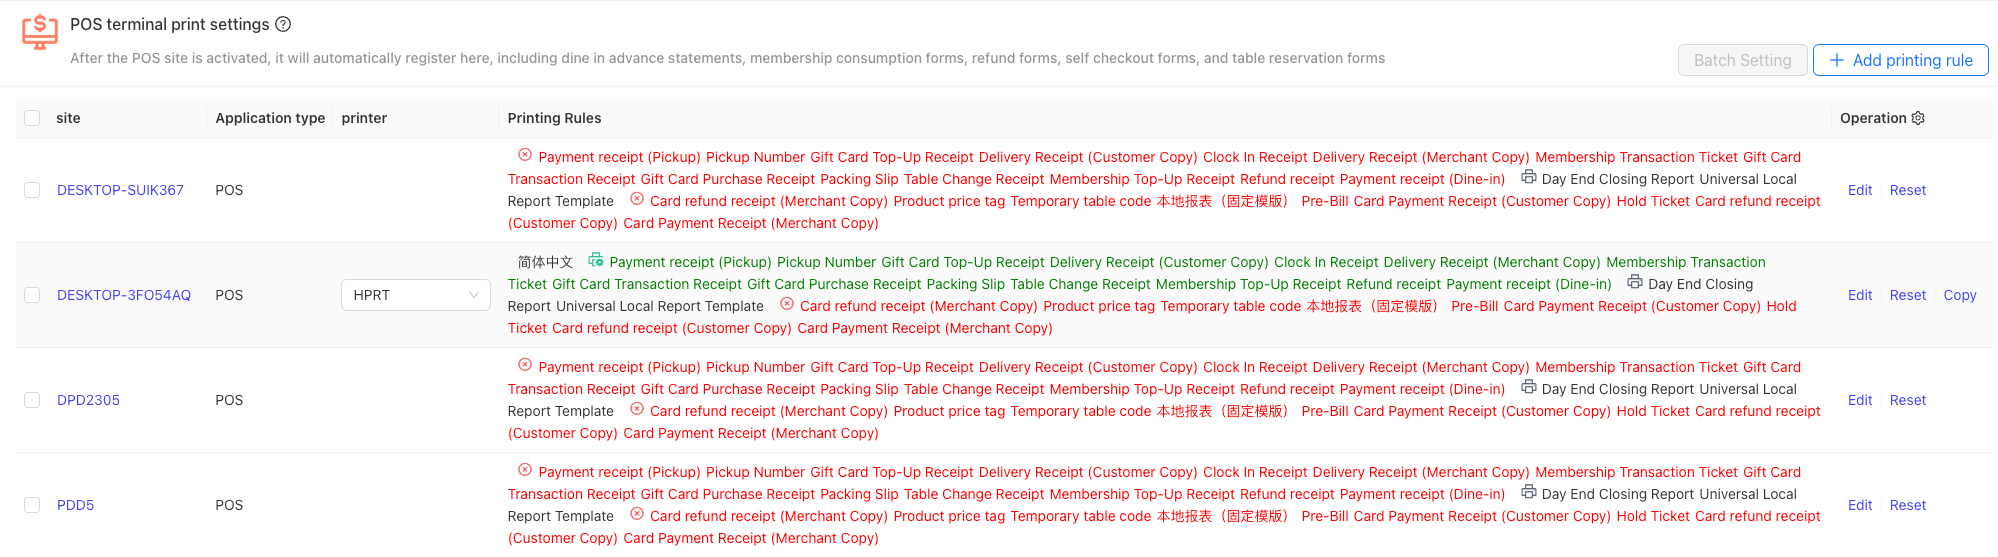
Step 1: Access the Configuration Page: The administrator logs in to the BO System ([Restaurant Management - Print Management - Print Management]) and selects [POS Terminal Print Settings].
Step 2: Select the Activated POS Terminal: Click [Edit] to configure the following parameters:
-
Basic Information:
- Exclude Order Sources: Optionally exclude orders from specific channels (e.g., do not print orders from the online H5 platform).
- Exclude Order Types: Optionally exclude specific order types (e.g., do not print dine-in orders).
- Printer: Select a printer connected to the device.
- Print Language: Select the language for the receipt content.
-
Document Settings:
- Auto Print: When enabled, printing is automatic after payment/pre-checkout is completed; when disabled, manual clicking of [Print] is required.
- Number of Copies: Defaults to 1 copy, adjustable to 2–3 copies (e.g., customer copy + merchant copy) or set to no printing.
- Image Printing: Print in image format.
- Template: Uses the enabled template in Document Management by default.
Step 3: Bind PrintersSelect a designated printer for the document (e.g., front-desk cashier printer), set a backup printer (optional), click [Save], and [Publish] the print rules.
4 Order Reception Print Settings
Supports configuring print rules for takeout orders, including: takeout customer copy, takeout merchant copy, and self-pickup checkout receipt.

Step 1: Access the Configuration Page: The administrator logs in to the BO System ([Restaurant Management - Print Management - Print Management]) and selects [Order Acceptance Print Settings].
Step 2: Configure Print Rules: Edit the default print rules or add new ones, and configure the following parameters:
- Basic Information:
- Name: Name of the newly added print rule.
- Exclude Order Sources: Optionally exclude orders from specific channels (e.g., do not print orders from the online H5 platform).
- Exclude Order Types: Optionally exclude specific order types (e.g., do not print dine-in orders).
- Printer: Select a printer connected to the device.
- Print Language: Select the language for the receipt content.
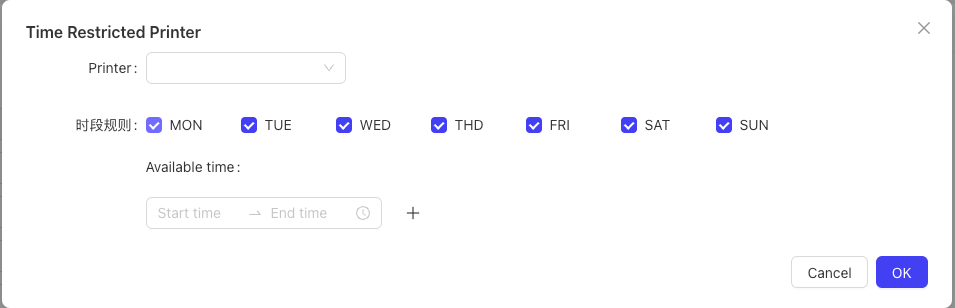
- Time-period Printer: Set a printer to be activated during specific time periods.
- Document Settings:
- Auto Print: When enabled, printing is automatic after payment/pre-checkout is completed; when disabled, manual clicking of [Print] is required.
- Number of Copies: Defaults to 1 copy, adjustable to 2–3 copies (e.g., customer copy + merchant copy) or set to no printing.
- Image Printing: Print in image format.
- Template: Uses the enabled template in Document Management by default.
Step 3: Save and Publish Rules: Click [Save] and [Publish] the print rules.
5 Prep Station Print Settings
Bind dedicated printers to each preparation station of dishes and set corresponding print rules.
Step 1: Access the Configuration Page: Go to [Restaurant Management - Print Management - Print Management] and select [Prep Station Print Settings].
Note: First configure preparation stations in [Merchant Center / Restaurant Management / Kitchen Management / Prep Station / Edit Prep Stations].
Step 2: Select a Preparation Station: Choose a preparation station (e.g., Hot Dishes Section, Cold Dishes Section) and configure its print rules:
- Basic Information:
- Exclude Order Sources: Optionally exclude orders from specific channels (e.g., do not print orders from the online H5 platform).
- Exclude Order Types: Optionally exclude specific order types (e.g., do not print dine-in orders).
- Printer: Select a printer connected to the device.
- Order Splitting Method
- Print Language: Select the language for the receipt content.
- Area: Defaults to all unspecified areas.
- Time-period Printer: Set a printer to be activated during specific time periods.

- Document Settings:
- Auto Print: When enabled, printing is automatic after payment/pre-checkout is completed; when disabled, manual clicking of [Print] is required.
- Number of Copies: Defaults to 1 copy, adjustable to 2–3 copies or set to no printing.
- Image Printing: Print in image format.
- Template: Uses the enabled template in Document Management by default.
Step 3: Bind Printers and Publish Rules: Bind a dedicated printer to each preparation station (e.g., Kitchen Printer 1 for the Hot Dishes Section), enable [Auto Print], click [Save], and [Publish] the print rules.
6 Label Print Settings
Label Print Settings is a core function of the catering system, suitable for scenarios such as milk tea shops, bakeries, and fast-food restaurants. By customizing label content, associating hardware devices, and binding print rules, it enables accurate identification of meal information, improving meal pickup efficiency and customer experience.
Step 1: Access the Configuration Page: Go to [Restaurant Management - Print Management - Print Management] and select [Label Print Settings].
Step 2: Select a Preparation Station and Configure Rules: Choose a preparation station (e.g., Hot Dishes Section, Cold Dishes Section) and configure its print rules:
-
Basic Information:
- Exclude Order Sources: Optionally exclude orders from specific channels (e.g., do not print orders from the online H5 platform).
- Exclude Order Types: Optionally exclude specific order types (e.g., do not print dine-in orders).
- Printer: Select a printer connected to the device.
- Order Splitting Method: Defaults to “One Set per Ticket”.
- Print Language: Select the language for the receipt content.
- Terminal: Select an activated POS terminal (optional).
- Area: Select a service area (optional).
-
Document Settings:
- Auto Print: When enabled, printing is automatic after payment/pre-checkout is completed; when disabled, manual clicking of [Print] is required.
- Number of Copies: Defaults to 1 copy, adjustable to 2–3 copies or set to no printing.
- Image Printing: Print in image format.
- Template: Uses the enabled template in Document Management by default.
Step 3: Bind Label Printers and Publish Rules: Select a label-specific printer (e.g., EPSON TM-L90), click [Save], and [Publish] the print rules.
7 Food Runner Print Settings
Food Runner Print Settings is a core configuration to ensure efficient collaboration between the front desk and kitchen. By binding printers to preparation stations and service areas, it ensures accurate and timely generation and delivery of food runner tickets, reducing errors such as wrong-table deliveries and missing orders from the source, and improving service efficiency.
[Image]
Step 1: Access the Configuration Page: Go to [Restaurant Management - Print Management - Print Management] and select [Food Runner Print Settings].
Step 2: Select a Preparation Station and Configure Rules: Choose a preparation station (e.g., Hot Dishes Section, Cold Dishes Section) and configure its print rules:
-
Basic Information:
- Name: Name of the newly added print rule.
- Exclude Order Sources: Optionally exclude orders from specific channels (e.g., do not print orders from the online H5 platform).
- Exclude Order Types: Optionally exclude specific order types (e.g., do not print dine-in orders).
- Printer: Select a printer connected to the device.
- Print Language: Select the language for the receipt content.
- Remarks: Add notes for the print rule.
- Area: Select a service area.
-
Document Settings:
- Auto Print: When enabled, printing is automatic after payment/pre-checkout is completed; when disabled, manual clicking of [Print] is required.
- Number of Copies: Defaults to 1 copy, adjustable to 2–3 copies or set to no printing.
- Image Printing: Print in image format.
- Template: Uses the enabled template in Document Management by default.
Step 3: Bind Printers and Publish Rules: Bind a dedicated printer to each preparation station (e.g., Kitchen Printer 1 for the Hot Dishes Section), click [Save], and [Publish] the print rules.
8 Area Print Settings
Configure print rules for documents corresponding to fixed service areas and tables.
[Image]
Step 1: Access the Configuration Page: Go to [Restaurant Management - Print Management - Print Management] and select [Area Print Settings].
Step 2: Add Area Print Rules:
-
Basic Information:
- Name: Name of the newly added print rule.
- Exclude Order Sources: Optionally exclude orders from specific channels (e.g., do not print orders from the online H5 platform).
- Exclude Order Types: Optionally exclude specific order types (e.g., do not print dine-in orders).
- Printer: Select a printer connected to the device.
- Print Language: Select the language for the receipt content.
- Area: Select a service area (e.g., Main Hall).
- Area Tables: Select specific tables (e.g., Table A01).
-
Document Settings:
- Auto Print: When enabled, printing is automatic after payment/pre-checkout is completed; when disabled, manual clicking of [Print] is required.
- Number of Copies: Defaults to 1 copy, adjustable to 2–3 copies or set to no printing.
- Image Printing: Print in image format.
- Template: Uses the enabled template in Document Management by default.
Step 3: Bind Printers and Publish Rules: Bind a dedicated printer to each area, click [Save], and [Publish] the print rules.
9 Exclude Dishes from Table Reservation Receipts
Select dishes that will not be printed on the Table Reservation Receipt.
Step 1: Access the Configuration Page: Go to [Restaurant Management - Print Management - Print Management] and select [Exclude Dishes from Table Reservation Receipts].
Step 2: Add Excluded Dishes: Click the [Add] button, select the dishes to exclude from the table reservation receipt, and click [Save].
[Image]
10 Exception Dish Print Settings
Print production tickets for specified dishes or specified flavors/preparations in designated areas.
[Image]
Step 1: Access the Configuration Page: Go to [Restaurant Management - Print Management - Print Management] and select [Exception Dish Print Settings].
Step 2: Add Exception Dish Print Rules:
-
Basic Information:
- Exclude Order Sources: Optionally exclude orders from specific channels (e.g., do not print orders from the online H5 platform).
- Exclude Order Types: Optionally exclude specific order types (e.g., do not print dine-in orders).
- Printer: Select a printer connected to the device.
- Order Splitting Method
- Print Language: Select the language for the receipt content.
- Area: Select a service area (e.g., Main Hall).
- Commodity: Special dishes applicable to the print rule.
- Flavor/Preparation: Special flavors/preparations applicable to the print rule.
- Side Dishes: Special side dishes applicable to the print rule.
-
Document Settings:
- Auto Print: When enabled, printing is automatic after payment/pre-checkout is completed; when disabled, manual clicking of [Print] is required.
- Number of Copies: Defaults to 1 copy, adjustable to 2–3 copies or set to no printing.
- Image Printing: Print in image format.
- Template: Uses the enabled template in Document Management by default.
Step 3: Bind Printers and Publish Rules: Bind a dedicated printer to each exception dish print rule, click [Save], and [Publish] the print rules.
11 Reservation & Queue Print Settings
[Image]
Step 1: Access the Configuration PageGo to [Restaurant Management - Print Management - Print Management] and select [Reservation & Queue Print Settings].
Step 2: Add Reservation & Queue Print Rules
-
Basic Information:
- Name: Name of the newly added print rule.
- Printer: Select a printer connected to the device.
- Print Language: Select the language for the receipt content.
-
Document Settings:
- Auto Print: When enabled, printing is automatic after payment/pre-checkout is completed; when disabled, manual clicking of [Print] is required.
- Number of Copies: Defaults to 1 copy, adjustable to 2–3 copies or set to no printing.
- Image Printing: Print in image format.
- Template: Uses the enabled template in Document Management by default.
Step 3: Bind Printers and Publish Rules: Bind a dedicated printer to the reservation & queue print rule, click [Save], and [Publish] the print rules.
12 Special Scenario Rule Configuration
12.1 Failover Settings
- Access Backup Printer Configuration: Go to [Restaurant Management - Print Management - Device Management] and select the primary printer (e.g., “Front Desk Cashier Printer”).
- Bind Backup Printer: In the [Backup Printer] dropdown menu, select an available device (must match the primary printer type, e.g., both 80mm receipt printers), and click [Save].
- Effective Logic: When the primary printer is disconnected or out of paper, the system automatically pops up a prompt: “Primary printer malfunction, switched to backup printer”, and print tasks are seamlessly transferred.
12.2 Card Payment Receipt Print Rules
-
Access the Configuration Page: Go to [Print Management - POS Terminal Print Settings] and check the boxes for “Card Payment Receipt (Customer Copy / Merchant Copy)” and “Card Refund Receipt (Customer Copy / Merchant Copy)”.
-
Parameter Configuration:
- Auto Print: Disabled by default; when enabled, printing is automatic after successful card payment/refund completion.
- Number of Copies: 1 customer copy + 1 merchant copy by default, adjustable to 2 copies (e.g., archive copy + accounting copy).
- Image Printing: Disabled by default (image printing not supported).
-
Save and Activate: Click [Save]. Receipts will be printed according to the rules after card payment operations.
13 Printer Adaptation and Management
13.1 Common Printer Adaptation (Administrator Operation)
[Image]
13.1.1 Regular Printers (e.g., EPSON TM-88V, Feie FP-N80WC)
-
Hardware Connection:
- USB Connection: Directly connect the printer to the POS via a USB cable; the system will automatically recognize it.
- Ethernet Connection: Go to [Settings - Print Management - Printers - Add New], enter the printer IP address (e.g., 192.168.1.121), and select the model (e.g., “EPSON TM-88V”).
-
Parameter Configuration:
- Paper Size: Select the corresponding size (e.g., “80mm” for 80mm receipt printers).
- Print Language: Defaults to Chinese; supports switching to English, Spanish, etc.
- Test Print: Click [Print Test Page] to confirm the printed content is clear (including Chinese, English, and font enlargement samples).
-
Feie Cloud Printer Adaptation (Special Steps):
- Go to [Add New Printer], select “Feie FP-N80WC”, and enter the printer SN code and Key (obtained from the device label).
- Call the Feie API to complete registration, and perform a test print to confirm normal cloud communication.
13.2 Print Exception Handling
13.2.1 Common Exception Scenarios and Troubleshooting Steps
Exception Scenario | Troubleshooting Steps |
Printer does not print |
|
Incomplete/misaligned print content |
|
Primary printer malfunction without automatic failover |
|
No "Re-print" mark on reprinted documents |
|
13.2.2 Error Messages and Response Guidelines
Error Message (Chinese) | Response Measures |
"No printer found" | Check the printer connection, replug the USB cable/reconfigure the Ethernet IP, or manually specify an available printer |
"Both primary and backup printers are malfunctioning" | Emergency activate the standby POS printer and contact technical personnel to repair the faulty devices |
"Template not found or not enabled" | Go to [Template Management], enable the corresponding document template, or re-select an available template |
"Feie printer registration failed" | Verify the SN code and Key are correct, check the network connection (internet access required for registration), and initiate the registration request again |
13.3 Frequently Asked Questions and Solutions
13.3.1 Template-related Issues
Problem Scenario | Troubleshooting Steps |
Custom template does not take effect |
|
Template components not displayed (e.g., member card number) |
|
13.3.2 Printer-related Issues
Problem Scenario | Troubleshooting Steps |
Ethernet printer frequently disconnects |
|
Label printer prints blurry content |
|
13.3.3 Document Content-related Issues
Problem Scenario | Troubleshooting Steps |
Checkout receipt does not display discount details |
|
Incorrect "Contact Person" display on self-pickup checkout receipt |
|