Hardware Adaptation
(For Cashiers, Servers, and Store Managers)
1 Introduction
This guide covers hardware adaptation in the POS system, including connection setup and usage of scales, card readers, cash drawers, and pickup lockers to ensure proper device operation.
2 E-Scale Integration (Weighing Items)
2.1 Supported Models and Setup
2.1.1 Supported Models
- Windows/Android Compatible: DINGJIAN OS2, DINGJIAN PS1, DAHUA ACS-15AB, ZHONGQI, Dibao ACS-G310, DIBAL G-305.
- Connections: USB or Serial Port (default baud rate: 9600, stop bit: 1).
2.1.2 Setup Steps
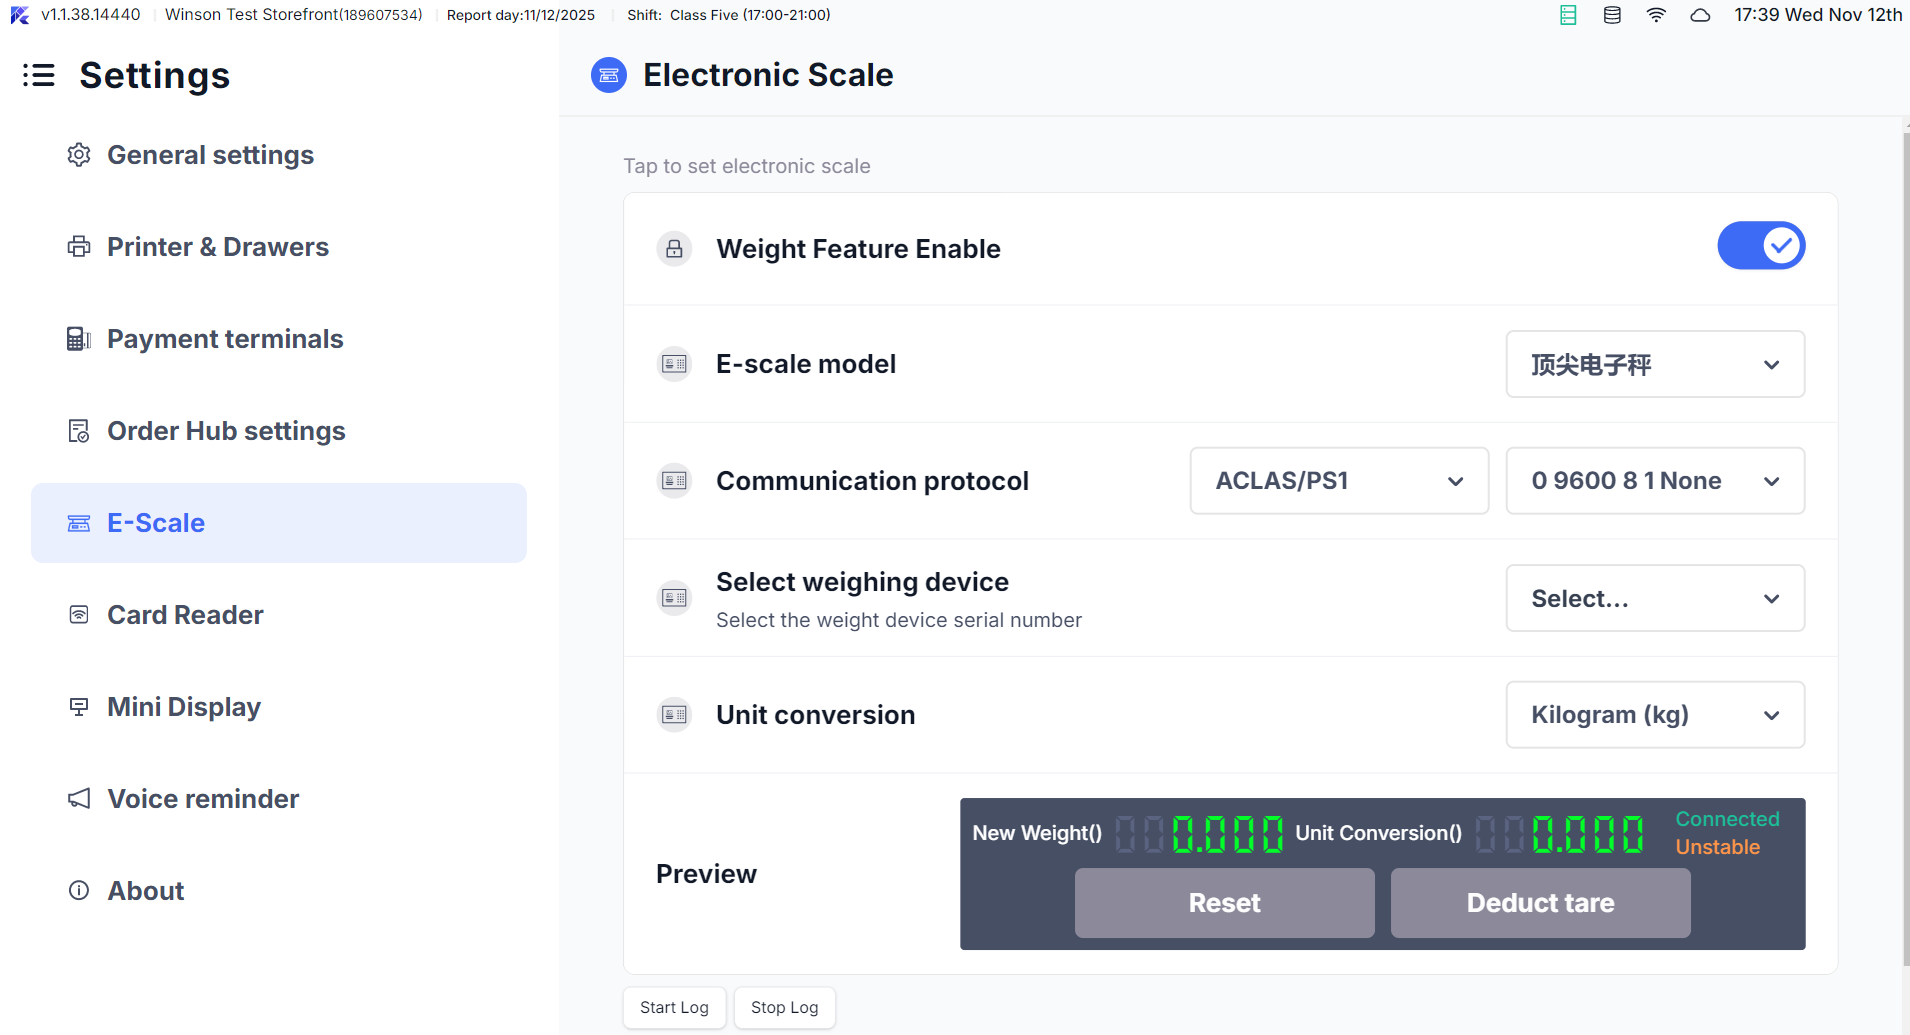
Access Settings: Log into the POS and navigate to【Settings】→【E-Scale】
-
Enable Scale: Turn on the【Enable E-Scale】switch.
-
Connection Method:
- USB: Automatically scanned by the system. Select your scale model (eg., Dahua-ACS-15AB)
- Serial Port: Click【Scan Serial Port】, select the port and confirm parameters.
-
Test Connection: Place an item on the scale. If the weight displays, the setup is successful. If not, it will show “Connect fail!“.
2.2 Unit Conversion Settings
2.2.1 Conversion Rules
- Default Unit: Grams (g). Can be converted to kilograms, pounds, ounces, etc.
- Conversion Formulas:
- Grams to Kilograms: 1g = 0.001kg
- Grams to Pounds: 1g = 0.0022046lb
- Grams to Ounces: 1g = 0.035274oz
2.2.2 Steps
- Enter Unit Settings: In the scale configuration, click【Sales Unit】
- Choose Unit: Select the desired unit (e.g., pounds) and confirm.
- View Conversion: Check the preview for the converted weight.
- Order Display: Shows converted weight and unit, no manual conversion needed.
2.2.3 Troubleshooting
Connection Issues: Ensure cables are secure and the model is supported.
Inaccurate Weights: Calibrate the scale under【Settings → E-Scale → Calibration】
Conversion Issues: Check settings and restart the POS.
3 Card Reader Integration (Physical Membership Cards)
3.1 Supported Models and Setup
3.1.1 Supported Models
- Mainstream Model: MW-RF-EYE-U010 for IC/ID cards, supports USB or Serial.
3.1.2 Setup Steps

-
Access Configuration: Click【Settings】→【Card Reader】.
-
Enable Reader: Turn on【Enable Card Device】.
-
Select Model and Method:
- Choose model (eg., MW-RF-EYE-U010)
- Configure parameters for serial or USB auto-recognition.
-
Test Card Reading: Place a card near the reader. The card ID should be displayed if successful.
3.2 Core Functions
3.2.1 Auto Card Reading (Quick Member Login)

- Check【Enable Auto Read Card】on the configuration page (only for IC/ID card)
- Go to【Member Center】or the Member function on the ordering page; the system automatically shows a card reading interface (animated prompt: “Please scan membership card”).
- Hold the card close, the system auto-reads the card ID and retrieves member info.
3.2.2 Member Operations
- Member Search: After swiping, the member balance, points, and level are directly displayed
- New Membership & Card Issuance: Click【Add Member】. After reading the card, the “Physical Card Number” field is auto-filled. Complete the membership by adding the remaining info.
- Checkout: Select “Member Payment”. After swiping, the member’s stored value balance is auto-retrieved. Enter the amount to deduct.
3.2.3 Troubleshooting
No Response When Reading Card: Check if the card reader is powered on. Confirm the card is IC/ID type (exclude incompatible types like magnetic stripe cards).
Auto-Read Pop-up Not Appearing: Confirm the "Auto-Read" function is enabled. Restart the POS and retry.
Member Info Retrieval Failed: verify if the card is registered in the system and if the Card ID was read correctly.
4 Cash Drawer Integration (Cash Management)
4.1 Setup and Testing
4.1.1 Connection and Setup
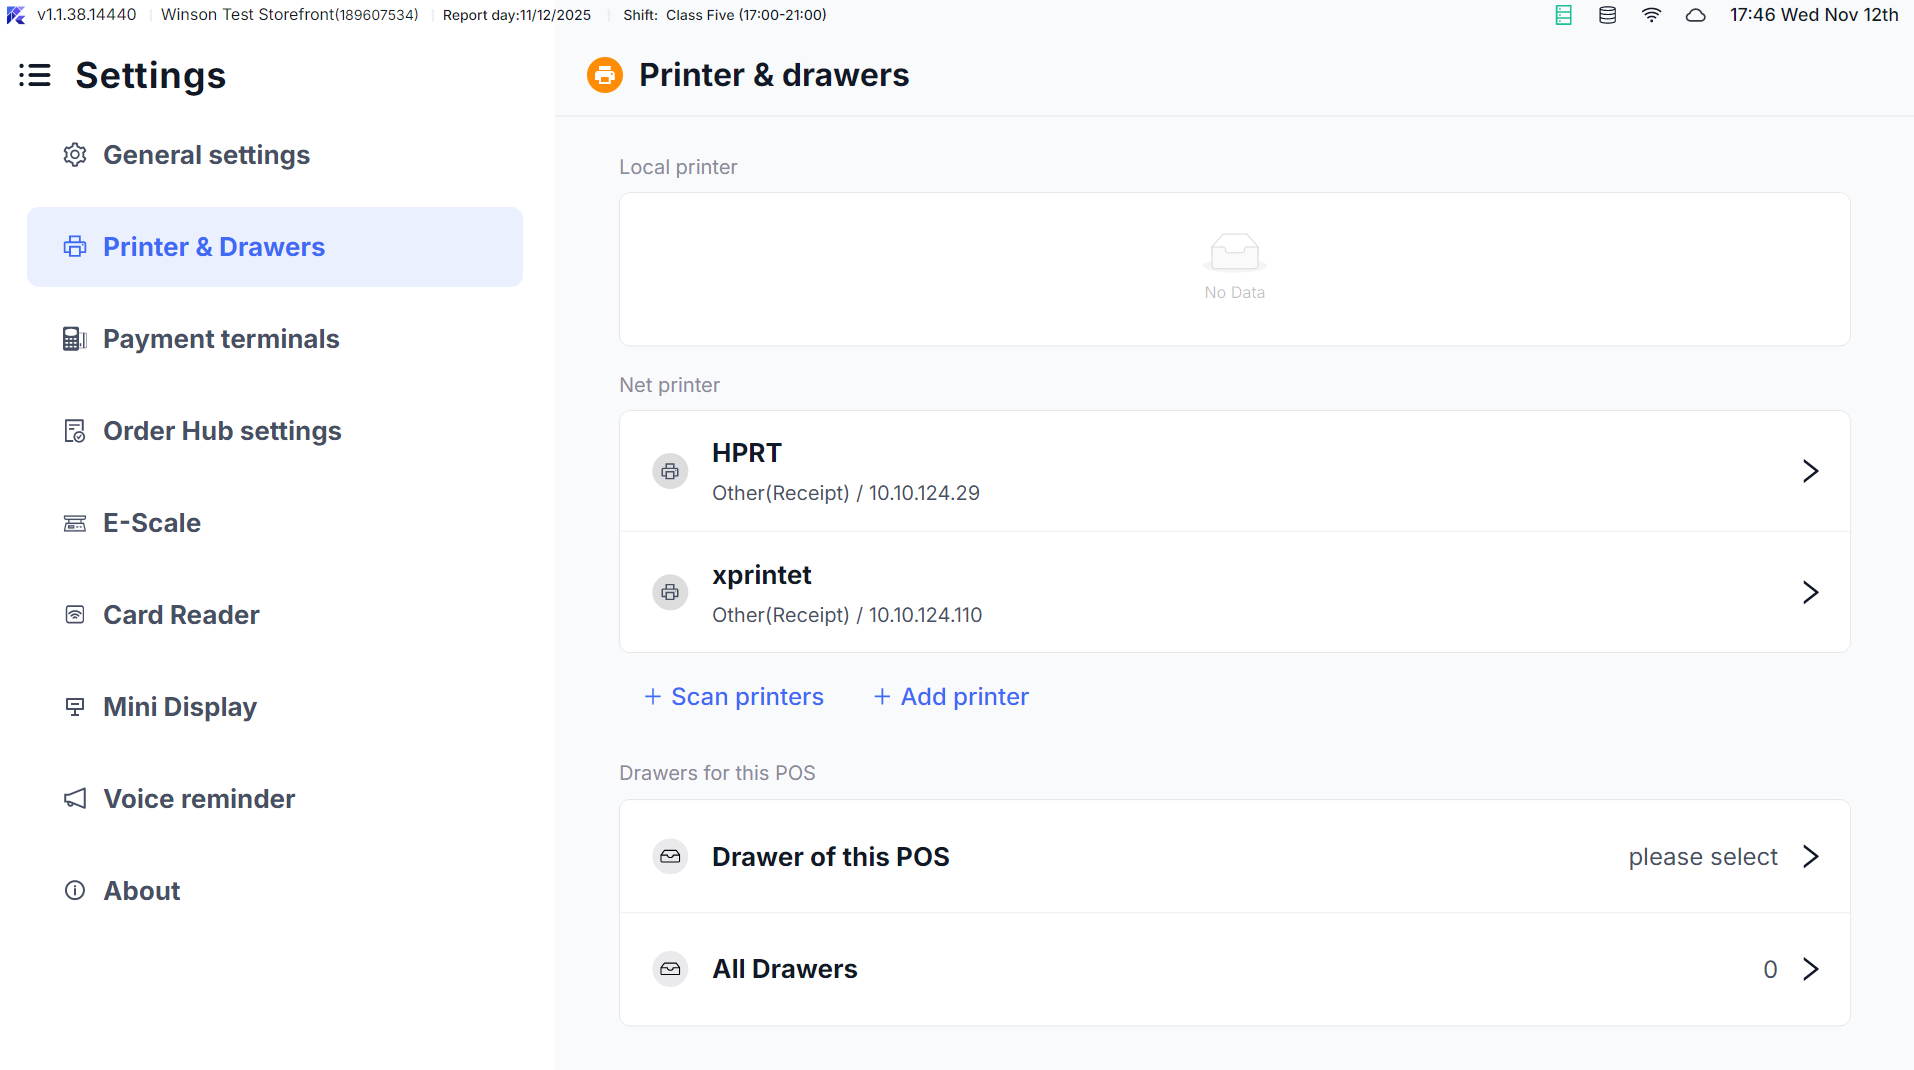
- Access Configuration: Go to Main Menu, Click【Settings】→【Printer & Drawers】→【Cash Drawer】
- Bind Printer: The cash drawer must be connected via a Y-cable to a printer. Select the bound printer (e.g., Printer 1).
- Select Channel: For a single drawer, select【Channel 1】. For dual drawers connected via a Y-cable, select 【Channel 2】 for the second drawer.
- Test Opening Drawer:
- Click【Test Open】. If the drawer opens, the configuration is successful.
- If it doesn’t open, test【Command 1】and【Command 2】sequentially. If it still fails, click【Custom】select pulse width (try values from 50ms to 500ms, starting small). Once it opens, click Confirm to save settings.
4.1.2 Trigger Scenarios
- Automatically opens after cash payment/refund is completed.
- Manual Open: Go to Main Menu → More → Open Drawer (requires permission; function named simply for clarity, independent of sales).
- Automatically opens after cash-related operations like member top-up, gift card purchase/refund.
4.2 Cash Drawer Search Logic
- The system first searches for the printer bound to the cash drawer; if found, it sends the open command.
- If no drawer is bound, it searches for the site’s default receipt printer and sends the open command.
- If no printer is found, the drawer won’t open; check if the printer configuration is correct.
4.2.1 Troubleshooting
Drawer Not Opening: Check the connection cable between printer and drawer. Retest and save the correct open command.
Only One Drawer Opens in Multi-Drawer Setup: Confirm the second drawer's channel is set to Channel 2 and bound to the correct printer.
No Manual Open Permission: Contact administrator for "Manual Open Drawer" permission, or trigger opening via a cash payment process.
5 Pickup Locker Integration (Self-Pickup/Takeout)
5.1 Supported Models and Configuration
5.1.1 Supported Models and Methods
- Supported Model: Zhengke Shuke Meal Pickup Locker.
- Access Methods: Scan code access, manual code entry access, ID card swipe access, facial recognition access (System supports scan code/ manual entry; other methods require hardware support).
- Prerequisite Configuration: Administrator must select “Zhengke Pickup Locker” on the BO end【Third-party Device Integration】, and enter the device secret and callback API address.
5.1.2 POS Setup
- Confirm Integration: POS automatically syncs with BO configuration; no extra setup needed on POS.
- Generate Pickup Code / QR Code:
- For self-pickup/takeout orders, the pickup QR code (containing order number and 6-digit numeric pickup code) is automatically printed on the order slip/receipt after ordering.
- Online orders also generate a pickup QR code, displayed in the mini-app/app, with the pickup code noted below (for easy manual entry).
5.2 Core Function
5.2.1 Storing Orders
- After order preparation is complete, locate the pickup QR code for the corresponding order.
- Store via Scan: Scan the QR code at the locker’s scanner; the corresponding compartment opens automatically. Place the meal inside and close the door.
- Store via Code Entry: Manually enter the 6-digit pickup code; the compartment opens for storing the meal.
- Storage Callback: After the system receives the callback notification from the locker, it automatically marks the order as “Preparation Complete” and syncs this status to online platforms.
5.2.2 Retrieving Orders
- Customer Pickup: Present the pickup QR code for scanning, or enter the pickup code; the corresponding compartment opens.
- Pickup Callback: After successful pickup, the system marks self-pickup orders as “Picked Up”, and marks takeout orders as “Out for Delivery” (in self-delivery scenarios).
- Meal Retrieval: In special cases where retrieval is needed, scan the QR code or enter the pickup code to open the compartment and remove the meal.
5.2.3 Troubleshooting
Locker Doesn't Open on Scan/Code Entry: verify the pickup code is correct and the order is marked "Preparation Complete".
No Storage Callback: Check the locker's network connection and verify the callback API address is configured correctly on the BO end.
Compartment Door Not Closed: The locker will prompt "Please close the door". The storage/pickup process only completes after the door is closed, preventing meal loss.
6 Printer Integration
6.1 Common Printer Setup (Administrator Operations)
6.1.1 Standard Printers (e.g., EPSON TM-88V, Moth FP-N80WC)
-
Hardware Connection:
- USB Connection: Connect the printer directly to POS via USB cable; system auto-detects.
- Network Connection: Go to【Settings → Print Management → Printers → Add】, enter the printer IP (e.g., 192.168.1.121), select the model (e.g., “EPSON TM-88V”).
-
Parameter Configuration:
- Paper Size: Select the corresponding size (e.g., “80mm” for 80mm receipt printers).
- Print Language: Default is Chinese; supports switching to English, Spanish, etc.
- Test Print: Click【Print Test Page】, confirm the printout is clear (includes Chinese, English, and enlarged font samples).
-
Moth Cloud Printer Adaptation (Special Steps):
- Go to【Add Printer】, select “Moth FP-N80WC”, enter the printer SN and Key (found on the device label).
- The Moth API is called to complete registration. Test printing to confirm cloud communication is normal.
6.1.2 Printer Renaming & Synchronization
- Local Renaming: In Printer Management, click the printer name, enter a new name (e.g., “Kitchen Cold Dishes Printer”). The system automatically syncs this to BO.
- BO Sync: If printer info is modified on BO, POS automatically pulls the update (or manually click Sync Printer Info).
6.2 Checking Printer Status (All User Operation)
-
Access Status Page: Click the Printer Icon on the POS status bar to view all printer statuses (Normal / Error).
-
Status Interpretation:
- Normal: Shows printer name, IP/Port, last update time.
- Error: Indicates error reason (e.g., “Out of Paper”, “Network Disconnected”, “Cover Open”).
-
Quick Actions:
- Test Print: Select a normal status printer, click Print Test Page to verify the device.
- Switch Printer: Next to an error printer, click Switch Printer to select a backup device to take over its tasks.
7 FAQs
-
Issue: Hardware Not Recognized
- Check if the device is powered on and if the connection cables are loose
- Confirm that the device model is on the system’s supported list
- Restart the POS and hardware devices, and rescan for recognition.
-
Issue: Non-Responsive Features (e.g., Card Reader, Open cash drawer)
- Check if the permissions are sufficient (e.g., manual cash drawer opening requires corresponding permissions)
- Verify if the configuration is correct (e.g., cash drawer linked to printer, electronic scale unit settings)
- Retest and save the configuration (e.g., reselect the command to open the cash drawer).
-
Issue: Inaccurate Data (e.g., E-Scale Weights)
- Calibrate the electronic scale (use standard weights for calibration)
- Confirm that the unit conversion settings are correct (e.g., if the selling unit is “jin,” whether the conversion rule is effective)
- Check if there are any hardware malfunctions (e.g., sensor issues with the electronic scale).