Table Order on POS
(For Cashiers / Store Staff)
1 Introduction
This guide covers table management in the POS system, including basic operations, table combining/merging/splitting, reservation handling, and bill processing - everything you need for efficient full-service and banquet operations.
2 Basic Table Operations
2.1 Accessing Table Management
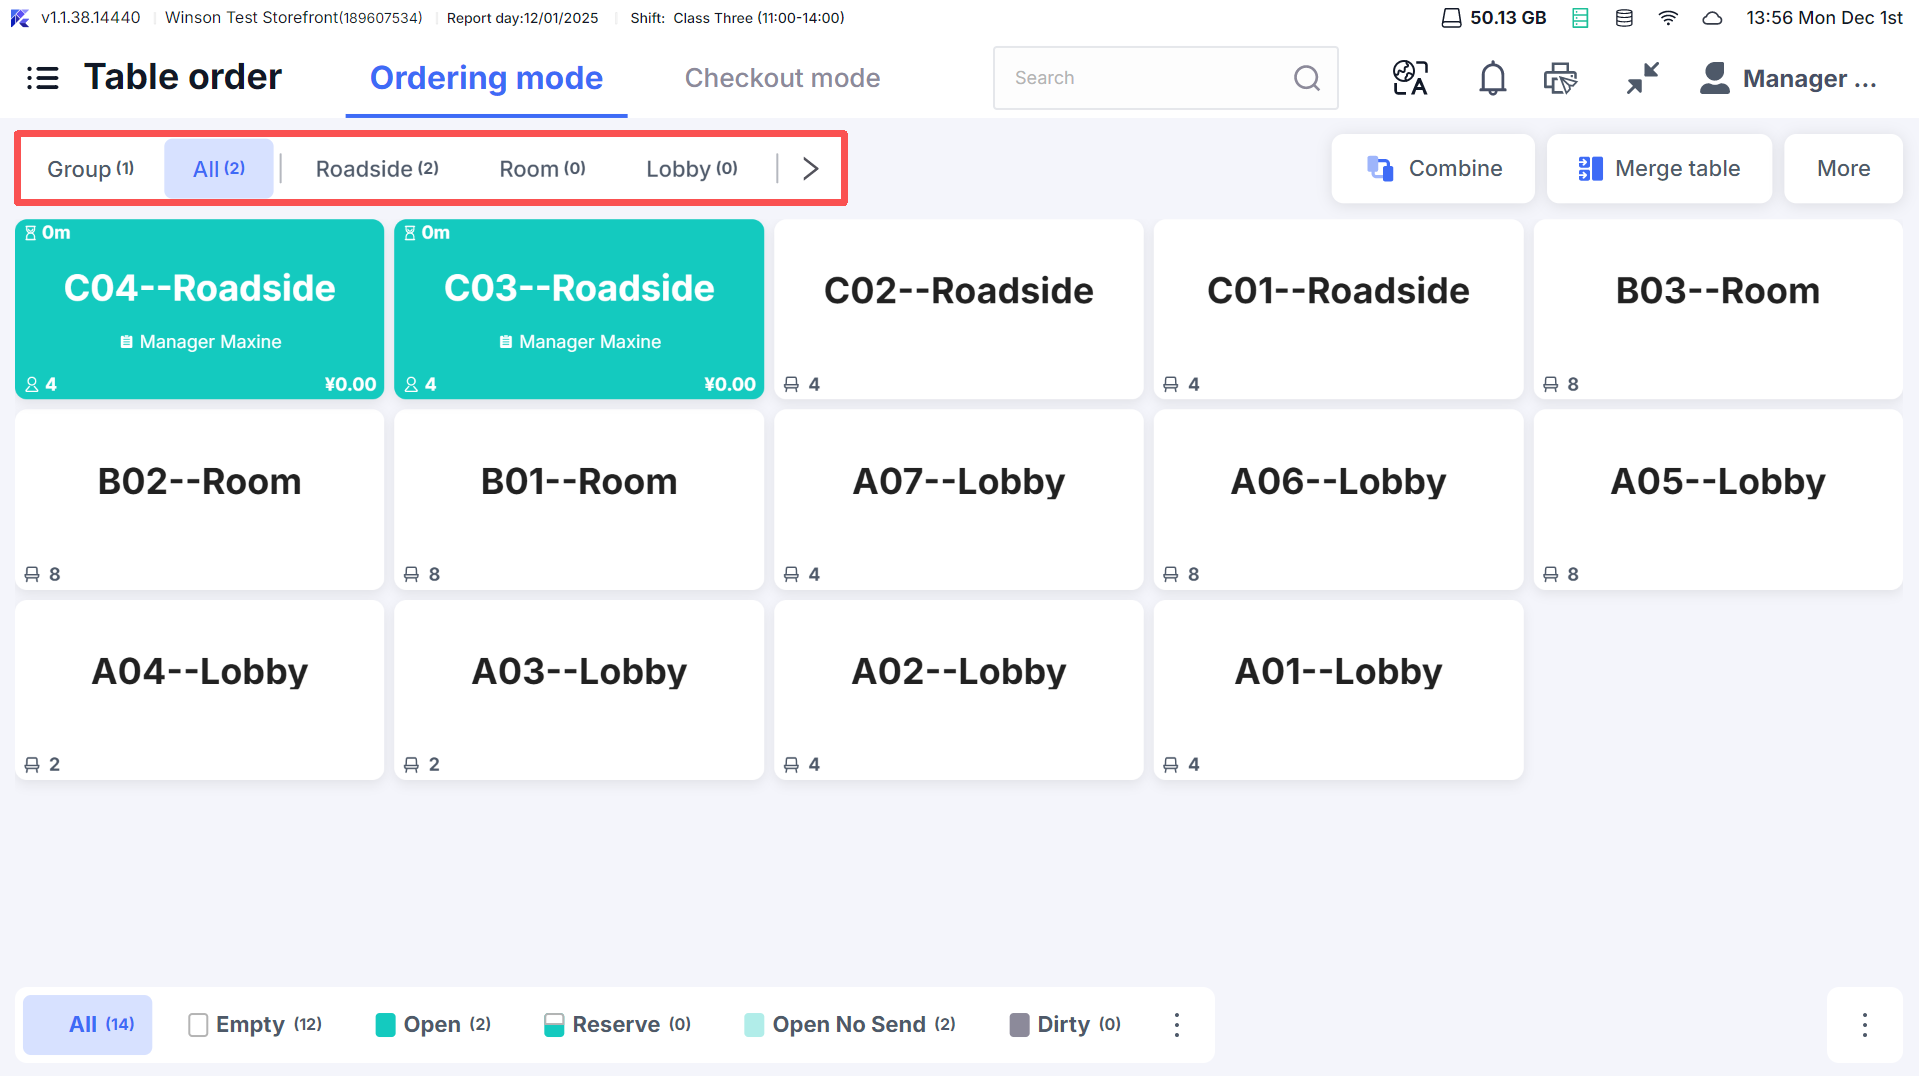
- After logging into the POS system, tap【Table Order】on the main menu
- The page defaults to showing【All Tables】, and you can switch between areas (e.g., “Floor 1,” “Floor 2”) or combined table groups using the top tabs
2.2 Opening a Table
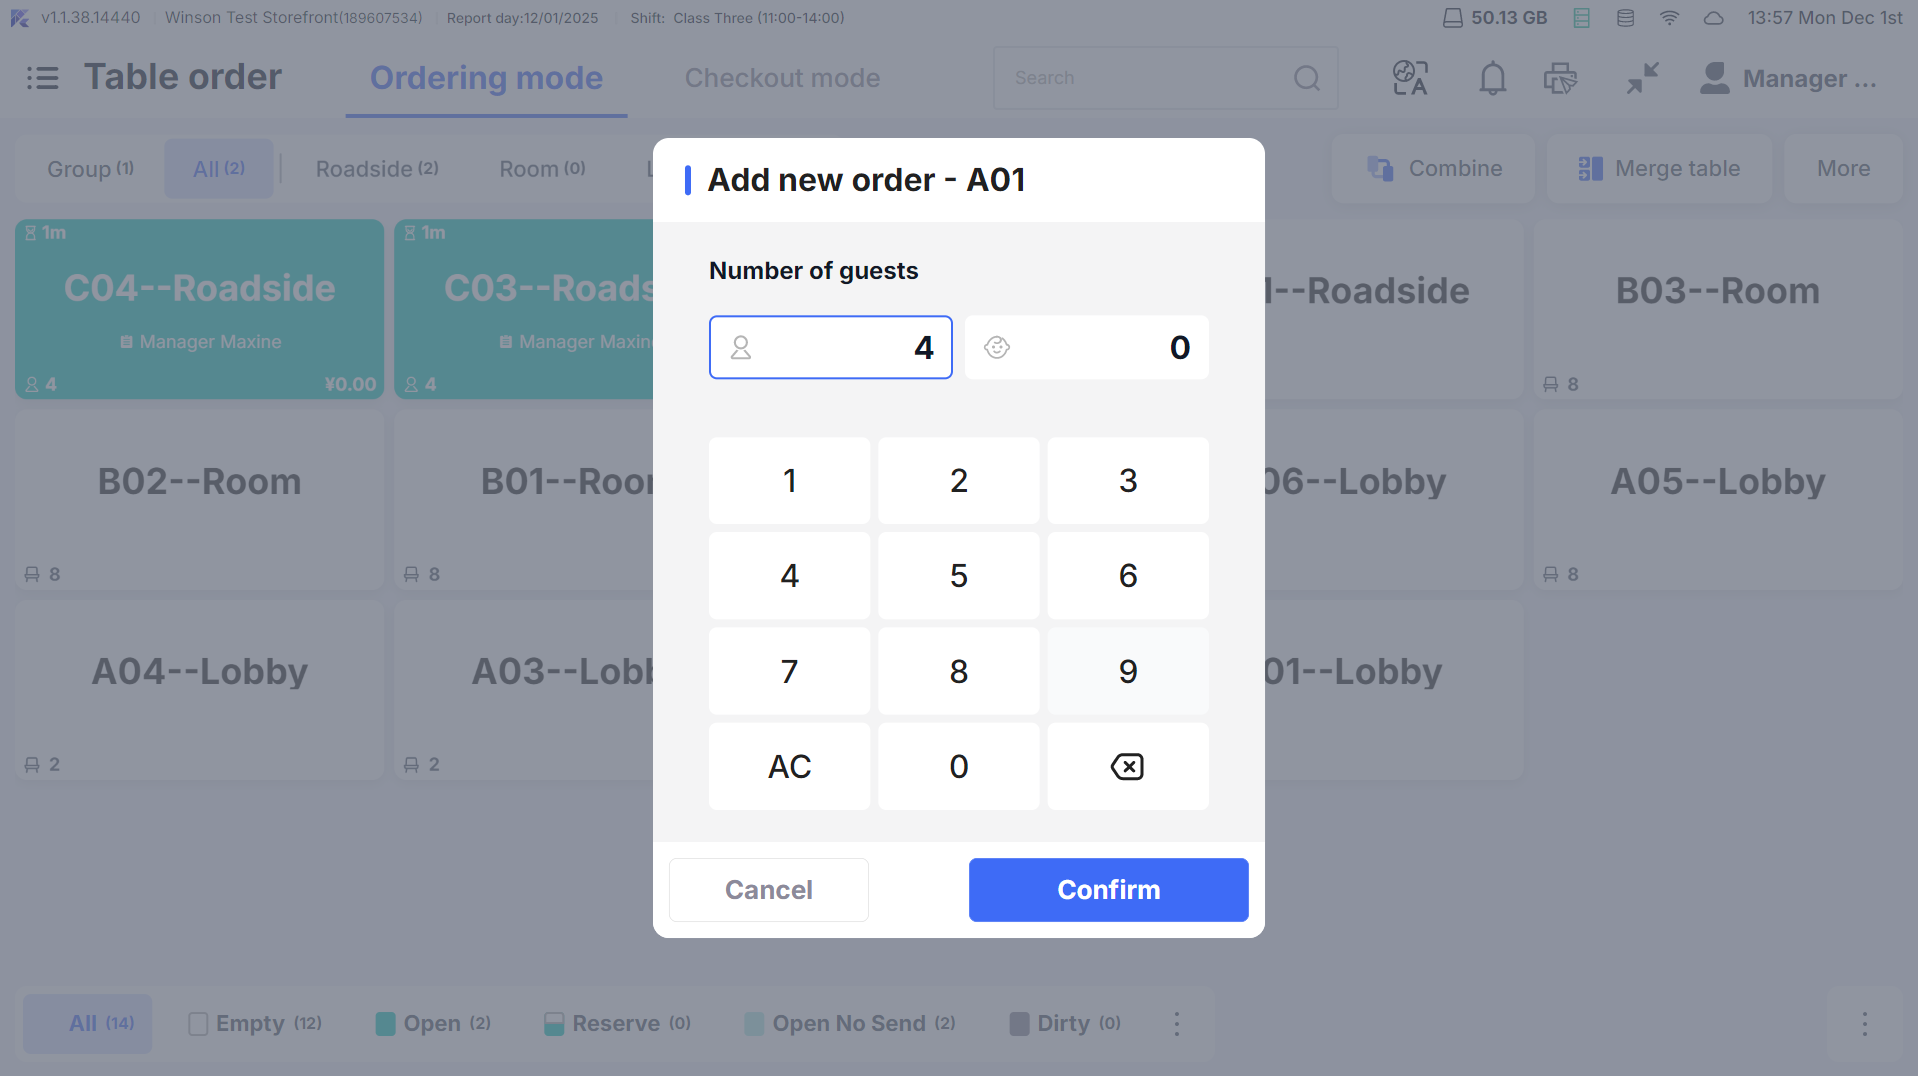
- Step 1: Tap【Empty Table】(shown as vacant) to open the table dialog
- Step 2: Enter guest count (required, 1-99 people, default equal to the table’s seating capacity)
- Step 3: Optionally add customer name and phone
- Step 4: Tap【Confirm】, table status changes to【In Use】, automatically enters the ordering screen
2.3 Clearing a Table
- Auto Clear: The System automatically resets tables after payment
- Manual Clear:
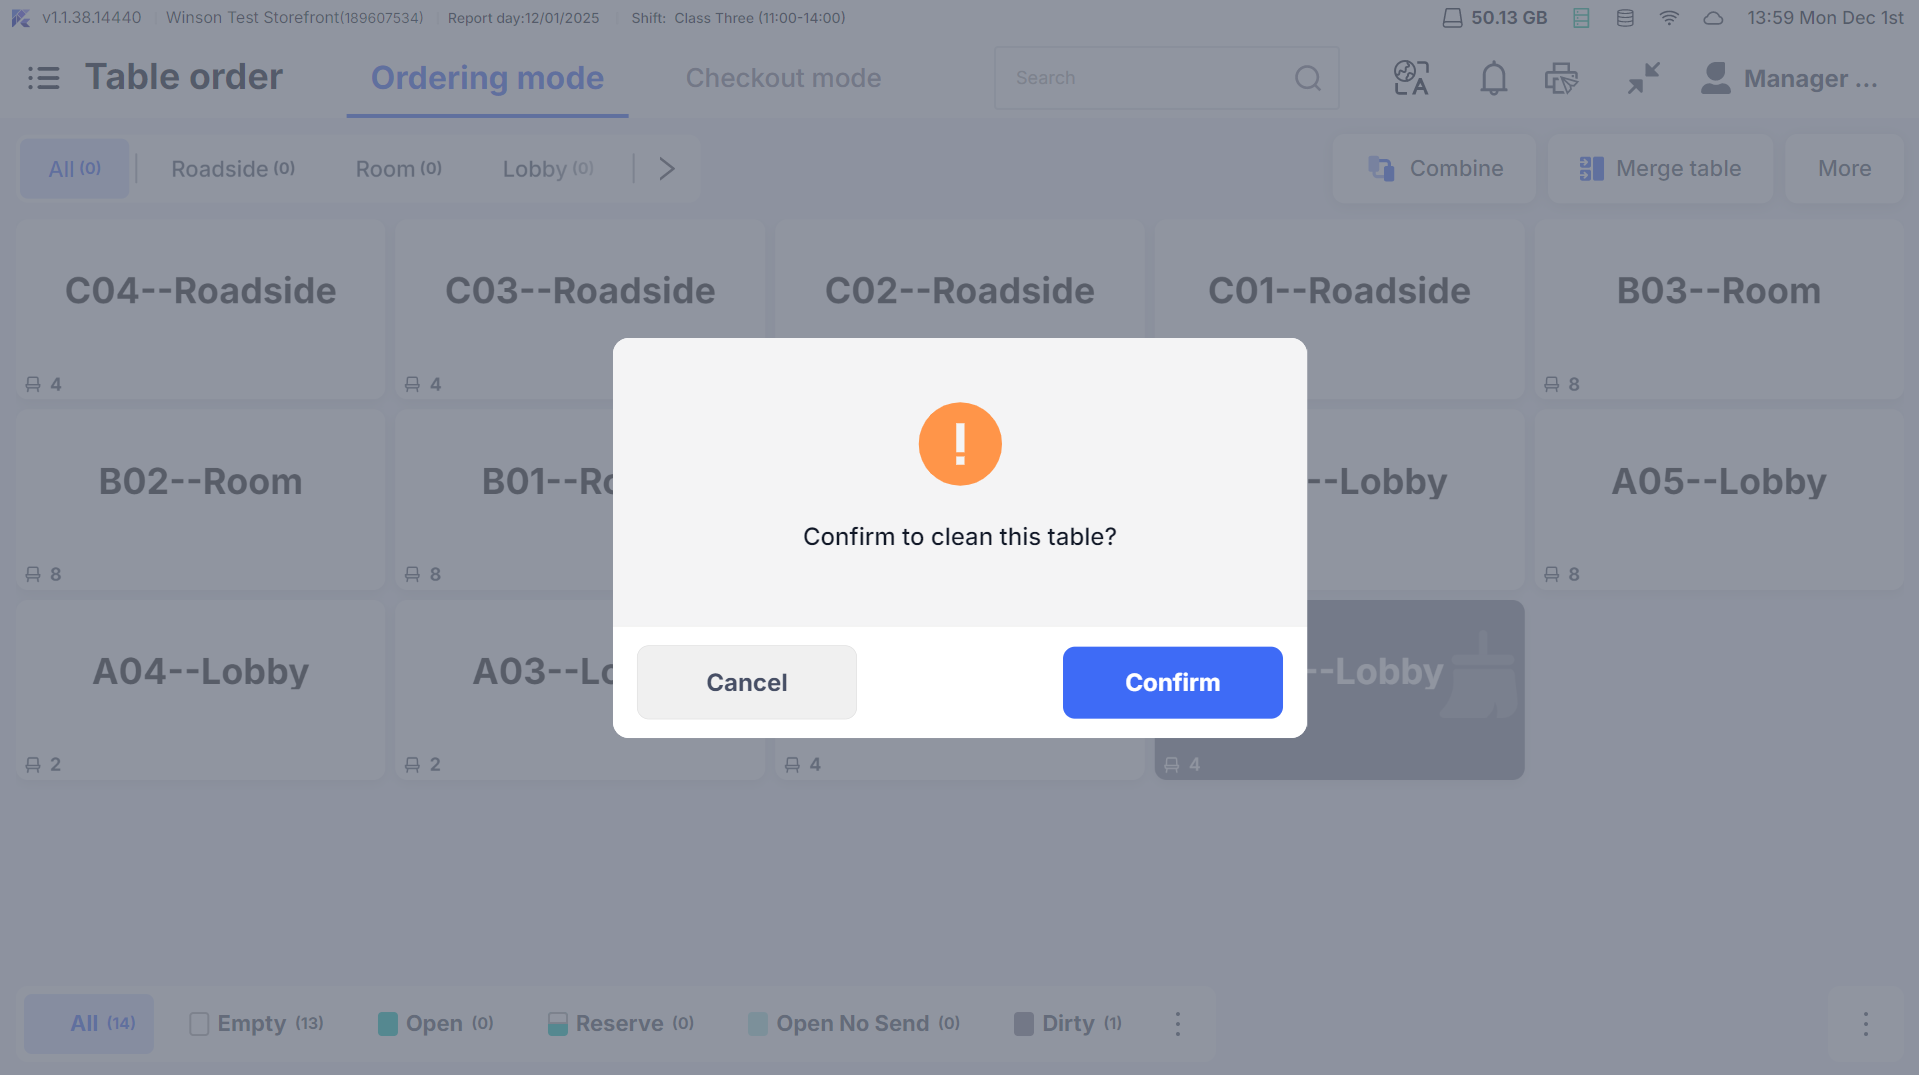
- Table shows【Pending Clear】after payment
- Click on the pending clearing table, and a dialog will prompt 【Clear Table?】 Click【Confirm】to complete clearing
2.4 Cancel Opening the Table
- If no items are ordered after opening the table and you need to cancel the opening and reset the table to empty:
- Order screen →【More】→【Cancel Opening the Table】
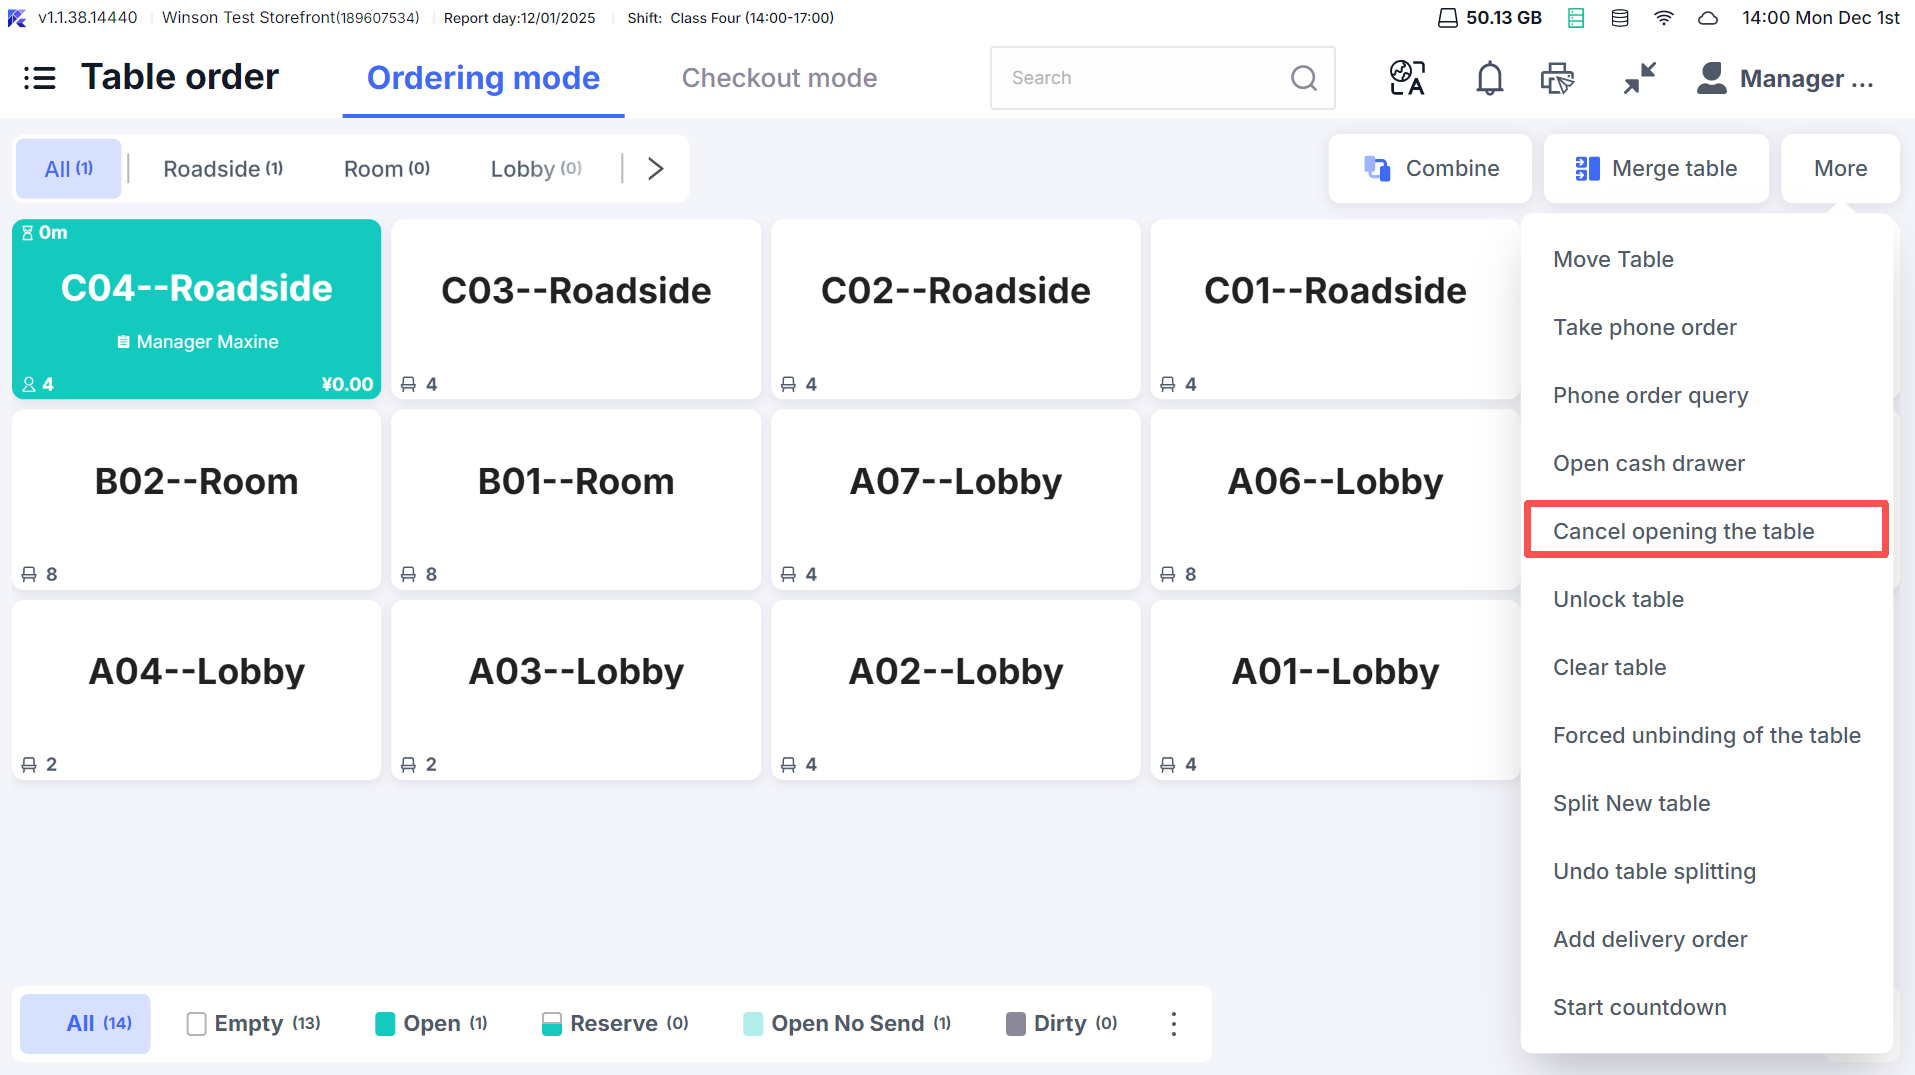
- Or long-press the table and select【Cancel Opening the Table】
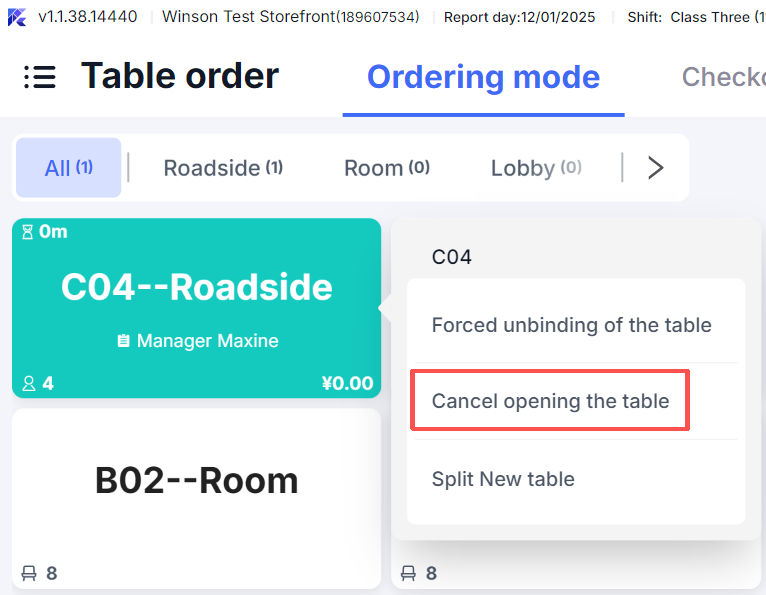
- Order screen →【More】→【Cancel Opening the Table】
3 Special Table Operations
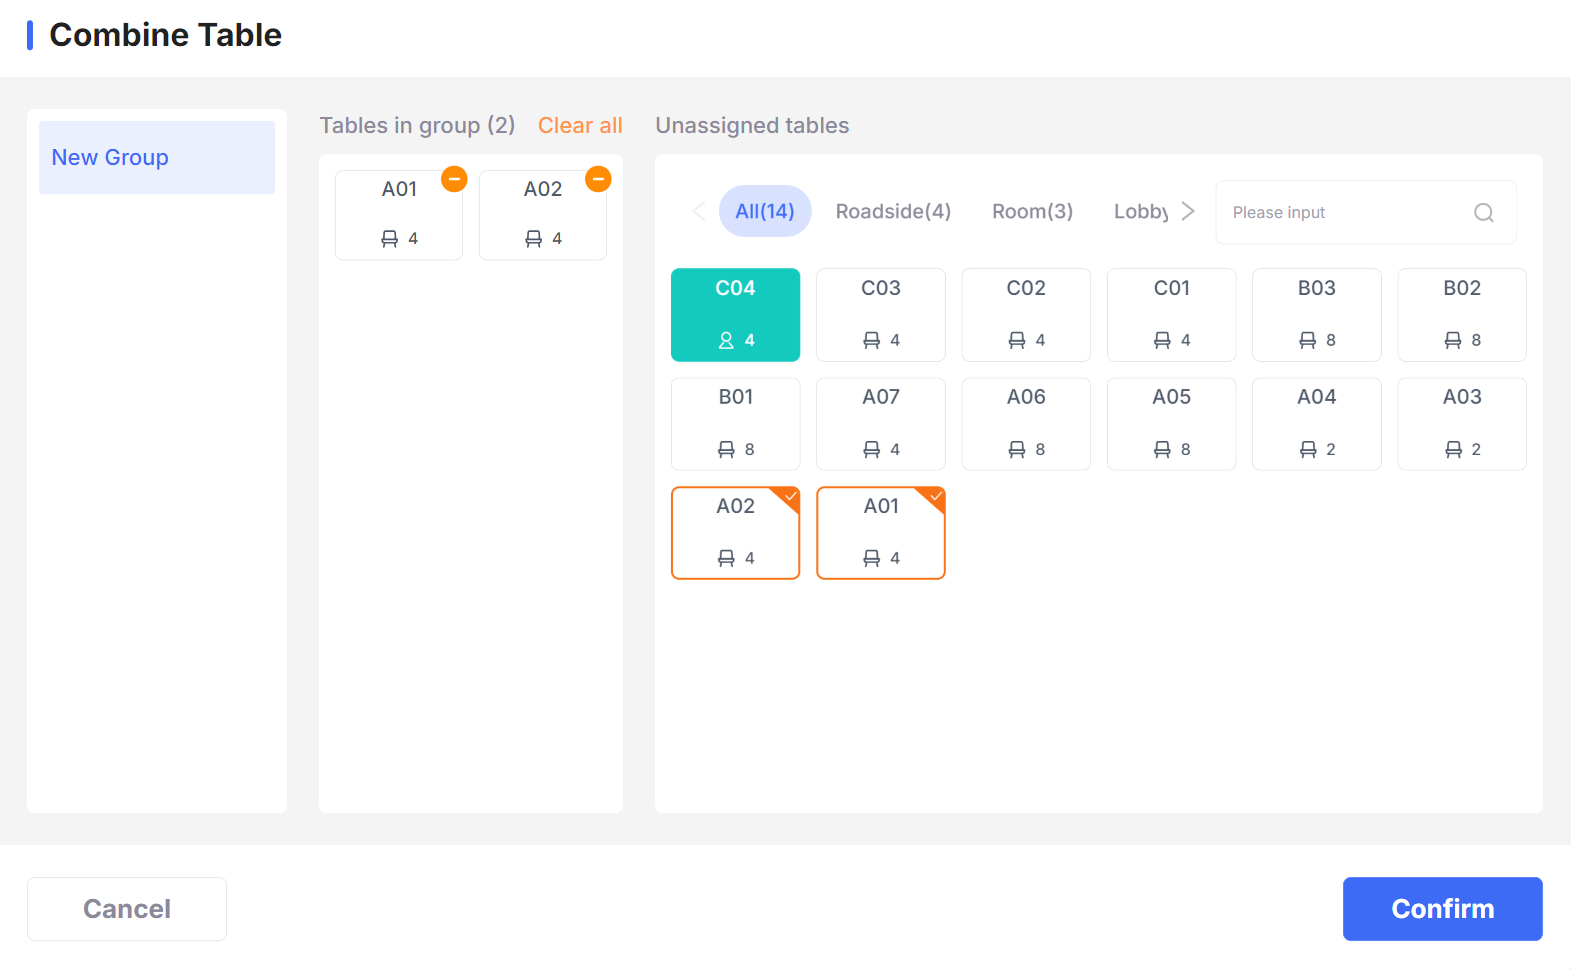
3.1 Combine Table
-
When to Use: Large groups needing connected tables but separate bills
-
Steps:
- Step 1: Enter the table page, tap the top【Combine】button
- Step 2: On the left, select【New Group】, and on the right, check the empty/open tables to combine (at least 2 tables)
- Step 3: Click【Confirm】to create a group (e.g., “Group 1”), and the tables will display a group label
-
Post-combination operations:
- Click any grouped table to swipe left/right to view orders from other tables in the group
- During billing, you can choose【Bill Separately】or【Combine Bill】
- To detach tables: Enter the group → click【Detach】→ confirm to reset tables to individual status
3.2 Merge Table
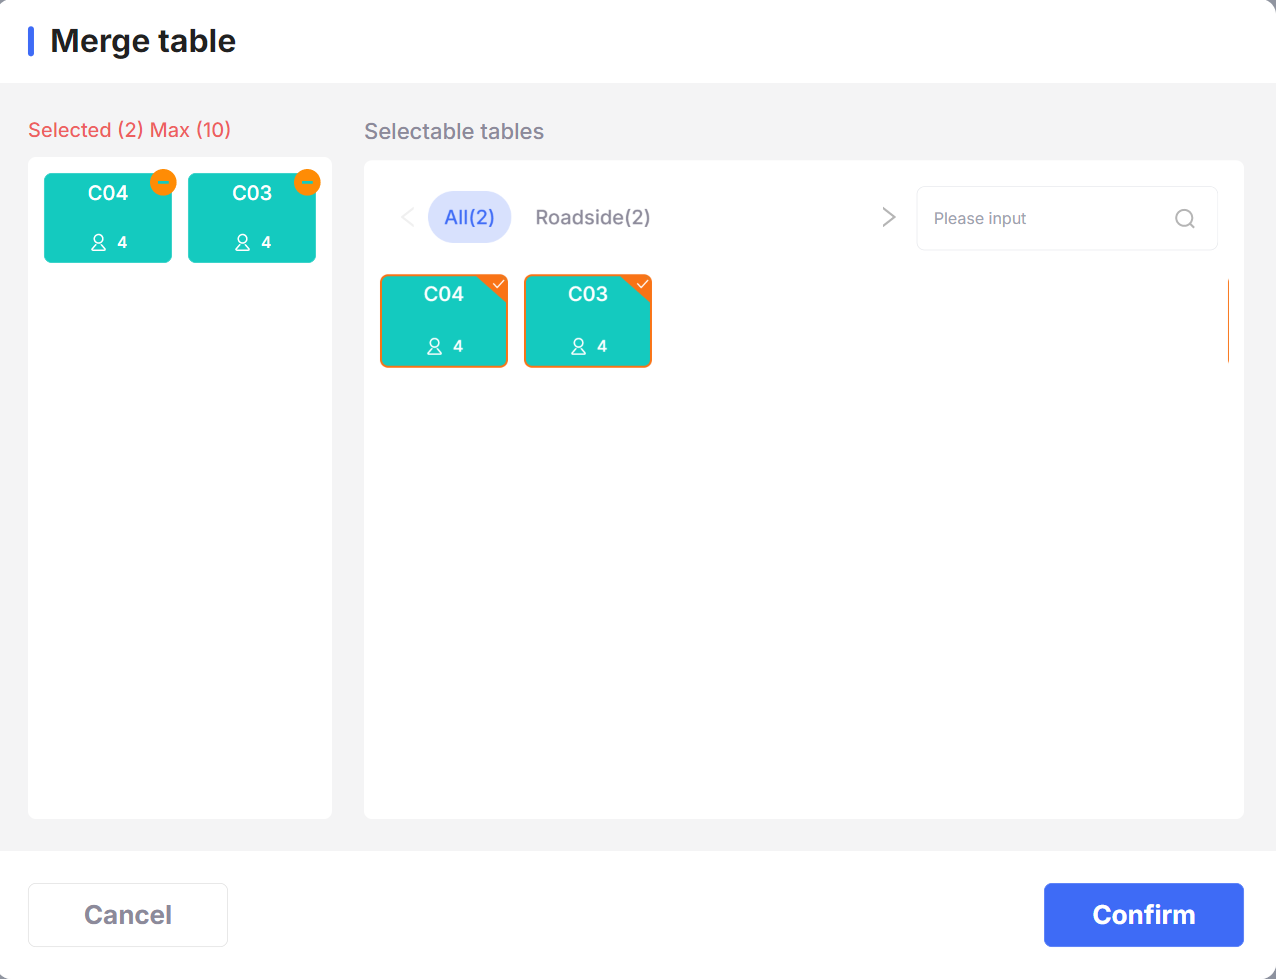
- When to Use: Suitable for guests merging multiple tables for a single bill (e.g., merging 3 tables into 1 for billing)
- Steps:
- Step 1: Enter the table page and click the top【Merge Table】button
- Step 2: On the right, check the open tables to merge (at least 2 tables, with no unplaced orders)
- Step 3: Click【Confirm】, the dialog will prompt “Merge to the last table,” and after confirmation:
- All items, discounts, and fees from all tables are merged into the last table’s bill
- Source tables are automatically cleared, retaining only the target table’s open status
- For billing, only operate on the target table’s bill
3.3 Split New Table
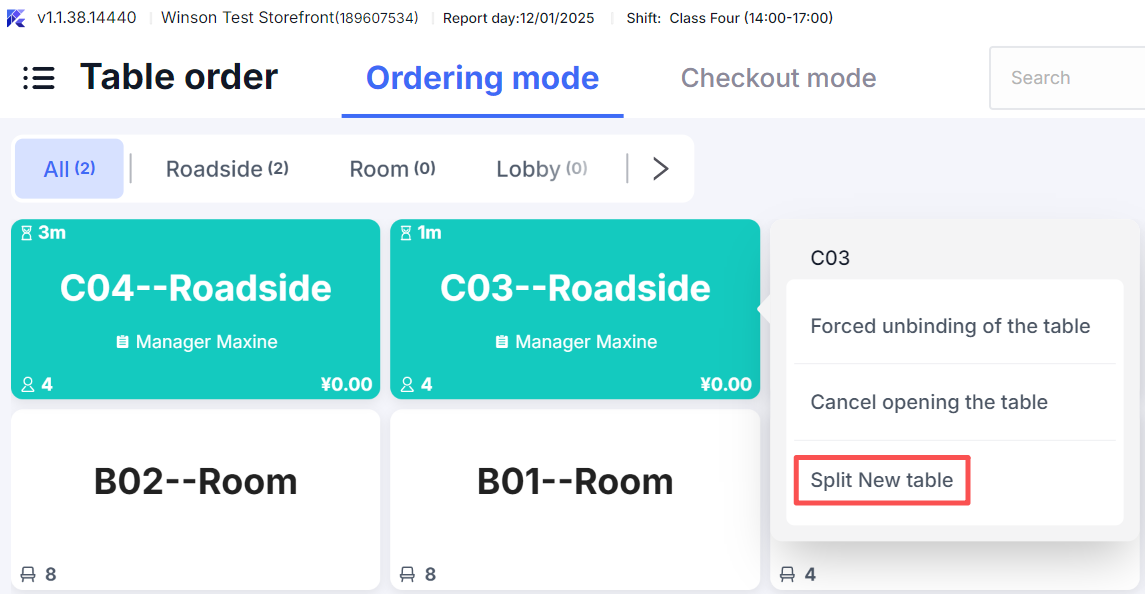
- When to Use: Suitable for serving multiple groups at one table (e.g., a 4-person table split into 2 groups)
- Benefits: Independent ordering and payment for each group
- Steps:
- Step 1: Enter an open table, Long-press the occupied table, select【New Order】
- Step 2: Enter guest count for new group to generate a new bill (table name shown as “Original Table
1,” e.g., “Lobby- C031”)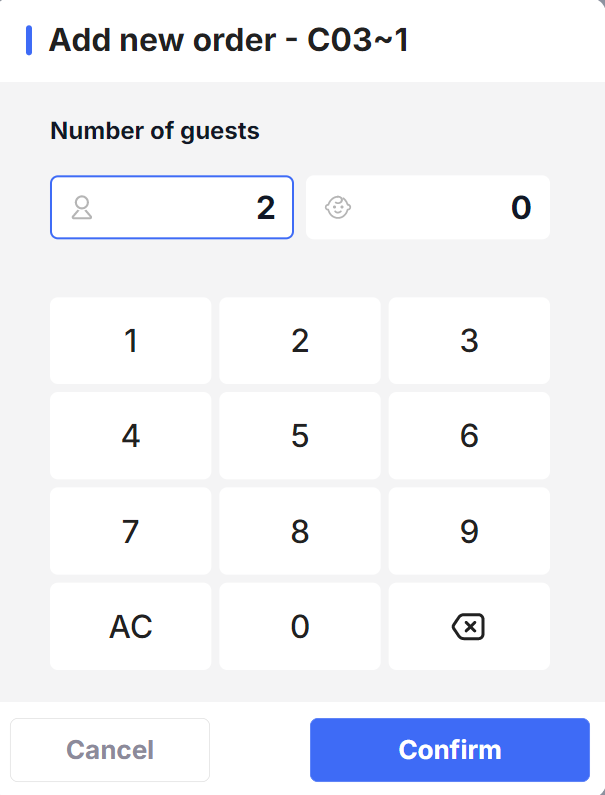
- Step 3: After splitting the table:
- Click the table to prompt a selection for the bill to operate (distinguishing between the two group orders)
- Each group can add items and settle bills separately, without affecting the other
- After any group settles, only that bill closes; the table continues to retain other orders
4 Reservation Management
4.1 Handling Online Reservations
When guests book online (e.g., via applets), the POS operations are as follows:
-
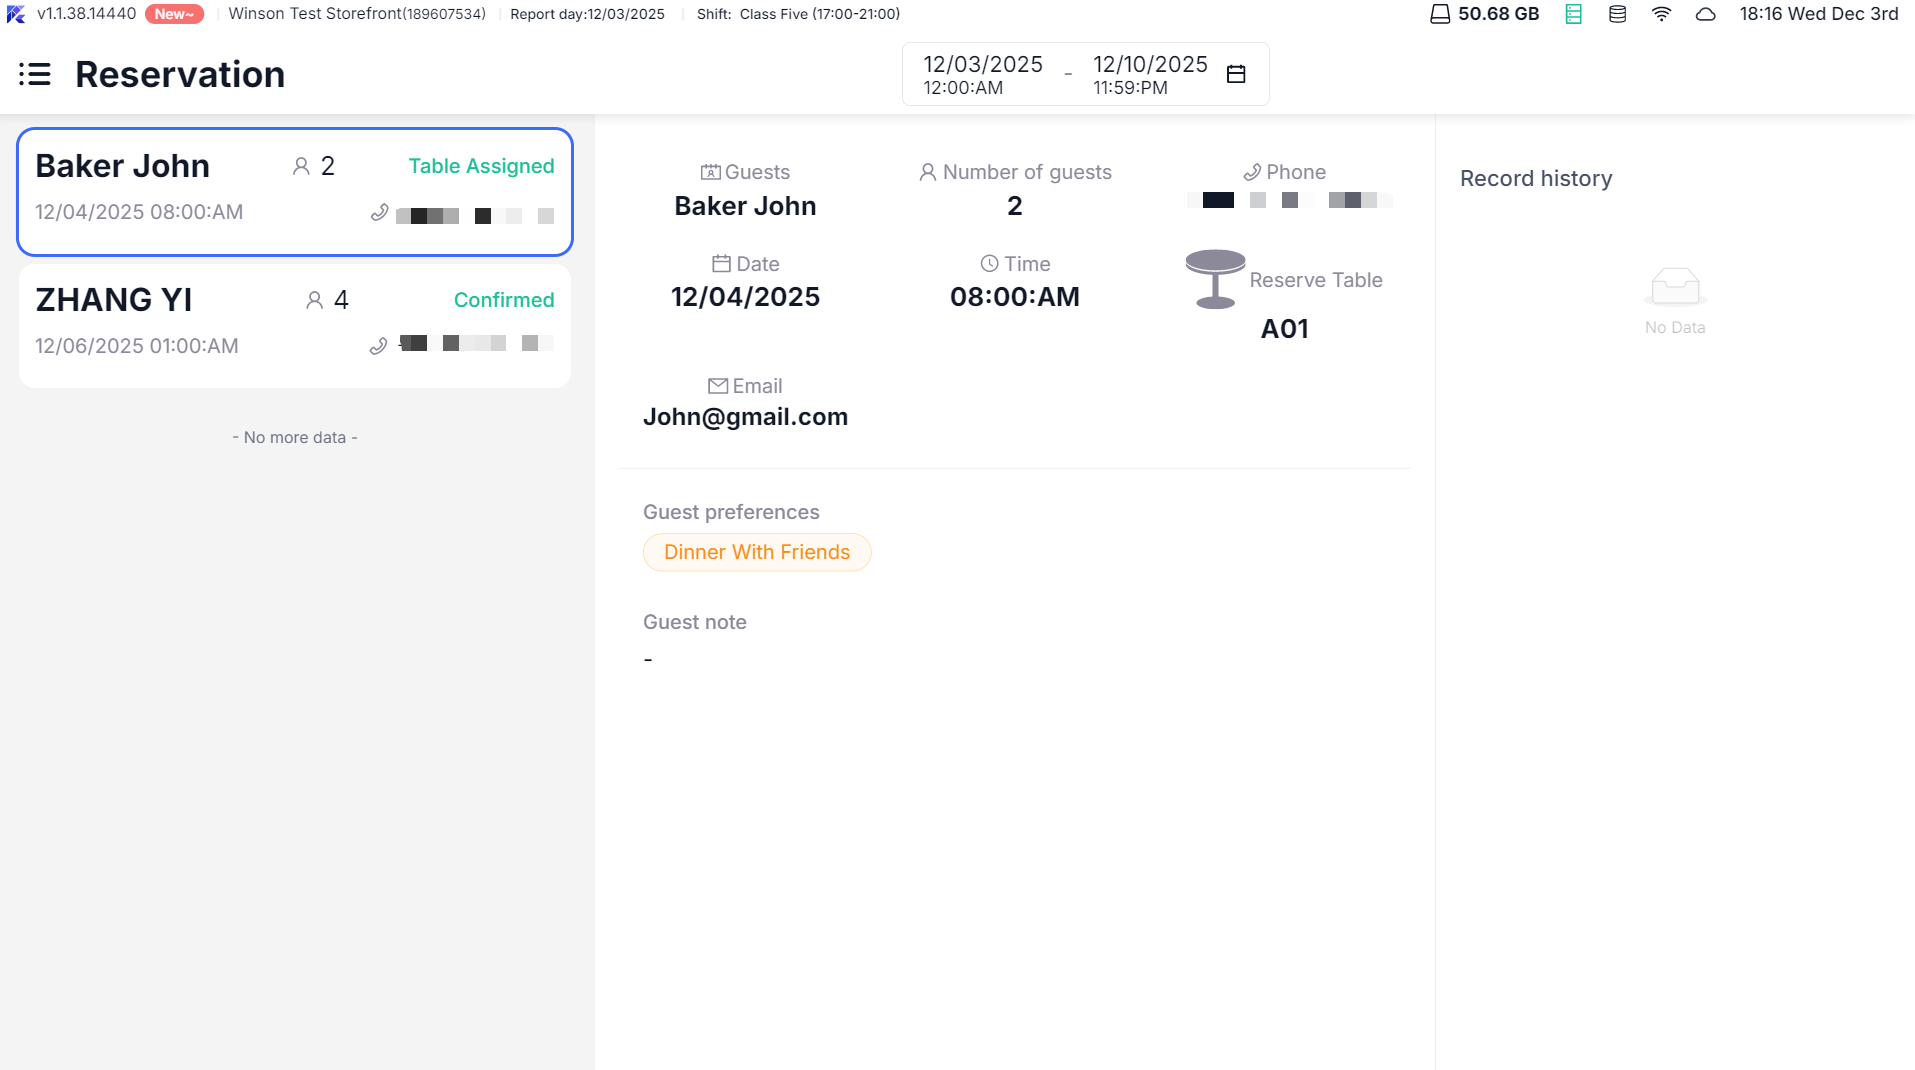
Step 1: Click the main menu【Message Center】→【New Reservations】to view the list of pending orders
-
Step 2: Click the reservation order to view guest information (name, number, reservation time, preferences)
-
Step 3: Receiving operations:
- 【Accept】: Choose【Assign Table】(directly assign a table) or【Do Not Assign Yet】(assign later).
- 【Reject】: Choose a reason for rejection (e.g., “Overbooked,” “Incorrect Phone”) and notify the guest.
-
Step 4: After accepting:
- Pending Allocation: Enter the table page【More】→【Assign】→ specify a table
- When guests arrive, click the reserved table →【Seat】→ confirm actual attendance → open the table for ordering
4.2 Creating Reservations — Manual Entry on POS
- When to Use: Suitable for in-person/telephone reservations
- Steps:
- Step 1: Table page →【More】→【New Reservation】
- Step 2: Enter date, time, headcount and guest details (required)
- Step 3: Fill in guest preferences (e.g., “Birthday Celebration,” “Allergy Notes”) (Optional)
- Step 4: Click【Confirm】to set the reservation to “Accepted & Pending Allocation”; allocate tables later or upon guest arrival.
5 Bill Processing
5.1 Splitting Bills — Dividing a Bill for Separate Payments
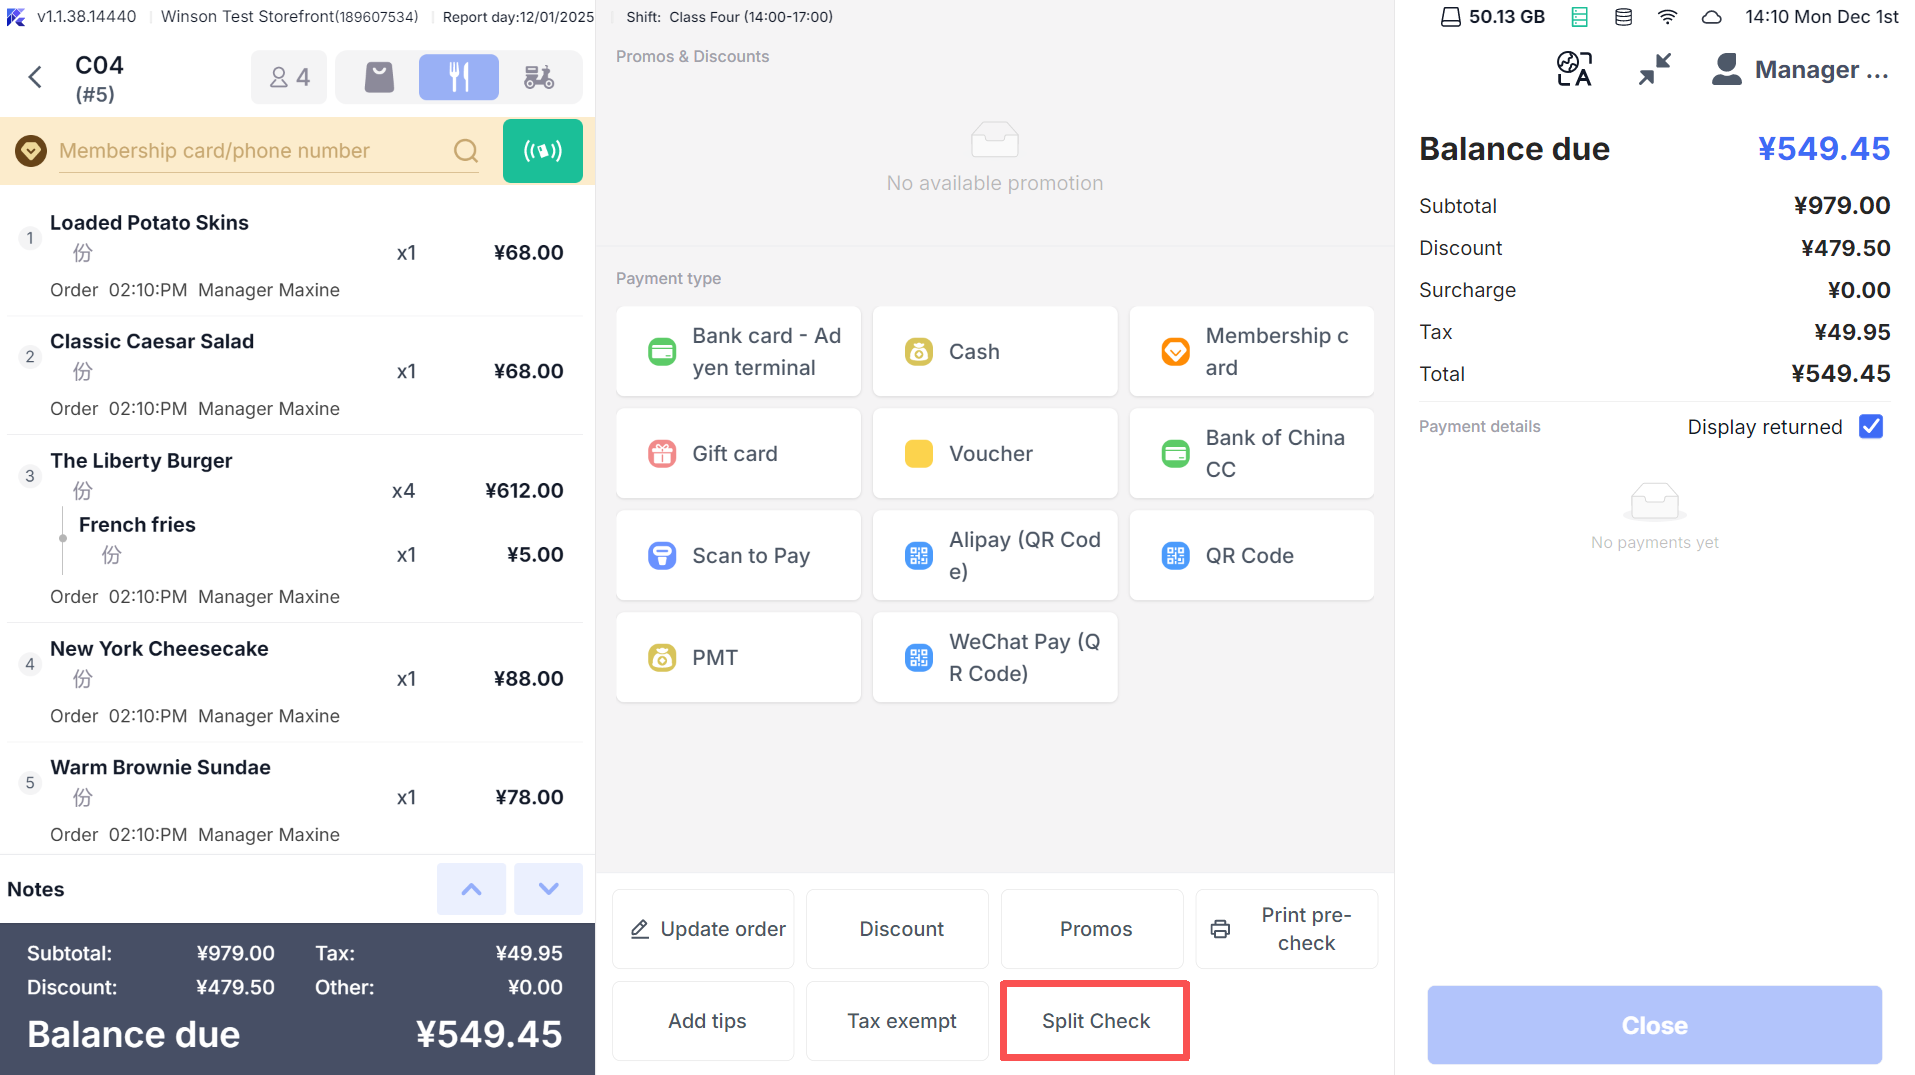
- When to Use: Suitable for guests wishing to split the bill
- Steps:
- Step 1: Enter the ordering page, click【More】→【Split】
- Step 2: Choose a splitting method:
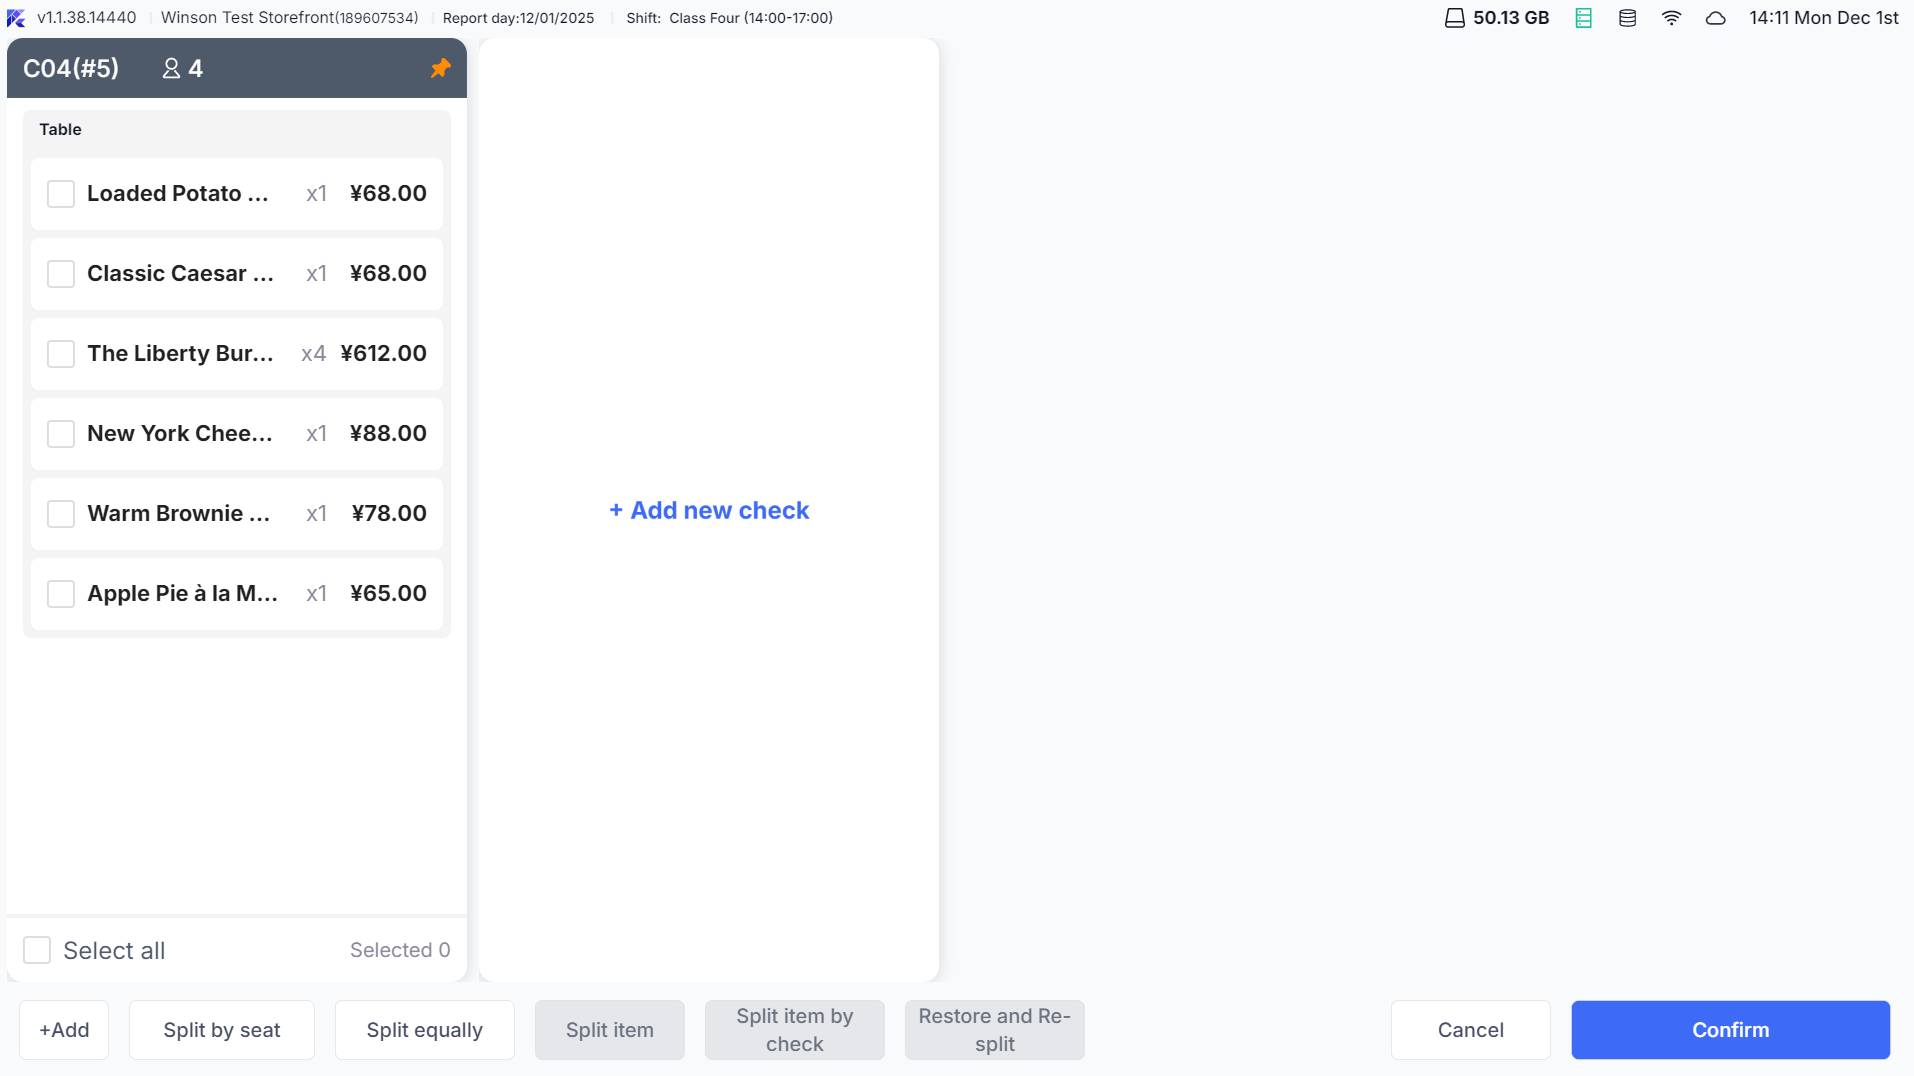
- Split by Seat: Split bills according to pre-set seats.
- Split Equally: Evenly distribute the amount by the headcount
- Split Item: Manually select items to distribute to different sub-bills
- Step 3: Click【Confirm】to generate sub-bills (e.g., “#1218-1,” “#1218-2”), each settled separately
If guests want to combine the bills?
Steps: Before settling split bills, enter the split page →【Combine All】→ revert to original bill
5.2 Printing Pre-Checks and Table Lock
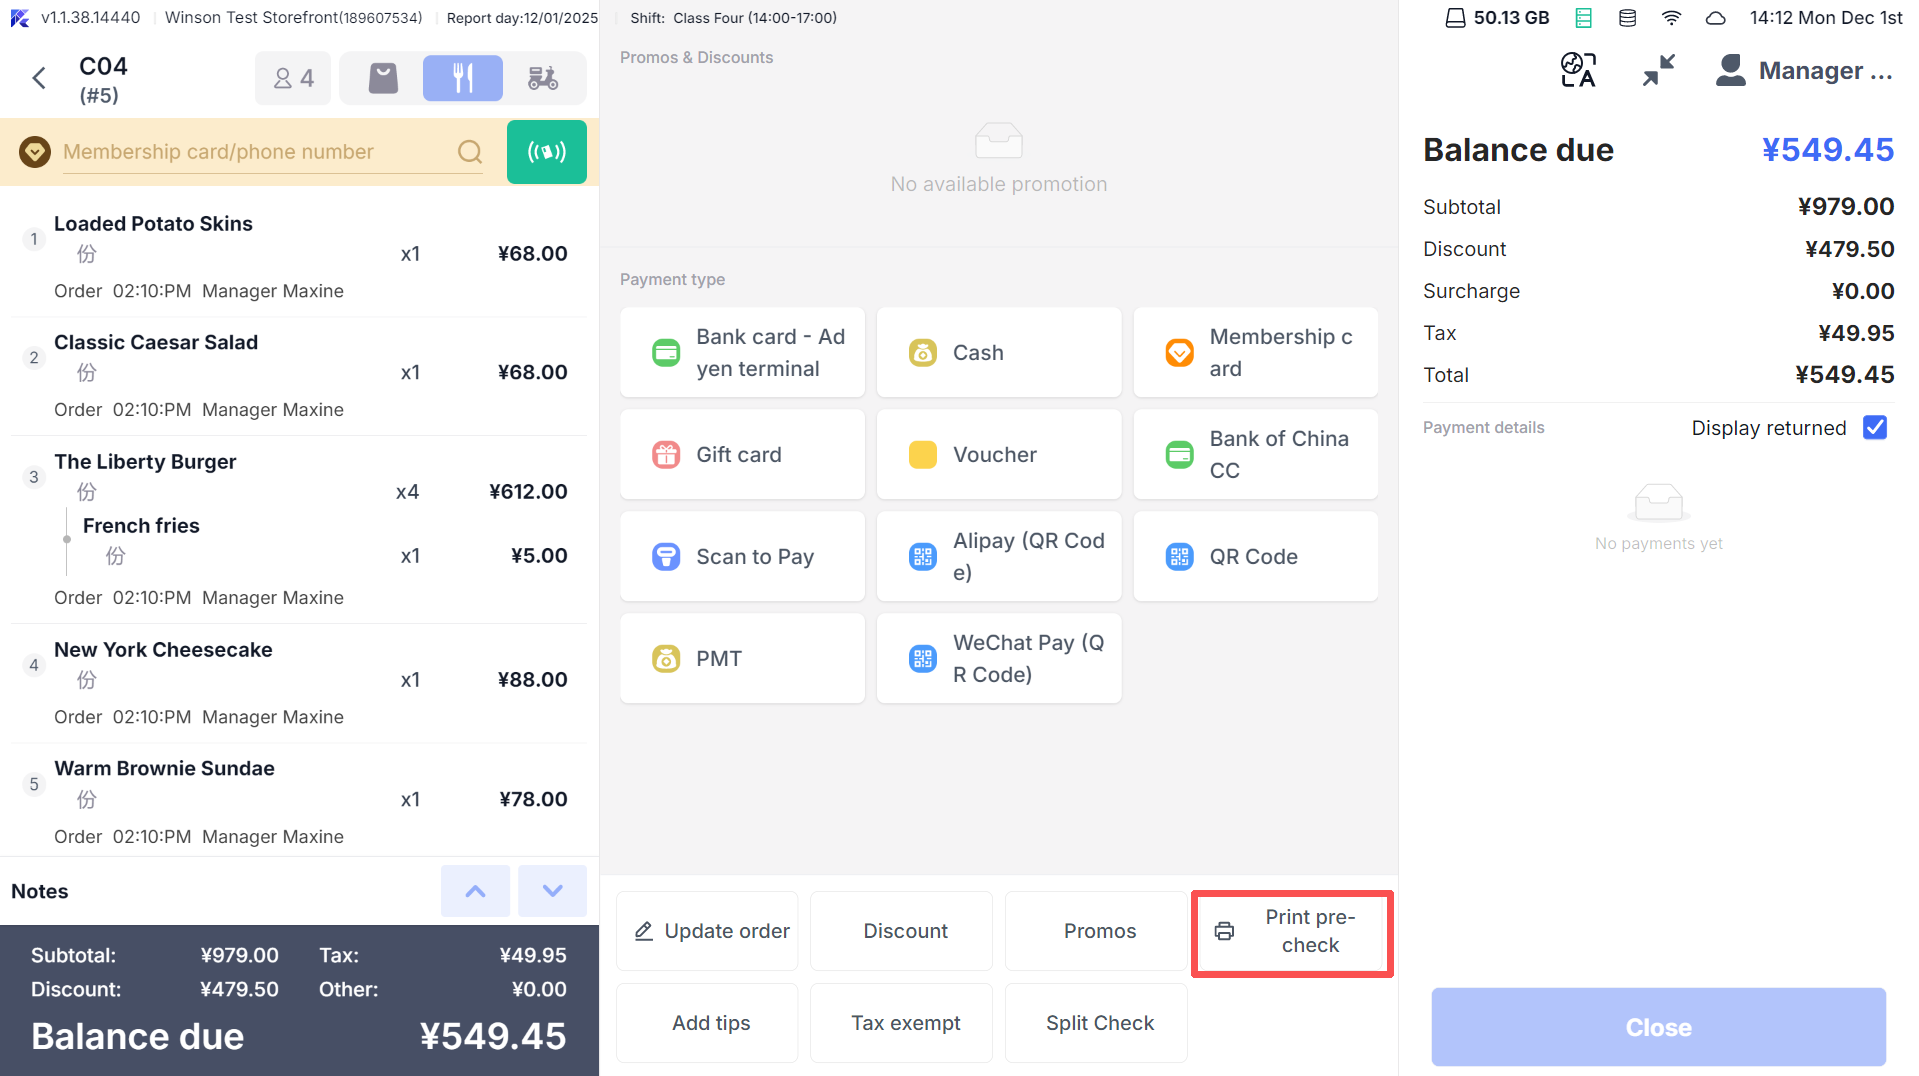
- When to Use: Suitable for guests requesting to review the bill to prevent additional orders
- Steps:
- Step 1: Enter the ordering page, click【Print Pre-check】→ select【Print This Bill】or【Print All Sub-bills】
- If the system has “Lock Table After Pre-check” enabled:
- Auto Lock: Prevents order changes after pre-check
- To unlock: Enter the table → click【Cancel Pre Check-Out】to restore editing
6 Special Scenarios
6.1 Table Time Management
- When to Use: Suitable for buffets (e.g., 2-hour dining limit) with overtime alerts
- System settings: Enter【Settings】→【Countdown Reminder】→ enable “Alert After Table Opening.”
- Set alert rules (e.g., “Alert 30 Minutes Early,” “Red Warning for Overtime”)
- After opening a table, a countdown timer displays (e.g., “01:59:00”), and upon overtime:
- The table background changes to red, and a pop-up alerts “Dining Overtime.”
- Servers can manually extend the time (requires permissions).
6.2 Minimum Spending
- When to Use: Suitable for setting minimum spend in private rooms (e.g., $100/table)
- When a table is set with a minimum spend, during ordering:
- If the total item amount < minimum spend, an “Add Minimum Spend Fee” is automatically added (e.g., spend $80, add $20).
- If the total item amount ≥ minimum spend, the “Add Minimum Spend Fee” is automatically removed.
7 FAQs
- Issue: Can’t combine/merge tables?
- Solution:
Check if conditions are met:
- Combining requires at least 2 tables with no unplaced orders
- Merging requires all tables to have placed orders with no unpaid items
- Issue: Cannot distinguish bills after splitting tables?
- Solution: Clicking the table will display all bill summaries in a pop-up (e.g., “#1218-1 (2 people, $120)”), and choose the corresponding bill.
- Issue: No table available for reservation?
- Solution: Enter【Message Center】→【Pending Allocation Reservations】→ click【Assign】and choose an available table for the guest
- Issue: Table locked and uneditable?
- Solution: Confirm if “Lock Table After Pre-check” is enabled, enter the table → click【Cancel Pre Check-Out】to unlock; or contact an administrator with “Unlock Permissions” to release