CFS Management
(for Cashiers and Store Managers)
1 Introduction
This guide explains how to use the POS customer display. It covers basic functions, customer self-service (order confirmation, tips, membership, gift cards), and back-office setup. These simple steps help improve customer experience and increase store efficiency.
2 Core Functions
2.1 Core Functions
- Displays Key Information: Shows order details, payment status, tip options, and membership benefits.
- Enables Self-Service: Customers can enter personal information, select tips, log in or join membership programs, and purchase gift cards.
- Idle Mode: Displays promotional content like welcome messages, brand logo, and image/video slideshows.
2.2 Screen Scenarios and Corresponding Displays
Main Screen Scenario | Customer Display Page | Core Functionality |
|---|---|---|
POS Locked/Inactive | Idle Page | Shows promotional content (Logo, slideshow, etc.) |
Order (with customization/discount) | Order Page | Syncs order details like items, prices, and totals |
Payment (with tip options) | Tip Selection Page | Allows tip selection or custom amount entry |
During Payment | Payment Page | Shows payment records and order status |
Payment Complete | Completion Page | Confirms successful payment and allows e-receipt entry |
Gift Card Purchase | Gift Card Purchase Page | Self-entry for purchase details and payment |
Membership Actions | Membership Page | Self-login, registration, and discount selection |
3 Core Customer Display Operations
3.1 Basic Operations (Ordering - Payment - Completion)
3.1.1 Order Sync Display
- After starting an order on the main screen, the customer display shows the order page with product names, specifications, quantities, prices, subtotals, taxes, and discounts.
- Any customization, cancellation, or discount applied on the main screen updates in real-time on the customer display (without showing the customization process itself).
- Customer information (name, phone number) entered on the main screen is partially masked for privacy on the customer display.
3.1.2 Tip Selection
- Activation: This function is active if enabled in the BO, the due amount is > $0, and no tip has been recorded.
-
Process:

- On payment selection on the main screen, the customer display shows a tip selection page with three fixed percentages (e.g., 1%, 5%, 10%), a custom option, and a no-tip option.
- Fixed Tip: Customer selects a percentage, and the tip amount is calculated, updating the total due on both screens.
- Custom Tip: Customer enters a custom amount (must be > $0), same process follows.
- No Tip: Selecting this returns to the order page.
-
Main Screen Assistance: During selection, the main screen shows a “Customer choosing tip” prompt, allowing manual input or skipping the tip page.
3.1.3 Payment Completion and E-Receipt
- Once payment is processed on the main screen, the customer display confirms with a “Payment Successful” page.
- For E-Receipts: Clicking 【Send E-Receipt】on the main screen prompts an email entry on the customer display for self-entry and receipt delivery.
3.2 Customer Self-Service Operations
3.2.1 Membership Login & Registration
-
Membership Login:
- The customer display shows a【Login】button, prompting entry of phone or membership card number upon click.
- Upon finding membership information, it displays member details like name and balance, linking the membership to the current order.
- To log out, the customer can click the【Log out】button.
-
Membership Registration:
- If no membership is found after a search on the Primary Screen, the Secondary Screen displays an【Add Member】button. Tapping it navigates the customer to the registration page.
- The customer fills in the required fields (marked with *, e.g., mobile number, email, name) as prompted on the Secondary Screen and checks the boxes for the “Registration Agreement” and “Privacy Policy” (tappable to view details).
- Once confirmed, the Primary Screen completes the registration process. The Secondary Screen membership is created, and the display shows member information linked to the order.
3.2.2 Gift Card Purchase and Payment
-
After entering the primary information, the Secondary Screen switches to the gift card purchase page, displaying the card name, face value, bonus amount (if any), validity period, etc.
-
Customer Self-Service Steps:
- Choose 【For Self】or【As Gift】(requires additionally entering the recipient’s name, mobile number, and email).
- Select Payment Method: Only the payment methods configured on the BO end for gift card purchases are displayed (e.g., Cash, Bank Card, Scan-to-Pay).
- Select Tip: If the selected payment method has the tipping function enabled, tipping options will appear on the Secondary Screen. The total amount (Gift Card value + Tip) is calculated automatically upon selection.
-
Post-Payment: The Secondary Screen displays a “Purchase Successful. Please check your SMS or email for notification.” message, automatically closes the purchase page, and returns to the idle screen or ordering page.
3.3 Language Switching
- A language switch button is available on any Secondary Screen page (when order information is present). Tapping it opens a language selection dialogue.
- Supports four languages configured in the BO, instantly changing all text to the selected language for convenience.
4 BO Configuration for Customer Display
4.1 Configuration Access
Log in to the BO, navigate to【Restaurant Management】→【Front-of-House】→【Customer Facing Screen】to configure display styles.
4.2 Key Configuration Options
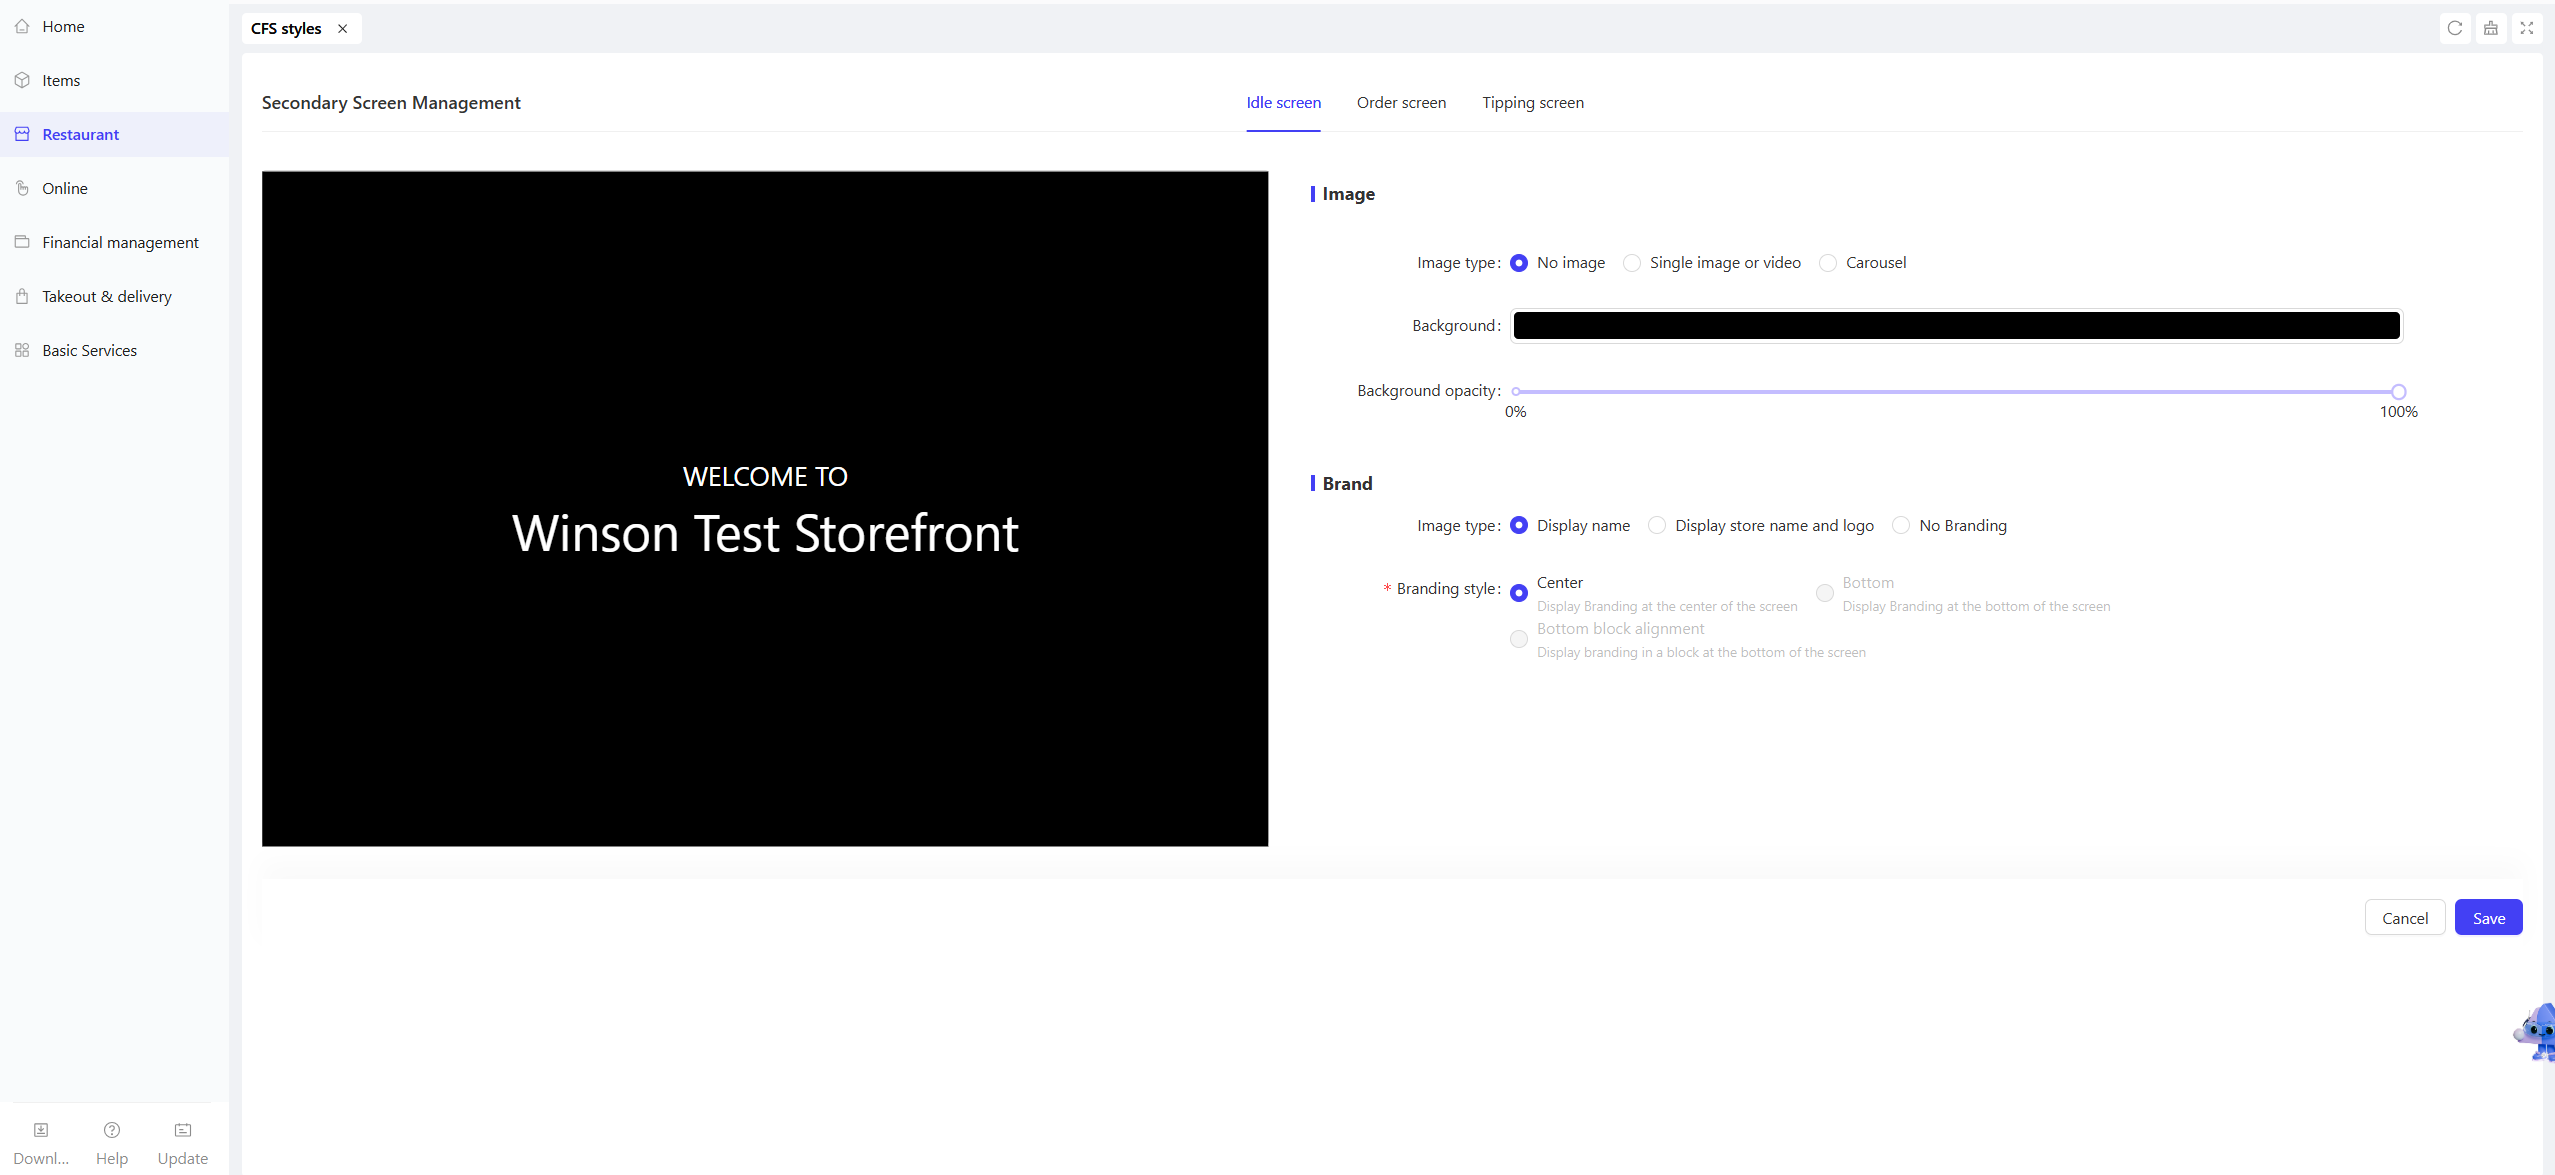
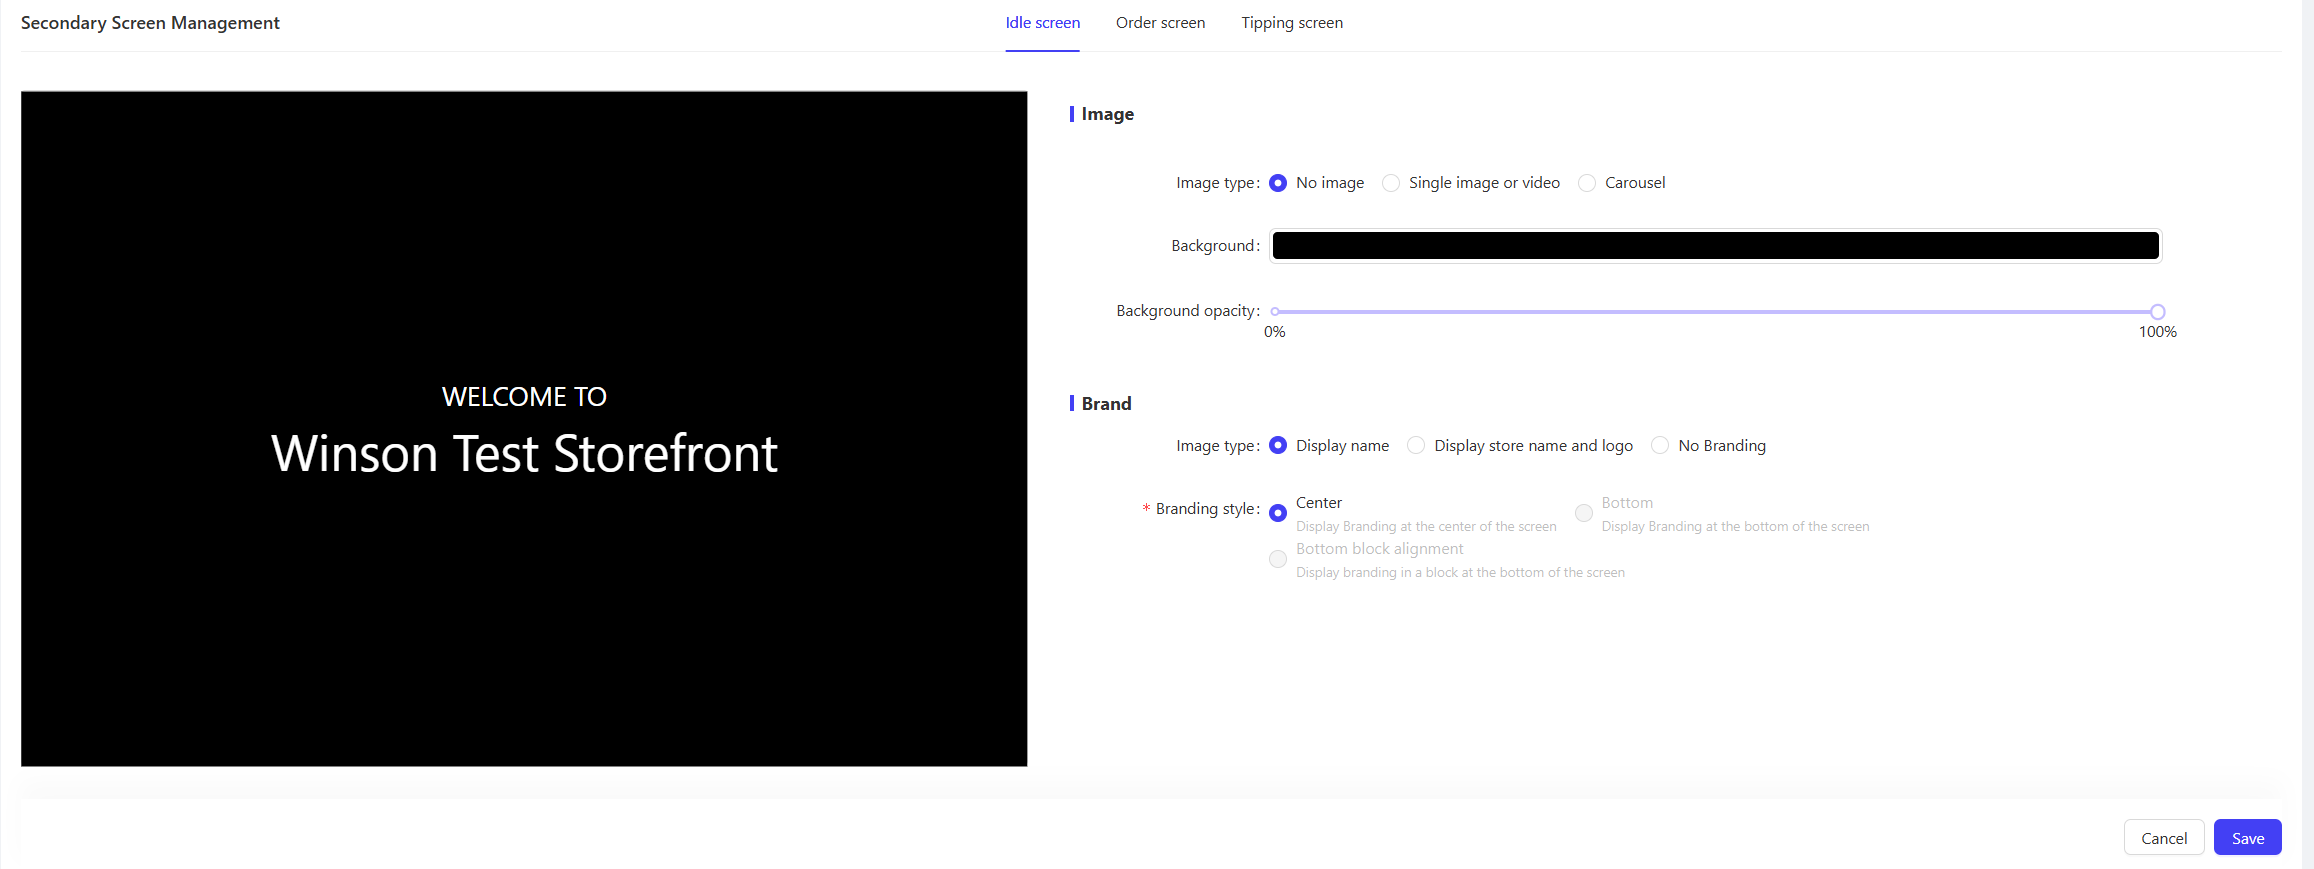
4.2.1 Idle Page Configuration
-
Content Settings:
- Image Type: Choose from【No Image】,【Static Image】, or【Slideshow】(multiple images for cyclic playback).
- Brand Information: Options to show “Store Name”, “Store Name + Logo”, or “Do Not Display”.
- Background/Overlay: When 'No Image' is selected, set a background color. With an image, set the overlay color and opacity (default is Black at 50% opacity)💡Logo priority: Page-configured > Store Logo > Brand Logo > Default Logo
-
Style Settings:
- Position of Brand Info: Choose “Center”, “Bottom”, or “Bottom Block”.
- Supports video upload (MP4/MOV, up to 100MB), recommended resolution 860x1080.
4.2.2 Order Page Configuration
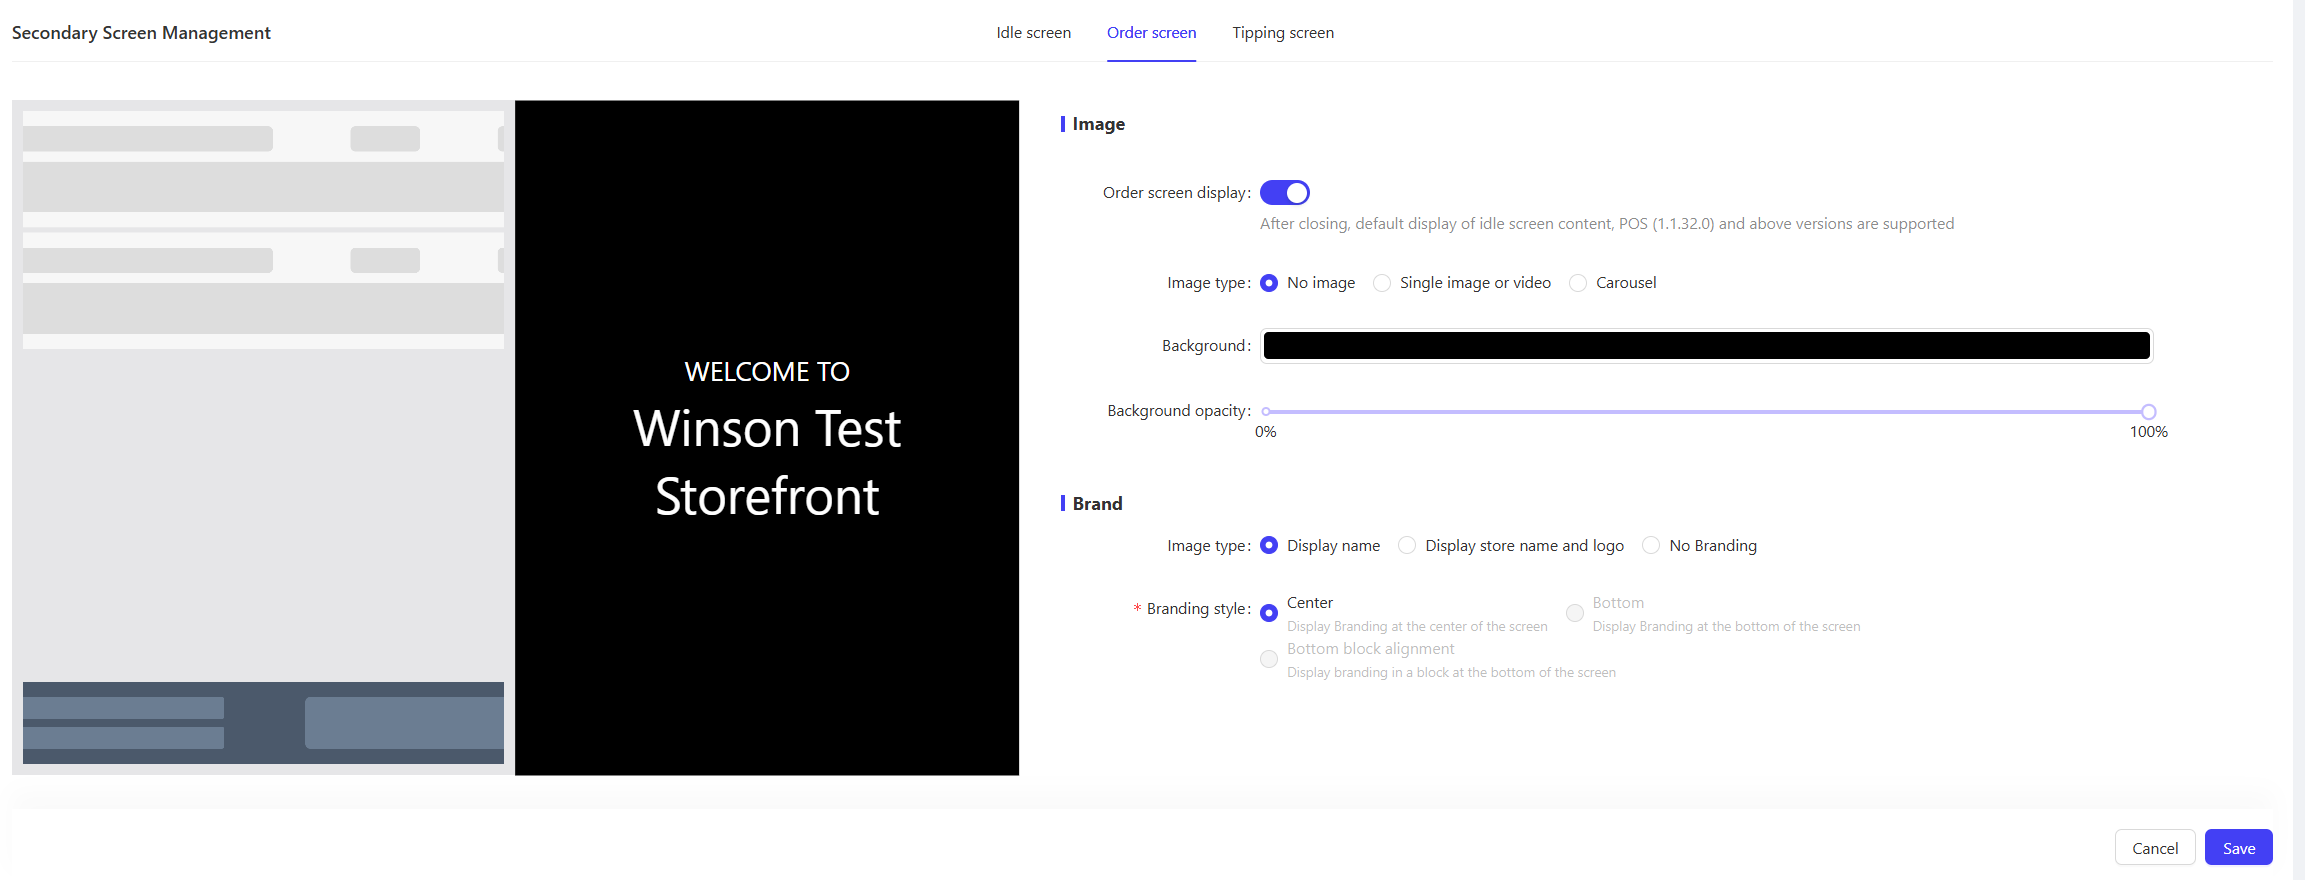
- Background Settings: Choose no image, static image, or slideshow with transparency control.
- Brand Information: Same as Idle Screen configuration, supports displaying Store Name and Logo.
- Order Display: By default, synchronizes with the order details from the Primary Screen. No extra configuration needed. Font size adapts automatically to the screen.
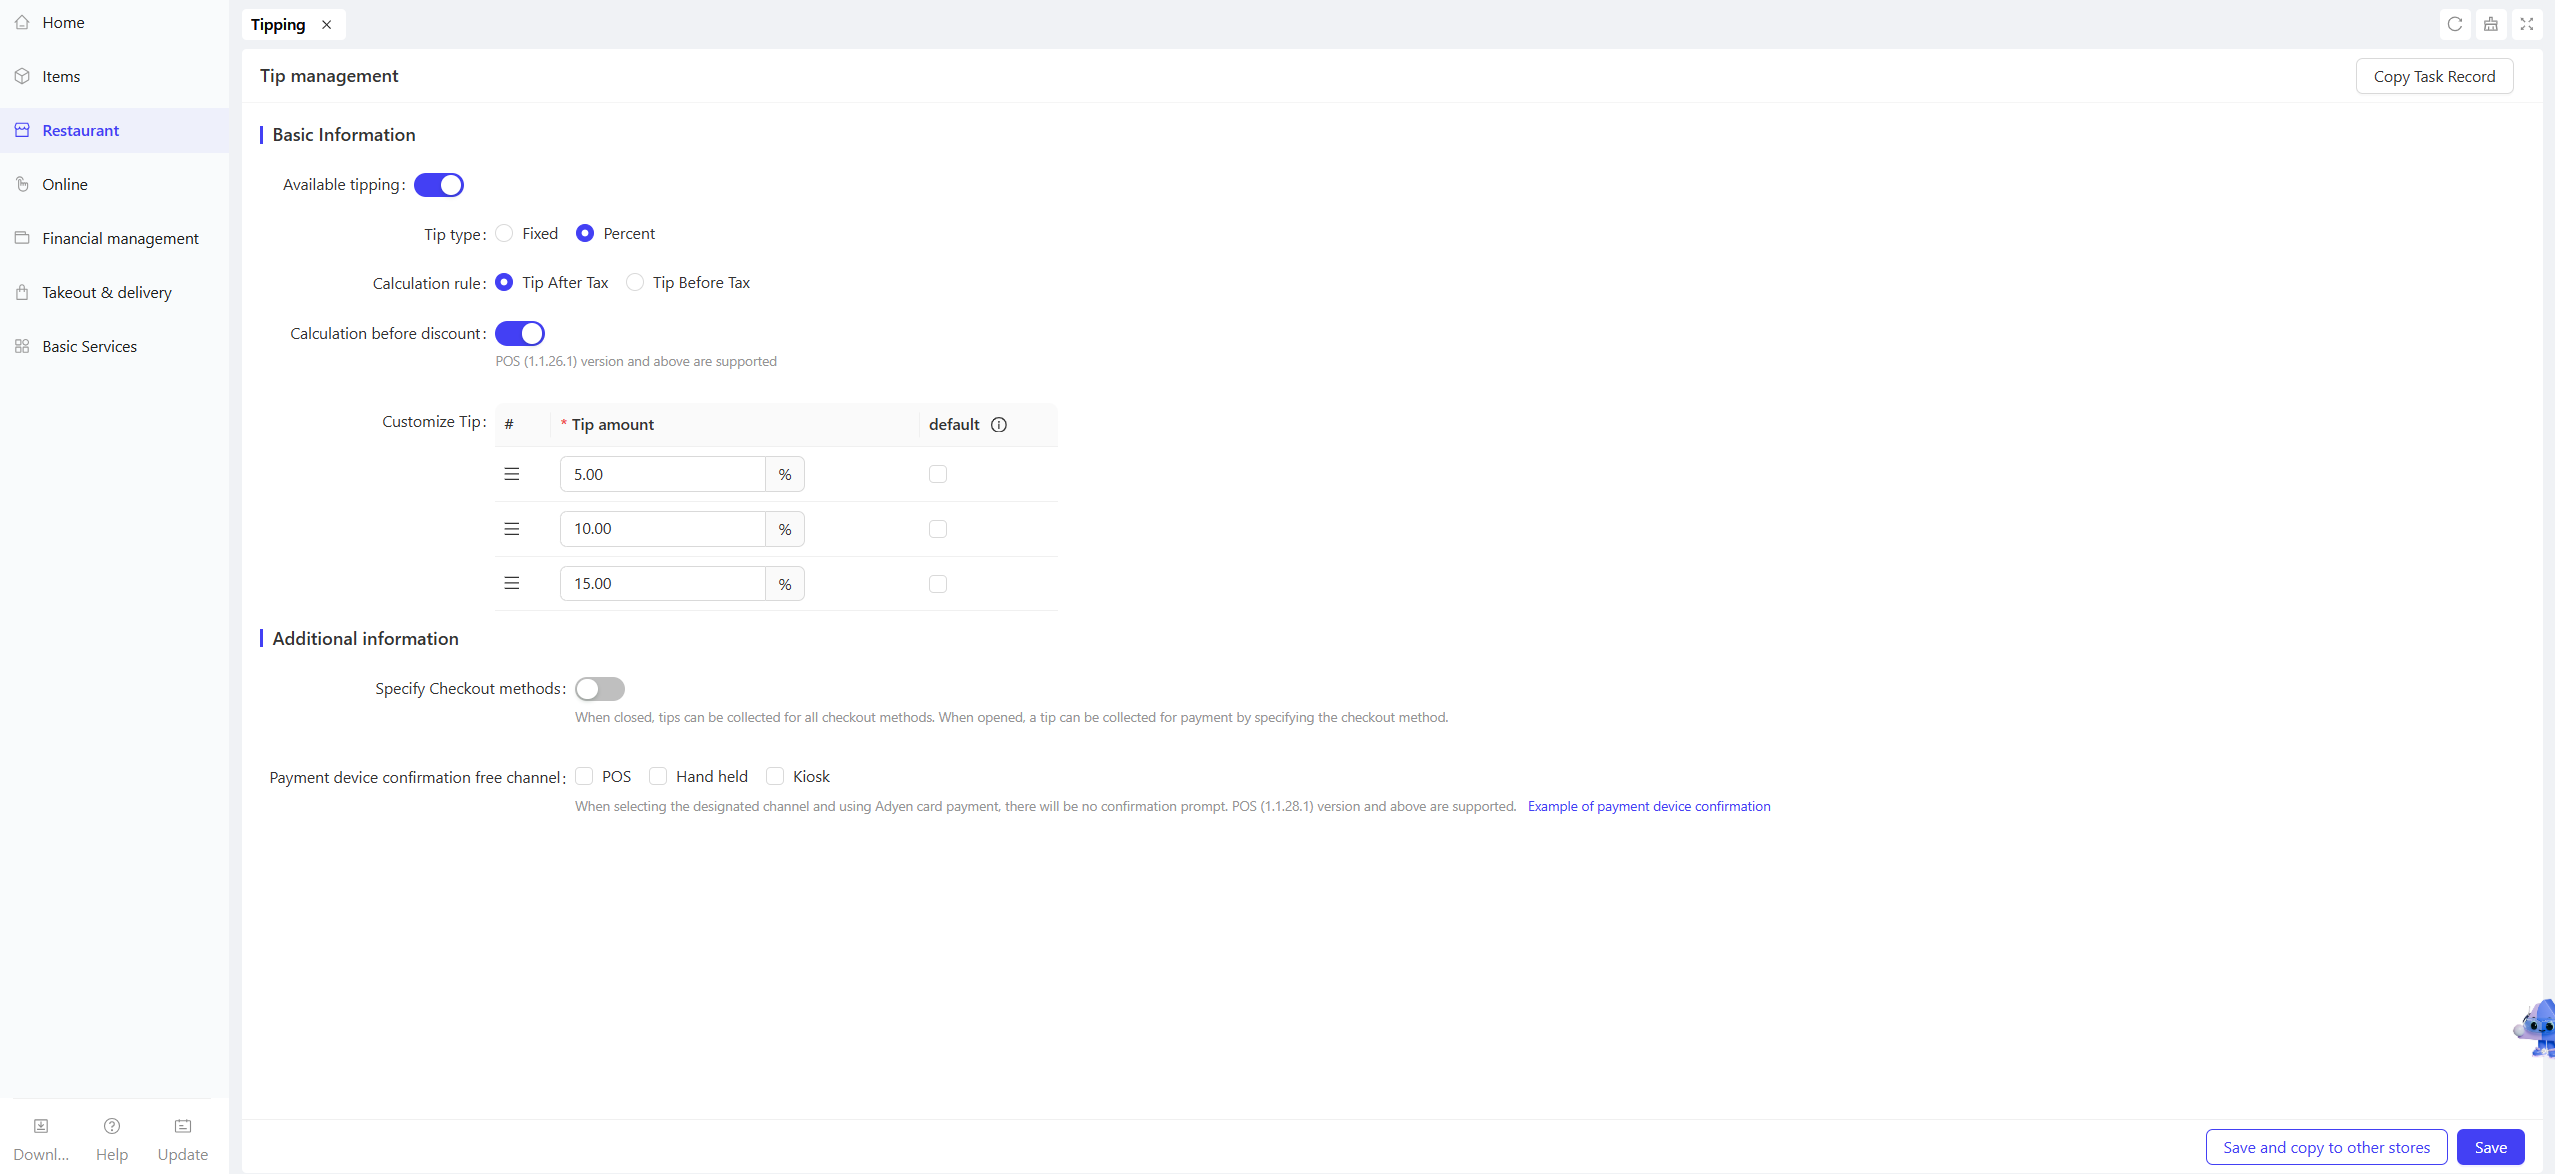
4.2.3 Tipping Page Configuration
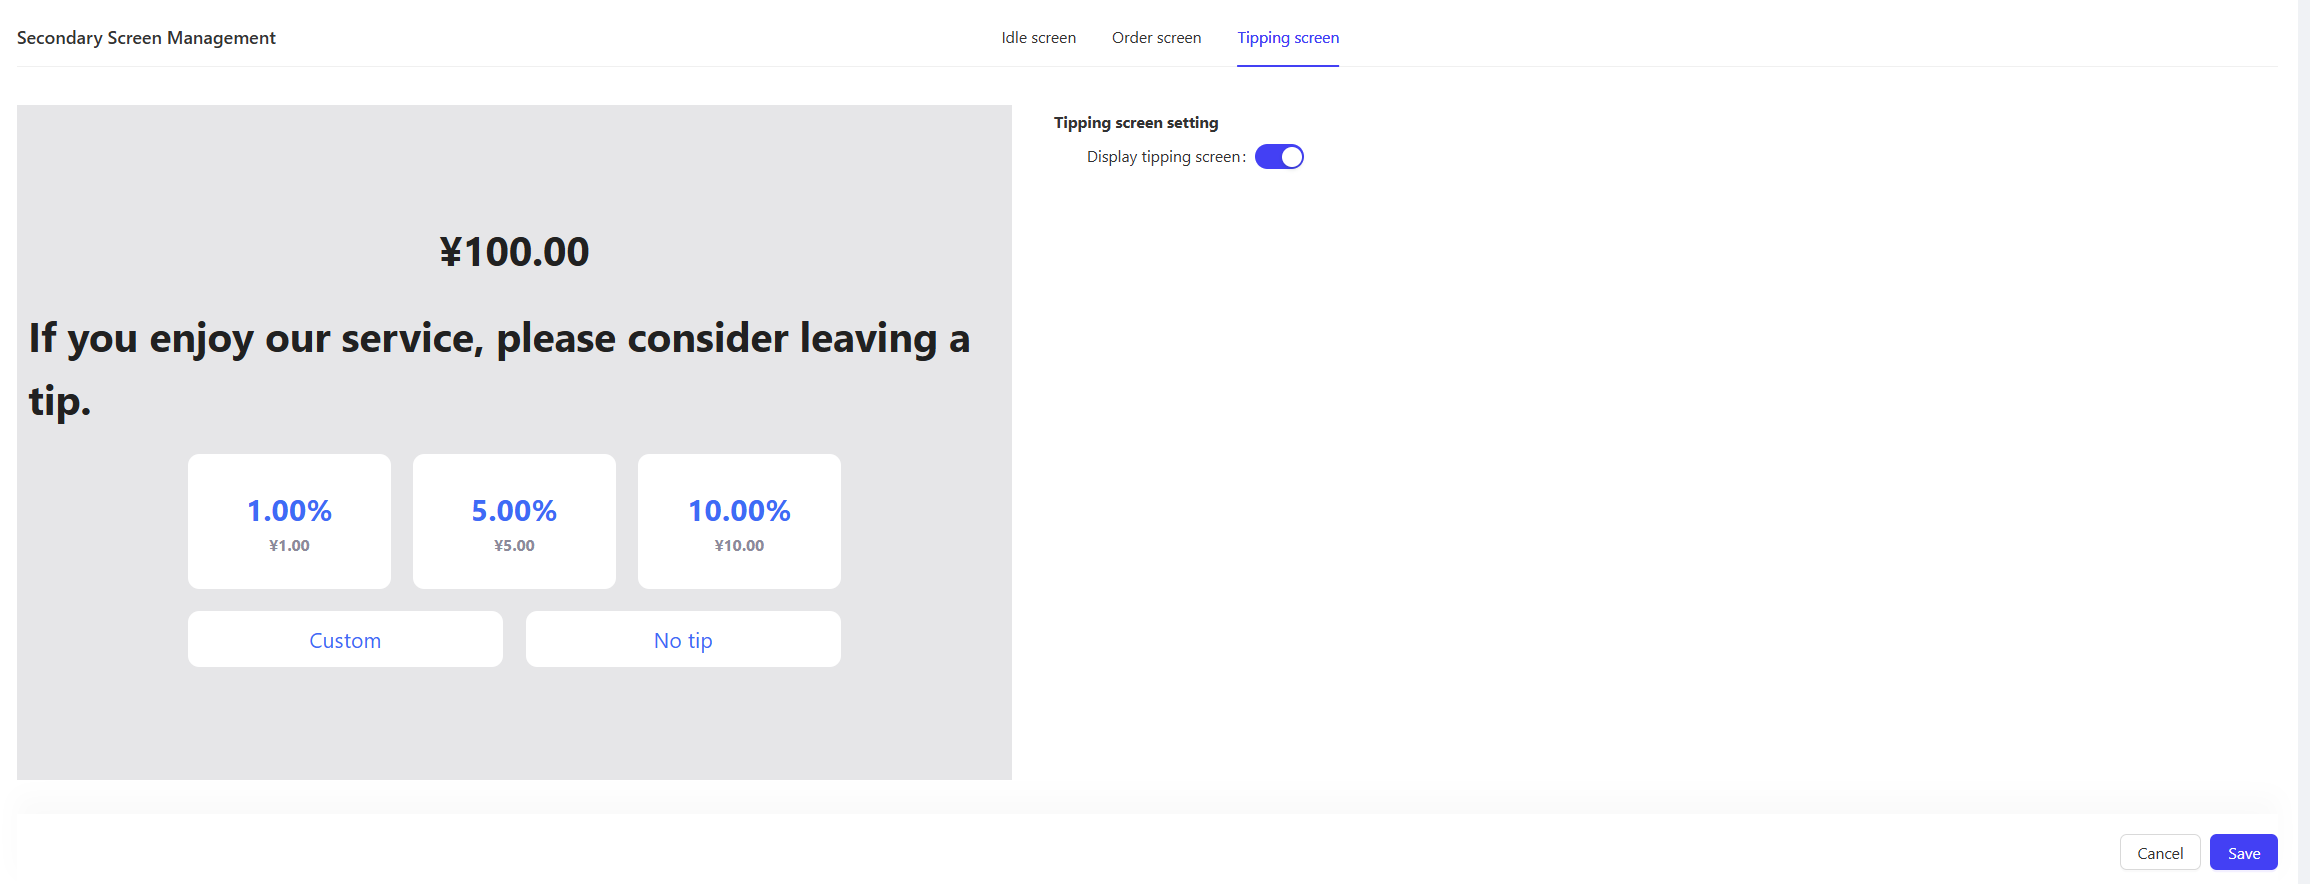
- Toggle Control: Check ‘Display tipping screen’ to enable the tipping function.
- Tip Percentages: Shows three default percentages (e.g., 5%, 10%, 15%, configurable in BO), with auto-calculation for amounts.
- Page Text: Customize the tipping prompt text (default is “Would you like to leave a tip?“)
4.3 Resource Requirements
- Images: Supported formats: JPG/PNG/GIF, ≤10MB, recommended 860x1080 resolution.
- Videos: Supported formats: MP4/MOV/M4V, ≤100MB, recommended 860x1080 resolution.
- Slideshow Images: Supports uploading multiple images. Playback order follows the upload sequence.
5 FAQs
-
Issue: Customer Display Not Syncing Order Info
- Check the connection between the display and the main screen
- Restart the display app to resync orders
- Confirm main screen order actions are complete
-
Issue: Customer cannot select a tip
- Verify tip functionality is enabled in BO
- Ensure the order amount is > $0
- Check if a tip selection has already been recorded (Only permitted once)
-
Issue: Display Won’t Accept Input
- Ensure the touch function is enabled
- Check if input fields are active; tap to open the keyboard
- Restart the display to resolve keyboard issues
-
Issue: Images/Videos Not Displaying
- Check if resource formats and sizes meet requirements
- Confirm resources are uploaded and saved
- Refresh or restart the display app to apply settings
6 Need Help?
- BO Configuration: Requires admin access; refresh or restart the display app after changes.
- Unlisted Issues: Use “Settings → Help Center” for tutorials or contact the store manager for assistance.