RS POS
1 How to install/activate the POS system?
-
Download
- Log in to the BO (Back Office) at https://bo.restosuite.cn .

- Navigate to the bottom left: https://www.restosuite.cn/zh_cn/download-center
- Log in to the BO (Back Office) at https://bo.restosuite.cn .
-
Installation Steps
- Obtain the installation package from the BO (ensure you check for 64-bit or 32-bit OS compatibility) and proceed with system installation.
- Double-click the installer (only change the drive letter from C to D if needed, preferably stored on the D drive; do not modify other parts of the path).
- After installation, select the environment based on your region: cn (China), sea (Southeast Asia), US (USA), or eu (Europe).
- The POS will display the Authorization Code screen upon completion.
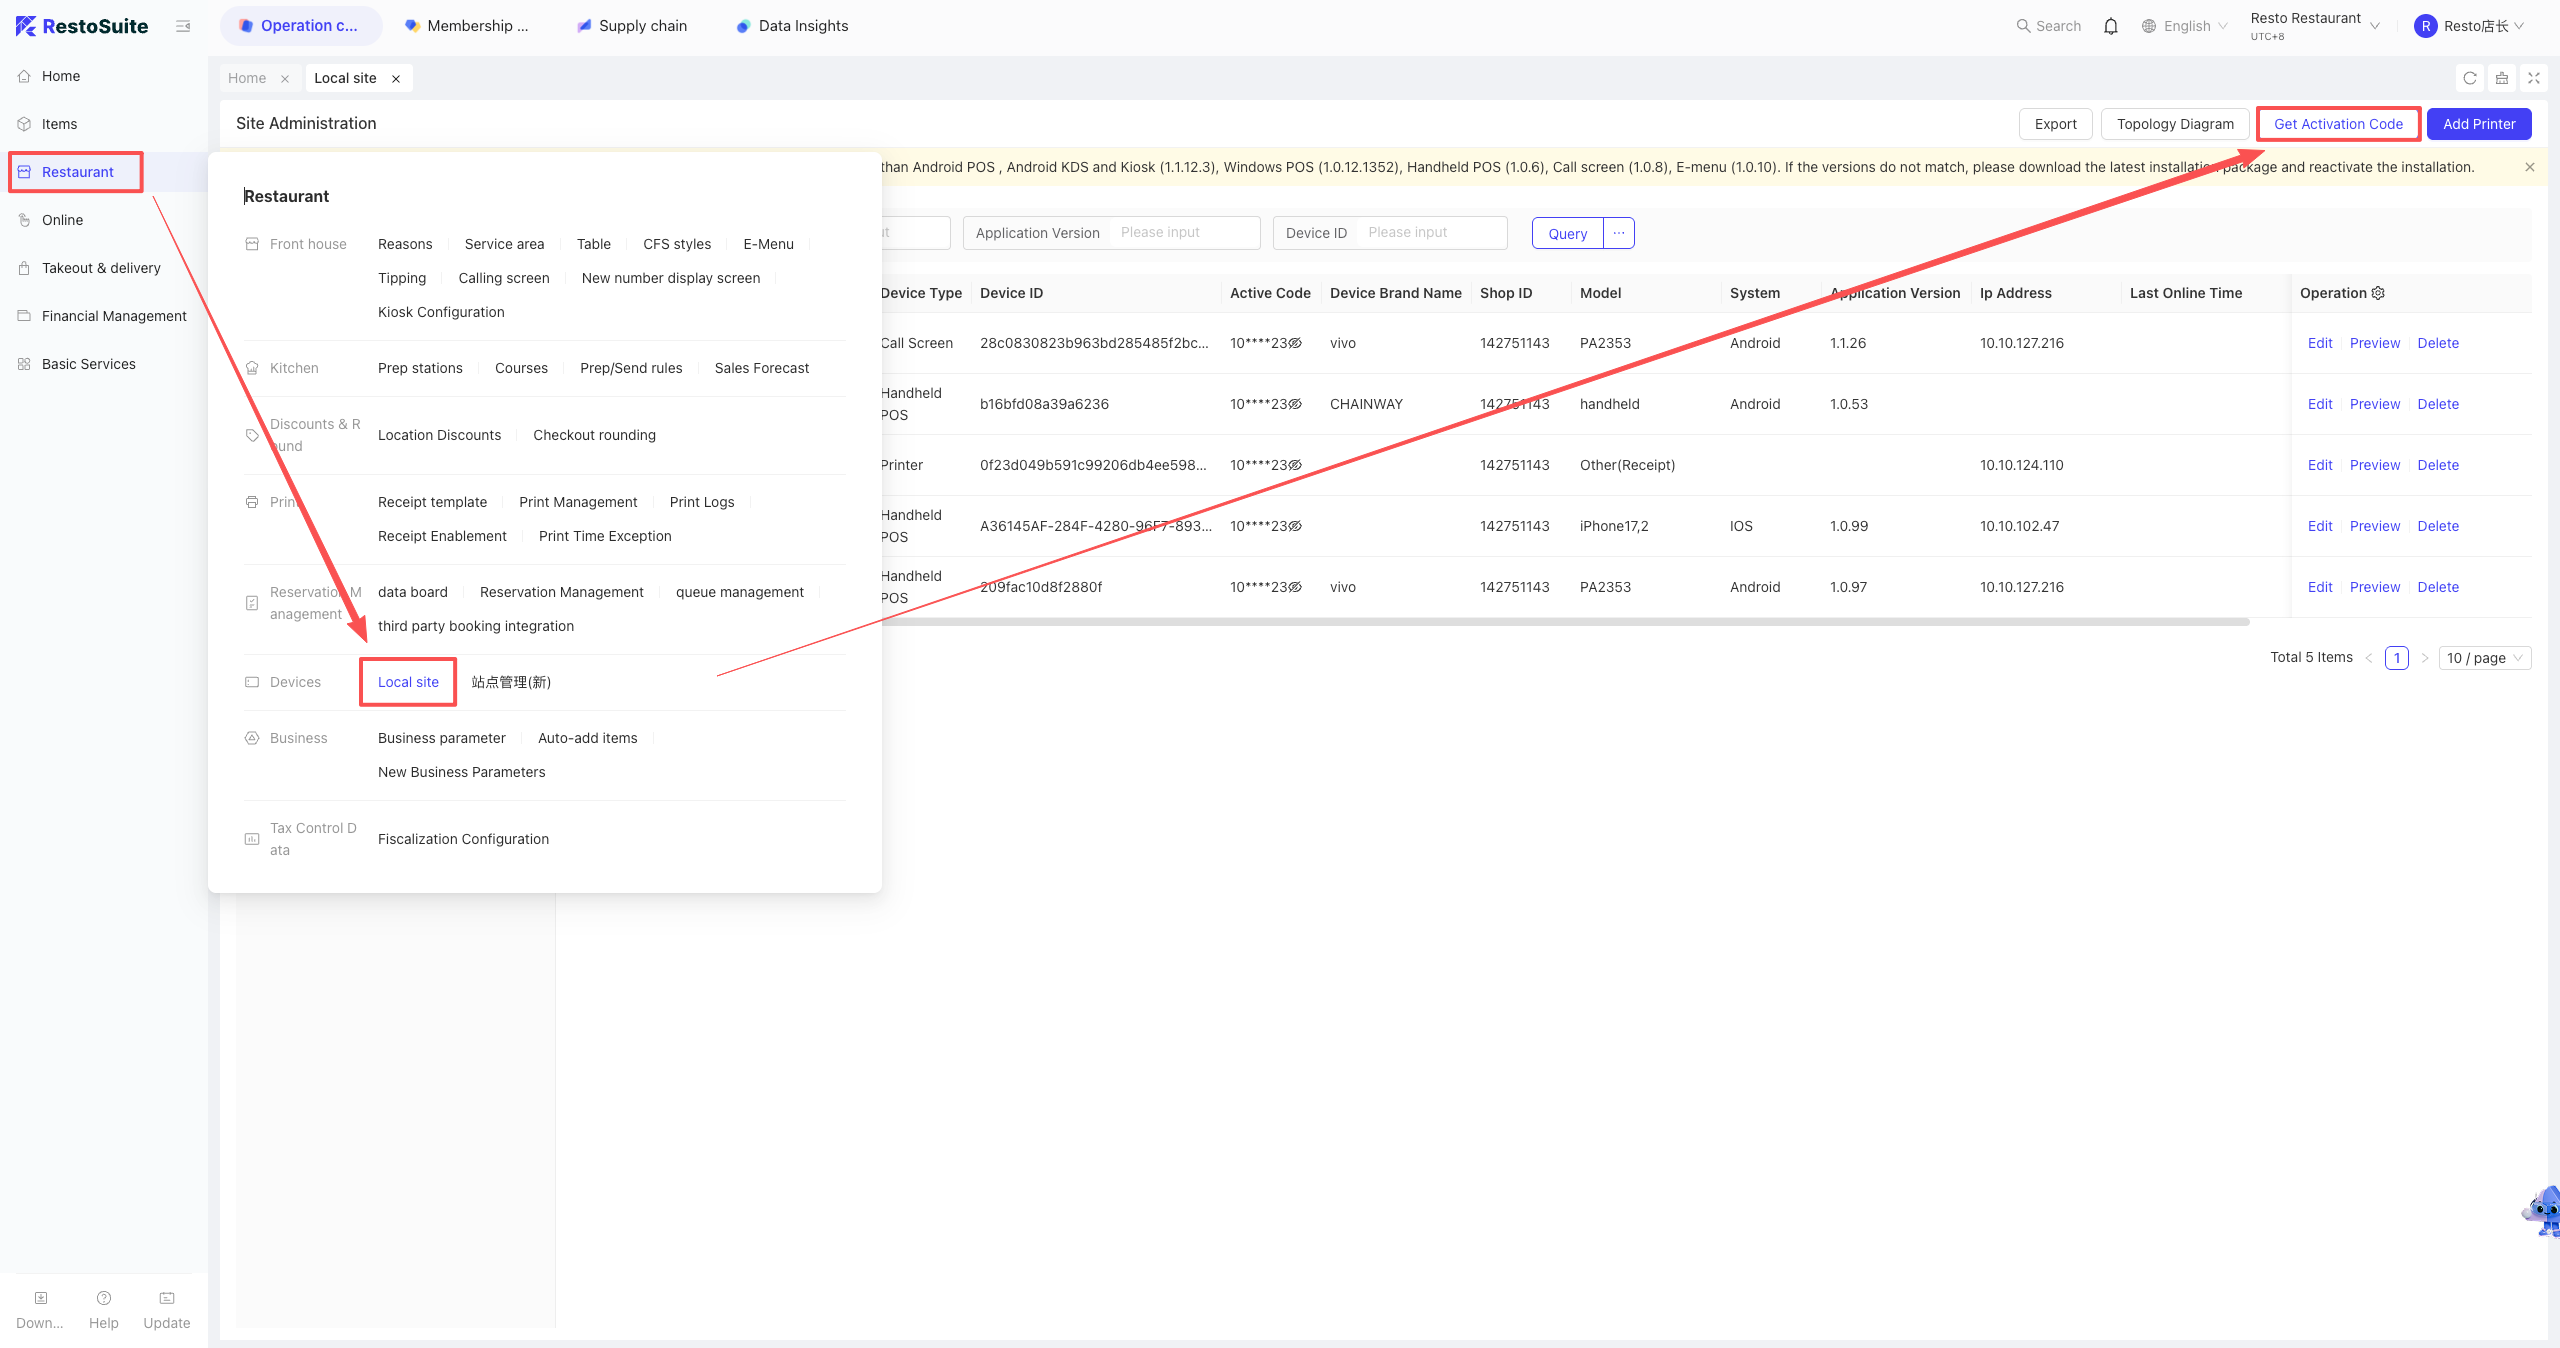
- In the BO Store View, go to: Restaurant Management > Station Association to get the authorization code, then enter it to register.
-
Login
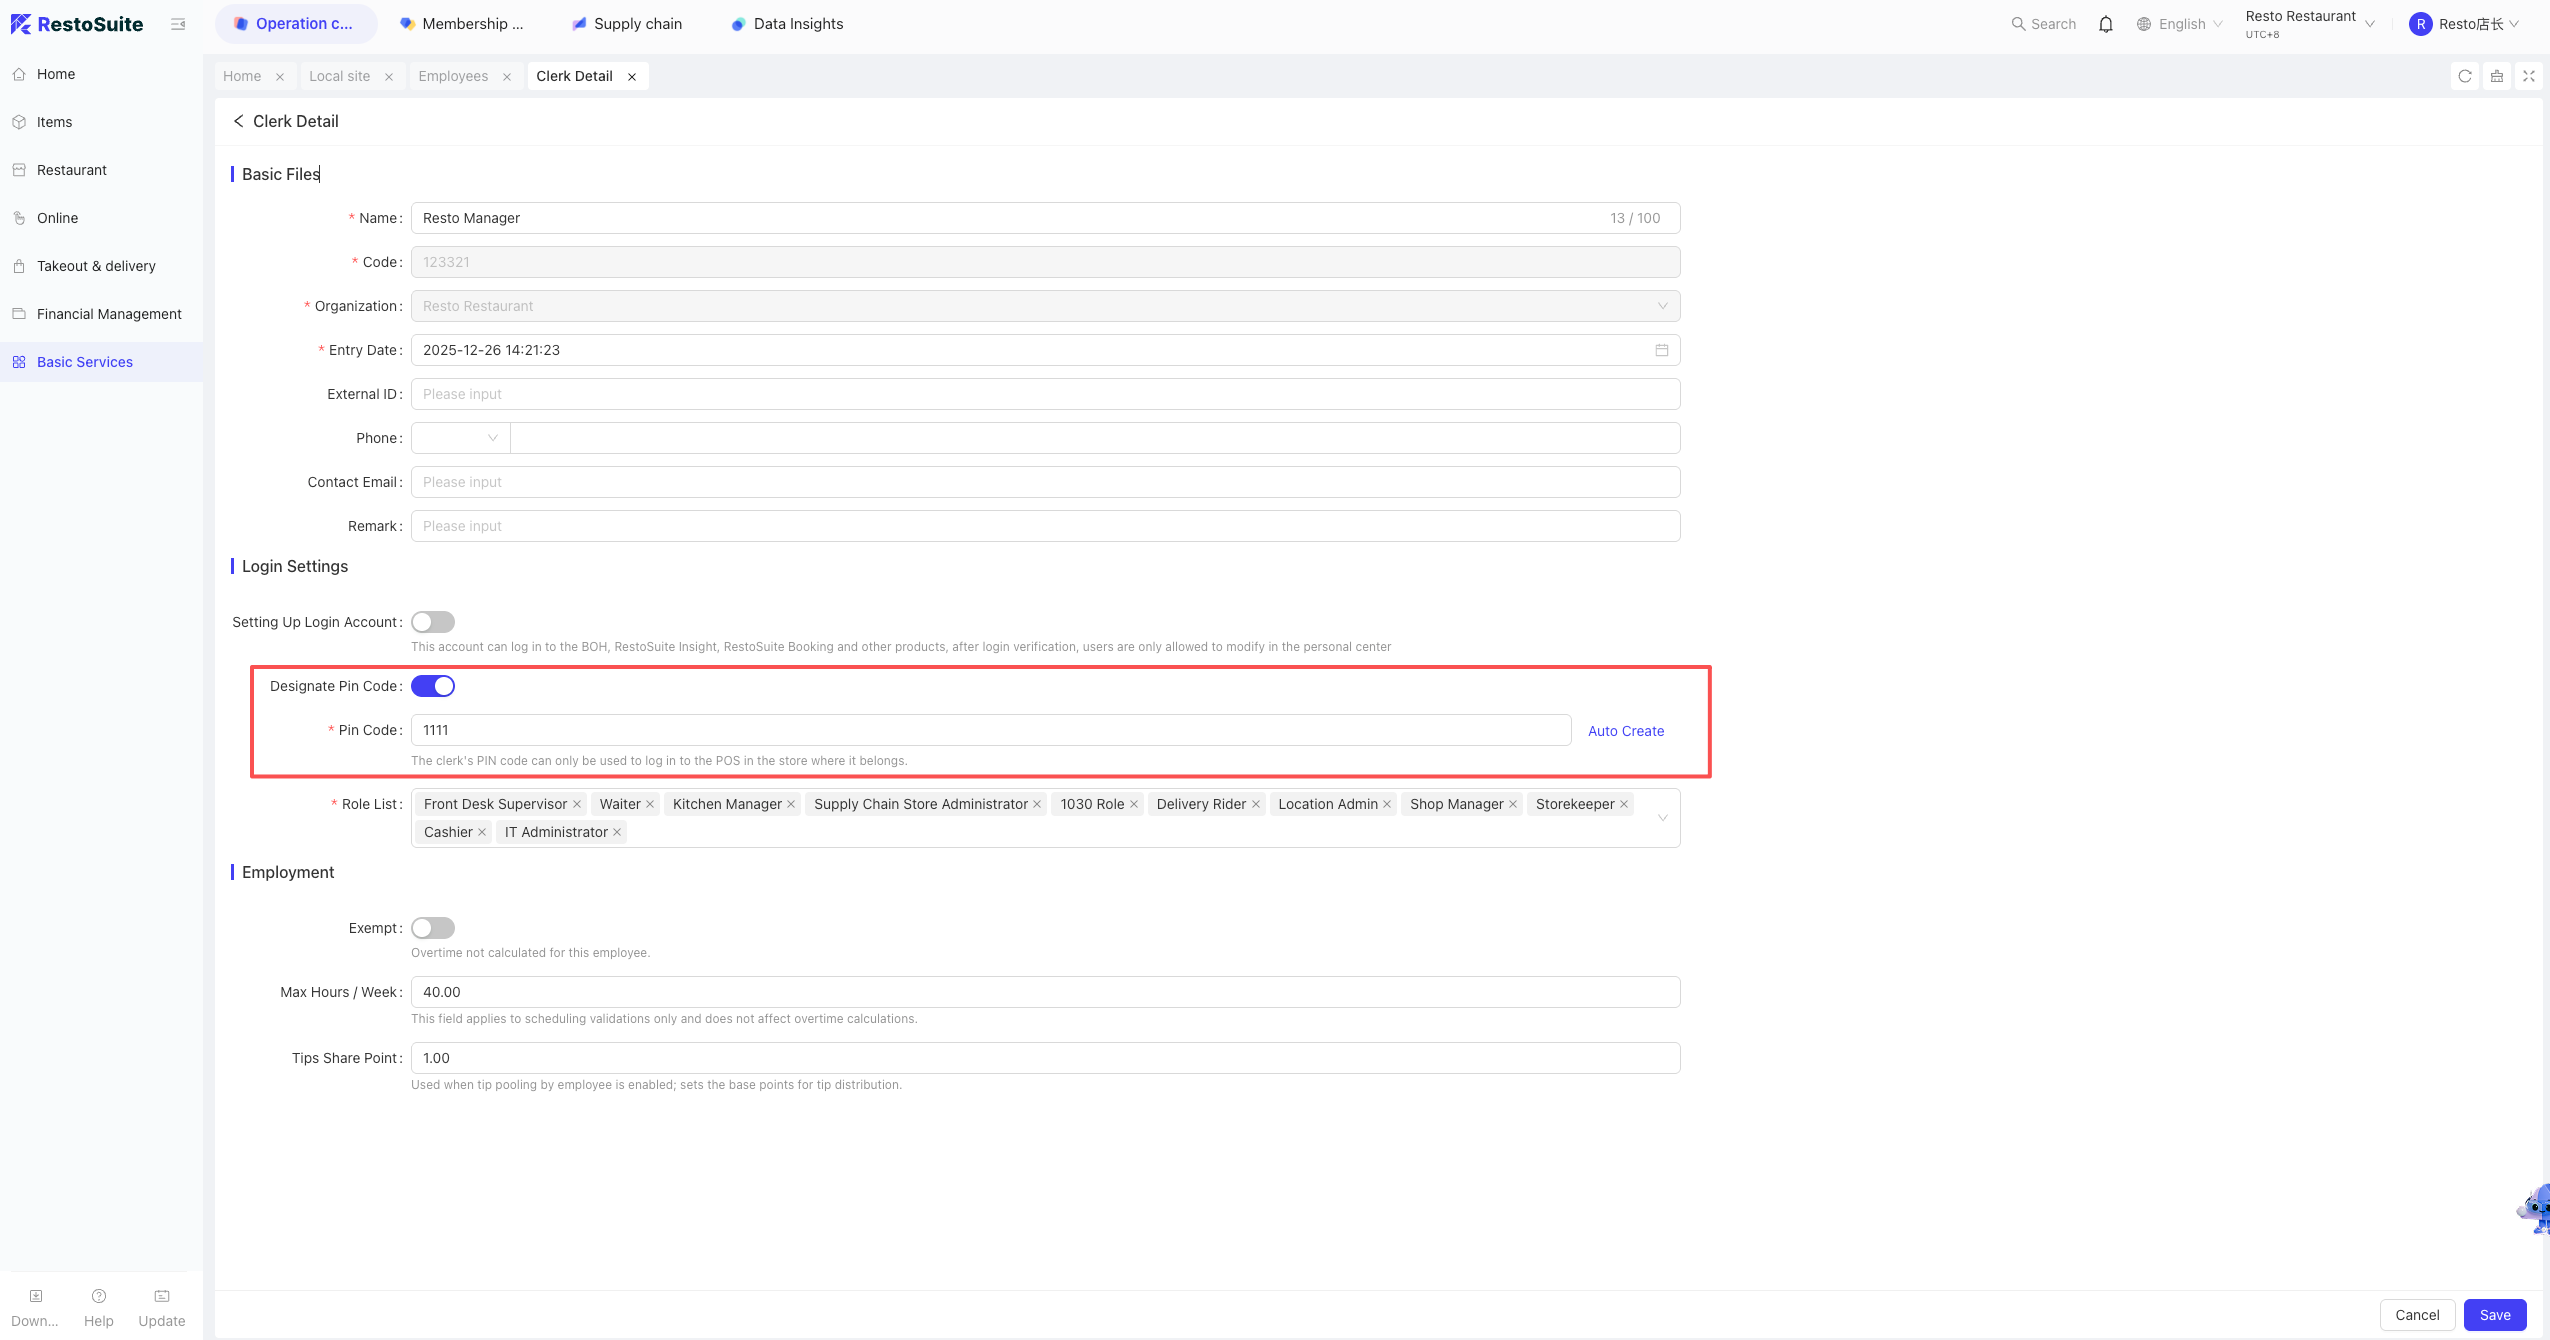
- The login account after registration is the Staff PIN configured in the employee settings.
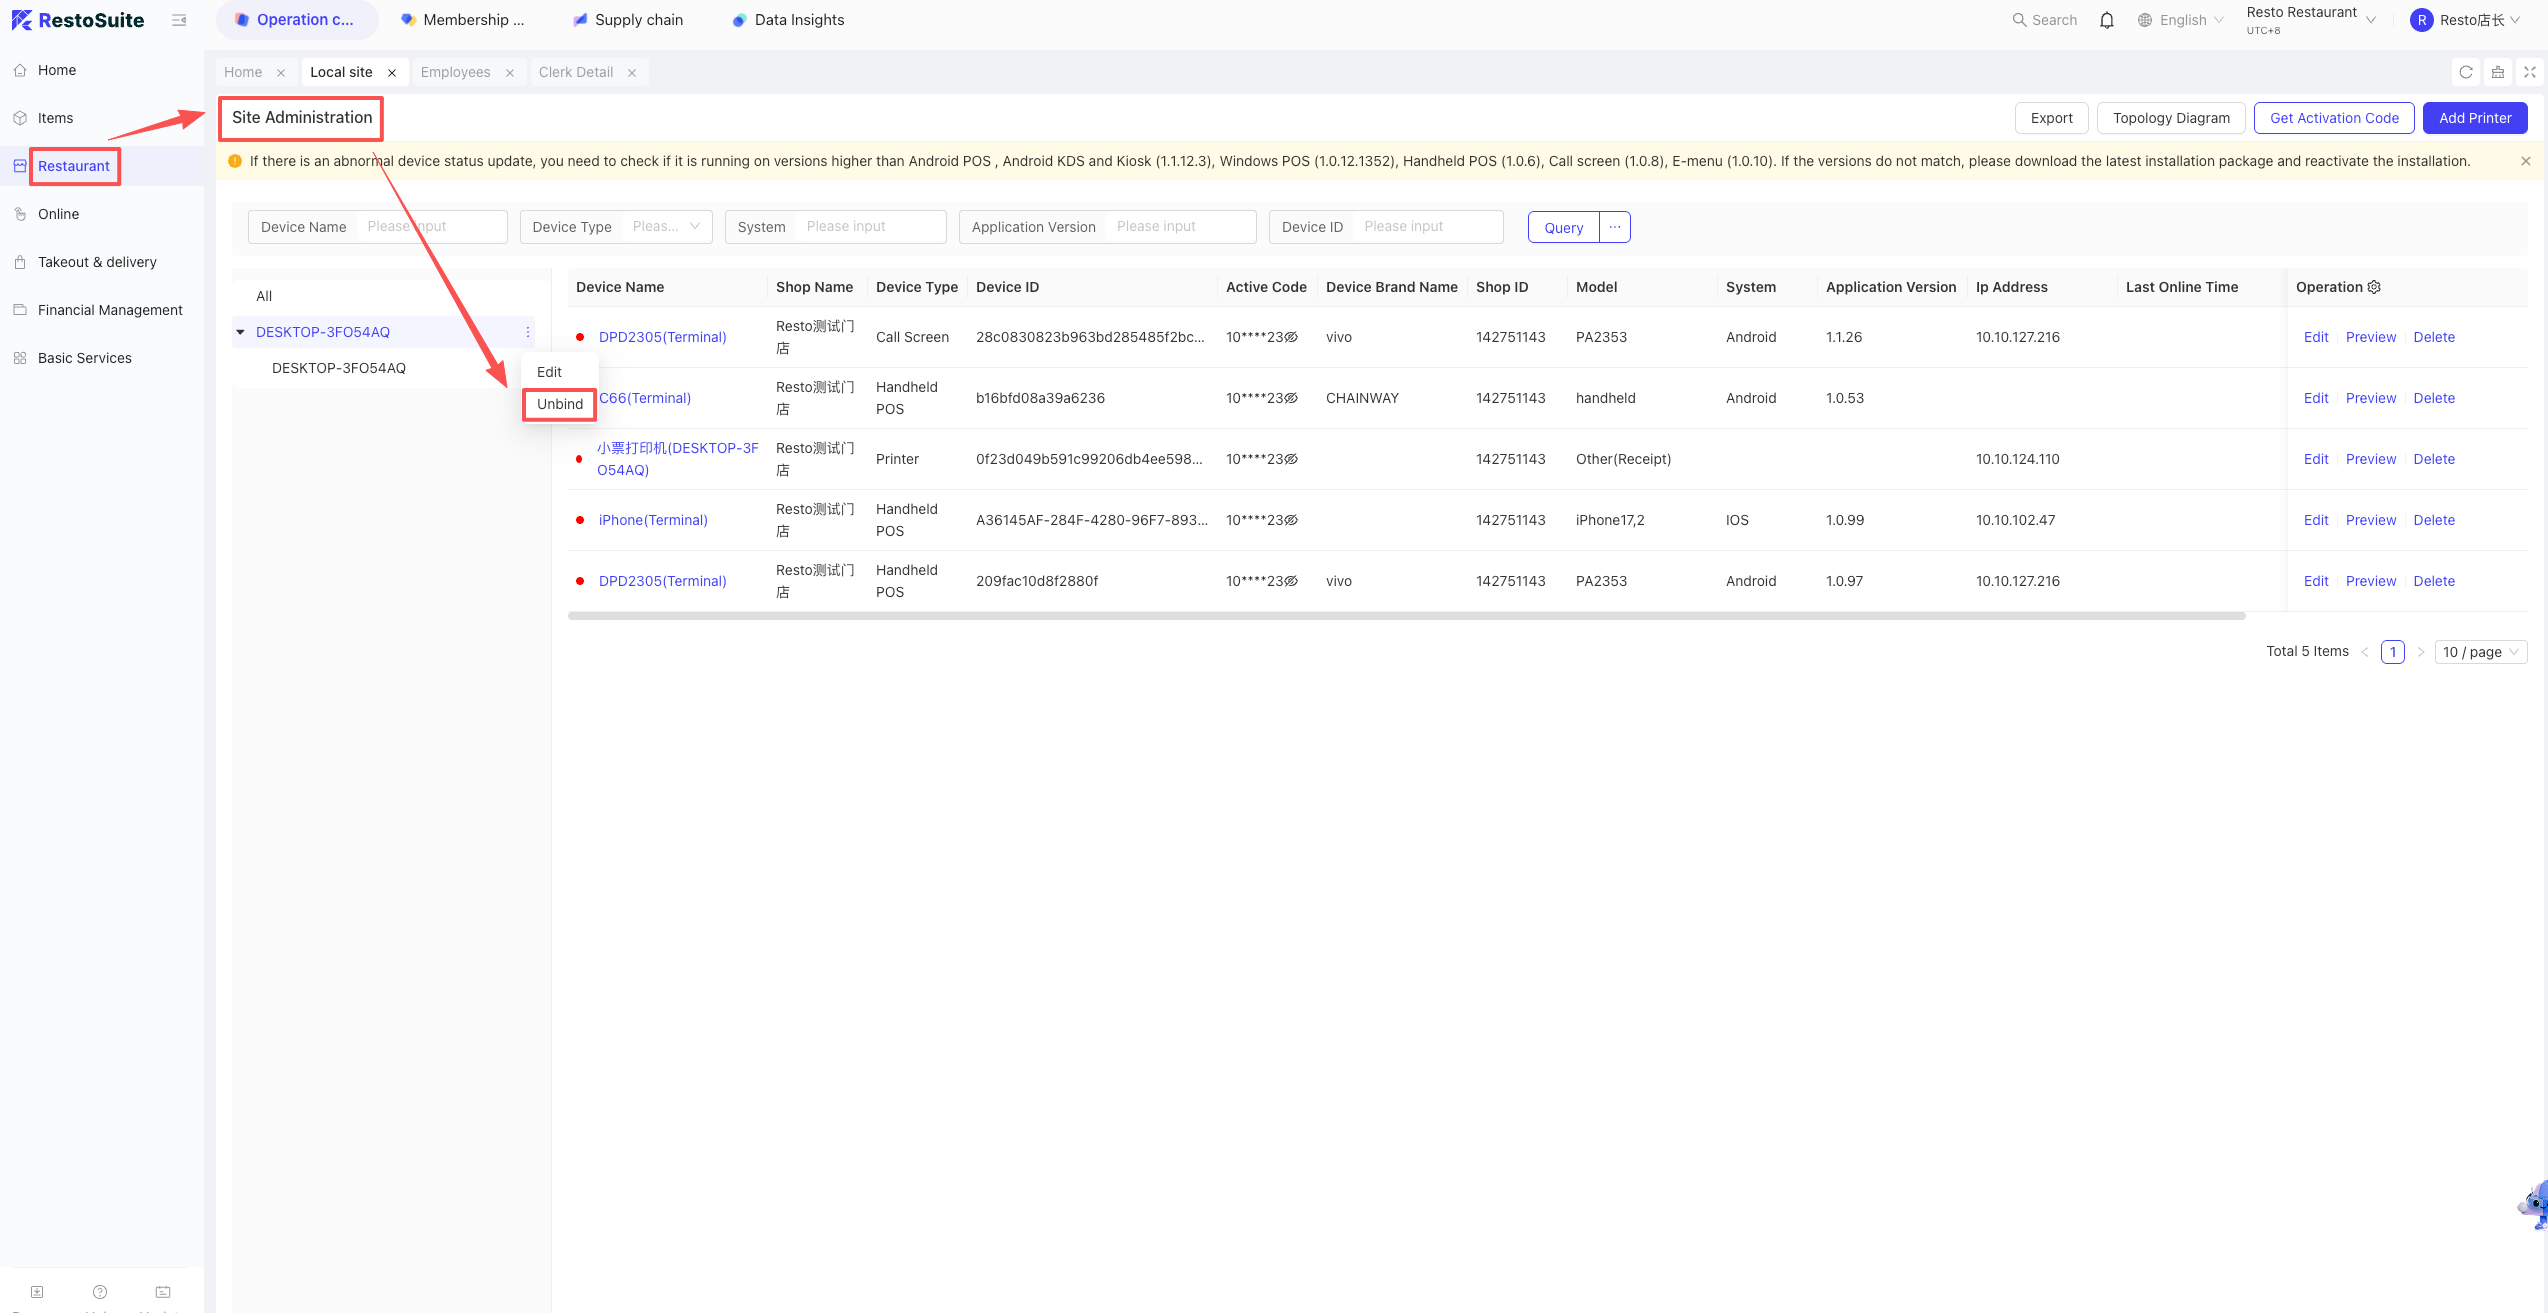
2 How to unbind the POS system?
- Path 1: Group unbinds store
- Log in to the BO and switch to Group View. On the left, go to Restaurant Management > Station Management. Locate the store and device name, then click Unbind.
-
Path 2: Brand unbinds store
- Log in to the BO and switch to Brand View. On the left, go to Restaurant Management > Station Management. Select the store and perform the unbind operation.
-
Path 3: Store-level self-unbinding
- Log in to the BO and switch to Store View. Go to Restaurant Management > Station Management, find the specific device, and unbind it.
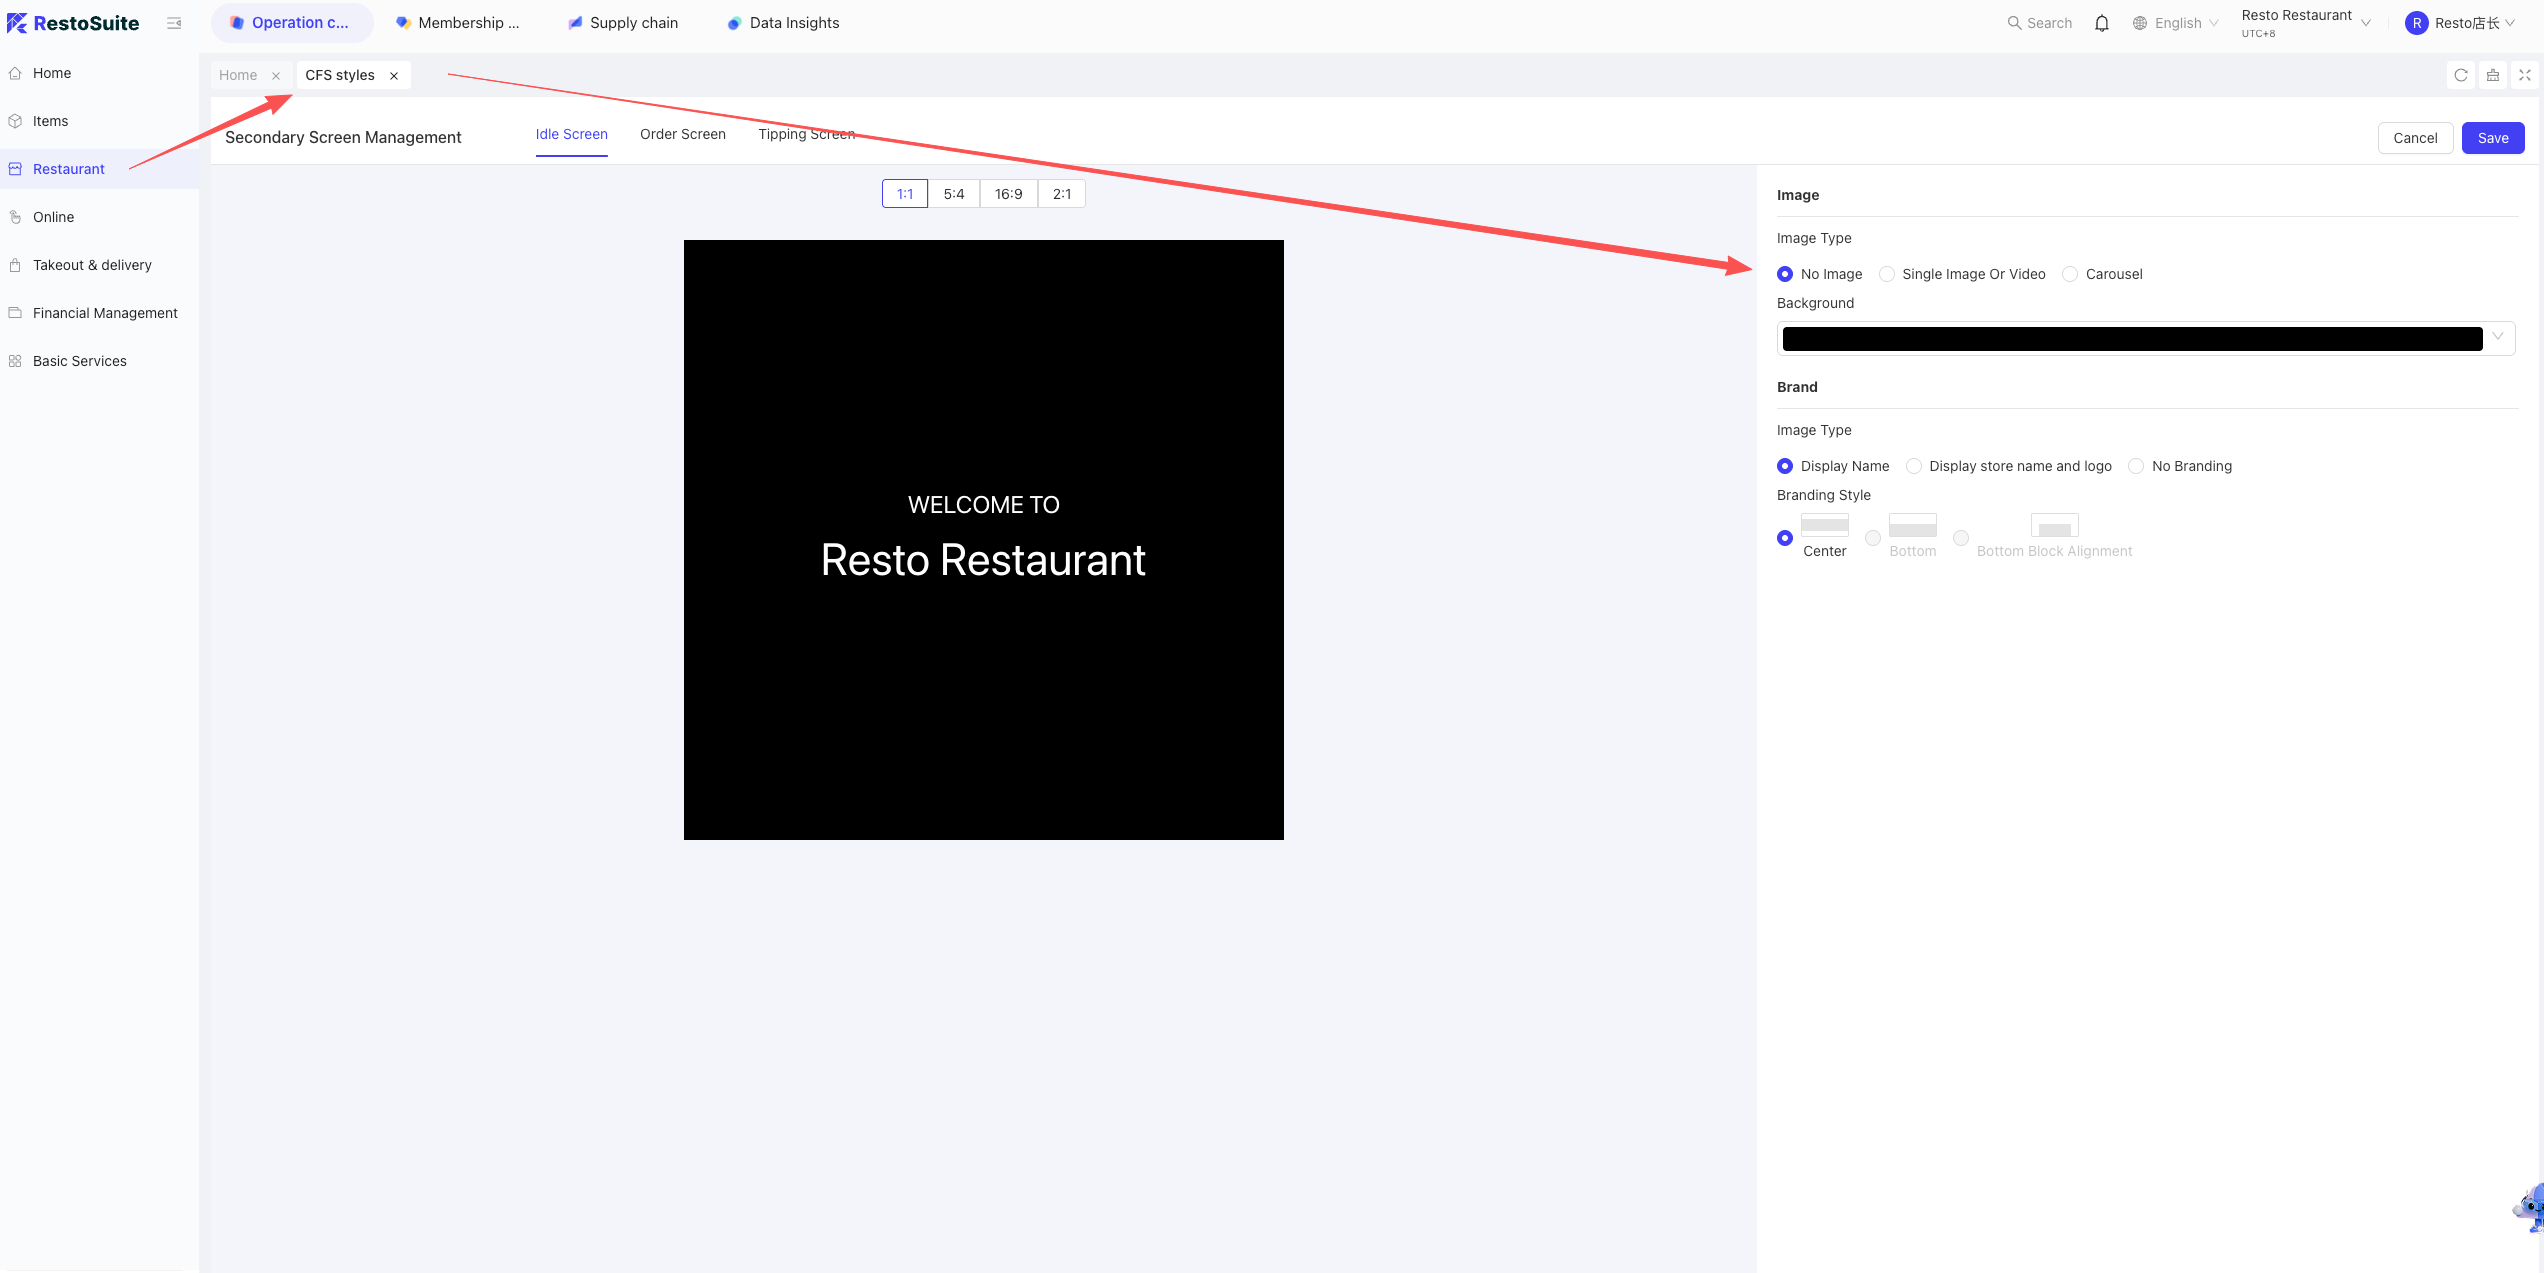
3 How to upload carousel images for dual-screen devices?
-
Path 1: Created by Group and dispatched to stores
- Log in to the BO Group View. Go to Restaurant Management > Secondary Screen Management. Add and decorate the screen, then click Dispatch to Stores.
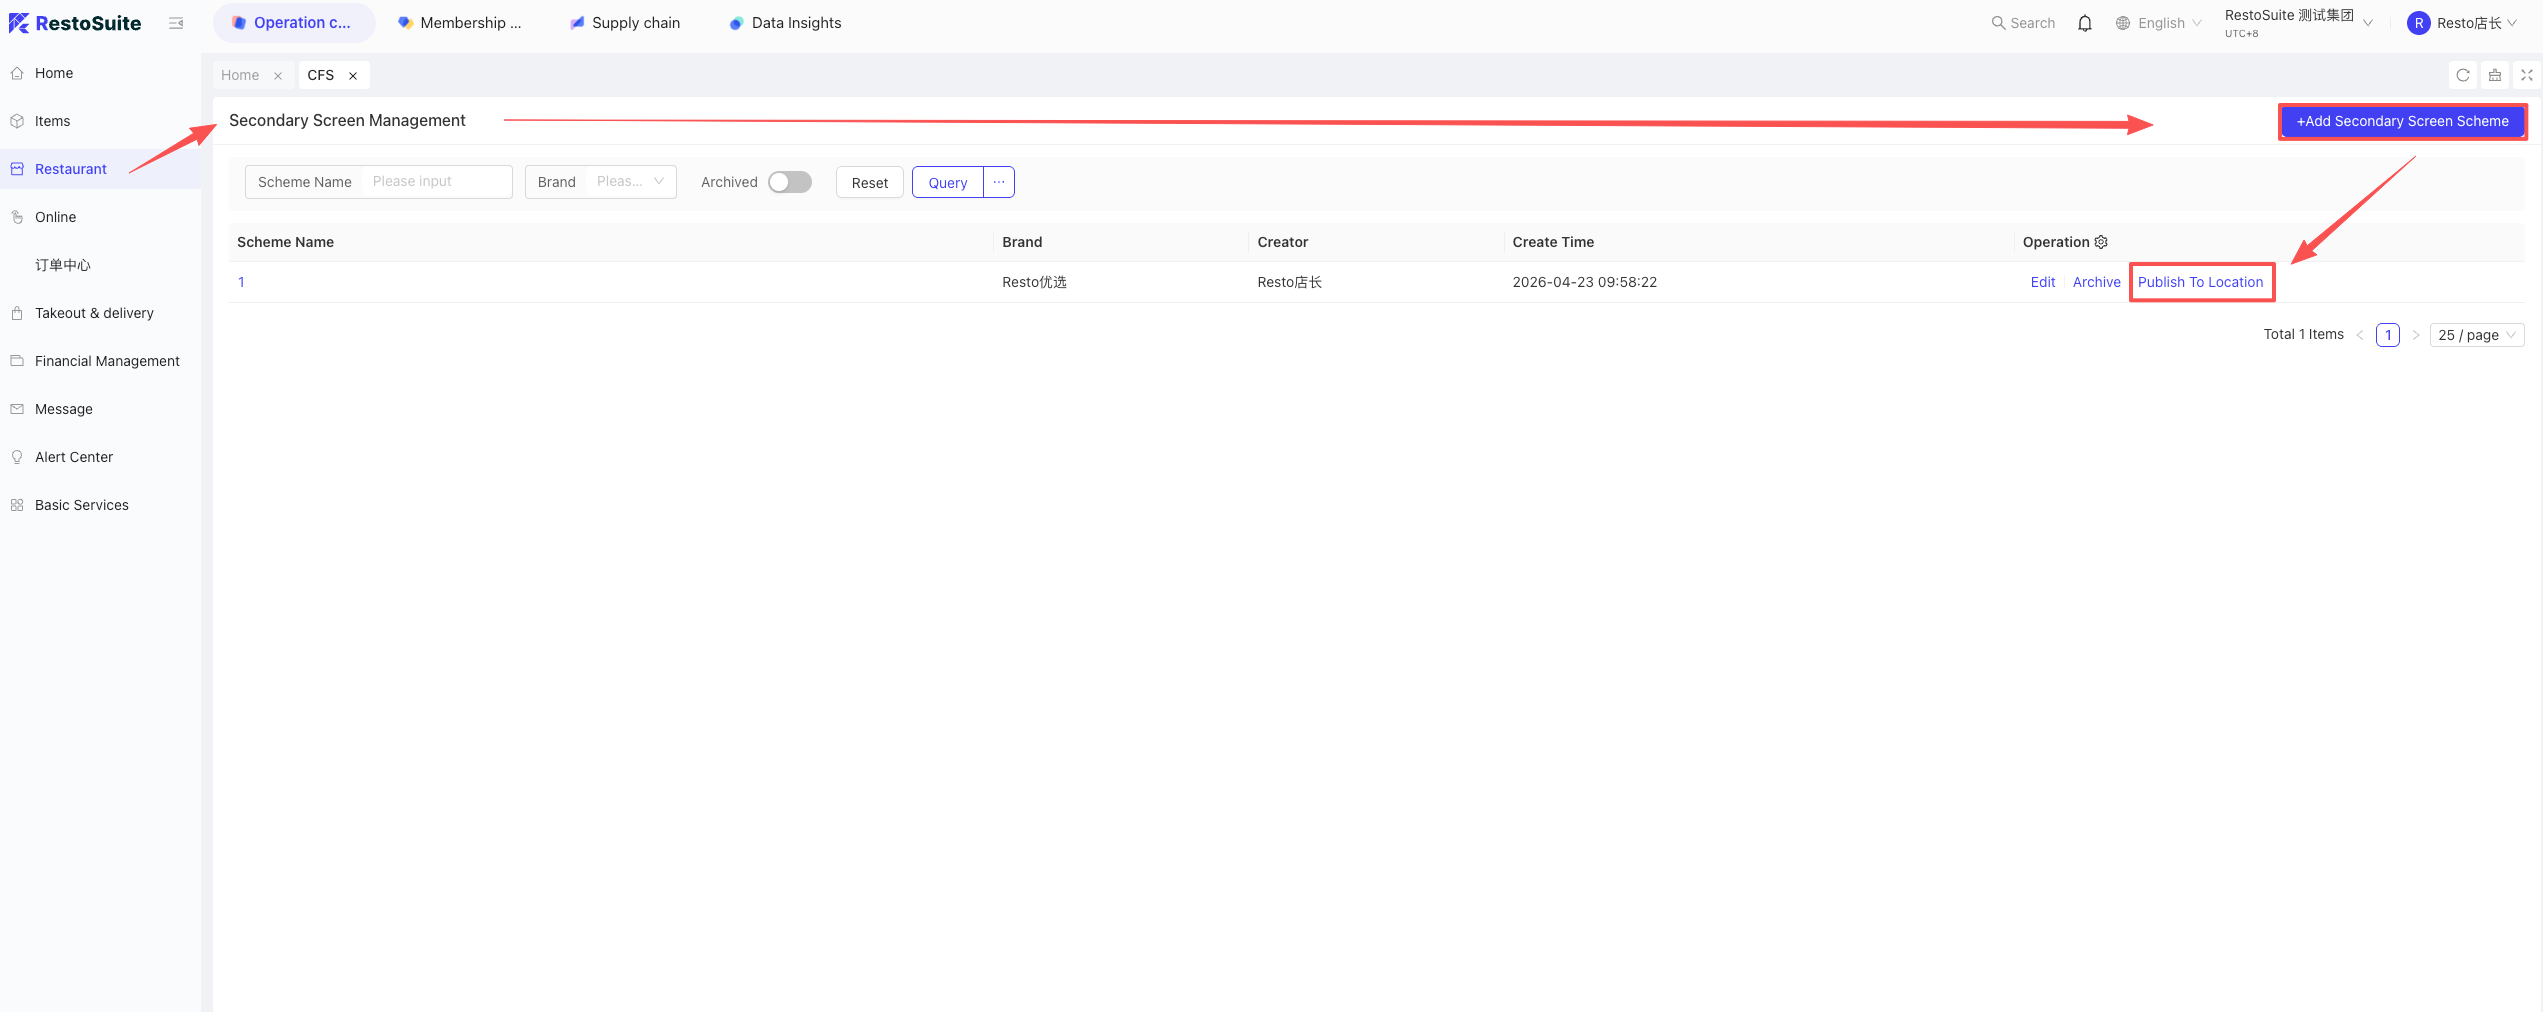
- Log in to the BO Group View. Go to Restaurant Management > Secondary Screen Management. Add and decorate the screen, then click Dispatch to Stores.
-
Path 2: Created by Brand and dispatched to stores
- Log in to BO Brand View. Go to Restaurant Management > Secondary Screen Management. Add and decorate the screen, then click Dispatch to Stores.
-
Path 3: Manual uploaded by store
- Log in to the BO Store View. Go to Restaurant Management > Secondary Screen Decoration to perform the setup directly.
- Log in to the BO Store View. Go to Restaurant Management > Secondary Screen Decoration to perform the setup directly.
4 Can table service fees be added based on specific dishes?
A: Currently, table service fees cannot be added per dish. To apply for a service fee, you must use the Surcharge function.
- Surcharge Setup Paths:
- Path 1: Group addition
- BO Group View: Operation Center > Item Management > Surcharge > Add Surcharge. Select “Service Fee” as the type, then dispatch to stores.
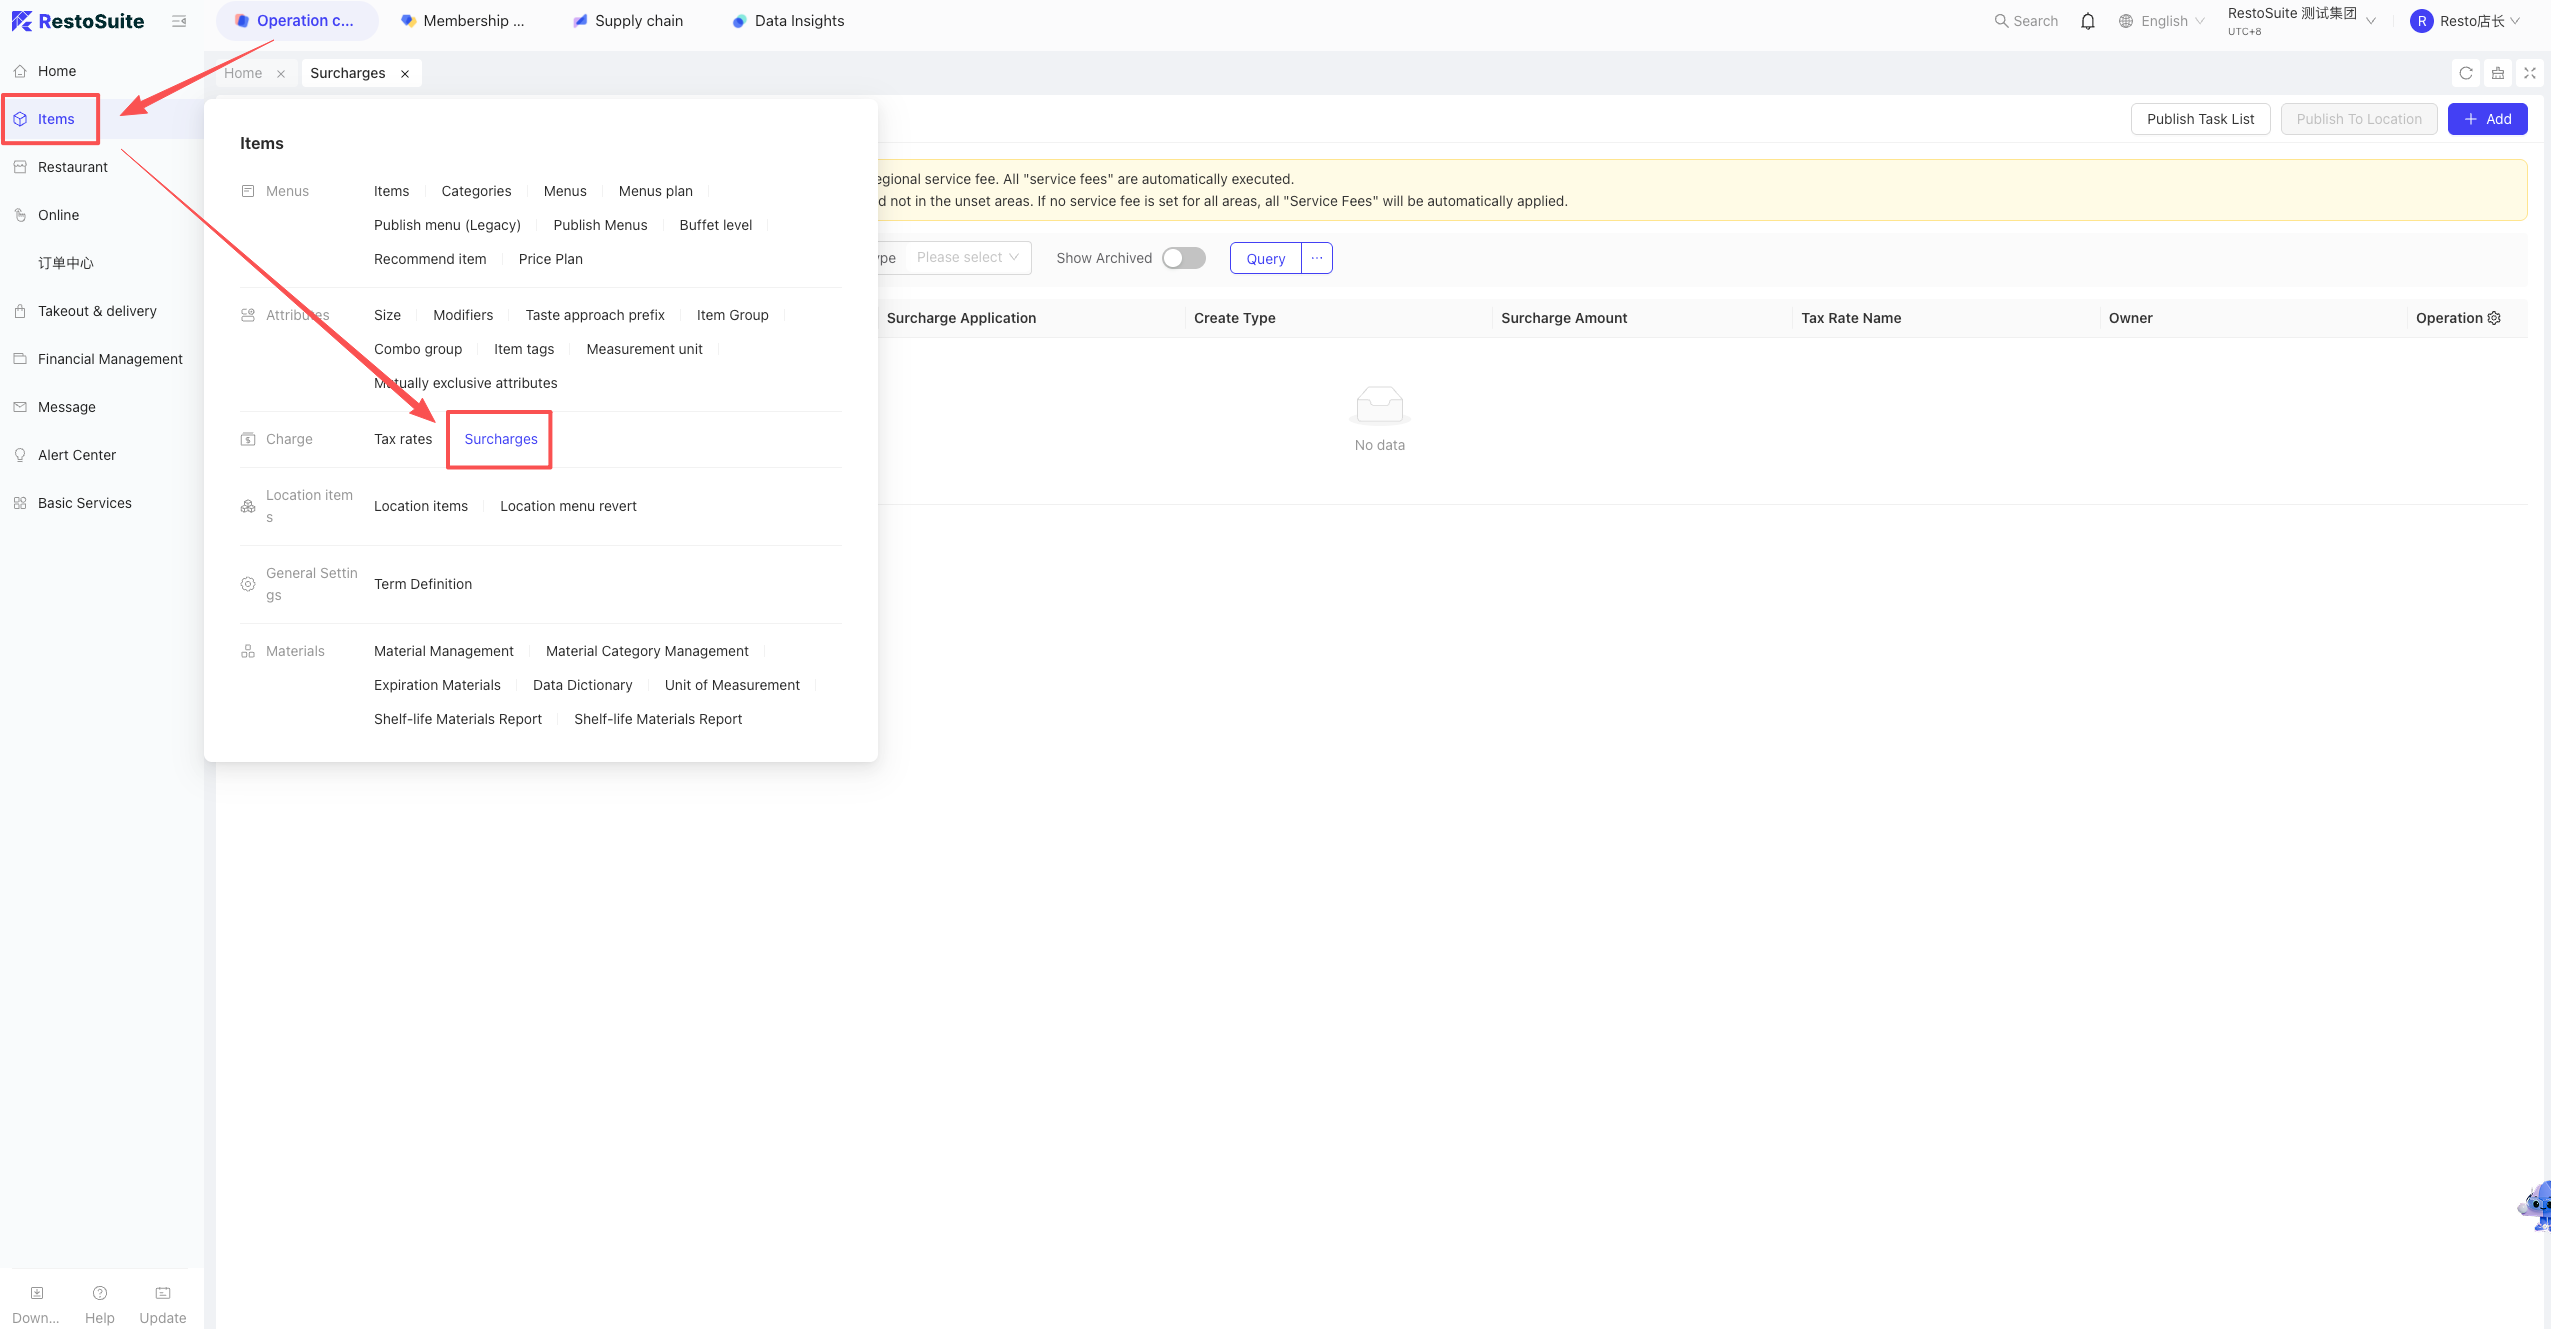

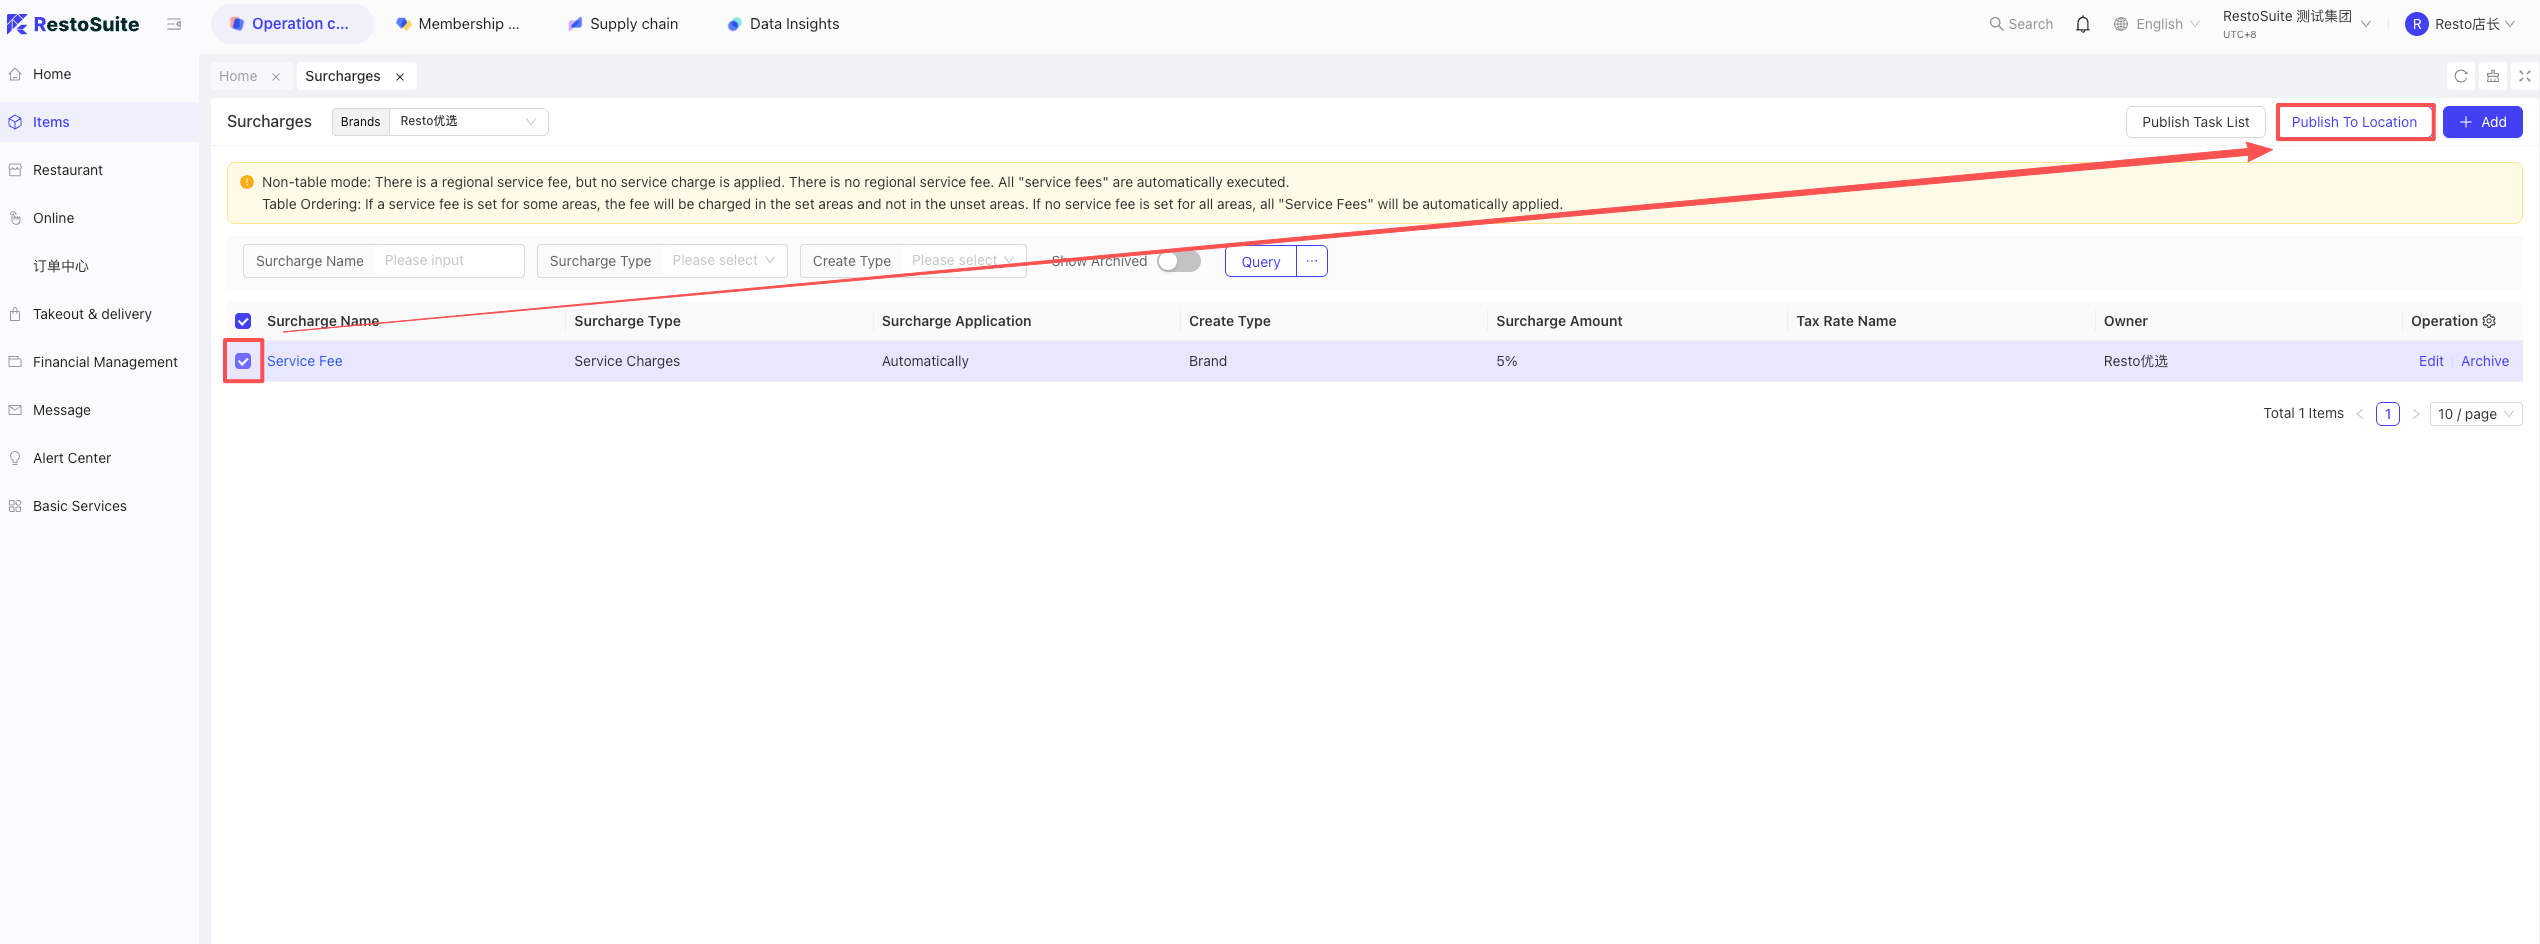
- Path 2: Brand addition
- BO Brand View: Operation Center > Item Management > Surcharge > Add Surcharge. Select “Service Fee” as the type, then dispatch to stores.
- Path 3: Store addition
- BO Store View: Operation Center > Item Management > Surcharge > Add Surcharge. Select “Service Fee” as the type.
- Path 1: Group addition
5 Can the POS automatically identify members and deduct balance when scanning a WeChat payment code during checkout?
A: This function is supported.
- Setup Path:
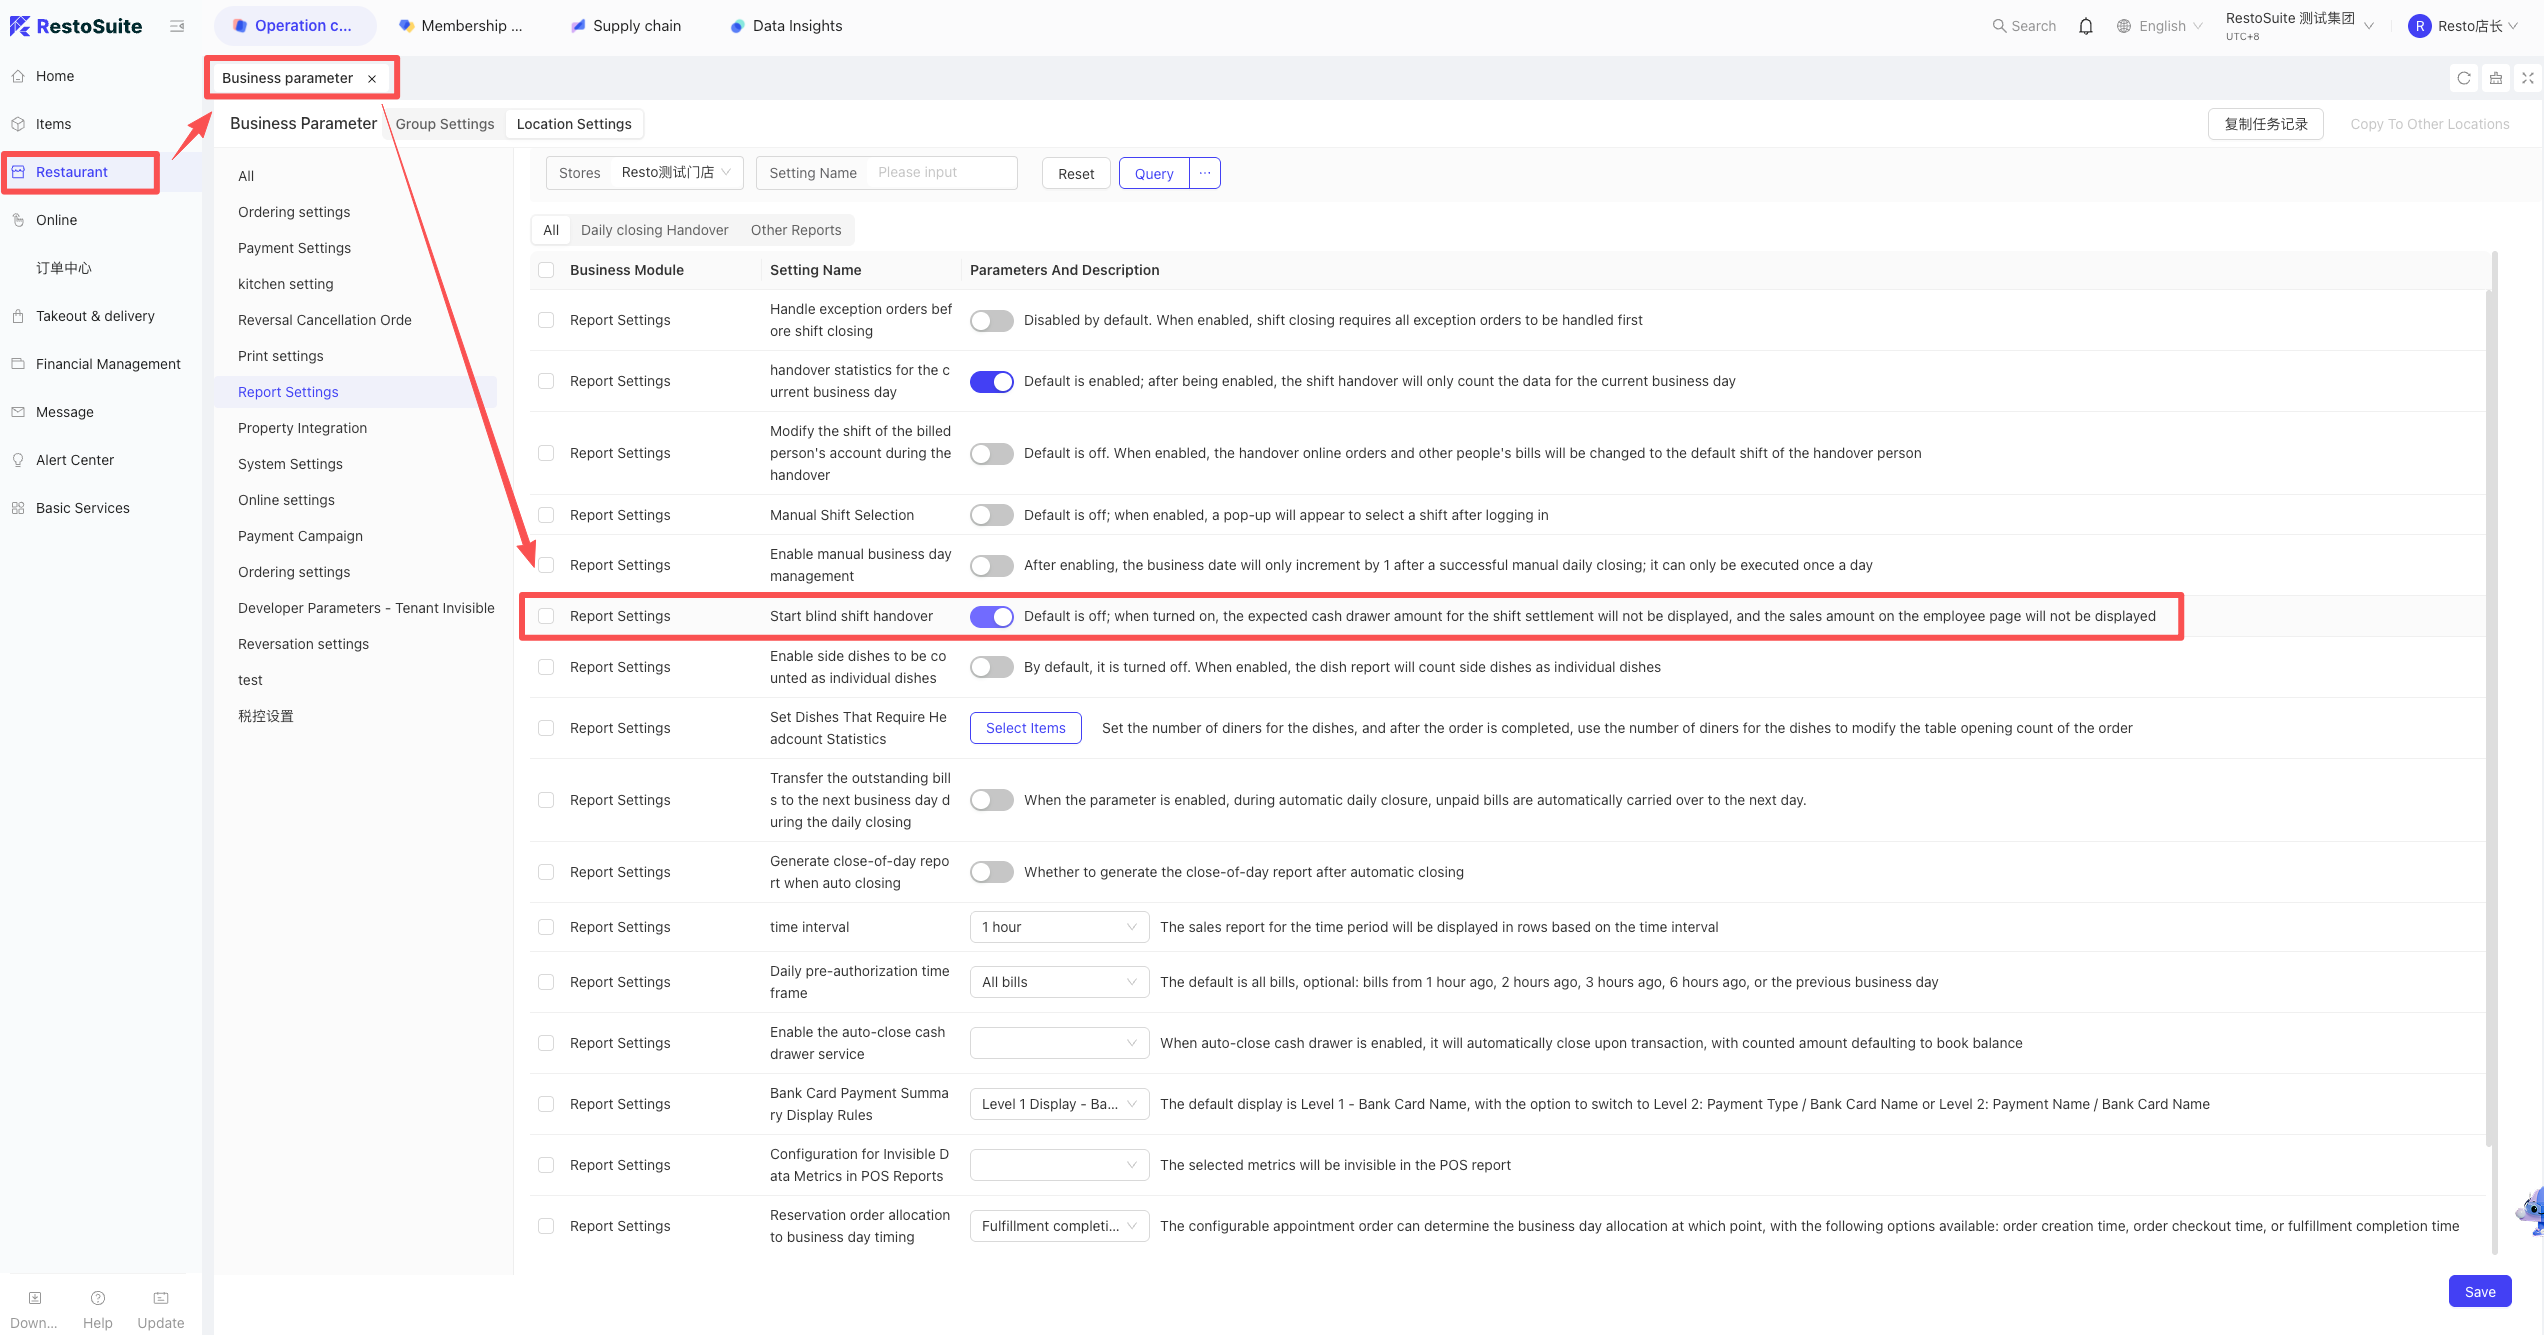
- Financial Subject Configuration:
The store must use a non-direct connection account via the SuiXingFu channel. BO Group View: Operation Center > Financial Management > Payment Configuration, select the store, and bind the certified account.
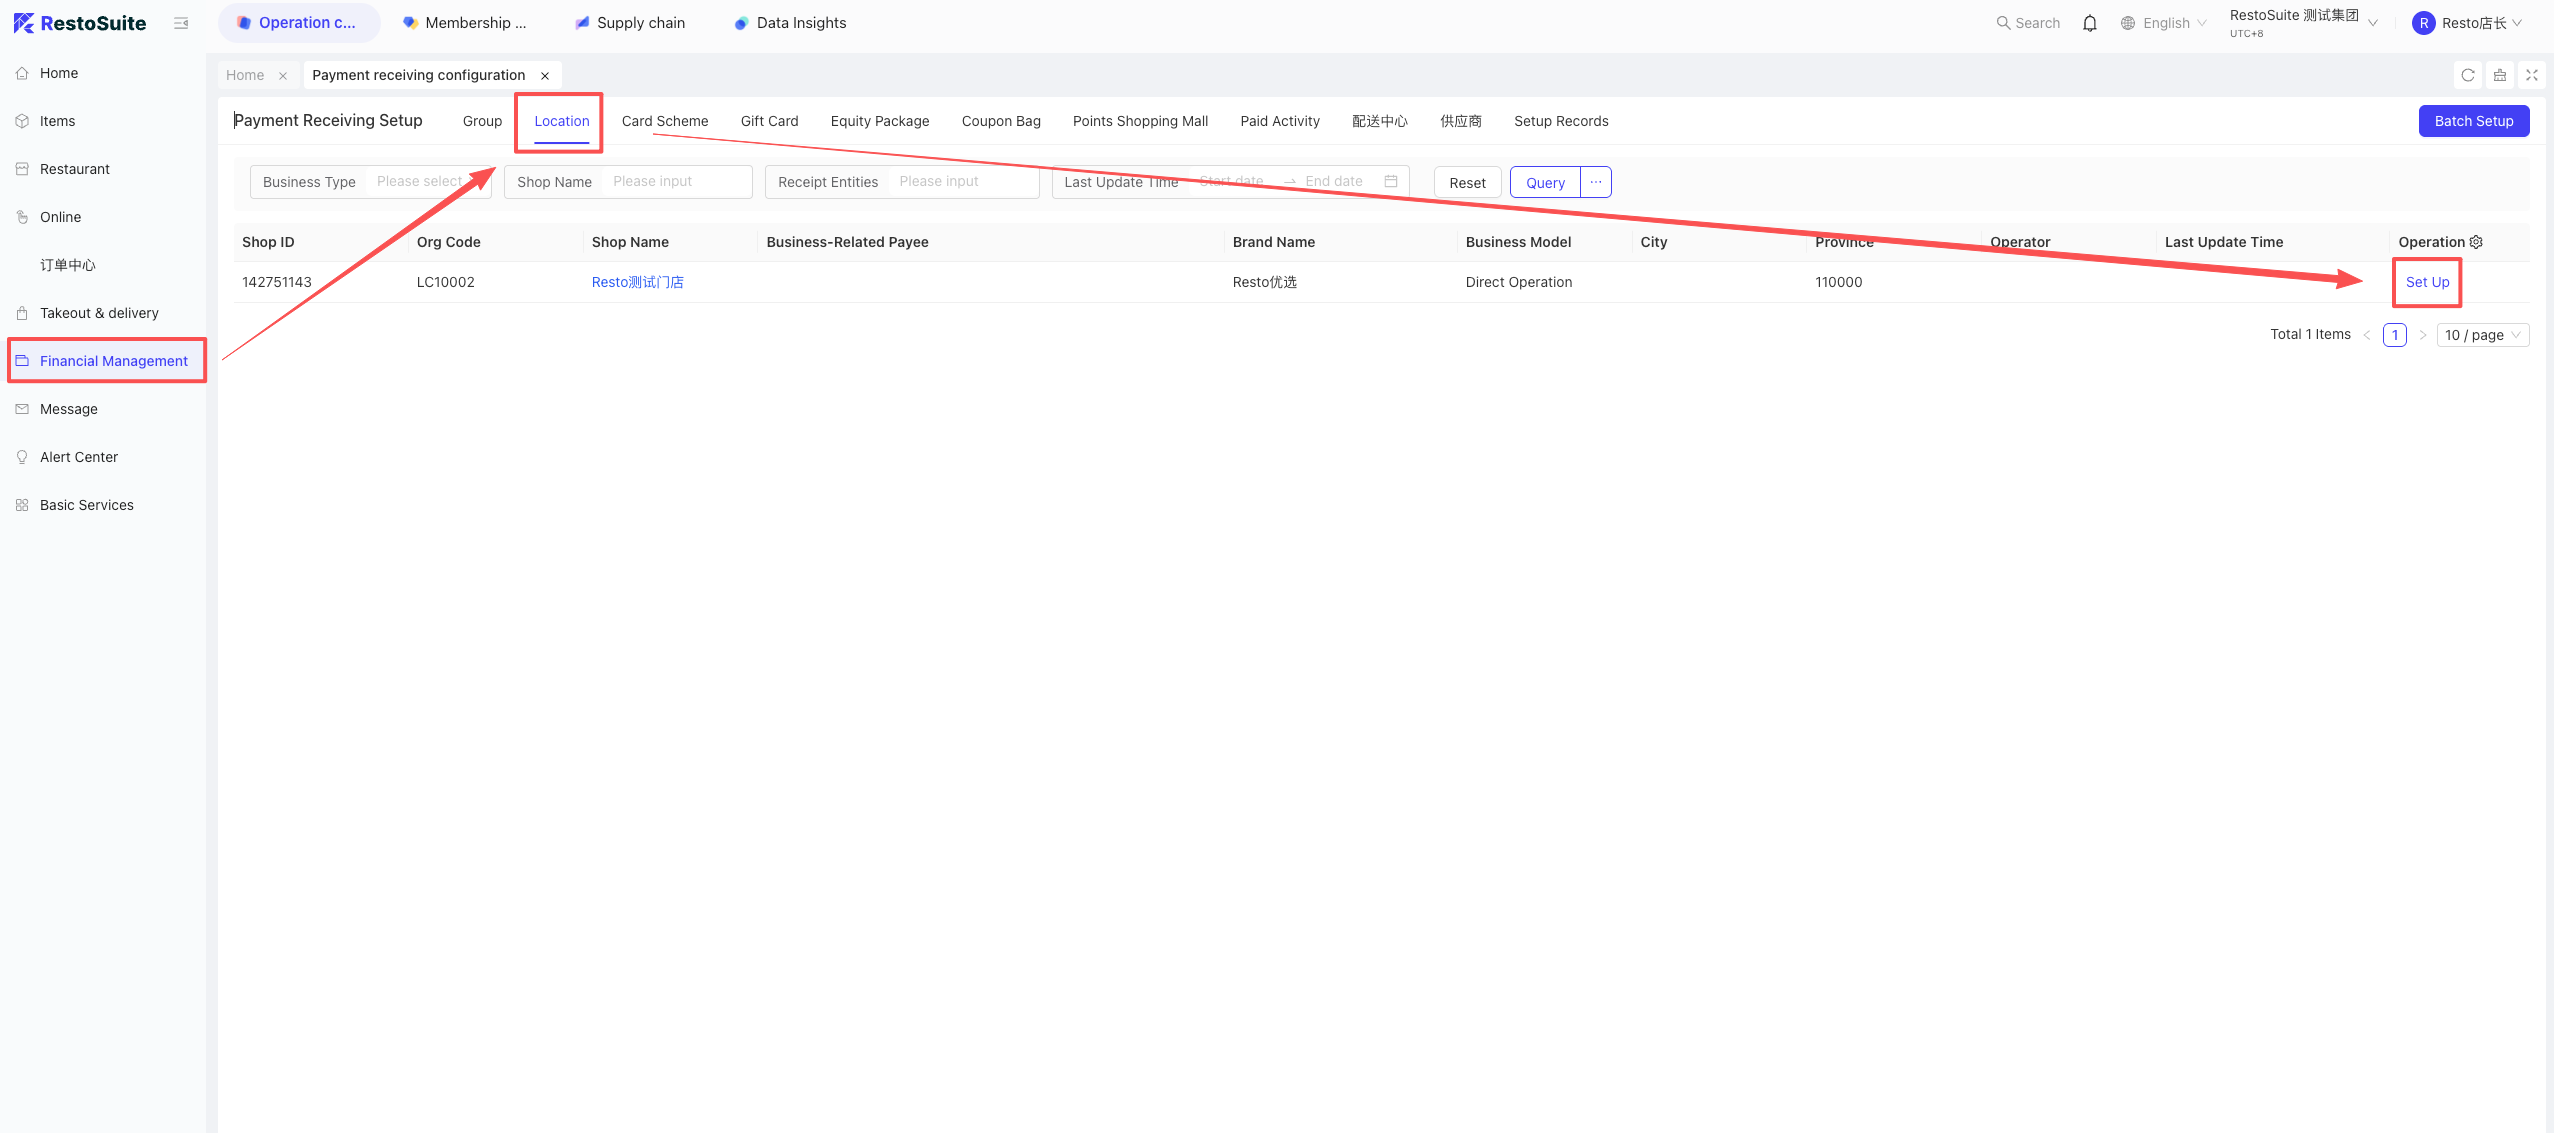
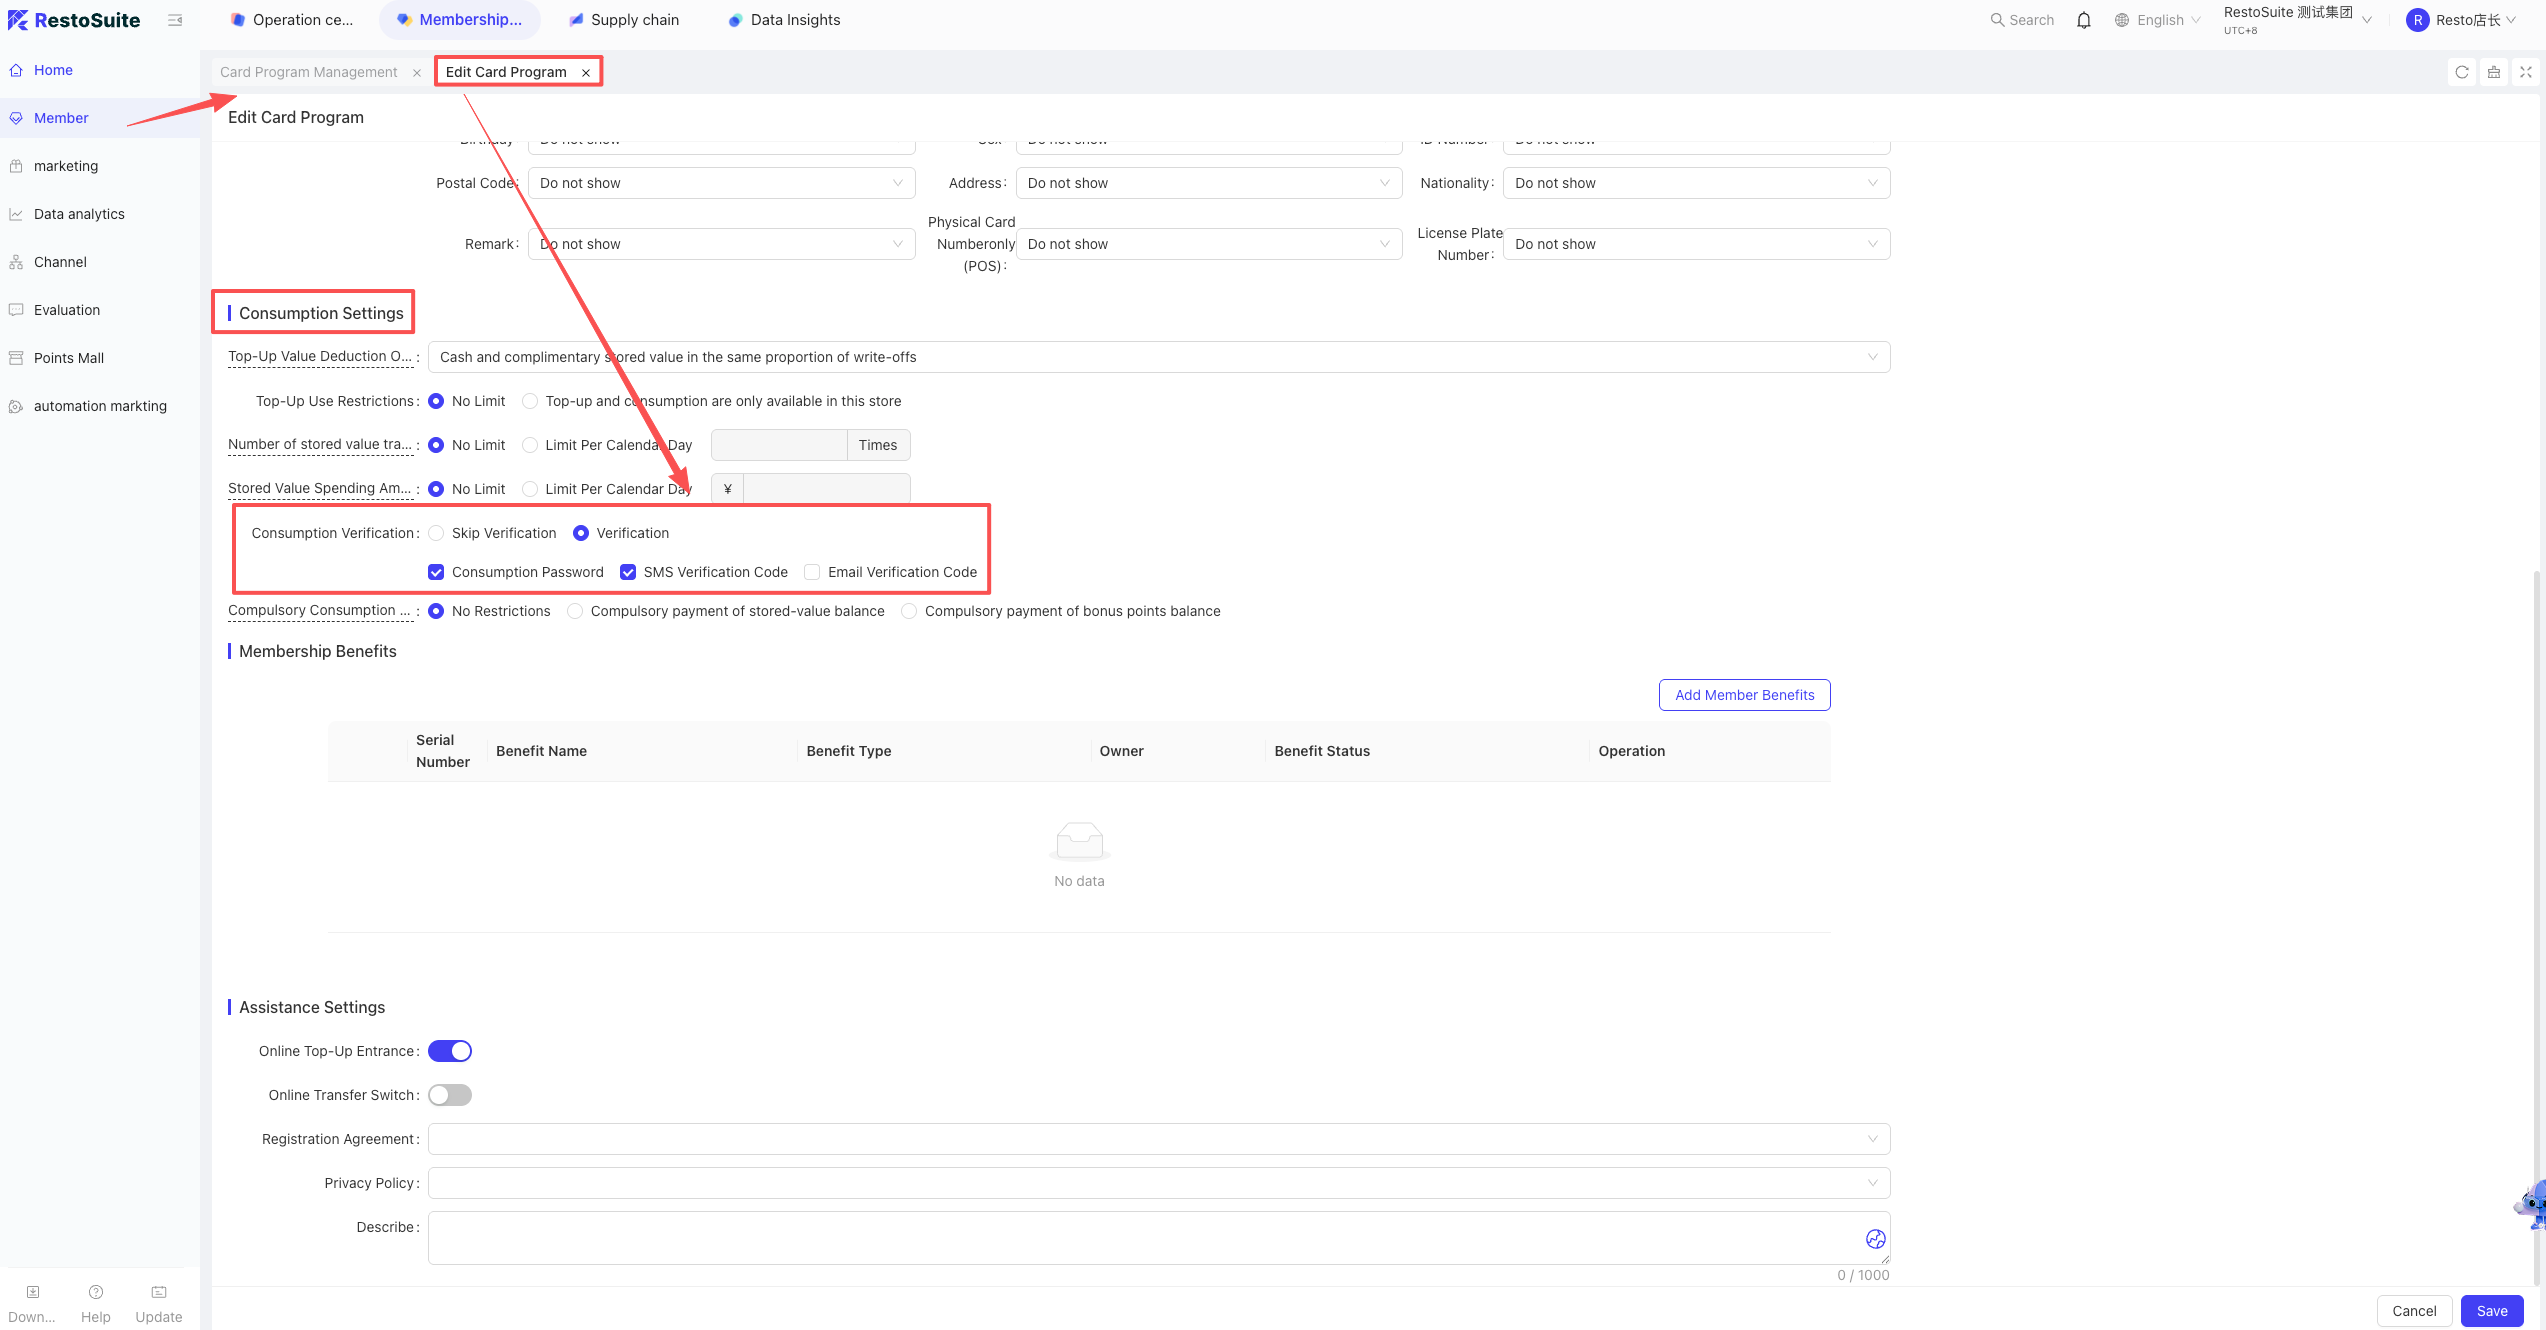
- Member Consumption Verification:
Must be set to “No Verification.” Path: Member Marketing > Member Scheme > Edit Scheme > Consumption Settings > Verification, select No Verification.
- Sufficient Balance: Ensure the member card has enough balance to cover the outstanding amount.
- Enable Business Parameter: BO Path: Operation Center > Restaurant Management > Business Parameters, enable “Scan WeChat Payment Code to Deduct Member Assets.”
- Financial Subject Configuration:
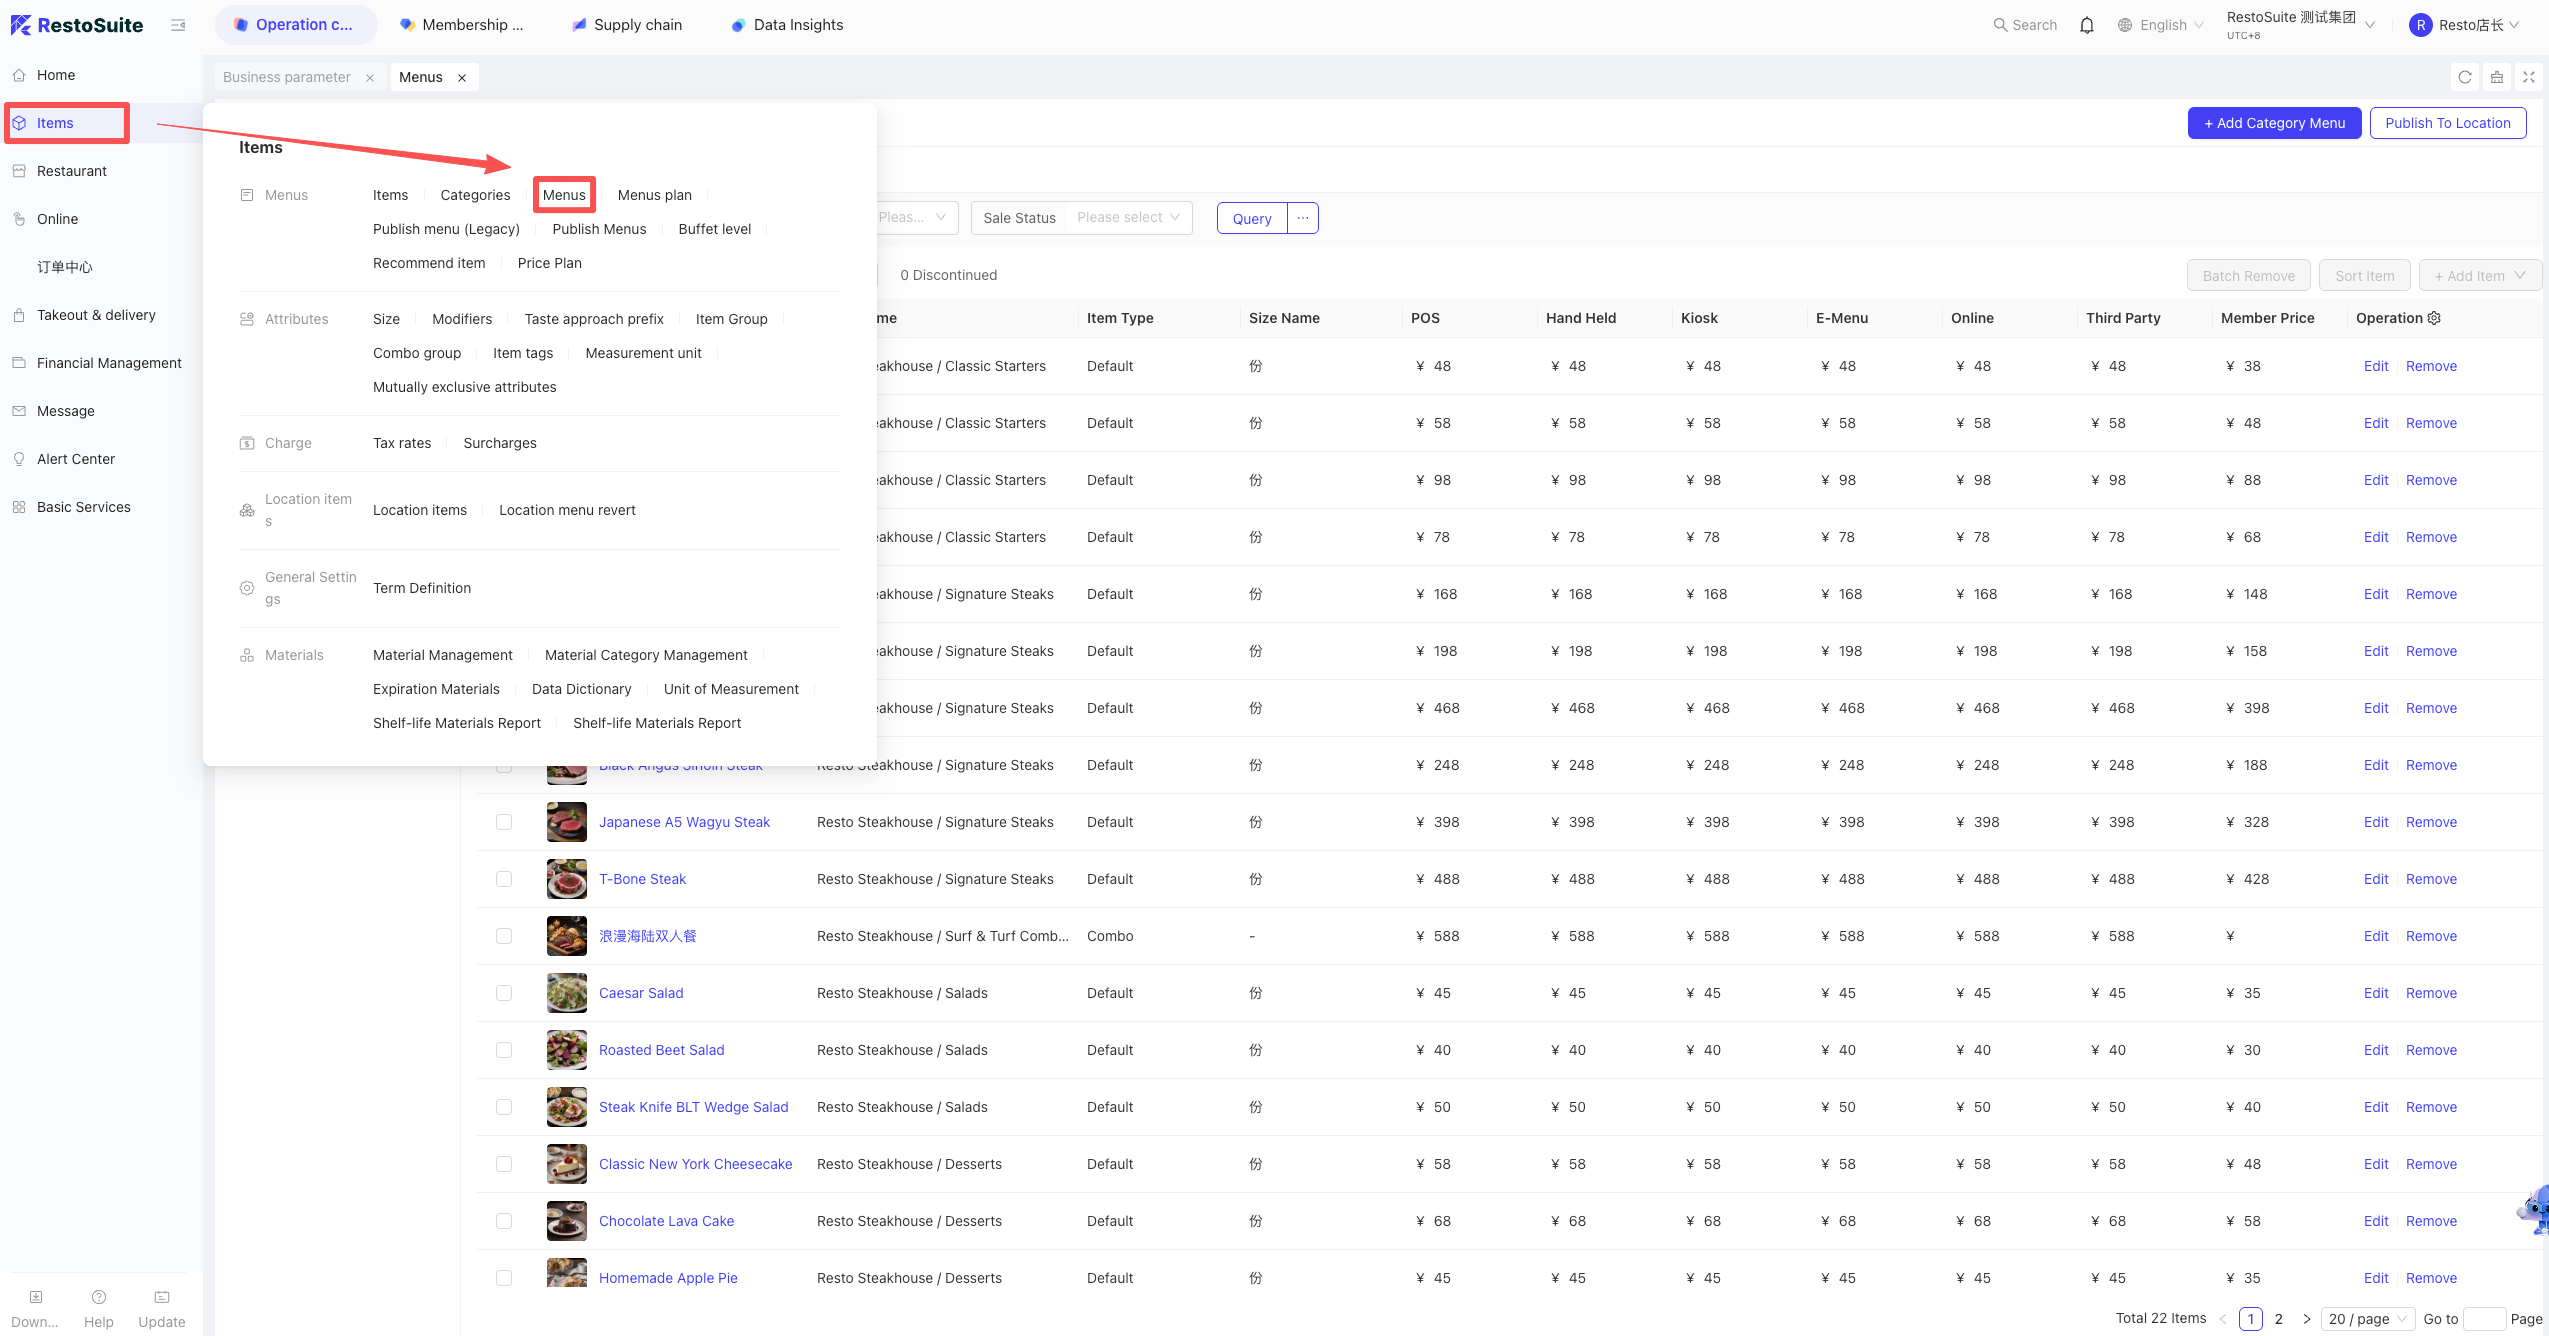
The store must use a non-direct connection account via the SuiXingFu channel. BO Group View: Operation Center > Financial Management > Payment Configuration, select the store, and bind the certified account.
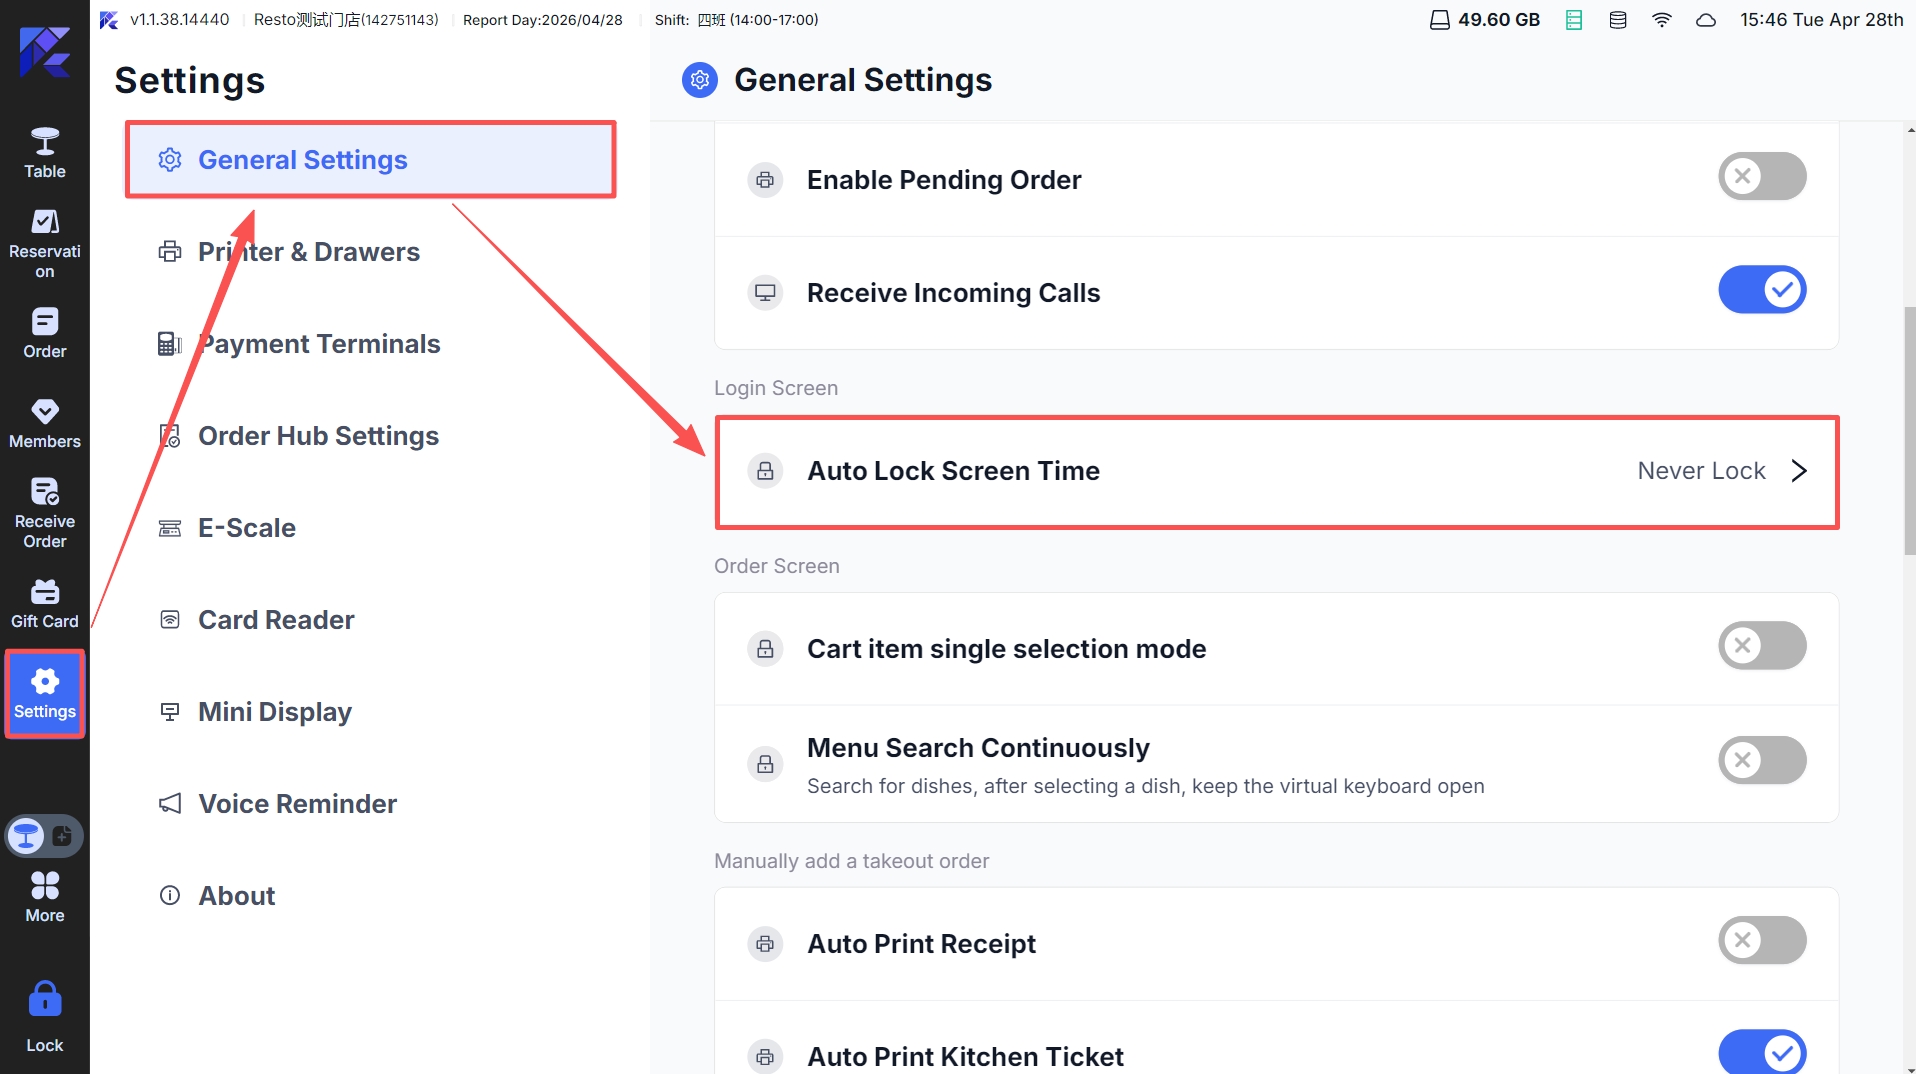
6 Does the POS support automatic logout to the login screen after ordering?
A: Supported.
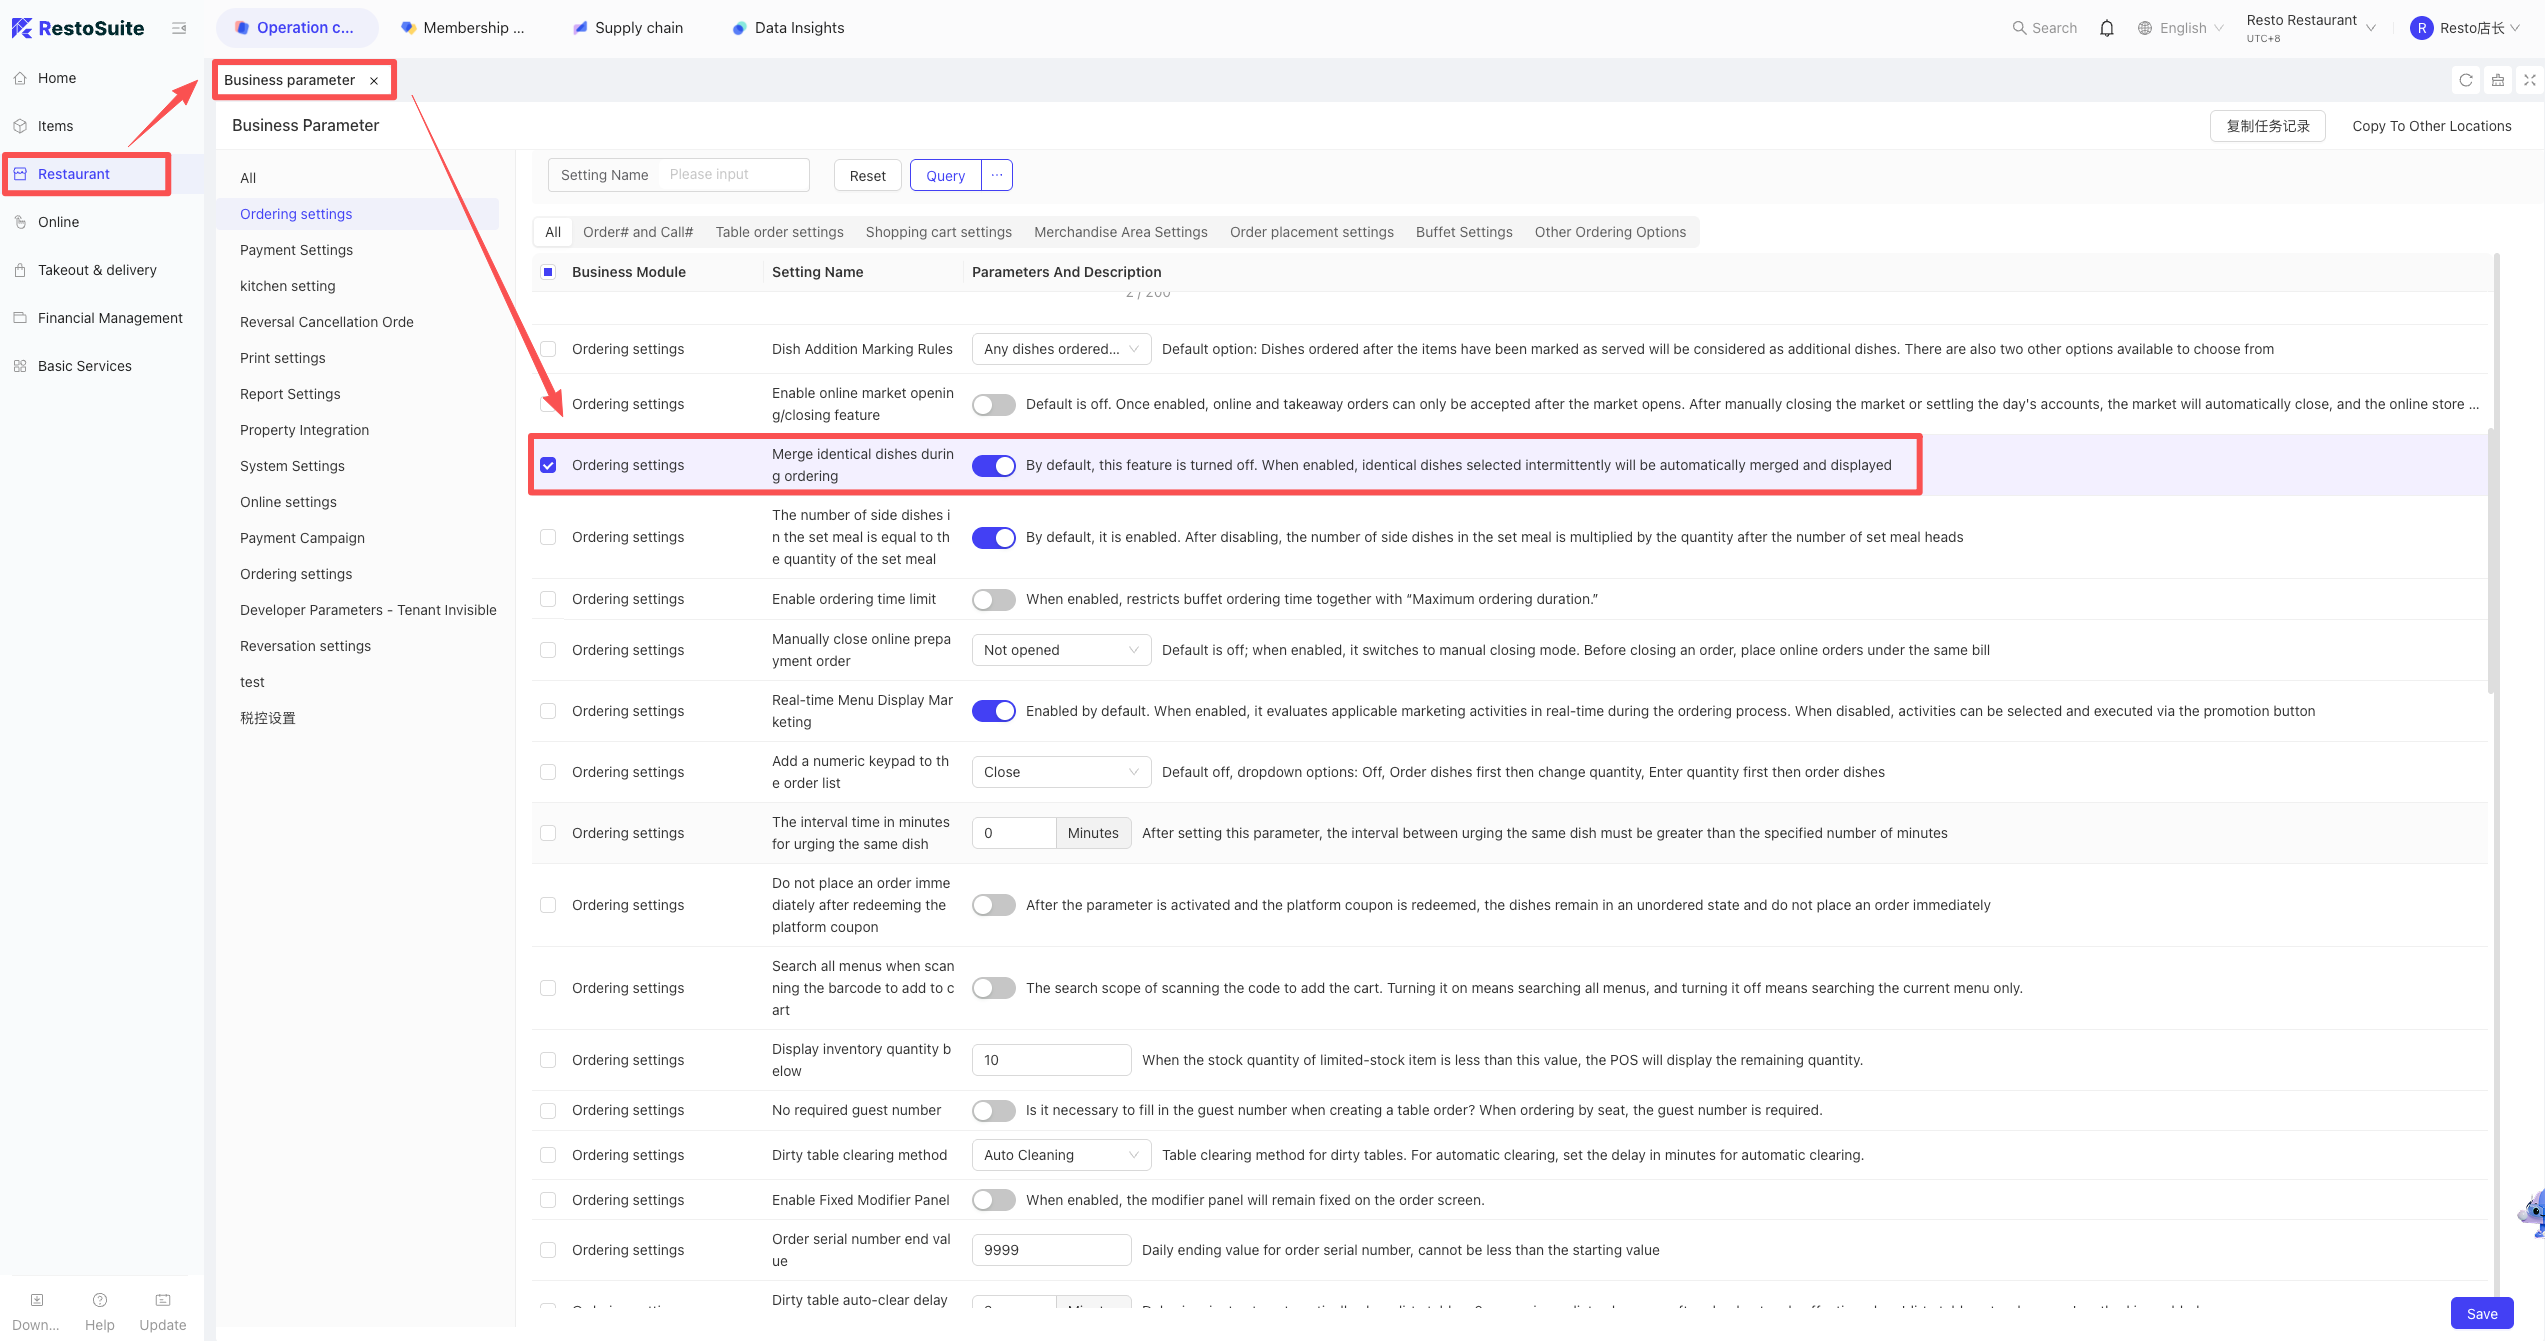
- Setup Path:
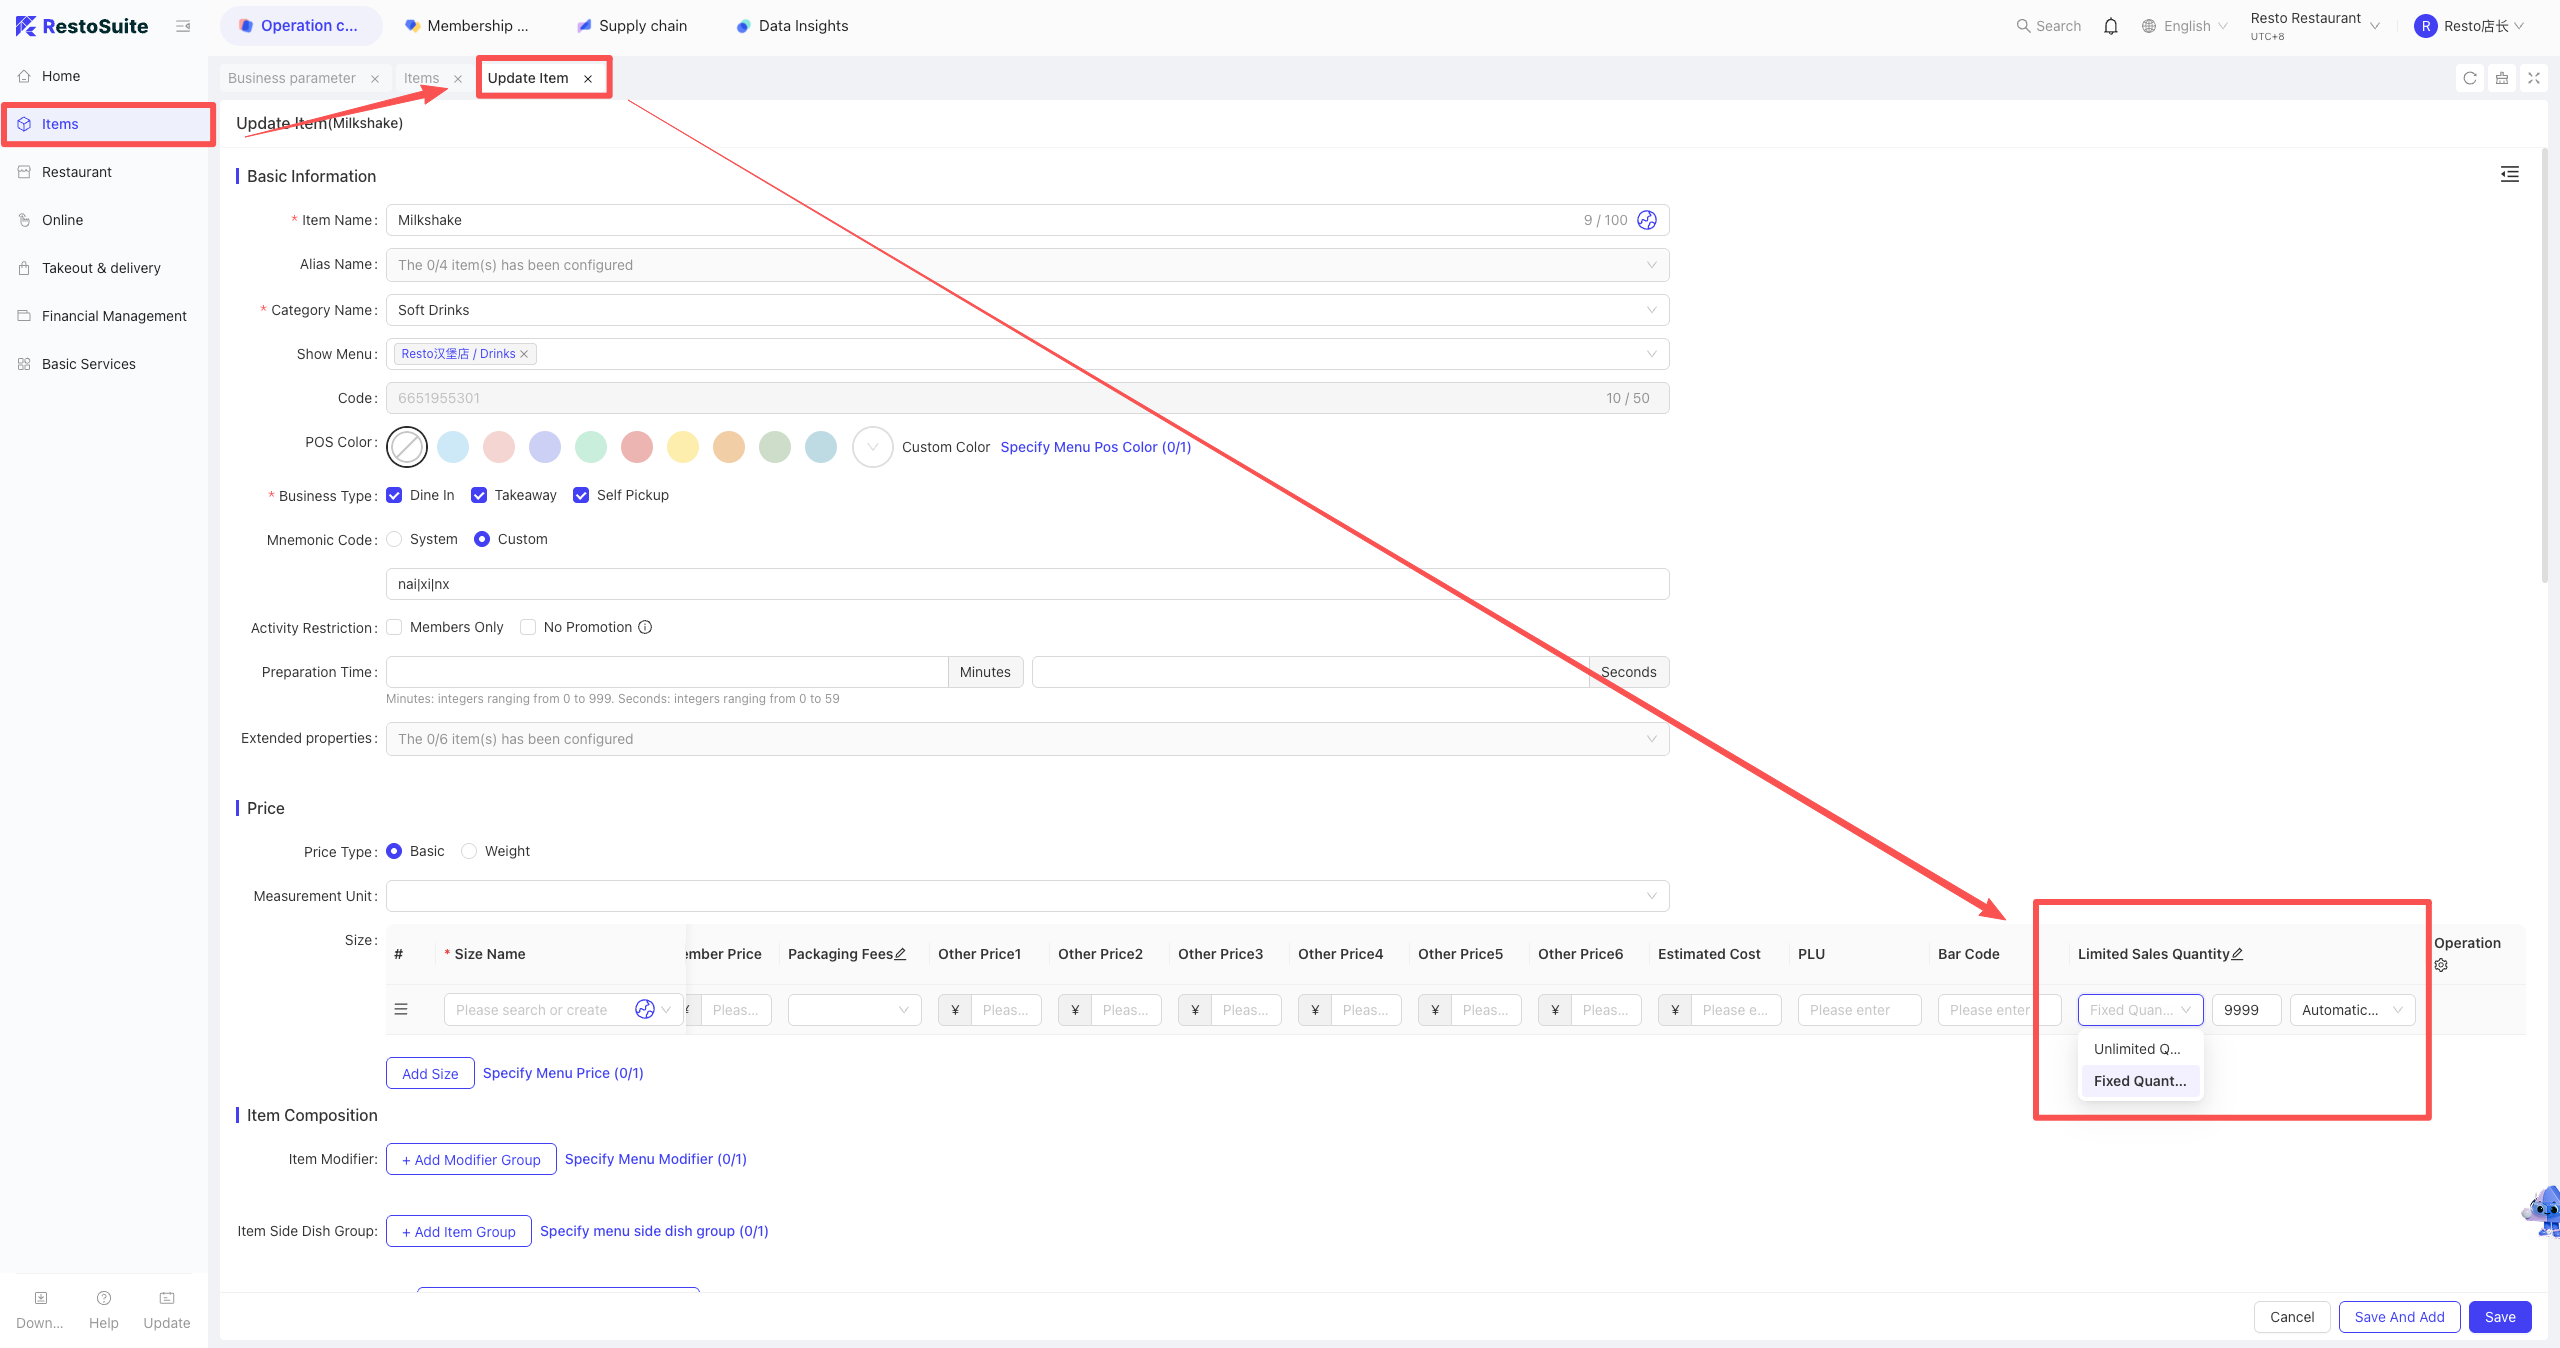
- Open the POS: Settings > General > Auto Screen Lock Time.
- Open the POS: Settings > General > Auto Screen Lock Time.
7 Can the size of dish tiles on the POS ordering interface be customized?
A: Dish tile sizes are controlled by setting the number of rows and columns; however, the size of Menu Groups cannot be customized.
- Setup Path:
- POS: Settings > General > Order Panel Settings > Display Rows/Columns.
8 How to display item images on the POS ordering interface?
- Ensure images are uploaded for items in BO Item Management.
- On POS: Settings > General > Order Panel Settings > Show Dish Images > Enable.
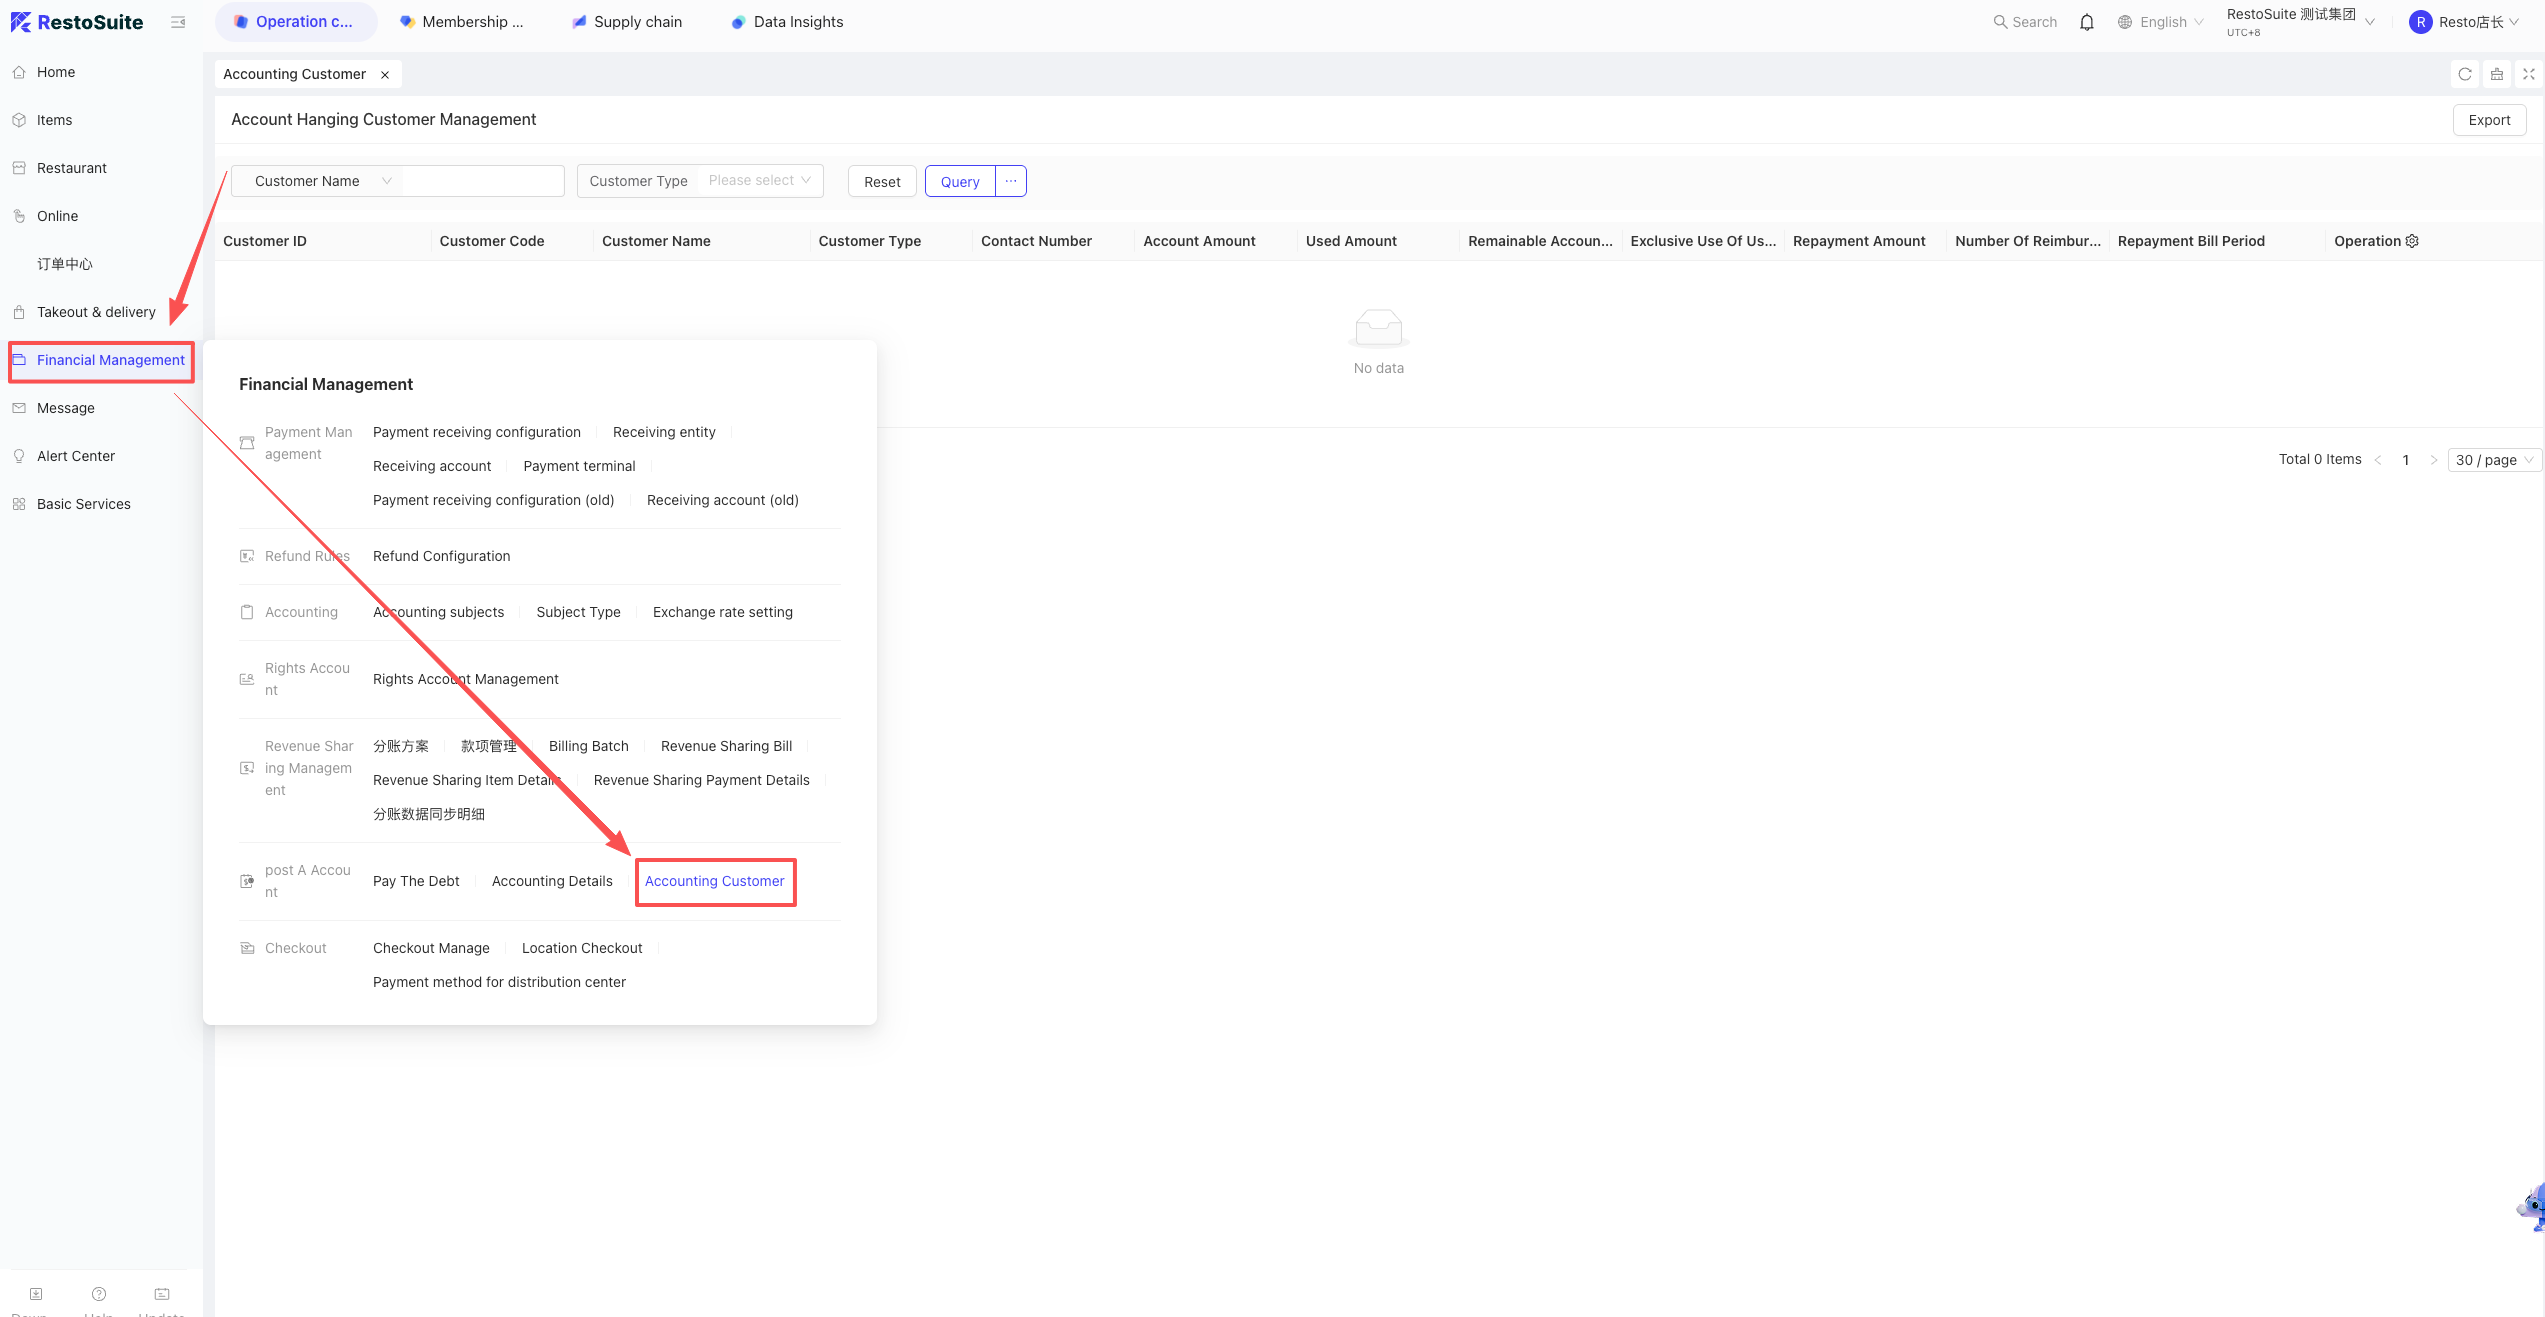
9 How to use the “On Account” function on POS?
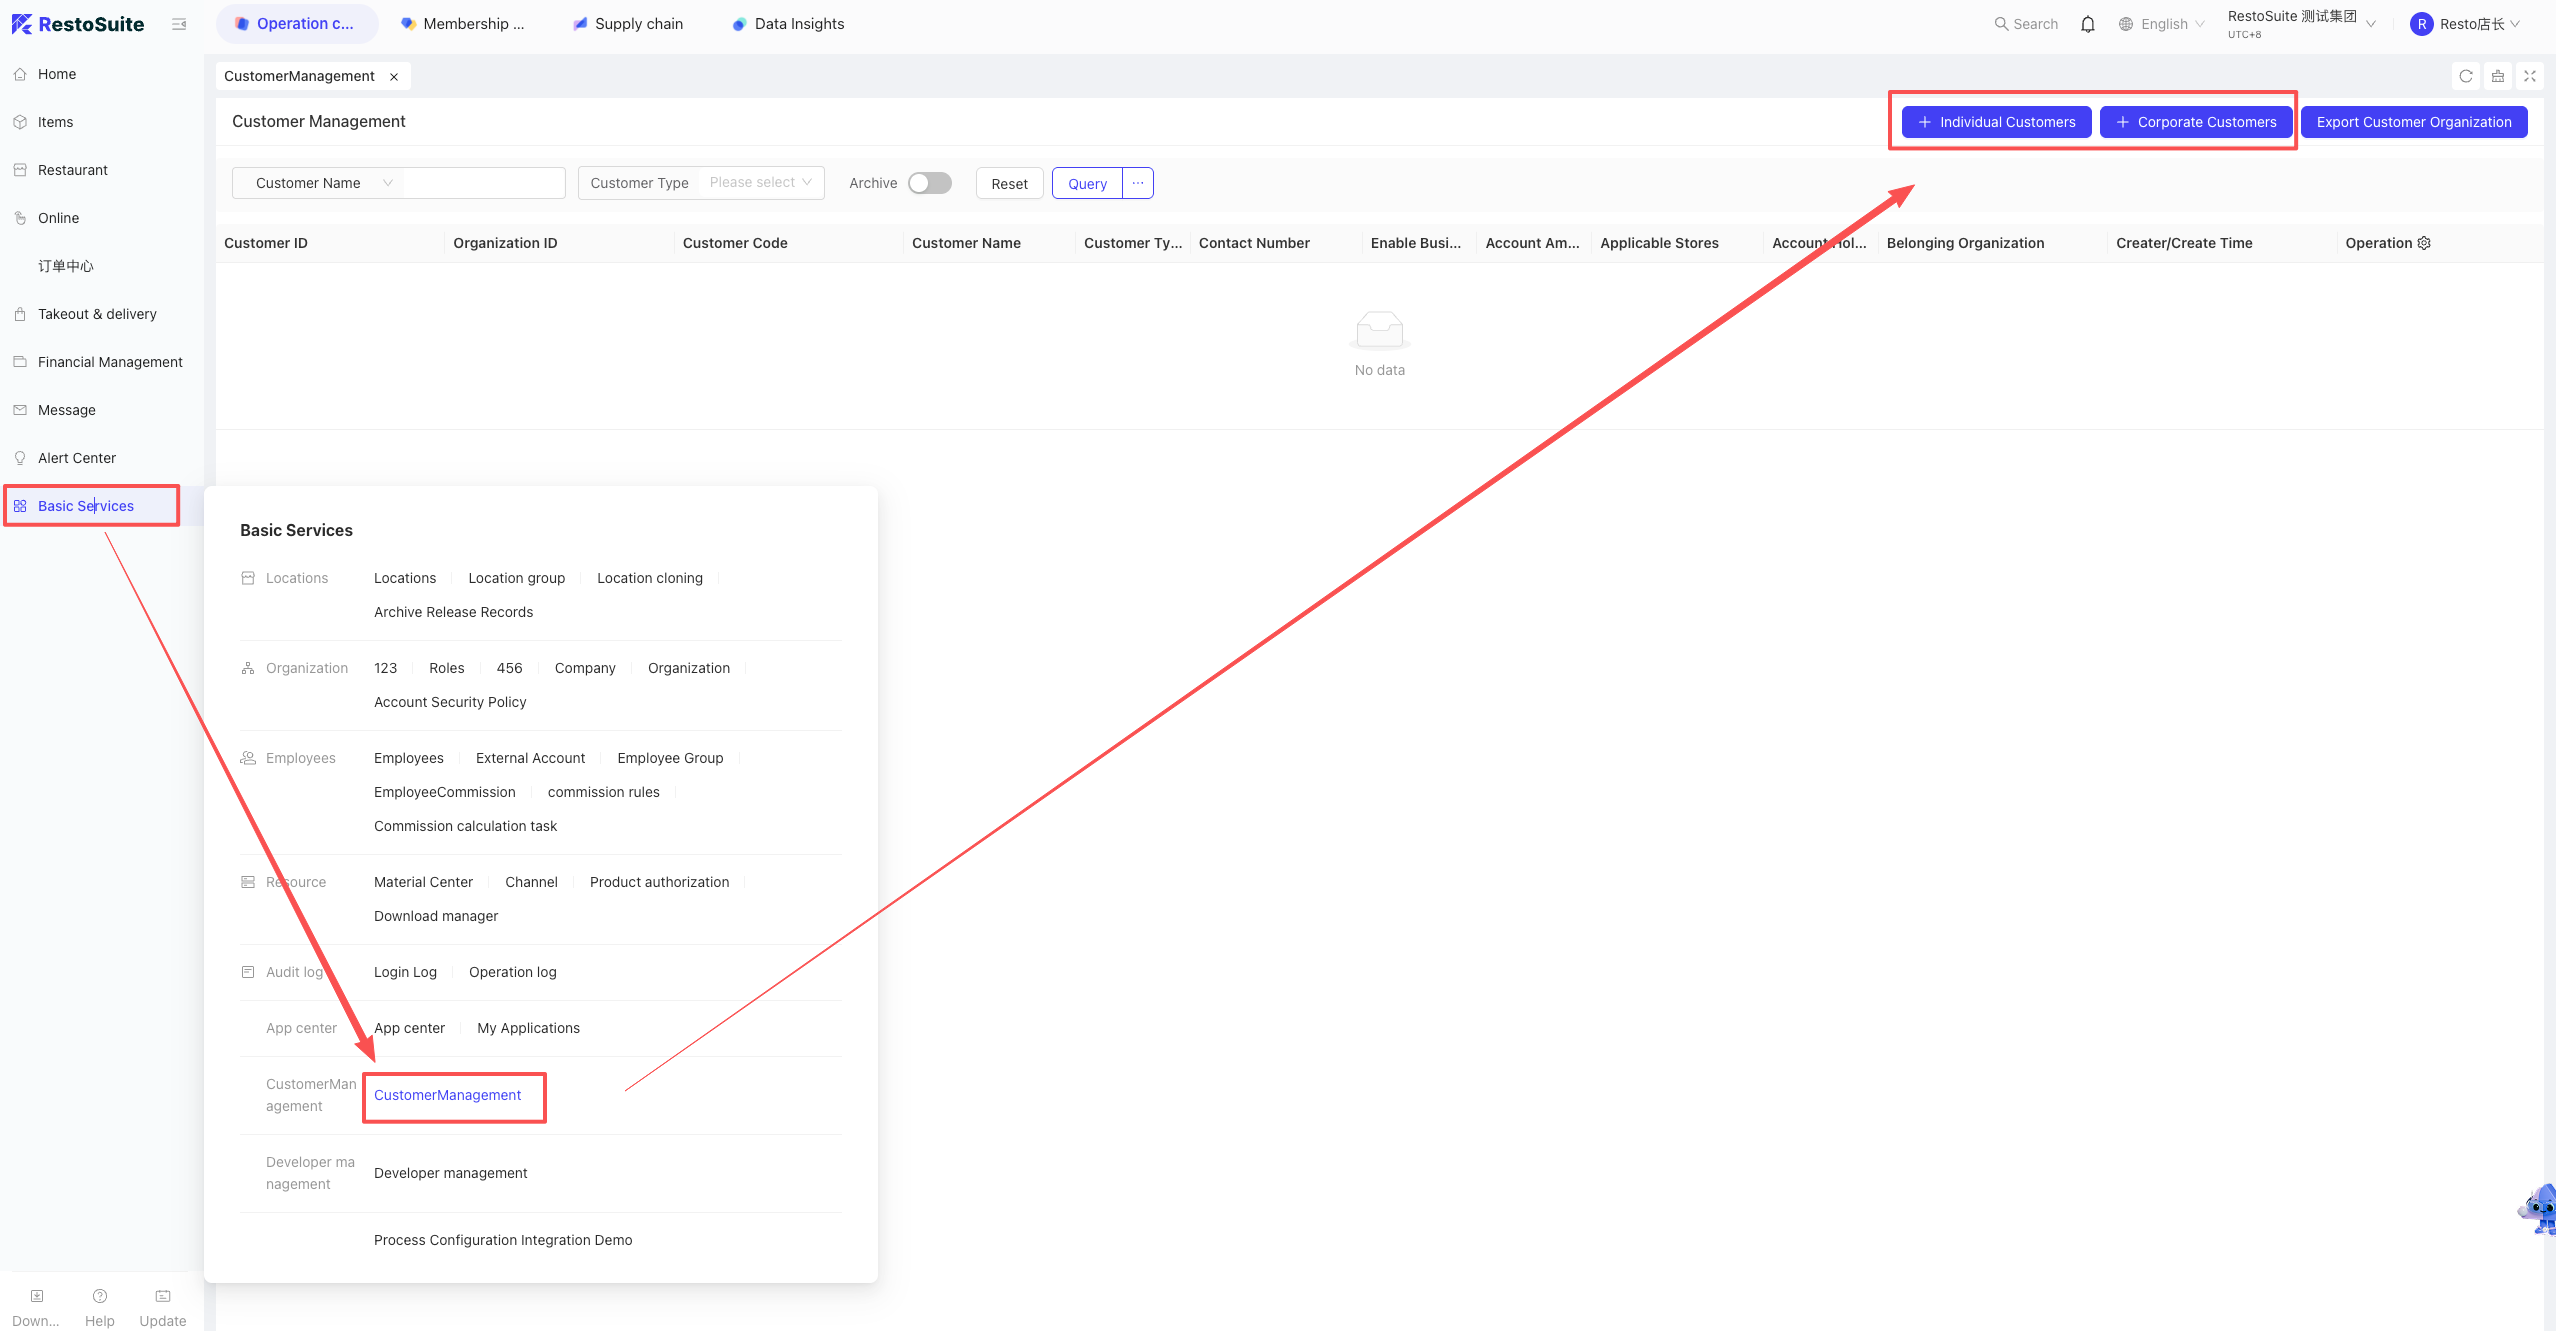
- Add Customer: Group View > Basic Services > Customer Management > Add Credit Customer.
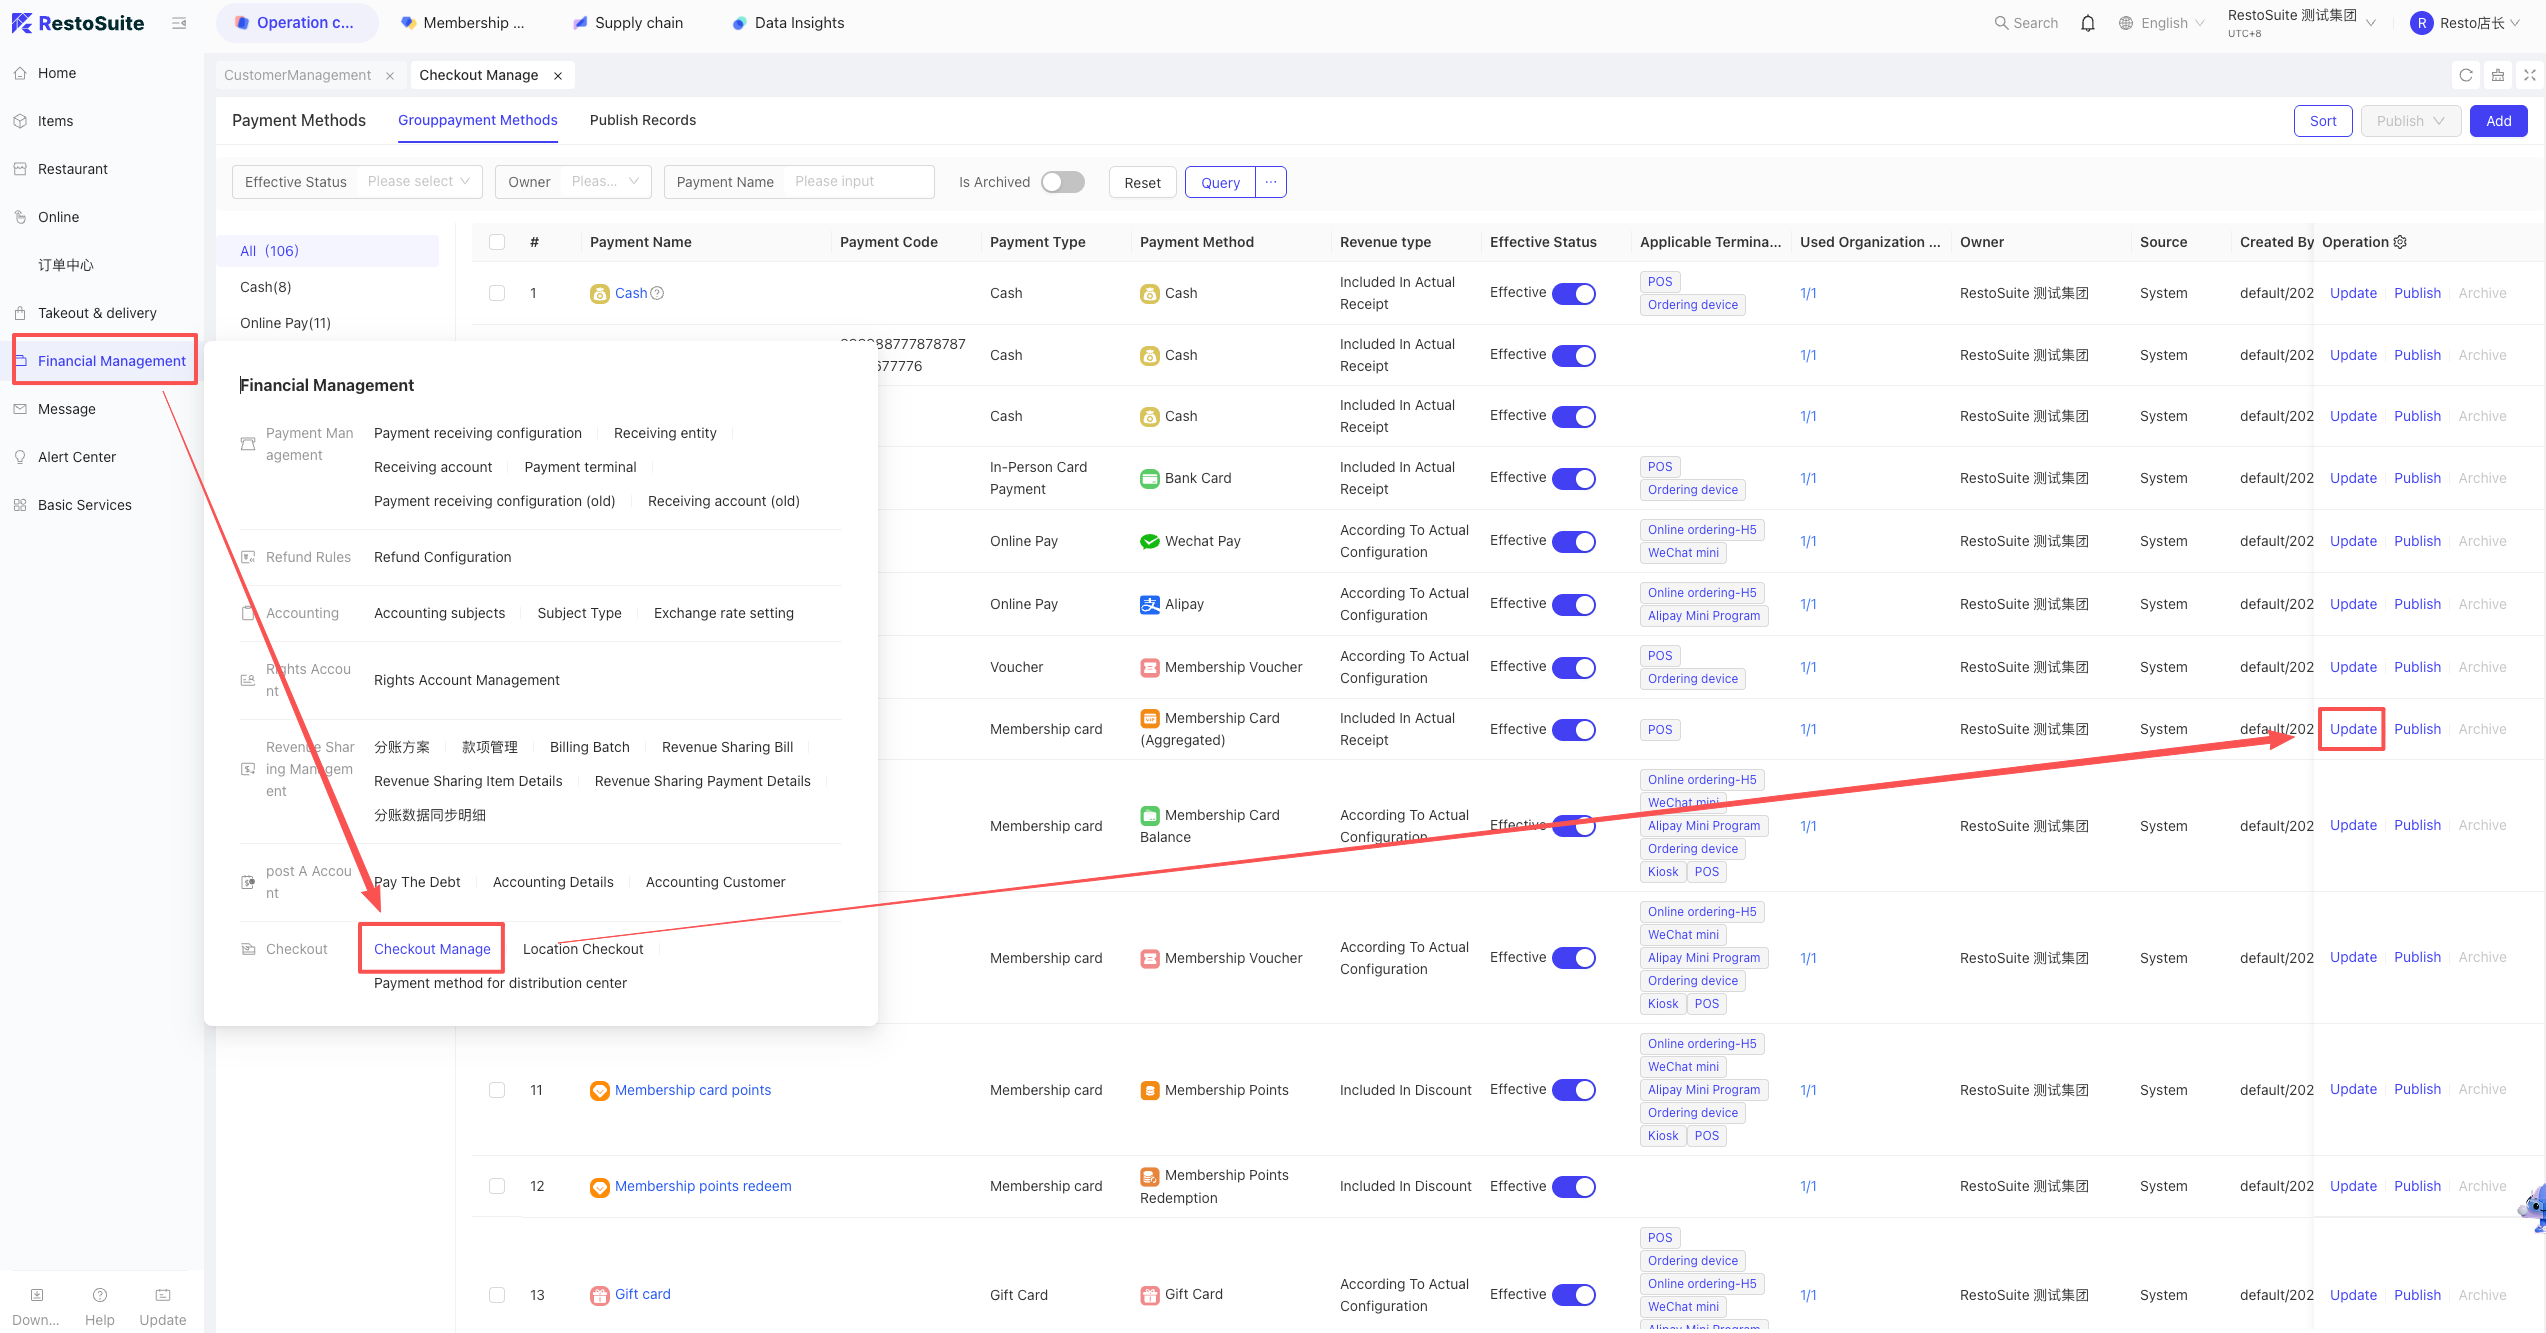
- Configure Subject: Group View > Operation Center > Restaurant Management > Settlement Method Management, select the “On Account” subject and dispatch it to stores.
- Front-end Checkout: Select the “On Account” payment method.
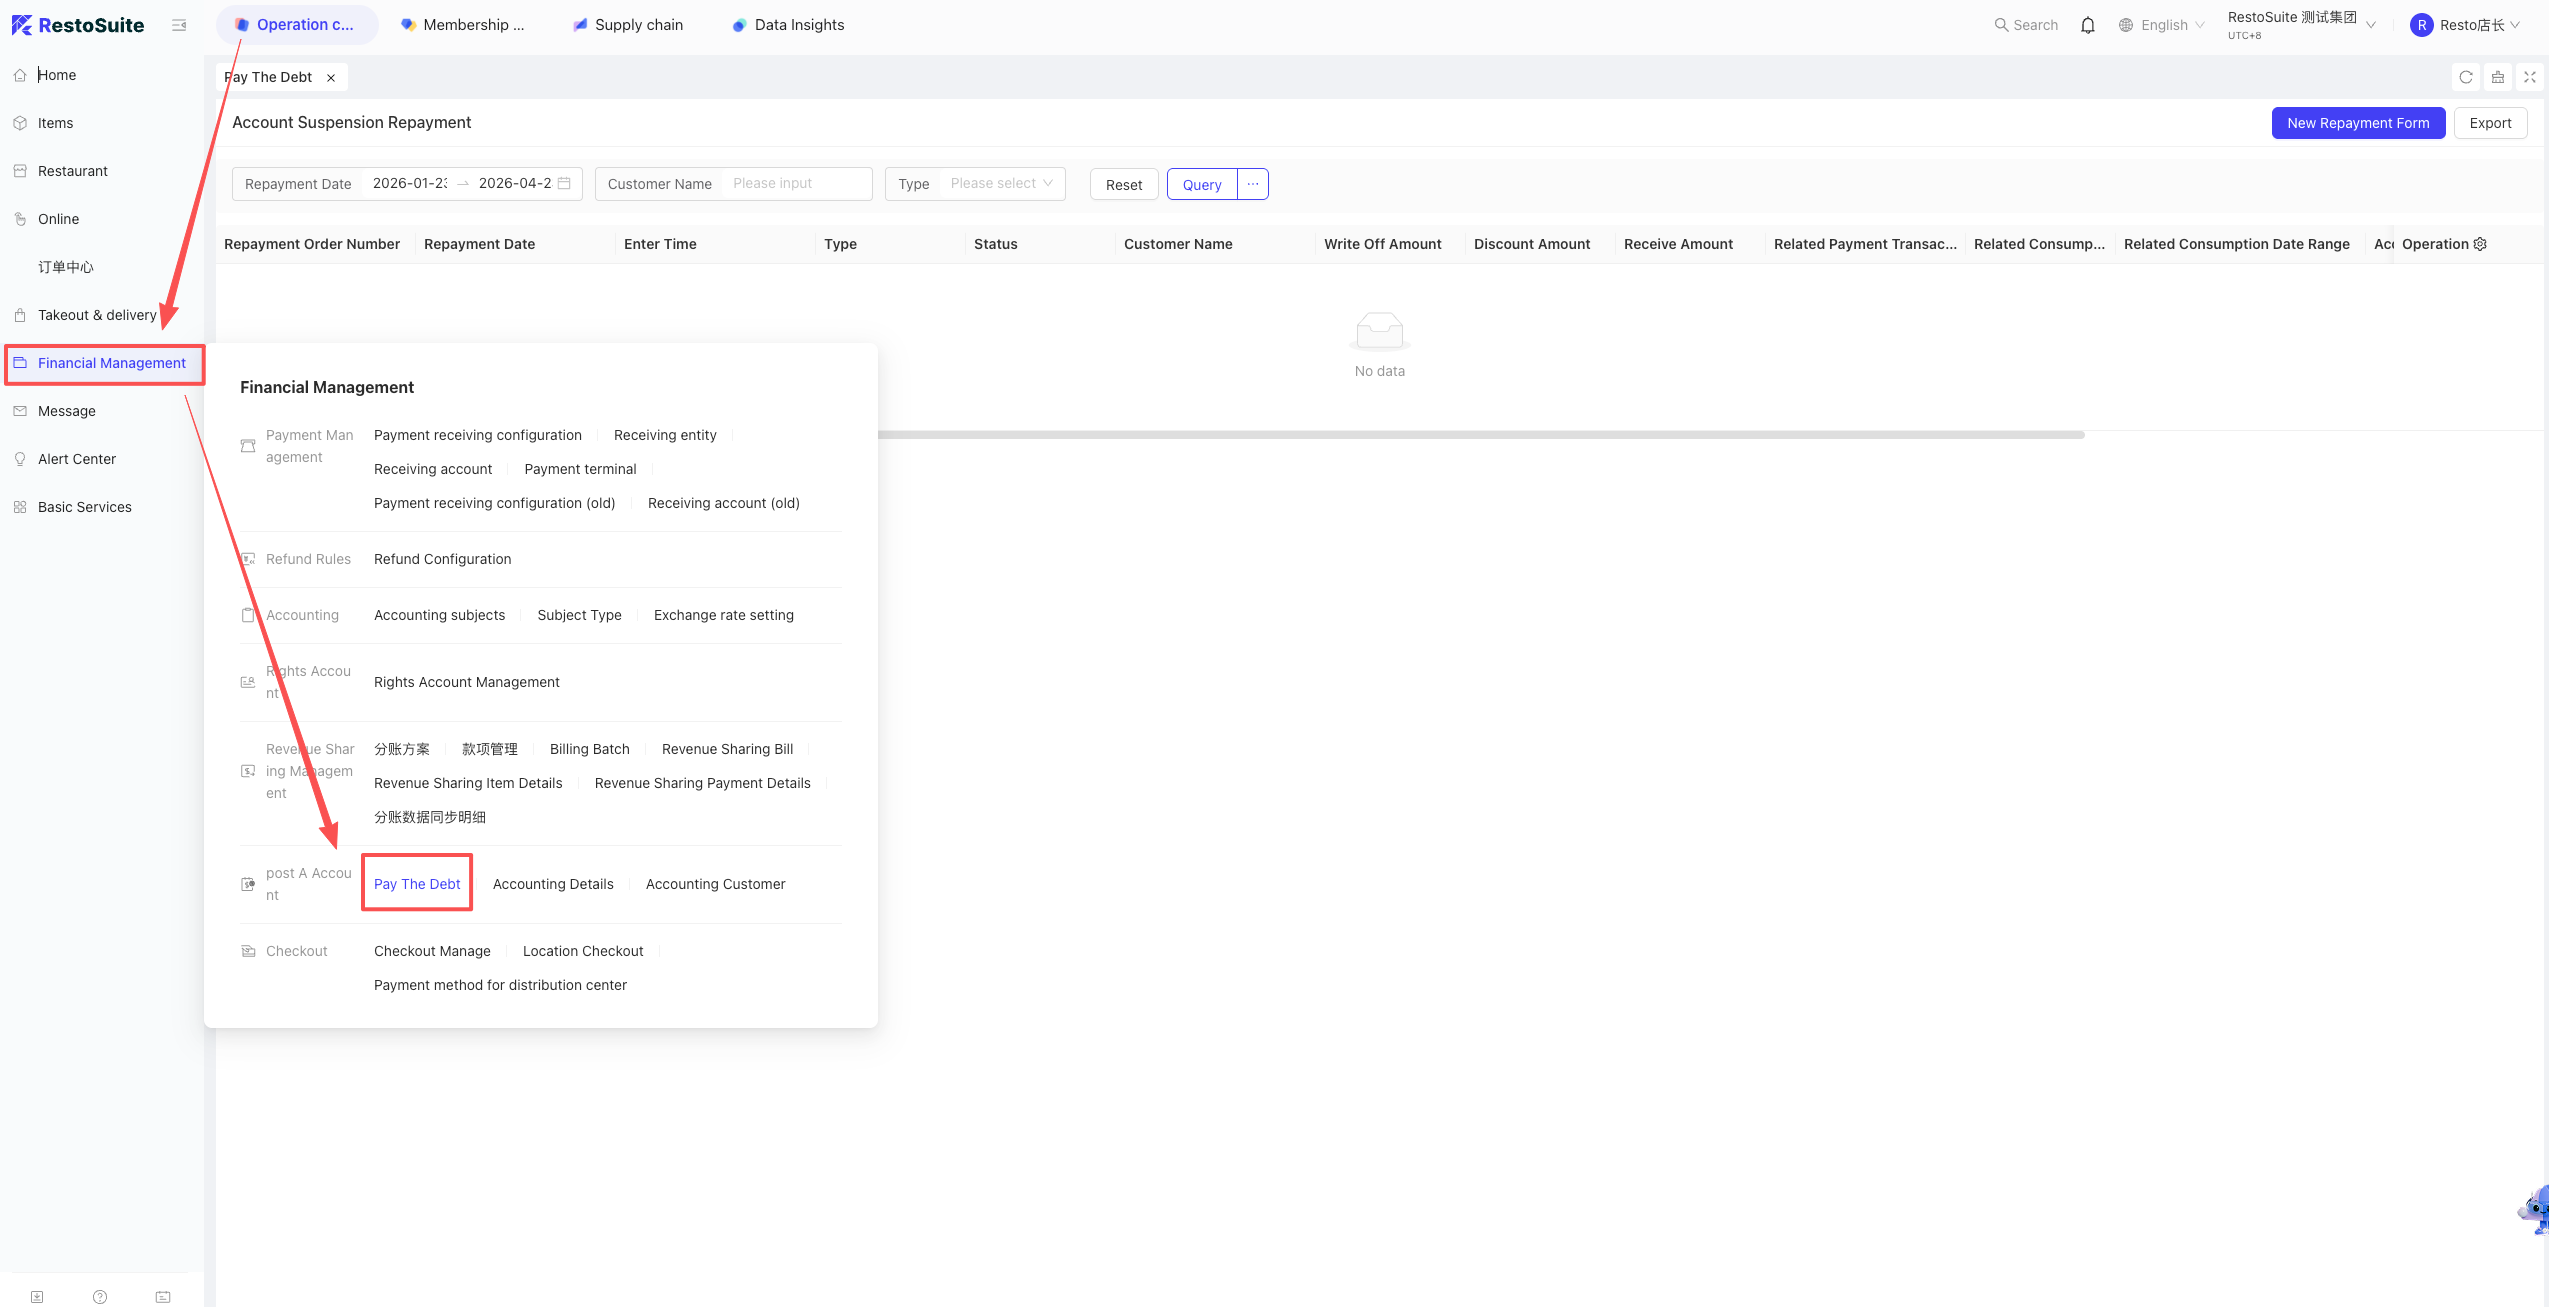
- Credit Repayment: Group View > Financial Management > Credit Repayment, select records to process repayment.
- View Records: BO > Financial Management > Credit Customer, select type to view credit and repayment history.
10 How to “Hold” and “Recall” orders in Quick Service mode?
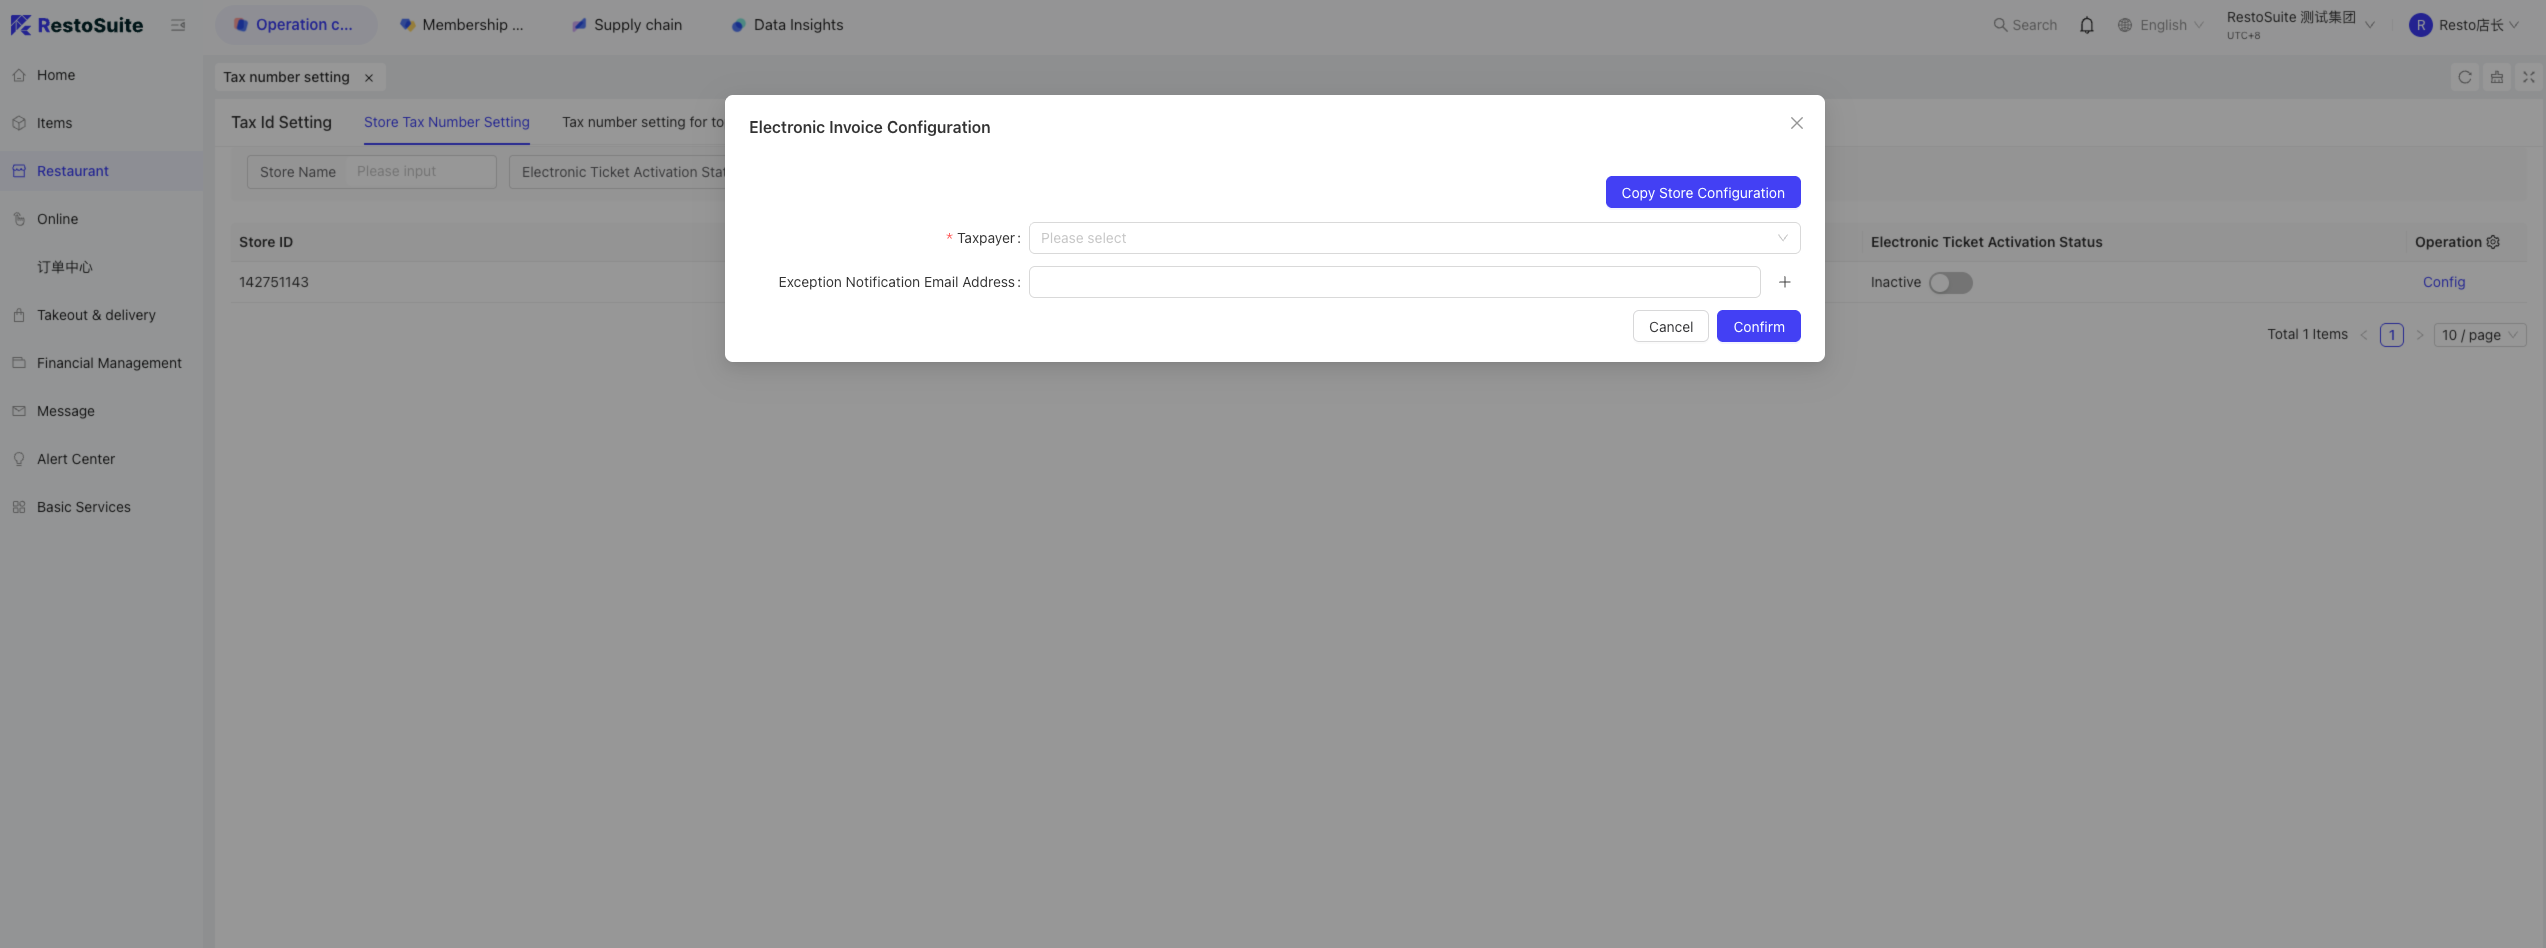
-
Scenario: Used when a customer is undecided, allowing the cashier to serve the next person first.
-
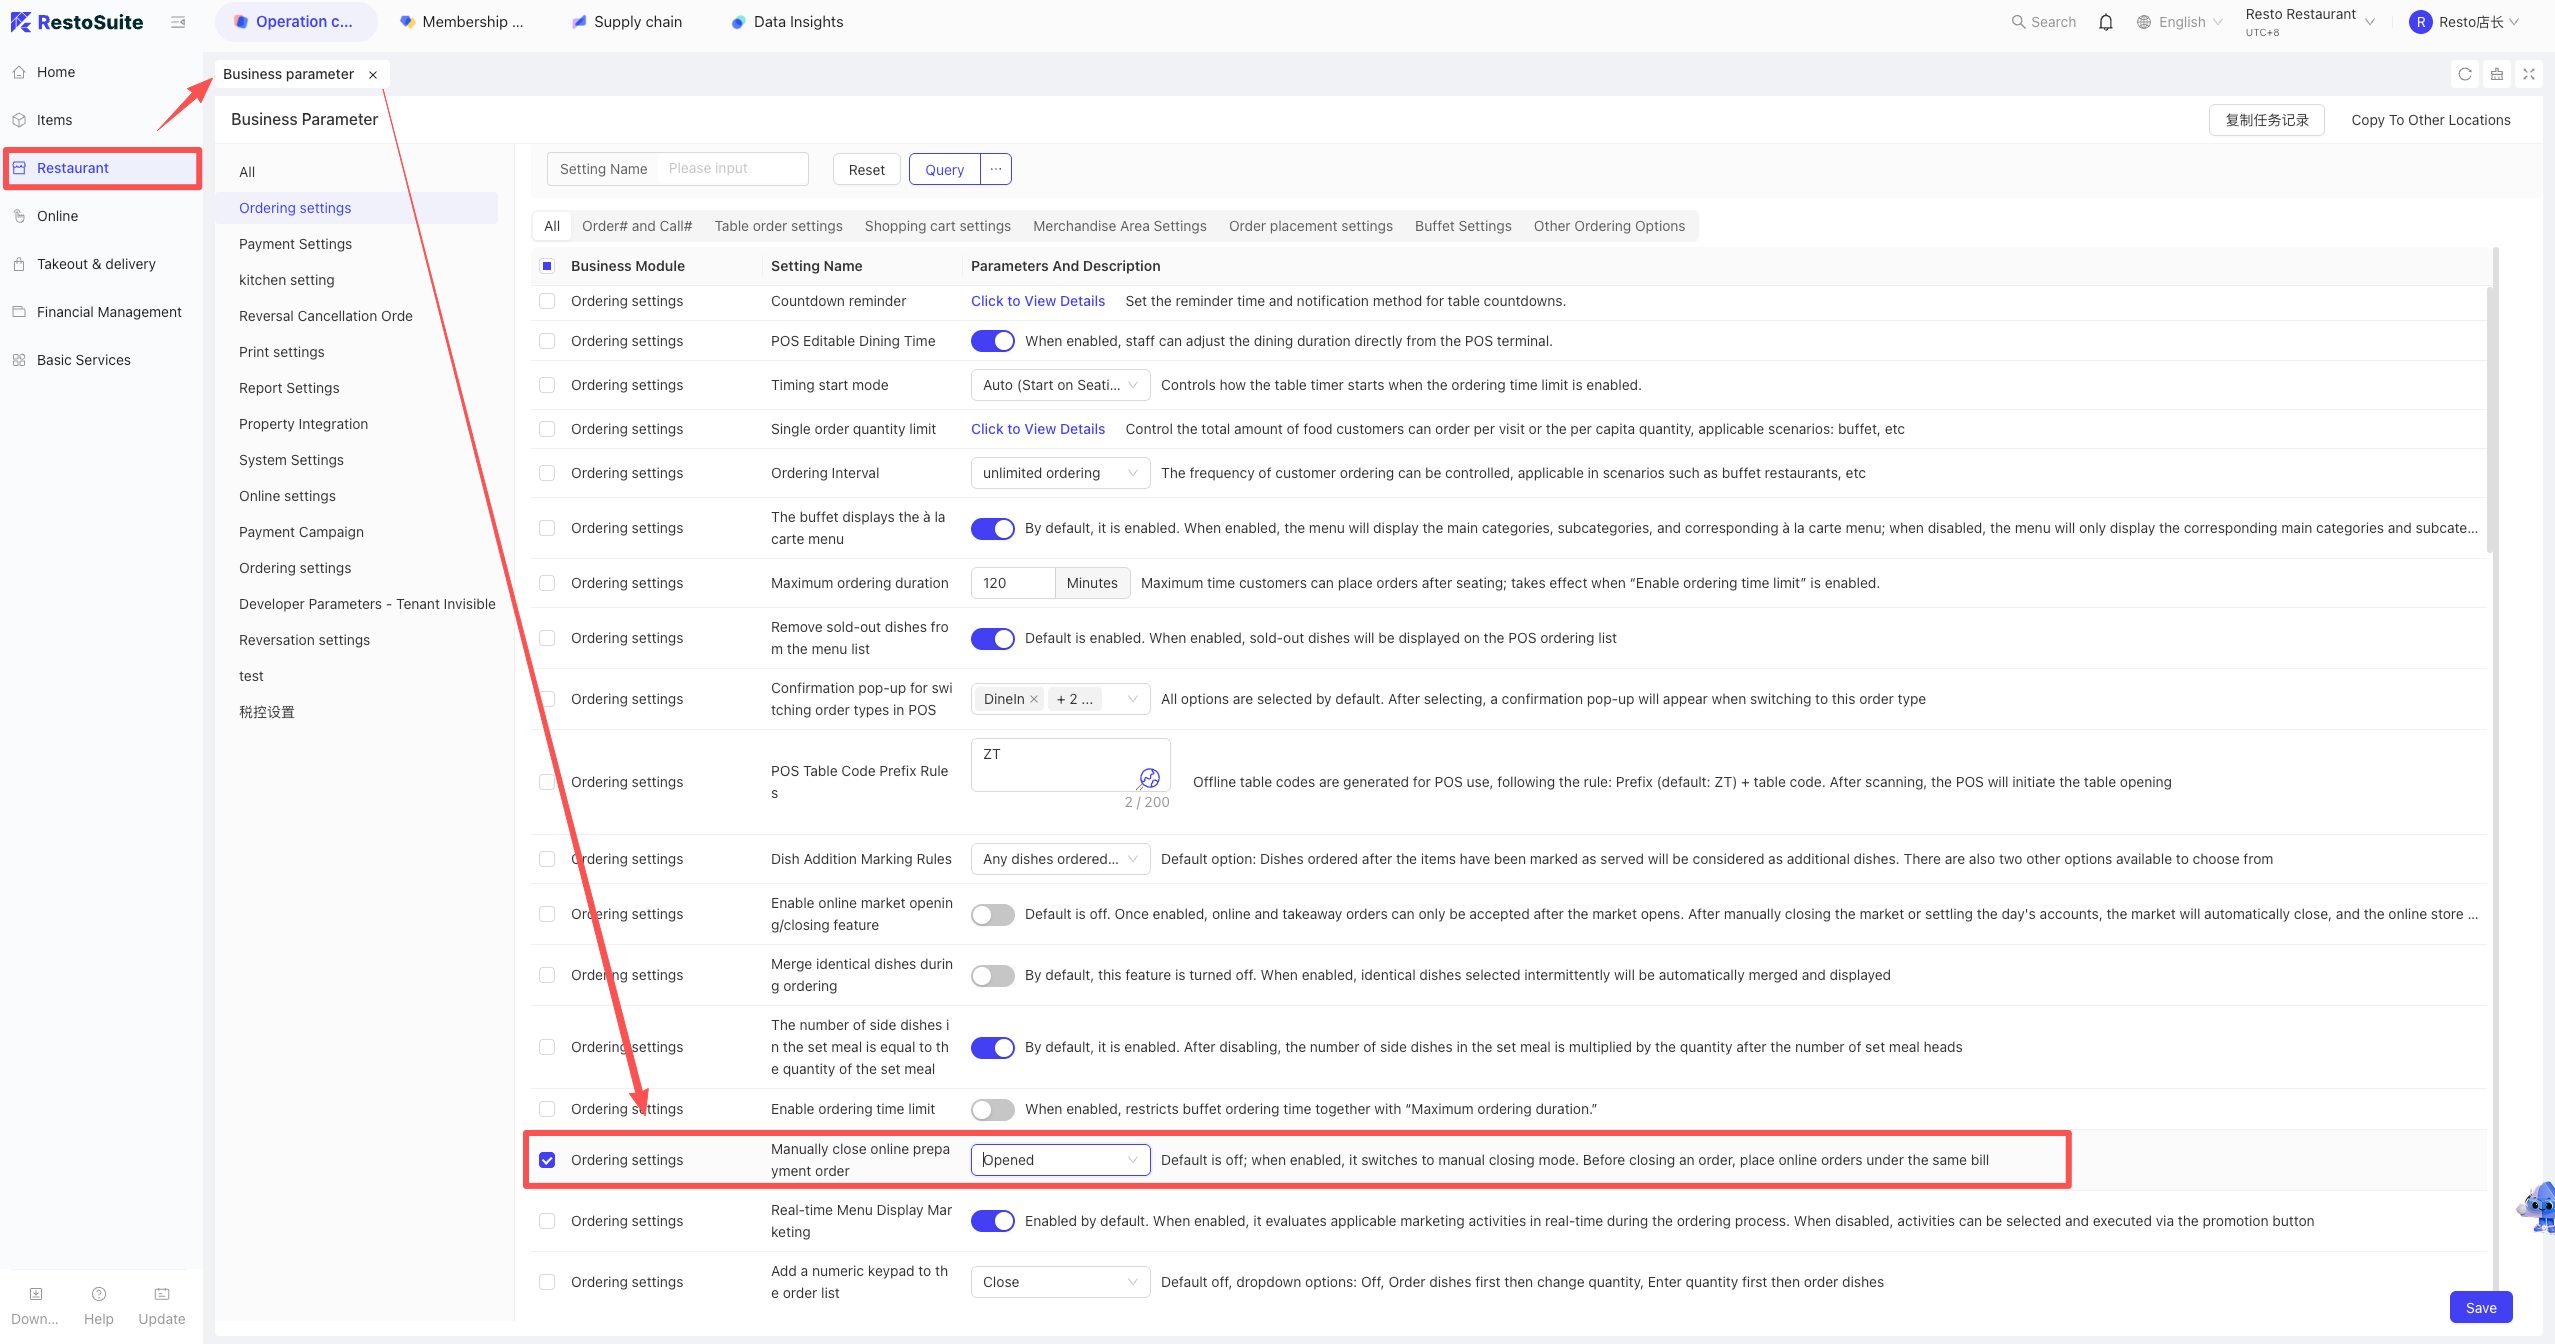
Prerequisite: Quick Service Mode.
-
Hold Order:
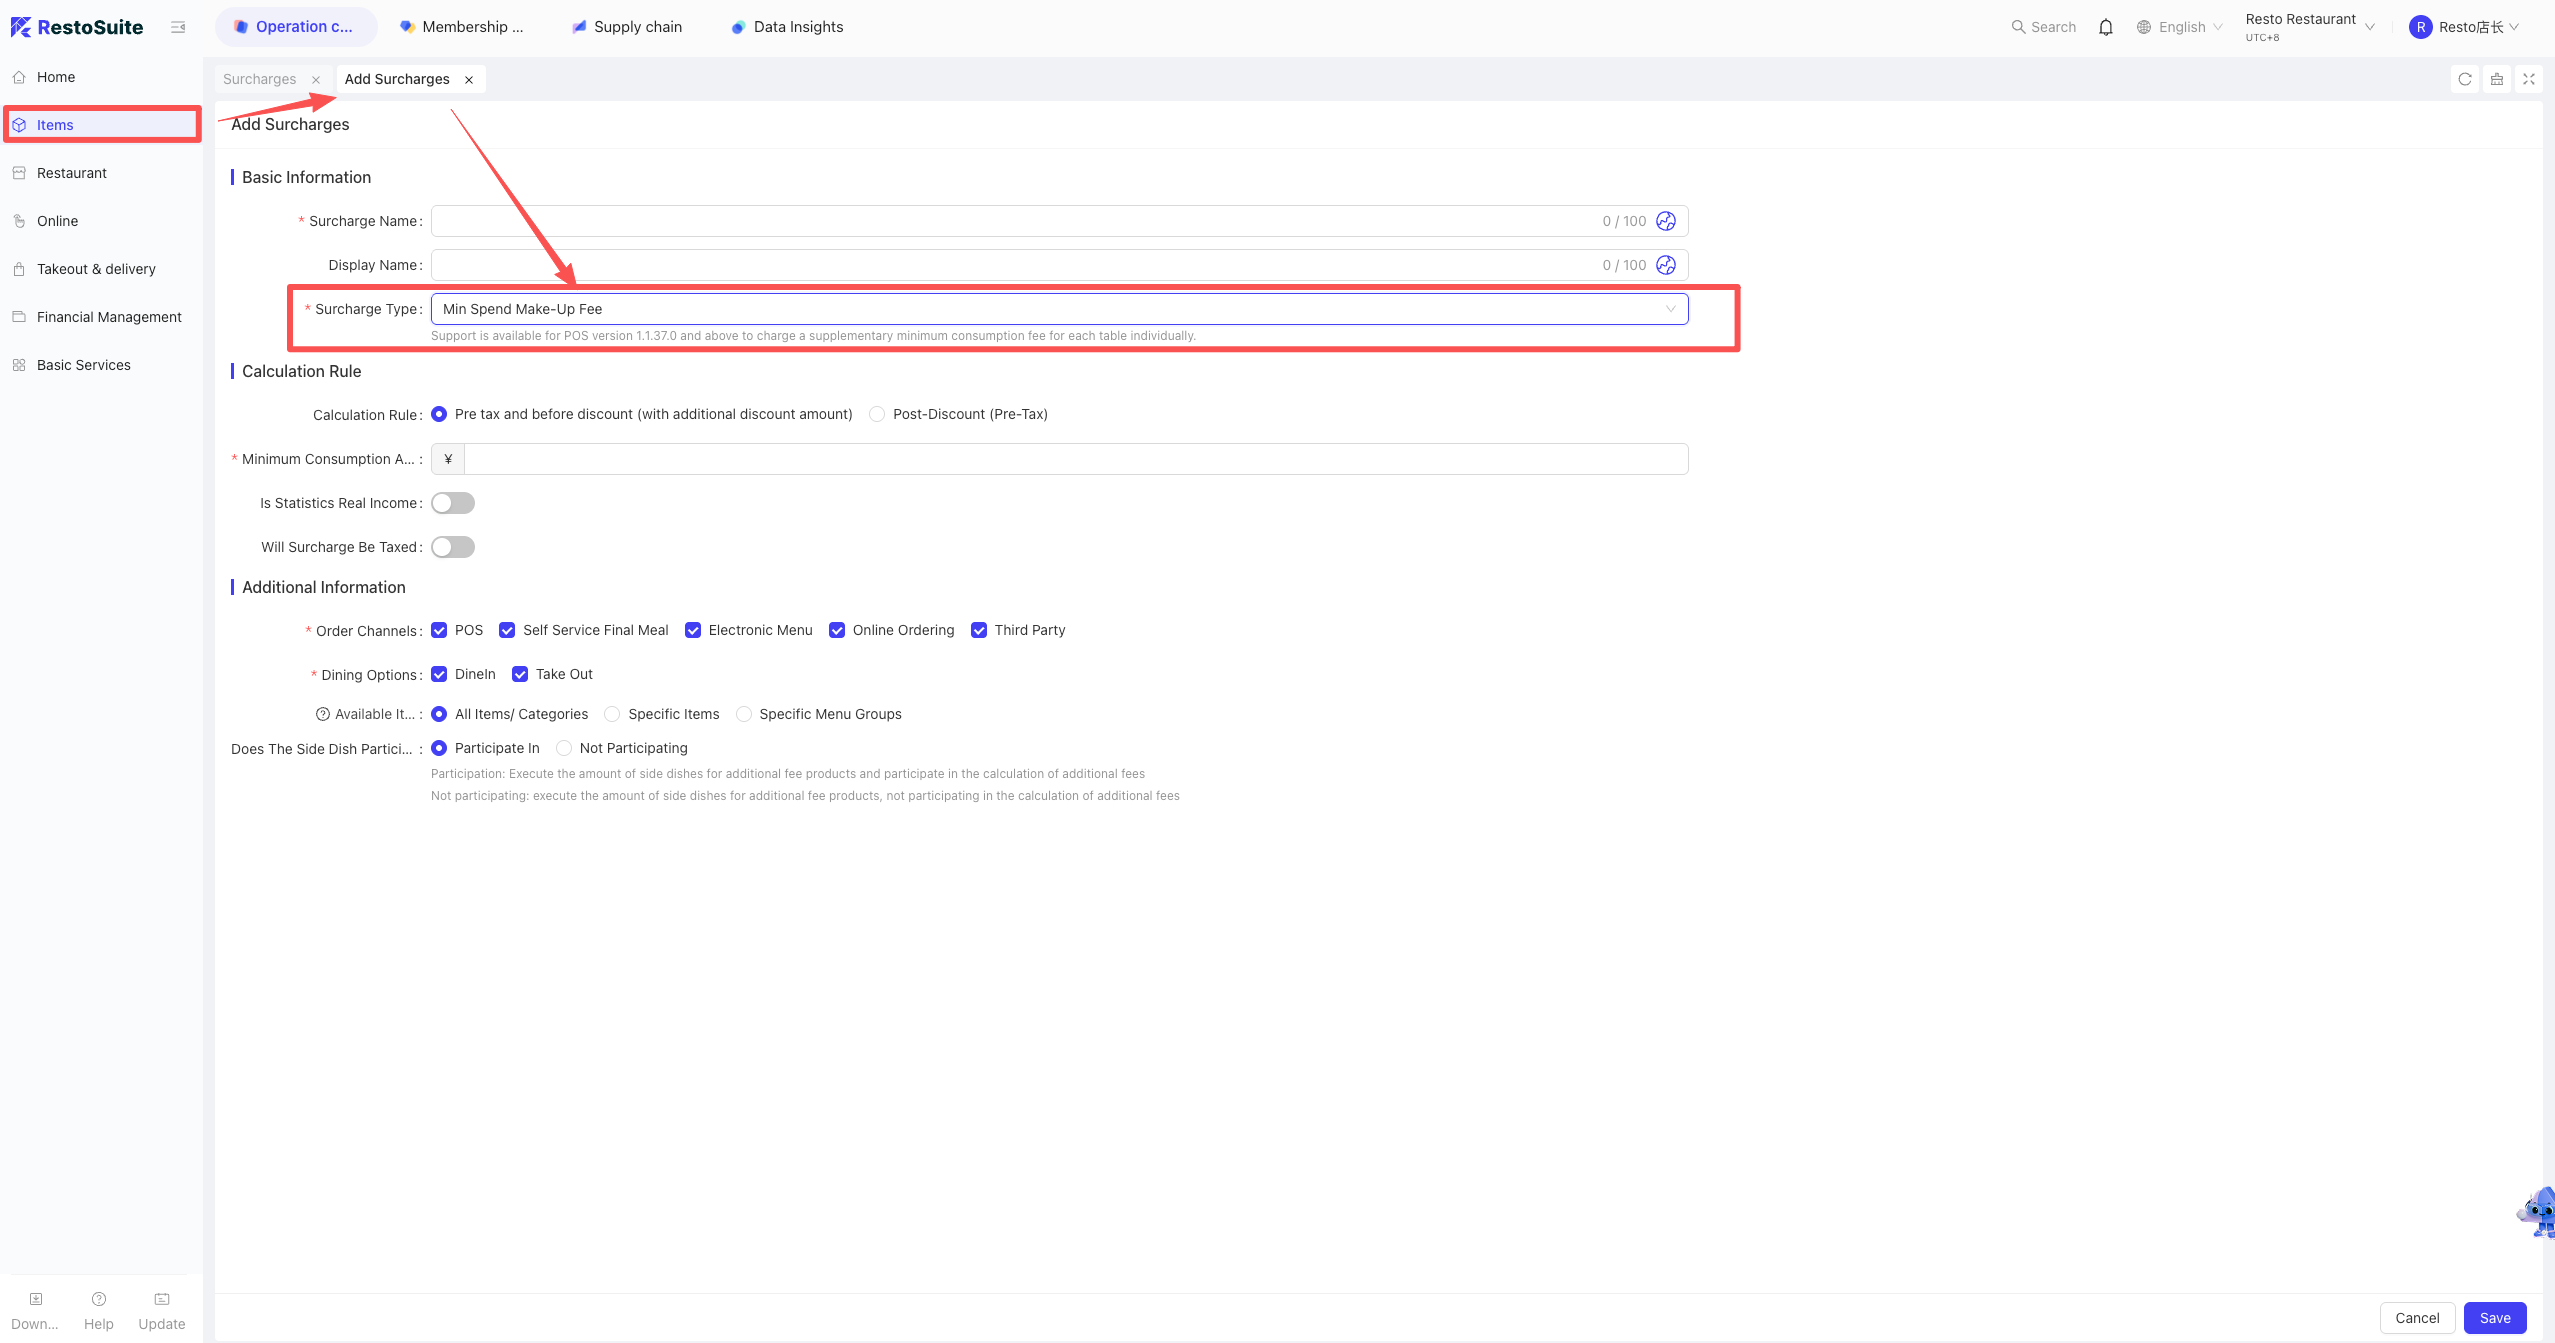
- POS Ordering Interface: More > Custom Buttons > Click “Order” button to Hold/Hang.
-
Recall Order:
- Click the Recall button on the ordering interface and select the order number.
11 How to quickly switch between Table Service and Quick Service modes on the POS?
-
Windows Version:
- POS: Settings > General > Enable “Fixed Main Menu”.
- POS: Settings > General > Dining Mode, select “Table & Quick Service Mode” and enable “Show Quick Switch Button on Main Menu”.
-
Android Version):
- POS: Settings > General > Enable “Fixed Navigation Bar”.
- POS: Settings > General > Enable “Show Quick Switch Button on Main Menu”.
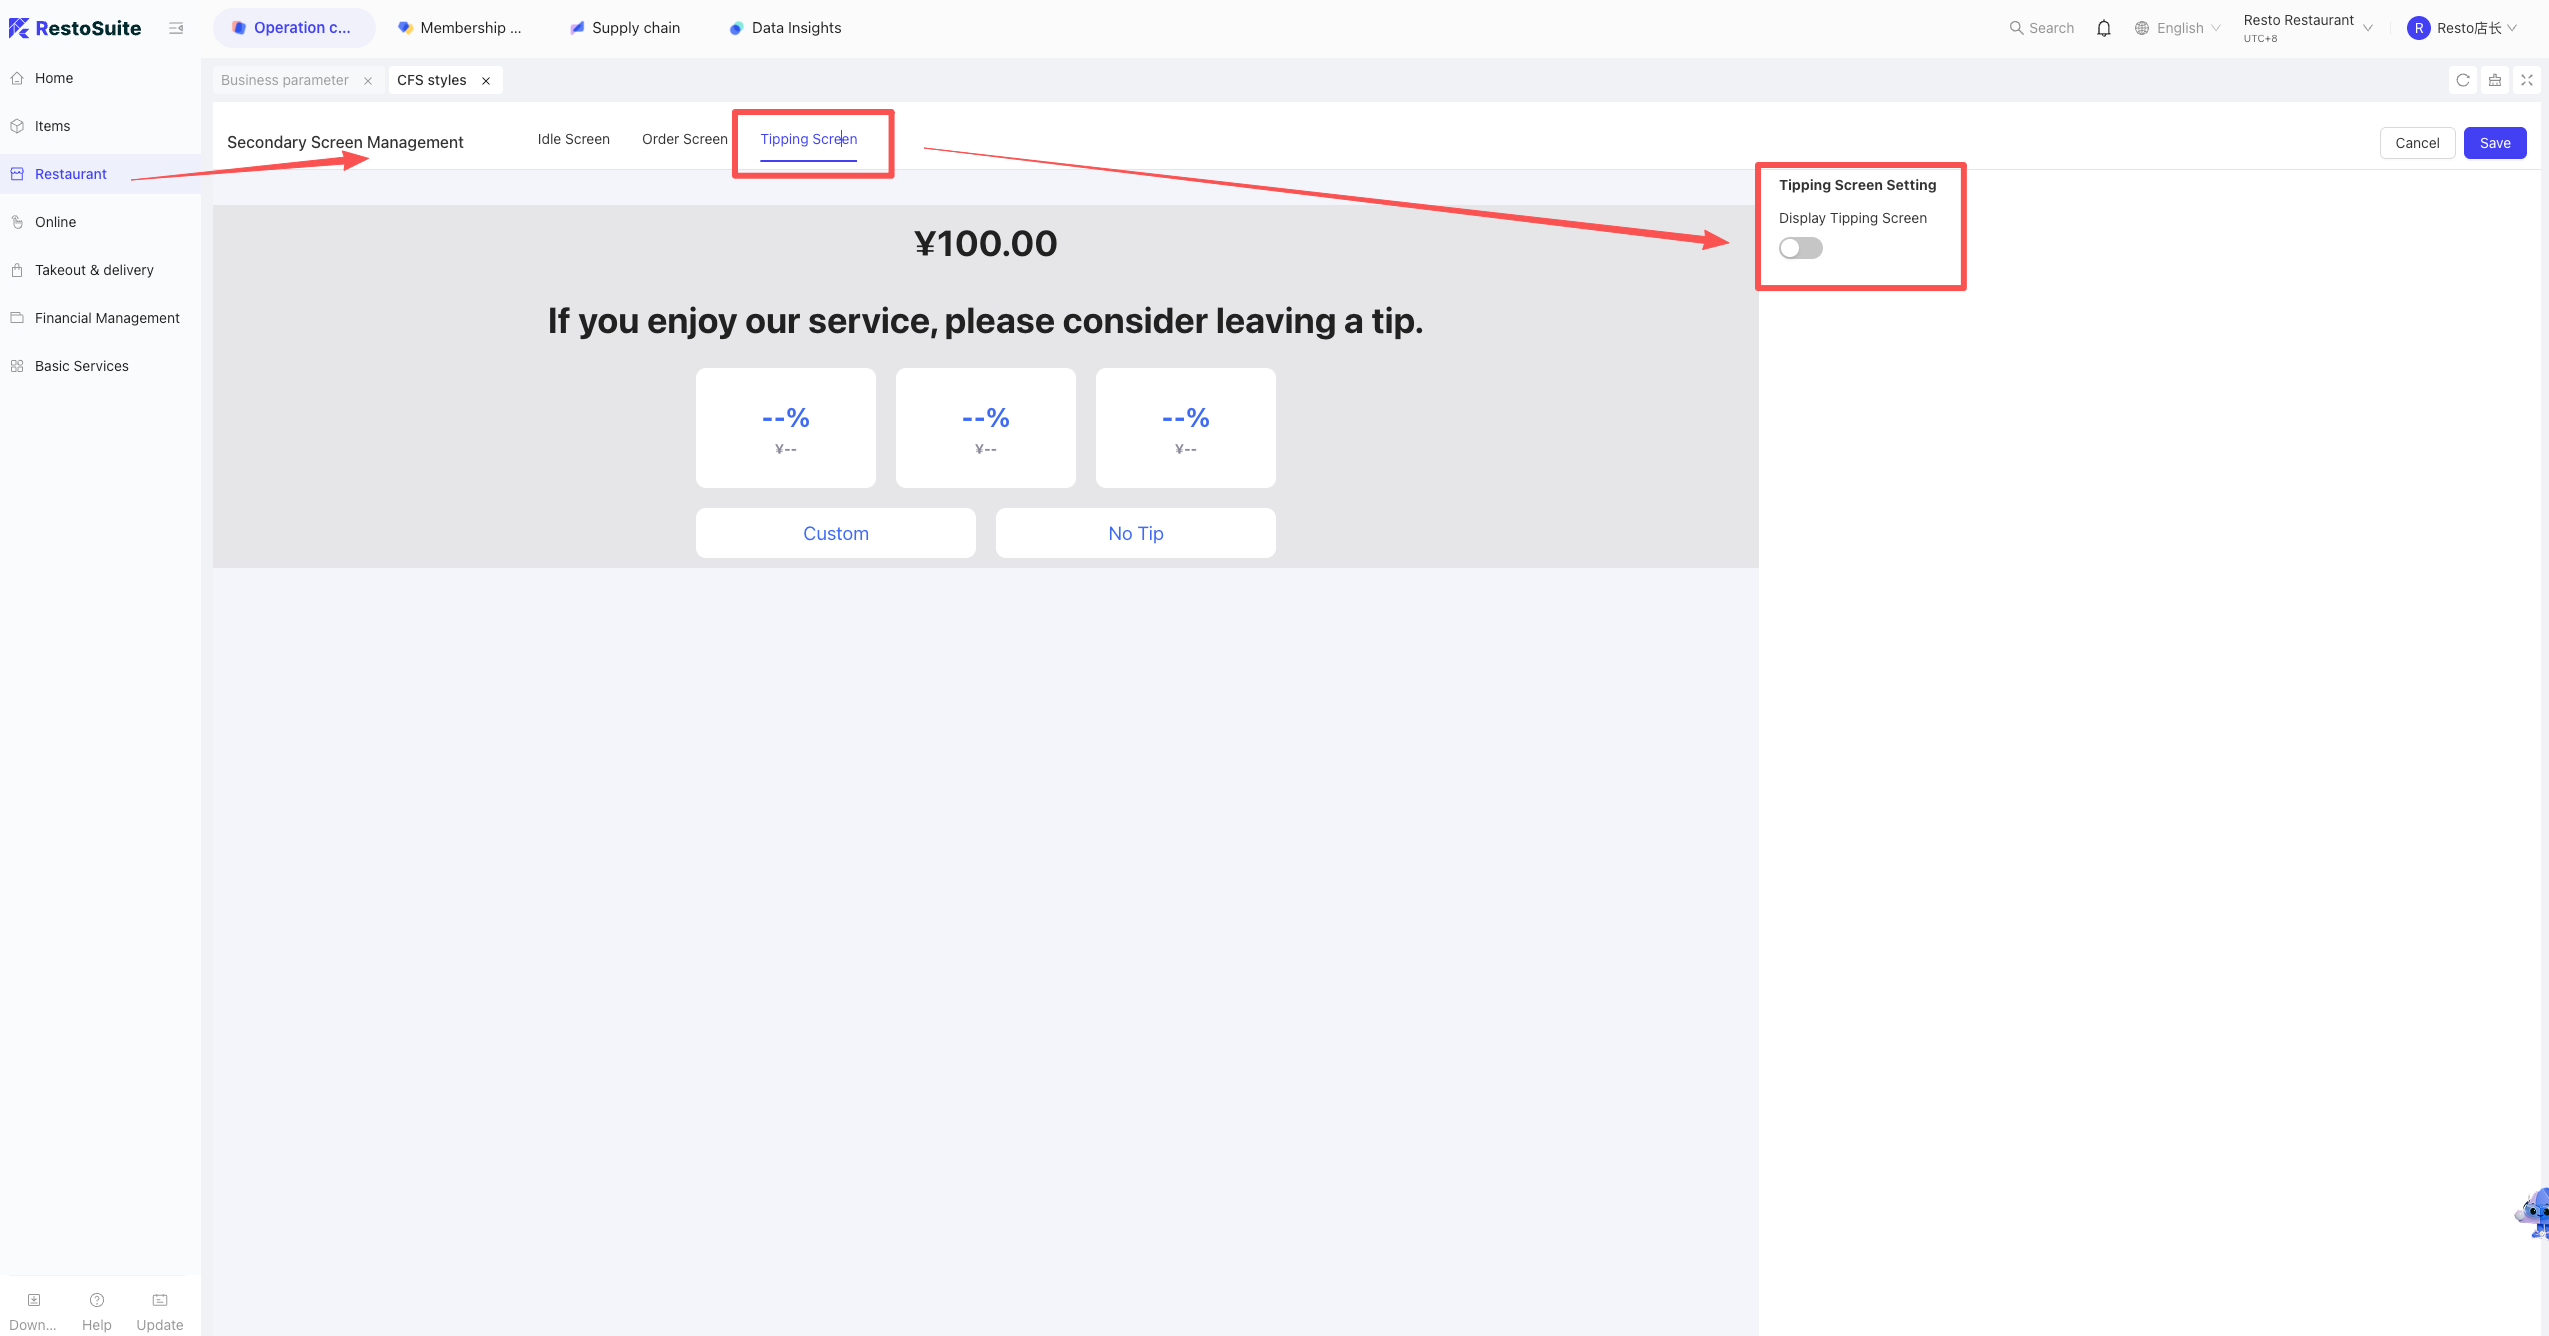
12 How to perform a Move Table on the POS?
Scenario: The customer moves from Table B to Table A once it becomes vacant.
Prerequisite: Table Service Mode.
Steps: Table Interface > Click “Move Table” button in the top right corner.
13 How to perform a Table Link on the POS?
Scenario: Used for banquets to merge bills and simplify checkout.
Prerequisite: Table Service Mode.
Steps: Table Interface > More > Link Tables. Select the tables to be linked for combined billing.
14 How to set different prices for the same dish in different service areas?
A: This function can only be achieved through multiple menu groups.
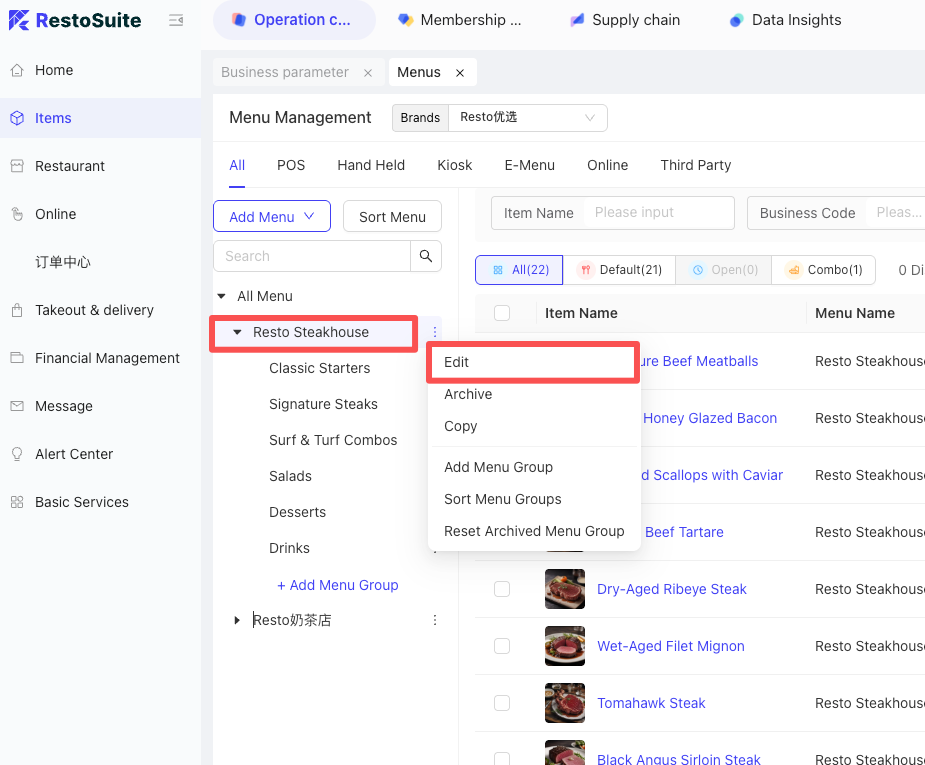
- Set Prices in BO: Operation Center > Item Management > Edit Item, set different values under “Other Prices”.
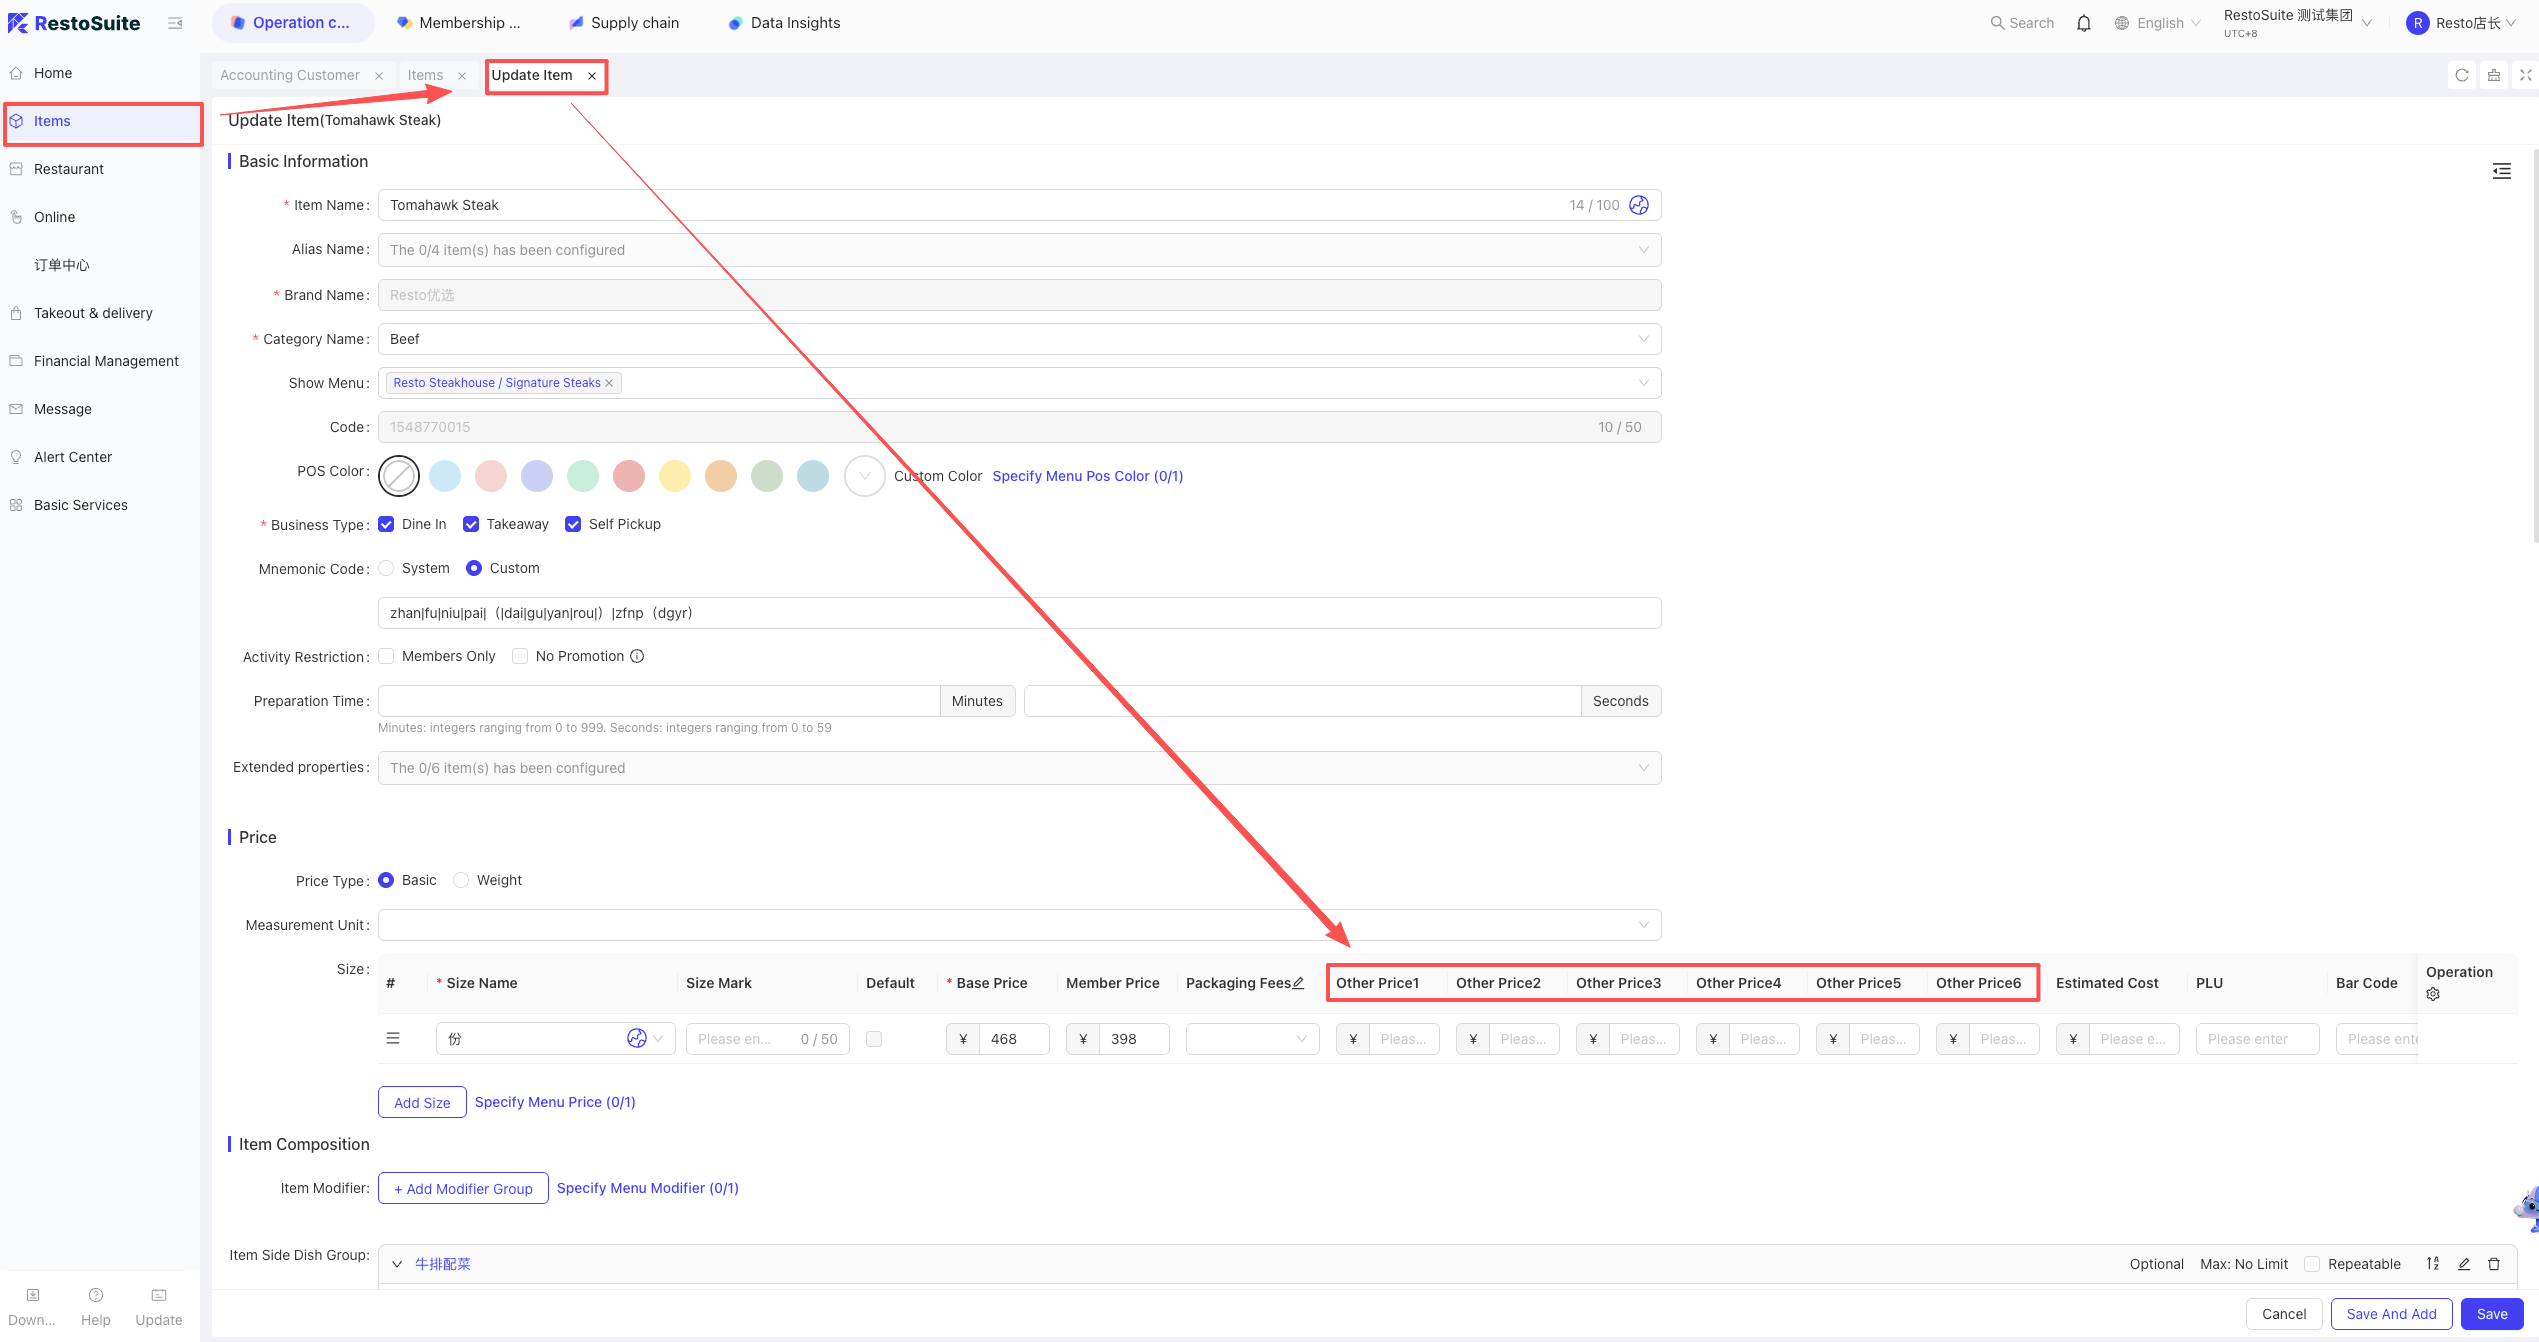
- Create Multiple Menus: Item Management > Menu Management, create menus and set “Default Applied Price” to the corresponding “Other Price”.
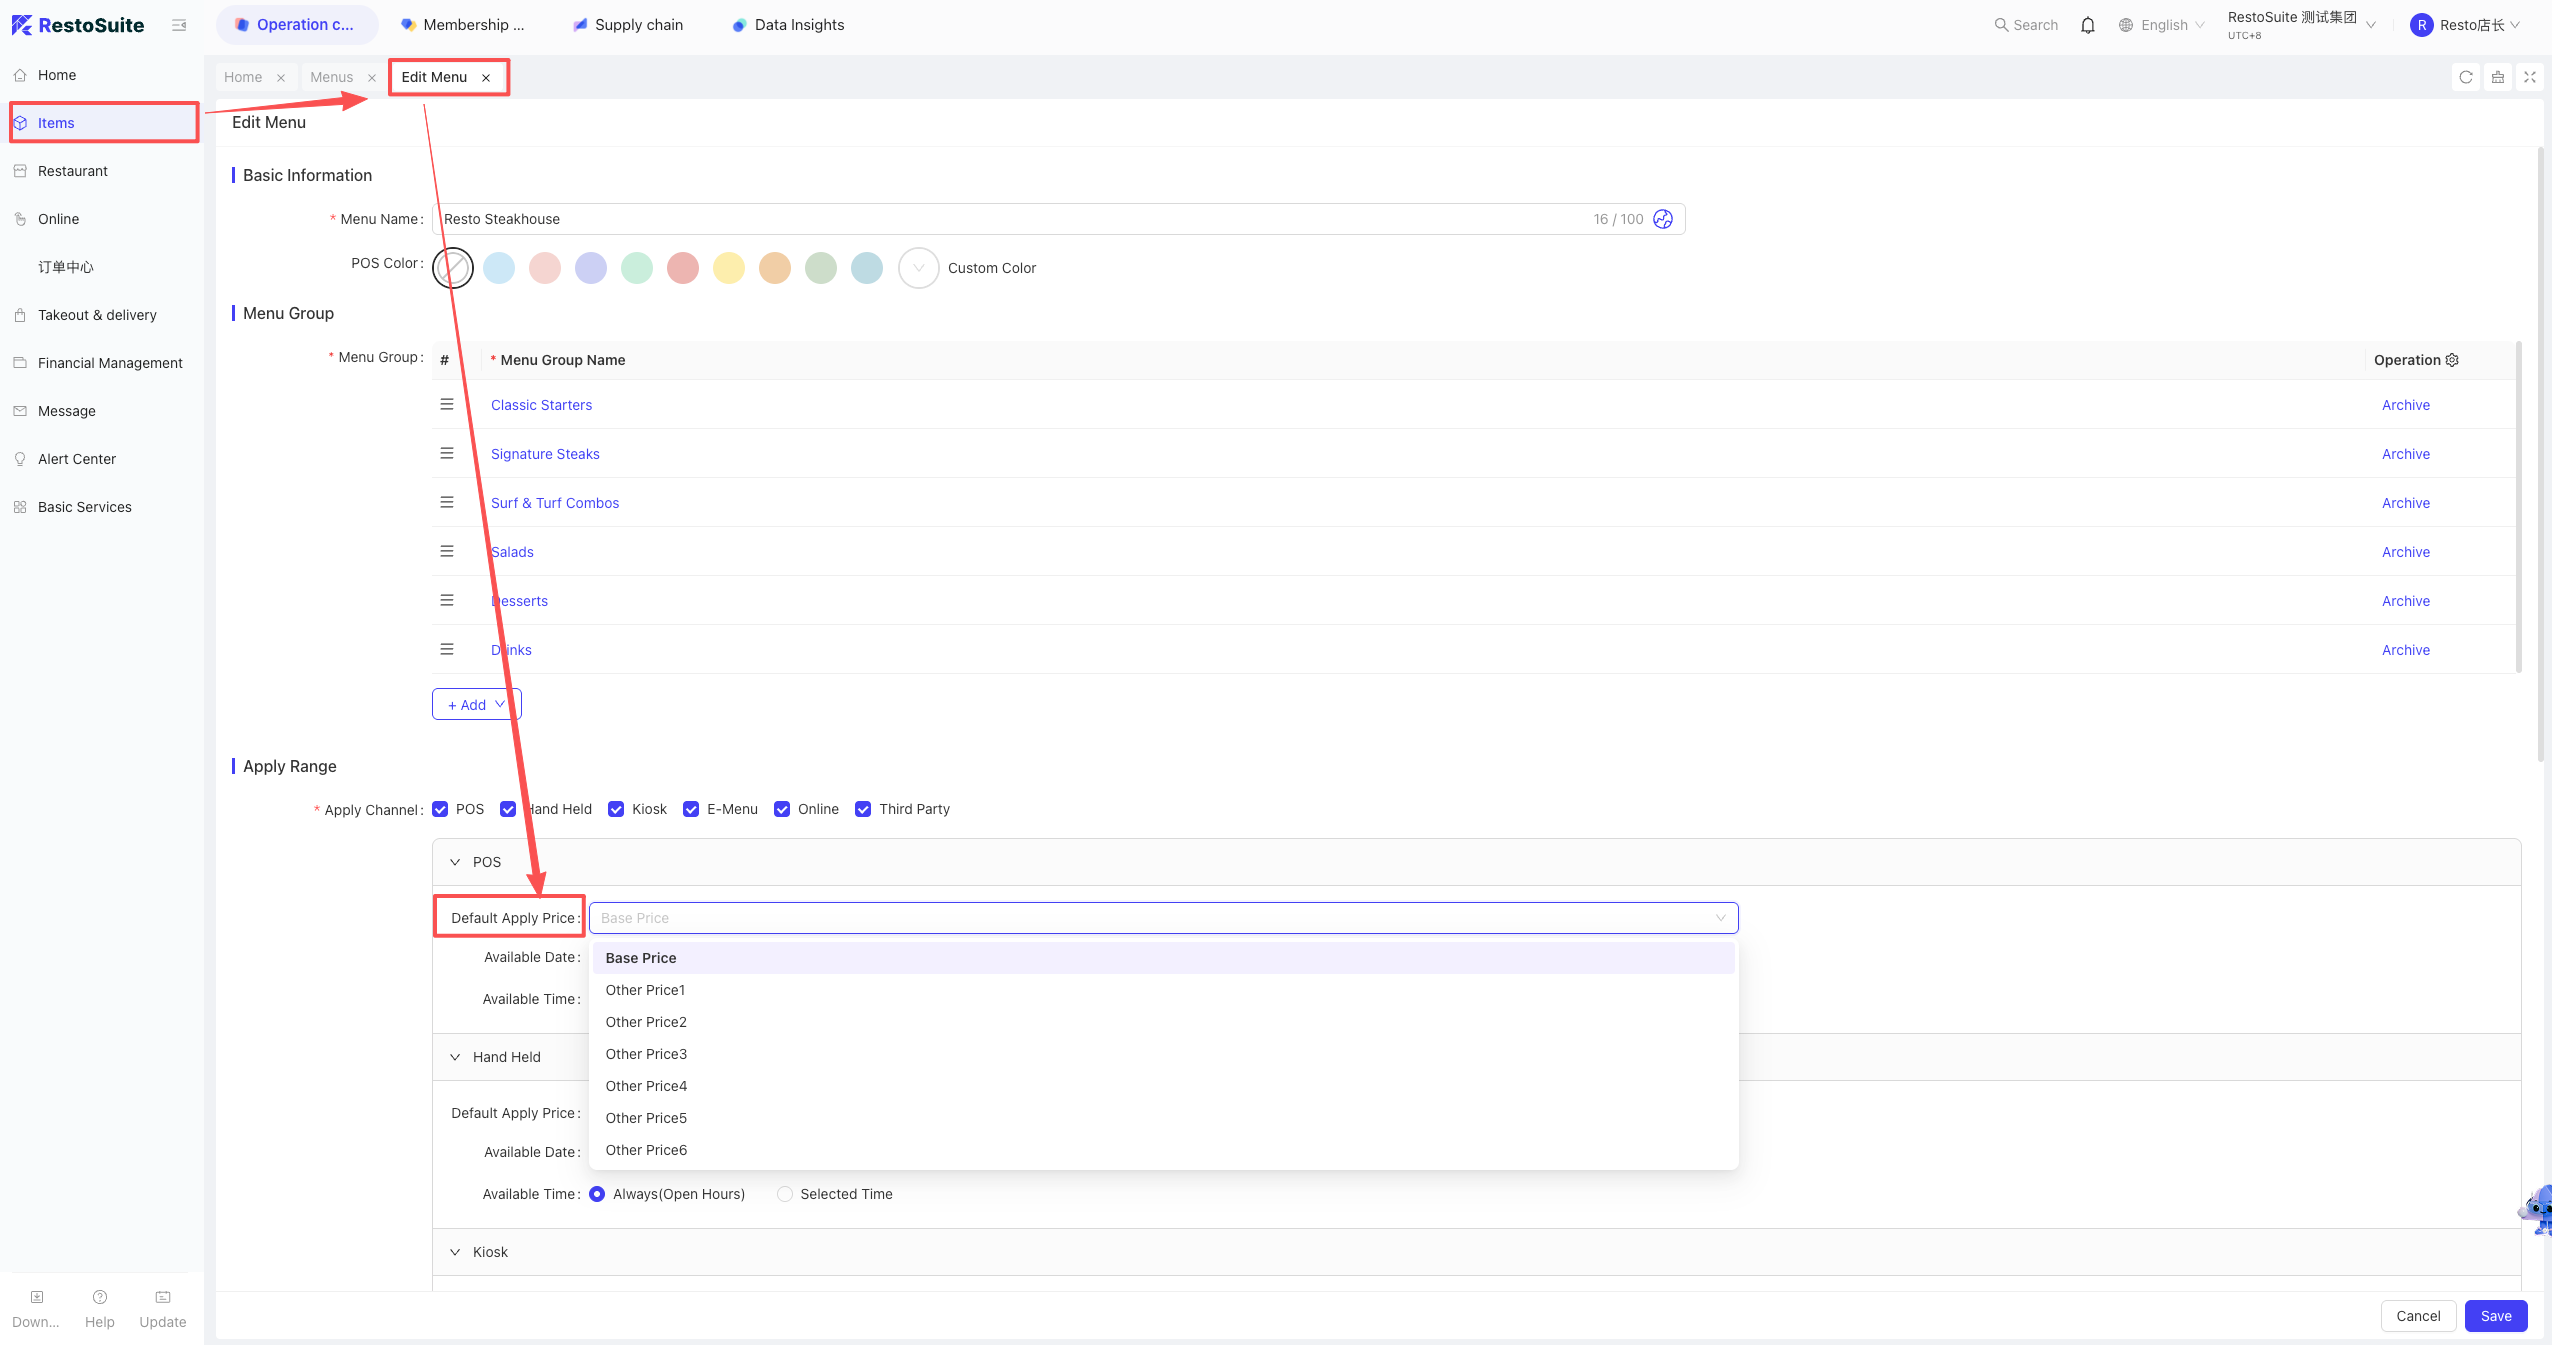
- Link to Area: Restaurant Management > Service Area, edit the area and select the appropriate Menu Group.
15 How to manually sync orders from the POS to the BO?
STEP 1: Settings > About > Debug Tools.
STEP 2: Click “Sync Order by ID” or “Sync Order by Business Day”, enter the info, and sync.
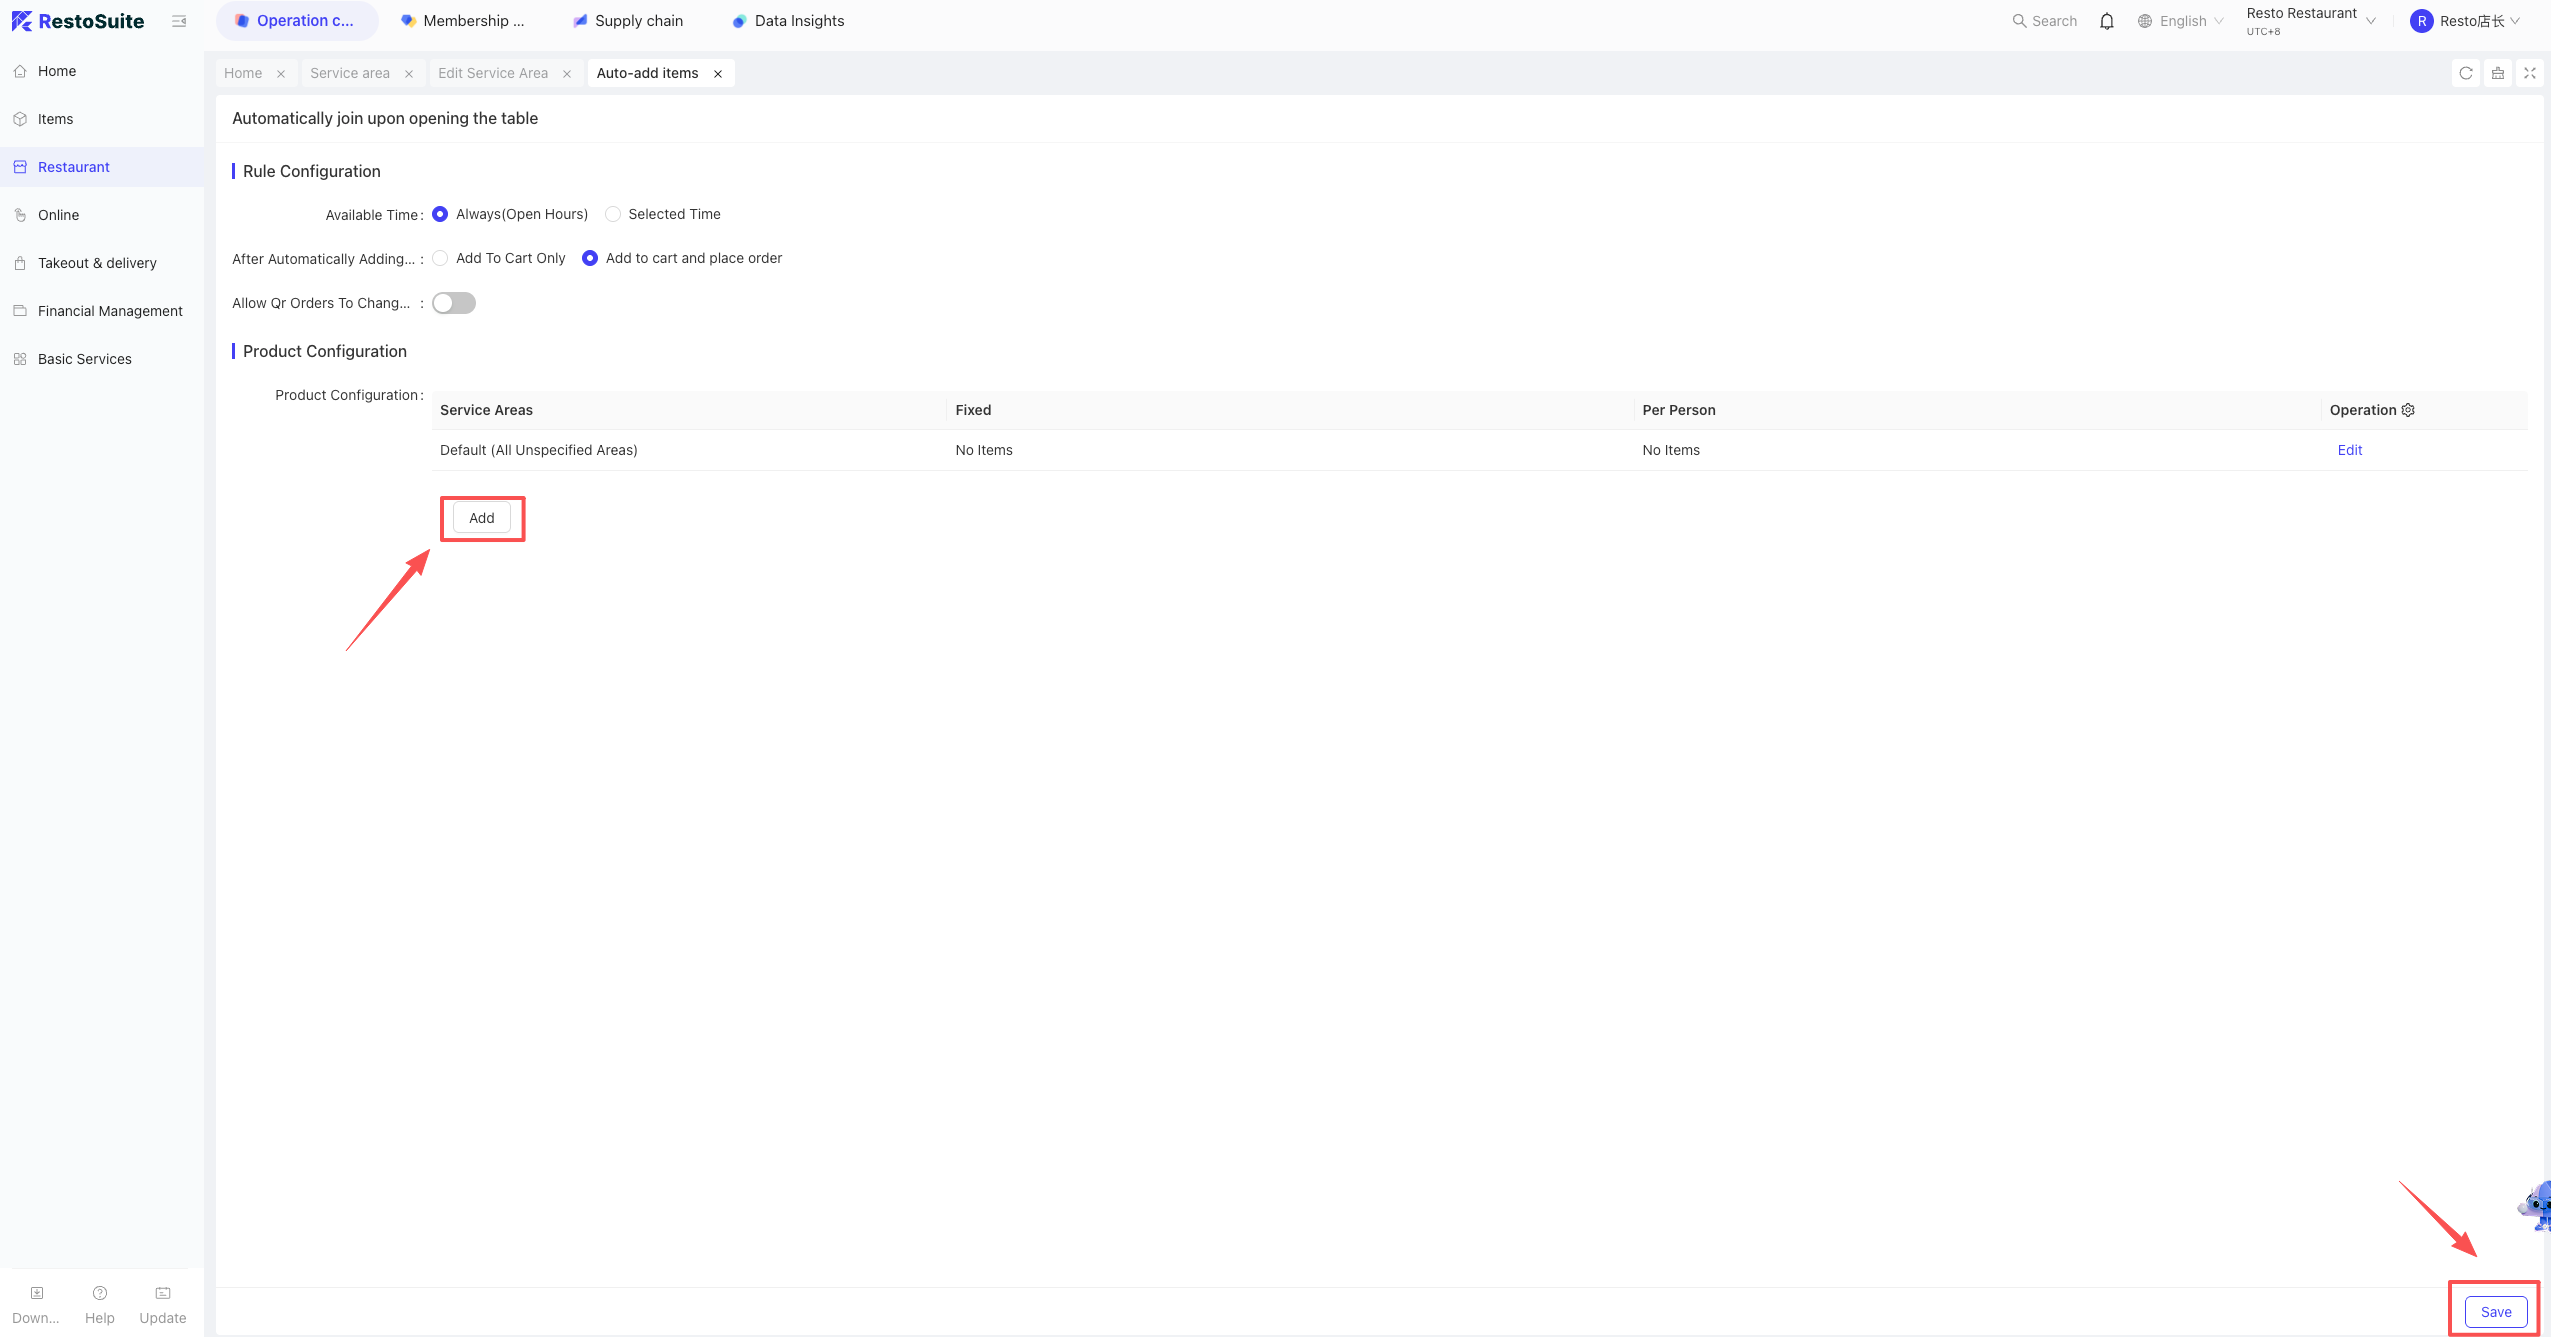
16 How to automatically add items (e.g., tea fee, napkins) when opening a table?
Setup Steps:
- BO Store View: Operation Center > Restaurant Management > Auto-Add on Table Open.
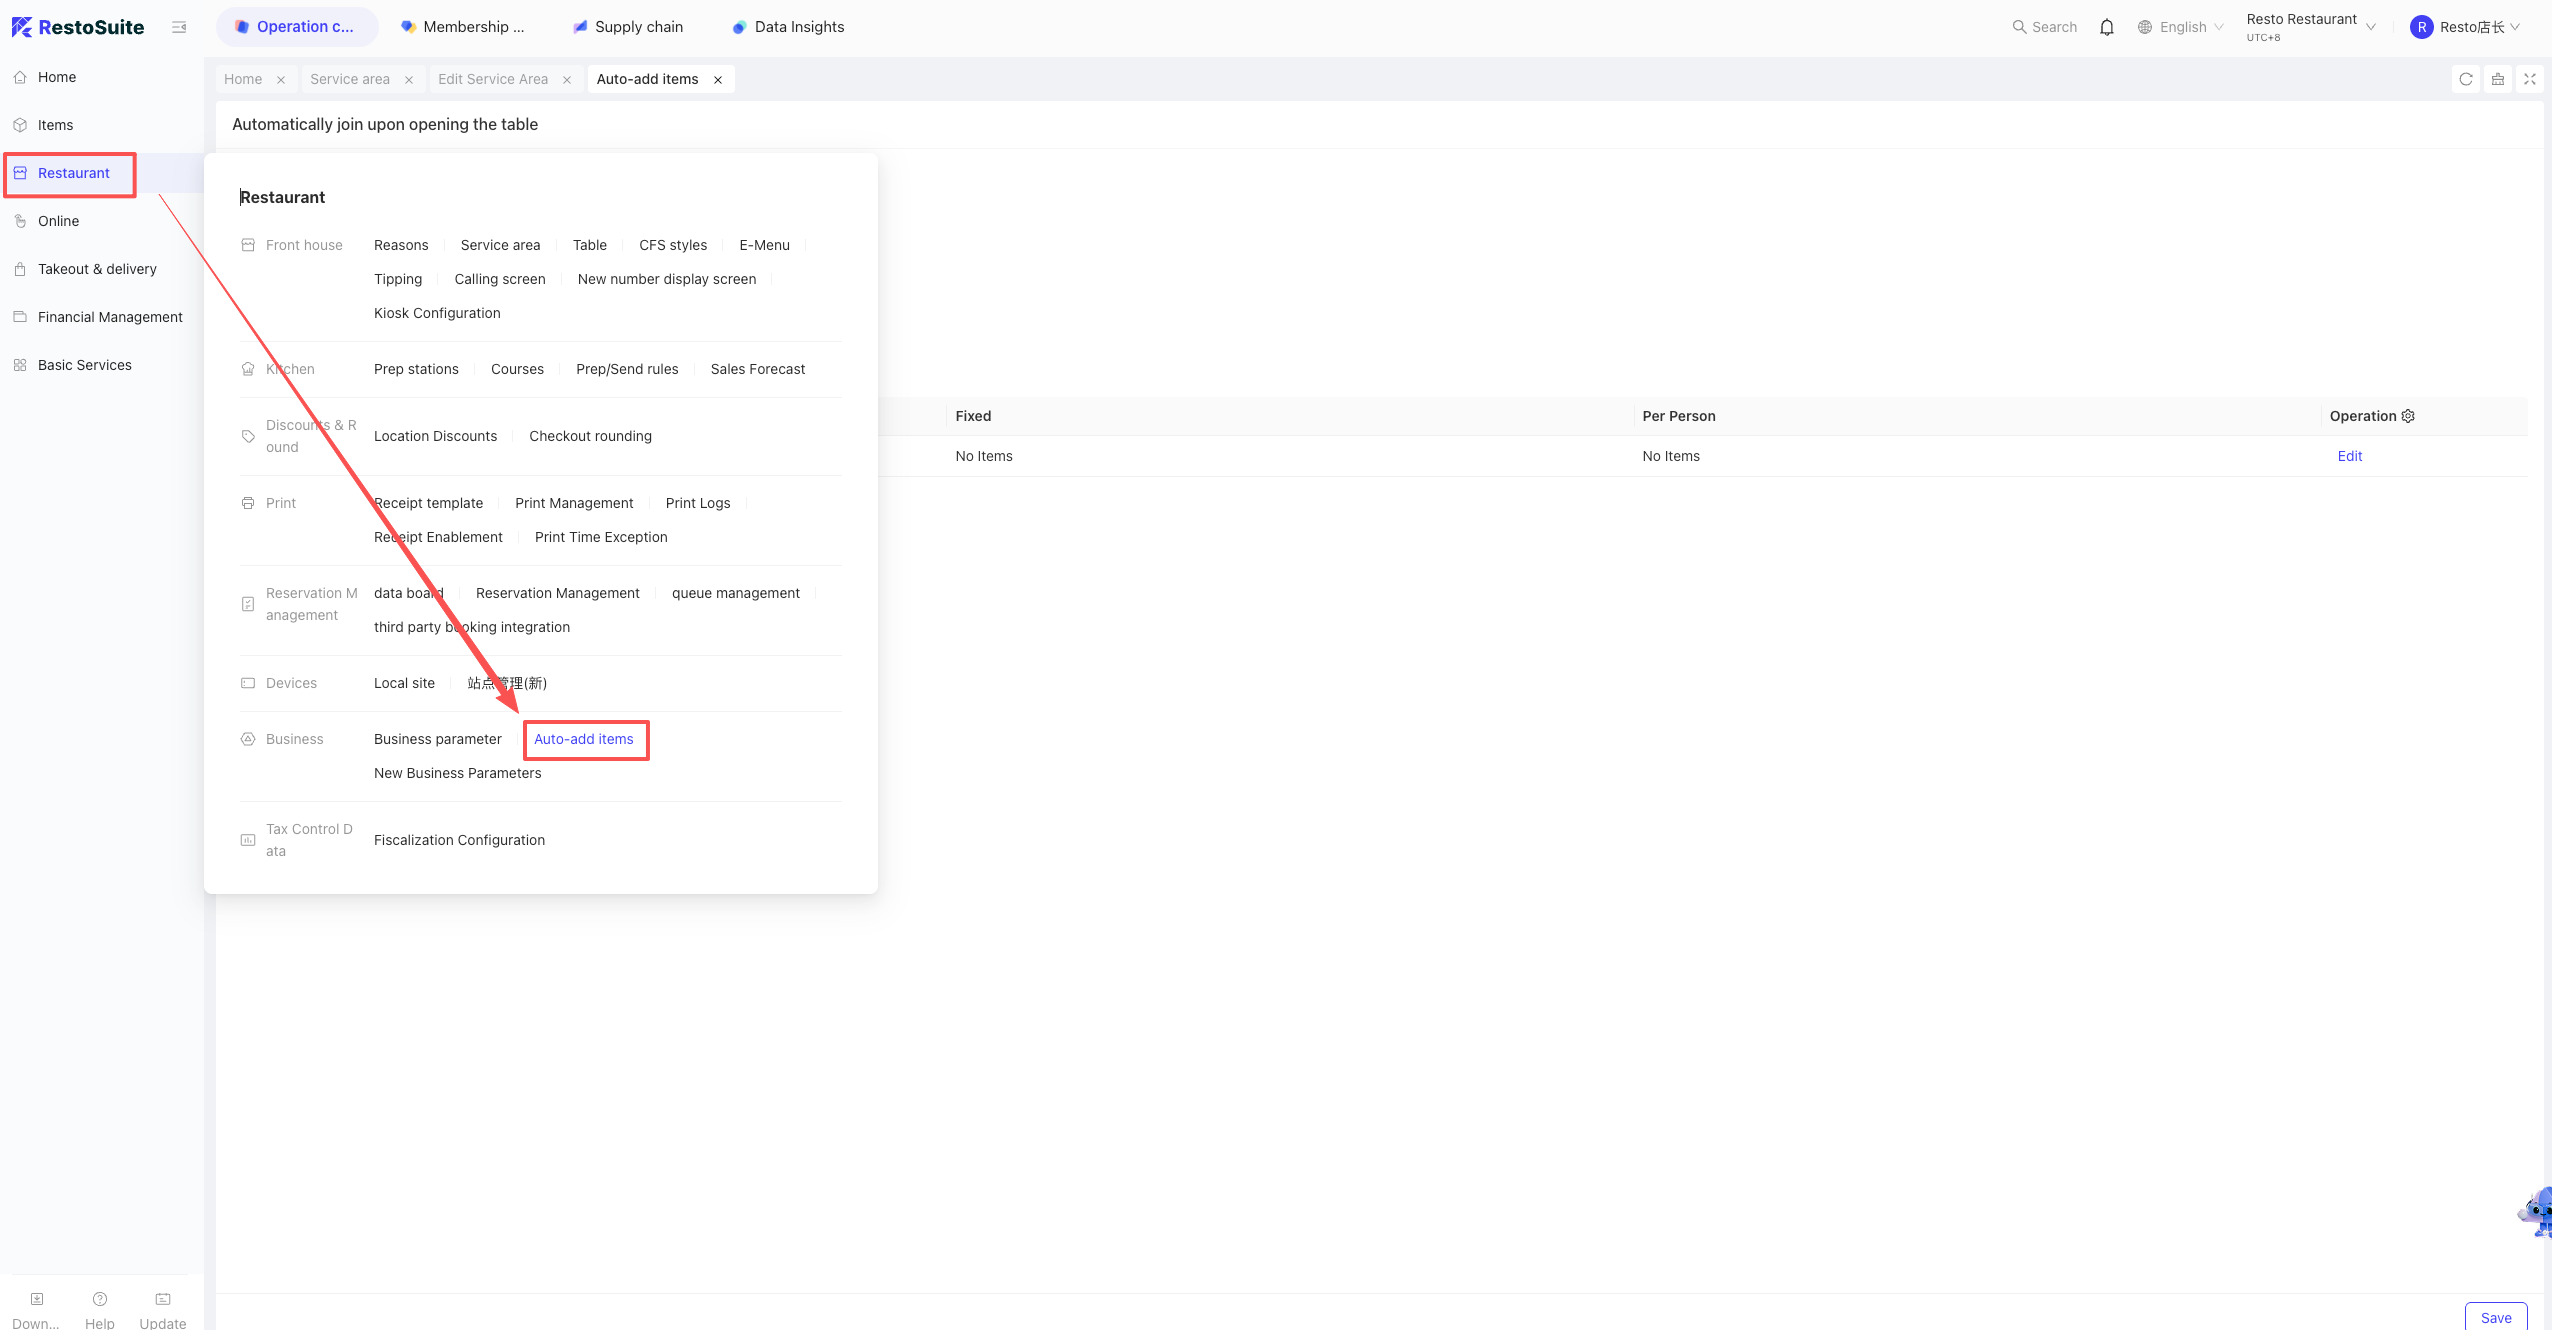
-
Configuration:
- Effective Time: All day/Specific time.
- Method: Add to cart only / Add and place order.
- Switch: Allow customers to modify quantity during mobile ordering.
-
Click “Add” to select items and save.
17 How to clear report data on the POS?
Business Scenario
During the initial setup or training phase, stores often generate test transaction data. Merchants may wish to clear this data before the official opening to ensure accurate reporting.
Note:
This operation only clears local data on the POS; it will not delete any data already synchronized to the BO (Back Office) system.
Operating Steps
Log in to the POS system and navigate to: Settings > About > Debug Tools > Clear Training Data.
- Verification Password: “Current Date + Resto” (e.g., 20260422Resto).
18 Why does DOUYIN coupon refund fail with error “douyin-3000015 | Reversal not supported”?
A: DOUYIN coupons cannot be refunded/reversed if more than 1 hour has passed since validation (DOUYIN platform policy).
19 What is the search range for member consumption records on POS?
- Path: POS > Member > Enter Card No. > Member Info > Consumption Records.
- Notes:
- Only supports records of member balance consumption.
- The search range is based on the “Bill Retention Time” set in the BO.
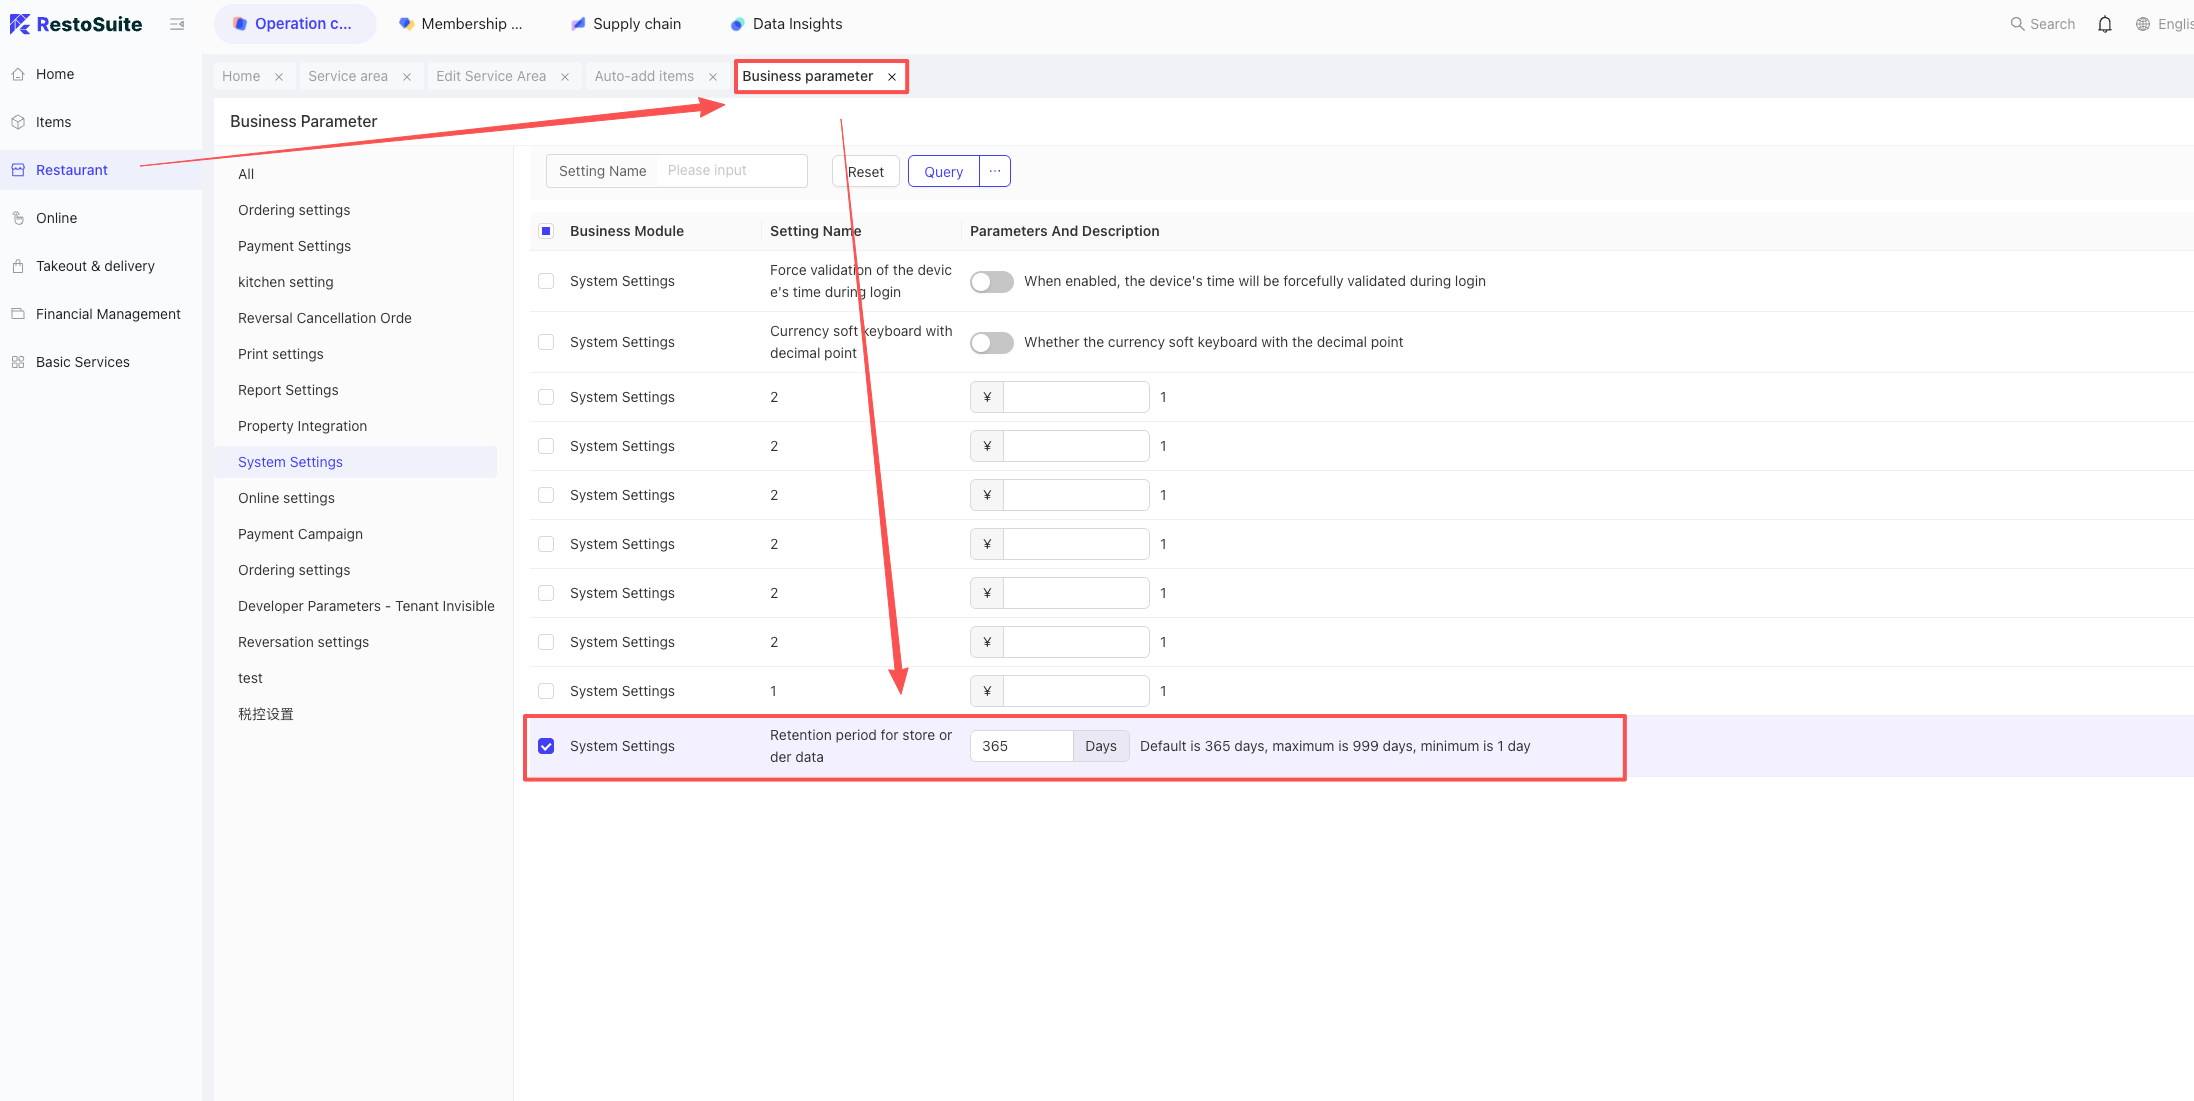
20 How long is the local bill retention period on the POS?
- Note: Min 1 day, Max 999 days, Default 365 days.
- Setup Path: BO > Operation Center > Restaurant Management > Business Parameters > Search “Store Bill Data Retention Days”.
21 How to troubleshoot when the “Invoicable Amount” is not showing in the POS Member module?
- BO Group View: Operation Center > Restaurant Management > Tax Number Settings.
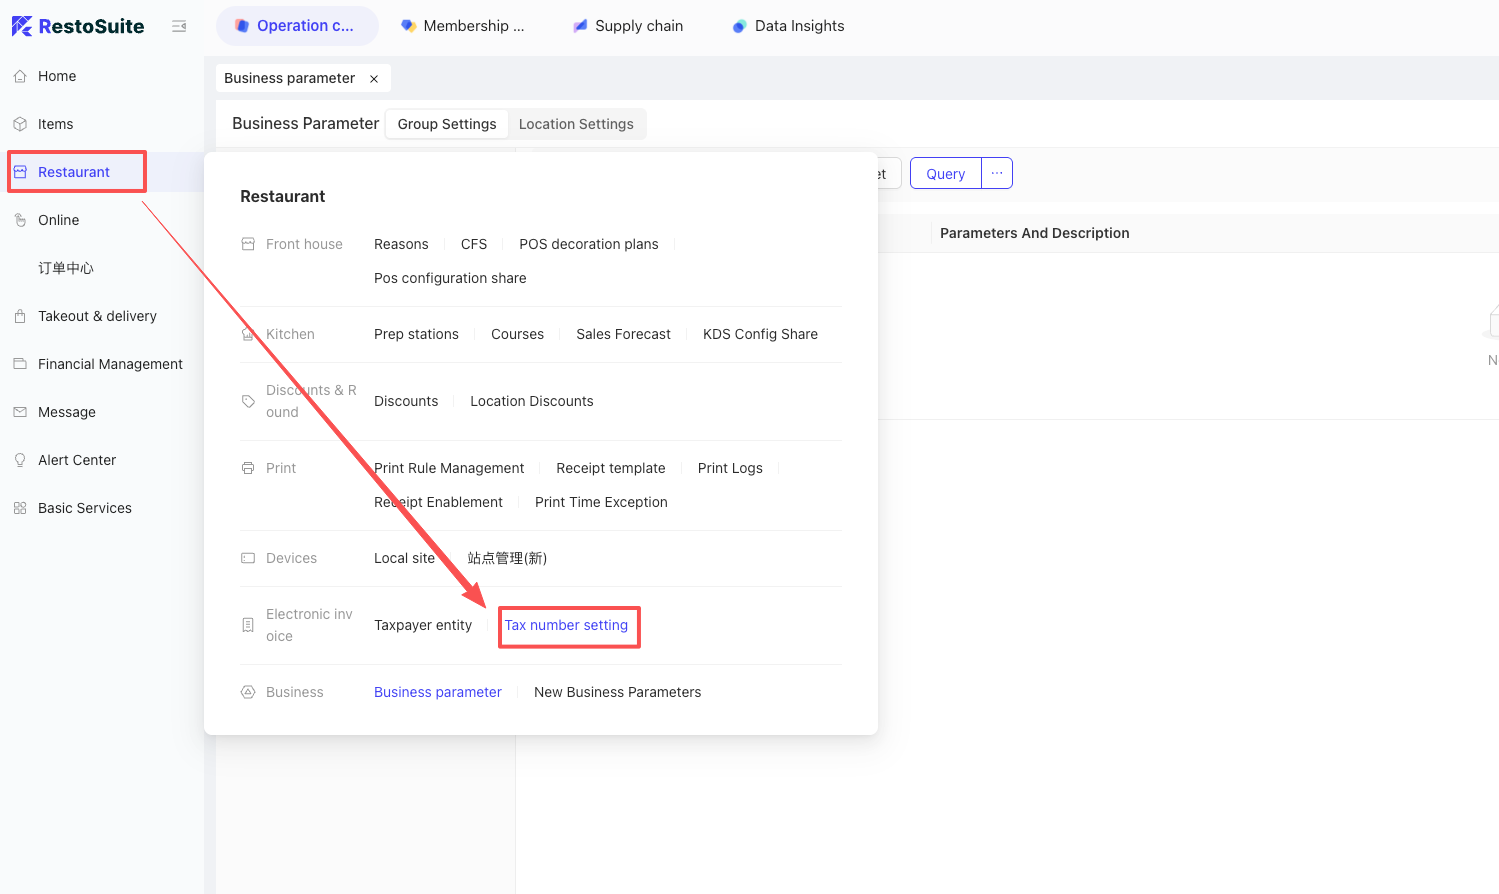
- Go to “Stored Value Invoice Settings” > Add Configuration.
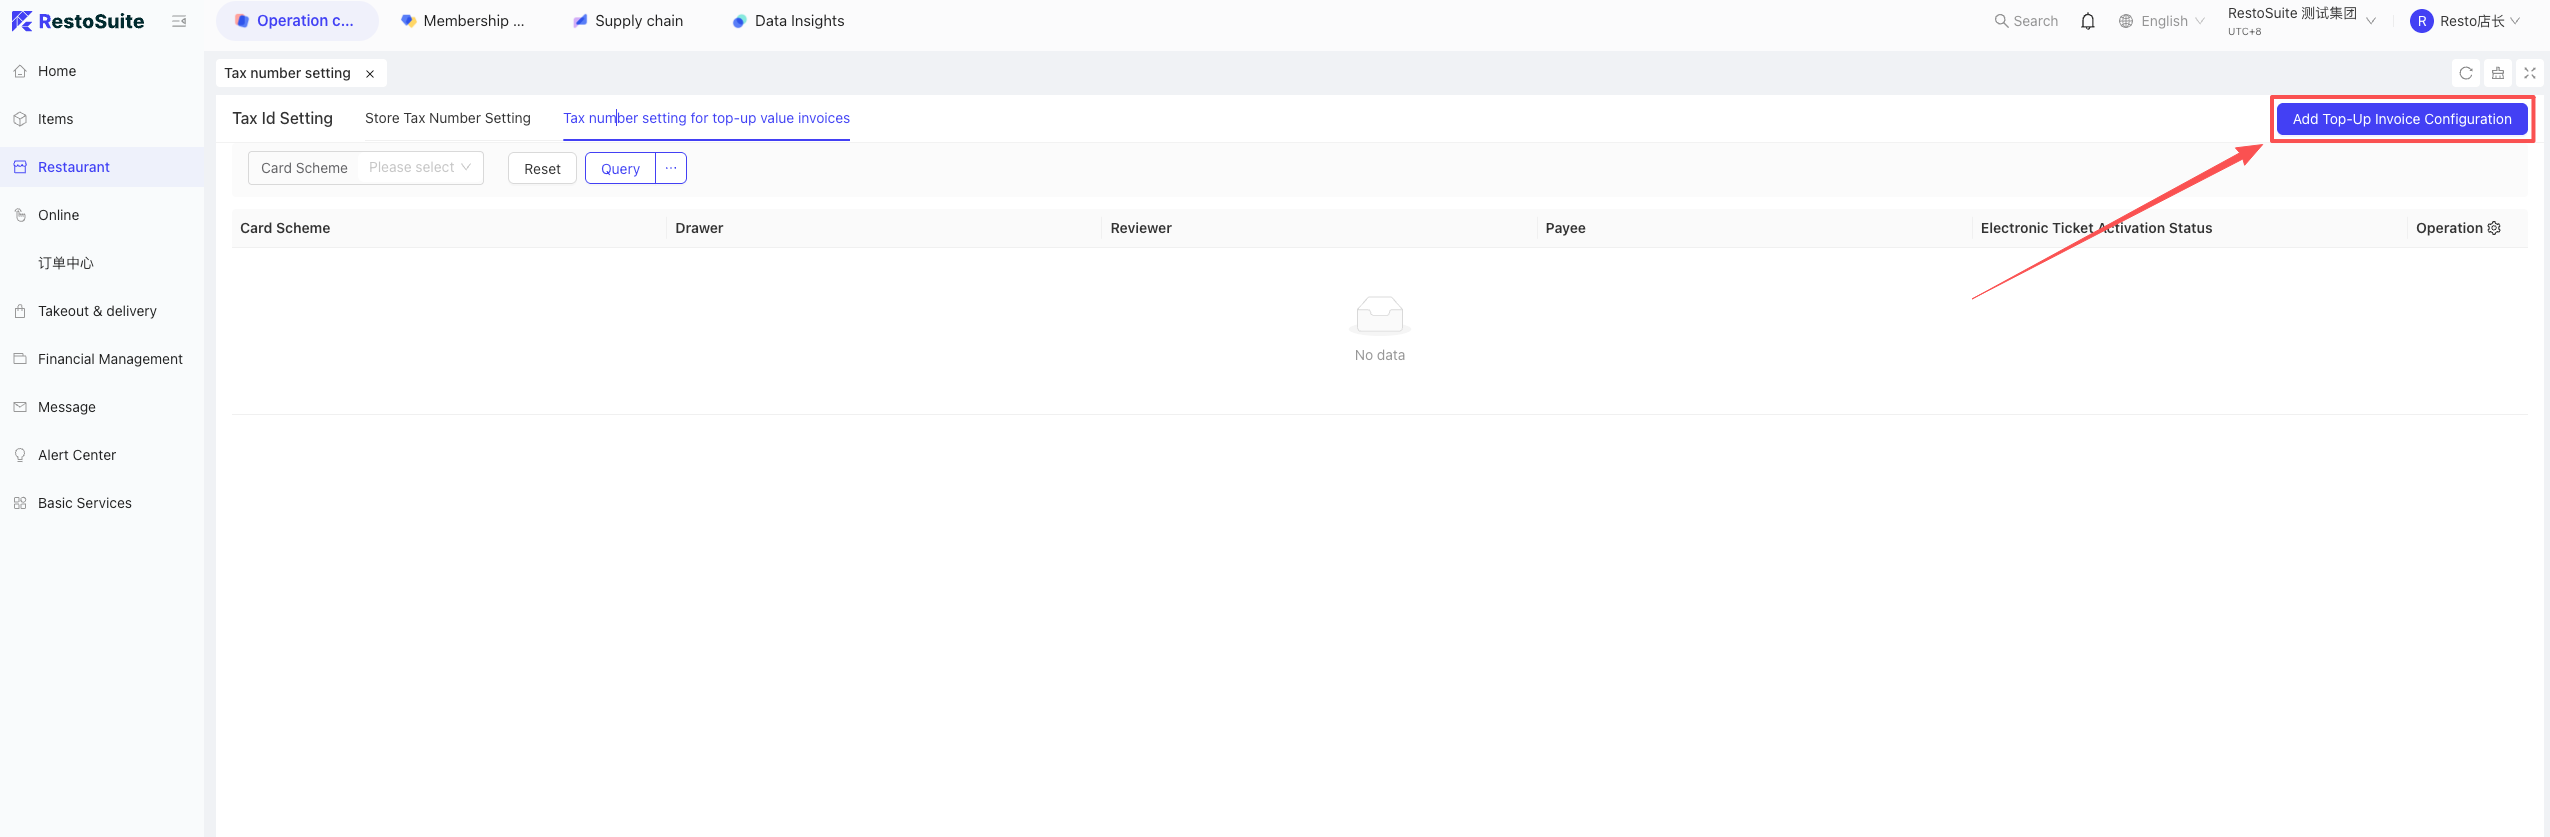
- Enable the “Online Self-Service Invoicing” parameter.
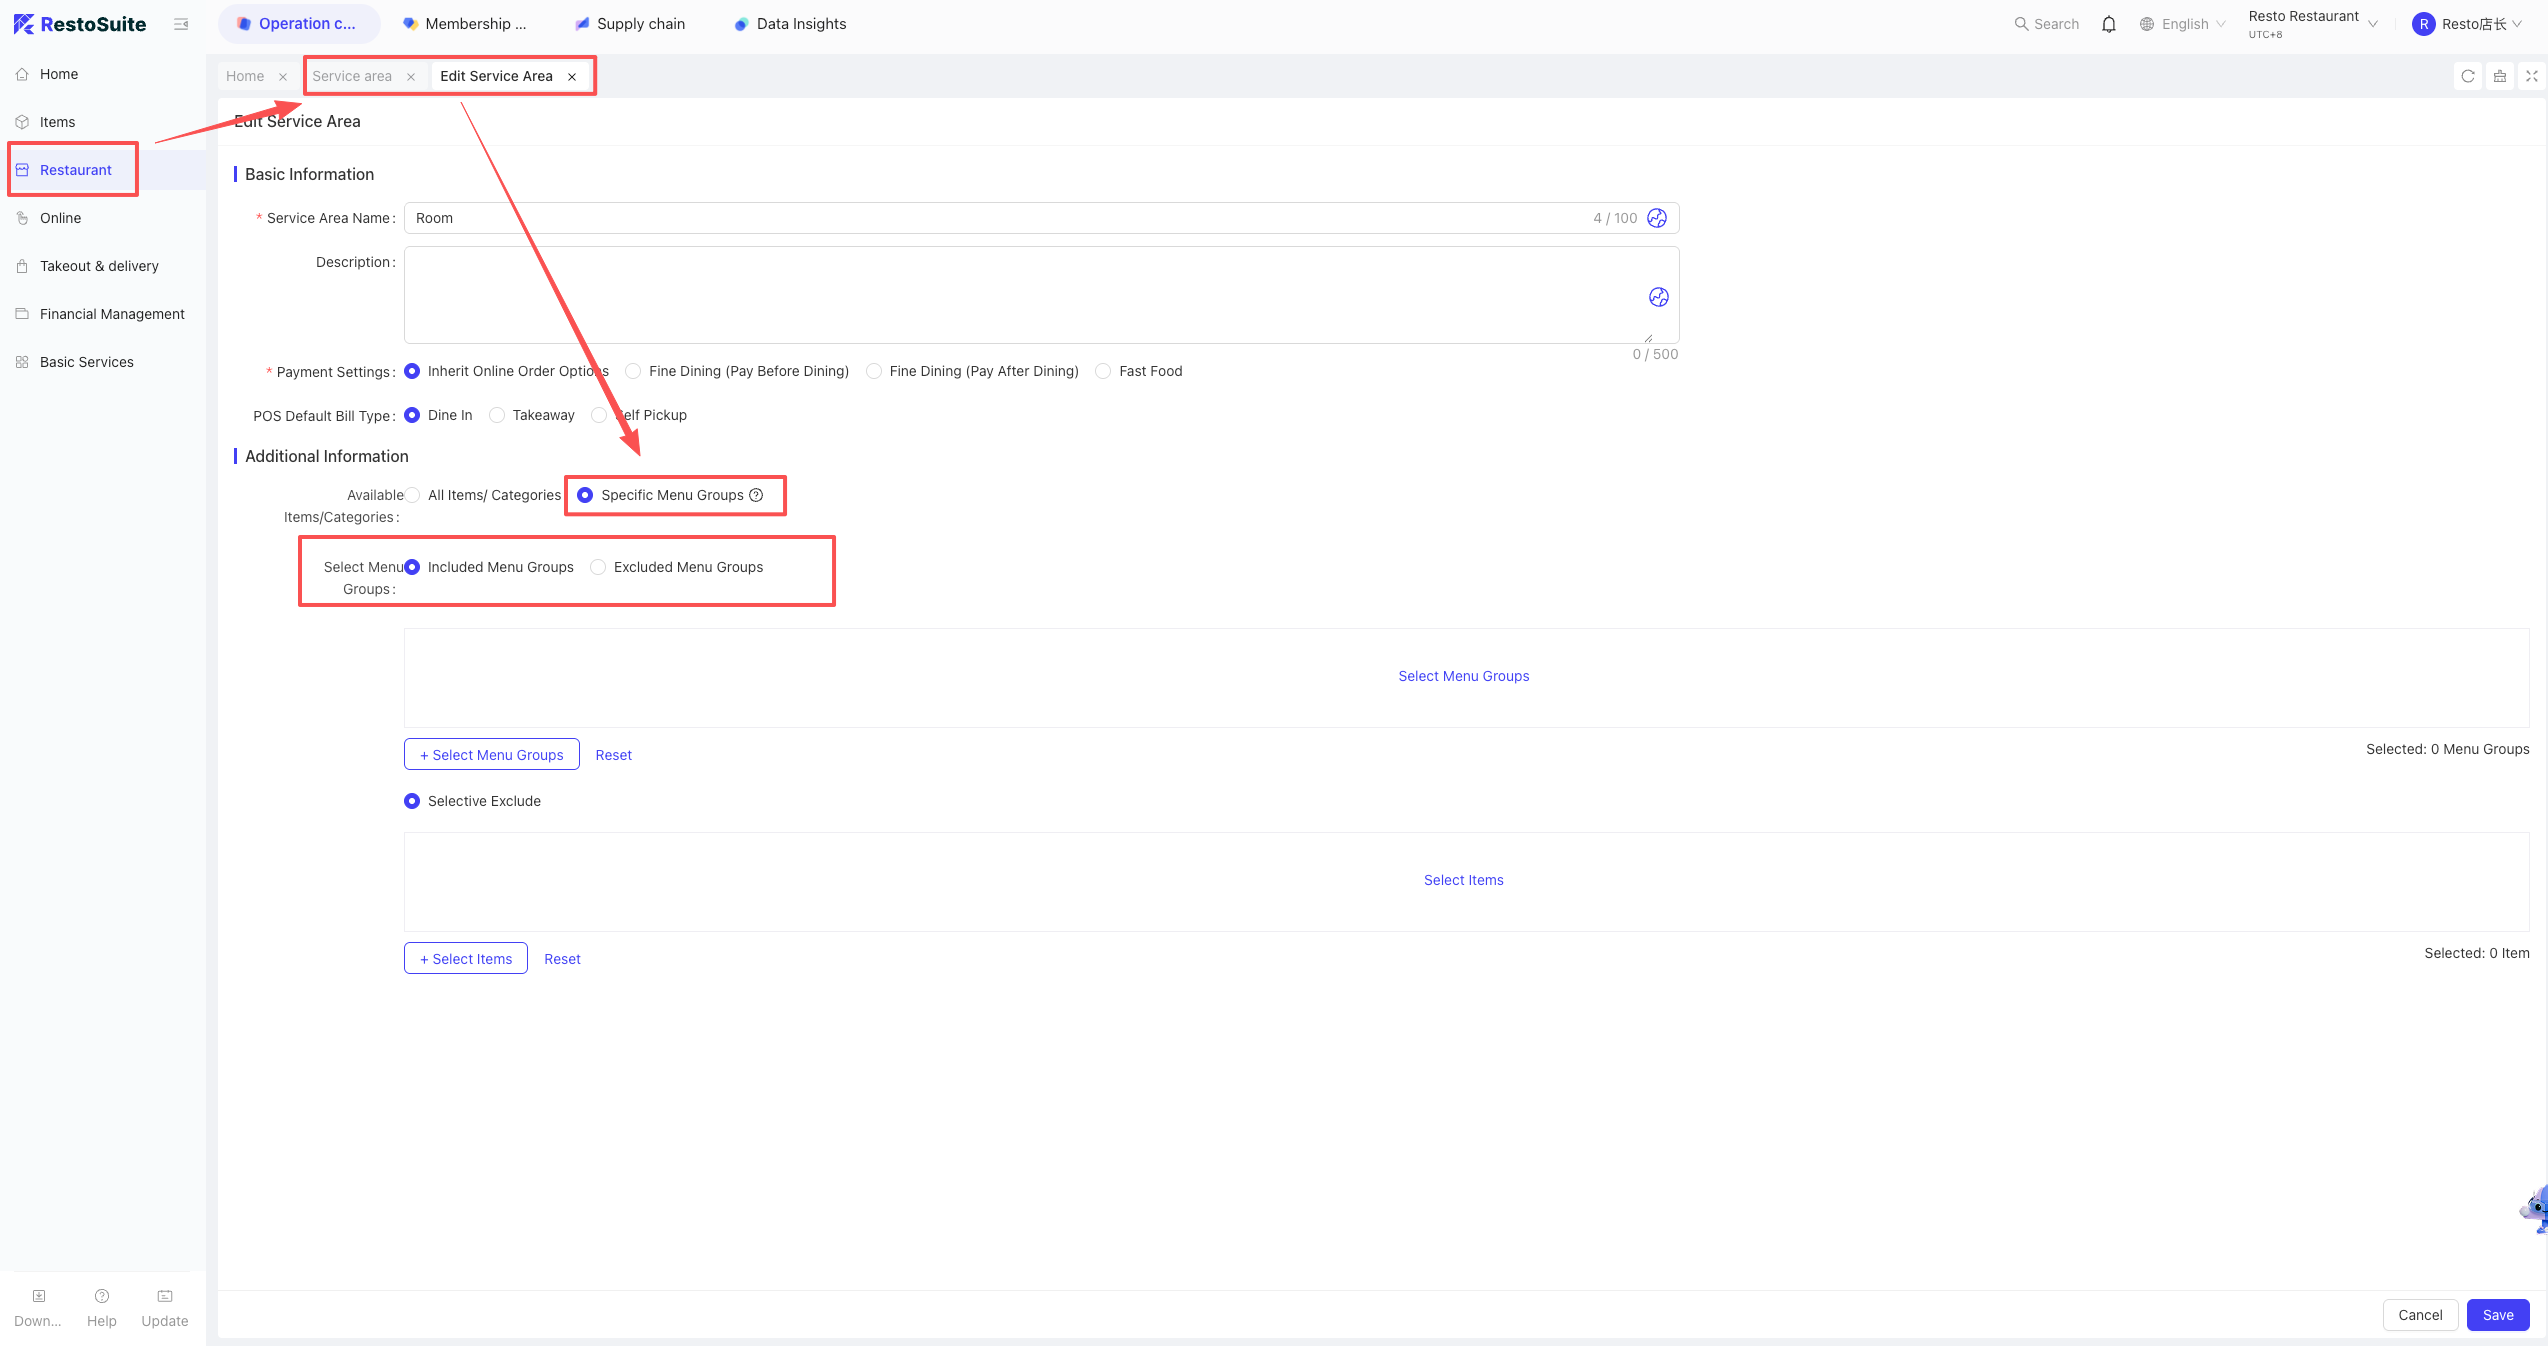
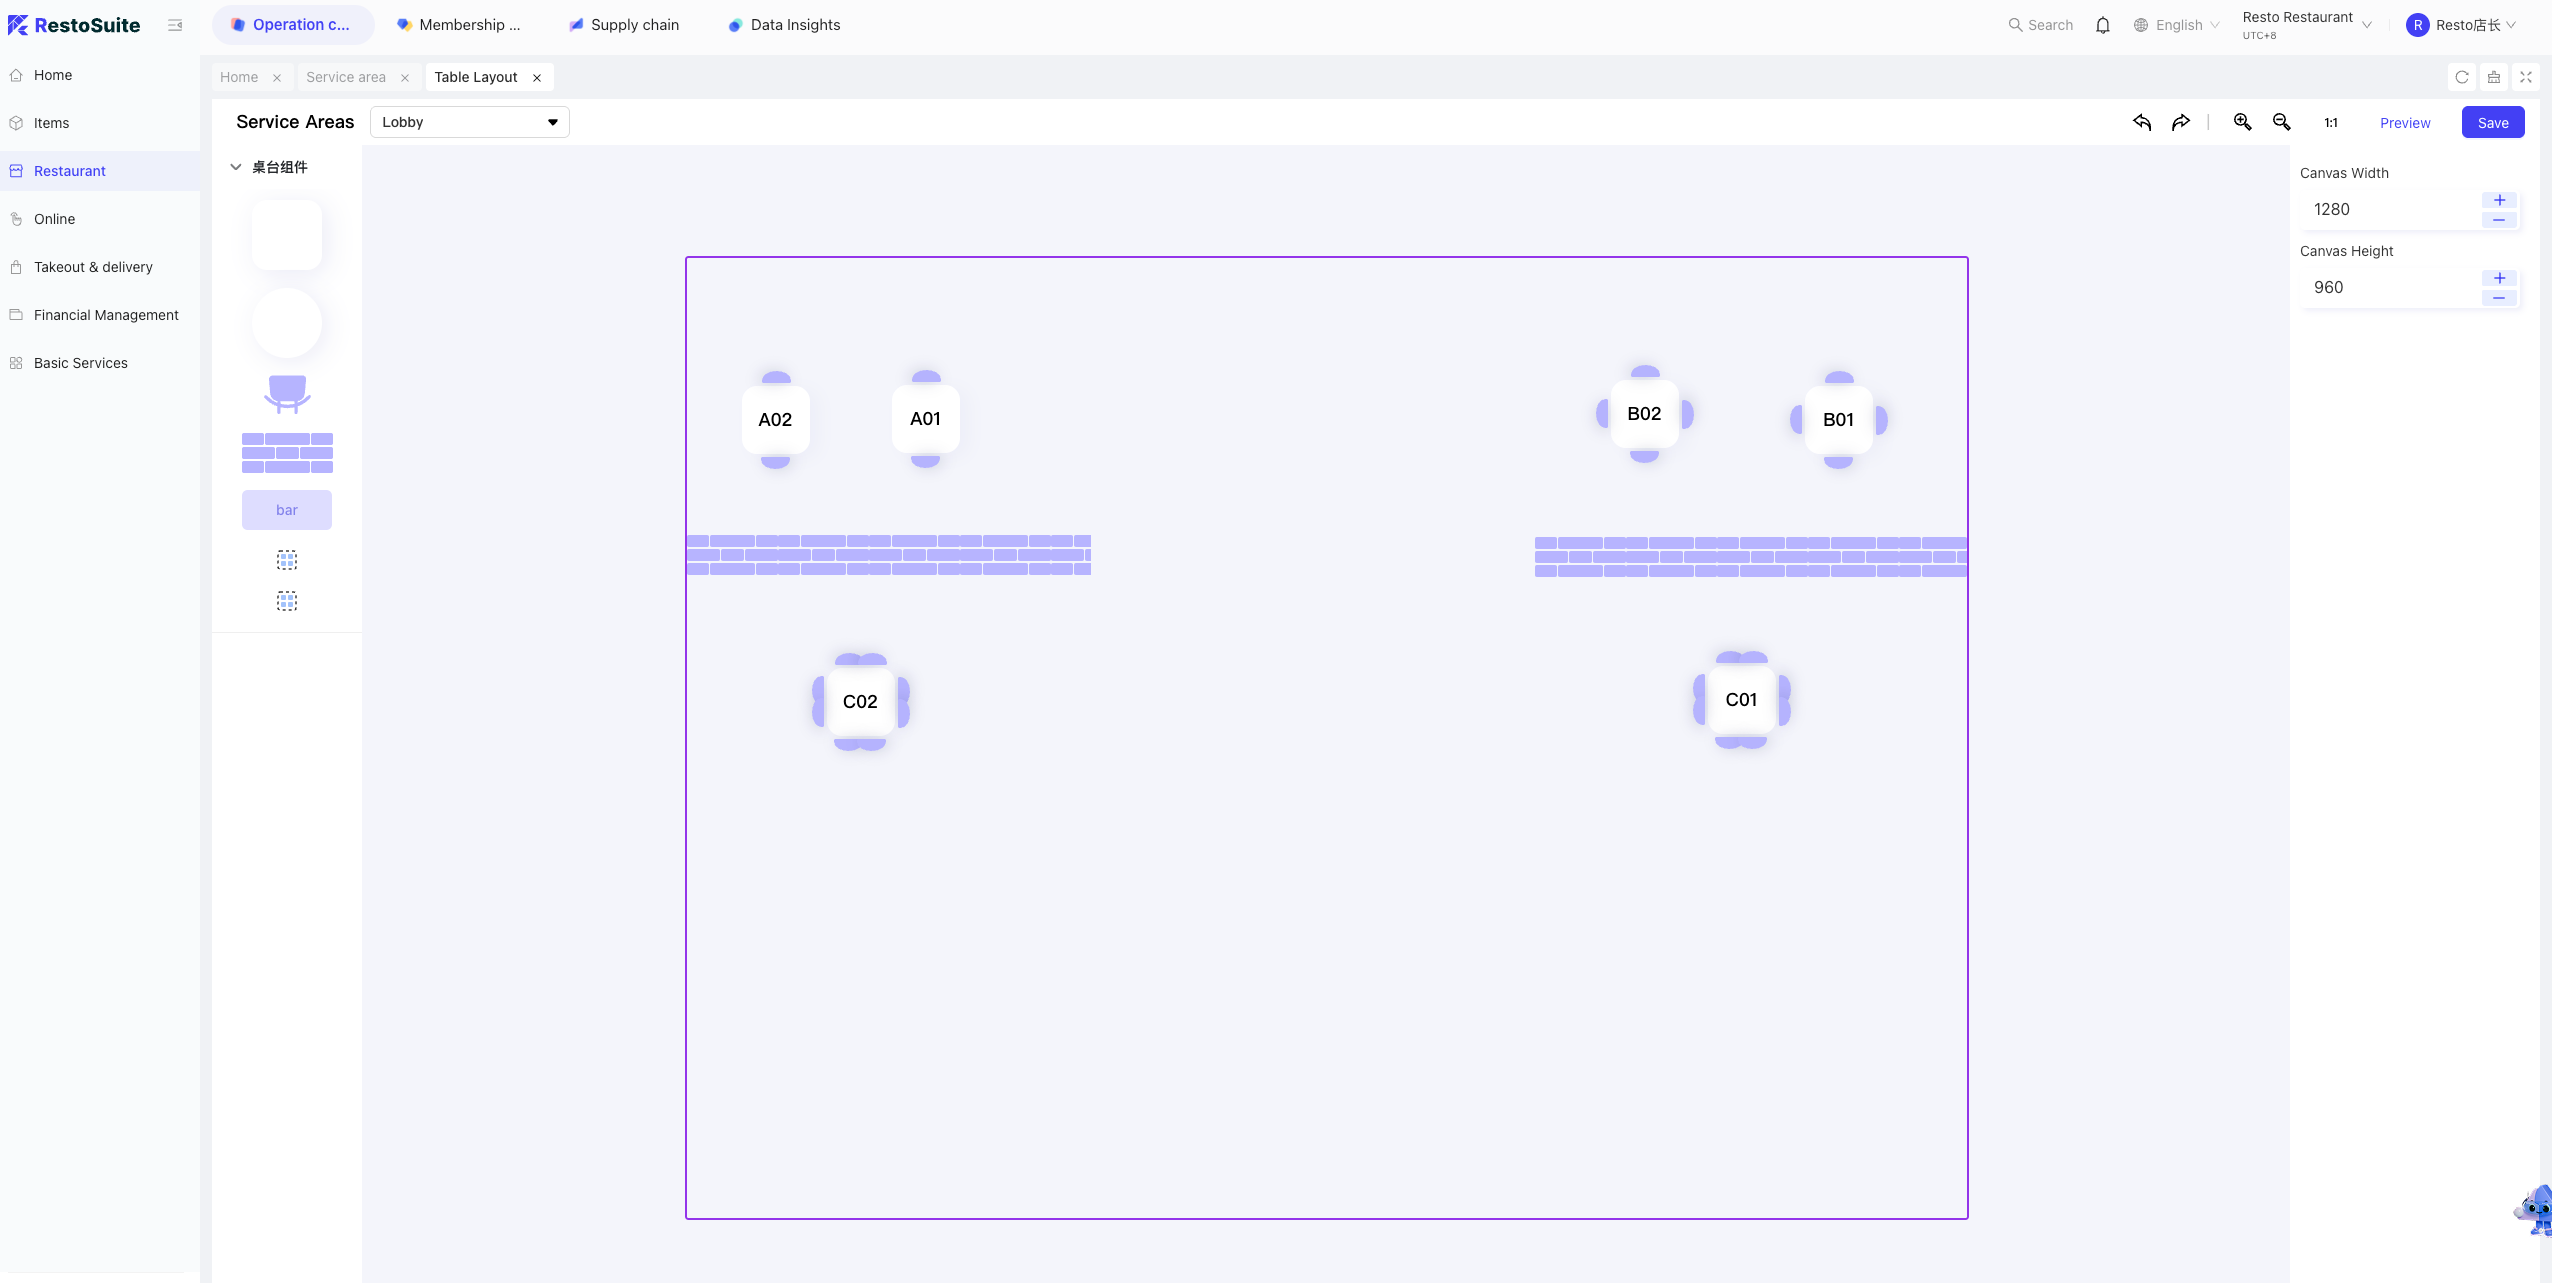
22 How to configure table layout for Table Service mode on the POS?
Setup Path:
- BO Store View > Operation Center > Restaurant Management > Service Area.
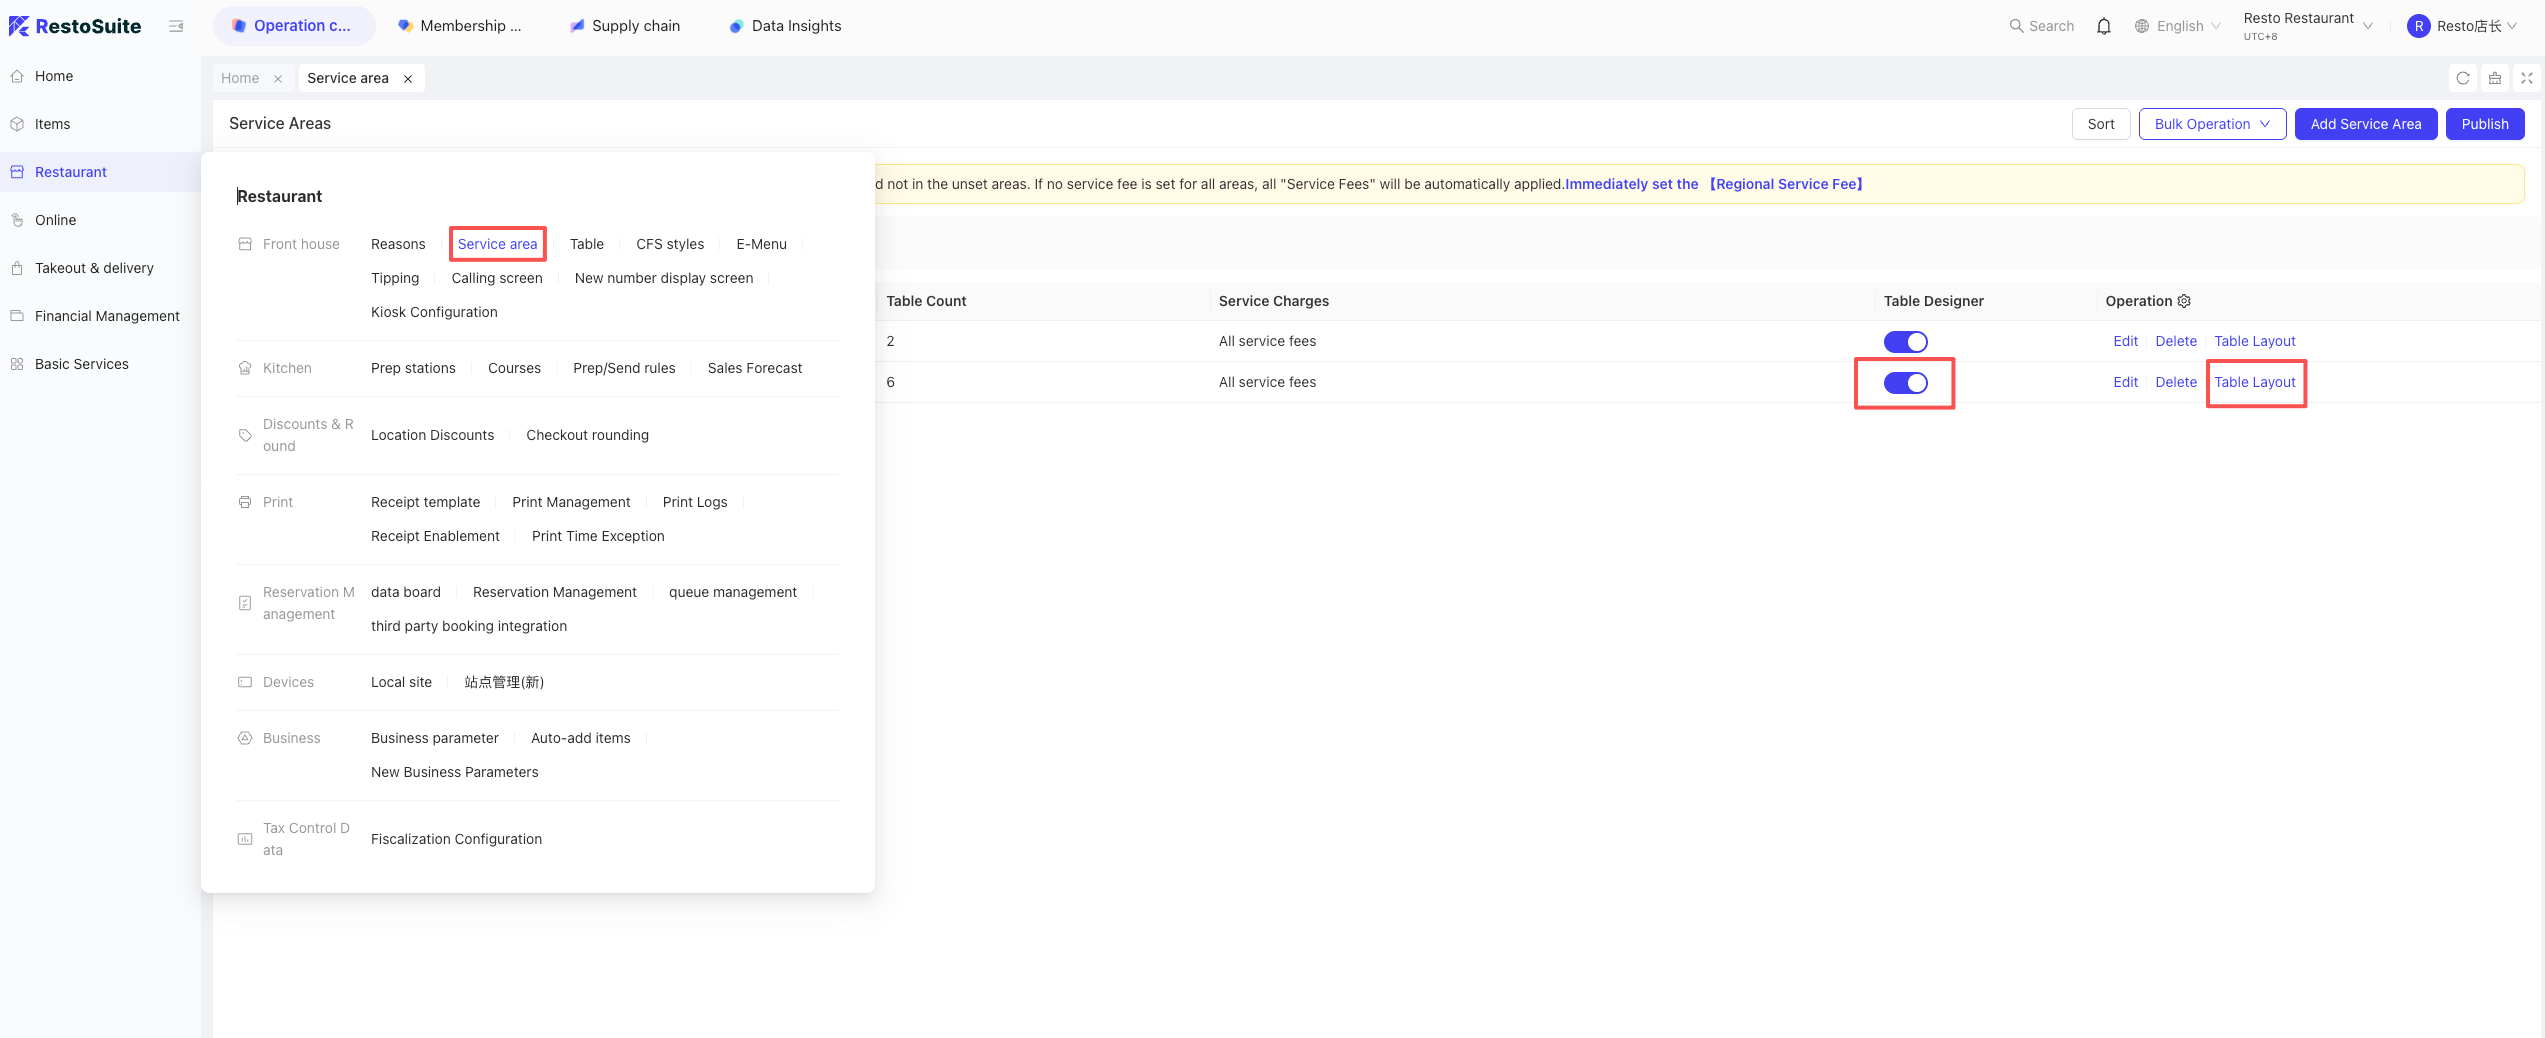
- Enable the “Table Design” switch and click “Table Layout” to configure.
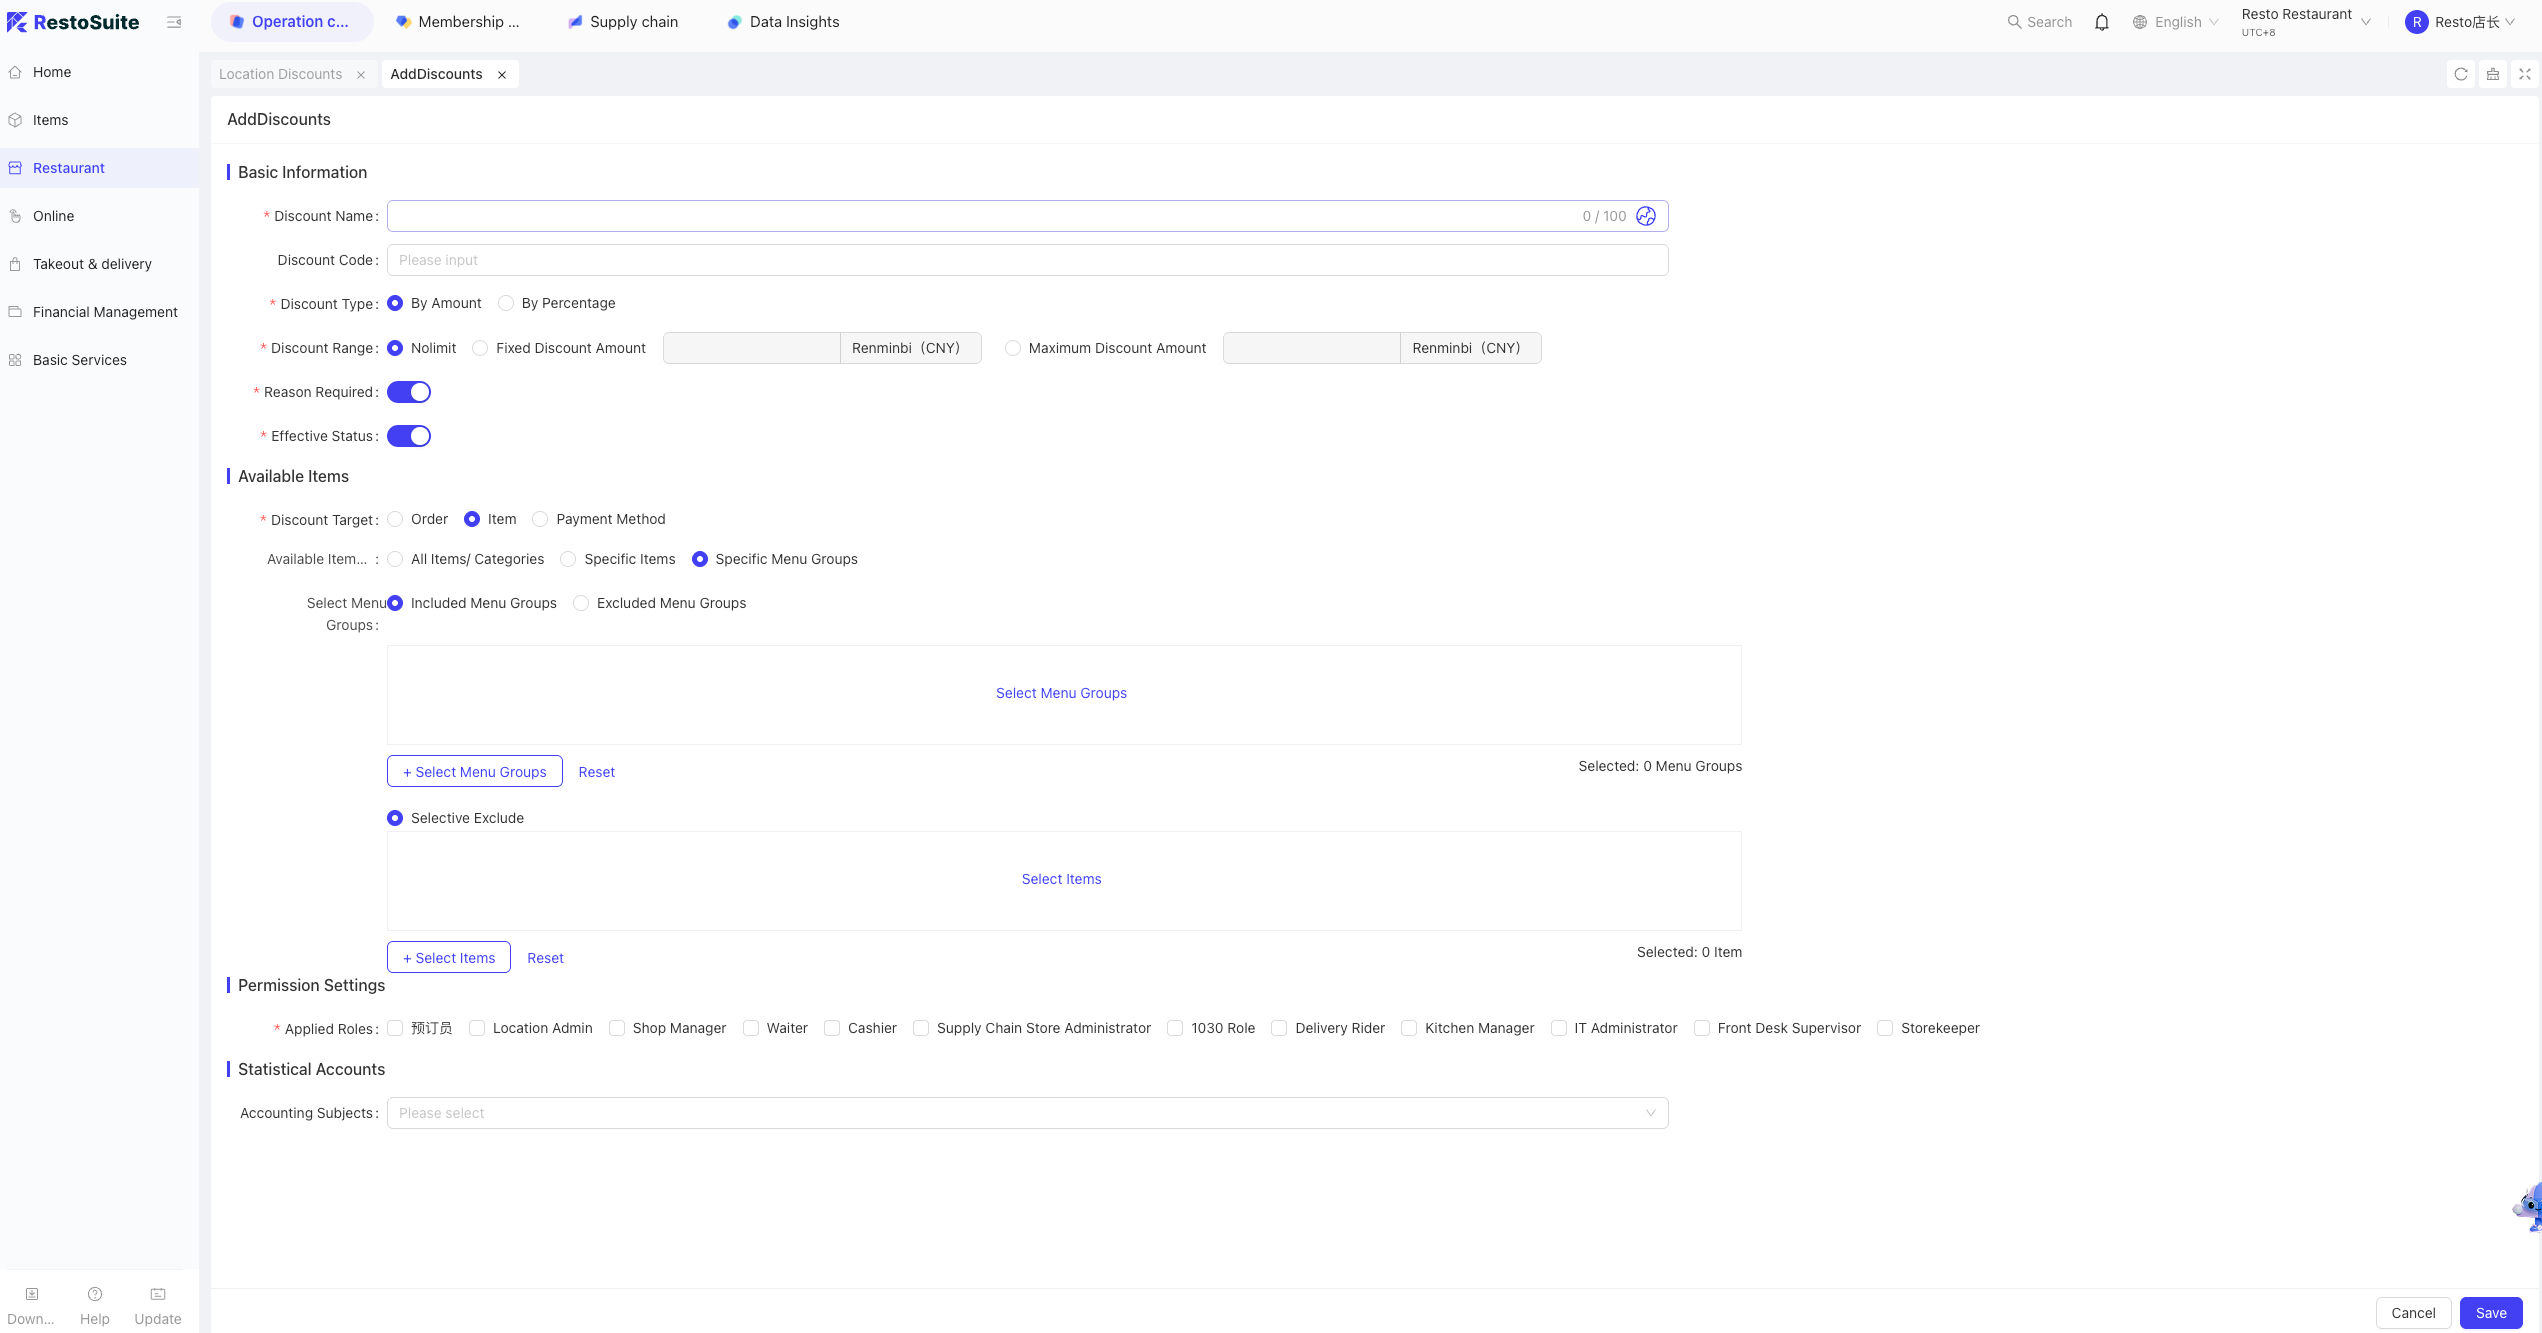
23 How to create a store discount scheme?
Path: BO > Operation Center > Restaurant Management > Store Discount Scheme > Add.
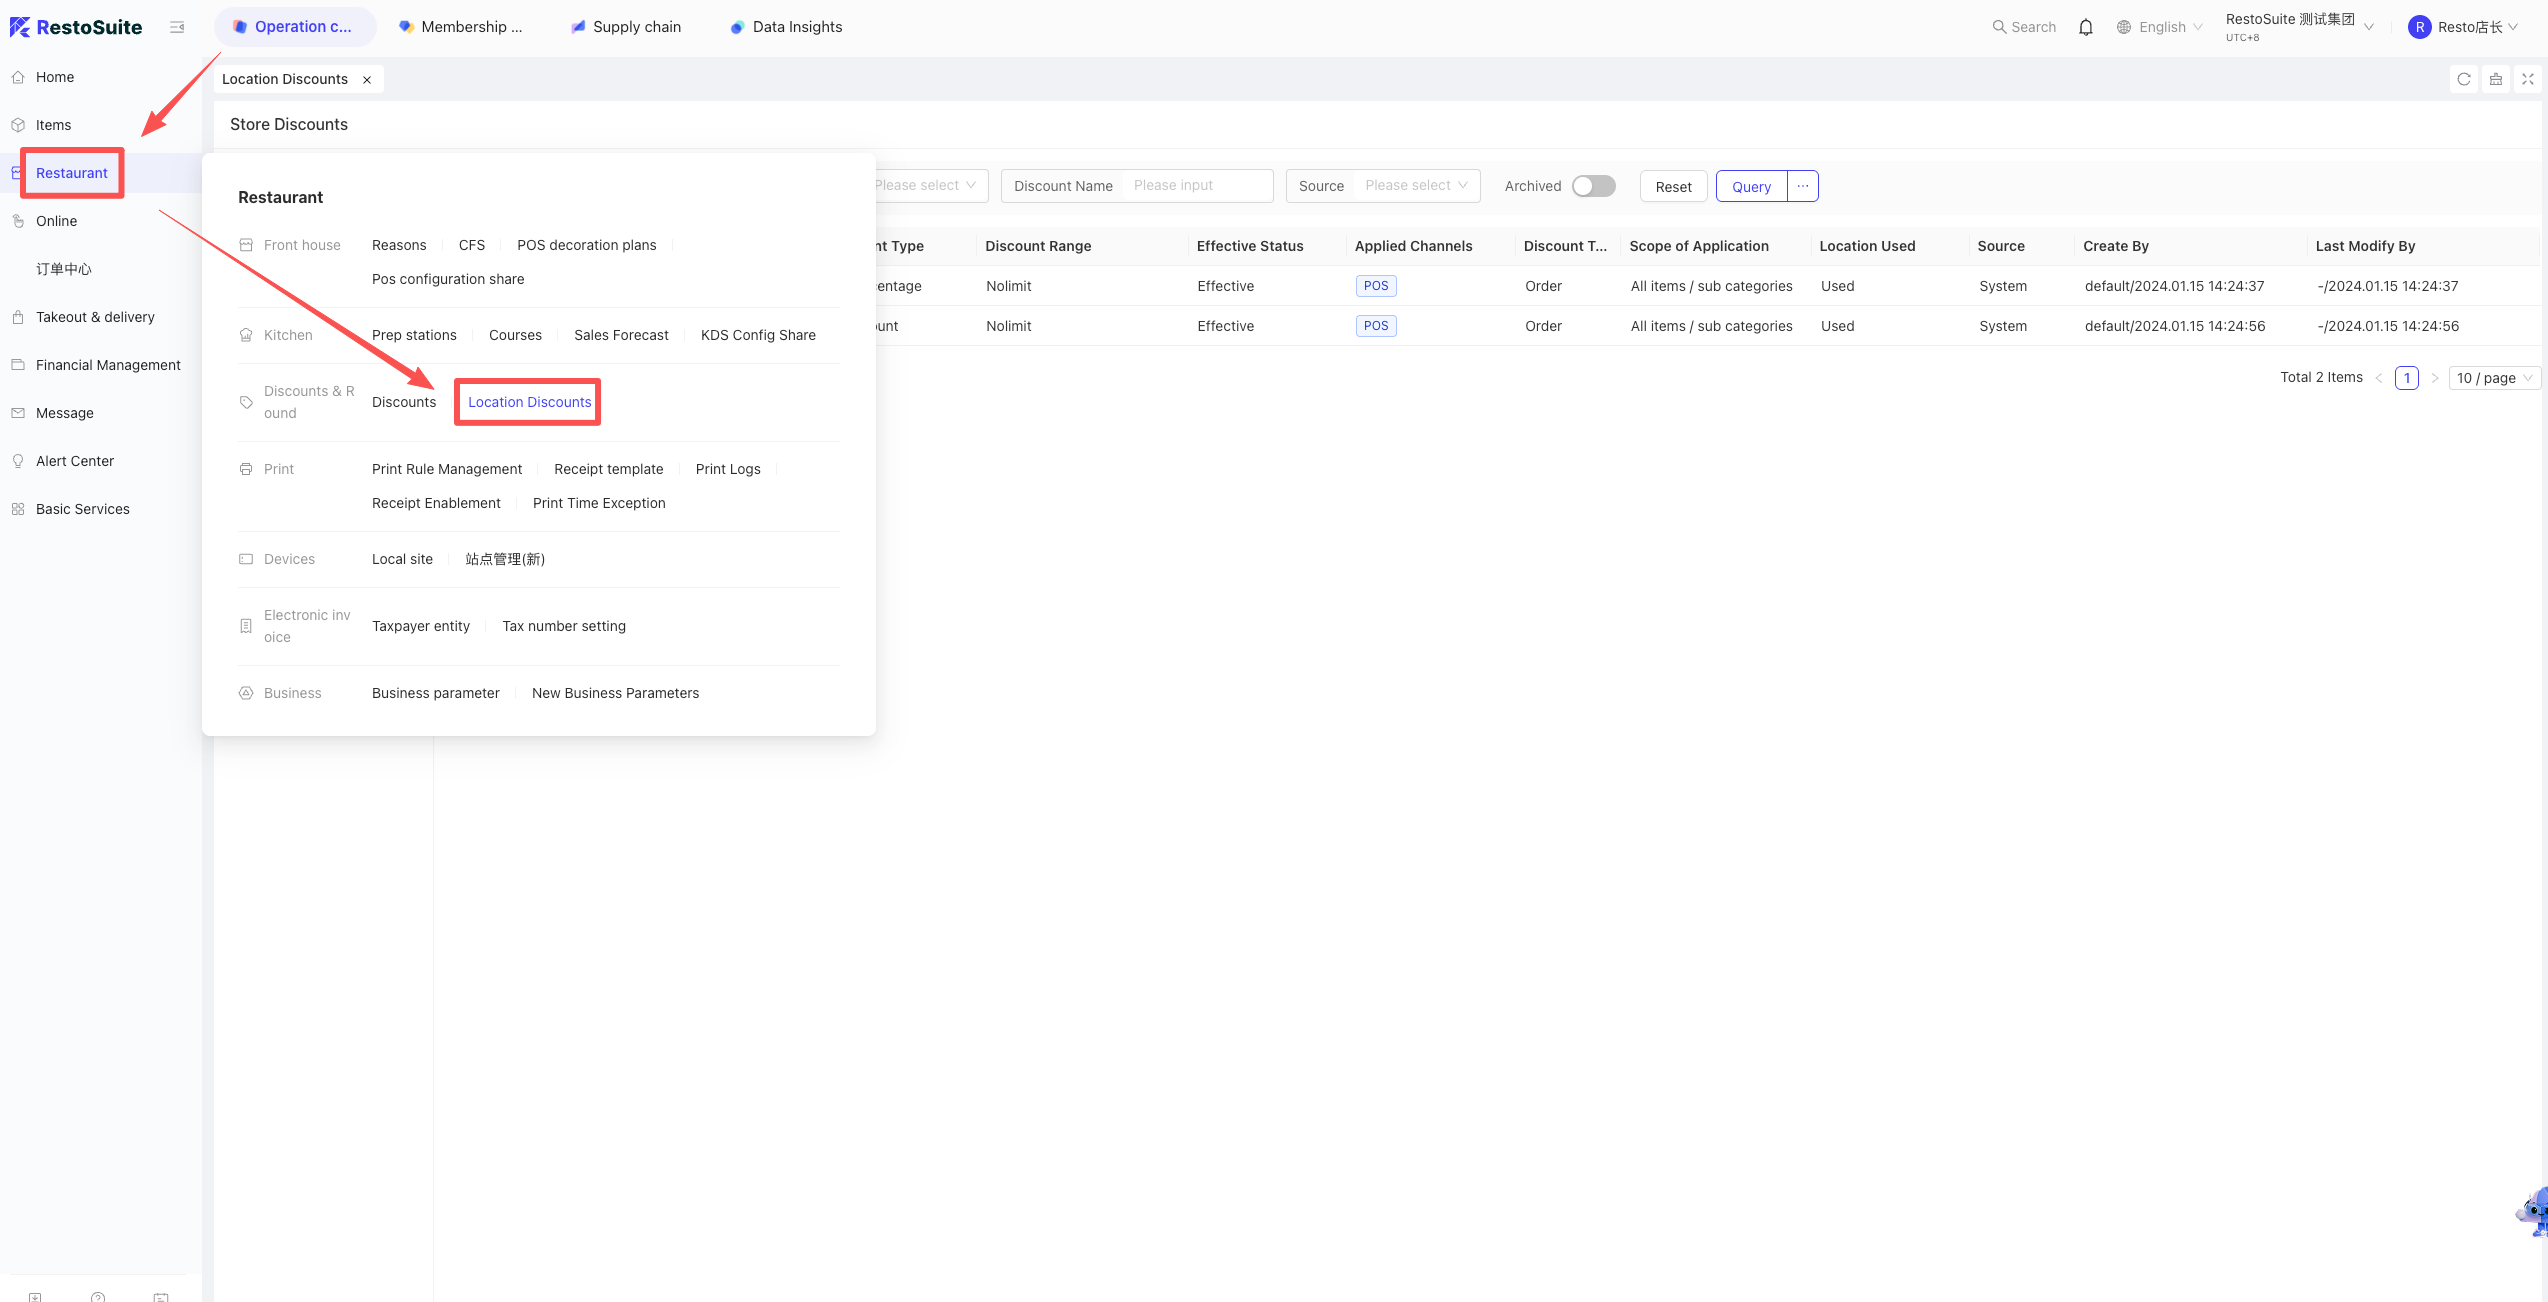
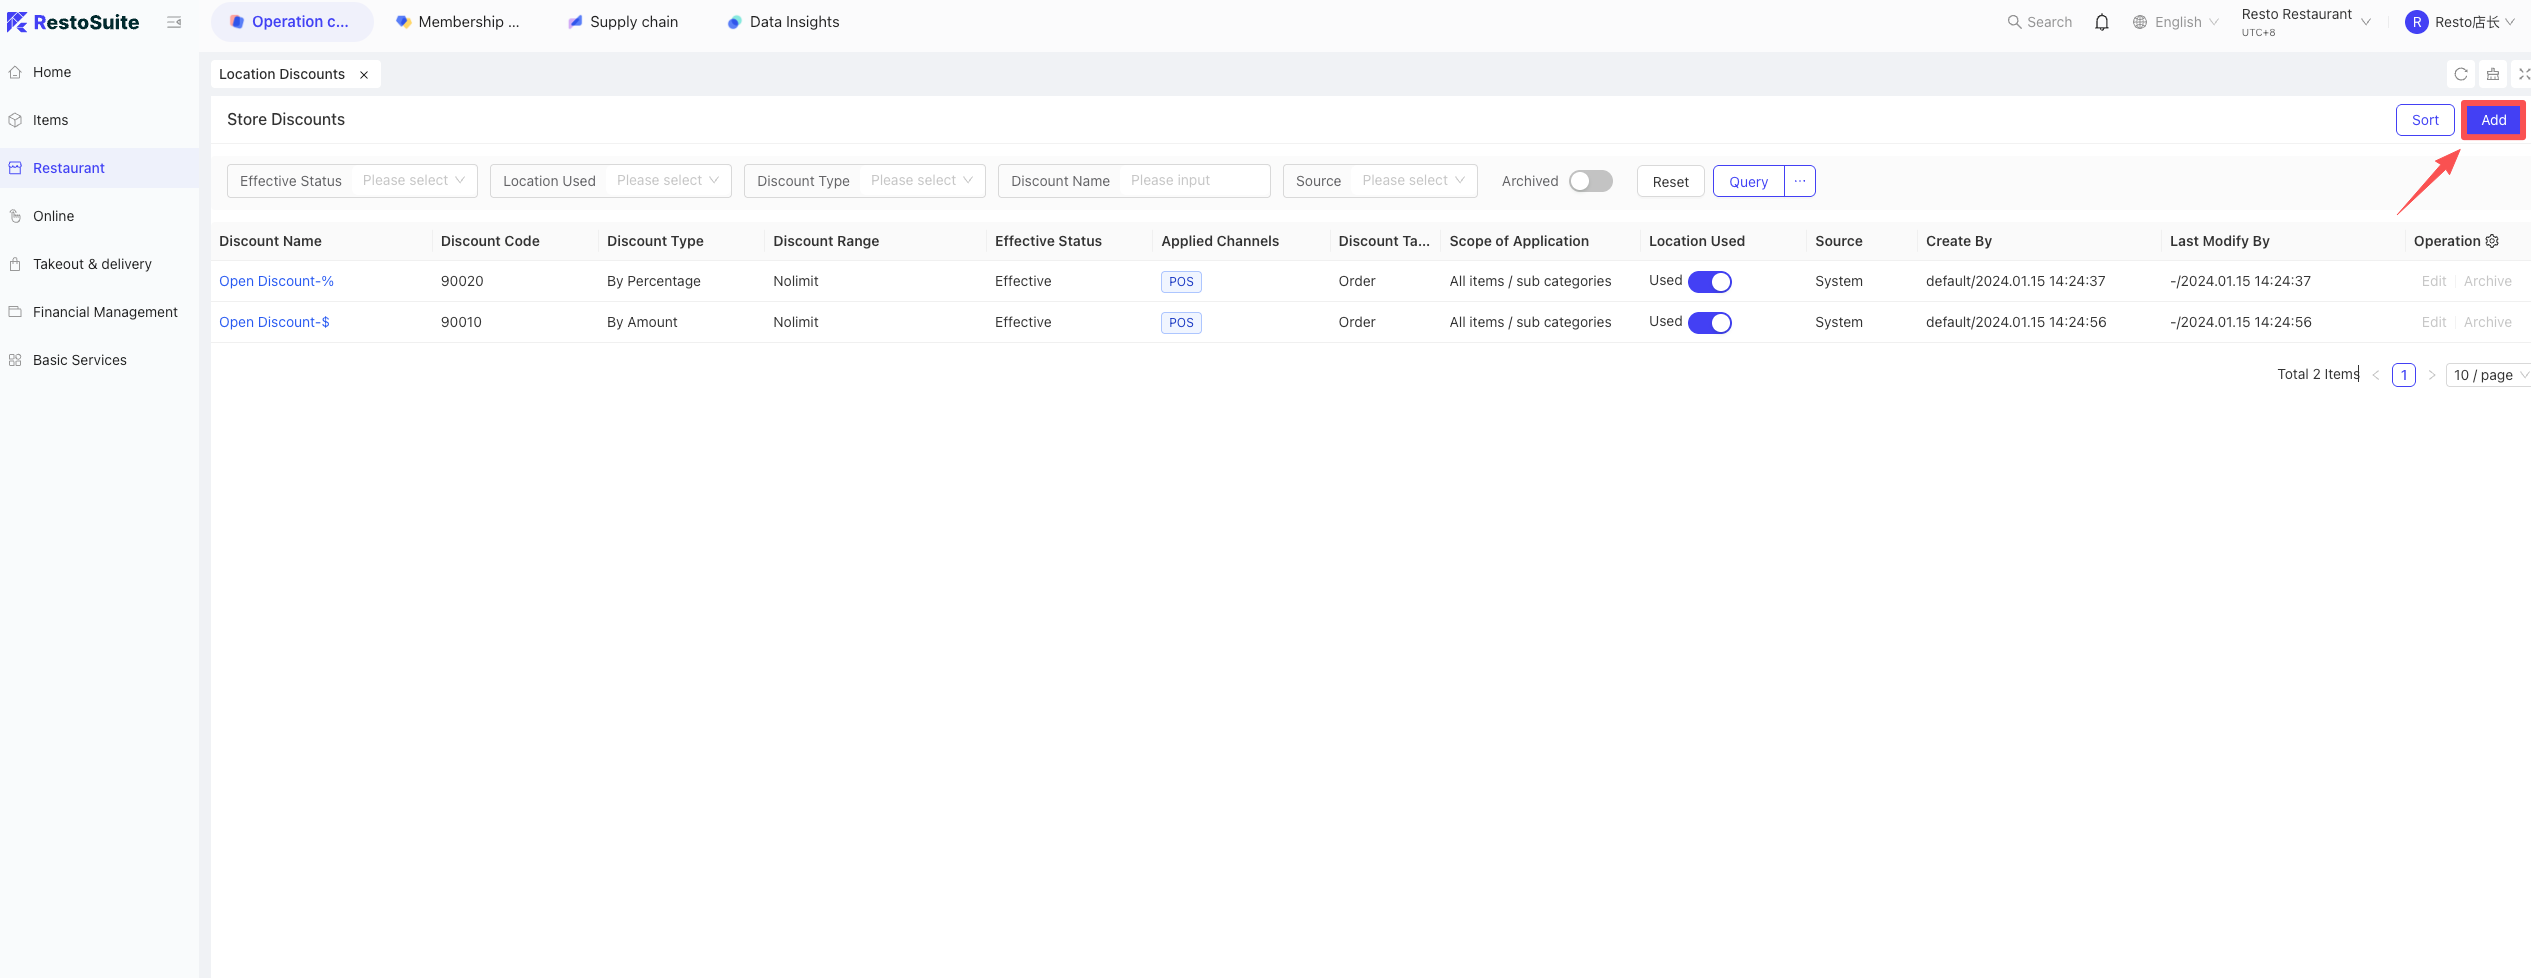
- Basic Info: Name, Code, Discount Type (Ratio/Amount), Range, Mandatory reason switch.
- Applicable Items: Target (Order/Dish), Scope (All/Specific Item/Menu Group).
- Permissions & Subjects: Applicable Roles, Statistical Subject.
24 How to cancel a “Pre-settlement” status after the pre-bill is printed?
- POS: Select Table > Ordering Page > More > Click “Cancel Pre-settlement”.
25 How to set functional modules to “Tile View” on the POS?
- POS > Settings > General > Enable “Show Separate Main Menu Page”.
- After enabling, click the “three-line” icon under the store logo.
26 How to configure the POS to check parameters during every End-of-Day (EOD)?
- POS: Settings > General > EOD Process > disable switches for parameters that don’t need validation.
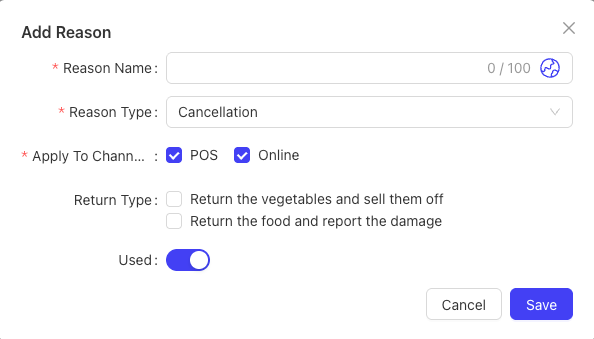
27 How to restore stock quantity after a dish is voided?
Business Scenario:
For items set with “Sales Limits” or “Sold Out” status, if a void/return occurs and the item can be resold (meaning ingredients were not consumed), merchants may want the system to automatically add the voided quantity back to the available inventory.
Configuration Logic:
Whether the quantity is returned to stock depends on the configuration of the “Void Reason”:
- Void & Sold Out: If this reason is selected during a void, the item will immediately be marked as “Sold Out.”
- Void & Scrapped (Waste): If this reason is selected, the item will be recorded in the waste report and the quantity will not be returned to stock.
- No Type Selected: If neither of the above options is checked for a void reason, the system assumes the ingredients were not consumed. If the item has a “Sales Limit” set, the voided quantity will be automatically added back to the available stock.
Setup Path:
- Log in to the BO and switch to Store View.
- Navigate to: Operation Center > Restaurant Management > Remark Management > Void Reason.
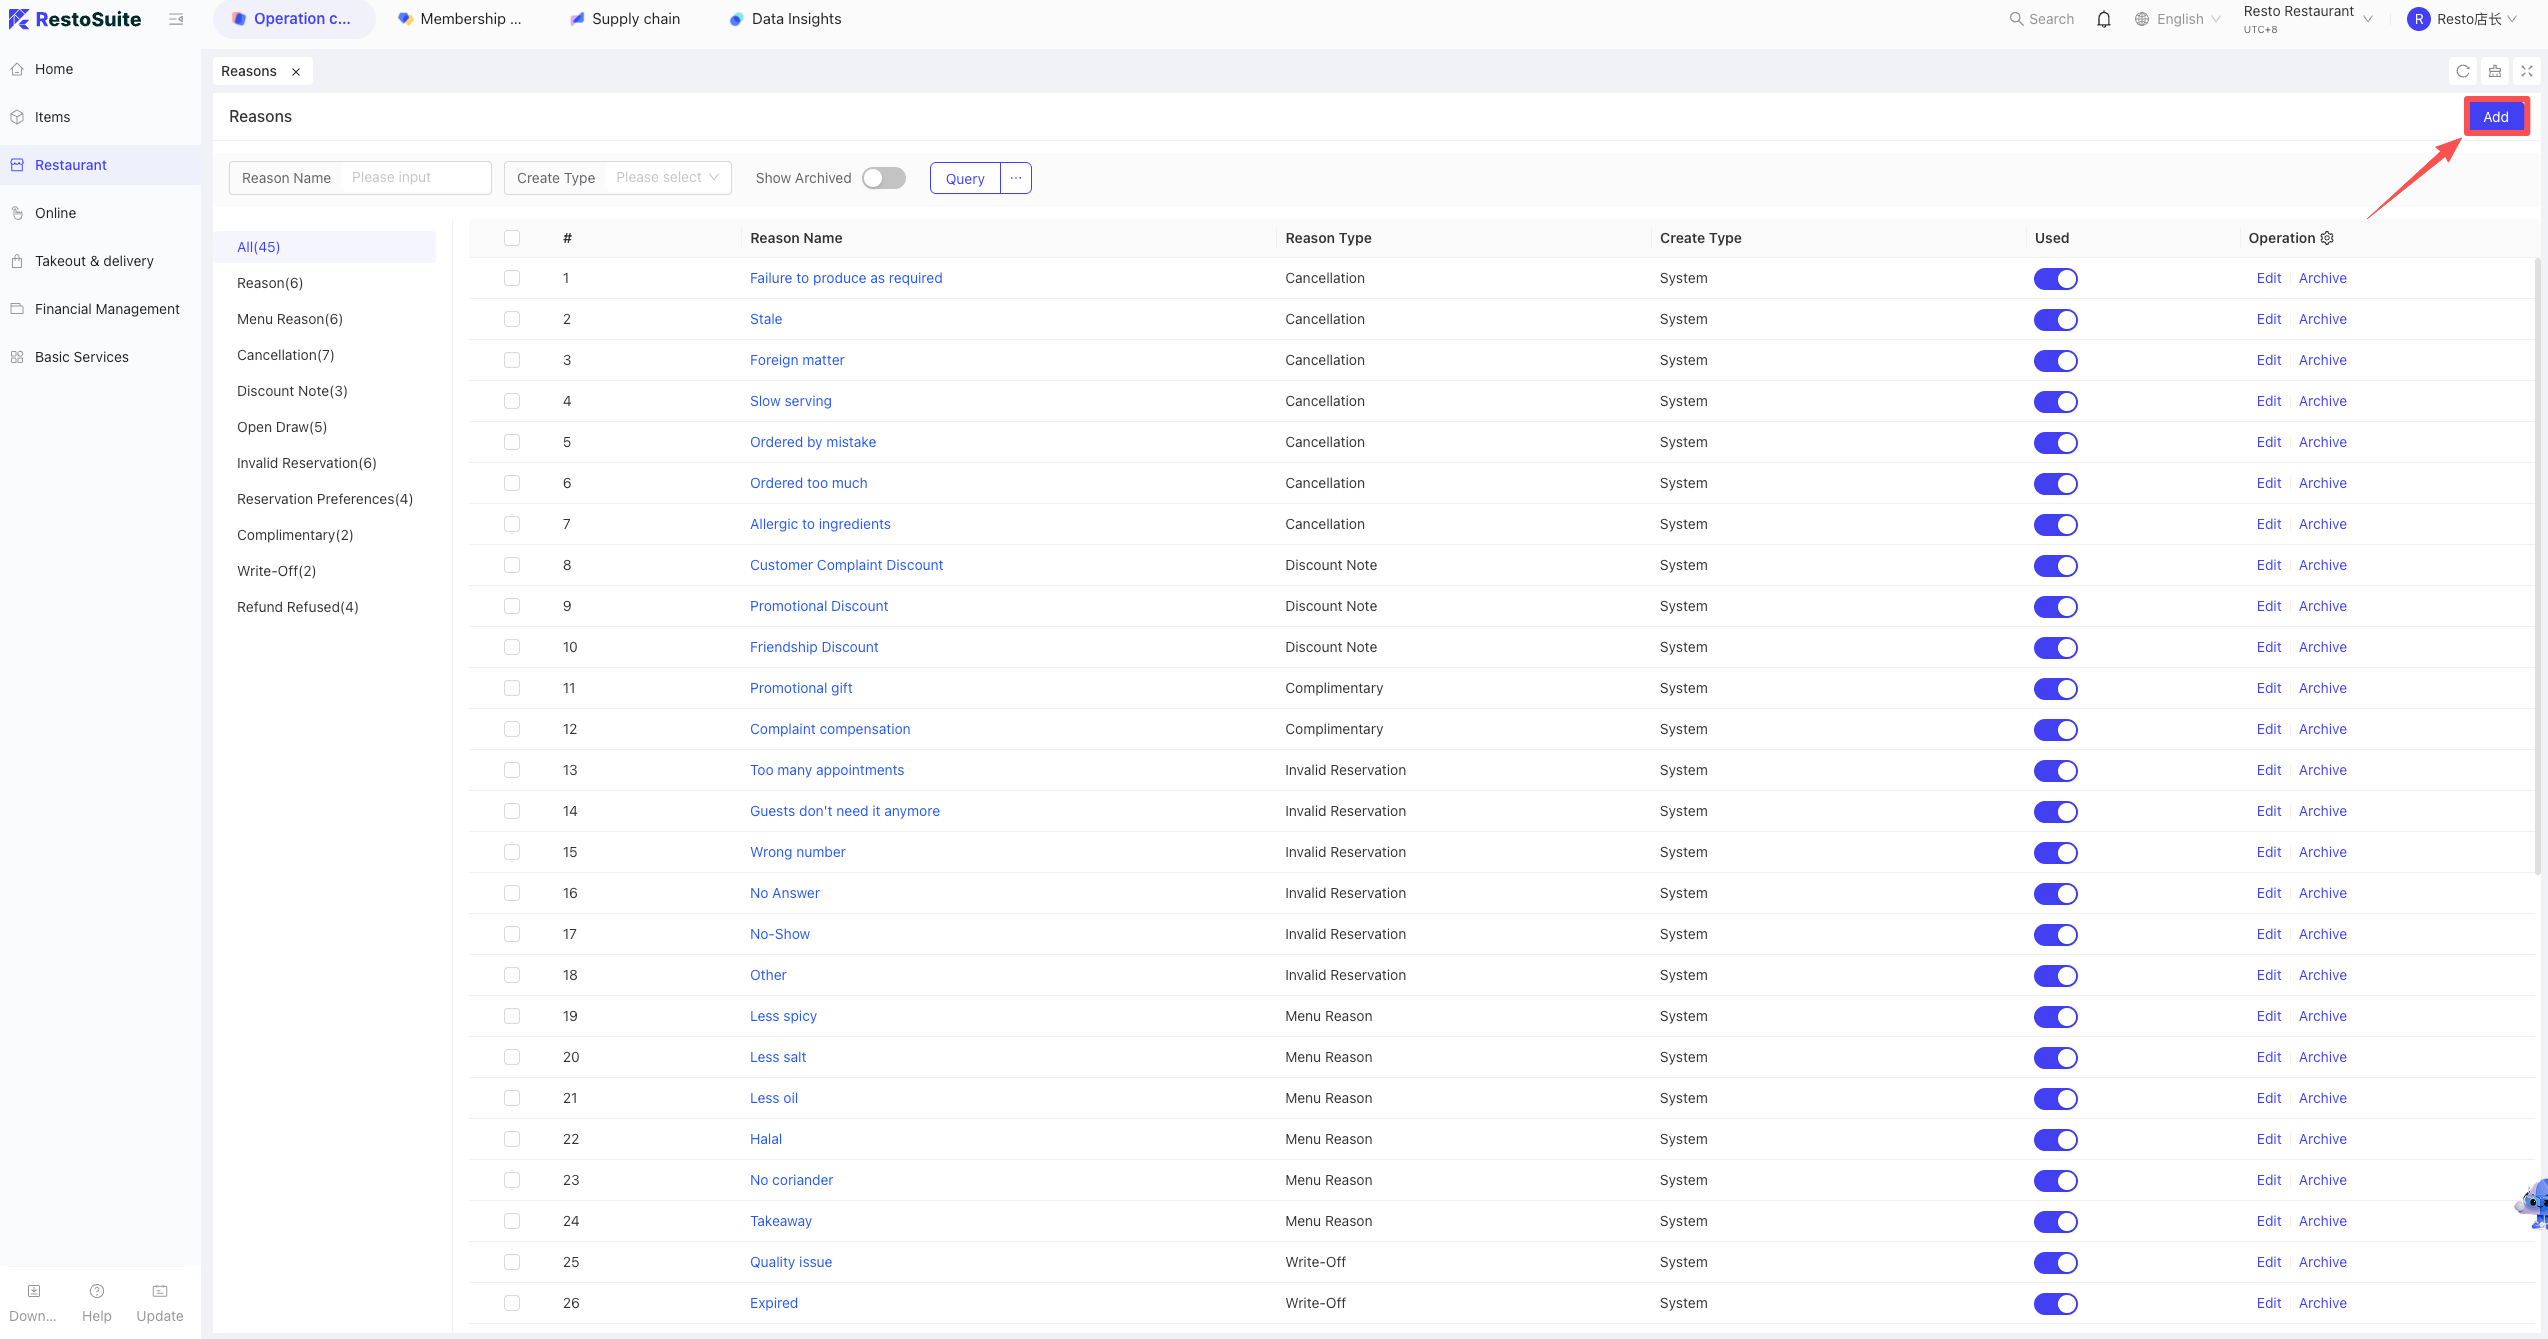
- Click Add in the top right corner. When creating the reason, configure the “Void Type.” Note: To automatically restore the available quantity after a void, leave all “Void Type” options unchecked.
28 How to set the POS to Manual End-of-Day (EOD)?
Business Scenario:
Manual EOD mode overrides the scheduled EOD time set in the “Basic Profile.” Merchants must manually trigger the EOD process at the end of each business day to advance the “Business Day.” If the manual action is not performed, the system will remain on the current business day and will not automatically rollover.
Setup Steps:
- Log in to the BO and switch to Store View.
- Navigate to: Operation Center > Restaurant Management > Business Parameters.
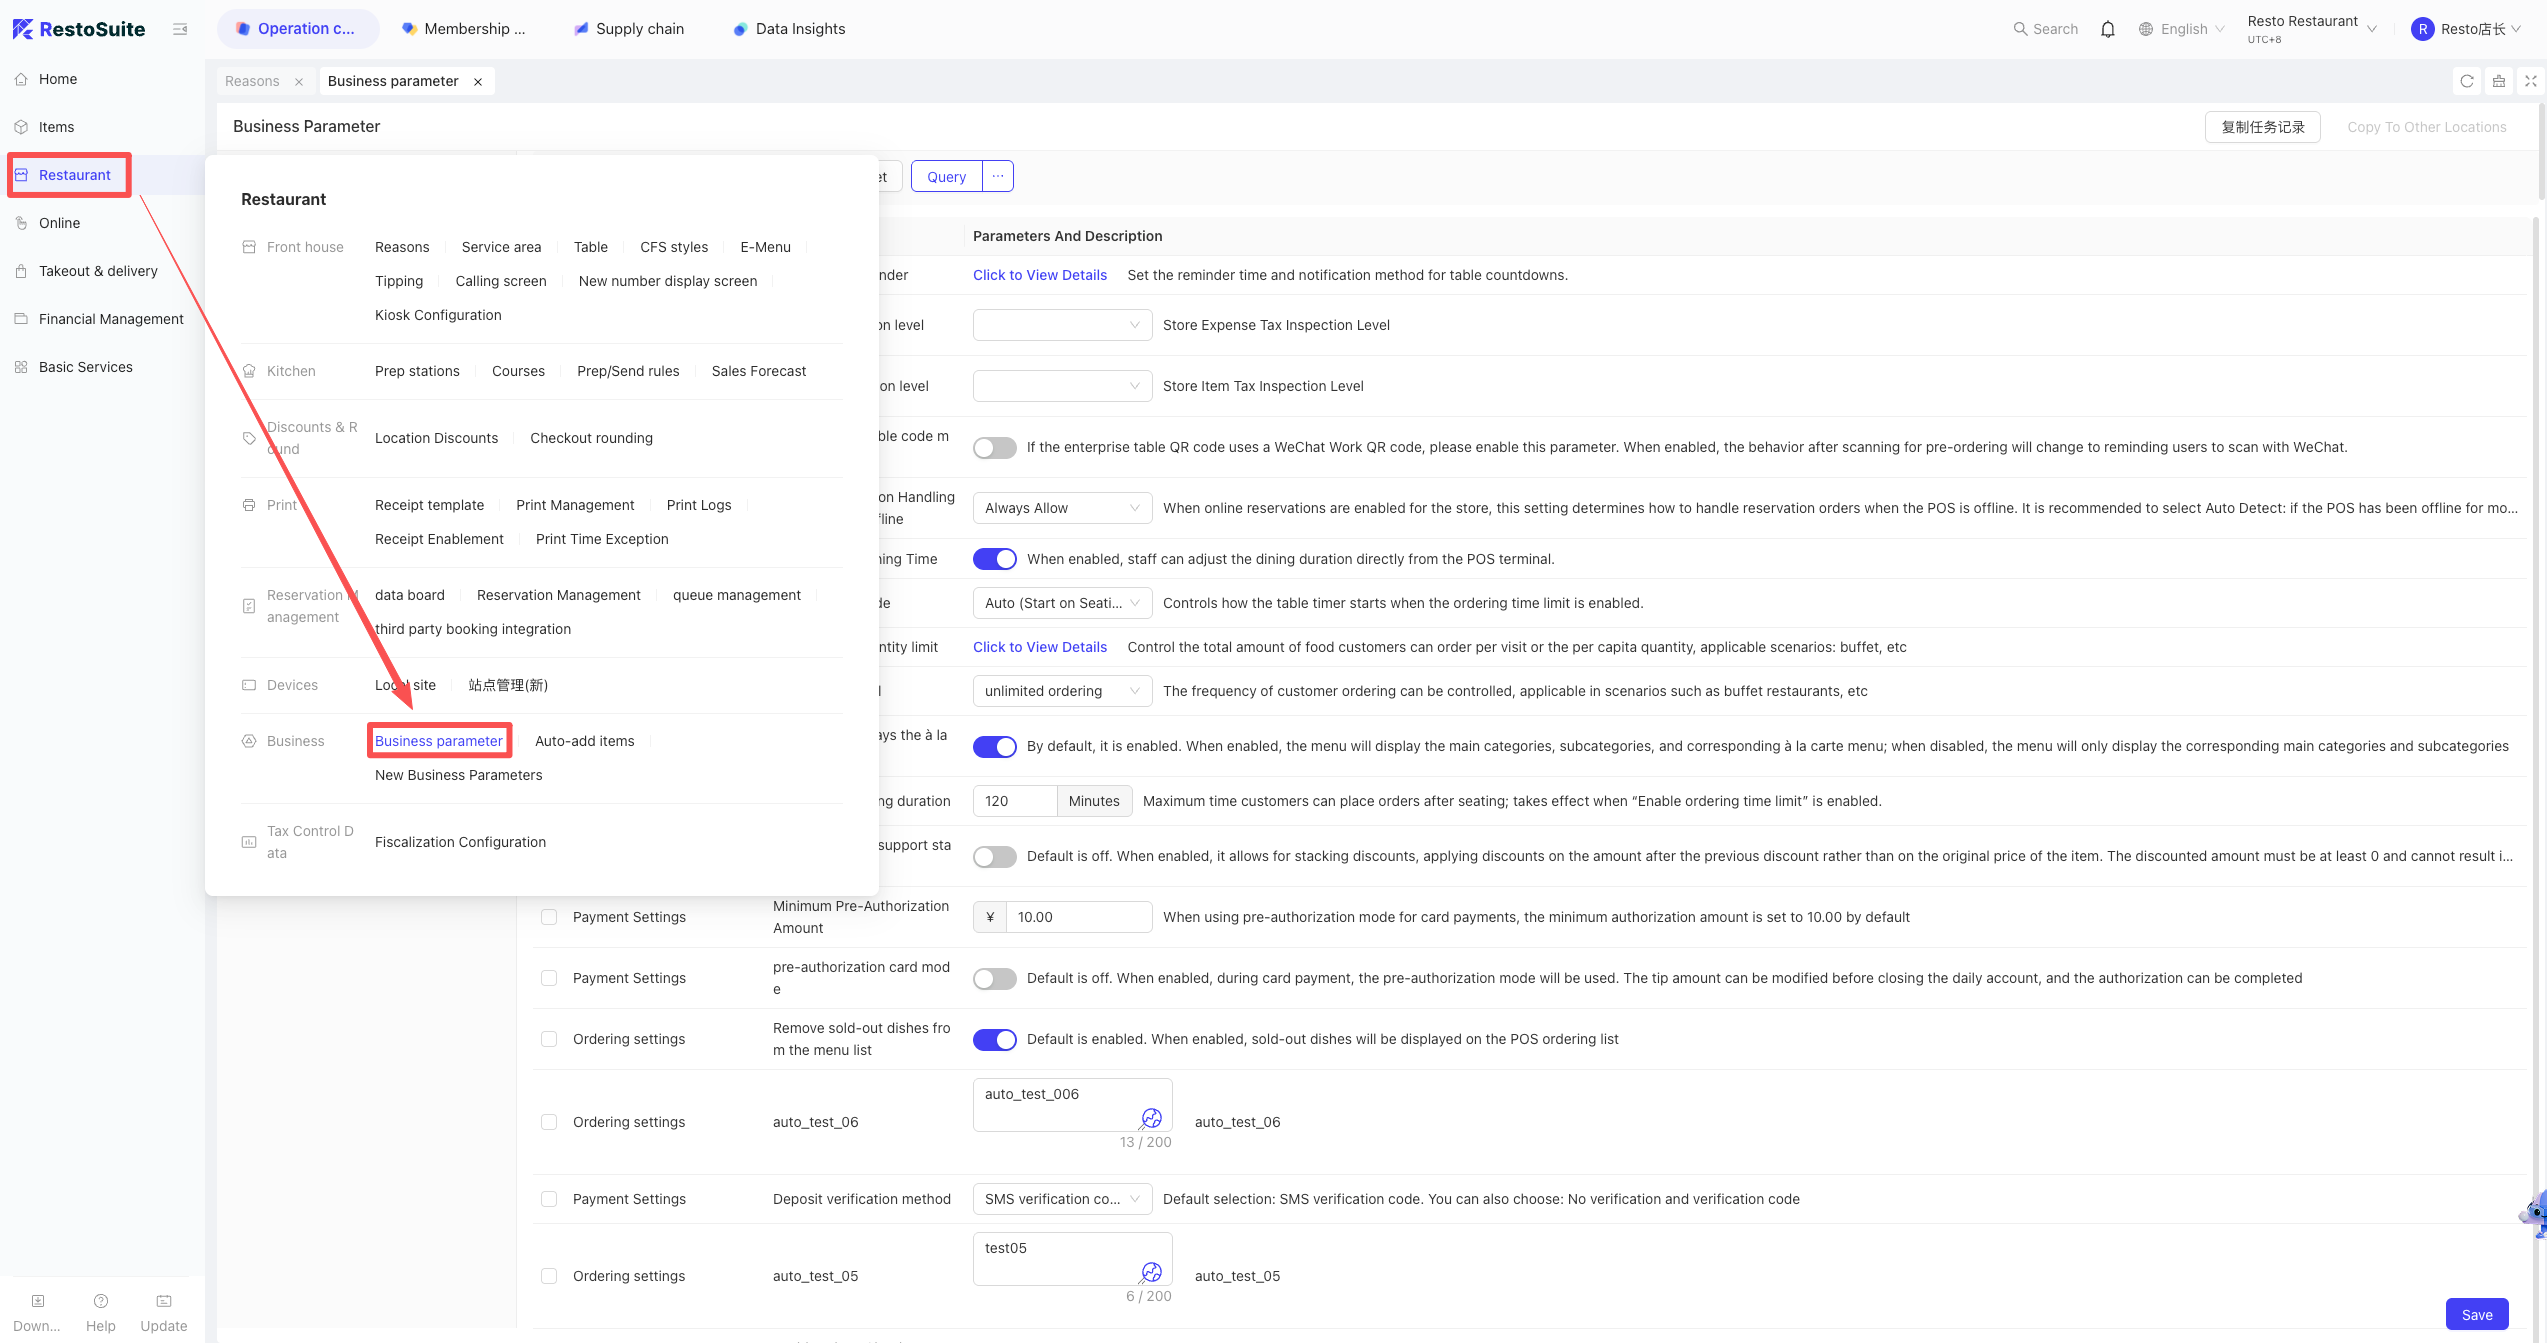
- Search for the parameter: “Enable Manual Business Day Management” and toggle it ON or OFF.
Key Notes:
- ON: EOD must be performed manually by staff.
- OFF: The system will perform an automatic EOD based on the scheduled time.
29 Does the POS support custom window resizing?
A: No, custom window resizing is not supported.
30 Can member coupons be used in the Shopping Cart interface?
A: No, member coupons can currently only be used in the Checkout interface.
31 How to integrate Meituan coupons?
-
Function Overview
- Scenario: Enables direct QR code validation of Meituan coupons on the POS, eliminating redundant operations on both the Meituan App and the POS system.
- Prerequisite: Merchants must have an active “Meituan Kaidianbao” account with group-buying services enabled.
-
Store Authorization
- Path: Log in to BO Merchant Center → Delivery & Distribution → Authorization Management.
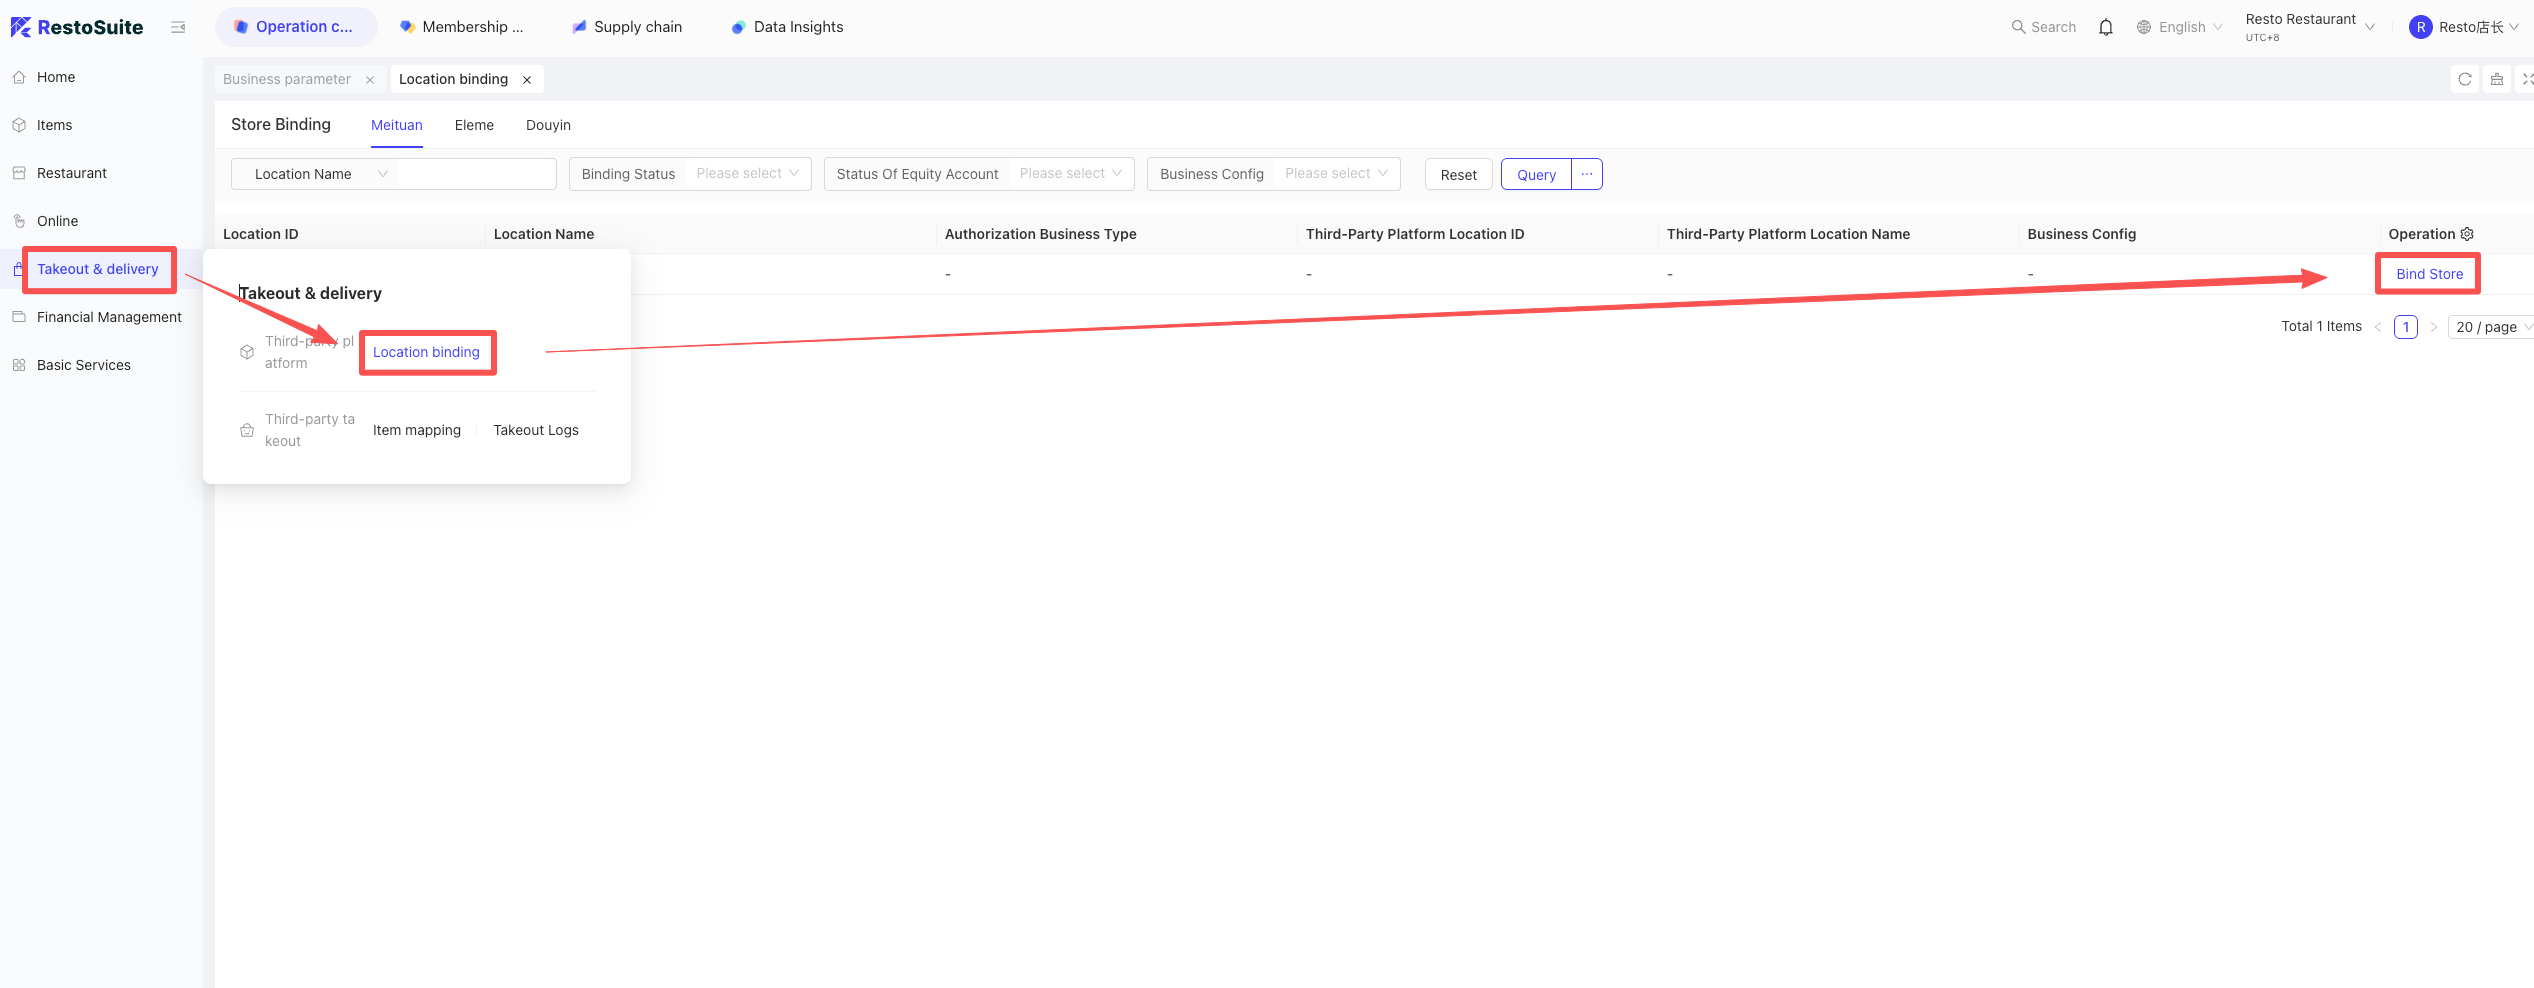
- Payment Subject: Upon successful authorization, a “Meituan Coupon” payment subject is automatically added for scanning or manual code entry.
- Path: Log in to BO Merchant Center → Delivery & Distribution → Authorization Management.
-
Item Mapping & Rules
- Mapping Steps: Log in to Meituan Kaidianbao → Item Management → Combo/Voucher. Enter our system’s “Dish Code/Spec Code” into the “Merchant Item ID” field (separate multiple IDs with commas, max 100 characters).
- Obtain Codes: BO: Operation Center → Item Management → Dish Code/Spec Code.
- Validation Rules:
- Vouchers: Applies to all dishes if no code is provided.
- Group-buy Coupons: No dishes are applicable if no code is provided.
- Matching Logic: Matches “Dish Code” first (all specs apply if matched), then “Spec Code.”
-
Validation Process
- POS: Select “Validate Coupon” → Scan or manual entry → Query → Redeem.
- Mini-Program: Supported during the online ordering process.
32 How to Integrate Douyin Coupons?
-
Function Overview
- Scenario: Realizes one-click validation of TikTok coupons on the POS to simplify the front-desk checkout process.
- Prerequisite: Single-store merchants register via “Douyin Laike”; multi-store merchants register via BD (Business Development) personnel.
-
Platform Authorization
- Path: Log in to BO Merchant Center → Delivery & Distribution → Douyin Laike Authorization.
- Binding: Go to Authorization Management → Select Store → Confirm Binding.
- Payment Subject: A “TikTok Coupon” payment subject is automatically added after binding.
-
Item Mapping & Rules
- Create Item: Log in to Douyin Laike → Item Management → Create Item (Supports Group-buy/Vouchers; seasonal/multi-pass cards are not supported yet).
- Mapping Steps: Enter our system’s “Dish Code/Spec Code” into the “Merchant Platform Coupon ID” field in the TikTok portal.
- Obtain Codes: BO: Operation Center → Item Management → Dish Code/Spec Code.
- Validation Logic: Same as Meituan (Vouchers apply to all by default; Group-buy coupons require codes; matching order is Dish Code > Spec Code).
-
Validation Process
- POS: Select “Validate Coupon” → Scan or manual entry → Query → Redeem.
- Mini-Program: Supported during the online ordering process.
33 How to perform Re-opening?
- Re-open: Re-opens orders for adding items or changing payment methods.
- Refund: Full order refund.
- Partial Refund: Refund specific items; online payments can be returned to the original source.
34 How to register a member on POS?
- POS: Member module > Add Member > Select Level > Enter Name & Phone > Click “Join” or “Join & Top-up”.
35 How to perform “Sold Out” on the POS?
- POS: Inventory Management > Dish Depletion > Select Item > Enter limit or click “Sold Out”.
36 How many days is the invoice validity period from the order date?
A: Up to 30 days.
Path: BO Group View: Restaurant Management > Tax Number Settings > Configuration.
37 How to log in to POS?
Login: Double-click icon > Enter PIN > Enter Table Interface.
38 How to perform ordering operations on the POS?
-
Open Table Identify the customer’s seating location and click the corresponding table number on the table layout screen to initiate the check.
-
Select Items Enter the ordering interface. Use the category navigation on the left to browse and click on the specific products requested by the customer to add them to the cart.
-
Adjust Quantity Tap the selected item in the cart and use the ”+” or ”-” buttons to adjust the quantity, or manually enter the specific amount.
-
Add Kitchen Remarks Click the [Kitchen Remark] button under the item. You can select from system-preset remarks (e.g., “Less Spicy,” “No Ice”) or enter a custom remark manually.
-
Place Order Carefully review the item details, quantities, and remarks. Once verified, click the [Place Order] button in the bottom right to send the order to the kitchen.
-
Print Pre-bill If the customer wishes to review the bill before payment, click the [Print Pre-bill] button. This function is available in both the “Ordering” and “Checkout” interfaces.
39 How to perform checkout on POS?
A: After ordering is complete, click the [Pay] button in the bottom right corner to enter the checkout interface. The system supports the following payment methods:
-
Scan to Pay For customers using WeChat Pay, Alipay, or UnionPay, select [Scan Pay]. Use a barcode scanner to scan the customer’s payment QR code to complete the transaction.
-
Cash Payment Select the [Cash] payment method, enter the amount of cash received from the customer, and click [Pay]. The cash drawer will automatically pop open and the system will display the change due. Once confirmed, the checkout is complete.
-
Member Card Payment
- Identification: Scan the member’s QR code or manually enter the member’s phone number and click the “Search” icon.
- Select Card: Click the corresponding “Member Card” displayed.
- Apply Coupons: If there are available coupons in the member account, click “Use” to apply for the discount.
- Confirm Deduction: verify the deduction amount and confirm.
💡Note:
If the card balance is insufficient, the system supports split payments. The remaining balance can be paid using other methods such as cash or scan-to-pay.
40 How to validate Meituan-Dianping and Douyin coupons on POS?
A: Depending on whether the store has completed platform authorization in the Back Office (BO), the validation process follows one of two modes:
-
Mode 1: Authorized Integration (Direct System Validation)
- On the checkout interface, select [Validate Coupon] as the payment method.
- When the scanning window appears, use a barcode scanner or scan box to scan the coupon QR code on the customer’s phone.
- The system will automatically connect to the platform to complete validation and deduct the corresponding amount from the bill.
-
Mode 2: Unauthorized/Manual Record (Manual Validation)
- On the checkout interface, select [3rd-Party Coupon] as the payment method.
- Manually select the corresponding coupon type (e.g., “Dianping Voucher” or “Douyin Combo Coupon”).
- Note: This mode is for bookkeeping within the POS system only. The cashier must still manually validate the coupon on the platform’s merchant app (such as TikTok Life or Meituan Kaidianbao).
41 How to manage bills and transactions on POS?
-
Bill Query Click the [Orders] button on the left side of the POS homepage to enter the bill management interface. You can search for historical bills within a specific time range and view detailed information, such as: total amount, payment method, itemized products, promotions, payment time, bill number, and transaction sequence number.
-
Anti-settlement and Refund Operations For settled orders, the system provides three processing options:
- Re-open (For incorrect table entry or modifications): Click the [Re-open] button and enter the reason. To perform a refund, click the “Delete” icon next to the payment method in the payment details. Note: If the original order was paid via WeChat Pay, Alipay, member card, or electronic coupons, the funds will be returned to the original source upon deletion.
- Partial Refund: Click the [Partial Refund] button, select the specific items to be refunded, choose the refund payment method, and enter the void reason. Once confirmed, click [Refund]; the corresponding amount will be returned to the original source.
- Full Refund: Click the [Refund] button and enter the reason for cancellation. After confirmation, the system will void the entire order and automatically execute an original-source refund.
42 How to use Inventory Management on POS?
- Overview The inventory management module on the POS is primarily used for “Sold Out” (Dish Depletion) operations. It allows cashiers to mark items as unavailable in real-time when stock or ingredients run out, preventing customers from placing invalid orders.
-
Setting an Item to “Sold Out”
- Click [More] — [Inventory Management] on the left navigation bar.
- Under the [In-Stock] tab, browse or search for the item you wish to mark as sold out.
- Click the button next to the item. The product will be removed from the ordering interface immediately.
-
Canceling “Sold Out” Status (Restocking)
- Click [More] — [Inventory Management] on the left navigation bar.
- Switch to the [Sold Out] tab to view the list of currently unavailable items.
- Click the [Sold Out] button next to the item to change its status back to [In-Stock]. Once restored, the item will reappear on the ordering interface for selection.
43 Why is the business day not changing after End-of-Day (EOD)?
A: You must log out and log back in after EOD; otherwise, the business day displayed at the top will not update.
44 How to split bills (AA Checkout) on the POS?
-
Enter Split Bill Mode On the payment interface after ordering is complete, click the [Split Bill] button at the bottom.
-
Set Split Quantities Select the [Average Split] option and enter the number of people to share the bill (e.g., for a 2-person AA split, enter “2”). The system will automatically divide the total amount equally.
-
Correction and Reset If the split quantity is entered incorrectly, you can click the [Re-split] button before final confirmation. The system will revert to the original bill status, allowing you to re-configure the split.
-
Complete Payment Once the split amounts are verified, click [Confirm]. The system will generate the corresponding sub-bills. Select each sub-bill individually to enter the checkout interface and complete the payment process.
45 How to use temporary table QR codes on the POS?
-
Business Scenario The cashier initiates the “Open Table” process and prints a receipt containing a temporary QR code for the customer. After being seated, the customer scans the code to order independently, and the order syncs automatically to the POS and kitchen.
-
Operating Steps
- Open Table & Print Code:
- Perform the “Open Table” action on the POS table interface. Once in the ordering screen, click the [Print Table QR] button. The system will automatically print a temporary QR code for that specific table via the receipt printer.
- Customer Self-Ordering:
- The customer takes the QR code to their seat and scans it using WeChat to enter the mobile ordering interface for their table.
- Submit Order: After selecting items, the customer clicks “Finished” and then the [Place Order] button.
- Automatic Sync: Once the order is submitted, the items will be displayed and announced in real-time on the POS system for the corresponding table.
- Open Table & Print Code:
46 How to set the rows and columns for the POS table interface?
Path: POS > Settings > General Settings > Table Display Settings > Set Rows/Columns.
47 Does the POS support separate displays of Cash Balance and Bonus Balance when querying a member?
A: Currently, the system does not support displaying “Cash Balance” and “Bonus Balance” separately.
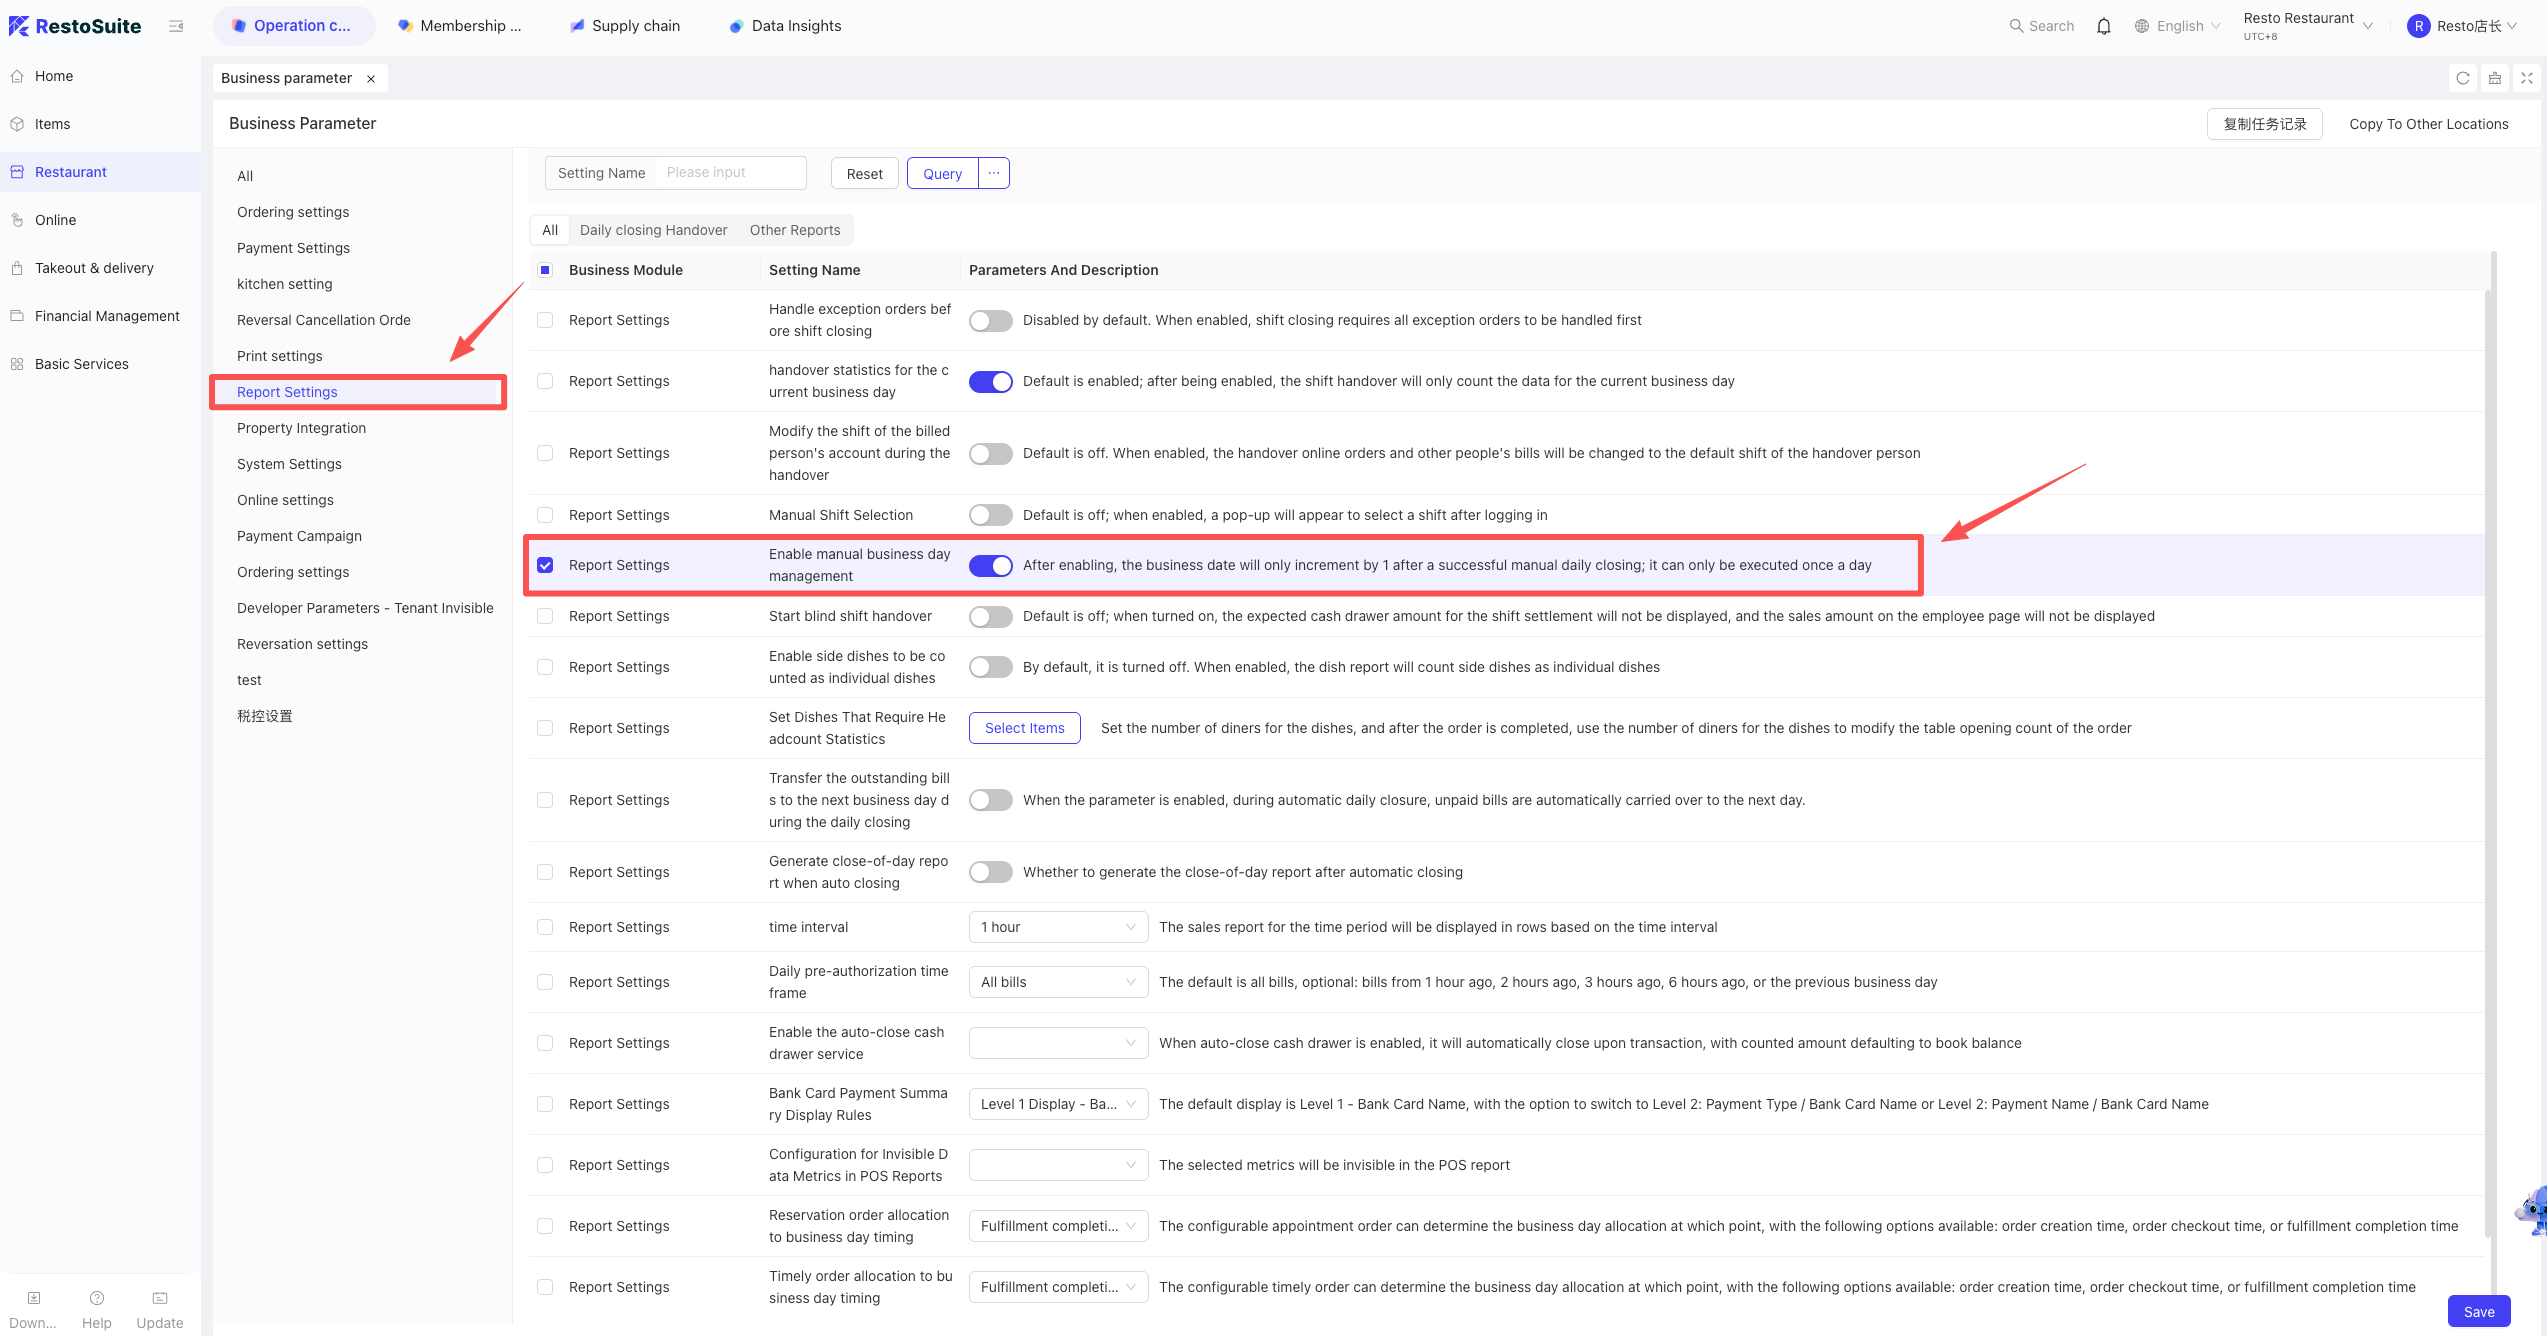
48 How to enable Manual End-of-Day (EOD) on the POS?
Path: BO (Store View) > Operation Center > Restaurant Management > Business Parameters > Enable “Enable Manual Business Day Management”.

Note:
Once enabled, the business date will only advance (+1) after a successful manual EOD. This operation can only be performed once per day.
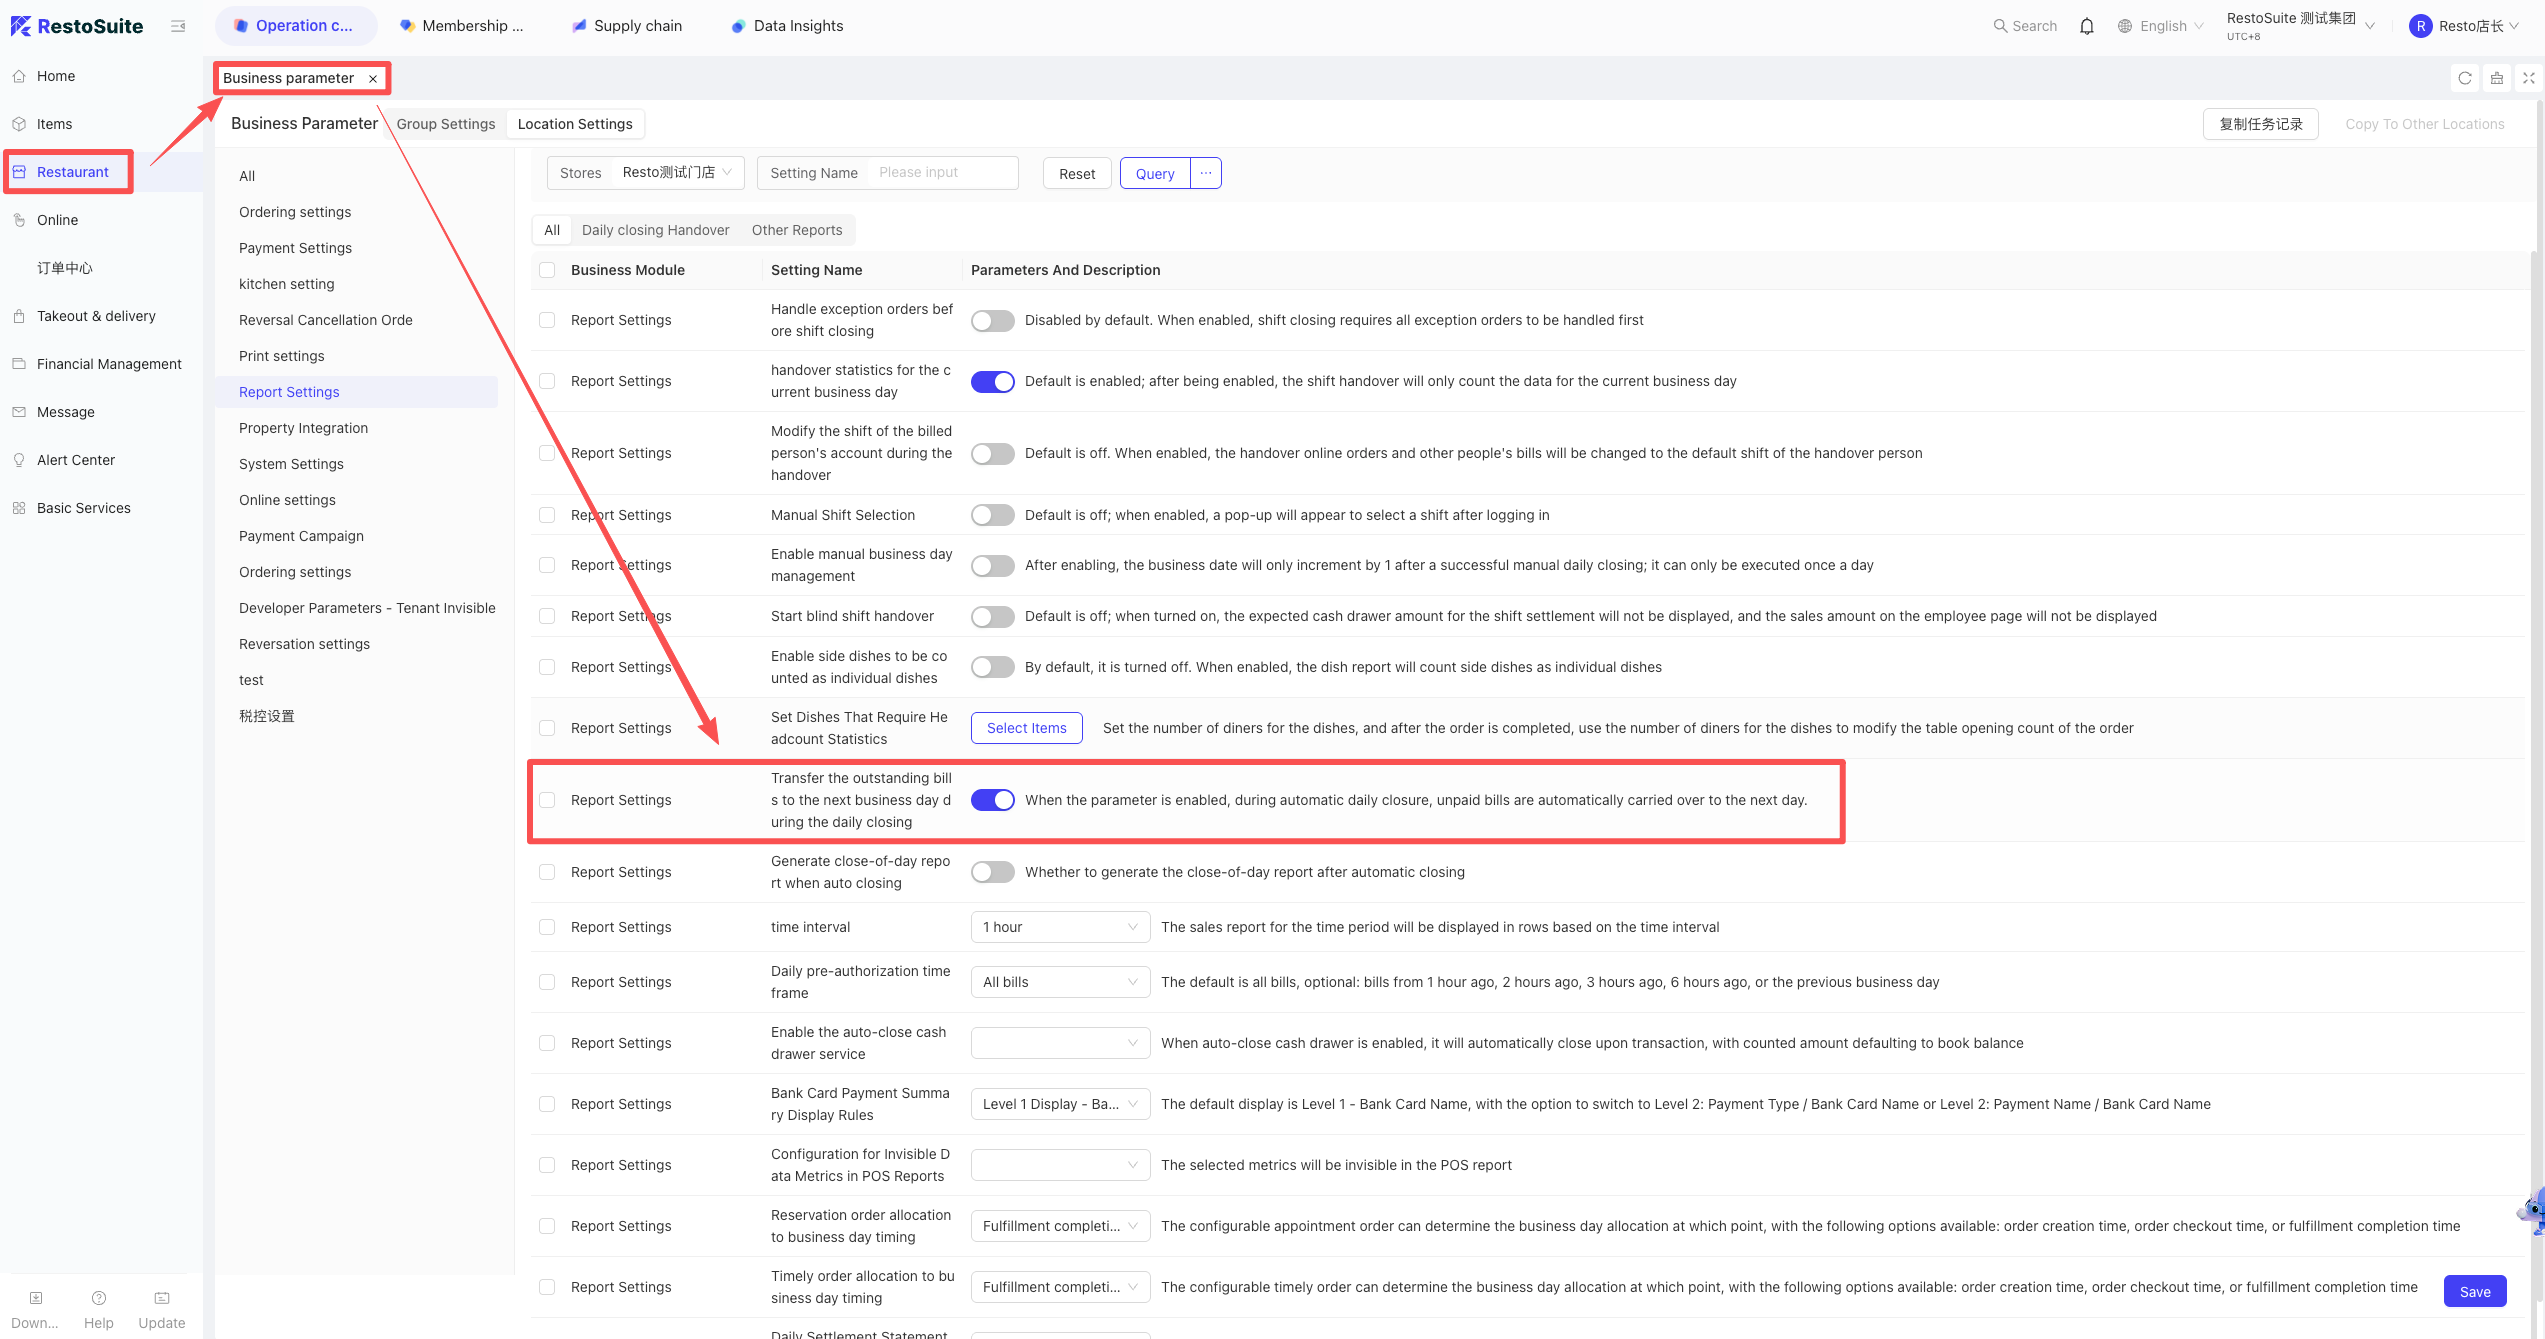
49 Can unpaid bills be moved to the next business day under automatic EOD?
Description:
Yes. Once enabled, any bills that remain unsettled during the automatic EOD process will be automatically transferred to the following business day.
Path:
BO (Store View) > Operation Center > Restaurant Management > Business Parameters > Enable “Transfer unpaid bills to next business day during EOD”.
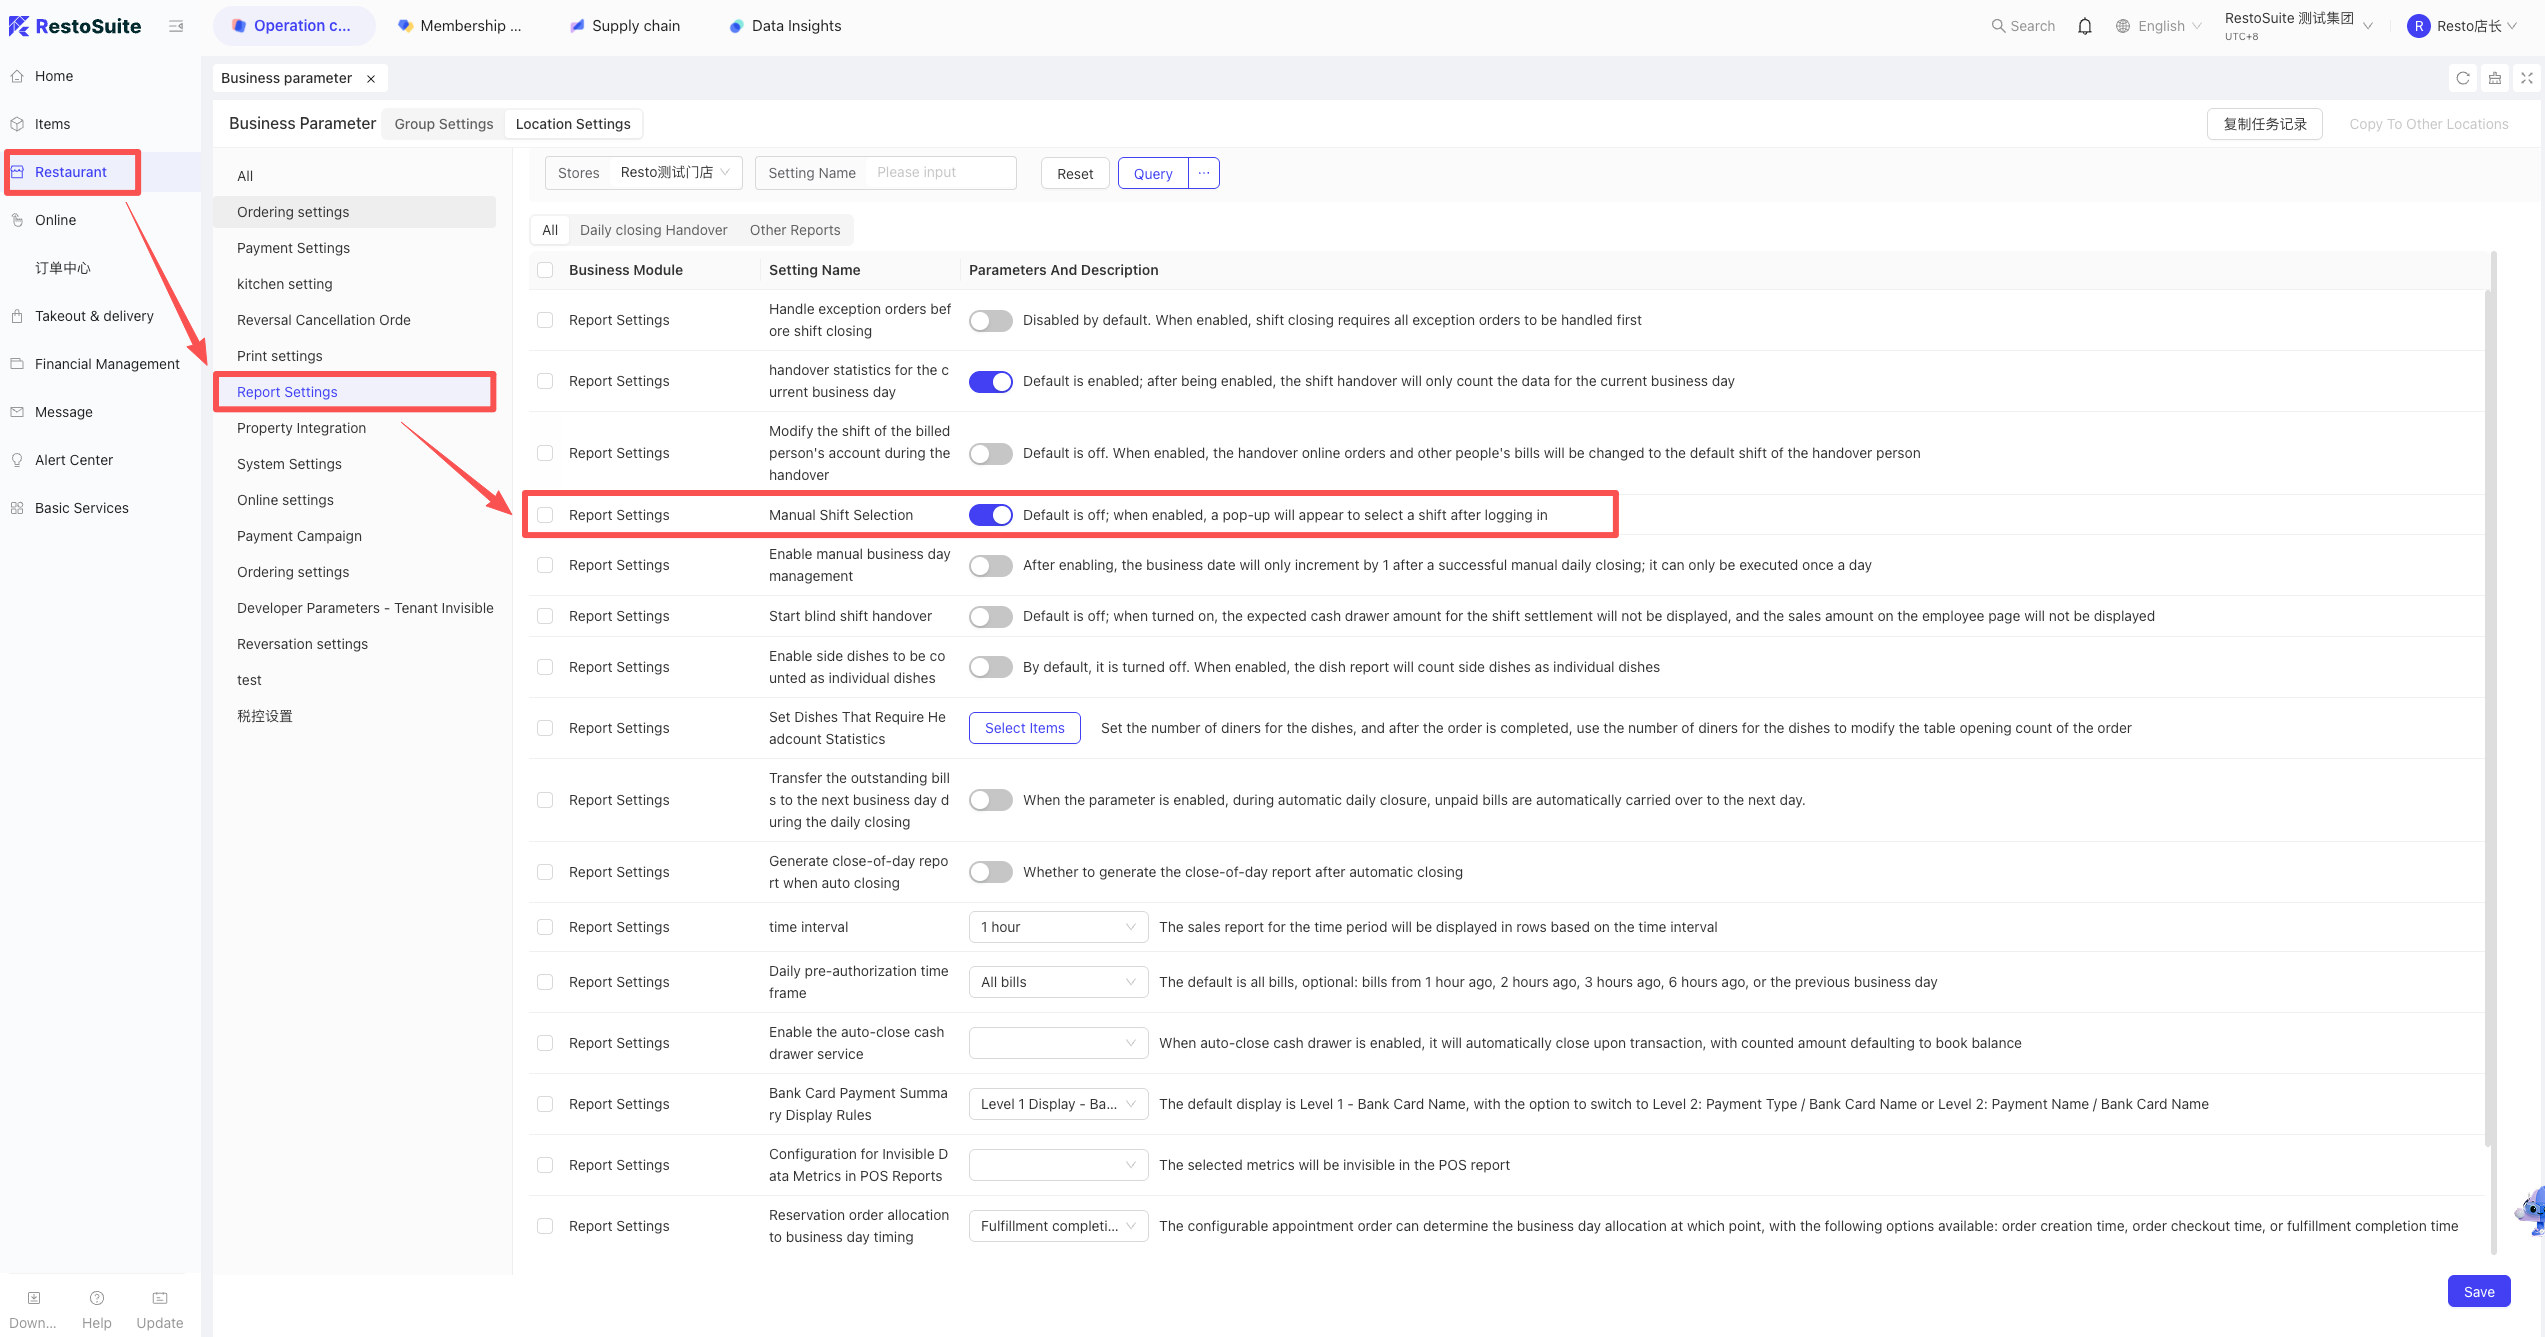
50 How to select a shift on the POS login screen?
- Path: BO Store View: Restaurant Management > Business Parameters > Enable “Select Shift at Login”.
51 How to hide the cash drawer amount during shift handover?
A: You need to click the “Blind Handover” button.
Path: BO Store View: Restaurant Management > Business Parameters > Enable “Blind Handover”.
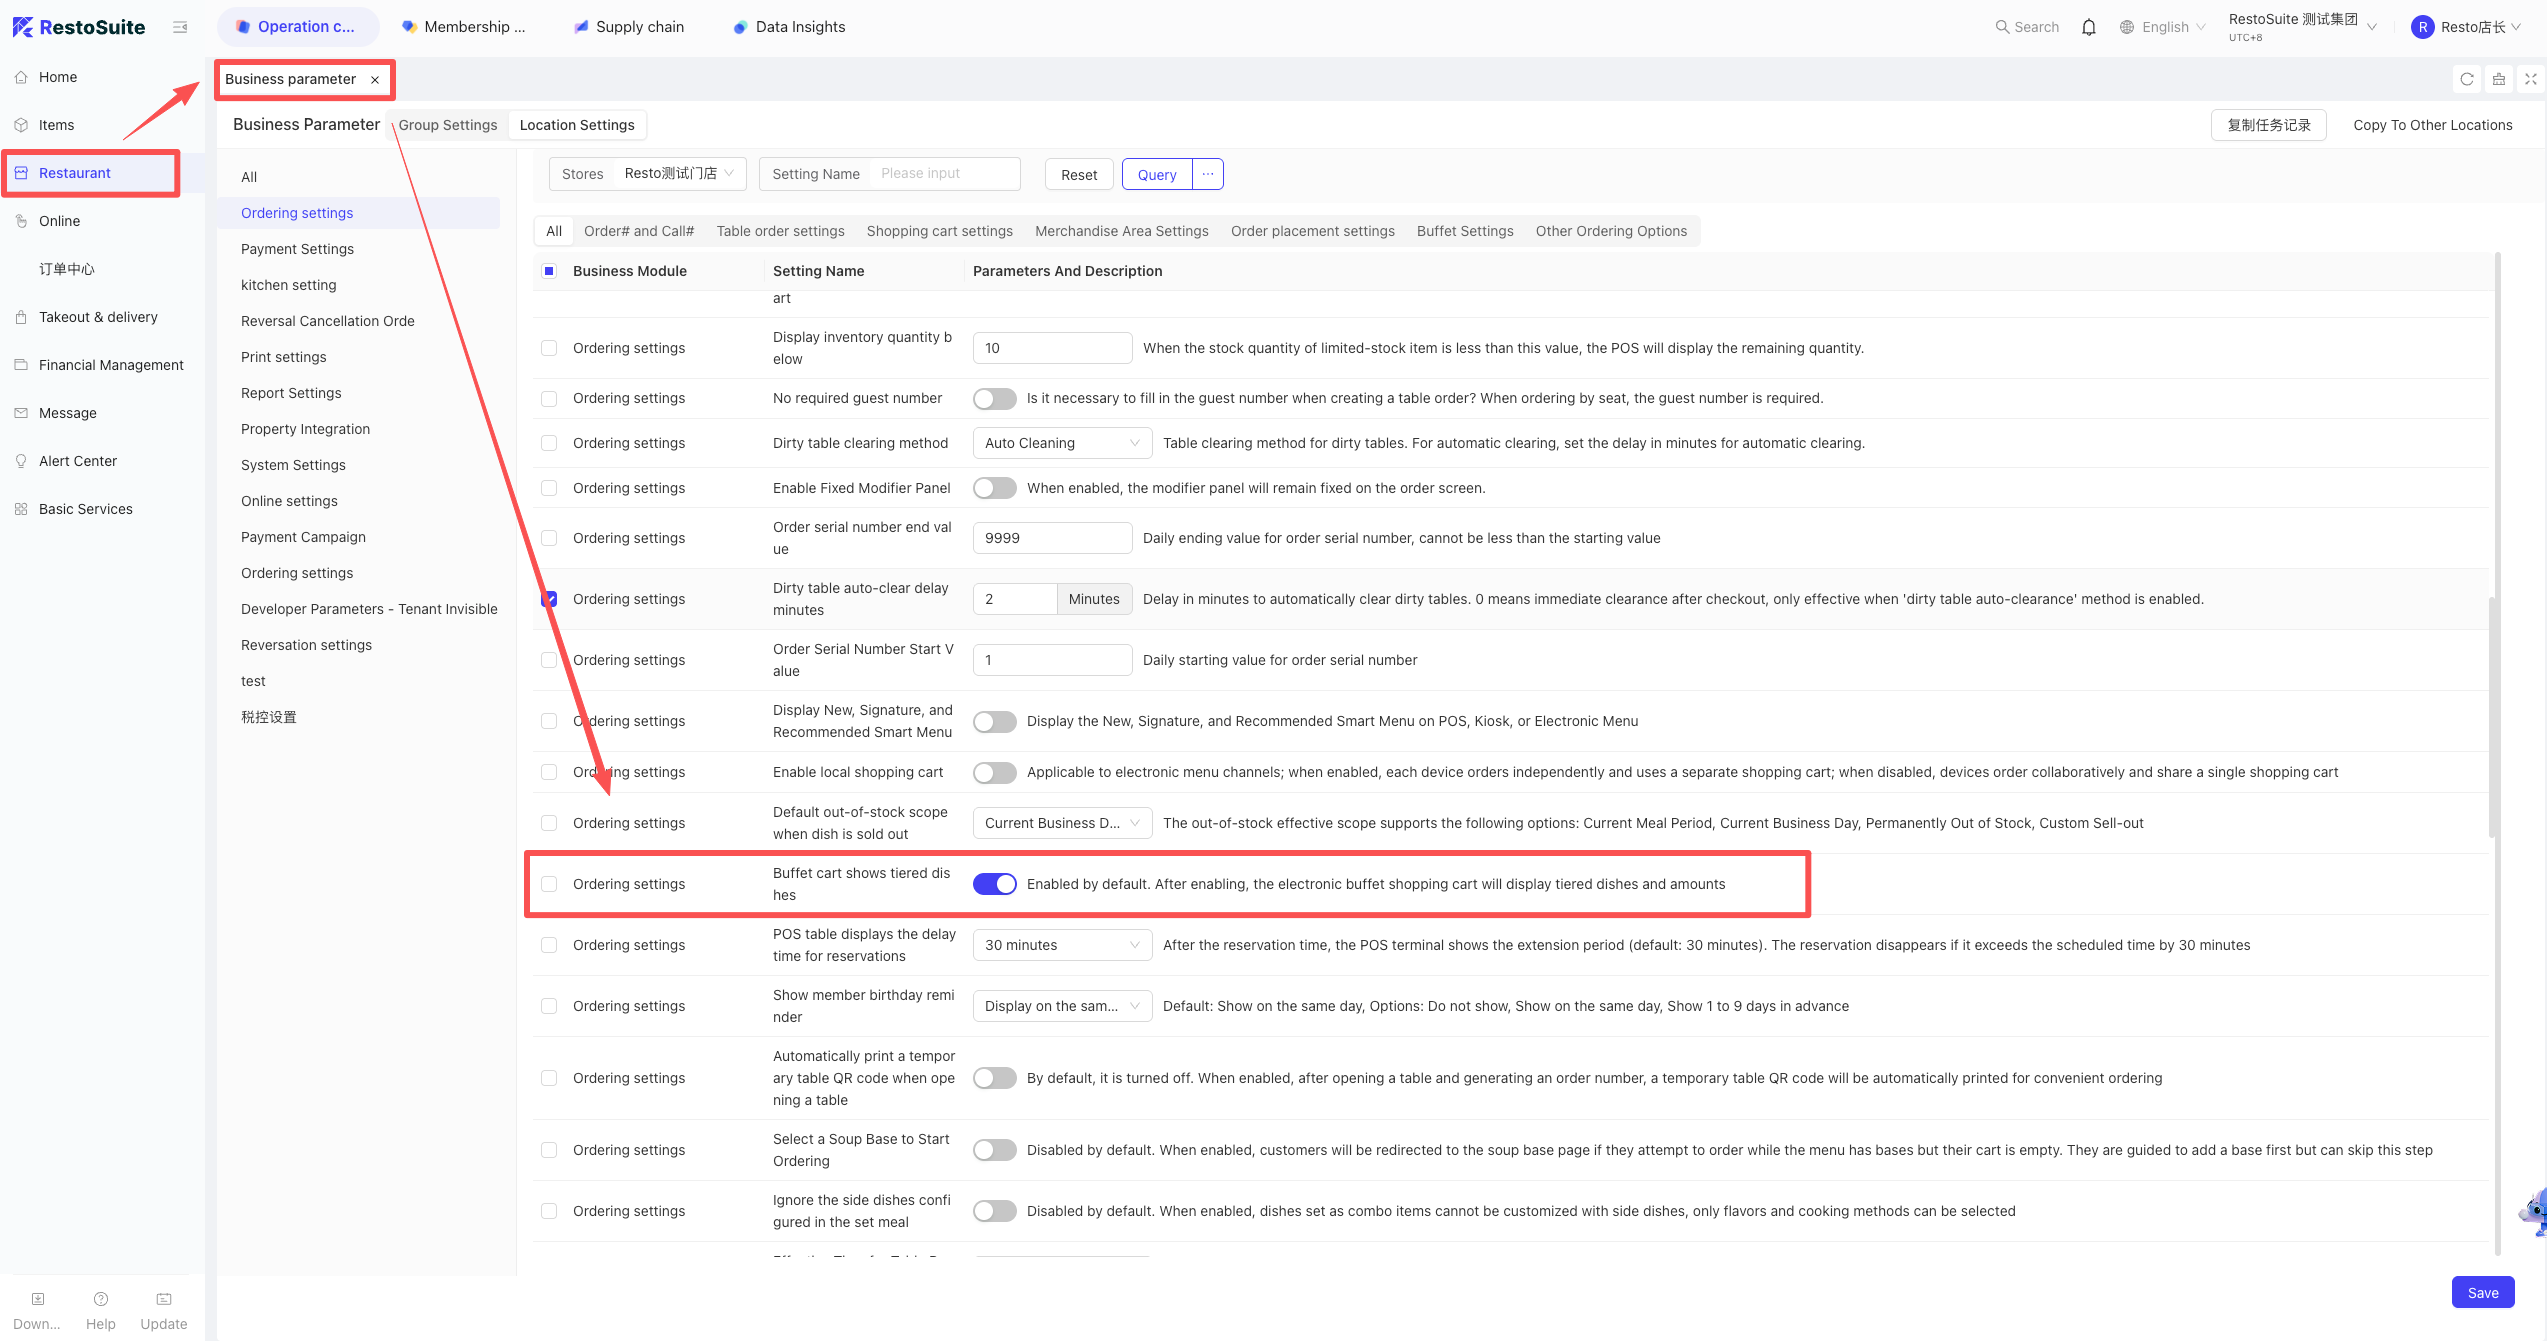
52 How to set the table clearing time?
- Path: BO Store View: Restaurant Management > Business Parameters > Set “Dirty Table Auto-Clear Delay (Minutes)“.
53 How to handle POS activation error: “Shop active failed: invalid activation code”?
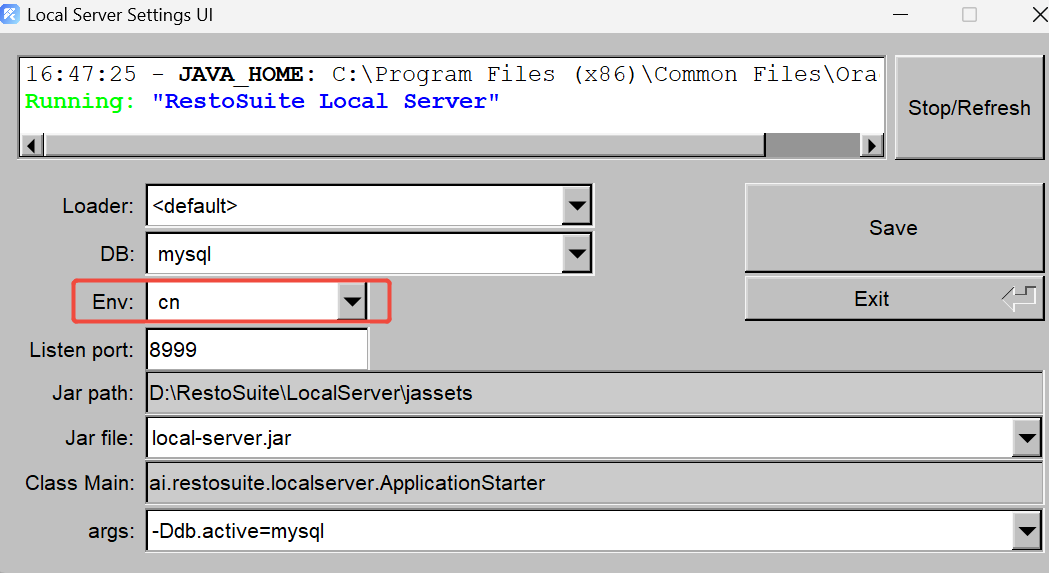
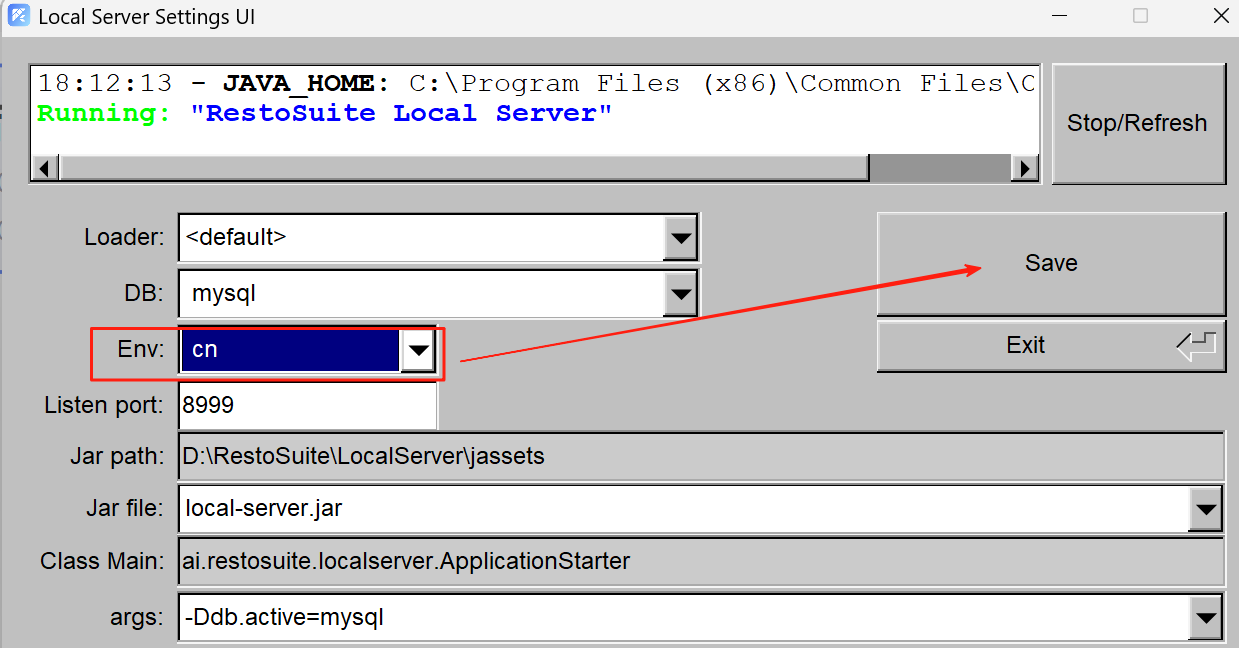
A: Open the config.service tool and verify if the “Environment” selection matches the store’s actual region (e.g., cn, sea, US, eu).
54 How to cancel unpaid orders on POS?
A: Go to the Orders interface on the POS, locate the unpaid order, and click Void/Refund.
55 Can scanning a QR code for an invoice automatically retrieve the bill amount?
A: Yes, once integrated, scanning for an invoice will automatically retrieve the bill amount.
56 Can side dishes be changed after the order is placed?
- No. If a side dish needs changing after placing the order, the entire item must be voided and re-ordered.
57 Does the system support kitchen remarks for side dishes or combo sub-items?
- Side Dishes: Currently not supported; remarks can only be applied to the main item.
- Combo Sub-items: Supported. Select the sub-item within the combo to customize and add remarks.
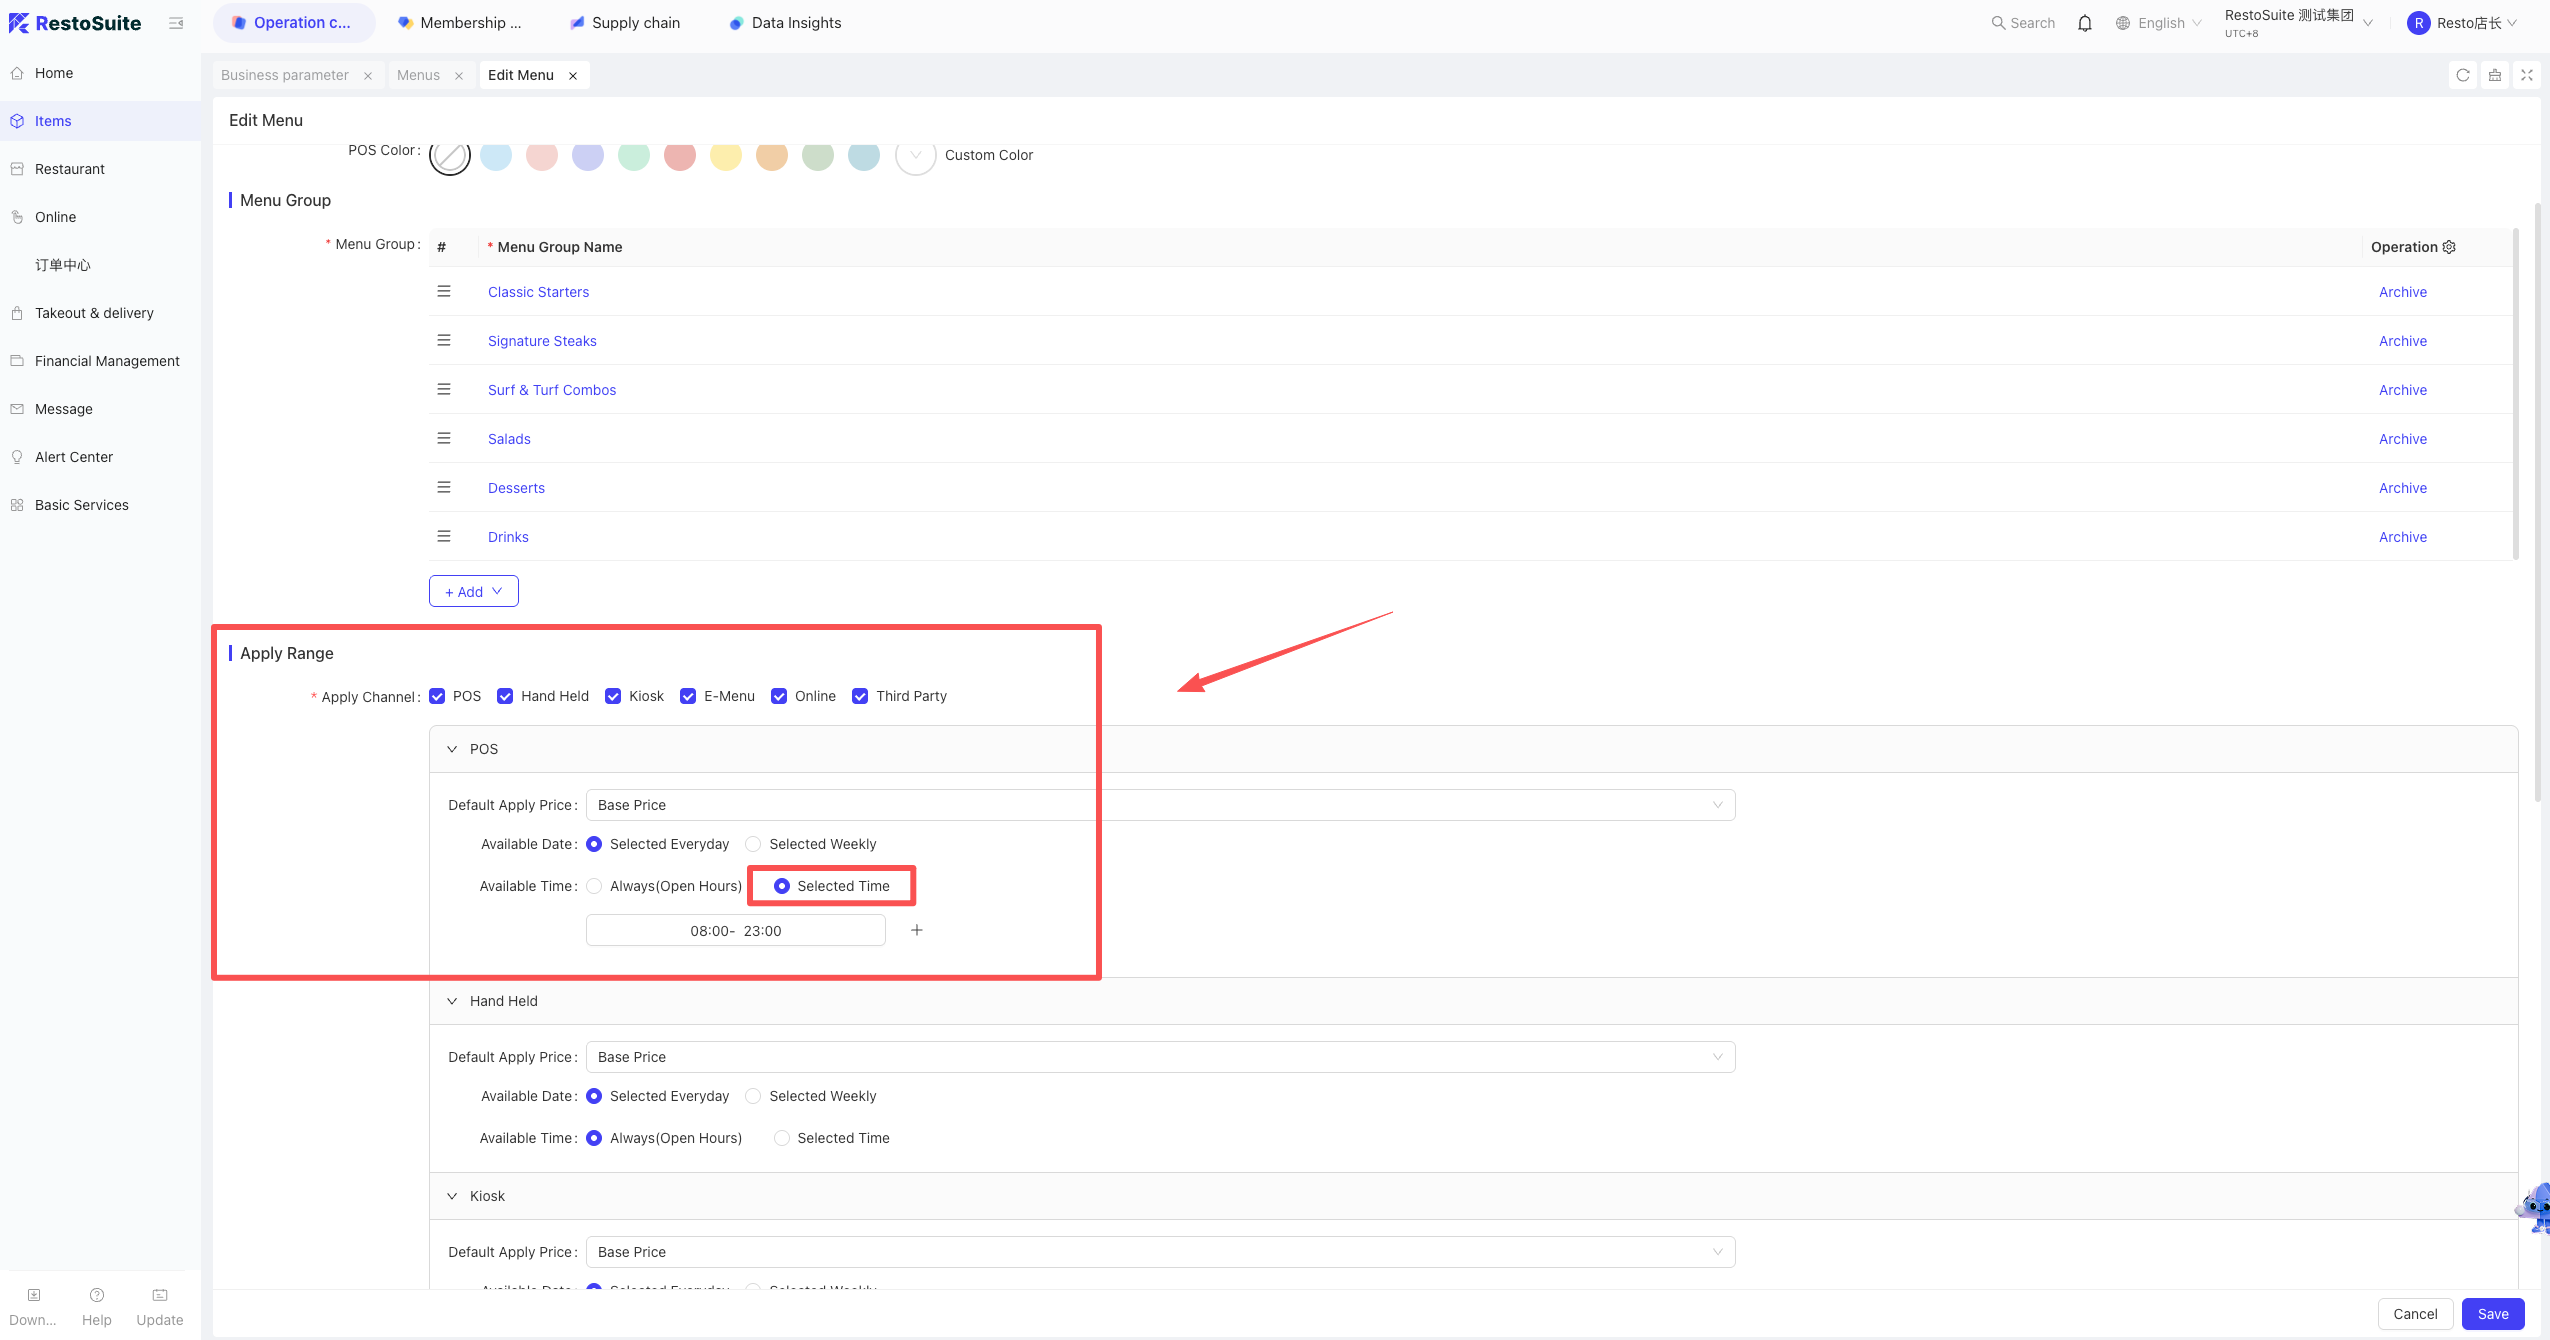
58 How to set the effective time for a menu on POS?
-
Use Case: Ideal for time-specific menus (e.g., Breakfast, Lunch). For example, a breakfast menu can be set to appear only from 5:00 to 10:00; it will be hidden from POS at all other times. Note: Effective for Windows POS V1.1.30.13767 and above.
-
Path:BO (Store View) > Product Management > Menu Management.
- Operating Steps: Edit the desired menu and configure the specific “Effective Time”.
59 How to cancel tips?
- On the checkout interface, click Add Tip again, then select None or enter 0 and click Add.
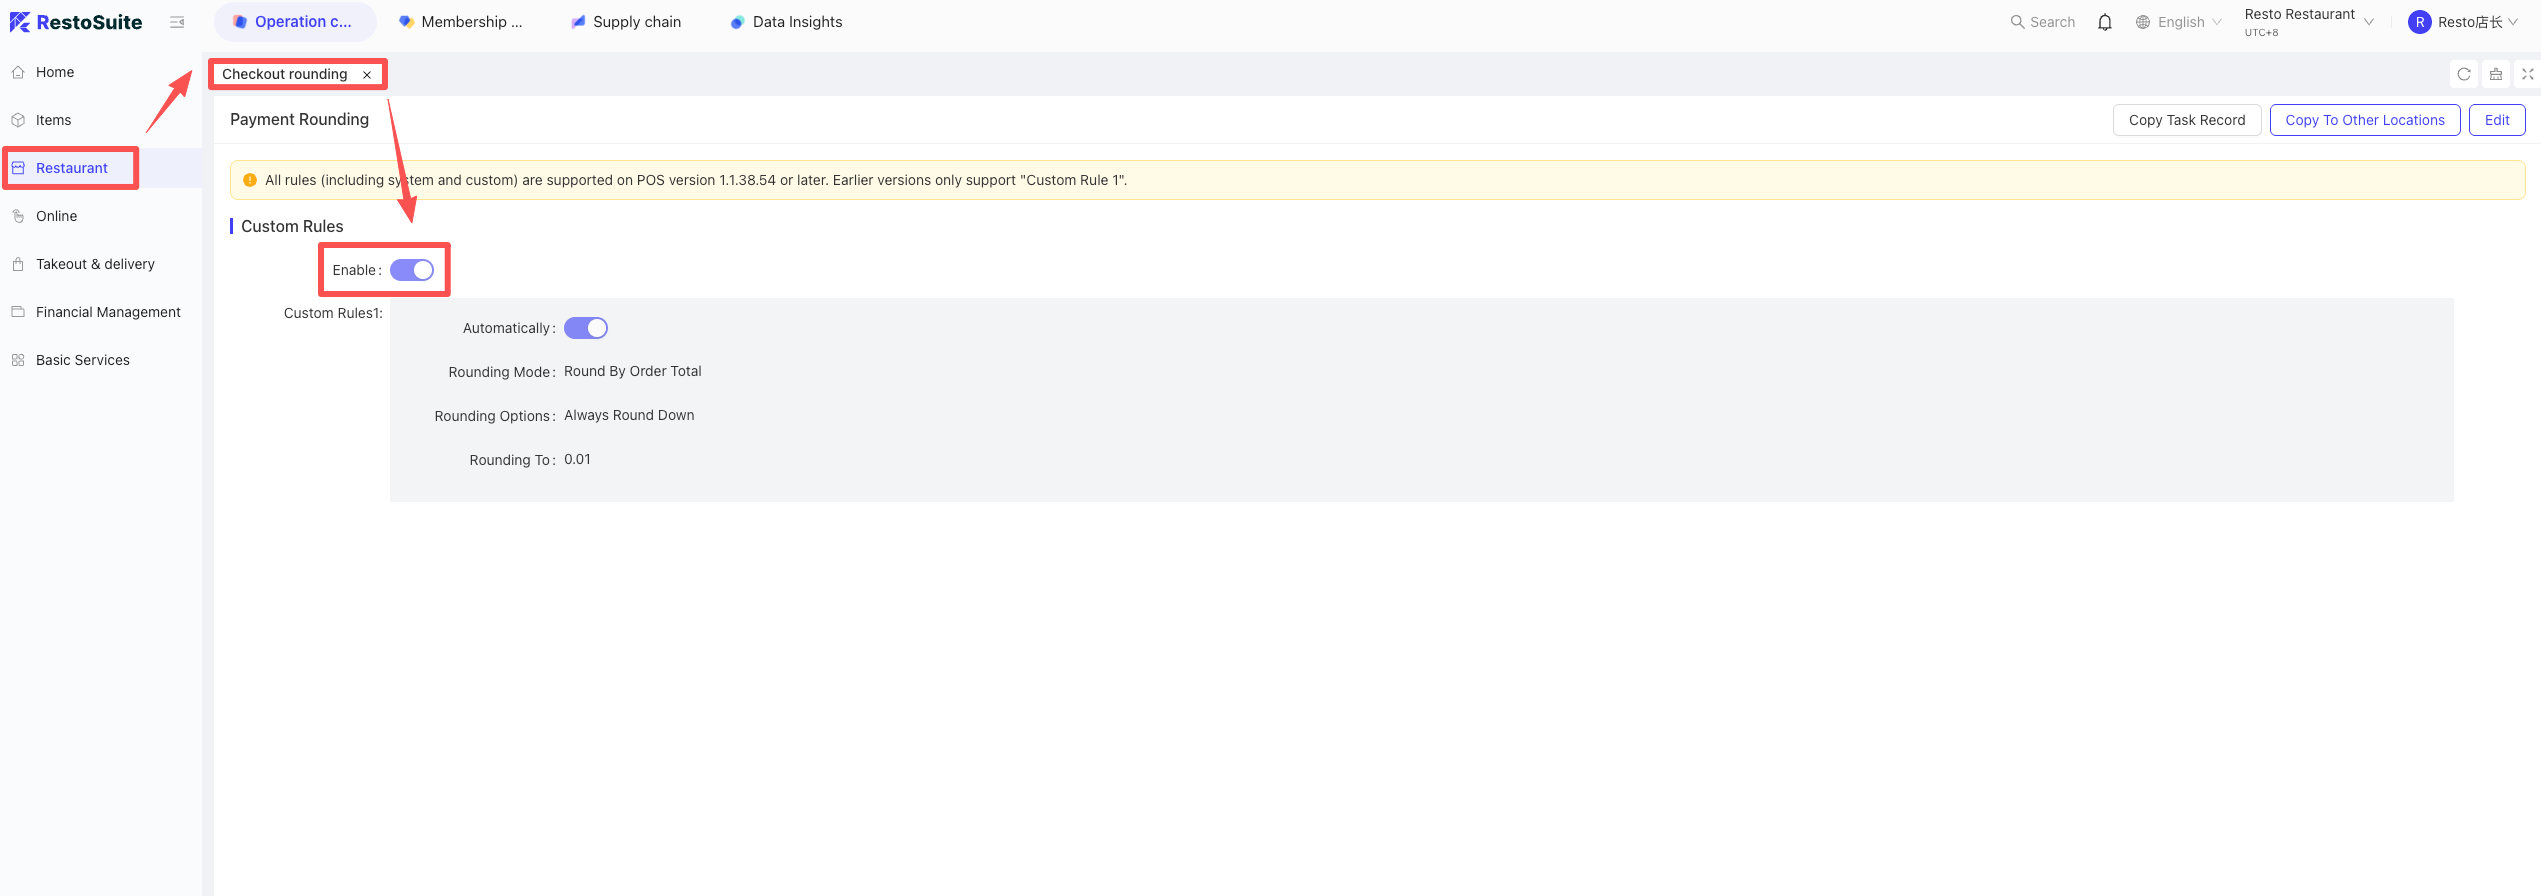
60 Why is the “Rounding” button missing from the checkout interface?
- Check if Settlement Rounding Rules are enabled for the store in the BO.
- Check if a specific settlement method is pre-selected; if so, the Rounding button will not be shown separately.
61 How to stop identical items from merging during ordering?
- Path: BO Store View: Business Parameters > Enable “Merge identical unplaced items during ordering”.
62 Where to set the auto-recovery quantity after dish depletion?
Path: BO: ltem Management > Edit ltem > Set “ltem Sales Limit”.
63 How to process checkout for coupons validated outside the system?
- Business Scenario:Used for coupons validated on 3rd-party platforms (e.g., paper vouchers or manual platform validation) that are not directly integrated with the POS system.
- BO Path:BO (Store View) > Operation Center > Restaurant Management > Store Settlement Method.
-
Setup Steps
- Click [Add] in the top right corner.
- Enter basic info (e.g., Name: “80-for-100 Voucher”), configure the details, and click Save.
- Restart POS: Fully exit and log back in to sync the new settlement method.
- Click [Add] in the top right corner.
-
POS Operation
- On the checkout screen, select [Custom Coupon] or the specific settlement method created.
- Select the desired voucher and enter the quantity used.
- Click [Confirm]; the system will deduct the amount and add the payment subject to the bill.
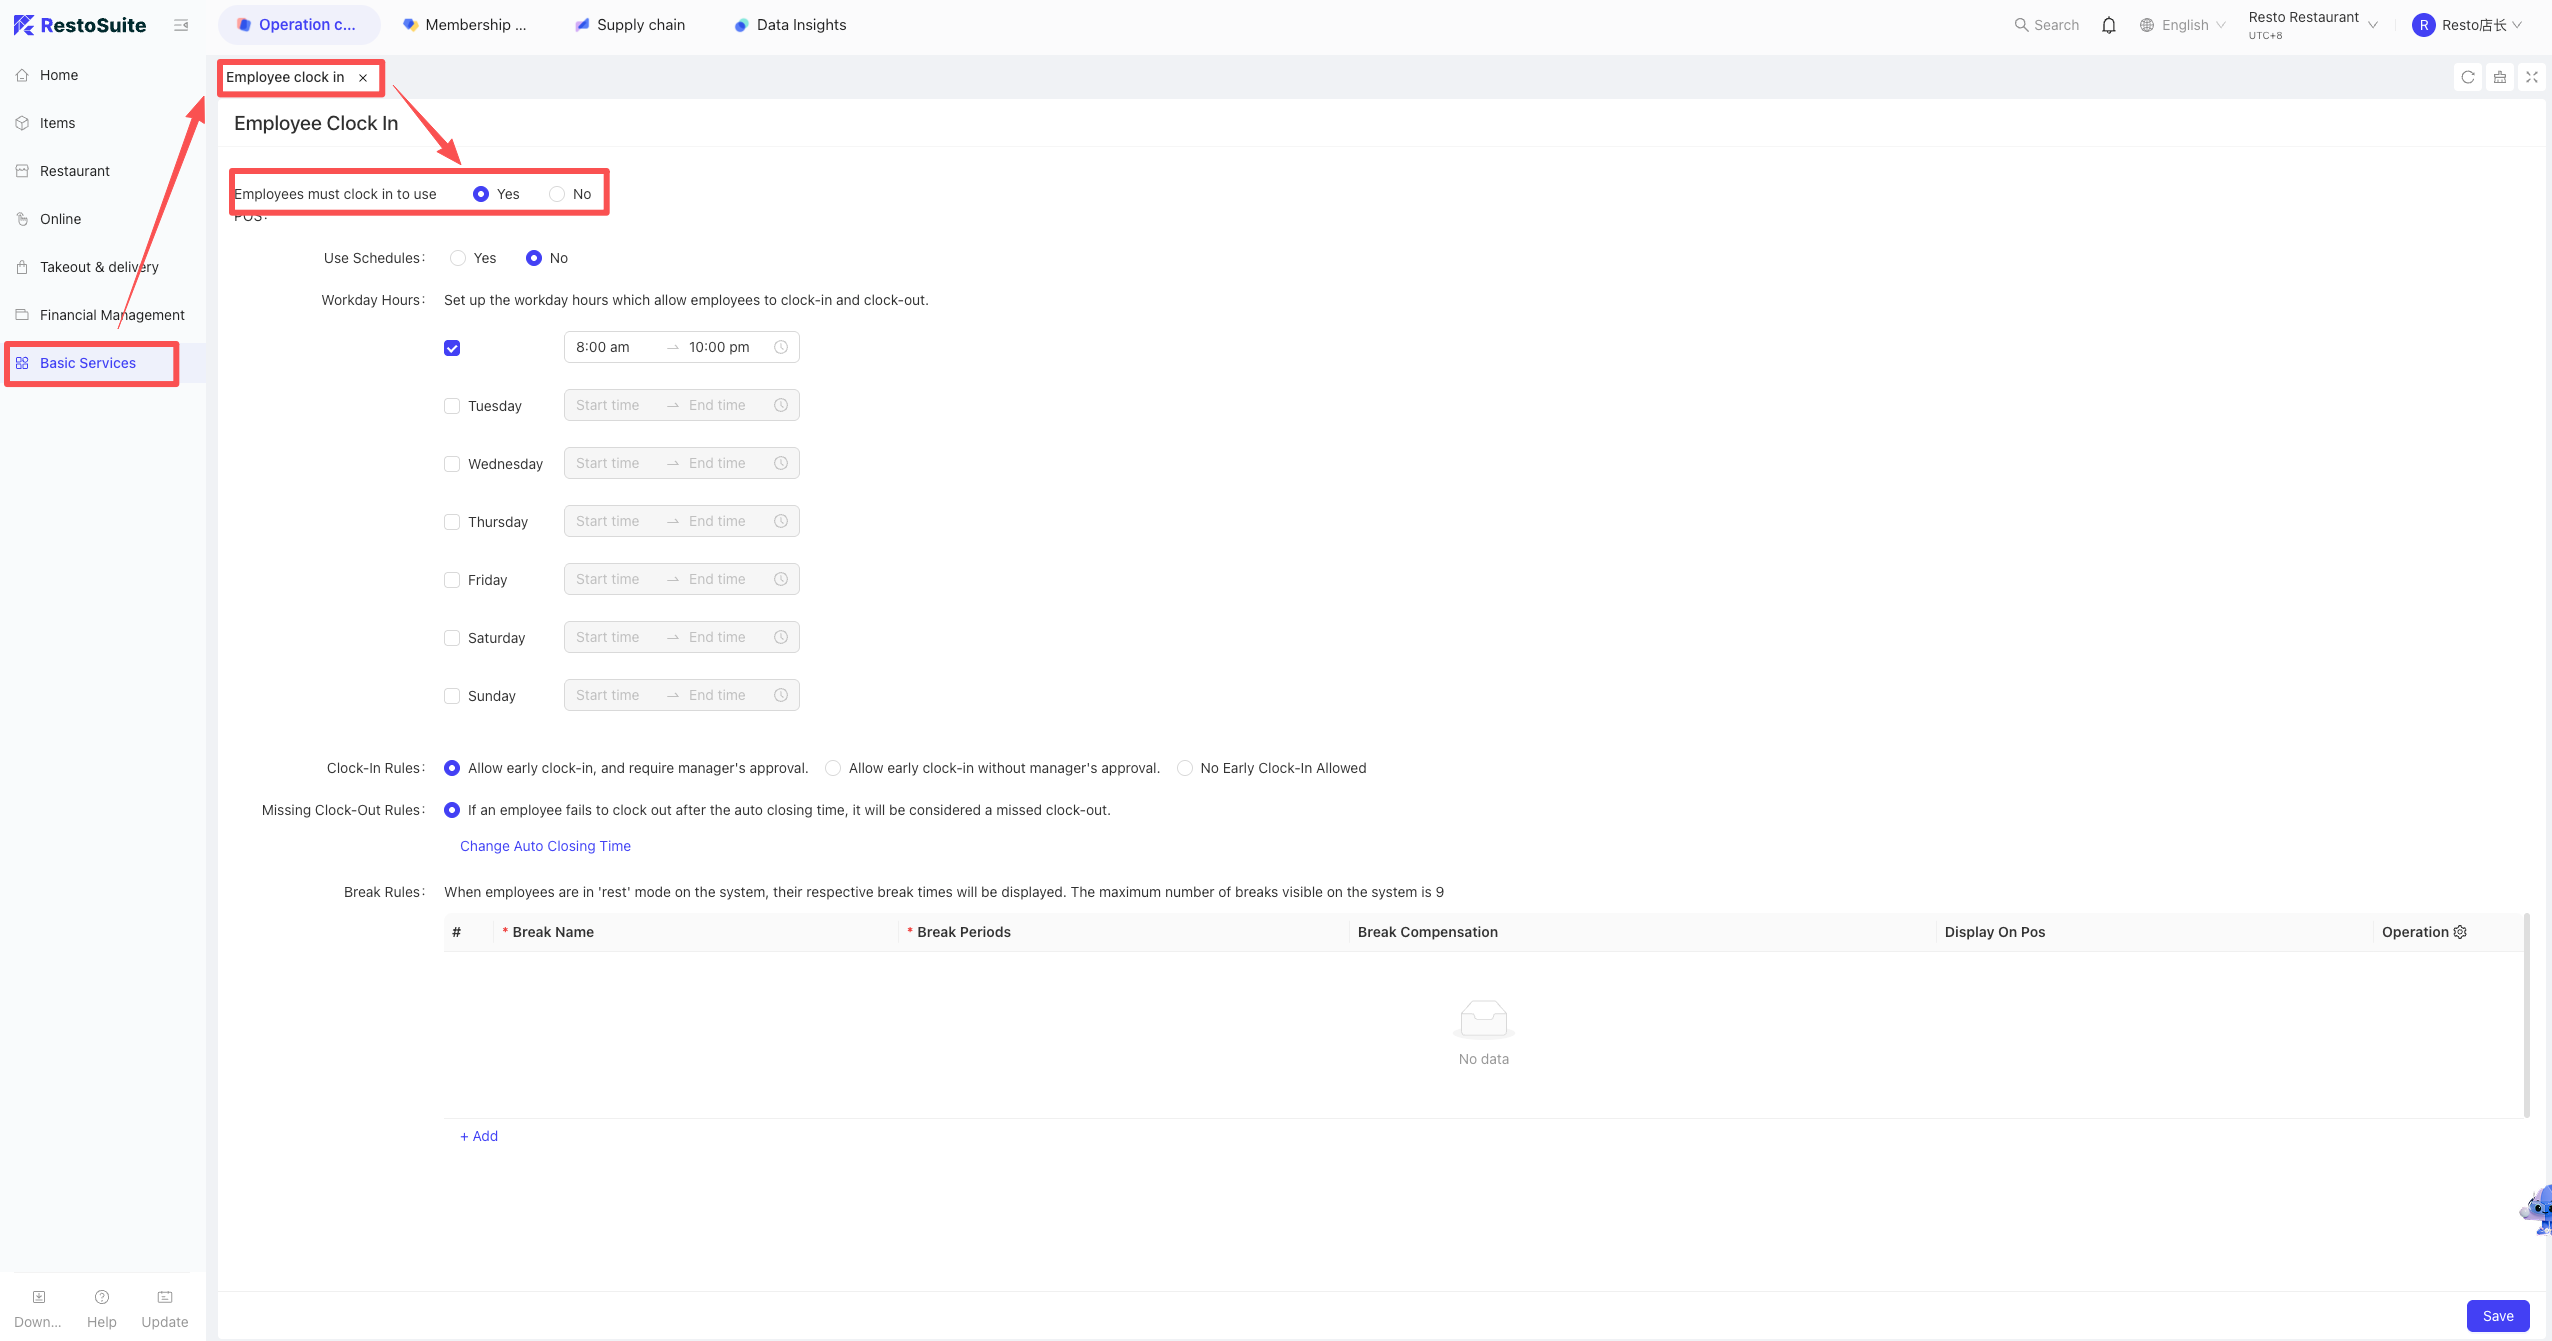
64 How to set up staff clock-in on the POS?
Note: Once enabled, staff must clock in to use the POS.
Path: BO Store View: Basic Services > Staff Clock-in Settings > Enable and set rules.
65 How to handle POS activation error: “Shop active failed: Localserver already exists…”?
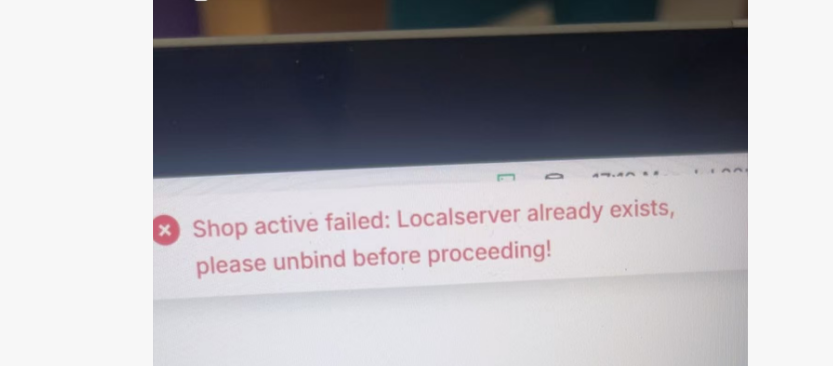
-
Cause the current store (station) is already registered on another device, or the previous installation was not unbound before re-installation, causing an authorization conflict.
-
Solution
- Log in to the BO and switch to Store View.
- Navigate to: Operation Center > Restaurant Management > Station Management.
- Locate the corresponding station name and click [Unbind].
- Return to the POS and proceed with registration and activation again.
66 Does entering an arbitrary remaining cash drawer amount affect EOD calculations?
A: It does not affect the business day total calculation, but it will cause a cash discrepancy. It is recommended to enter the correct amount.
67 Does the POS support custom sorting of the left functional list?
A: No, custom sorting is not supported.
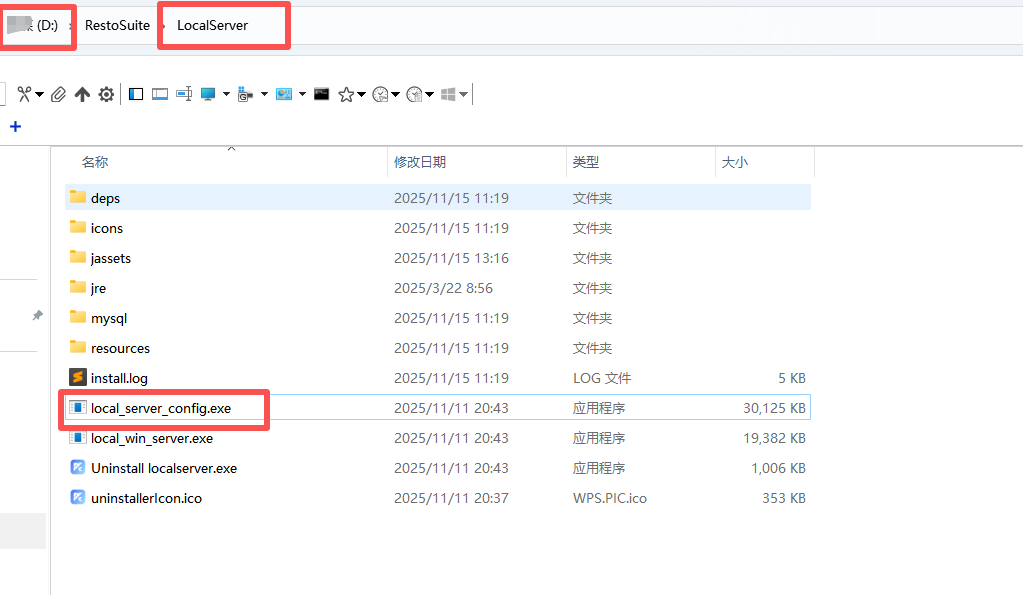
68 How to switch the operating environment after POS installation?
- Path: On the device where the POS is installed, open the config.Service application.
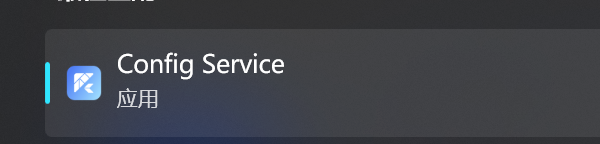
- Operating Steps
- Locate the Env option within the config application.
- Select the desired operating environment (e.g., cn, sea, US, eu) from the list.
- Click Save.
- Critical Step: After saving, you must restart the MySQL service for the changes to take effect.
69 How to perform an EOD Recalculation on the POS?
Business Scenario:
If orders were missed, or if anti-settlement/modifications occurred after the End-of-Day (EOD) process, you must recalculate the data for that business day to ensure report accuracy.
- Path
- Open the POS and enter the [Reports] module.
- Locate [EOD Report] on the list.
- Select the target date and click […] (More) icon.
- Select “EOD Recalculation.”
70 How to reprint a kitchen slip?
- Unsettled: Ordering Interface: More > Reprint > Select dishes.
- Settled: Orders Interface: Find Order > Print > Reprint Prep Ticket > Select dishes.
71 Why does Anti-settlement show “Different business day, operation not allowed”?
Cause:
By default, the system only allows anti-settlement operations within the same business day. This error occurs if the EOD process has been performed or the preset operational time limit has expired.
Path:
BO (Store View) > Operation Center > Restaurant Management > Business Parameters > Anti-settlement/Refund.
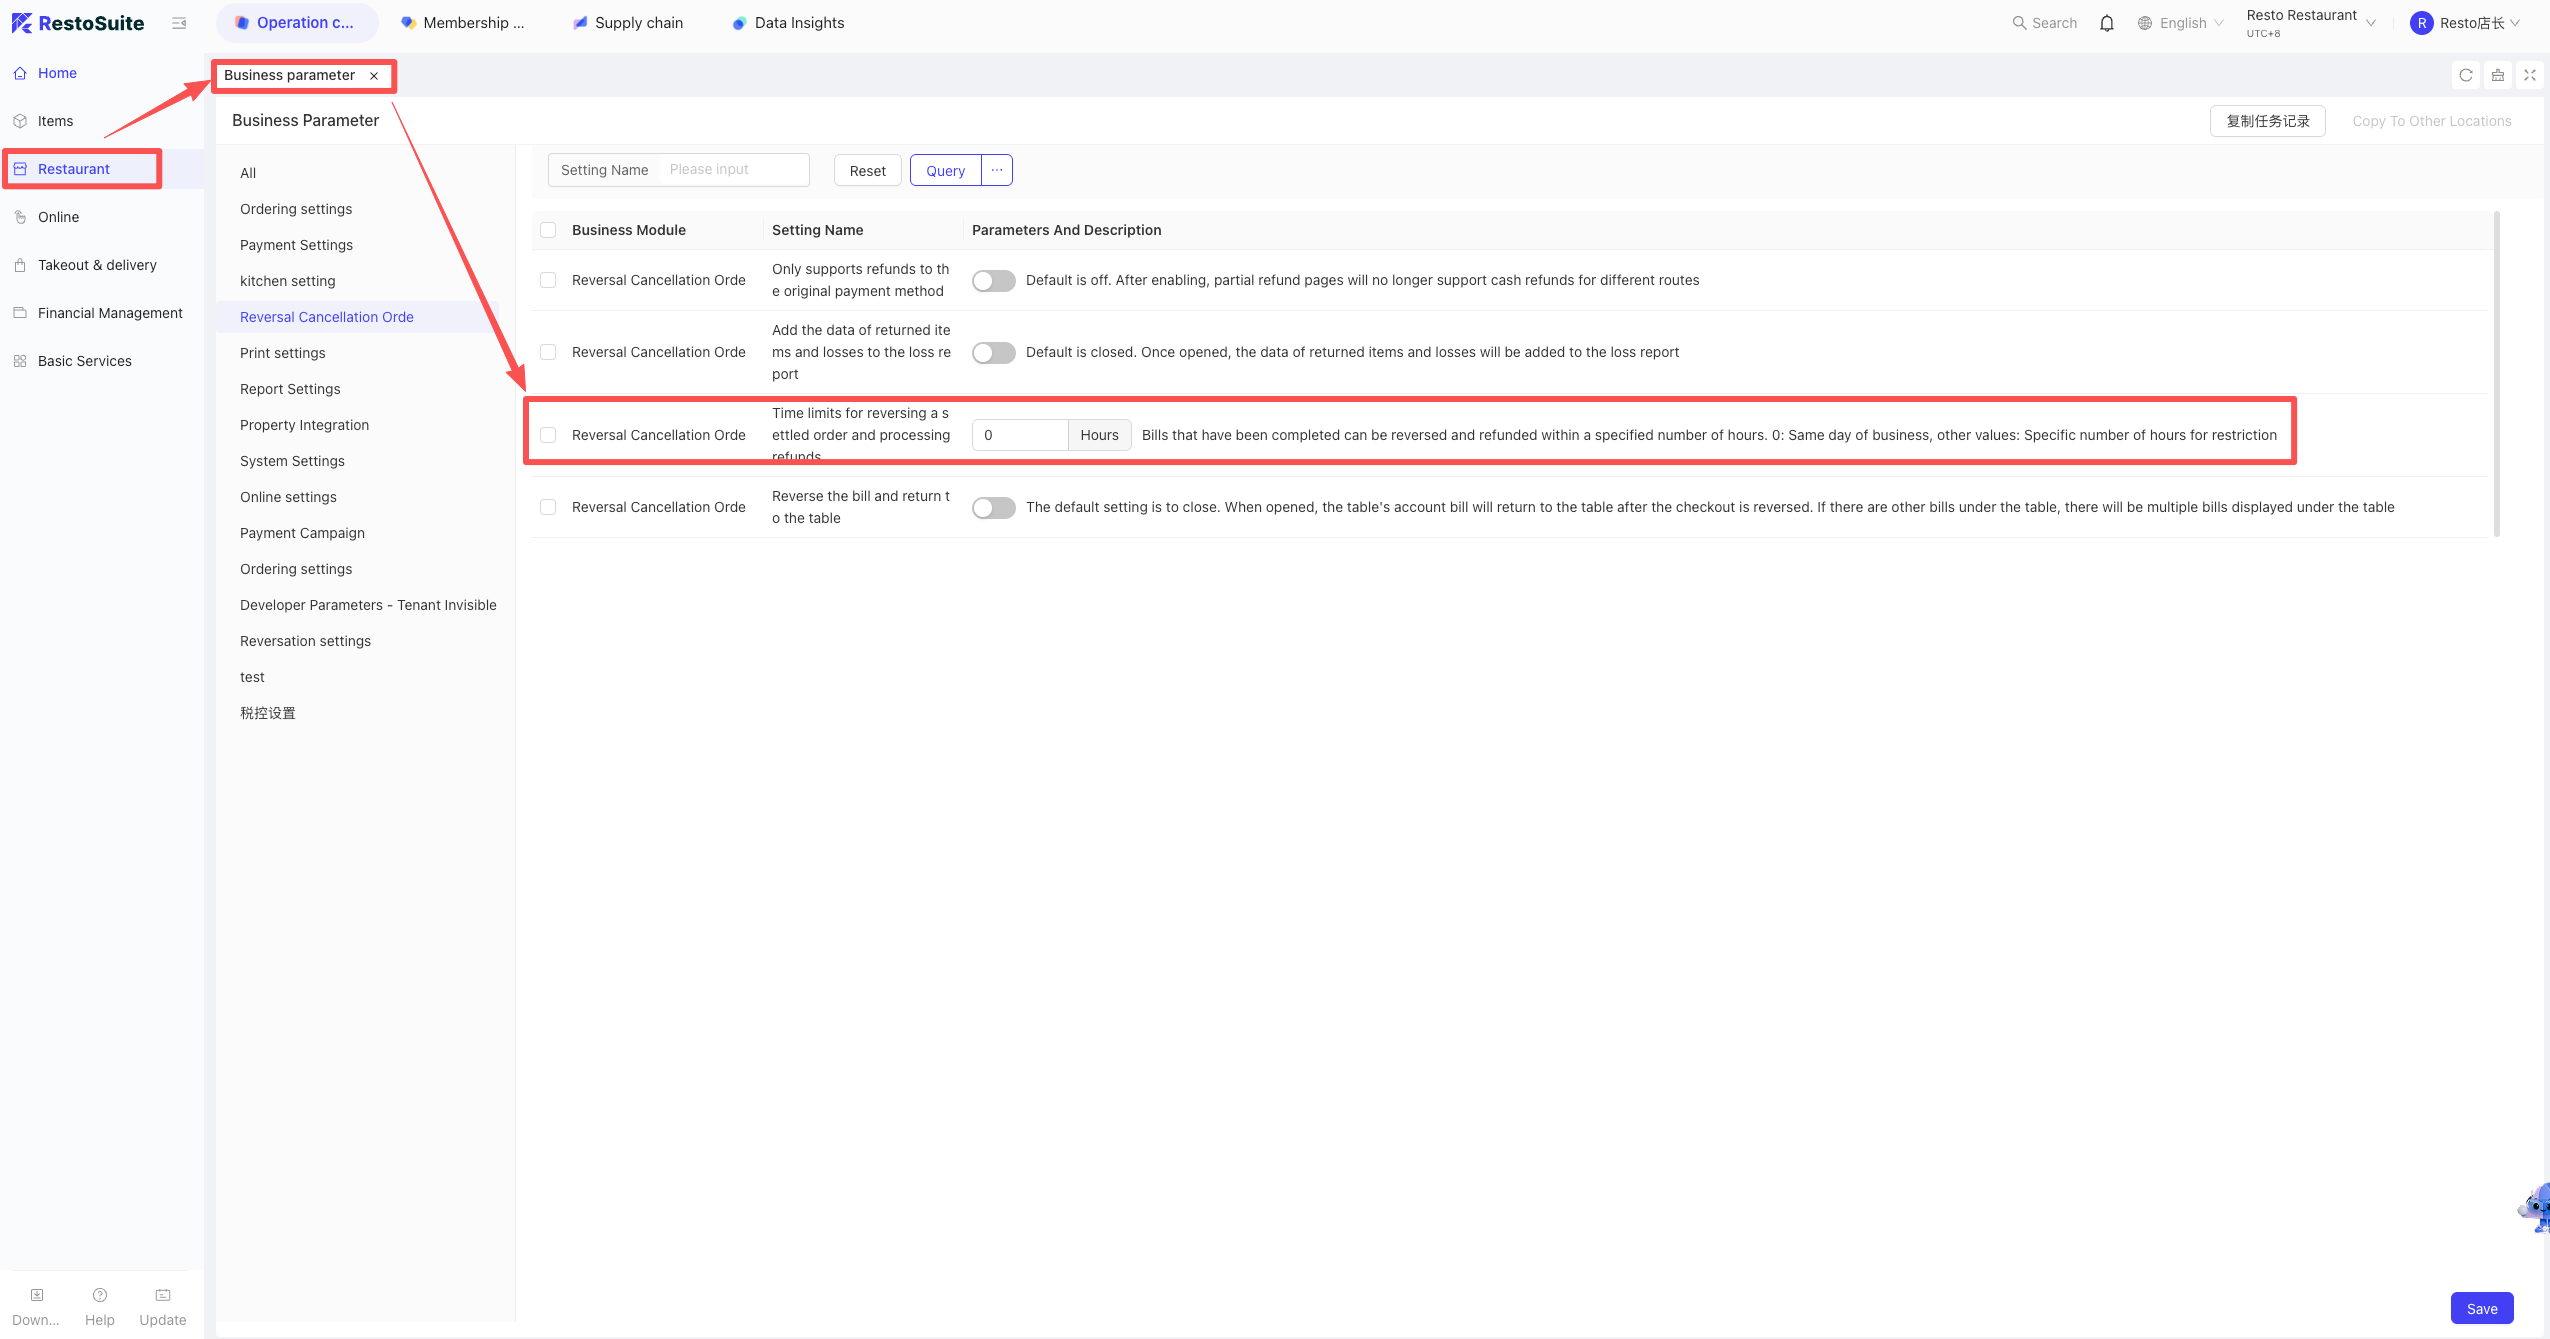
Solution:
Locate the parameter “Set time limit for anti-settlement and refunds” and adjust it:
- Set to 0: Operation is only allowed within the same business day.
- Set to other values (e.g., 24 or 48): Allows operations within a specific number of hours after settlement (Max 999 hours).
- Activation: Save the changes and restart the POS software for the settings to take effect.
72 How to perform a cash drawer count on the POS without performing EOD?
Path:POS > Reports > Cash > Count Cash Drawer.
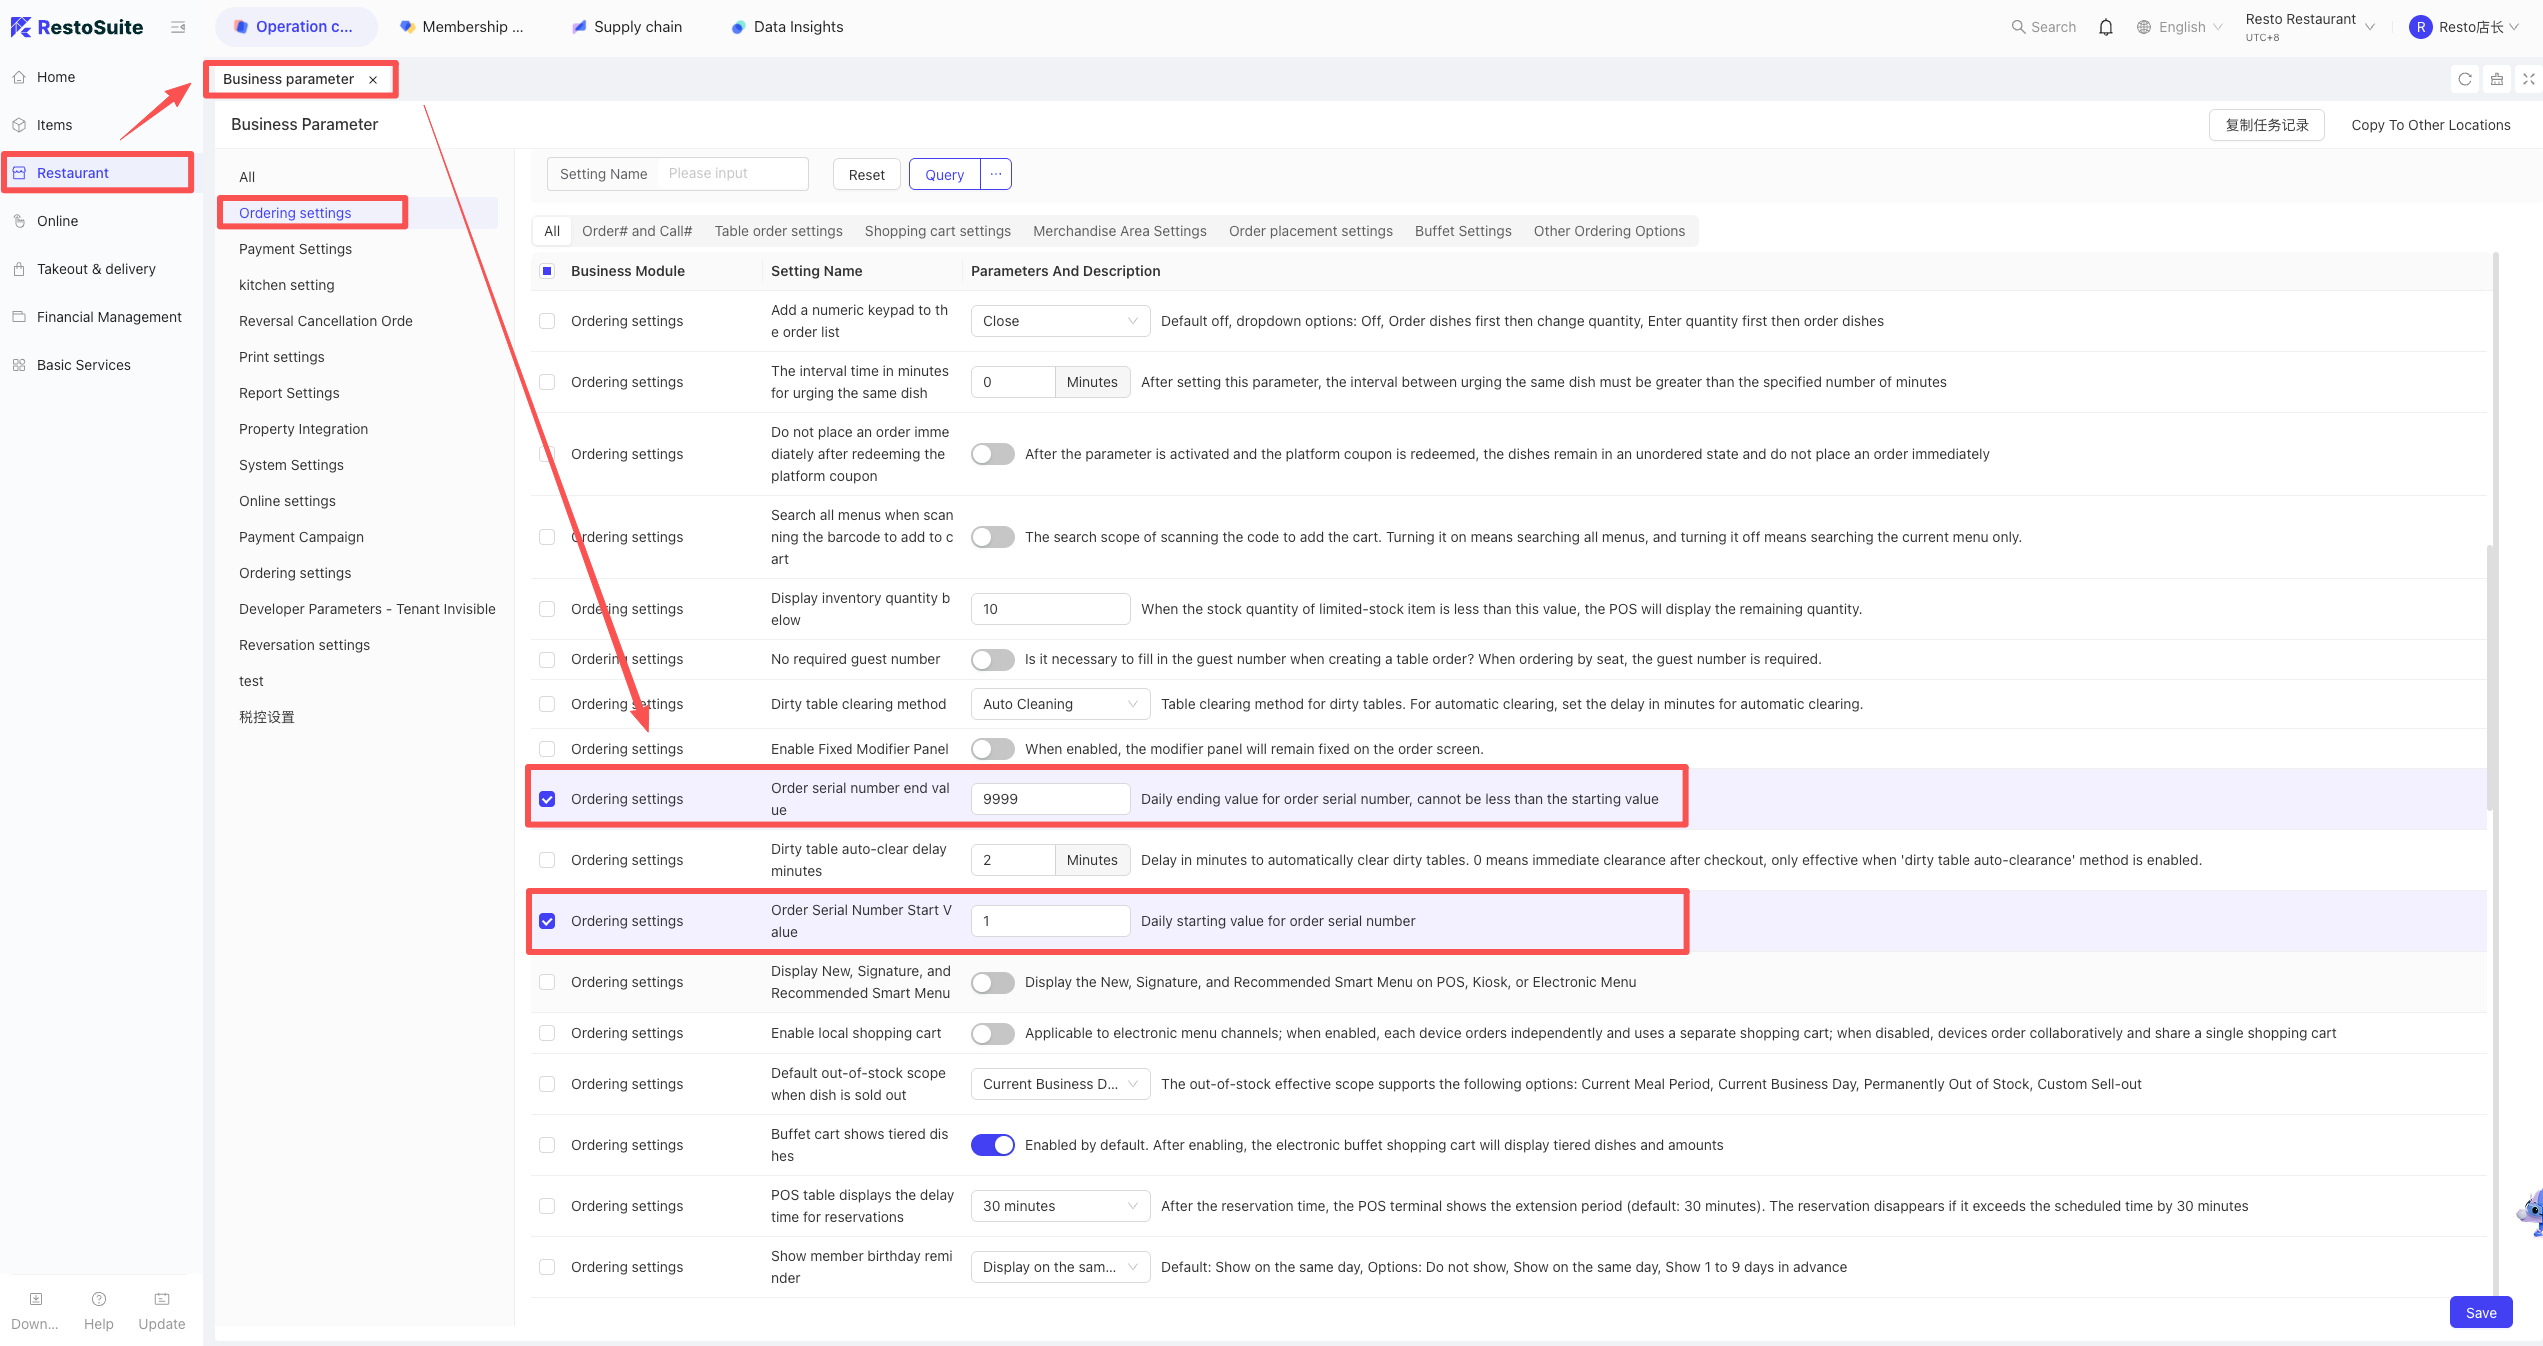
73 How to set the starting value for the POS order serial number?
Path:
BO: Restaurant Management > Business Parameters > Search “Serial Number” > Set Starting Value.
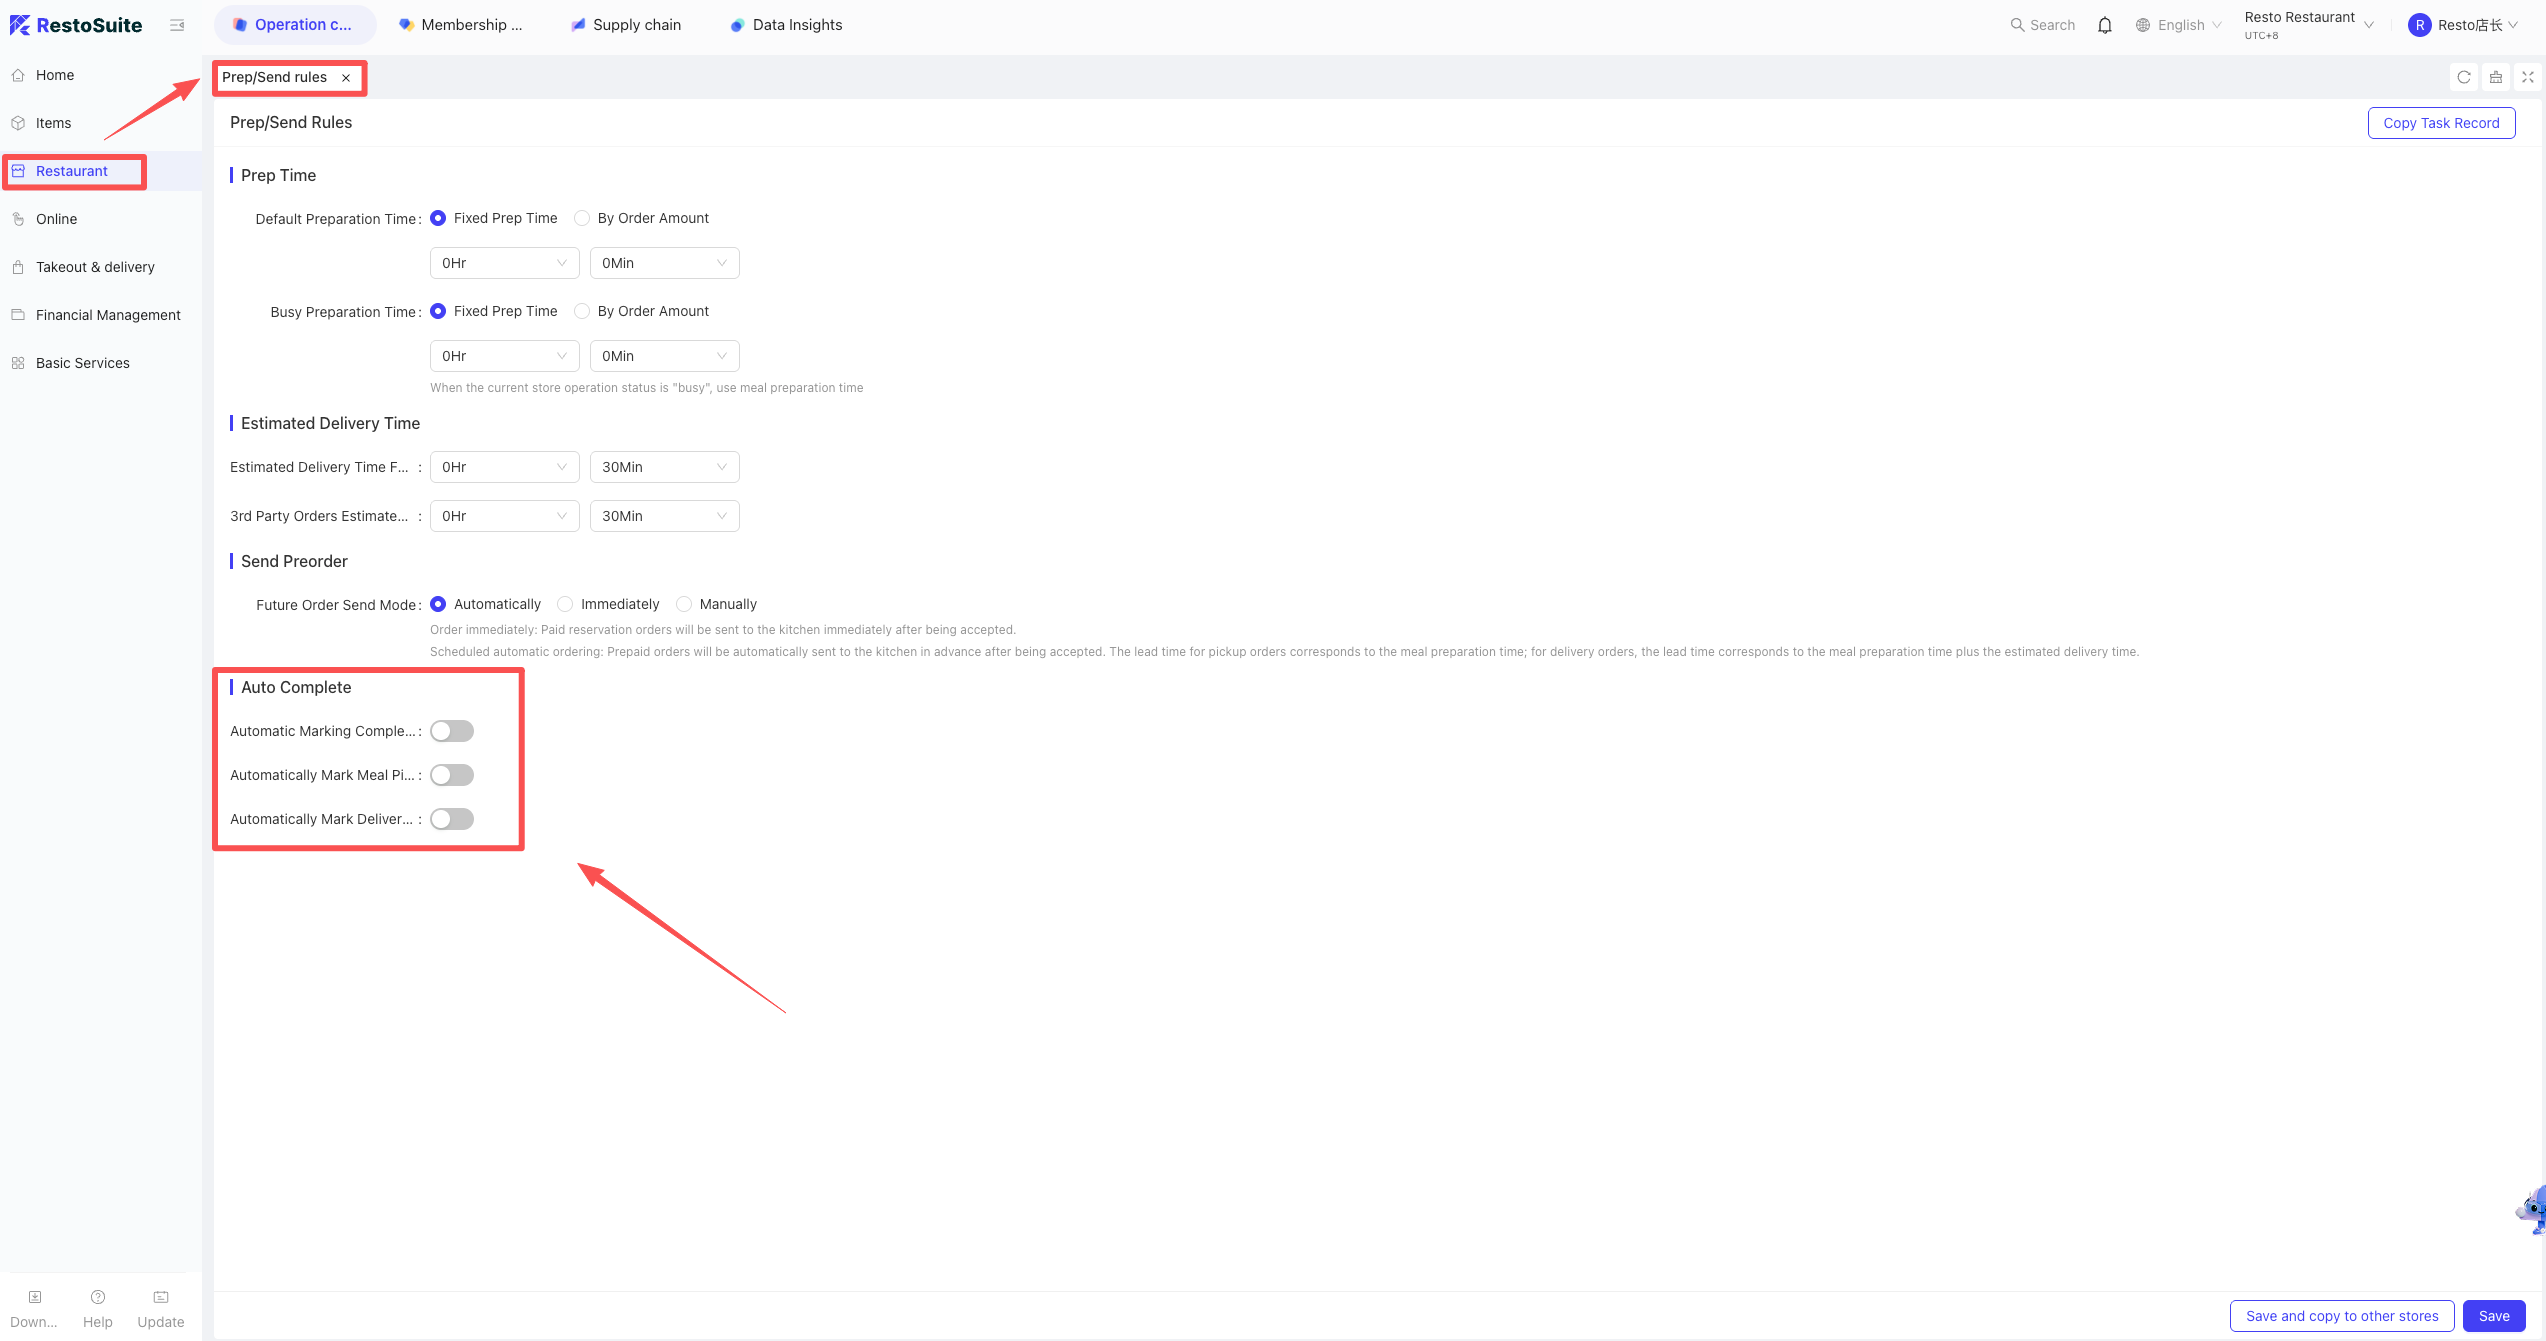
74 How to auto-mark status for delivery/self-pickup orders (Prepped, Picked up, Completed)?
Business Scenario
- Used when you want the system to automatically advance order statuses (e.g., auto-marking as “Prepared,” “Picked up,” or “Completed”) after an order is placed, eliminating the need for manual updates.
Path
- BO > Restaurant Management > Prep Configuration > Auto-Complete Settings.
75 How to switch between POS Service Mode and Terminal Mode?
STEP 1: On the login screen, move the mouse to the top-left corner and right-click (when the cursor turns into a hand icon).
STEP 2: Select the desired operating mode.
76 POS Bill QR Code: Setup and Functions
- Overview
By printing a “Processing Code” (划单码) on the bill, staff can scan it from any POS interface to execute specific tasks. Four functions are currently supported:
- Locate or Open Bill: Automatically retrieves and displays the order details.
- Mark All Items Prepared & Call Number: Updates prep status and triggers the calling system.
- Mark Pick-up Completed: Quickly updates the order status to “Picked Up.”
- Scan to Refund Deposit: Facilitates rapid deposit refunds for relevant orders.
- Configuration Path (Print Template)
- Log in to BO > Print Template Settings.
- Select Dine-in Guest Bill > Click Configure.
- Add a Custom QR Code component.
- Select “Processing Code” as the data source on the right and save.
- How to Use From any screen on the POS, simply scan the QR code on the printed bill using a barcode scanner to trigger the corresponding action.
77 How to view invoice issuance records?
- Path
BO (Group View) > Operation Center > Restaurant Management > Tax Entity.
- Steps
- Locate and click on the specific Tax Entity.
- Click the [Details] button.
- Select “Transaction Invoice Details” or “Stored Value Invoice Details” to view the records.
78 How to modify issuer information after electronic invoice integration?
- Path: BO (Group View) > Operation Center > Restaurant Management > Tax ID Settings.
- Steps:
- Select the corresponding store from the list.
- Click the [Configure] button to enter settings.
- Update the issuer details and save your changes.
79 Will modifying the dish production department on the POS sync to the cloud?
A: Yes. POS: More > Production Department > Set and click “Sync to Cloud”.
80 How is the Cash Summary calculated in the EOD report?
- Logic
The “Cash Summary” in the EOD report reflects the actual cash amount recorded within the cash drawer.
- Prerequisite
Cash data is only aggregated into the “Cash Drawer Summary” if the settlement device (POS terminal) is physically connected to a cash drawer.
- Exception
If the device used for checkout is not connected to a cash drawer, cash transaction data will not be counted towards the cash drawer totals.
81 How to manually clear a table in Online Prepaid mode after payment is completed?
Solution: BO -> Restaurant Management -> Operational Parameters -> Ordering Settings -> Manual Close for Online Prepaid Orders -> Set to [Enabled] -> Save.
82 How to troubleshoot when Member Card payment is unresponsive during checkout?
A: verify if the default member payment method under the Member Card category includes the current operating scenario in the store’s Payment Subjects.
83 How to set up pop-up confirmation for modifiers?
- Item Settings: POS Ordering Default Pop-up. If any item (Modifiers/Side Dish) is set as “Required,” a pop-up will appear for confirmation.

84 How to set a Minimum Spend for tables?
Note:
Supported in POS version 1.1.37.0 and above. Used to charge a minimum spend supplement for individual tables.
84.1 Add a Surcharge (Type: Minimum Spend Supplement)
Path: BO Backend → Store View → Item Management → Surcharges
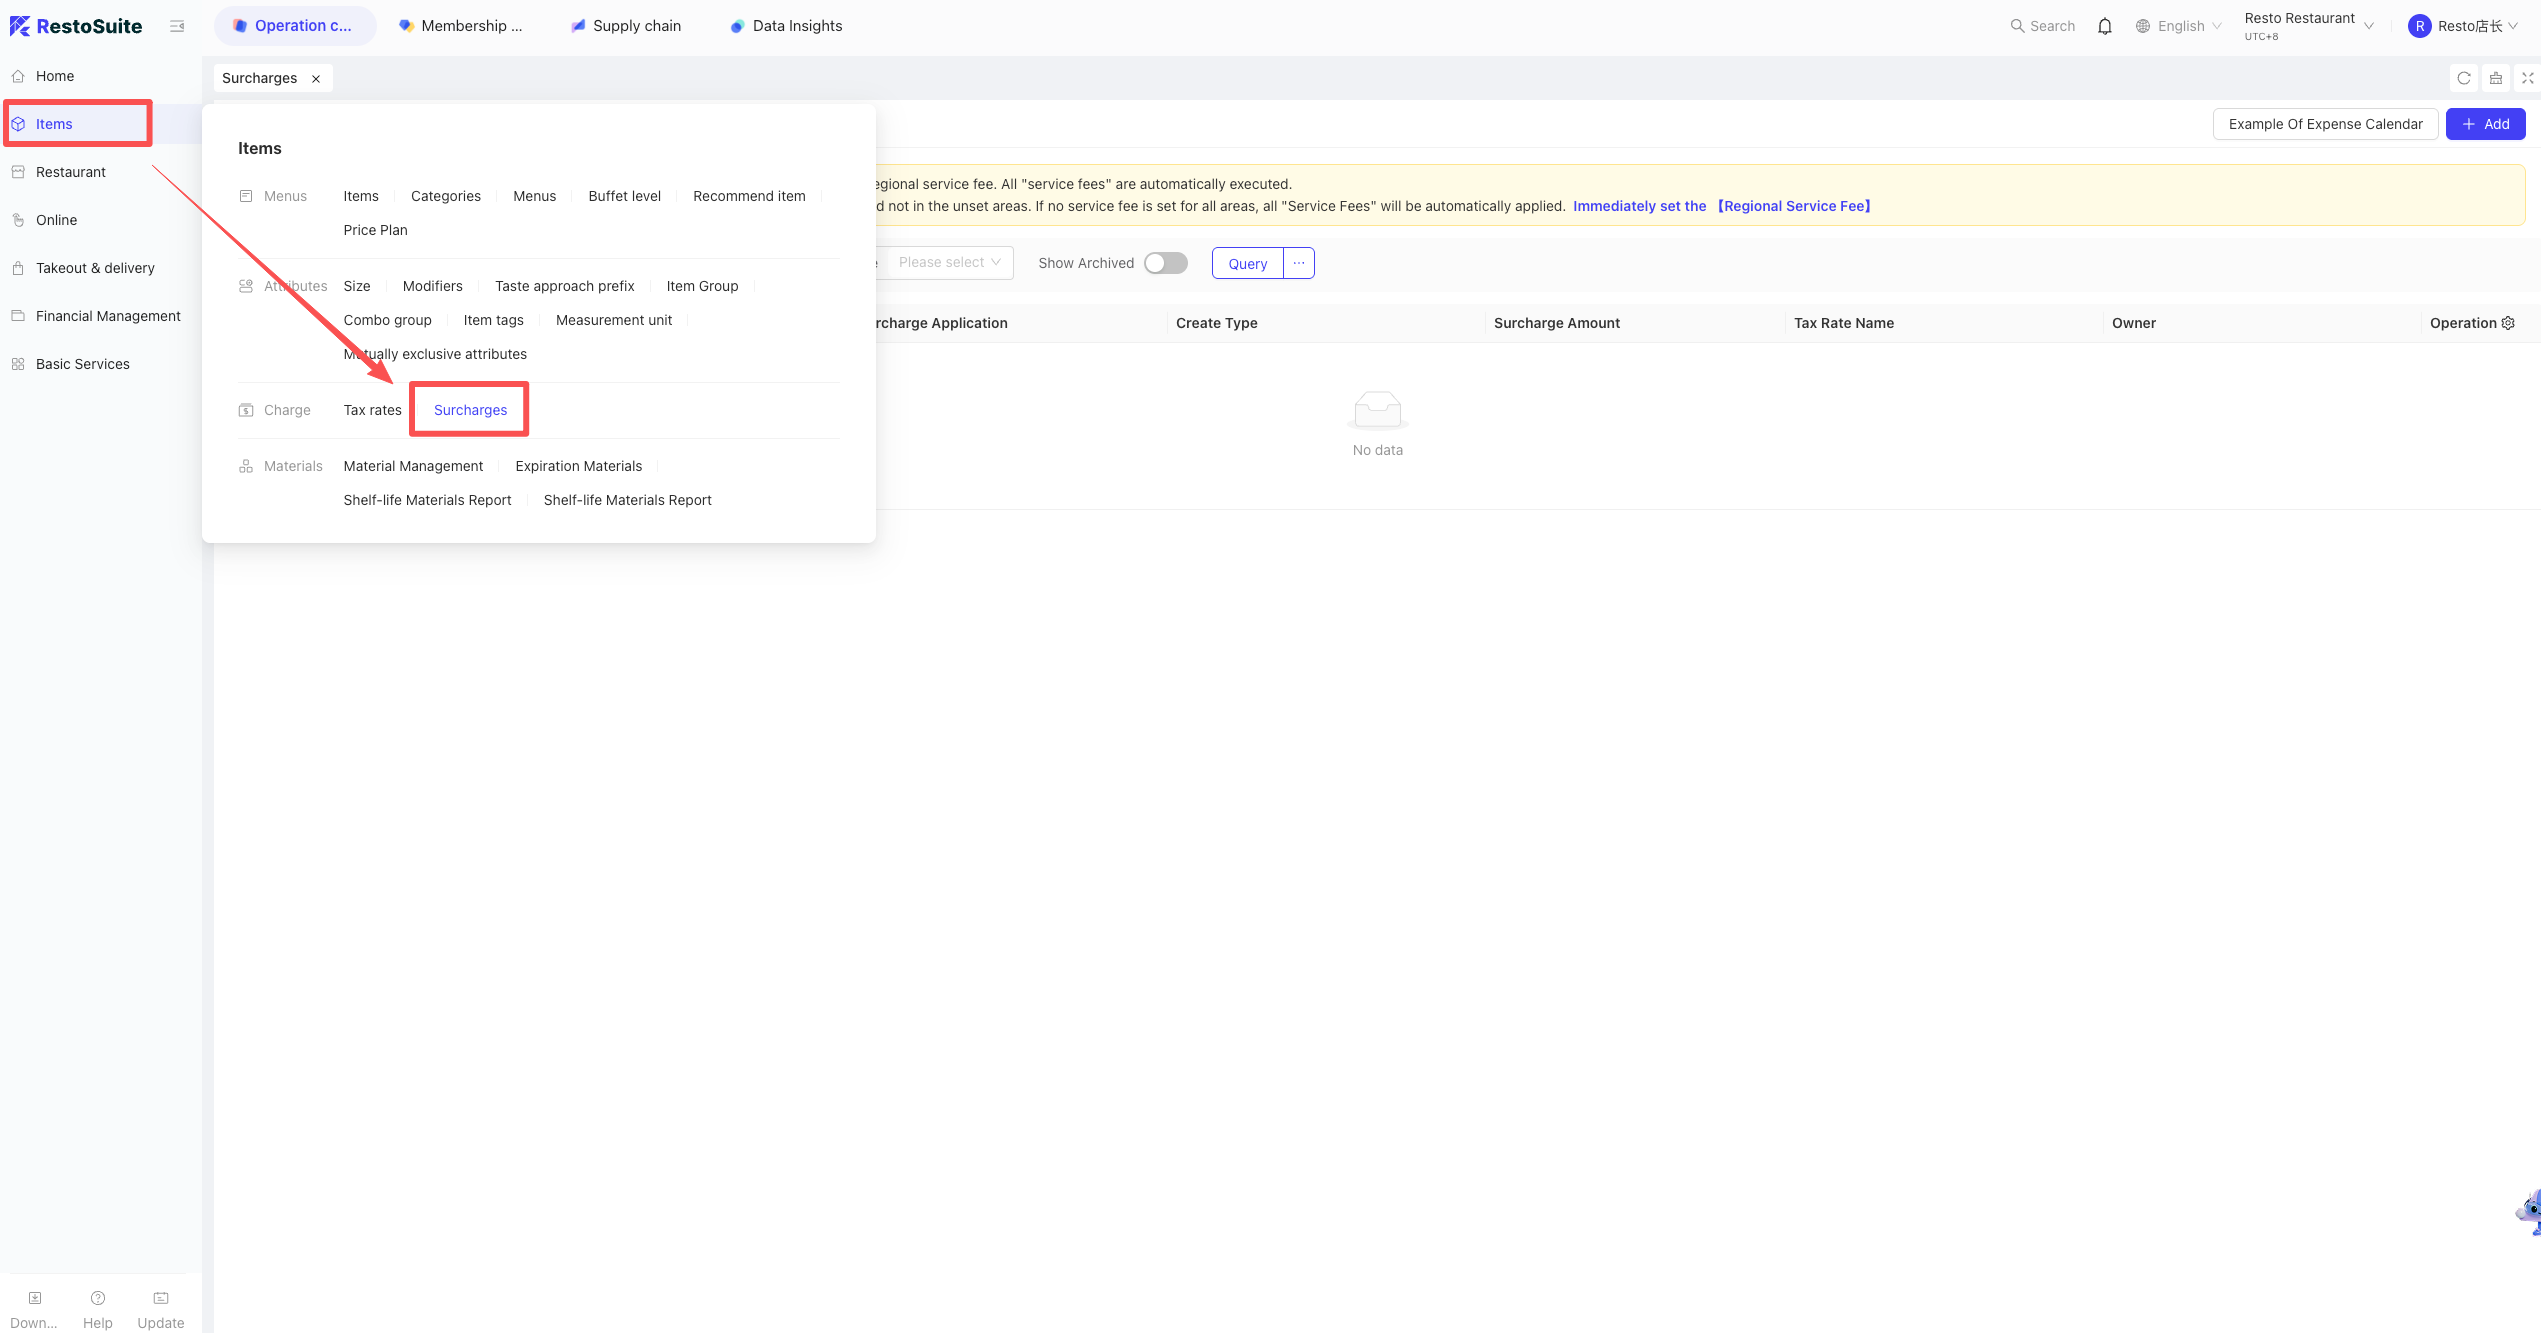
Click Add, fill in the surcharge name and amount, set Surcharge Type to Minimum Spend Supplement, then save.
84.2 Set Table Minimum Spend
Path: BO Backend → Store View → Restaurant Management → Table Management

Edit the table to set the minimum spend, select the preconfigured minimum spend rule, then save.
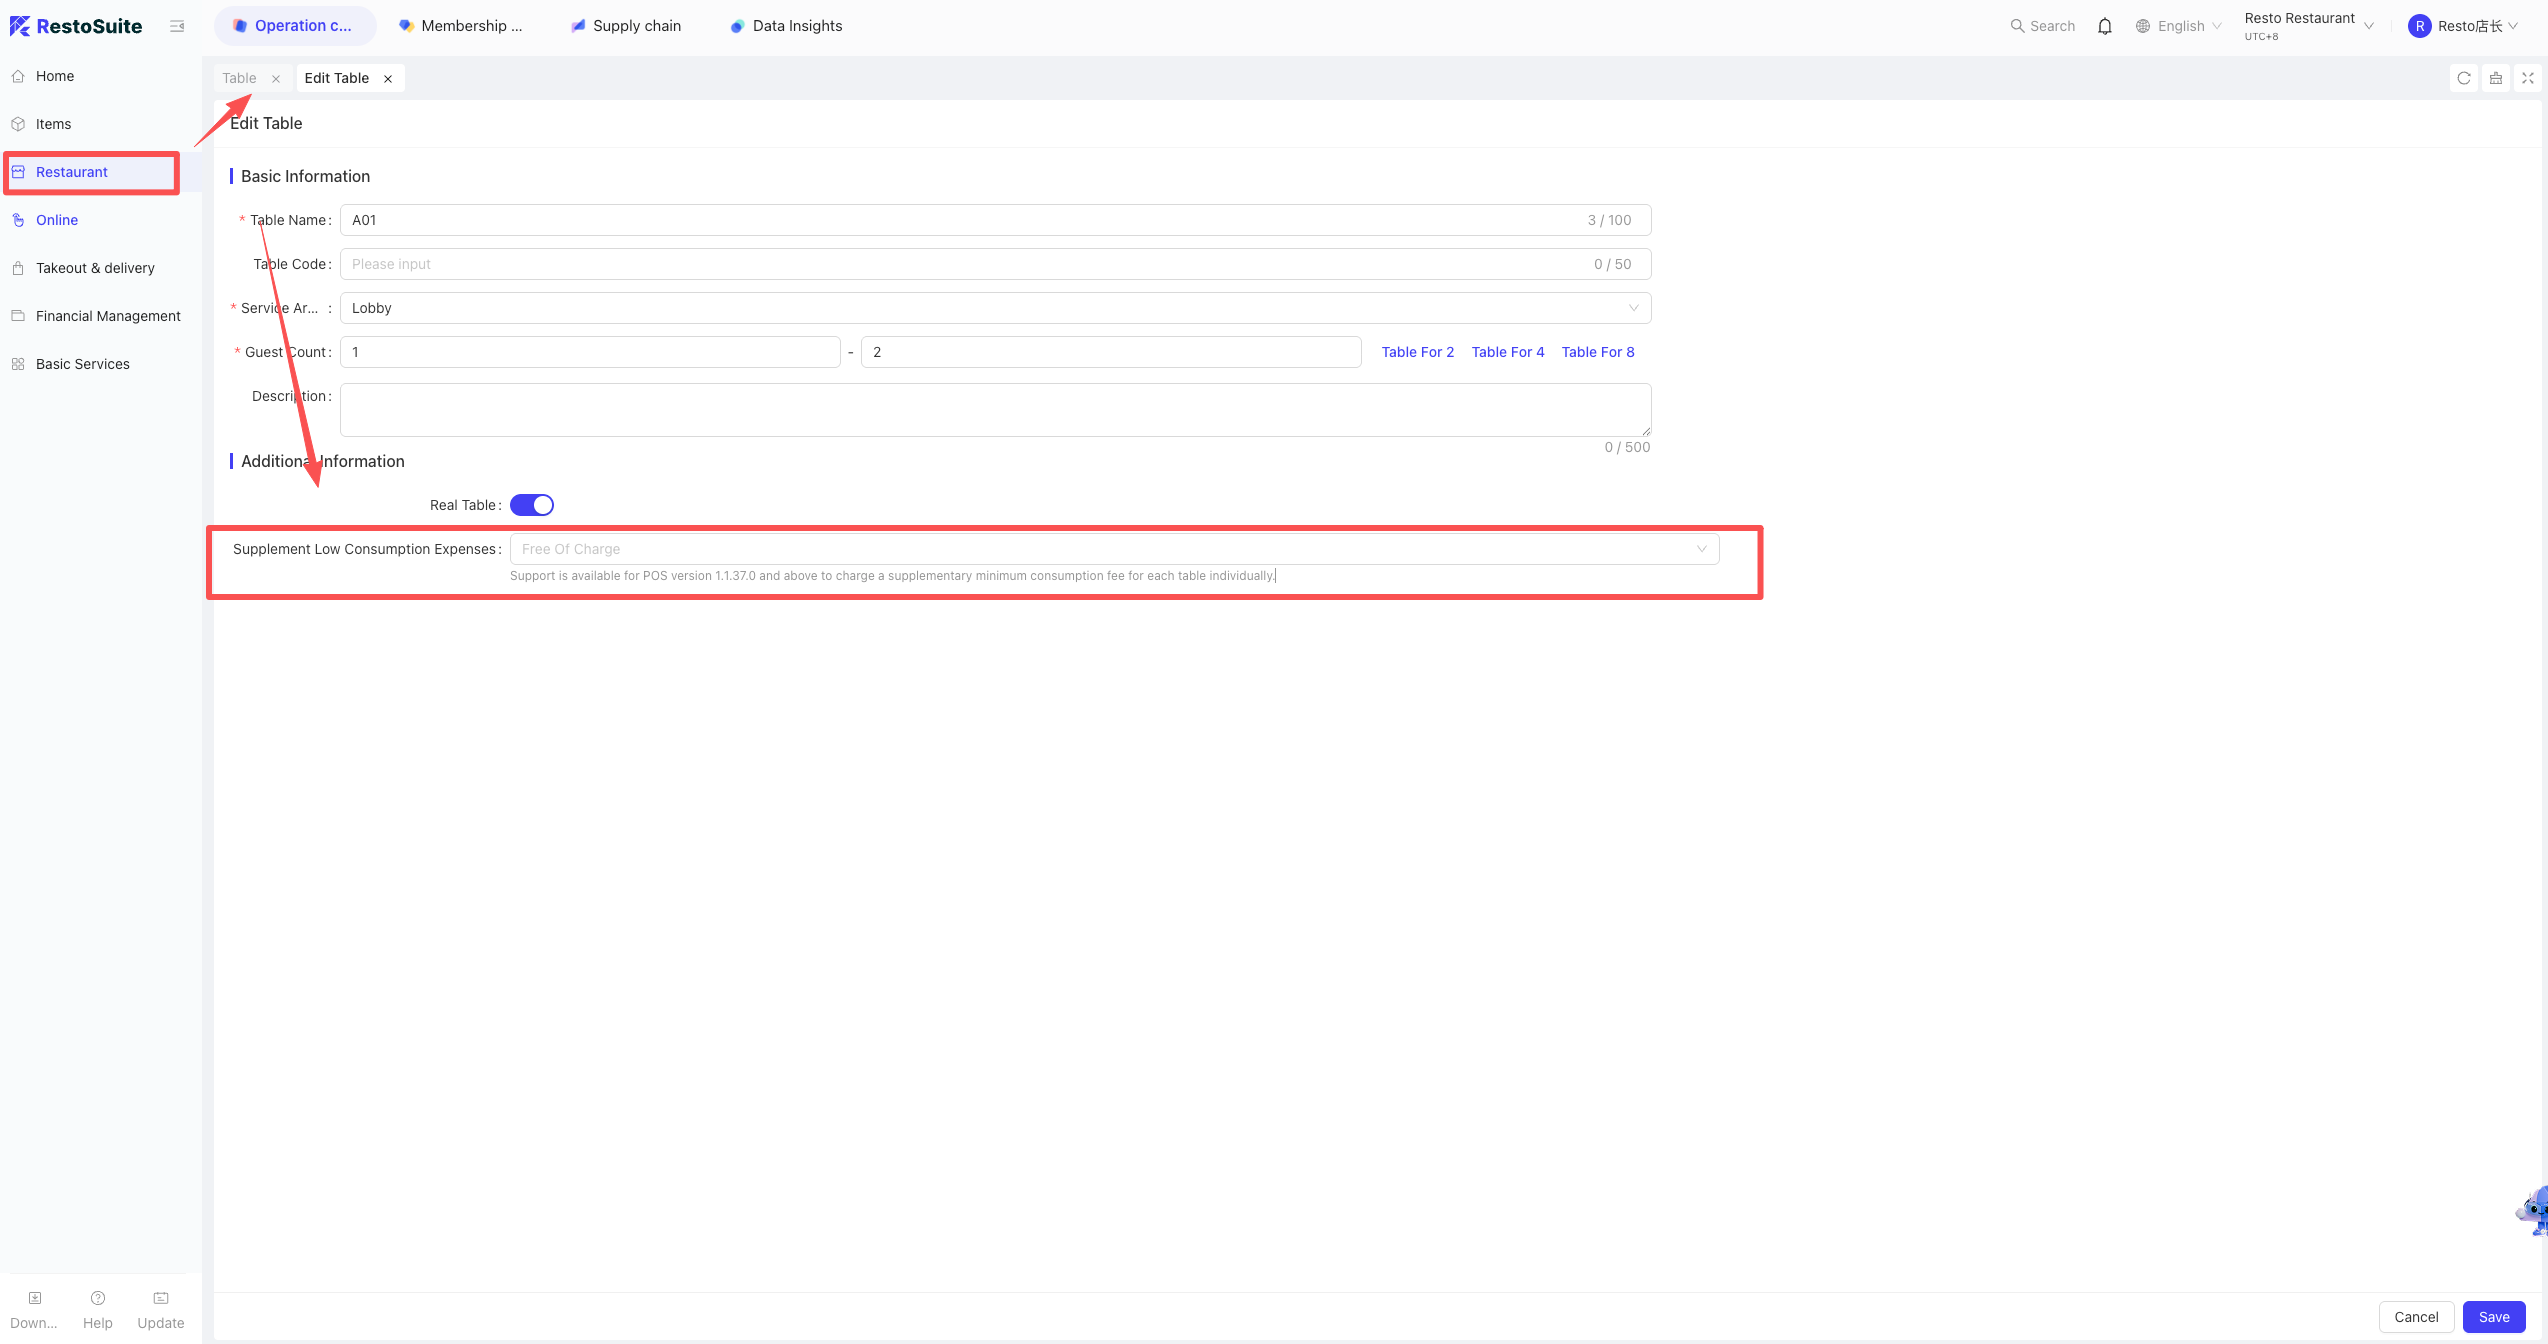
You may also set multiple tables in bulk: select target tables, click Bulk Actions → Batch Edit Tables.
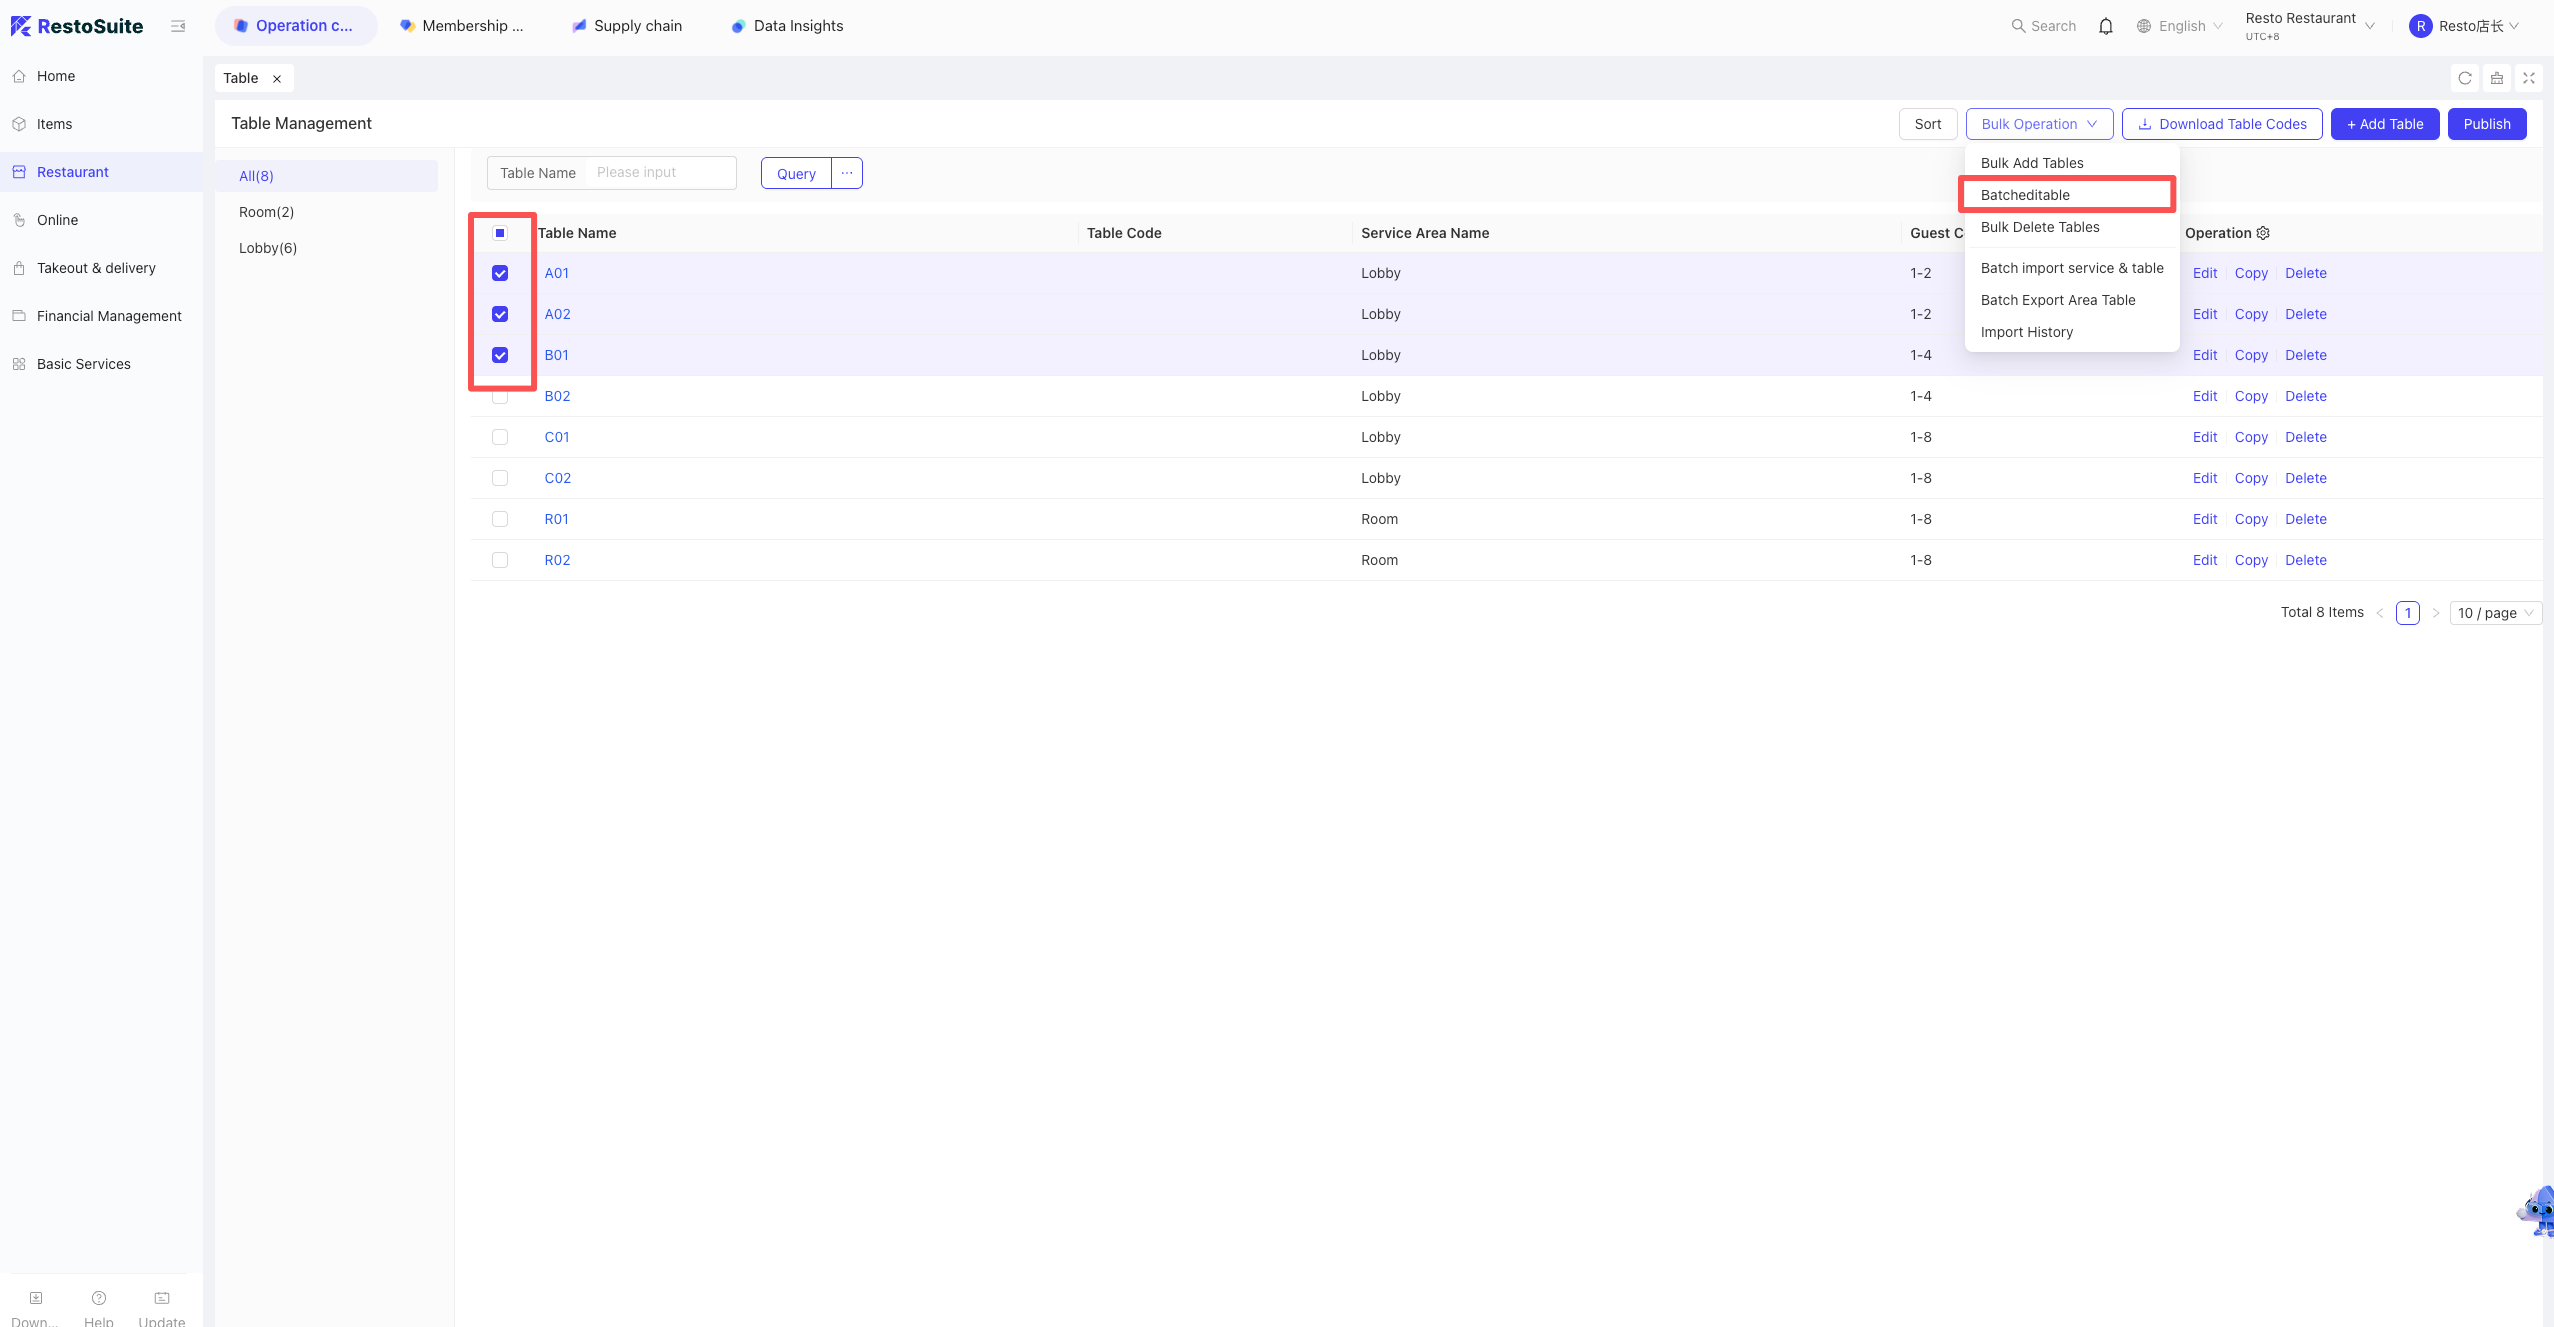
For Minimum Spend Amount: select Batch Replace, choose the preconfigured minimum spend, then confirm.
84.3 Publish Settings
On POS:When the actual consumption amount is less than the set minimum spend, the system will automatically charge the minimum spend supplement.
85 How to split/merge tables on POS?
A: Long-press a table for 2s+ or click “More” in the top-right corner, then select [Split New Table]. A new table with the suffix “~1” will be created.
86 Does the system support revoking or refunding Douyin vouchers after verification?
A: Yes, but only within 1 hour of verification. Revocation is not supported after one hour.
87 What is the default membership password for sign-ups on POS?
A: The default member password is: 888888.
88 Does the POS support backfilling business data to previous dates?
A: No.
89 Does the POS support Anti-Daily Settlement (reversing EOD)?
A: No.
90 Adjusting the Daily Settlement (EOD) receipt template.
A: The template style is fixed, but versions after POS36 allow local adjustment of the printed data content.
91 Can the left navigation bar buttons on the POS be edited or reordered?
A: Currently, it supports Android only; the Windows version is not supported.
Path: BO -> Group View -> Restaurant Management -> POS Decoration Scheme.
92 How to distinguish between “Fully Submitted” and “Partially Submitted” orders on the table layout?
A: Tables with unsubmitted items show a “Pending” prompt and a lighter color. Fully submitted tables appear in a darker color.
93 How to Sort Items by “Serving Sequence” on the POS Interface?
-
Enable Operational Parameters
- Path: BO -> Restaurant Management -> Operational Parameters
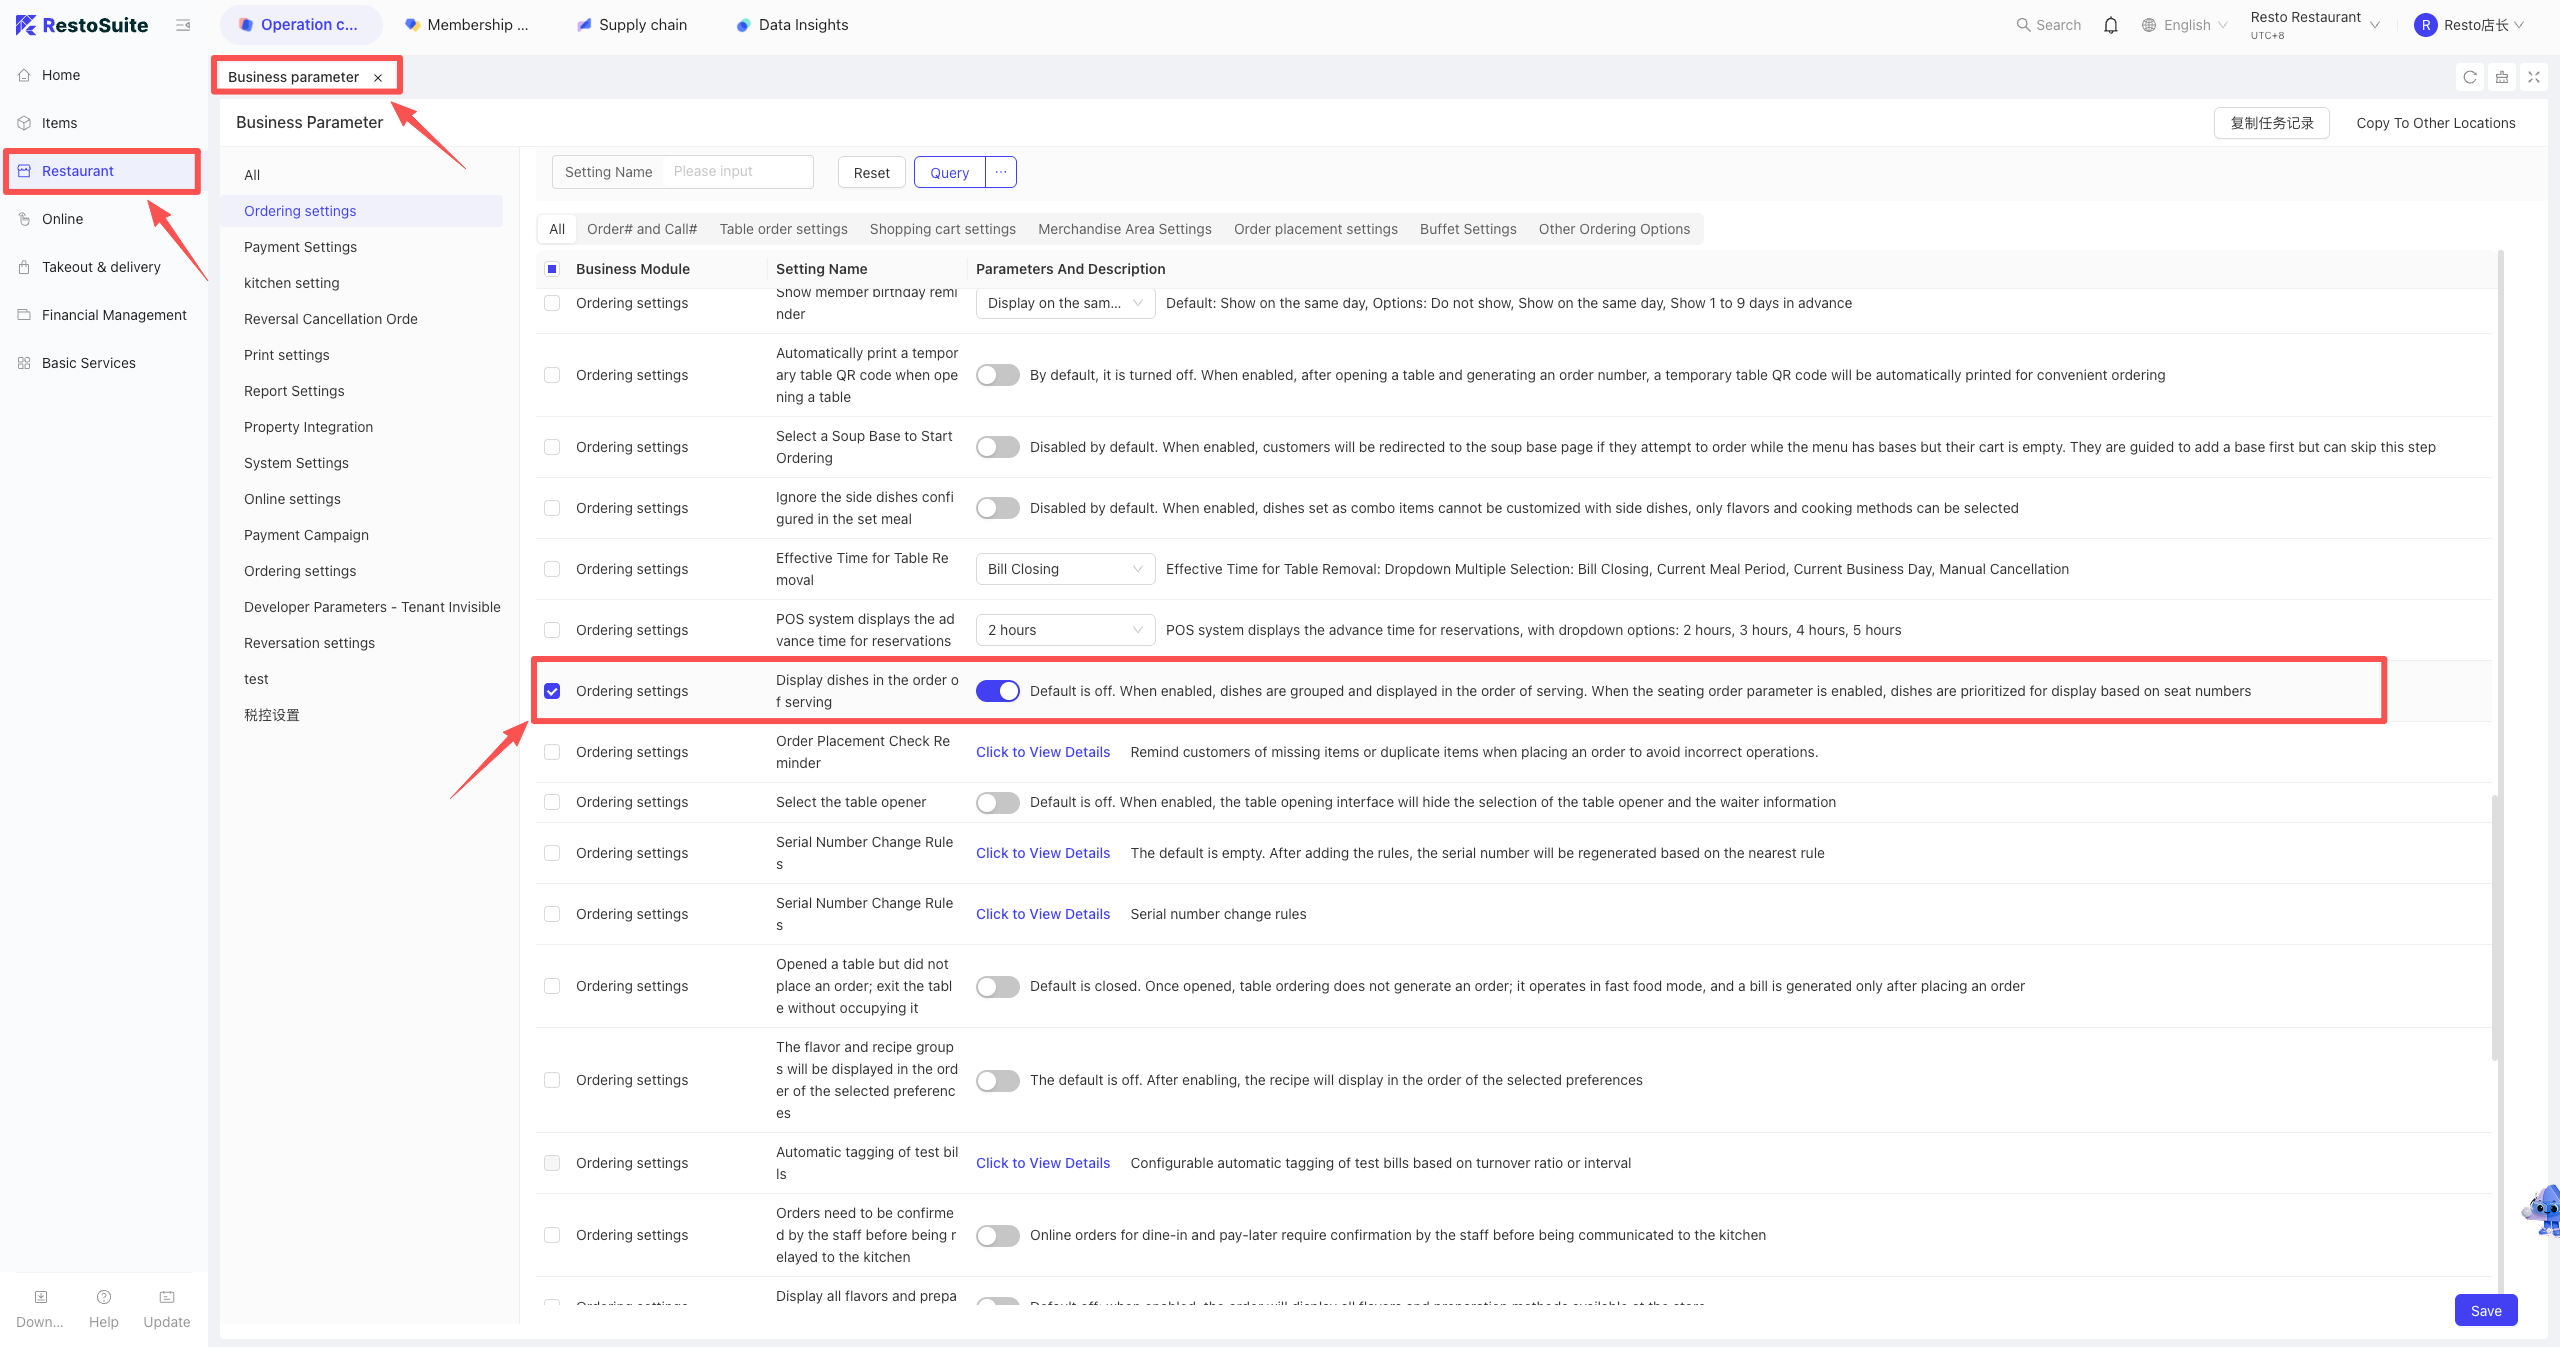
- Action: Enable [Display Dishes by Serving Sequence].
- Display Logic: * Once enabled, items in the cart are grouped by their preset serving sequence rather than just by order time.
- Each sequence category creates a “Sequence Header,” and newly added items appear at the bottom of their respective category.
- Items without an assigned sequence will be pinned to the top of the list.
- Item indices (serial numbers) will be automatically re-numbered from top to bottom based on the final display.
- Path: BO -> Restaurant Management -> Operational Parameters
-
Configure Serving Sequence & Sorting
- Path: BO -> Restaurant Management -> Serving Sequence -> Add
- Action: Create sequence names (e.g., Appetizer, Main Course, Dessert) and adjust their sorting order based on store requirements.
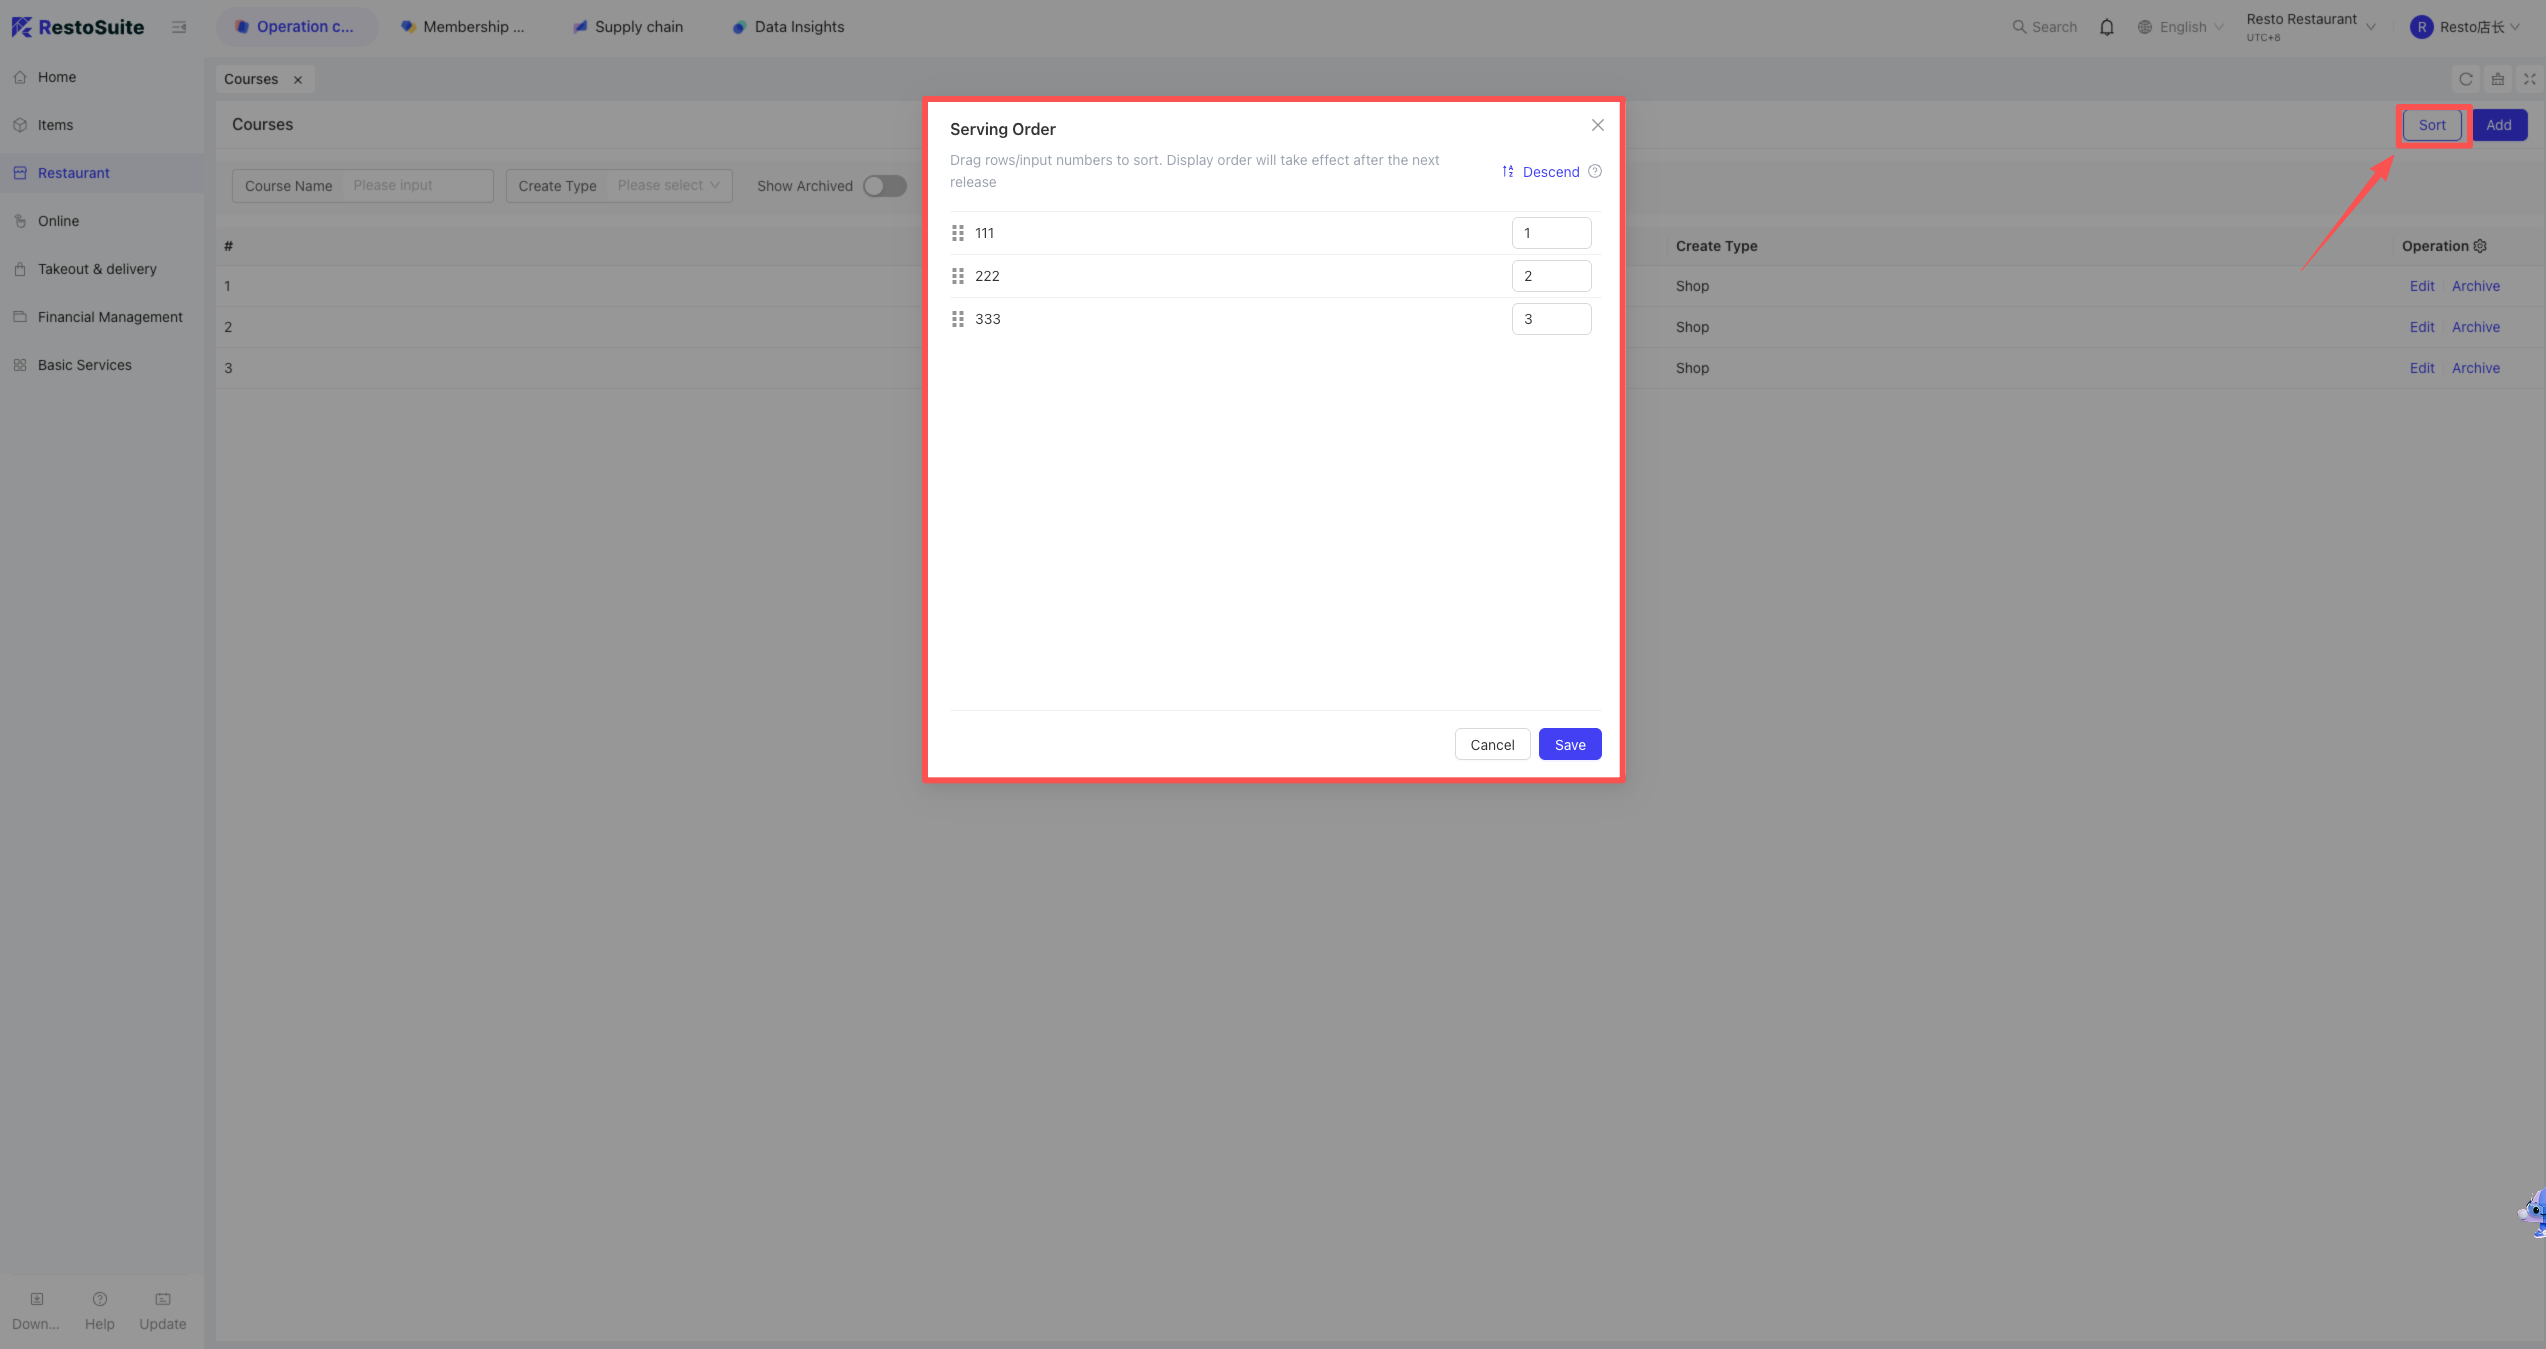
- Path: BO -> Restaurant Management -> Serving Sequence -> Add
-
Link Categories & Publish
- Action: Assign the specific Serving Sequence to each item category.
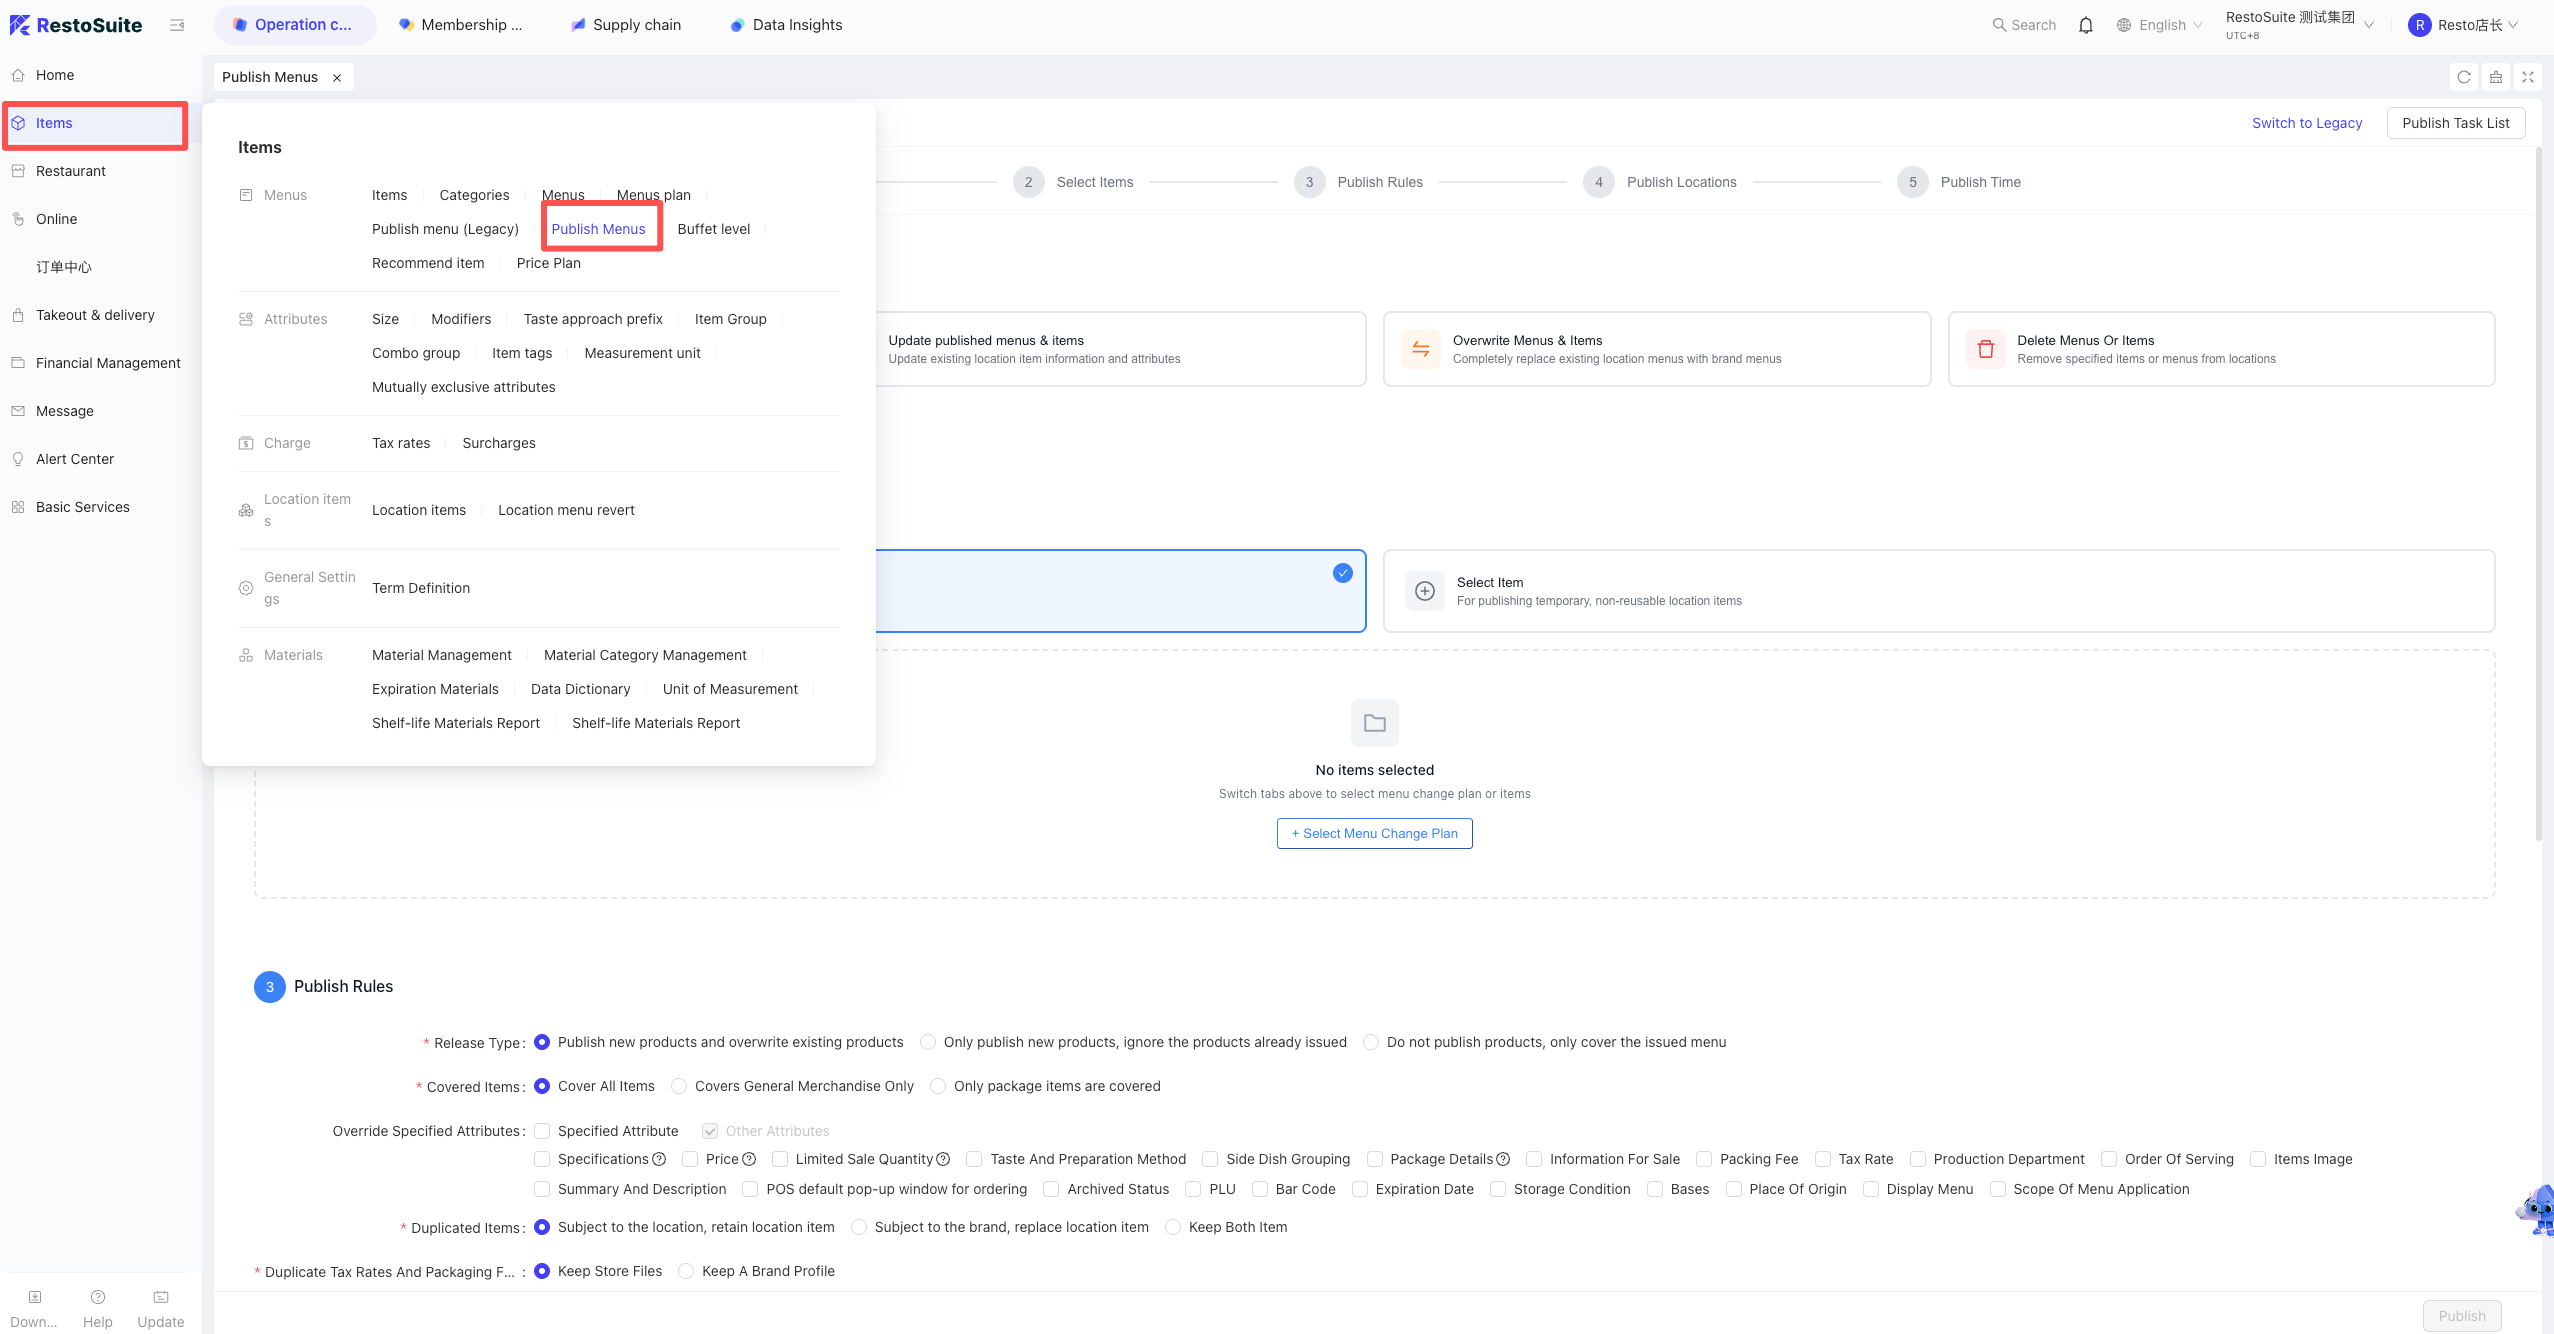
- Note: After configuration, you must click [Publish Menu] for the changes to take effect on the POS.
- Action: Assign the specific Serving Sequence to each item category.
94 How to handle Octopus payment errors?
Solution: Usually caused by network mismatch. Ensure the POS and Octopus terminal are on the same local network (same Wi-Fi).
95 How to re-enter the Server and Station selection screen?
Operation: Right-click in the top-left corner of the login screen.
96 What data to check if marketing activities are not taking effect on POS?
-
Items to check: Effective time, product scope, applicable business/channels, user scope, and applicable roles.
97 How to display the “No Tips” shortcut button on the Tip Screen?
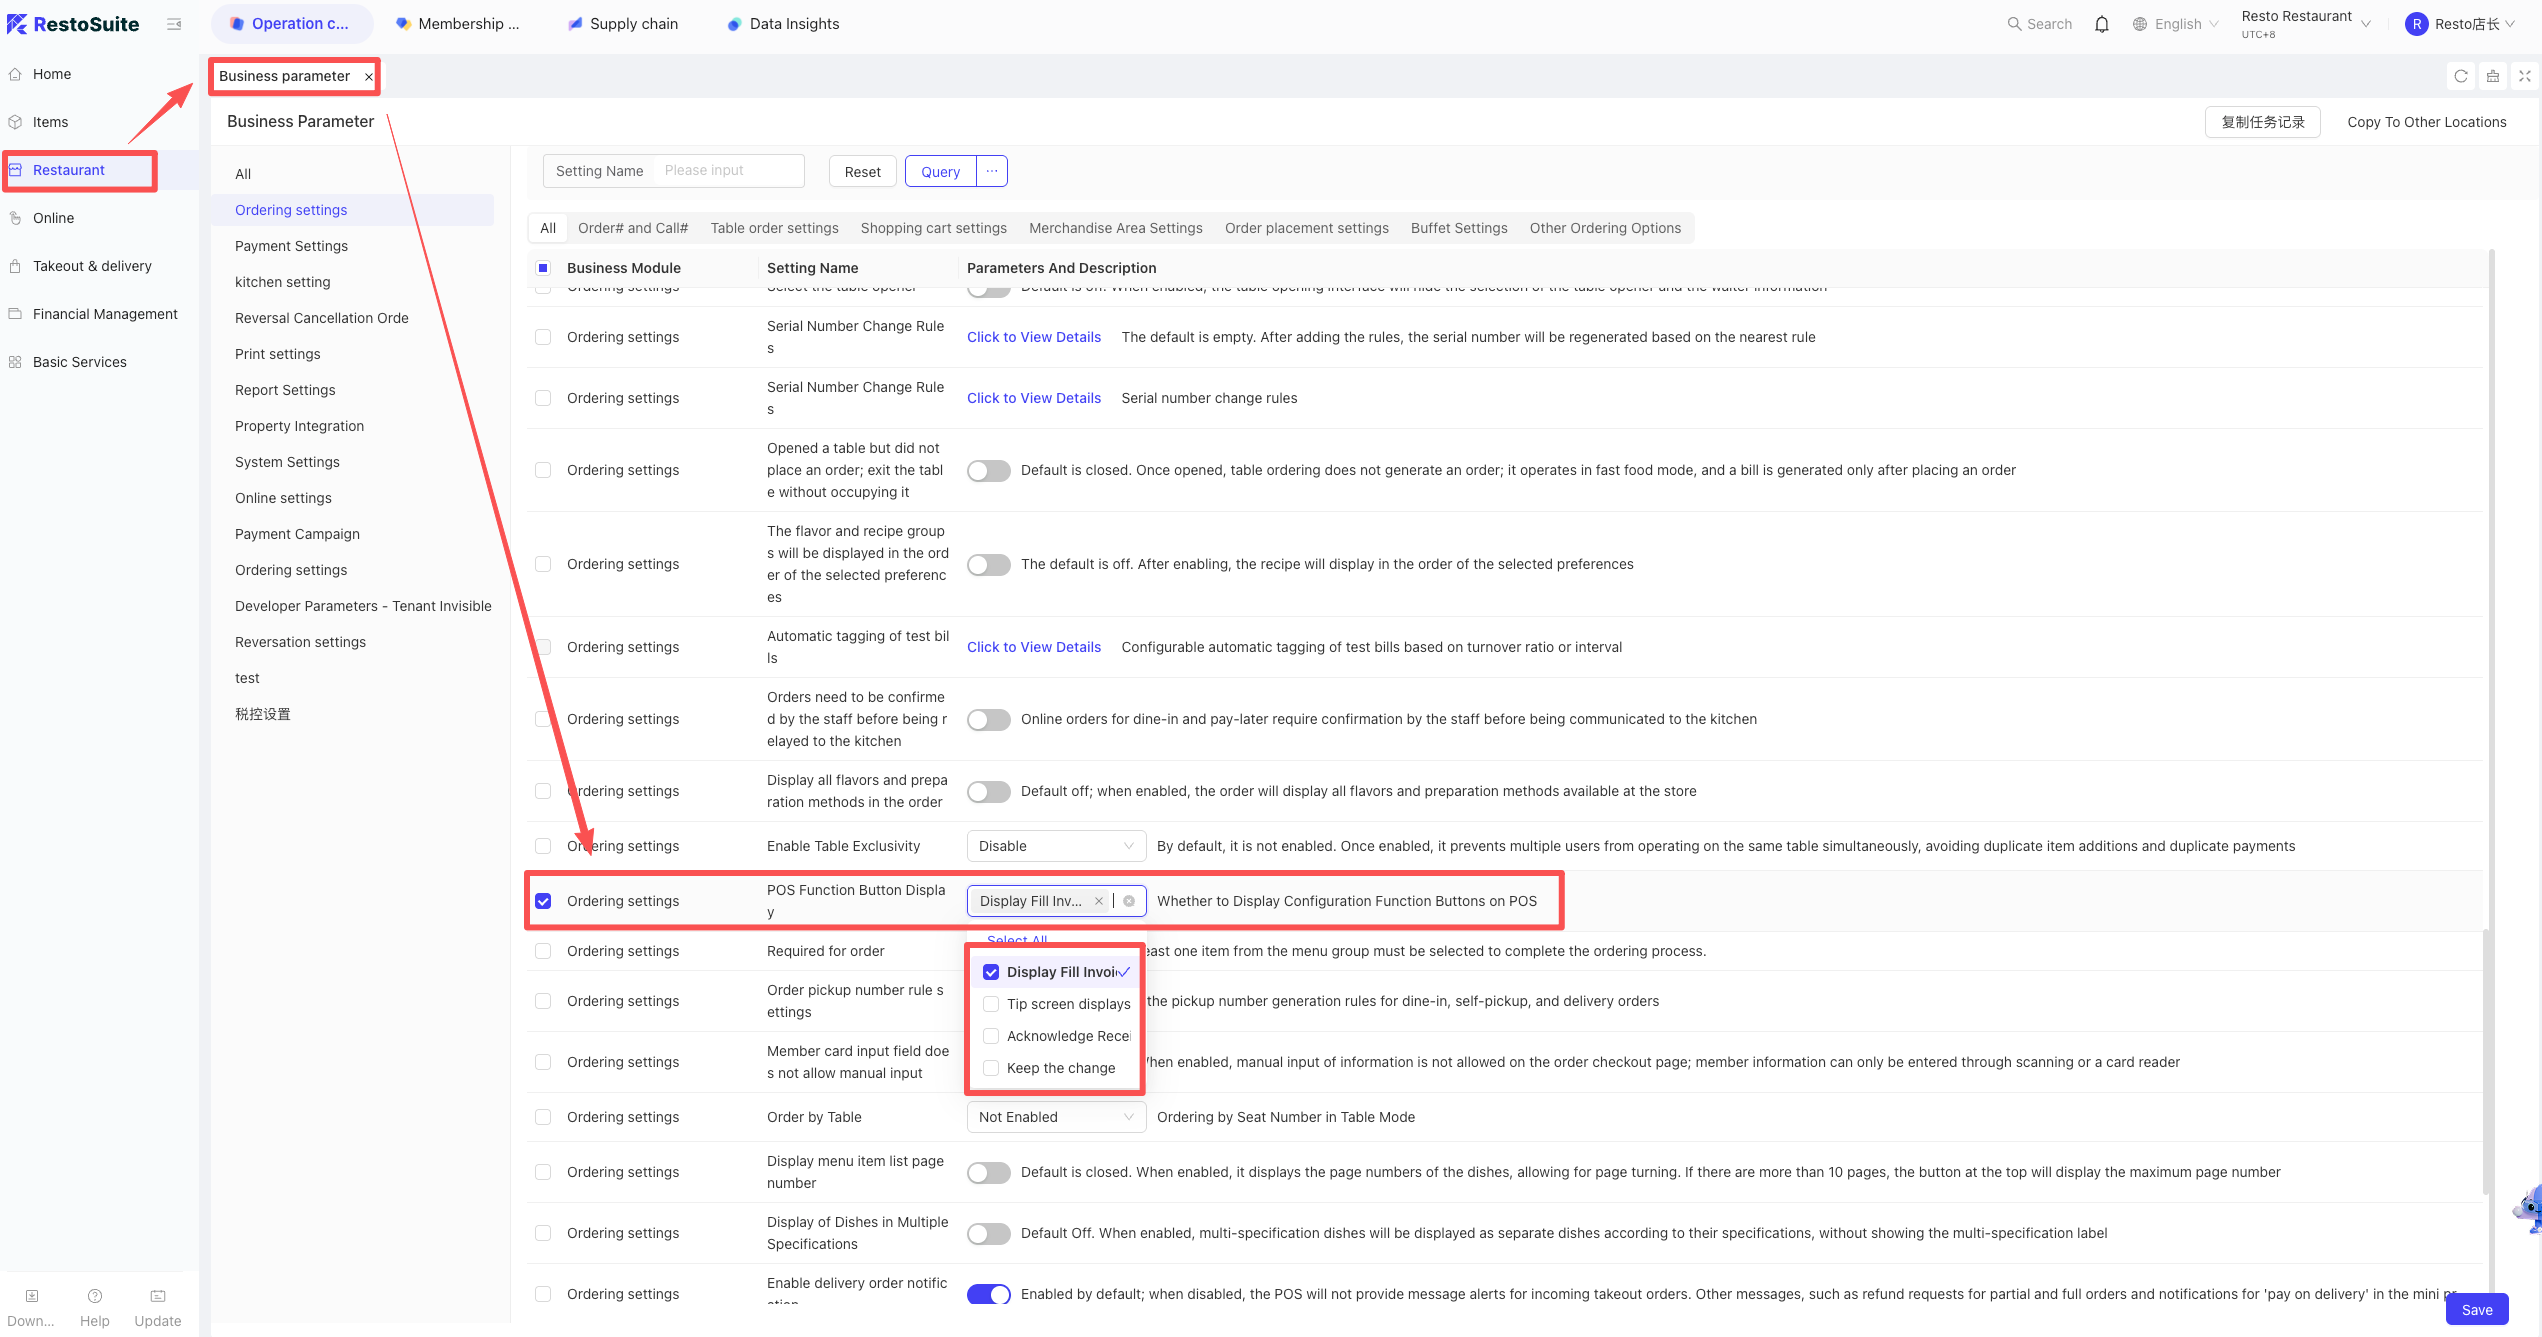
Setting: BO -> Restaurant Management -> Operational Parameters -> Ordering Settings -> POS Function Button Display -> Check [Show No-Tips shortcut on Tip Screen].

98 How to turn off the POS Tip Screen?
Setting: BO -> Restaurant Management -> Secondary Screen Decoration -> Tip Screen -> Display Tip Screen: [Off].
99 Transaction amount discrepancy after POS Pre-authorization?
Solution: After checkout, go to [More -> Edit Tip] and perform [Batch Complete Authorization] to trigger the corrected amount update.
100 How to fix missing voice files for POS Voice Call-outs?
Solution: Install the corresponding voice package in Windows System Settings (Time & Language -> Speech).
101 Why are multiple cash boxes displayed during EOD settlement?
Reason: Multiple stations exist with linked cash boxes. EOD is a store-wide operation.
102 Does the POS support displaying different table service areas by station?
A: No.
103 Can employees backfill clock-in hours for the current day?
A: No. Only previous data can be backfilled (available after midnight).
104 What operations trigger Cash Box Initialization?
A: Any cash box interaction, such as opening the drawer or generating records in Cash/Drawer Management.
105 Does the system support deposit refunds via a different payment method?
A: Not supported by Table Deposits; supported by Buffet Deposits.
106 Does the POS Shift Report support tip statistics by employees?
A: No. Tips are not bound to individuals; the report shows the total tips for all cashiers within the shift.
107 How to bind a credit card terminal to the POS system?
Path: POS Settings -> Payment Terminal -> All Terminals -> Enter Name/IP/Serial Number.
108 Where to enable “Enter Invoice Info” in Order Reprint?
Path: BO -> Store View -> Operation Center -> Restaurant Management -> Operational Parameters -> POS Function Button Display -> Check [Show Fill-in Invoice Info].