Menu Structure & Management
1 Introduction
Welcome to the Menu Structure and Management Module Guide. By reading this article, you will learn about menu hierarchy, creating and configuring menus/menu groups, multi-channel menu filtering management, setting up and distributing menu change plans, and publishing rules for both corporate and store perspectives. These features fulfill the business needs of corporate-level menu control and store-level flexibility in adjusting dishes.
Start with the Glossary below to gain a deep understanding of the module’s core concepts.
2 Glossary
Menu: A collection of directly orderable items displayed to customers across different sales channels (e.g., in-store POS, online food delivery platforms). It is the final presentation form of items. A brand or store can configure multiple menus, such as a Regular Menu or Lunch Set Menu.
Menu Group: A classification label used within a menu to categorize items, optimizing menu structure and helping customers browse and order quickly. For example, under a Regular Menu, you can set up menu groups like Main Courses, Beverages, and Snacks.
Relationship Between Menus, Menu Groups, Item Categories, and Items
These four components form a complete hierarchical system from backend management to frontend display, with the following specific relationships:
Item: The smallest unit of backend management, such as Coca-Cola or Hamburger.
Item Category: A logical category for backend item management, mainly serving internal management scenarios like inventory statistics and operational analysis, e.g., Alcoholic Beverages or Main Meals.
Menu Group: An item classification label for frontend menu display, whose core function is to enhance the customer ordering experience.
Menu: Integrates menu groups and items to form the final sales view for specific sales channels.
In short, items are first categorized by item categories for backend management, then selected and organized into menu groups based on operational needs, and finally presented to customers via menus.
3 Creating Category Menu
STEP 1: Log in to the BO end as a group administrator and switch to the Group Perspective in the top-right corner.
STEP 2: Navigate to【Item Management > Menu Management】 and click【Add Category Menu】in the top-right corner. A pop-up window titled Auto Create Menu by Category will appear. Check the target categories and confirm.
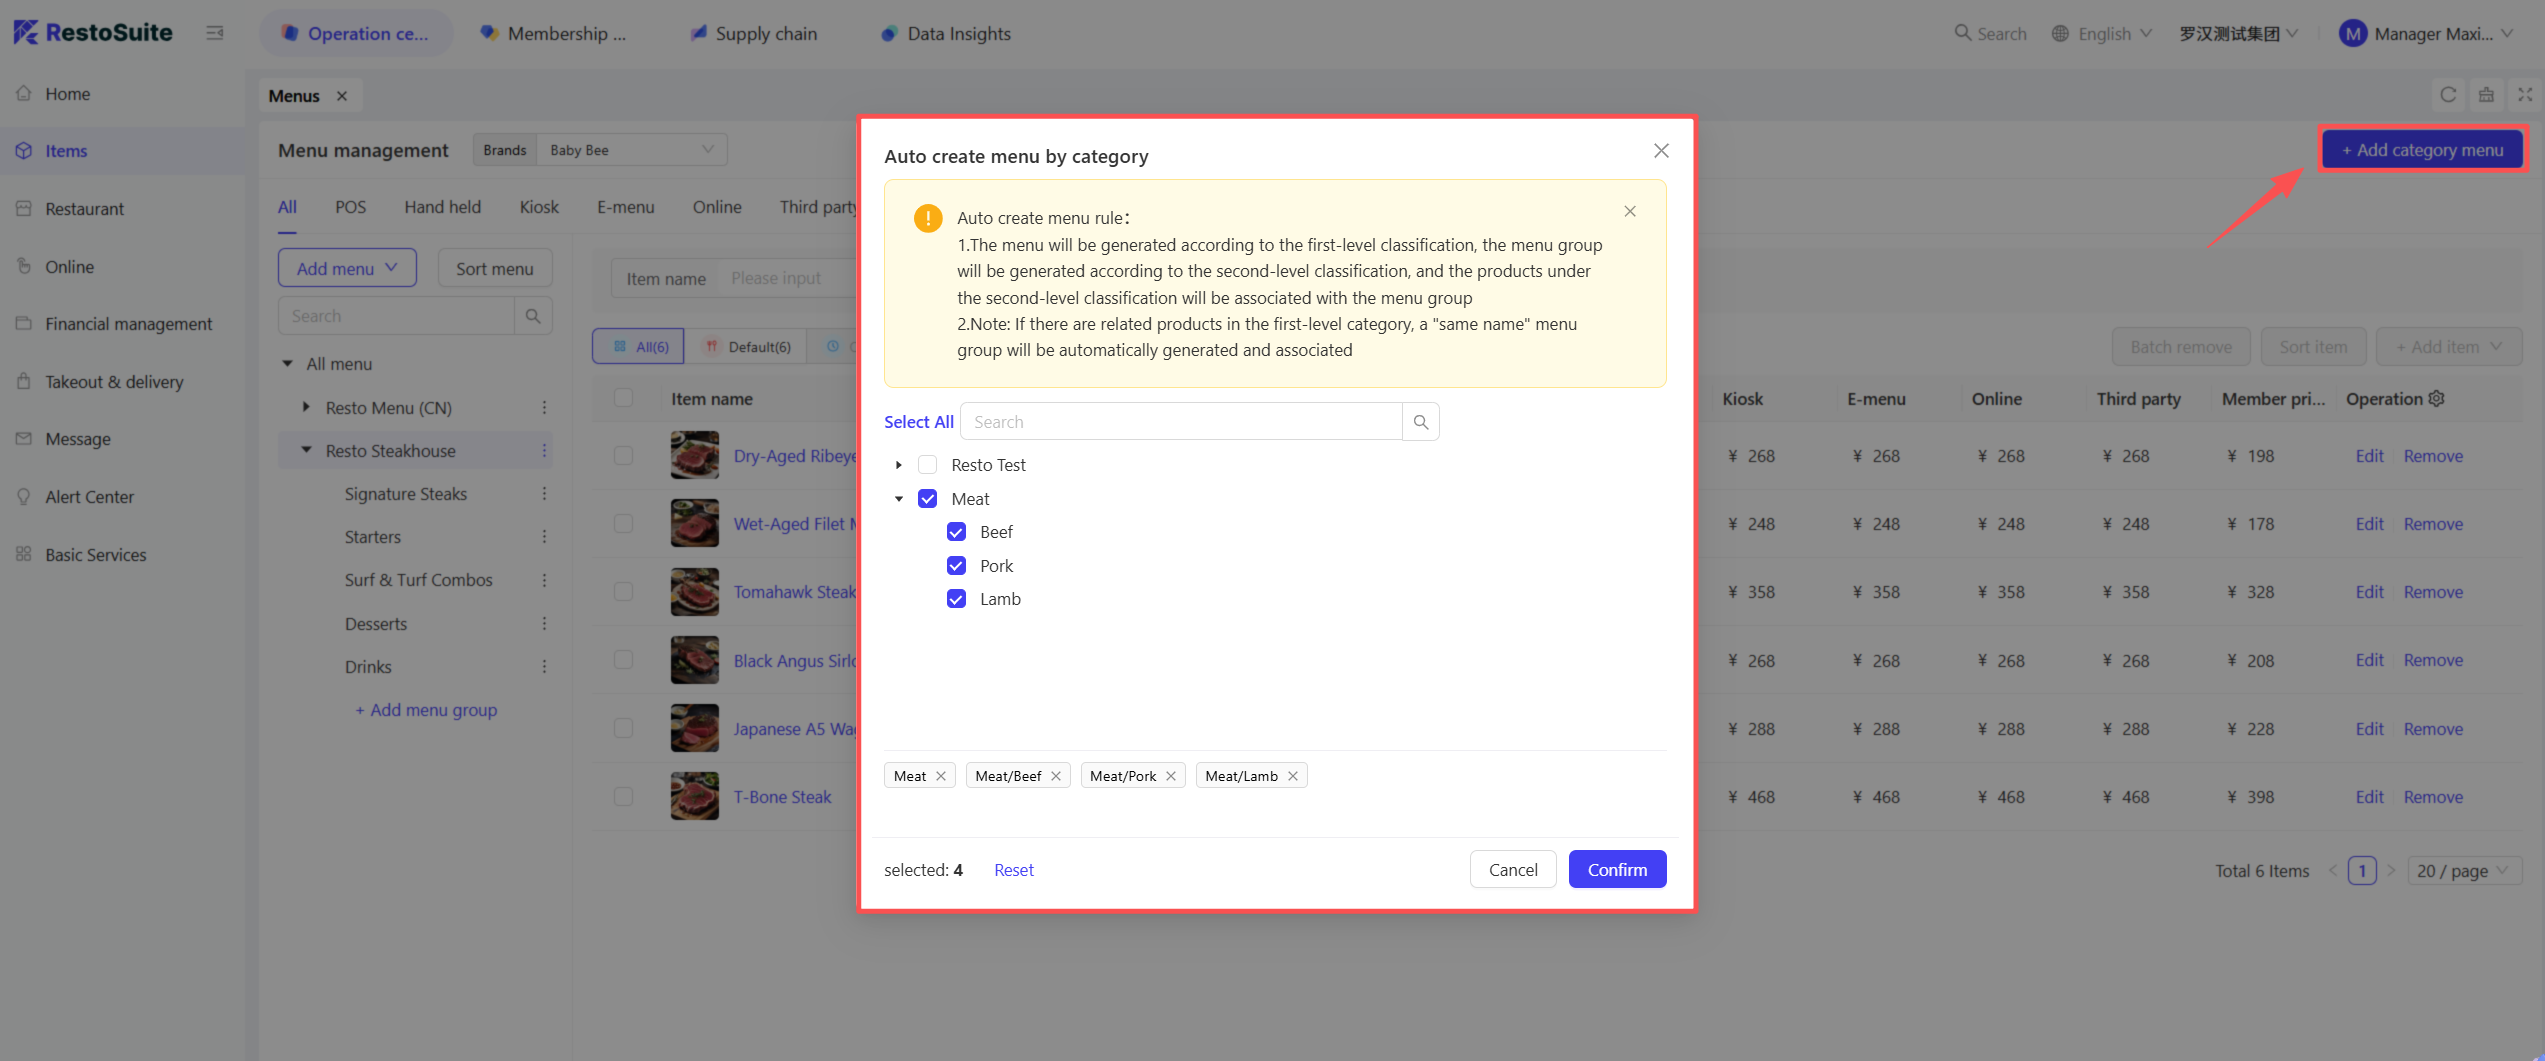
STEP 3: The system will automatically generate menus based on the category settings configured on the Item Category page, following these rules:
- Level-1 Categories → Generate Menus.
- Level-2 Categories → Generate Menu Groups, with Items under each level-2 category automatically associated with the corresponding menu group.
- Additional Note: If a level-1 category is directly associated with items, the system will auto generate a menu group with the same name as the level-1 category and associate the corresponding items with it.
Notes:
At least one level-1 category (e.g., "Hot Dishes") or level-2 category (e.g., "Stir-Fried Dishes") must be selected for menu and menu group generation.
If no level-1 or level-2 categories are selected, the system cannot generate menus or menu groups.
4 Creating a Menu
STEP 1: Log in to the BO end as a group administrator and switch to the Group Perspective in the top-right corner.
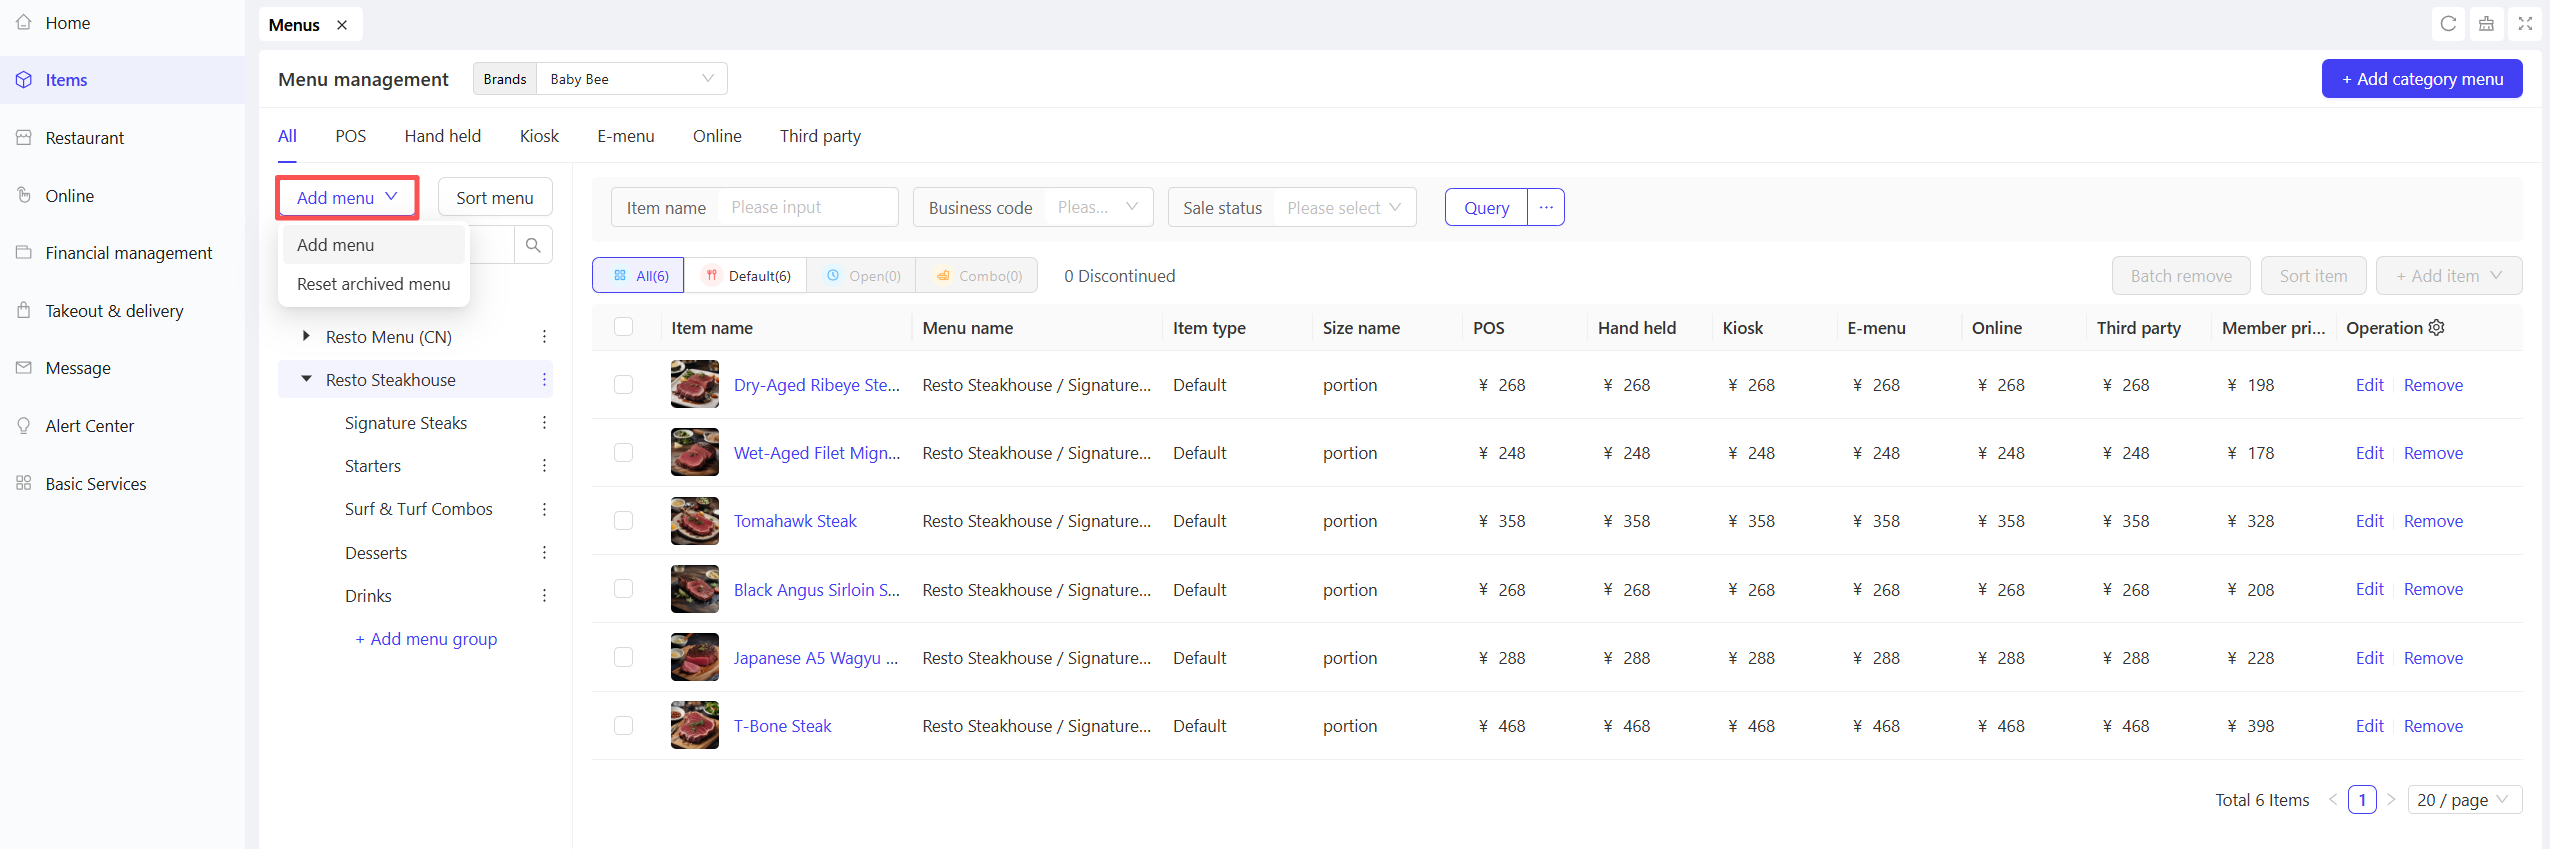
STEP 2: Navigate to【Item Management > Menu Management】, locate the target brand for which you want to create a menu, and click the【Add Menu】button in the top-left corner.
STEP 3: On the Add Menu page, configure the following information:
Configuration Item | Configuration Description |
|---|---|
Menu Name | Enter the name of the menu you want to create. |
Menu Group | Configure menu groups for this menu (multiple groups supported). Simply enter the name of each menu group. |
Channel Display |
|
Additional Information | Enter a text description for the menu. |
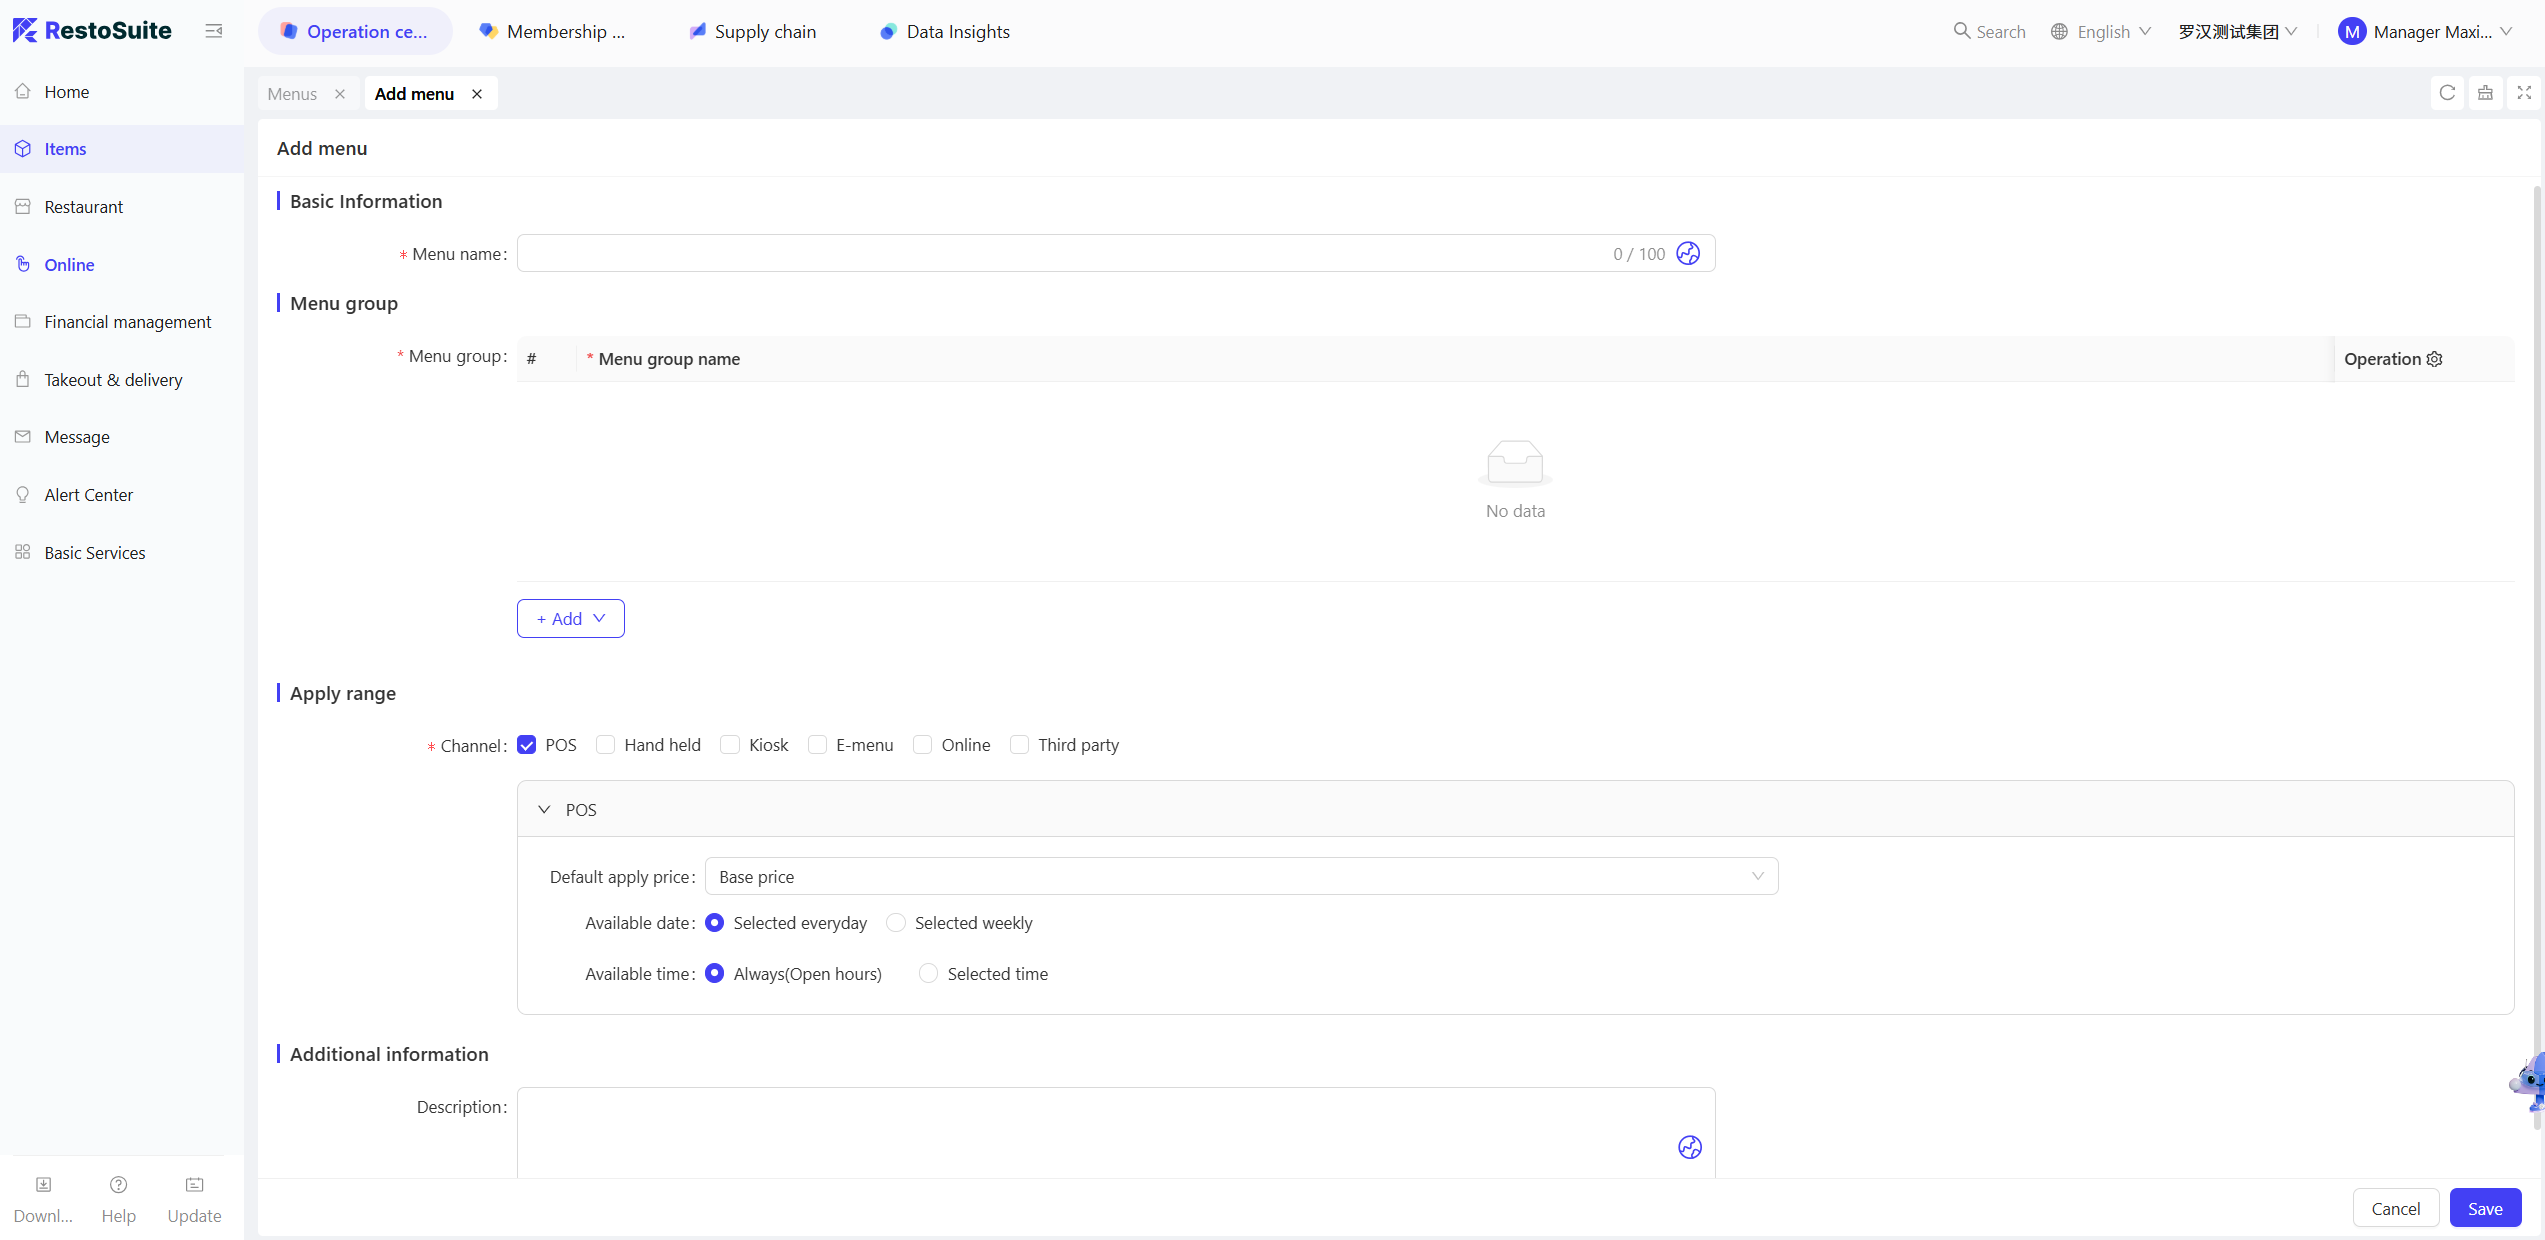
STEP 4: Click【Save】after completing the configuration to finish creating the menu.
5 Adding Items to a Menu
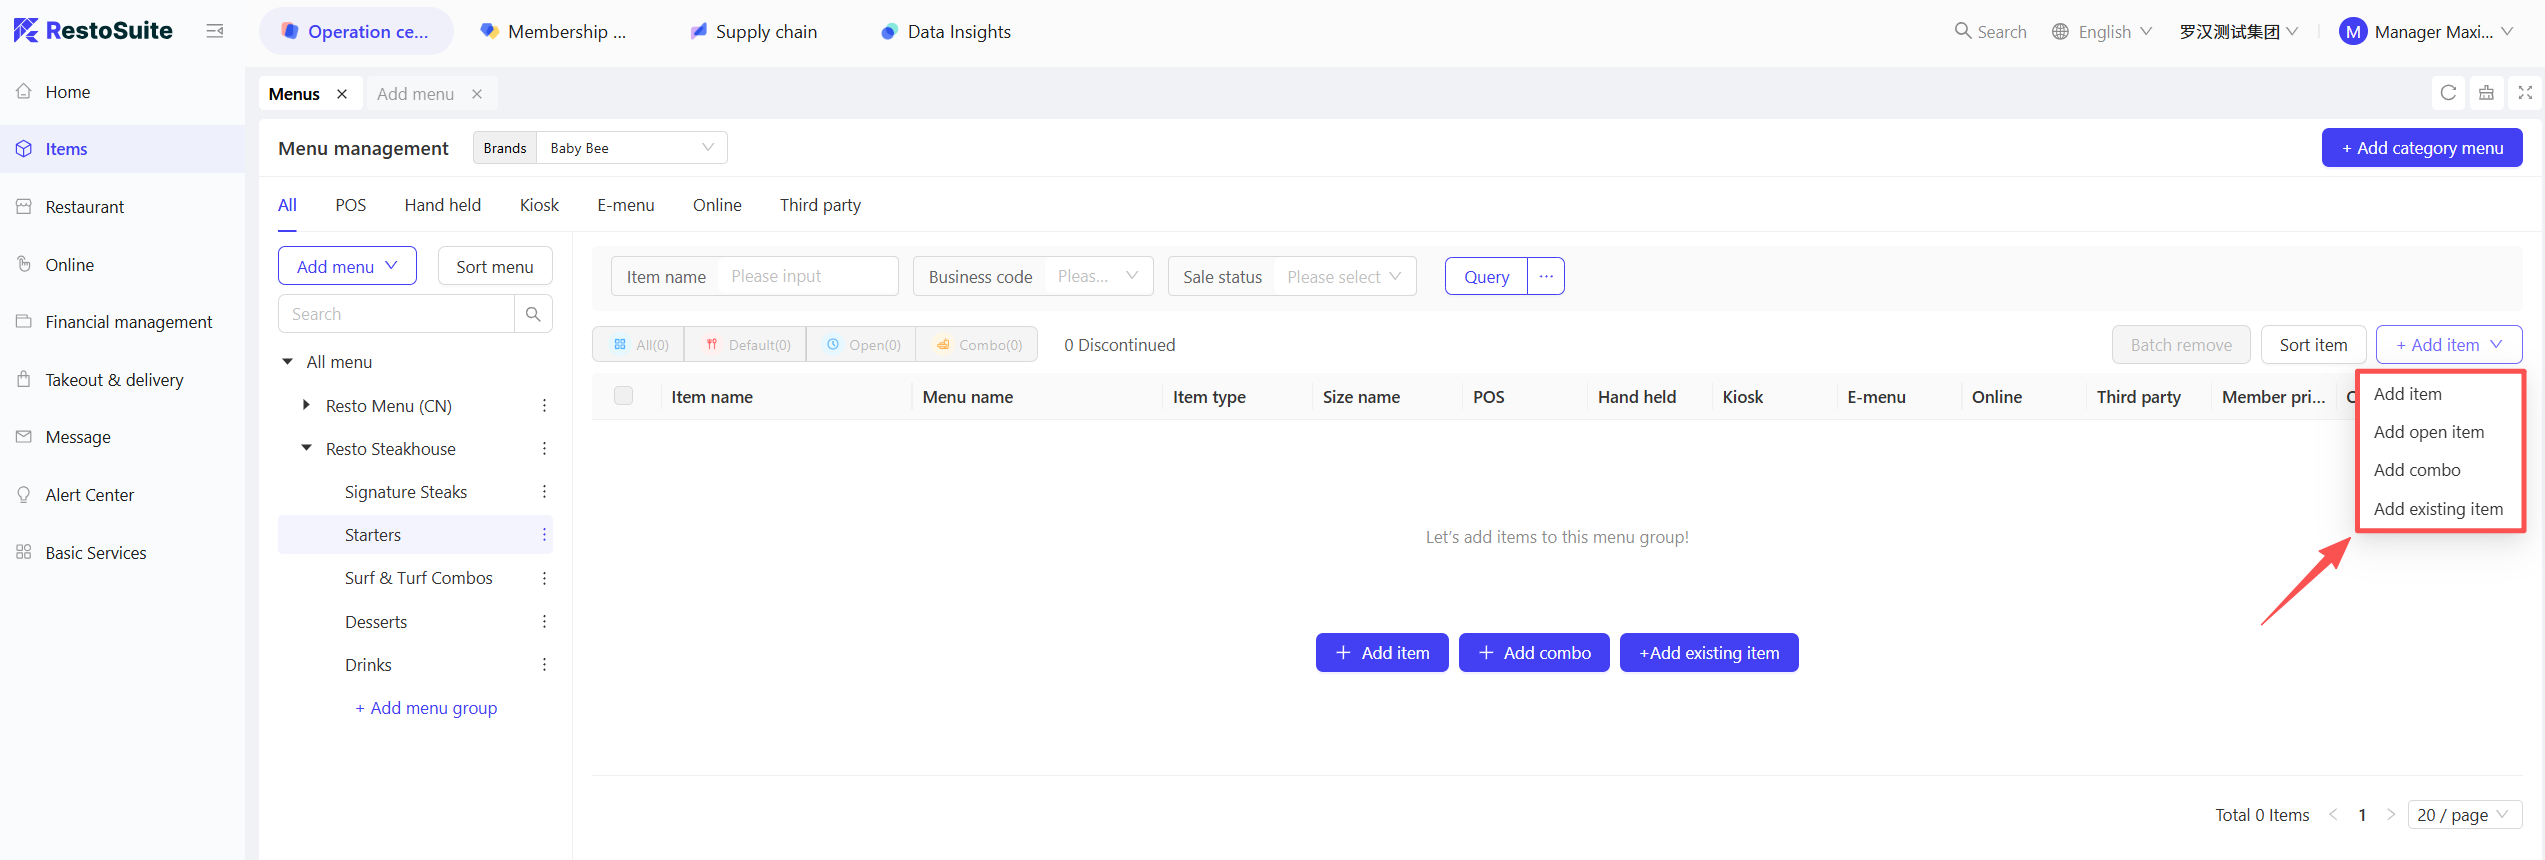
STEP 1: Under the newly created menu, click on a menu group. Operation buttons for adding items will appear on the right side. Select the type of item you want to add:
- Add Regular Item: Create a new regular item that does not exist in the system.
- Add Market-Priced Item: Create a new market priced item that does not exist in the system.
- Add Combo Item: Create a new combo item that does not exist in the system.
- Add Existing Item: Select items that have already been created in the system.
STEP 2: After adding items, you can sort them using two methods:
- Drag-and-Drop Sorting: Directly drag the icon on the left to move items up or down and adjust their order.
- Sequence Number Modification: Enter the target sequence number in the order column on the right to adjust the sorting.
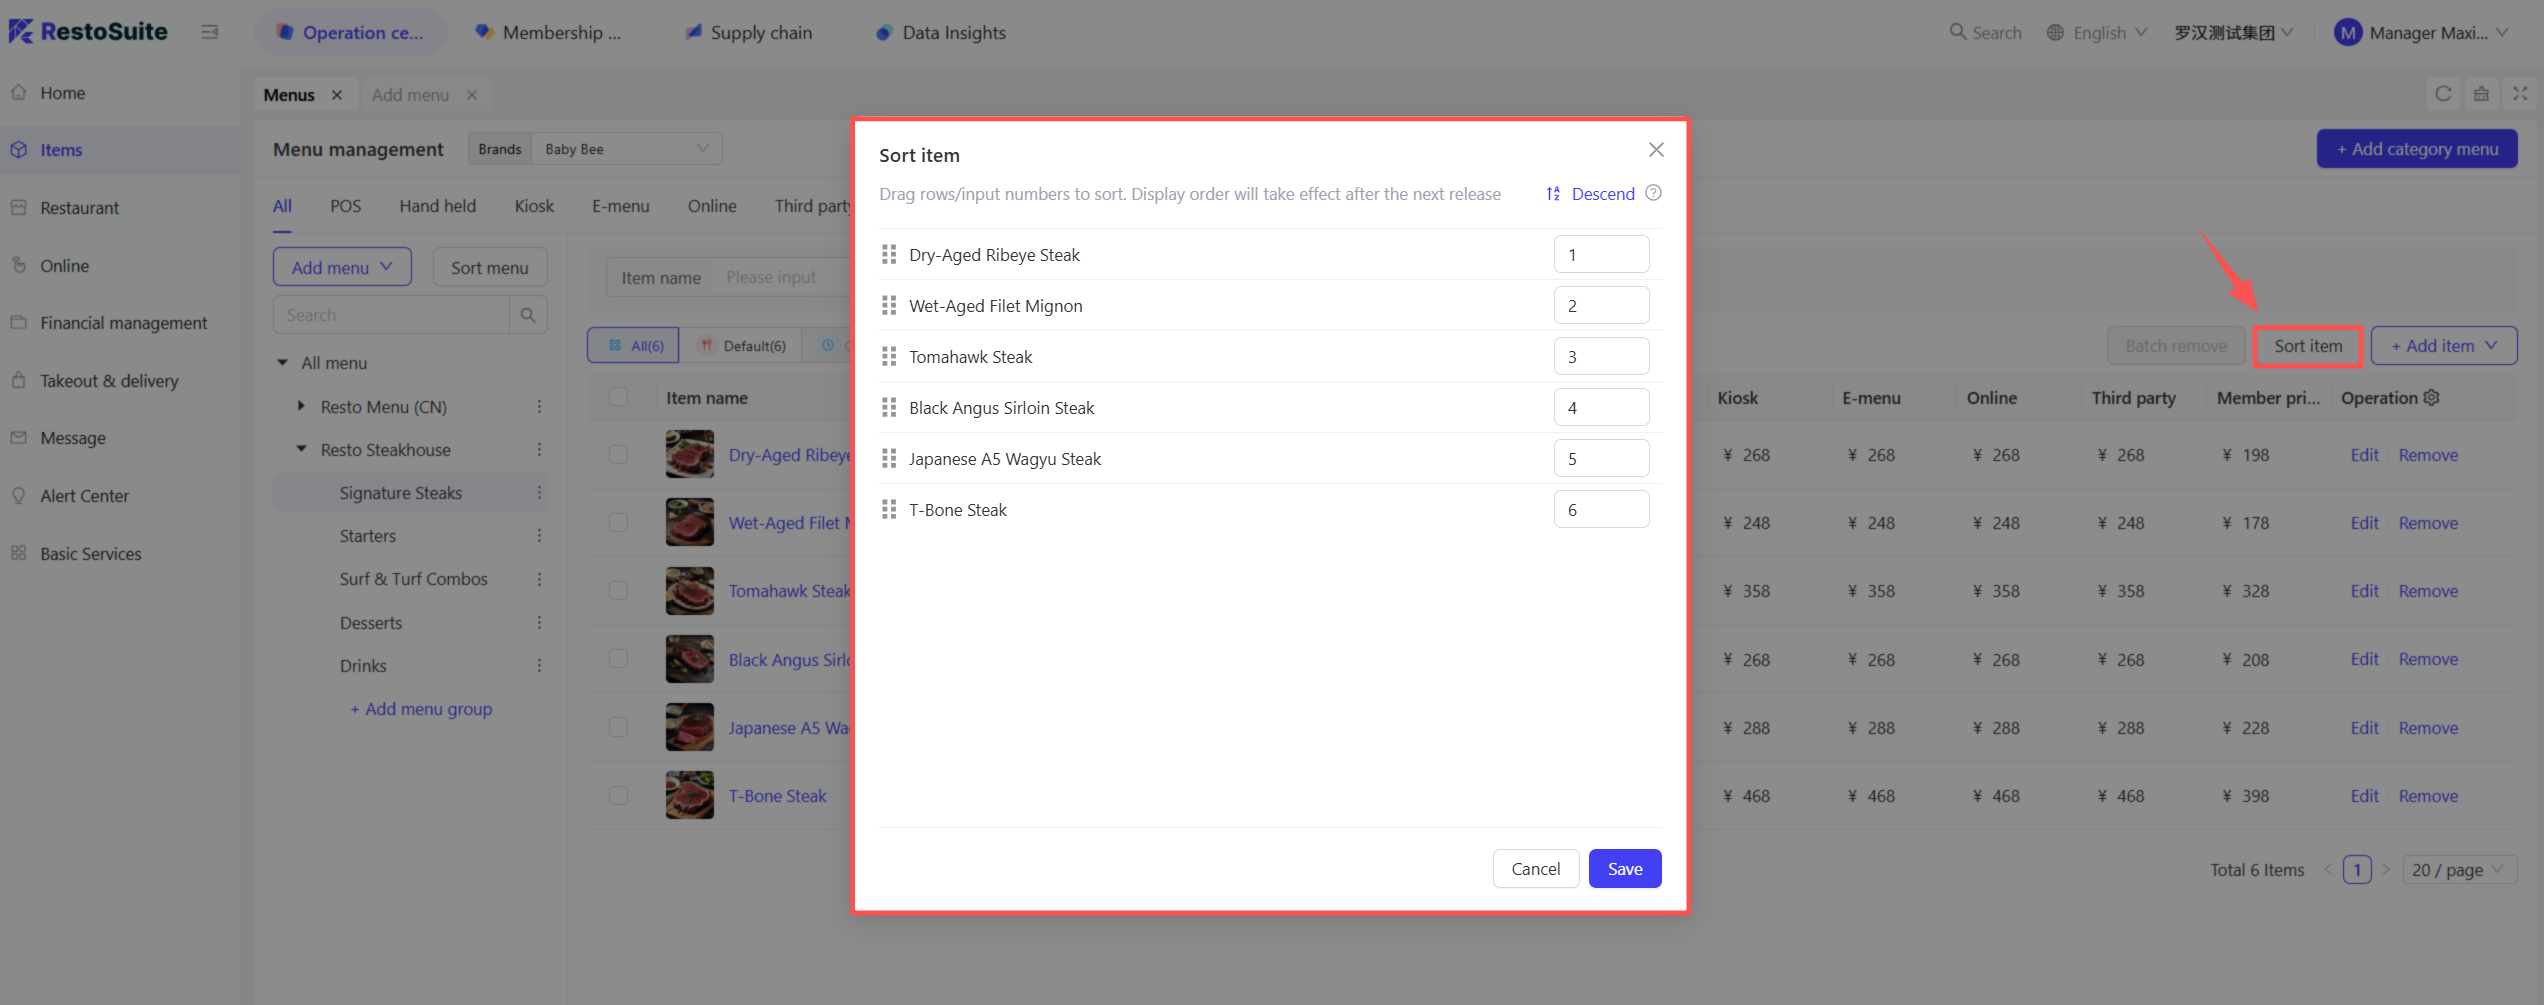
Note: The display order adjusted via the above two methods will take effect only after the next menu is published.
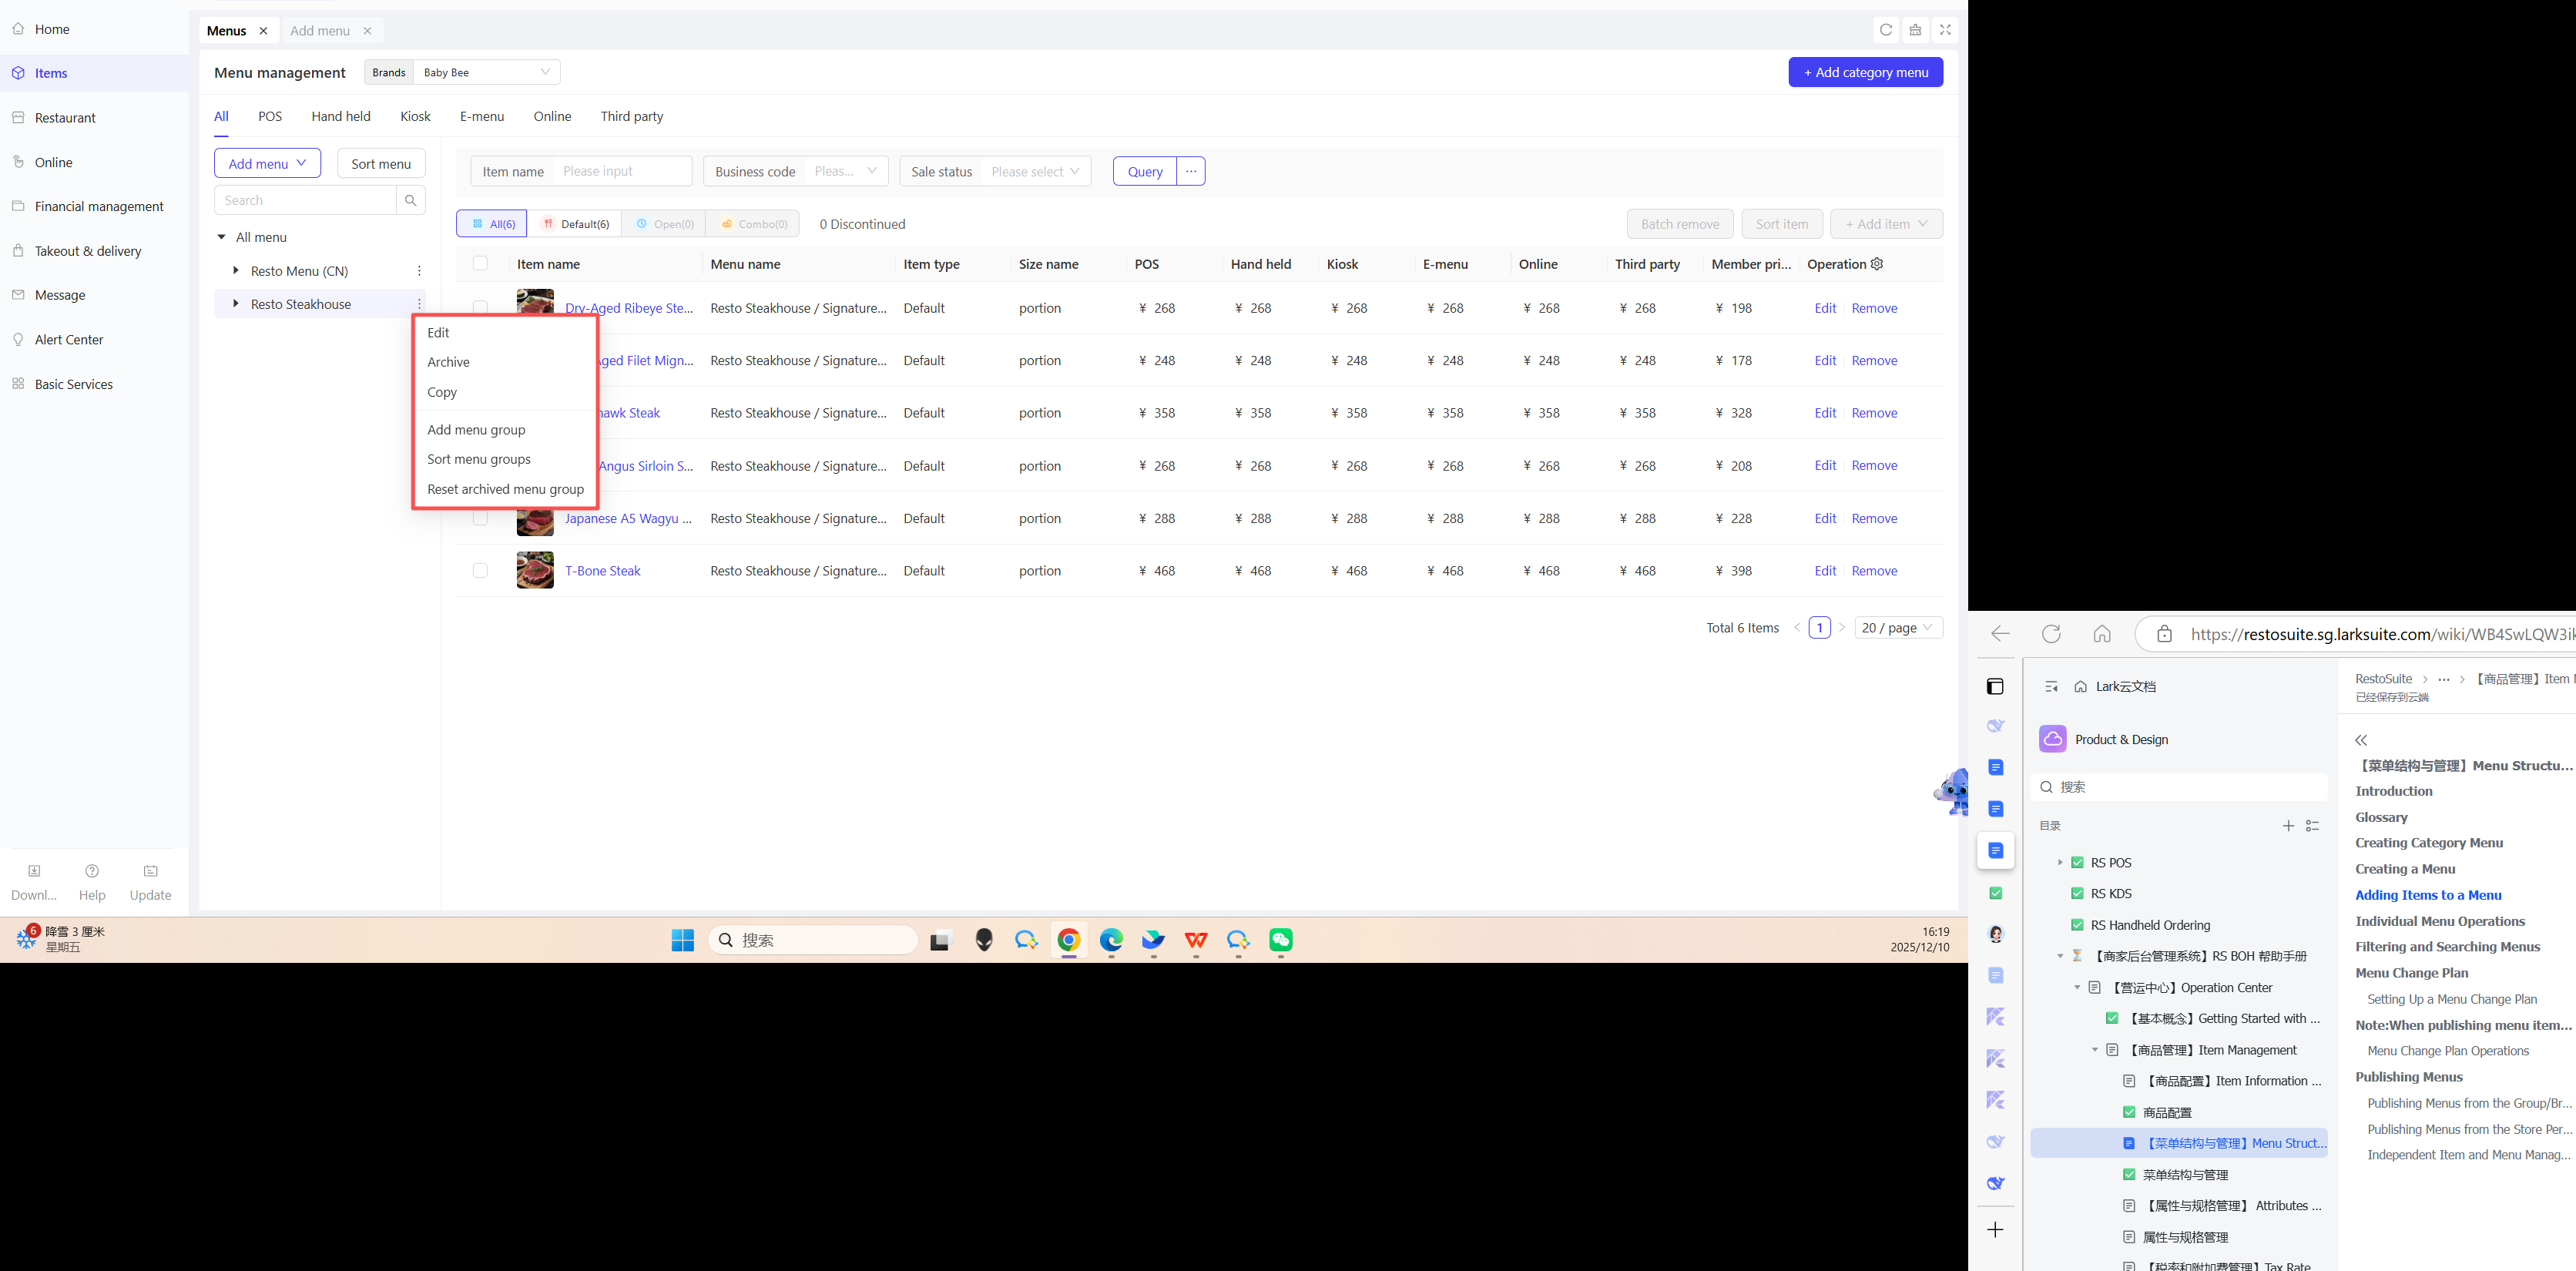
STEP 3: Click the More button next to the menu name to add new menu groups or sort existing menu groups.
- Switch between different application channels (e.g., All, POS, Ordering Pad, Online Ordering) at the top of the page. The system will display the corresponding menus and menu group information for the selected channel, making it easy to quickly view the actual menu and item content presented on each channel.
6 Individual Menu Operations
-
Edit: On the Menu Management page, click the【Edit】button in the More options next to the target menu to modify the menu information.
-
Copy: On the Menu Management page, click the【Copy】button in the More options next to the target menu to quickly generate an identical copy of the original menu, which will be automatically displayed in the menu list.
🔋Applicable Scenarios:
Multi-store Item Reuse: Deploy the same menu across multiple stores under the same brand. Simply copy the master menu and fine-tune item prices/specifications to avoid repetitive work.
Holiday/Seasonal Menu Revisions: Quickly generate limited-time holiday or seasonal menus based on existing ones by retaining the core structure and only replacing or adding selected items.
A/B Testing for Menu Configurations: Test the sales performance of different item combinations by copying the original menu and modifying part of its content to create a comparison version.
Rapid Launch of Temporary Menus: Deploy pop-up menus (e.g., afternoon tea menus) at stores by copying similar menus and making adjustments instead of building from scratch.
-
Archive: On the Menu Management page, click the【Archive】button in the More options next to the target menu to remove the menu from the current menu list while retaining its historical records. Archived menus will no longer be displayed on any application channels (POS, online ordering, etc.).
🔋Applicable Scenarios:
Removing Expired Menus: Archive expired limited-time menus (e.g., holiday or promotional menus) for future reuse while cleaning up the current menu list.
Menu Optimization at Stores: Temporarily remove underperforming menus. Archiving does not affect historical data and facilitates subsequent review and adjustment.
-
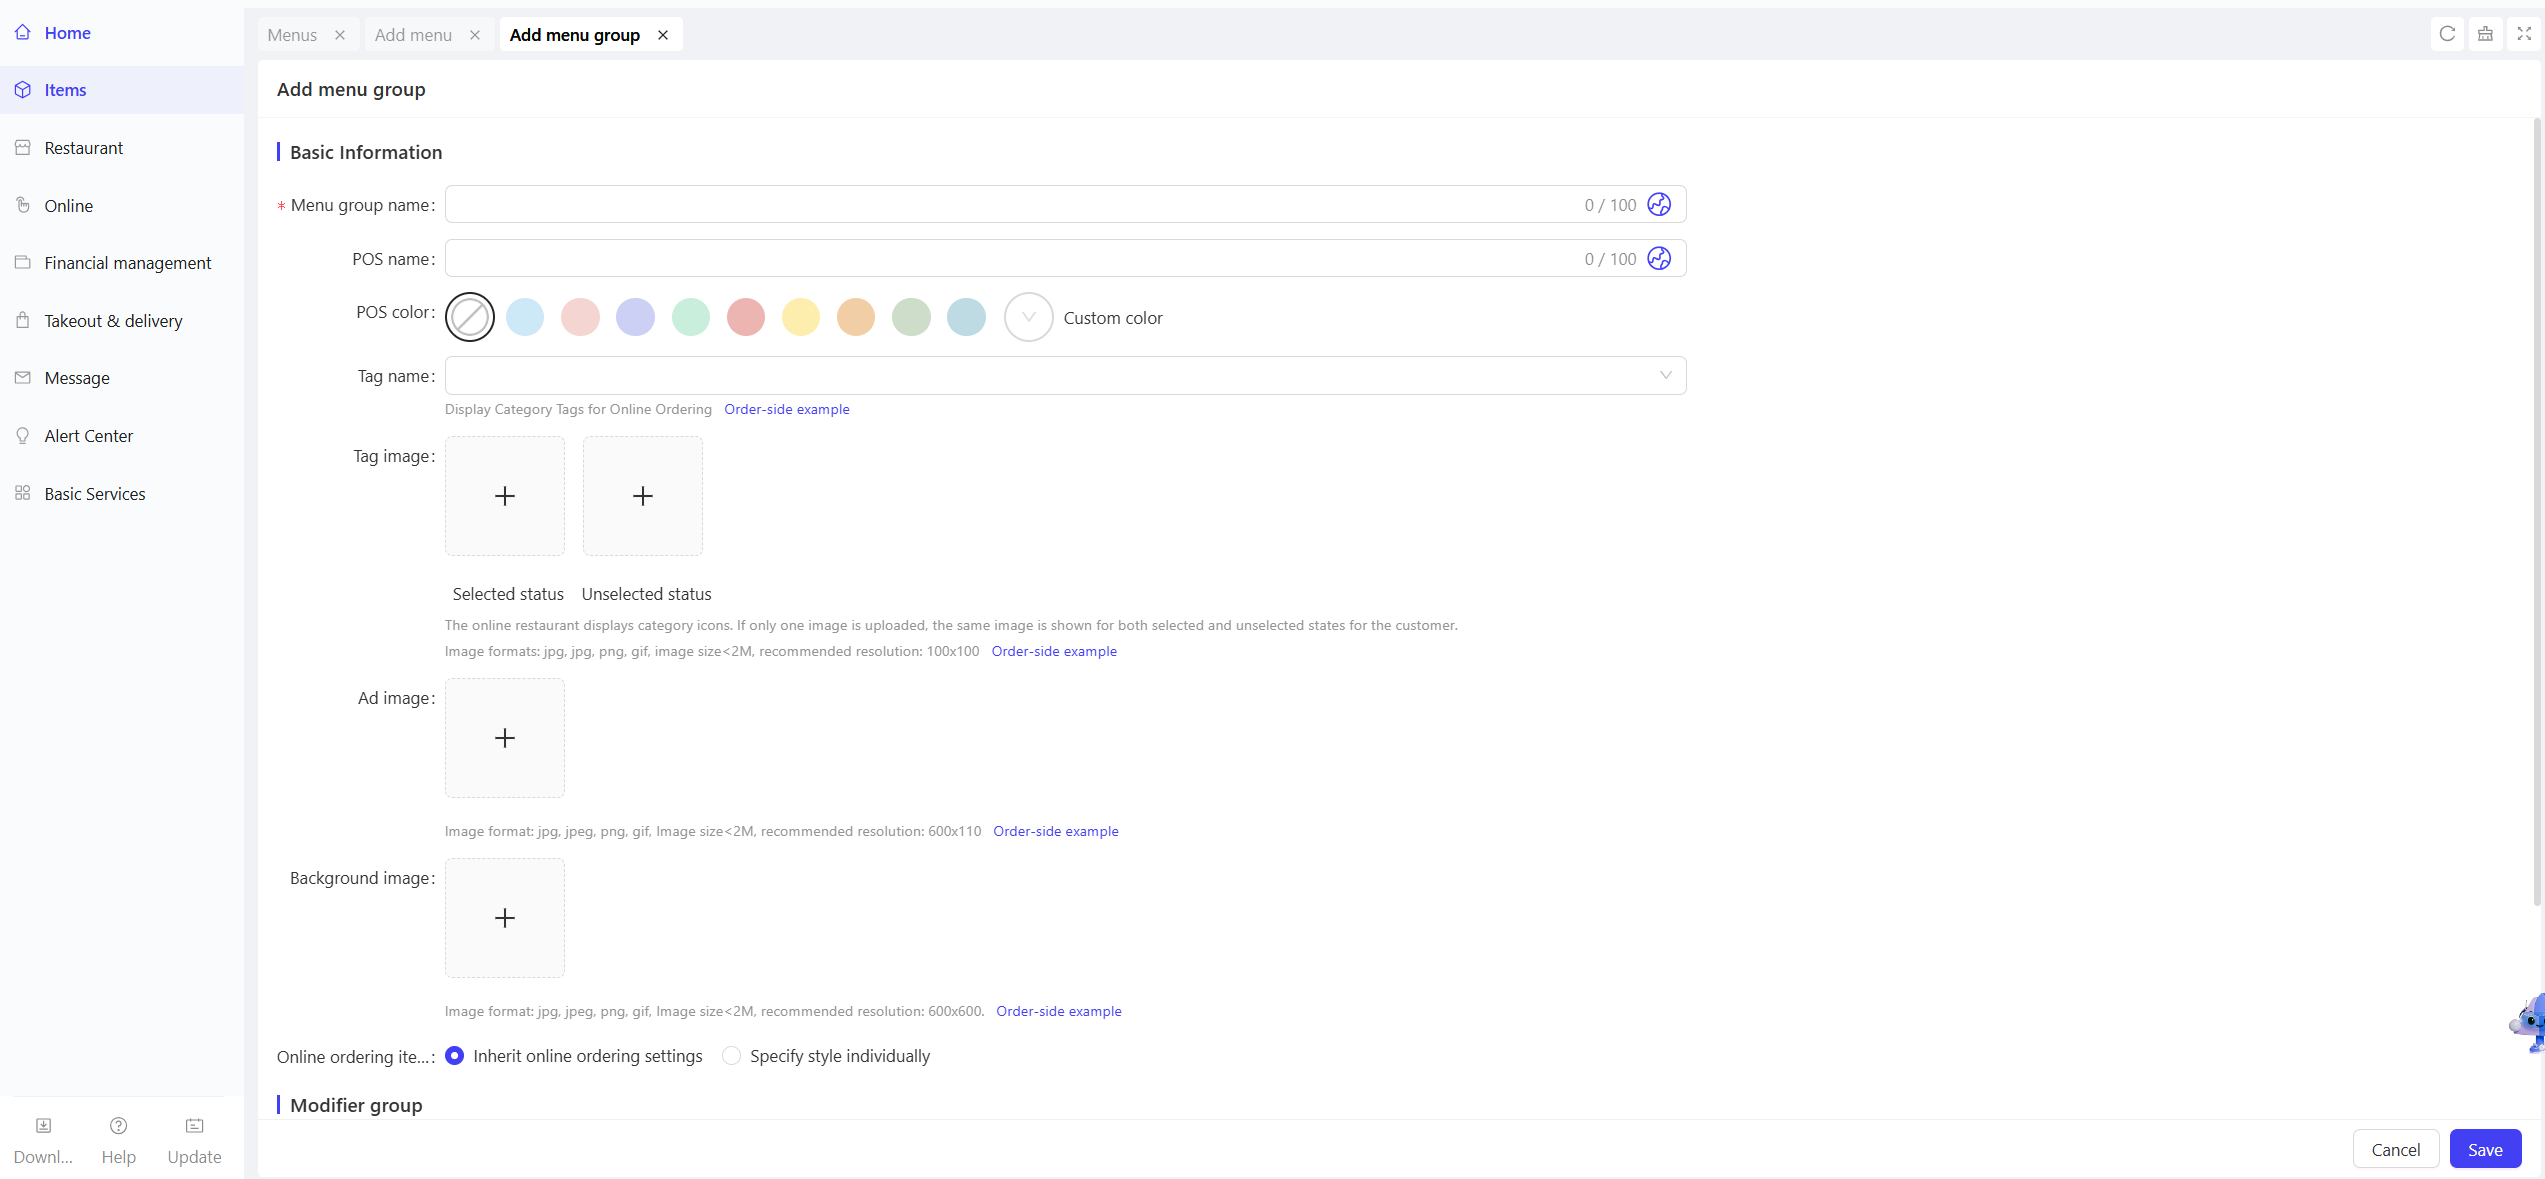
Add Menu Group: On the Menu Management page, click the【Add Menu Group】button in the More options next to the target menu to create a new menu group under that menu. The following information needs to be configured:
Configuration Item | Configuration Description |
|---|---|
Menu Group Name | Enter the name of the menu group you want to add (required). |
POS Name/Color | Enter the display name of the menu group on POS terminals and select its display color. |
Label Name/Image |
|
Ad/Background Image | Upload the advertisement or background image for the menu group. |
Online Ordering Item Style |
|
Modifier Group | Add modifier group for the menu group |
Description | Enter a text description for the menu group |
Click【Save】after completing the configuration to finish creating the menu group.
-
Sort Menu Groups: On the Menu Management page, click the【Sort Menu Groups】button in the More options next to the target menu to sort the menu groups under that menu. You can use either drag-and-drop or sequence number modification.
-
Restore Archived Menu Group: On the Menu Management page, click the【Restore Archived Menu Group】button in the More options next to the target menu. Select the archived menu group you want to restore and click【Confirm】to move it back to the current menu list.
7 Filtering and Searching Menus
STEP 1: Switch to the Group Perspective
- Log in to the Operation Center as a group administrator.
- Click Perspective Switch in the top-right corner and select Group perspective.
STEP 2: Access the Menu Management Page
- Entry: 【Item Management > Menu Management】
- Filter by Brand: Use the Brand dropdown menu at the top to select the target brand (only menus under the selected brand will be displayed).

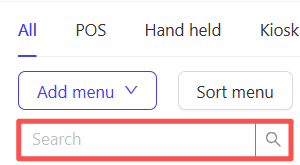
- Filter by Display Channel: Switch between channel types at the top of the page to filter menus.

- Search by Name: Directly enter the menu name in the search box to find the target menu.
8 Menu Change Plan
8.1 Setting Up a Menu Change Plan
STEP 1: Log in to the BO end as a group administrator and switch to the Group Perspective in the top-right corner.
STEP 2: Access the Menu Change Plan creation page
- Navigate to【Item Management > Menu Management > Menu Change Plan】in the backend navigation bar.
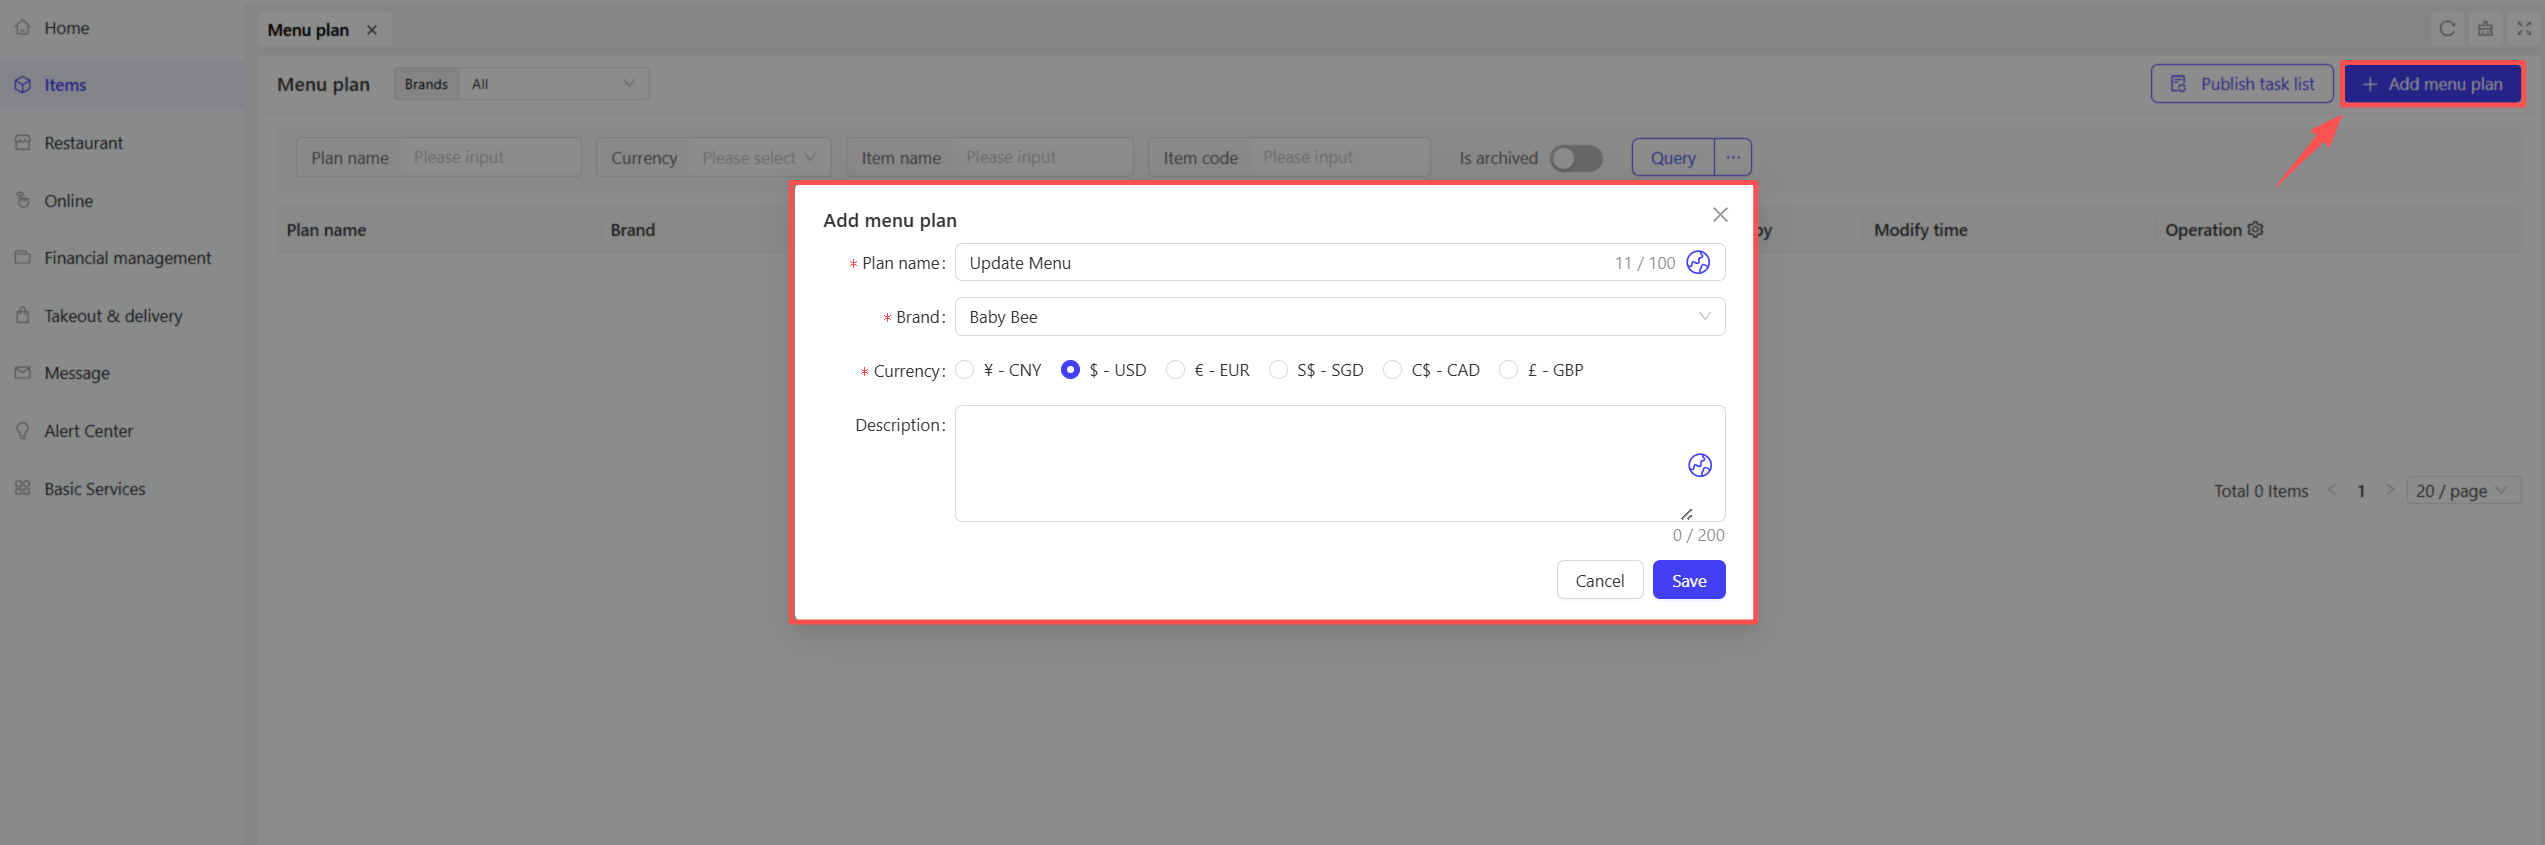
- Use the Brand dropdown menu at the top to locate the target brand, then click the【Add Menu Change Plan】button in the top-right corner of the page. A plan creation window will pop up.
STEP 3: Create a New Menu Change Plan
- On the pop-up add page, enter the plan name, select the corresponding brand and currency type, then click【Submit】to create the new plan.
STEP 4: Configure Items and Menus in the Plan
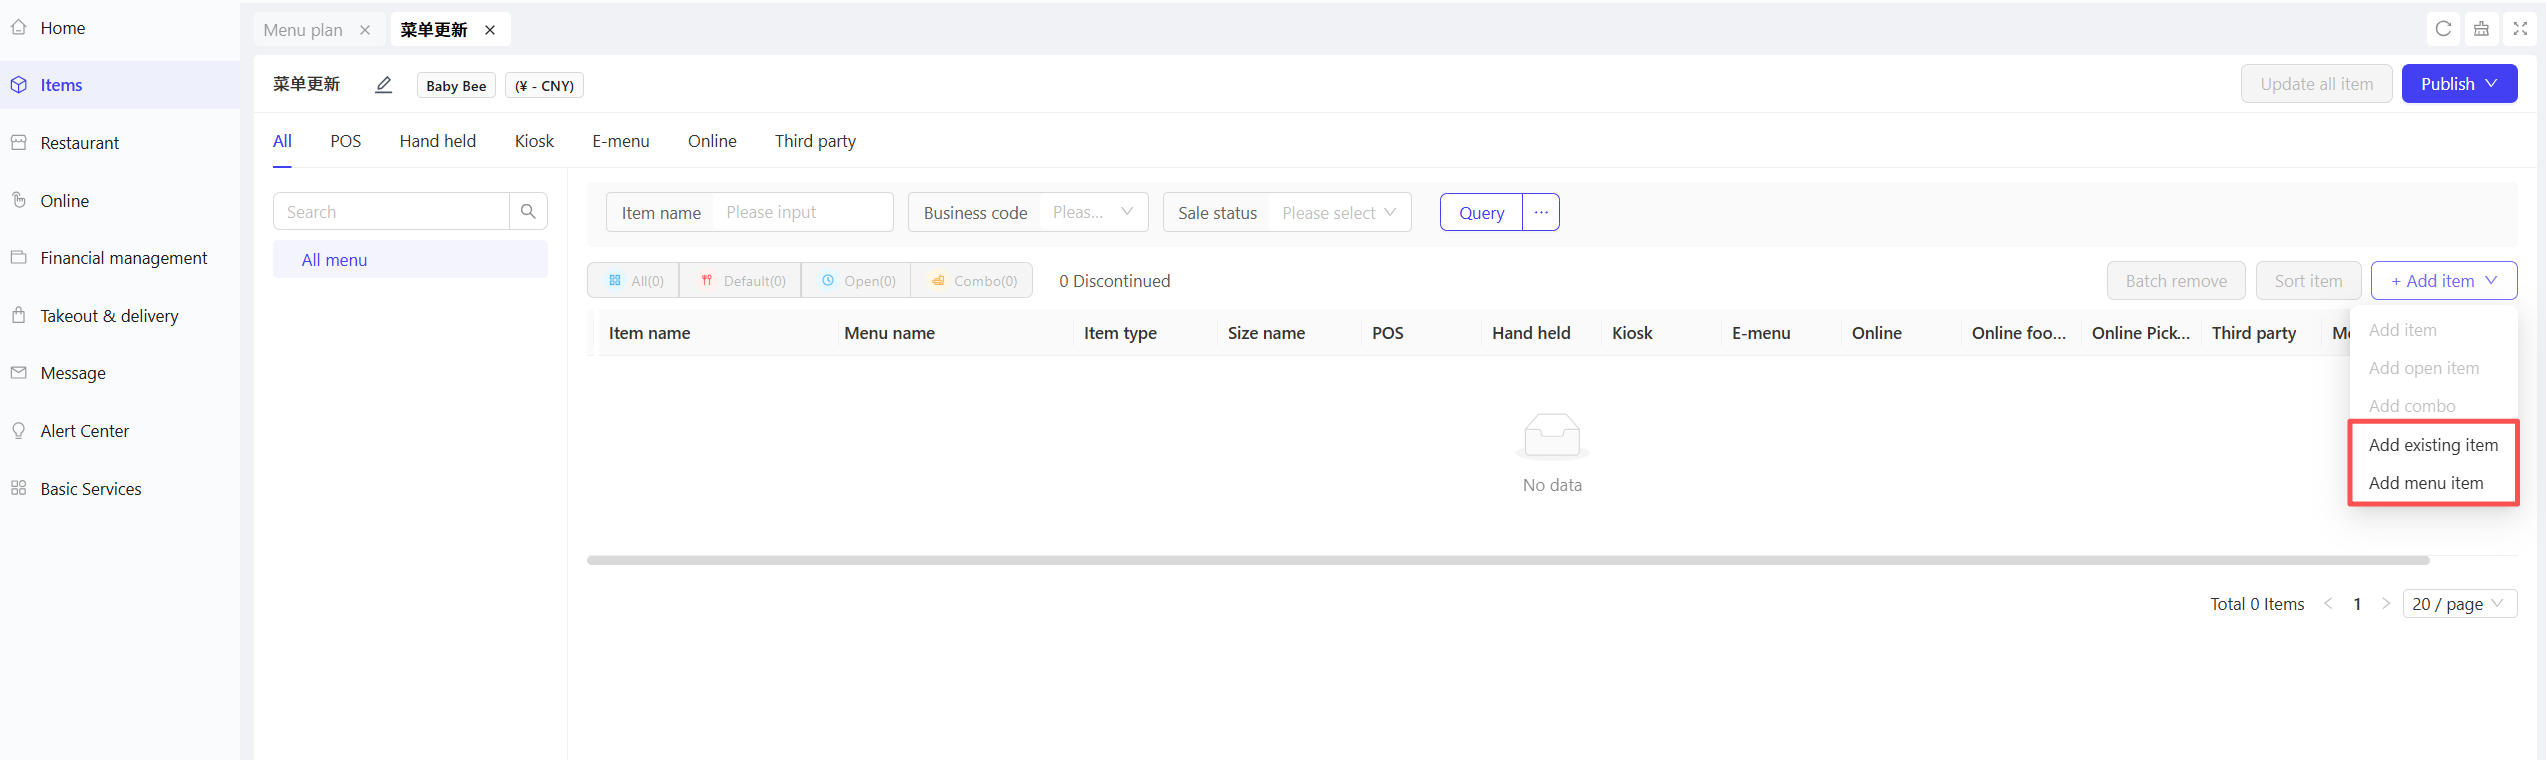
-
Enter the details page of the created plan and add content using the following methods:
- Add Existing Item: Manually select individual items to be included in the change plan.
- Add Menu Item: Directly select a pre-created complete menu; all items under the menu will be automatically added to the plan.
-
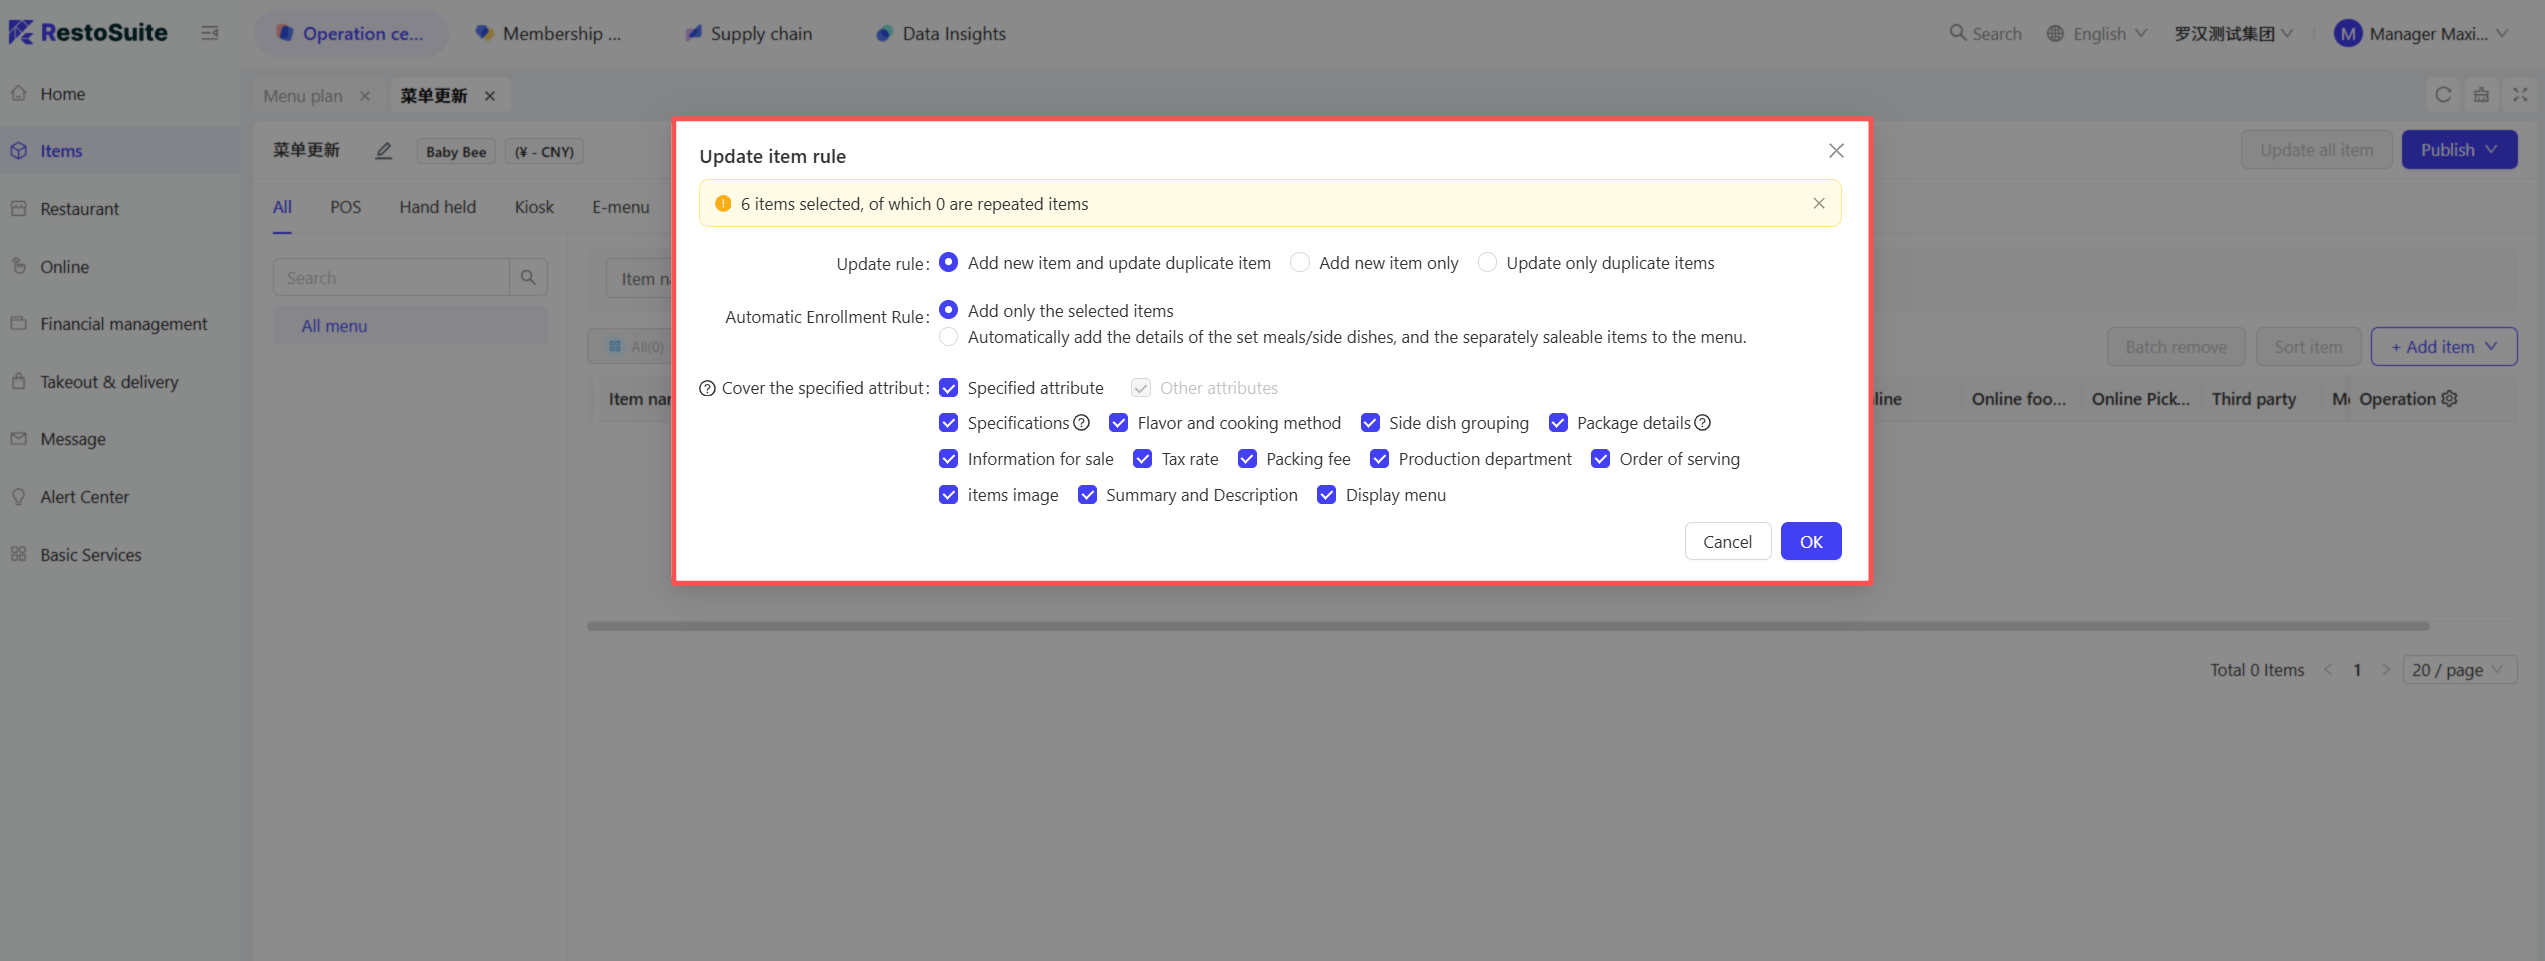
Set Item Update Rules:
- Update Rule: Choose from Add new items and update duplicate items, Add new items only, or Update only duplicate items.
- Auto-add Rule: Choose from Add only selected items or Auto-add combo/side item details and individually sellable items to the menu.
- Cover the Specified Attributes: Only applicable to duplicate items already in the change plan. Check the item attributes to be uniformly updated (e.g., price, specifications, description).
STEP 5: Select Distribution Type and Execute Store Publish
-
On the details page of the plan, click Distribute to Stores in the top-right corner, or find the corresponding plan in the change plan list and click Distribute to Stores. A dialog box for selecting the distribution type will pop up.
-
Select one of the following distribution types:
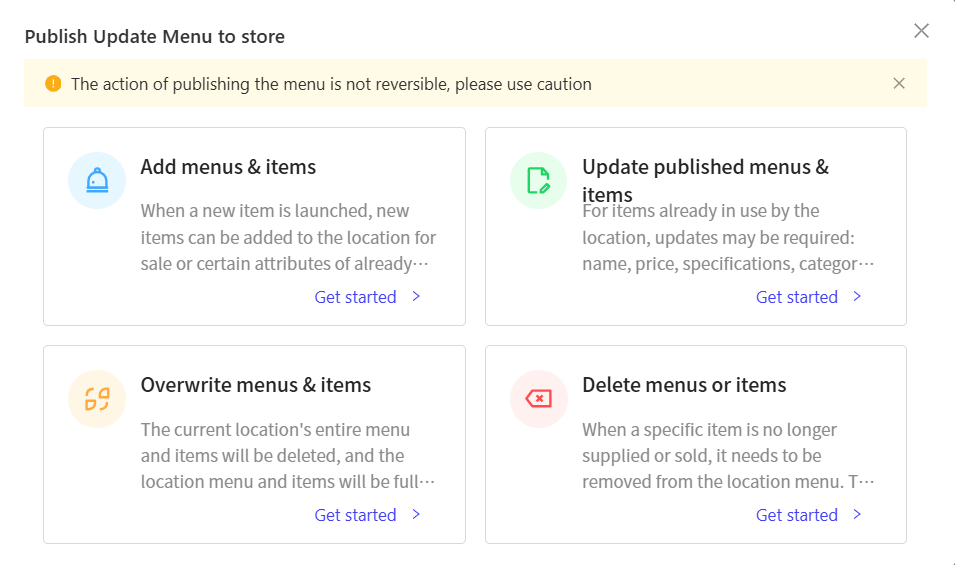
- Add Menus and Items: Add new sellable items to stores or replace some attributes of already distributed items.
- Update Published Menus and Items: Batch update attributes of items currently in use at stores.
- Overwrite Menus and Items: Clear all existing menus and items at stores and fully replace them with the content in this plan.
- Delete Specified Menus or Items: Remove specified items from the store’s current menu.
-
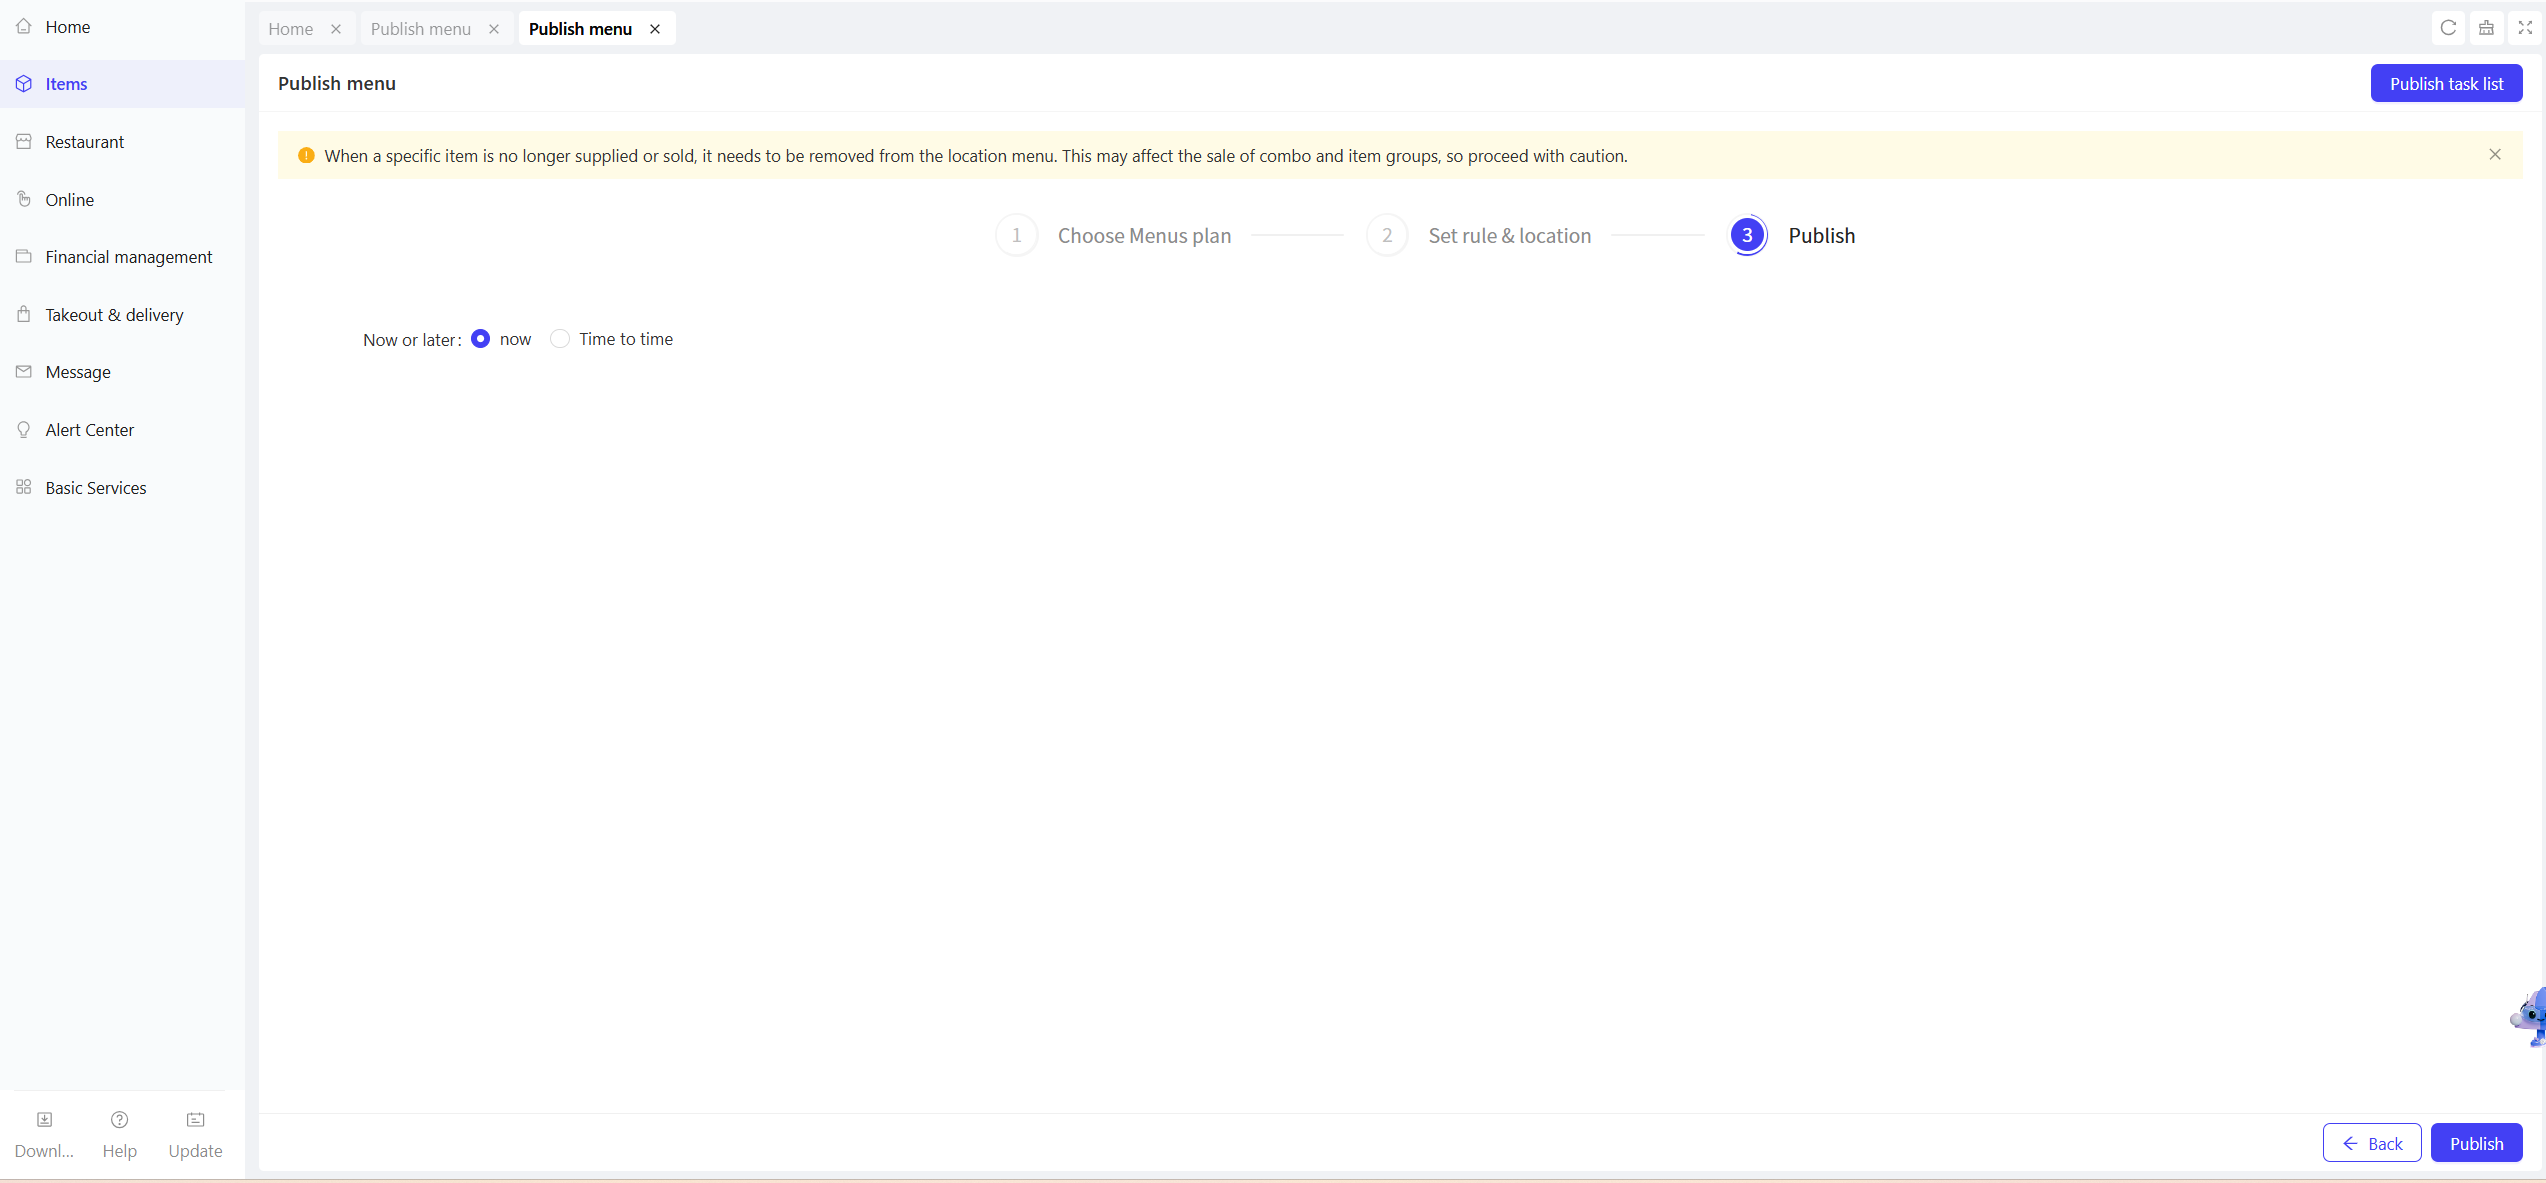
Proceed to the Publish Menu page, select the publish type, item coverage scope, and other attributes as needed, then click【Continue】.
-
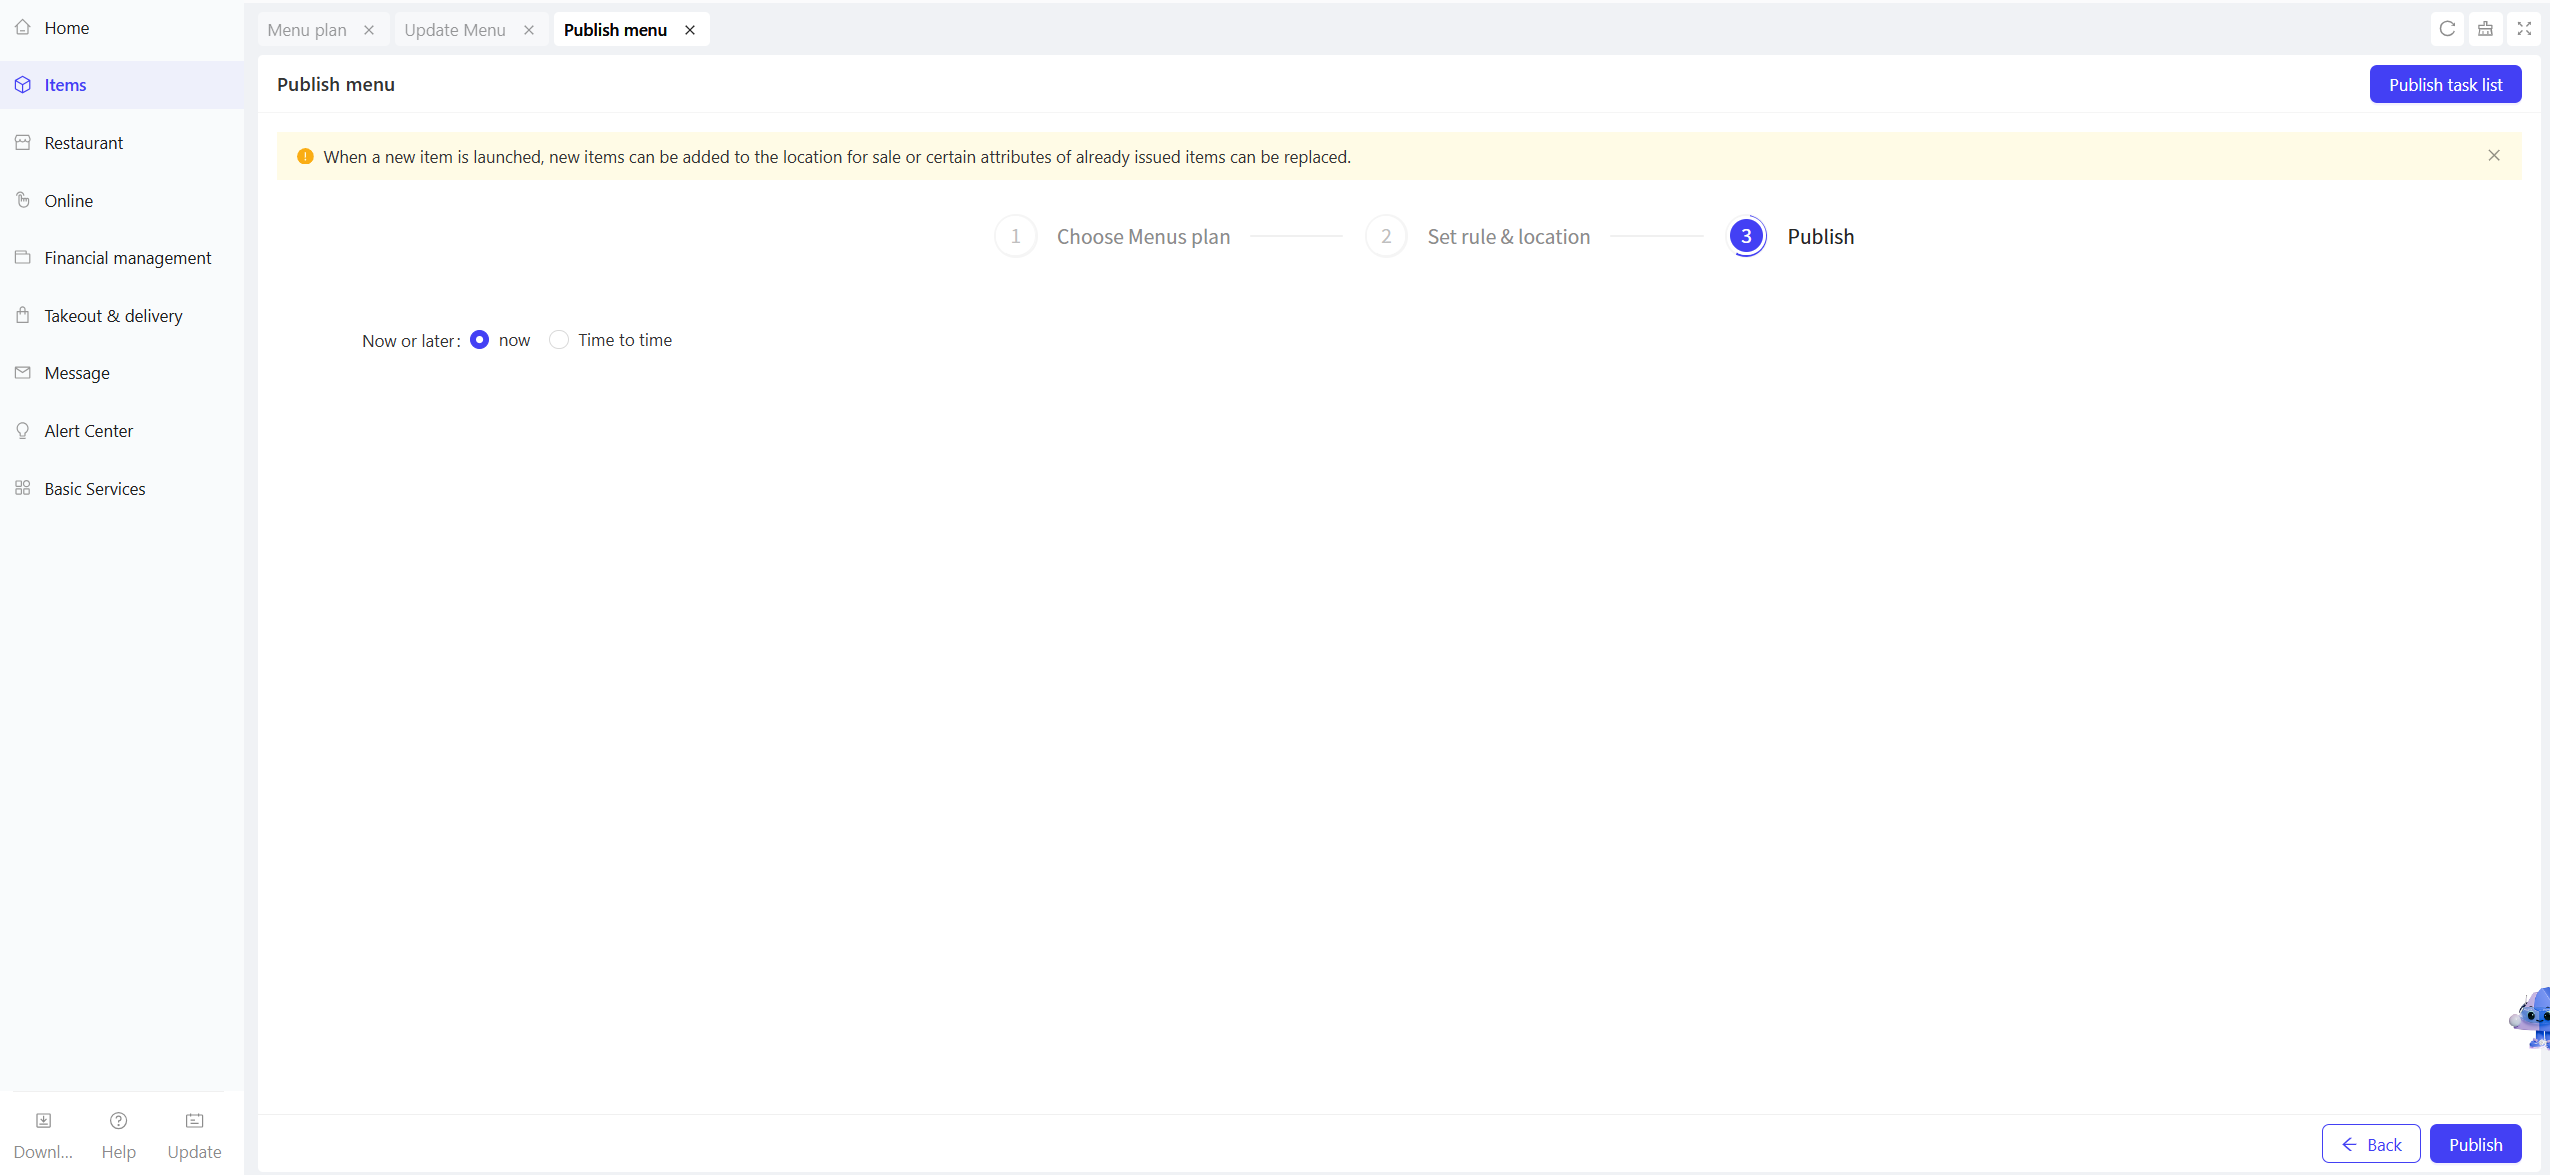
Select the publish time on the release page. Two options are available:
- Now: Item changes configured in the plan will be synchronized to the specified stores in real time.
- Scheduled: Set a specific execution time; the system will automatically push the item changes at the designated time.
-
Click【Publish】to complete the distribution process.
Note:
When publishing menu items, ensure that the POS devices of the target stores are online. Otherwise, the items cannot be synchronized to POS terminals and online mini-programs.
8.2 Menu Change Plan Operations
-
Copy: On the Menu Change Plan page, click the【Copy】button in the operation column of the target menu change plan to quickly generate an identical copy, which can be further modified as needed.
-
Edit: On the Menu Change Plan page, click the【Edit】button in the operation column of the target menu change plan to directly add, modify, or remove configured items on the plan details page. Save the changes to update the plan content.
-
Archive: On the Menu Change Plan page, click the【Archive】button in the operation column of the target menu change plan to remove the plan from the current list while retaining its historical records.
-
Update All Items:
- If item information in the change plan is modified in other functional modules, the item information stored in the plan will still retain the pre-modified version.
- In this case, click the【Update All Items】button to pull the latest attribute information of all items and synchronize it to the plan. Re-distributing the plan will override the existing item information at stores.
-
Publishing Task Records: View the distribution status, execution time, and result details of the change plan for each store to track the implementation progress of the plan.

9 Publish Menu
9.1 Publishing Menu from the Group/Brand Perspective
STEP 1: Switch to the Group/Brand Perspective
- After logging in to the Operation Center, click the Perspective Switch button in the top-right corner and select Group/Brand perspective from the dropdown list, then choose the target group/brand.
STEP 2: Initiate the Menu Publishing Process
- Navigate to【Item Management】>【Menu Management】>【Publish Menu】page.
- Select one of the following four publishing types:
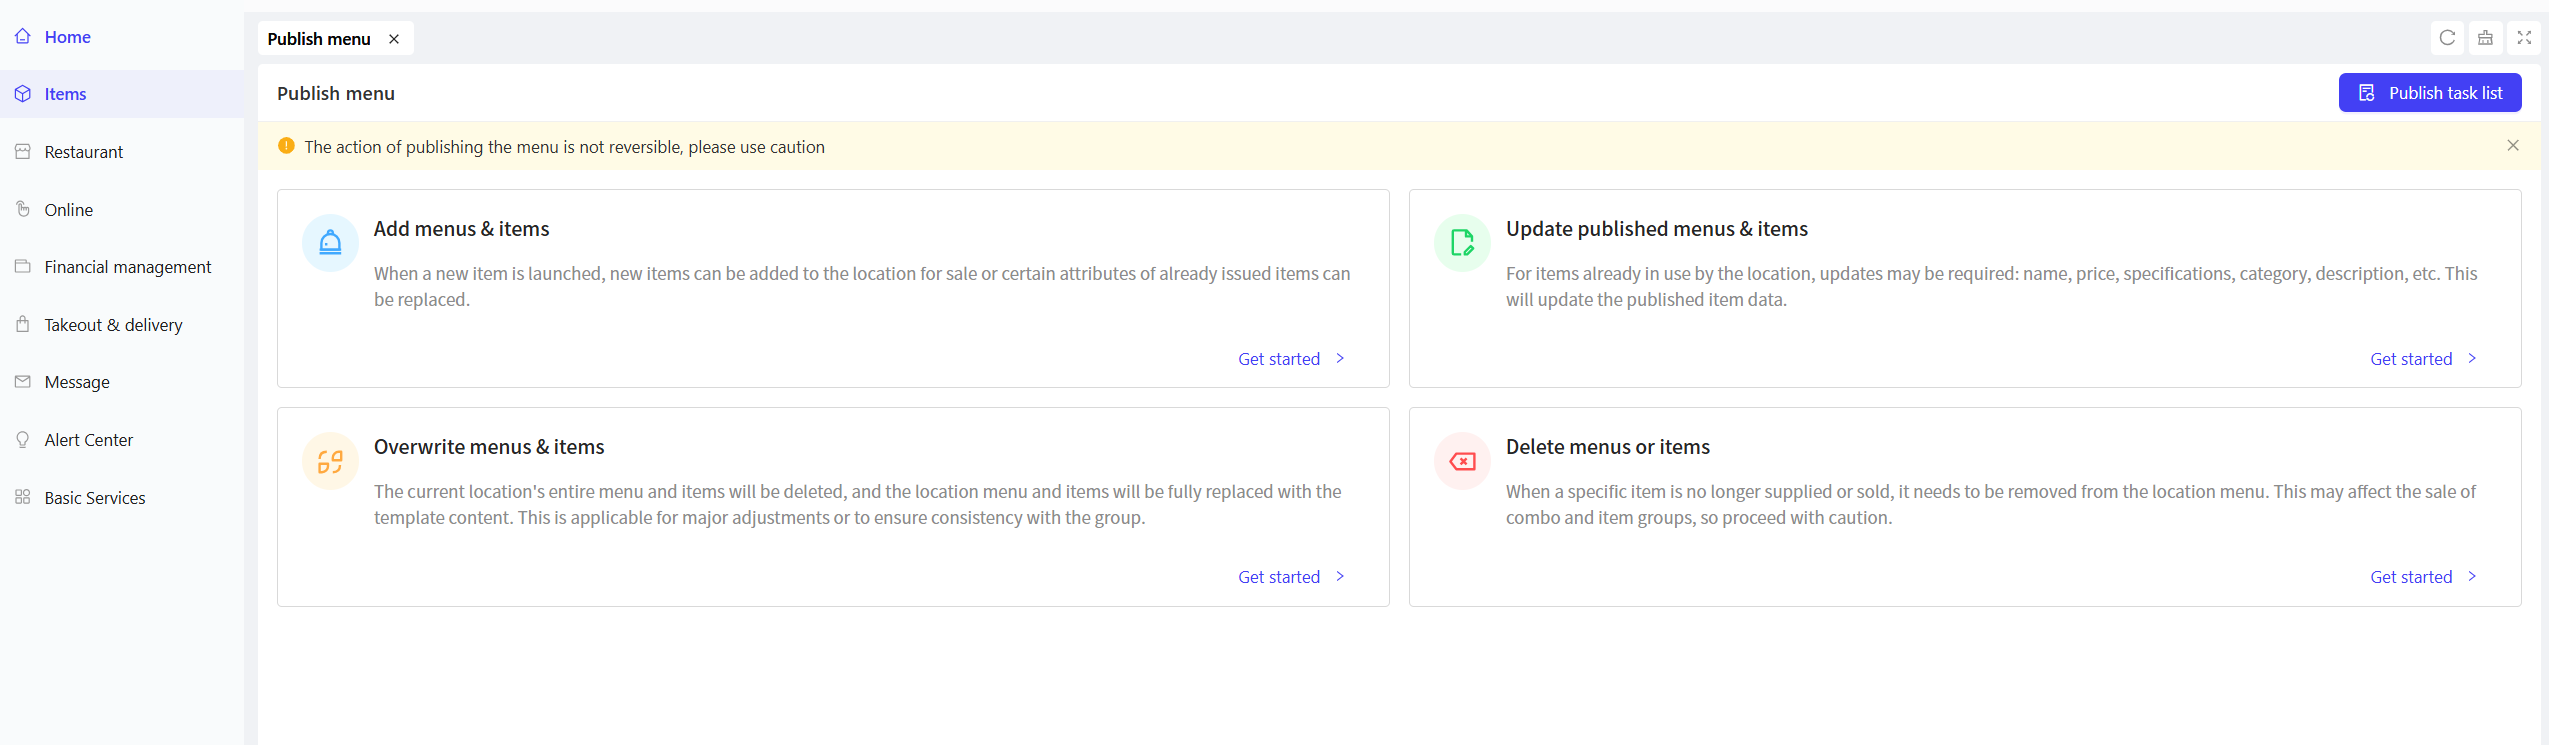
- Add Menus and Items: Use this option when launching new items to add new sellable items to stores or replace some attributes of already distributed items.
- Update Published Menus and Items: Use this option to update attributes (e.g., name, price, specifications, category, description) of items currently in use at stores.
- Overwrite Menus and Items: Use this option to delete all existing menus and items at stores and fully replace them with the template content. It is suitable for major adjustments or ensuring consistency with the group.
- Delete Specified Items: Use this option to remove specified items from store menus when they are no longer available or discontinued. Note: This may affect the sales of combo items and side item groups; use with caution.
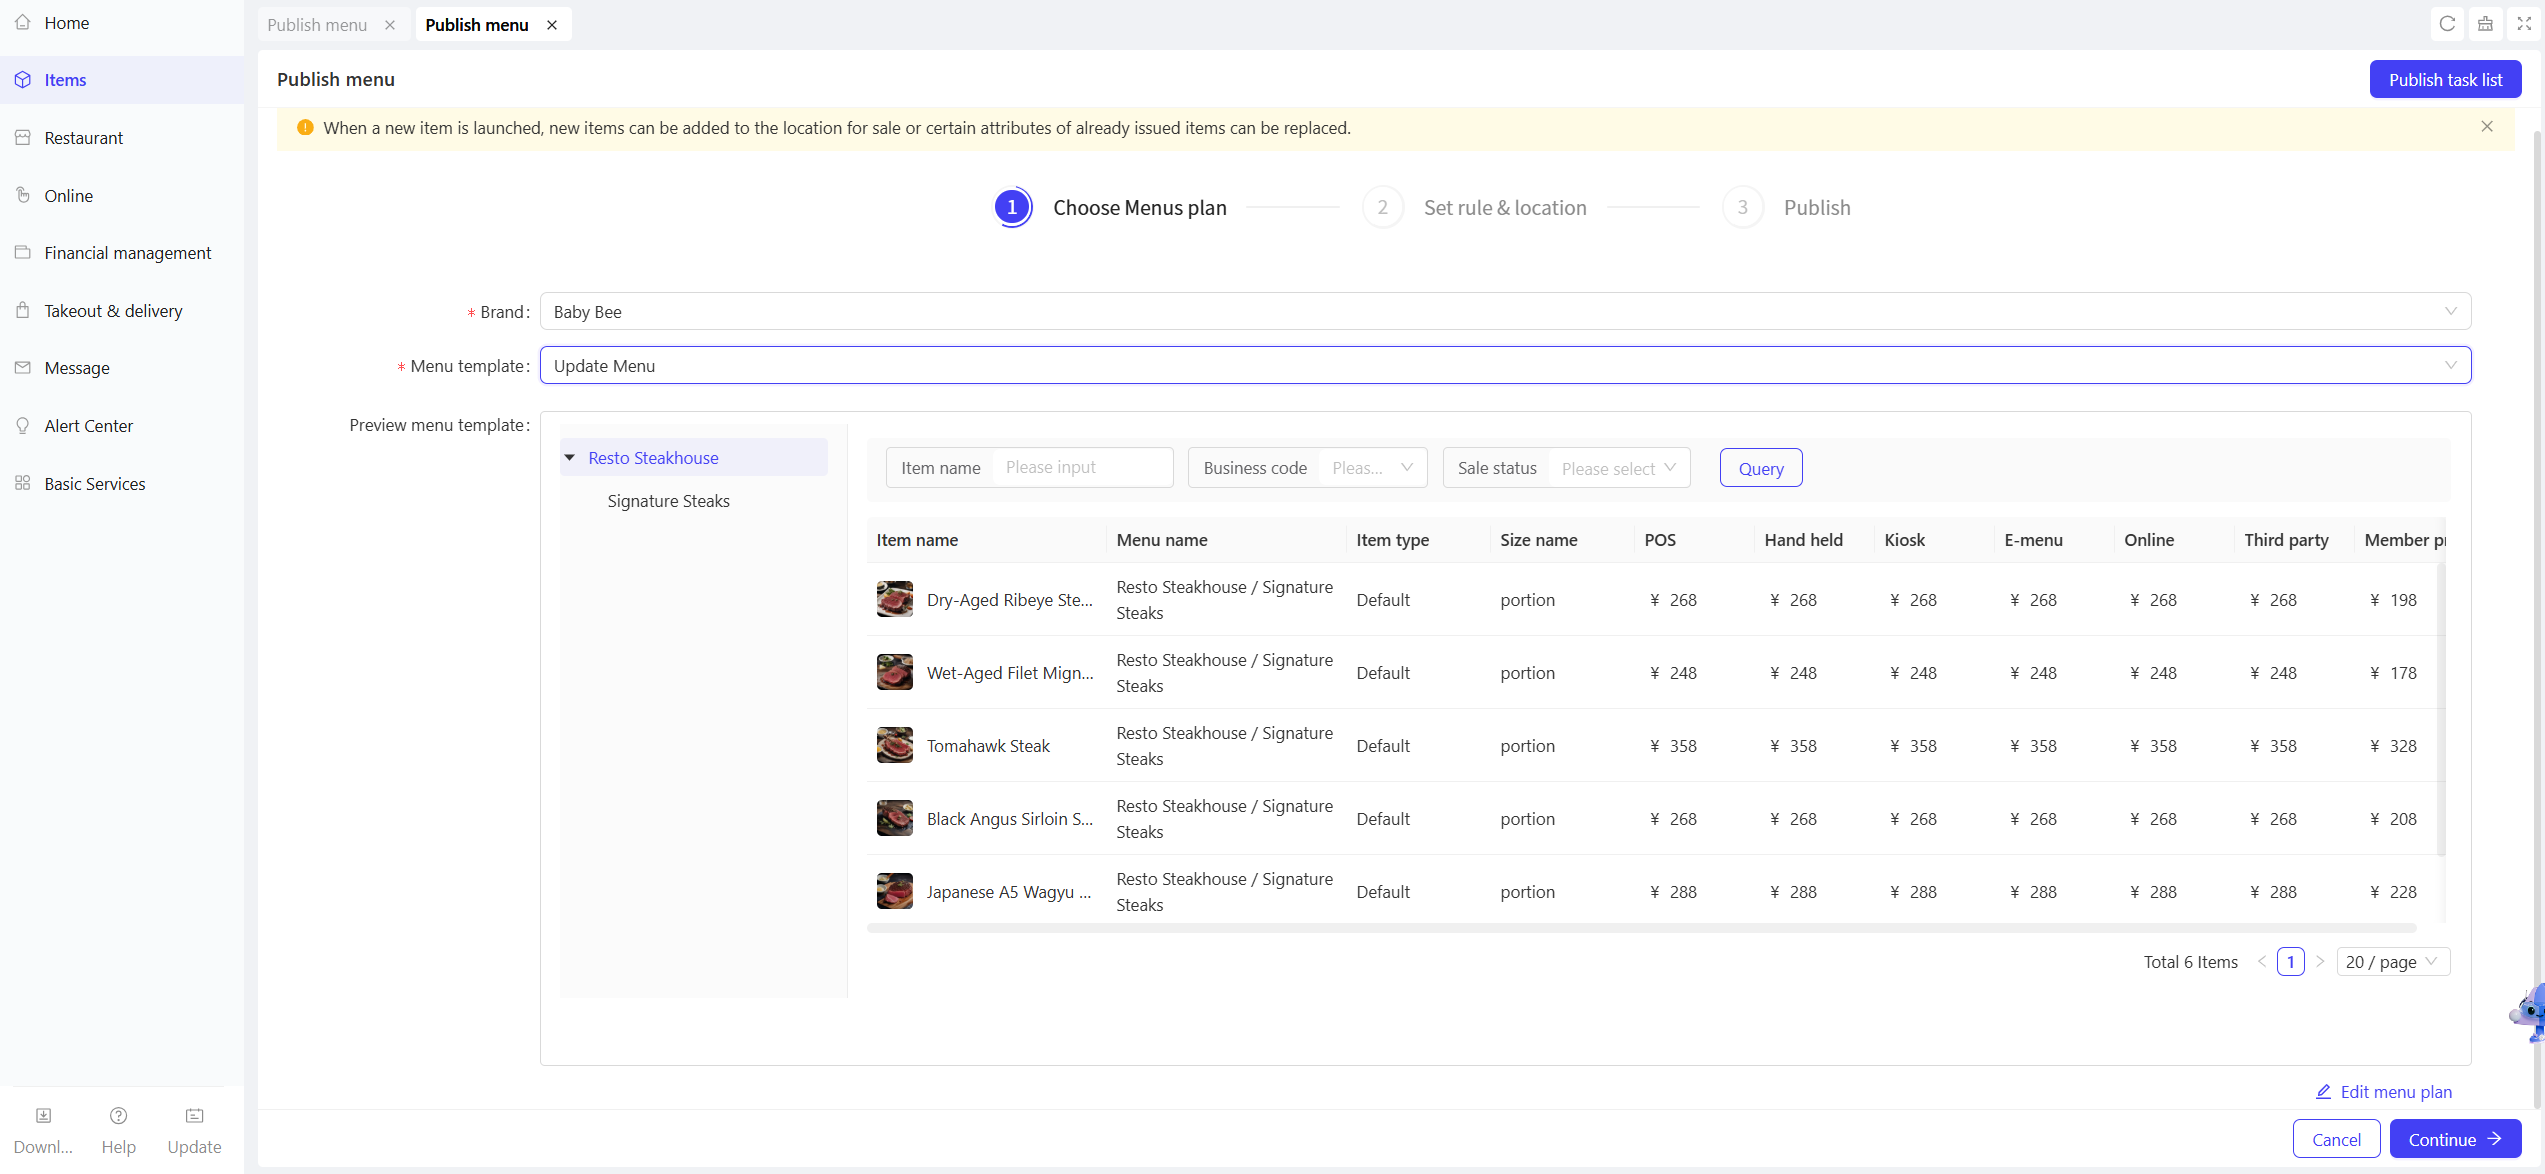
STEP 3: Select a Menu Change Plan
-
Configure the following fields:
- Brand: Select the target brand.
- Menu Template: Select the menu change plan template.
- Preview Menu Template: View and edit the menu change plan after selection.
-
Click【Continue】after completing the selection.
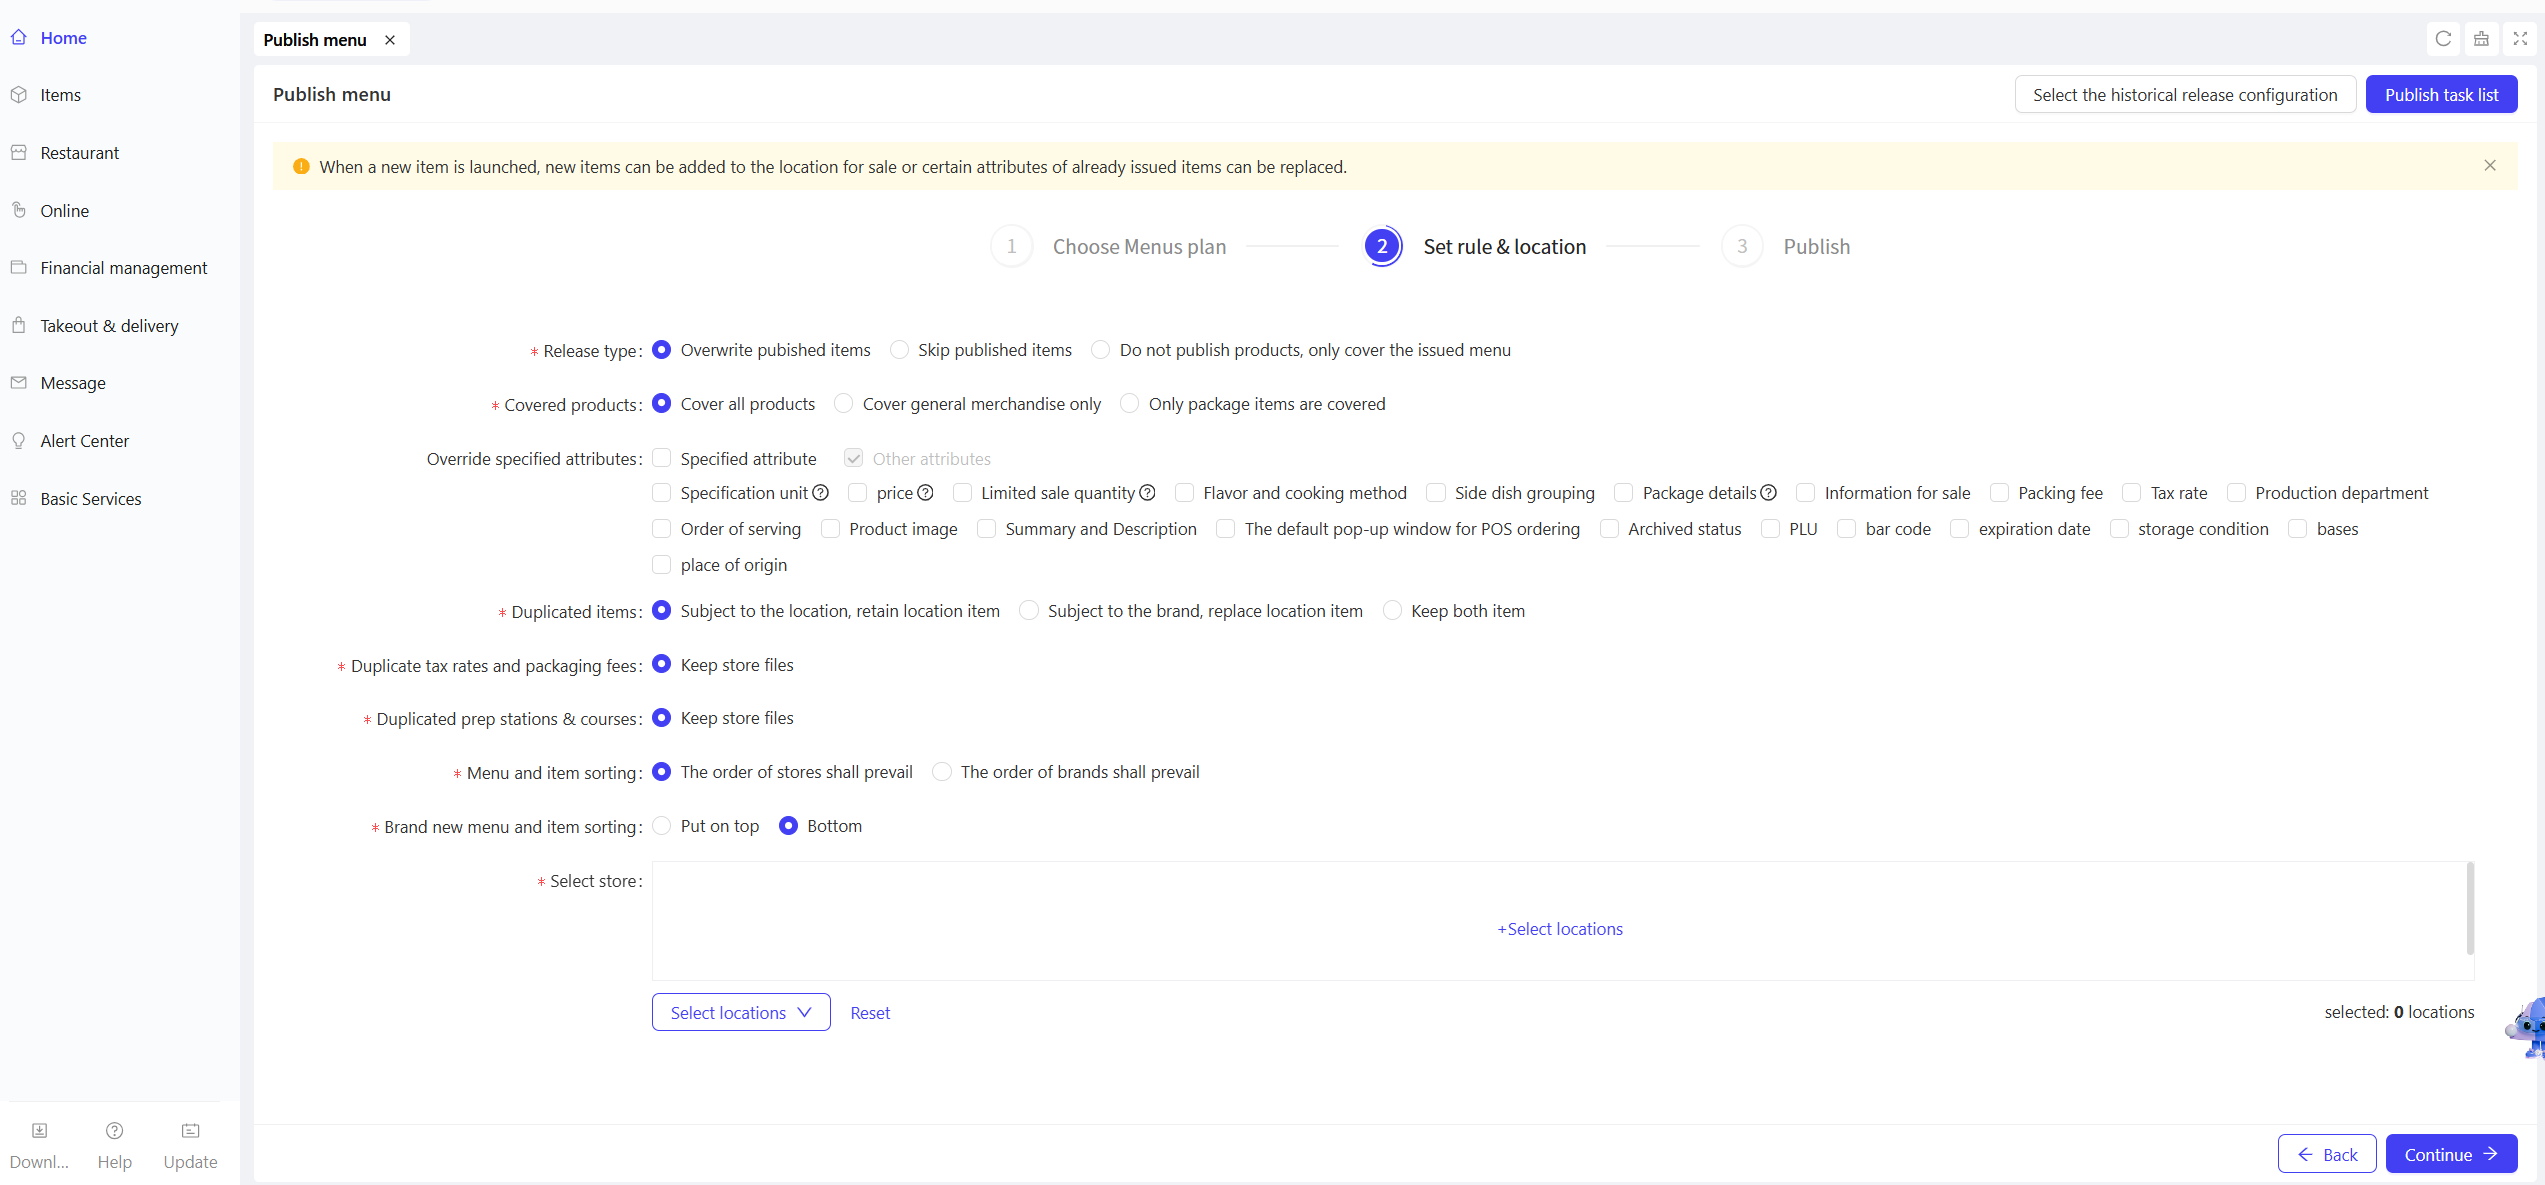
STEP 4: Set Rules and Select Stores
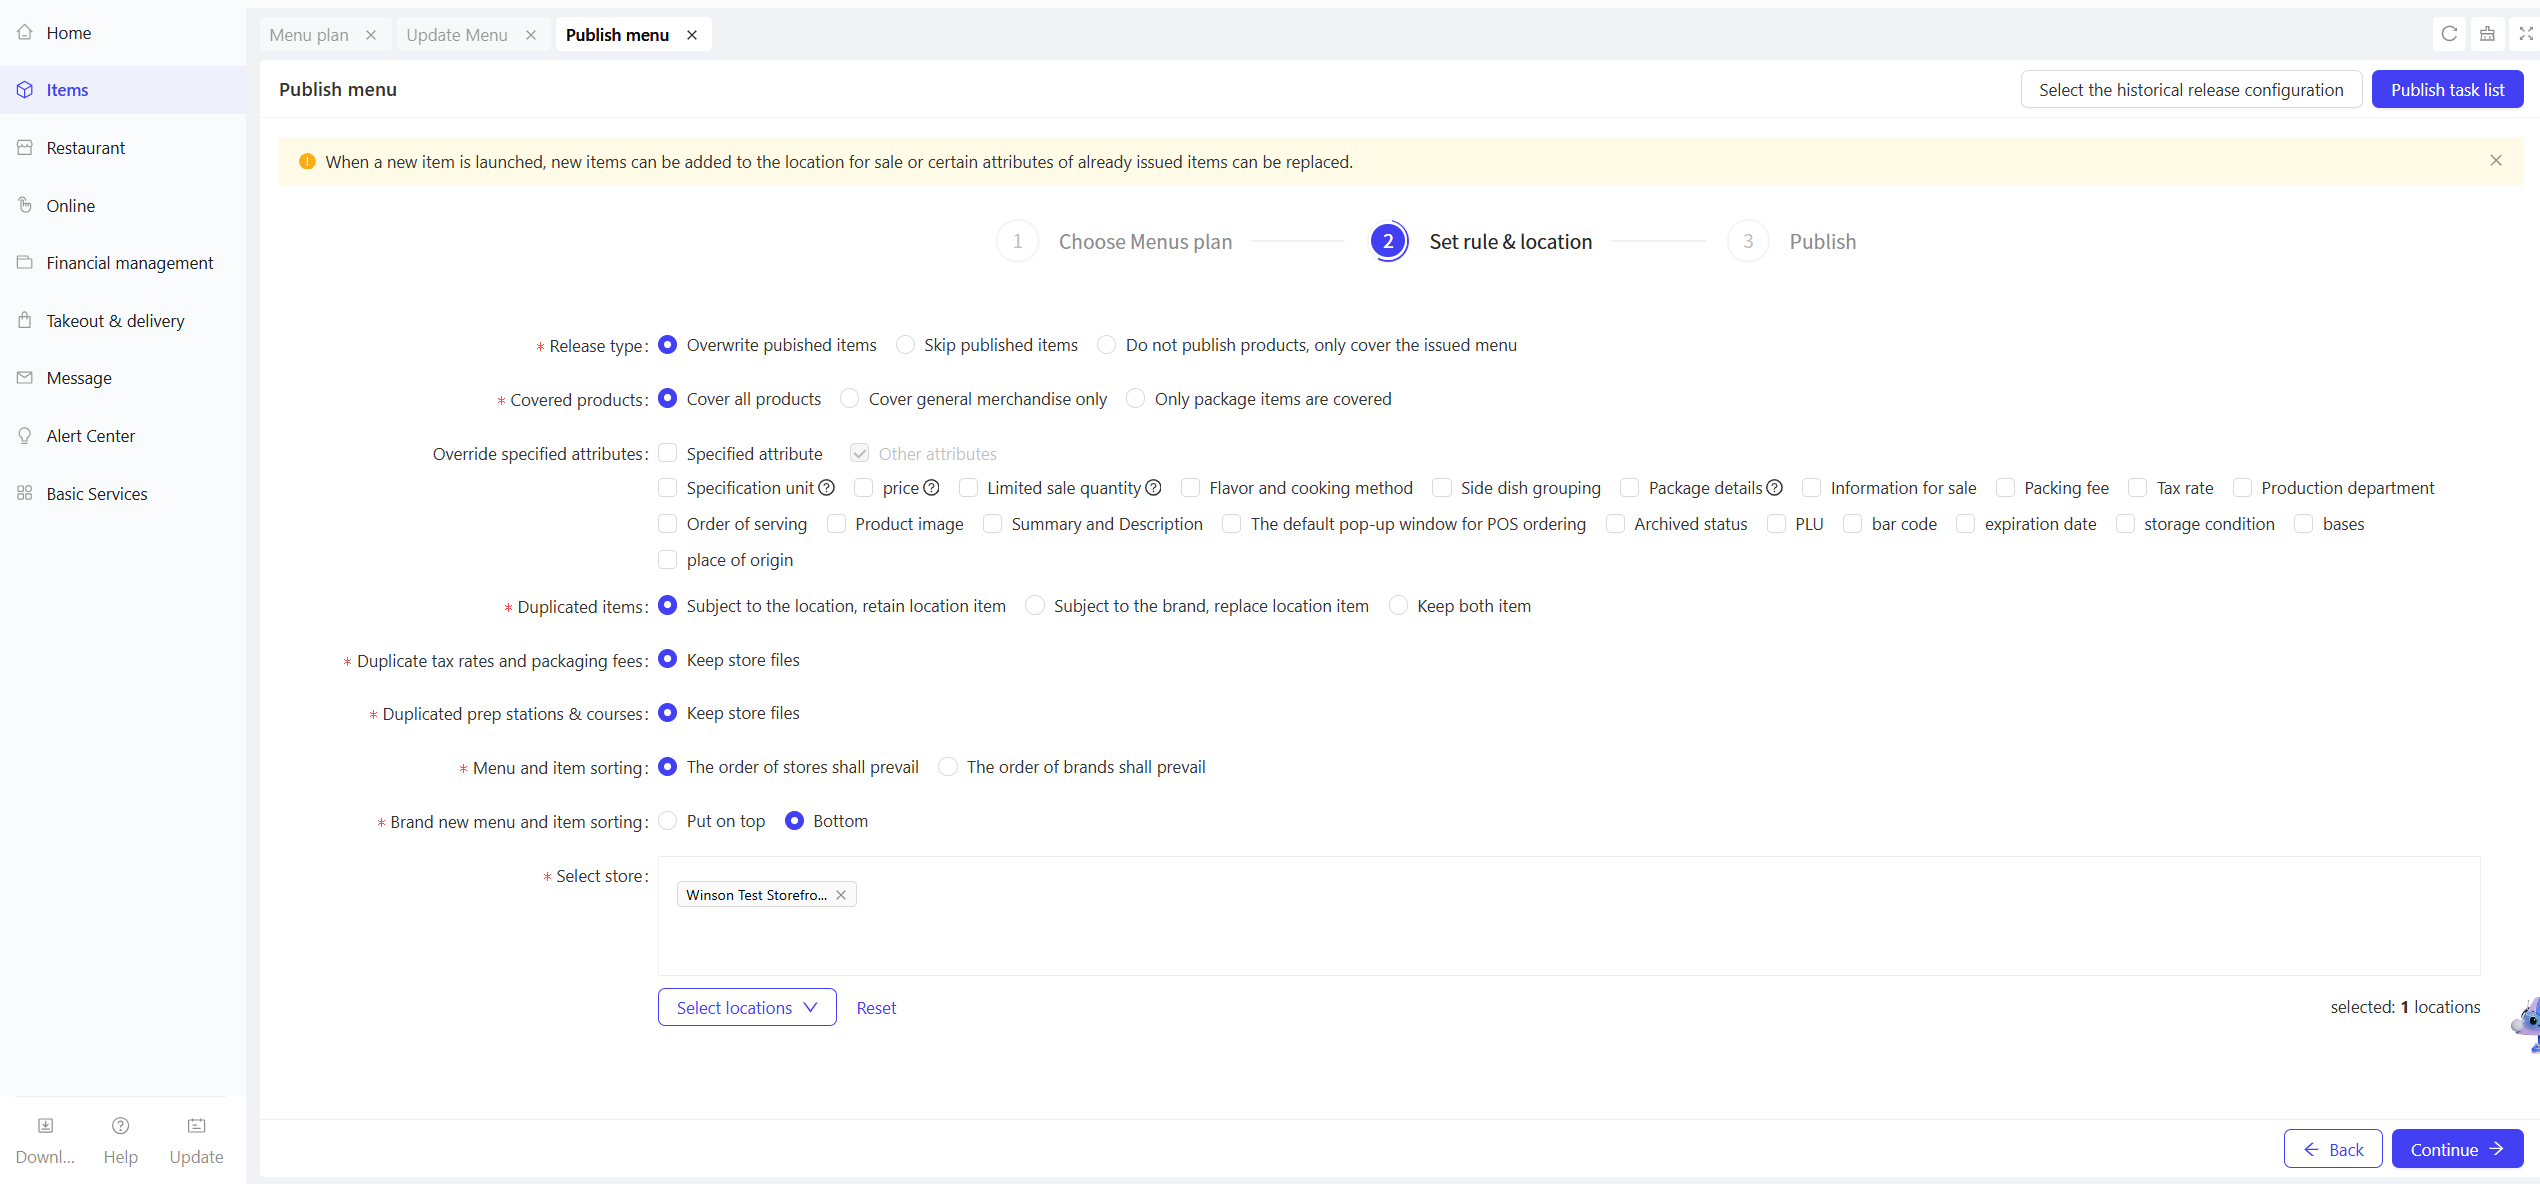
- Set Rules:
- If “Add Menus and Items” is selected as the publish type, configure the following rules:
Configuration Item
Configuration Description
Publish Type
Choose from three options:
- Publish new items and cover distributed items
- Publish only new items and ignore distributed items
- Do not publish items; only cover distributed menus
Covered Items
Choose from three options:
- Cover all items
- Cover regular items only
- Cover combo items only
Covered Specified Attributes
- Check the box next to "Specified Attributes" to select all attributes.
- Or individually check specific attributes (e.g., unit of measurement, price, modifier) to override.
Duplicate Items
Configure rules for duplicate items by choosing from three options:
- Prioritize store settings; retain store items
- Prioritize brand settings; replace store items
- Retain both versions
Duplicate Tax Rates and Packaging Fees
Keep store records
Duplicate Production Departments and Serving Sequence
Keep store records
Menu and Item Sorting
Choose from two options:
- Prioritize store sorting
- Prioritize brand sorting
Brand new menu and item sorting
Choose to pin to top or bottom
- If “Update Published Menus and Items” is selected as the publish type, no need to configure the “Publish Type” field; all other rules are the same as the “Add Menus and Items” type.
- If “Overwrite Menus and Items” is selected as the publish type, no rule configuration is required.
- If “Delete Specified Items” is selected as the publish type, configure the following rule:
Configuration Item | Configuration Description |
|---|---|
Item Deletion Rule | Choose from two options:
|
- After configuring the rules, select the stores to publish to. You can select stores directly, or choose from existing stores or historically published stores. Click【Continue】after completing the selection.
STEP 5: Select the publish time (Now or Scheduled) and click the【Publish】button to complete the operation.
9.2 Publishing Menu from the Store Perspective
STEP 1: Switch to the Target Store Perspective
- After logging in to the Operation Center, click the Perspective Switch button in the top-right corner and select Store from the dropdown list, then choose the target store.
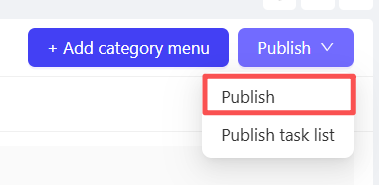
STEP 2: Execute the Menu Publishing Process
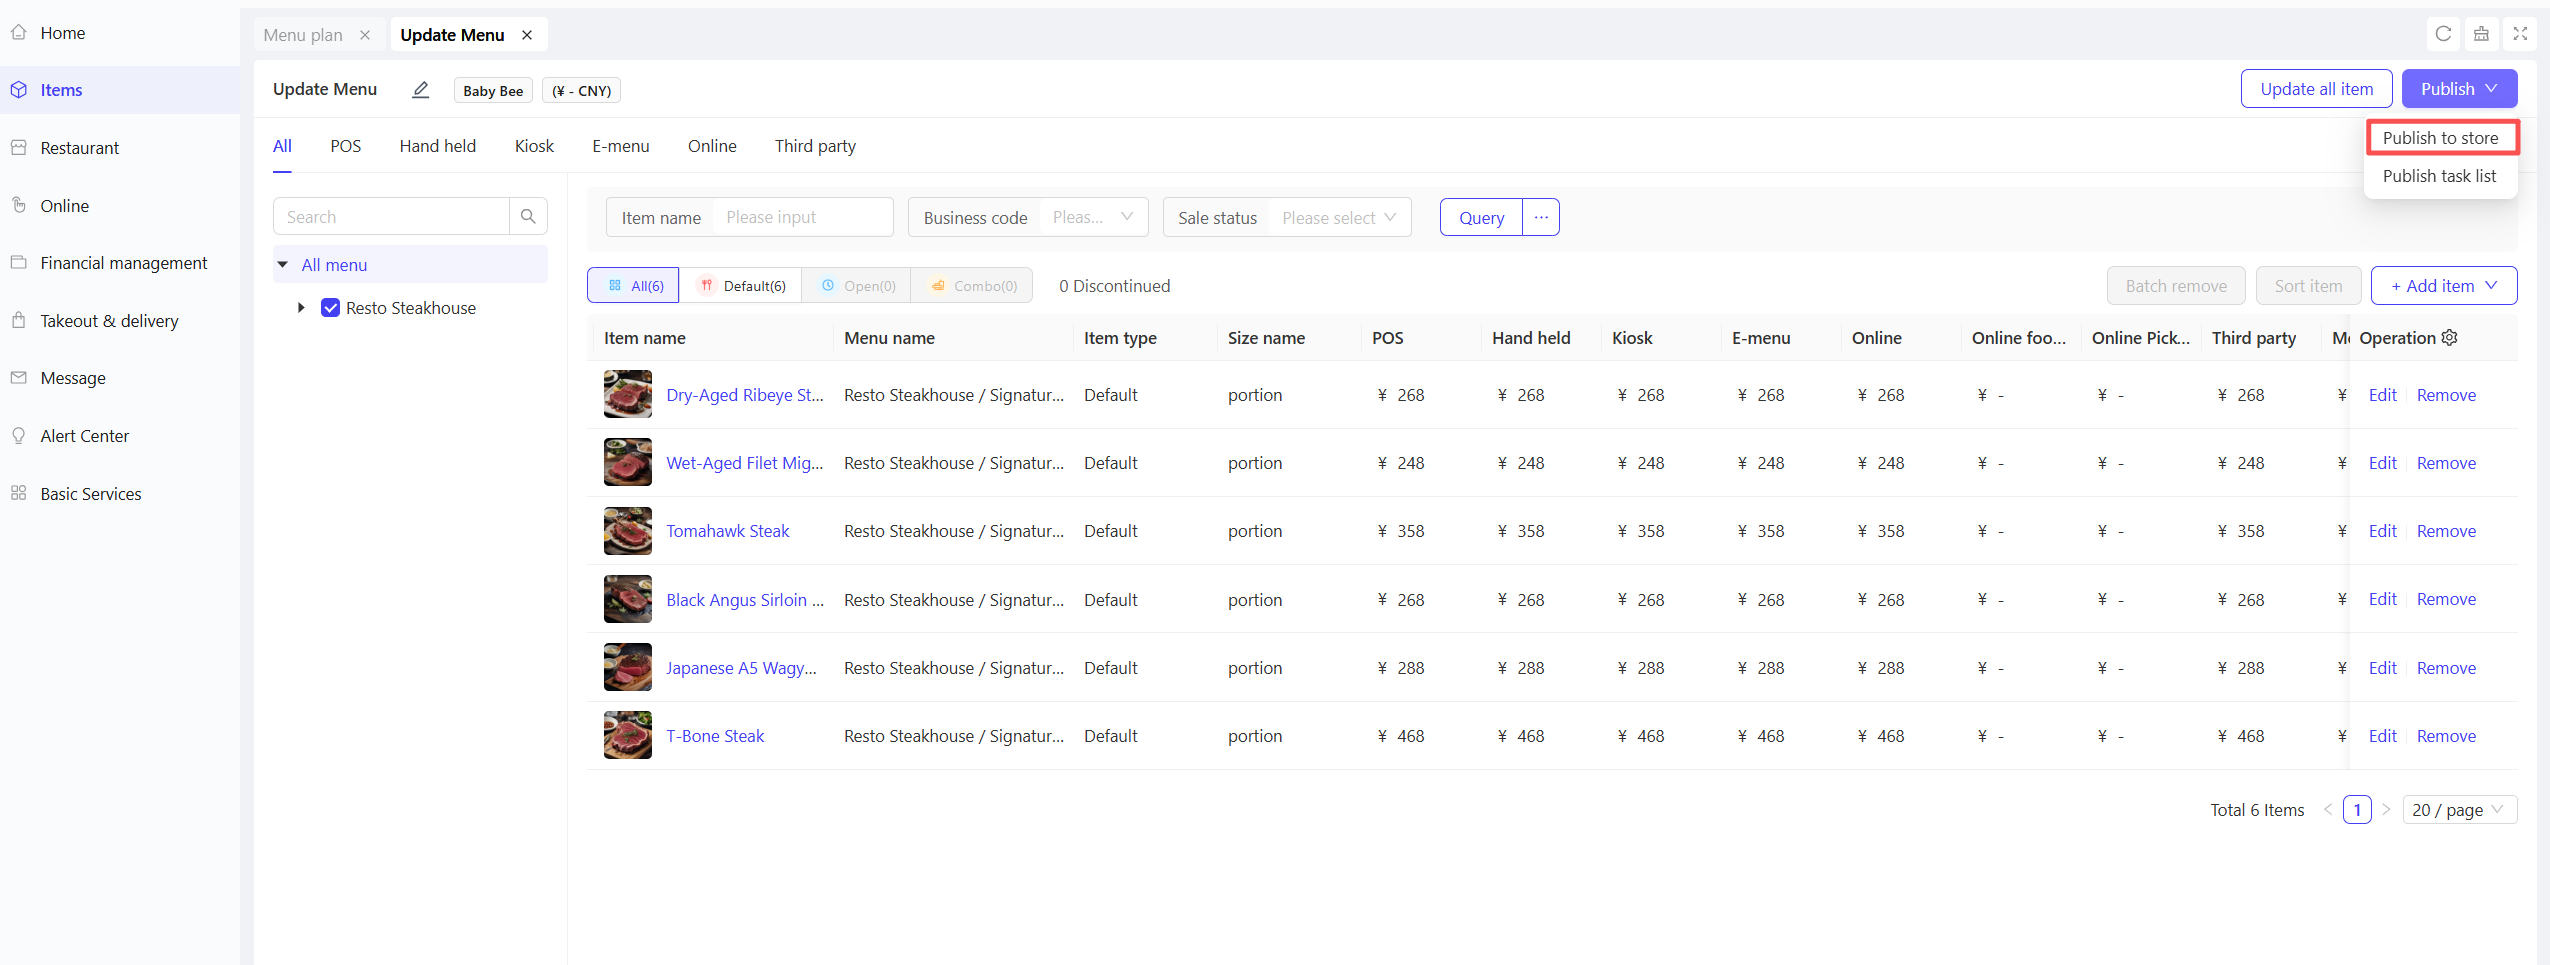
- Navigate to【Item Management】>【Menu Management】page. After confirming that the current menu content is correct, click the【Publish】button in the top-right corner.
- A publish confirmation pop-up will appear. Carefully review the information and click【Confirm】. The system will start publishing the current menu and all associated items to all channels used by the store.
STEP 3: View and Manage Publishing Tasks
- After completing the publishing operation, you can view the detailed status of the task in【Publishing Task Records】.
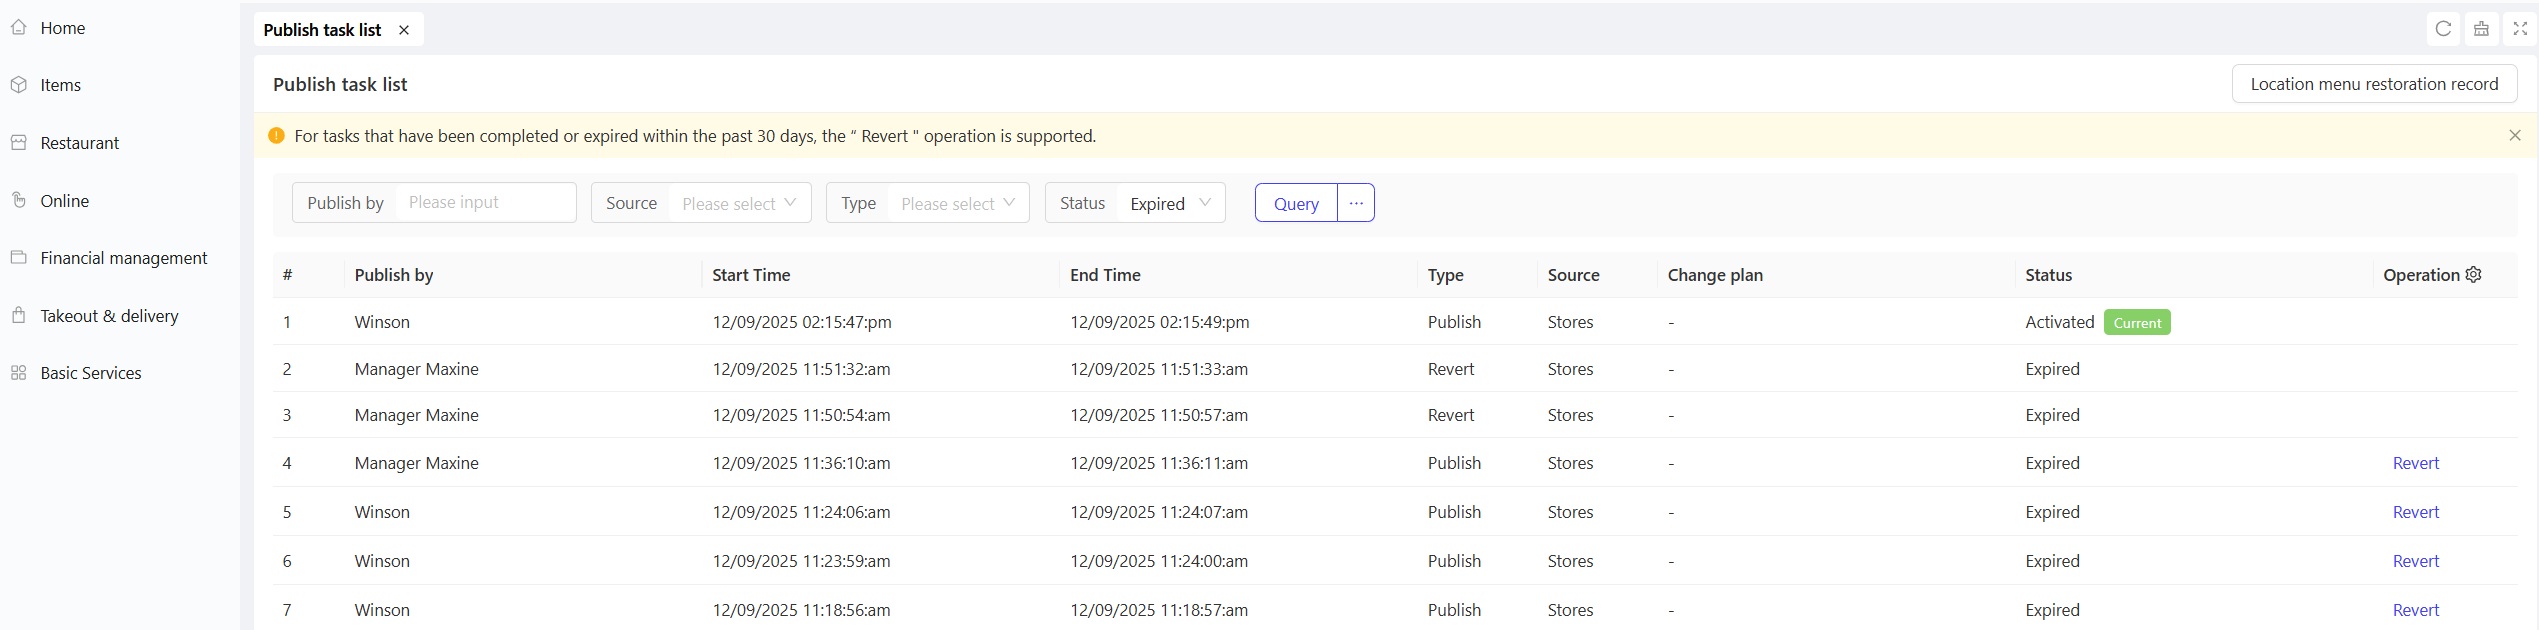
-
Status Description:
- Activated: Indicates that the menu has been successfully distributed to all channels (e.g., POS terminals).
- Pending Activation: Usually caused by offline target channel devices (e.g., POS machines). The system will retain the publishing task and auto activate it once the device is back online.
-
Handling Pending Effective Tasks:
To publish records with a Pending Effective status, you can perform a Restore operation.
This will cancel the undelivered distribution task, and the system will generate a Restore record.
The status of the original “Publishing” record will be changed to Expired.
- Restore operations are supported for tasks marked as Completed or Expired within the last 30 days.
Item and Menu Management at Stores
From the store perspective, you have independent permissions for item and menu management.
You can create unique item categories, menus, and items exclusive to the store.
These contents will only be visible and usable within the store and will not affect data of the group or other stores.