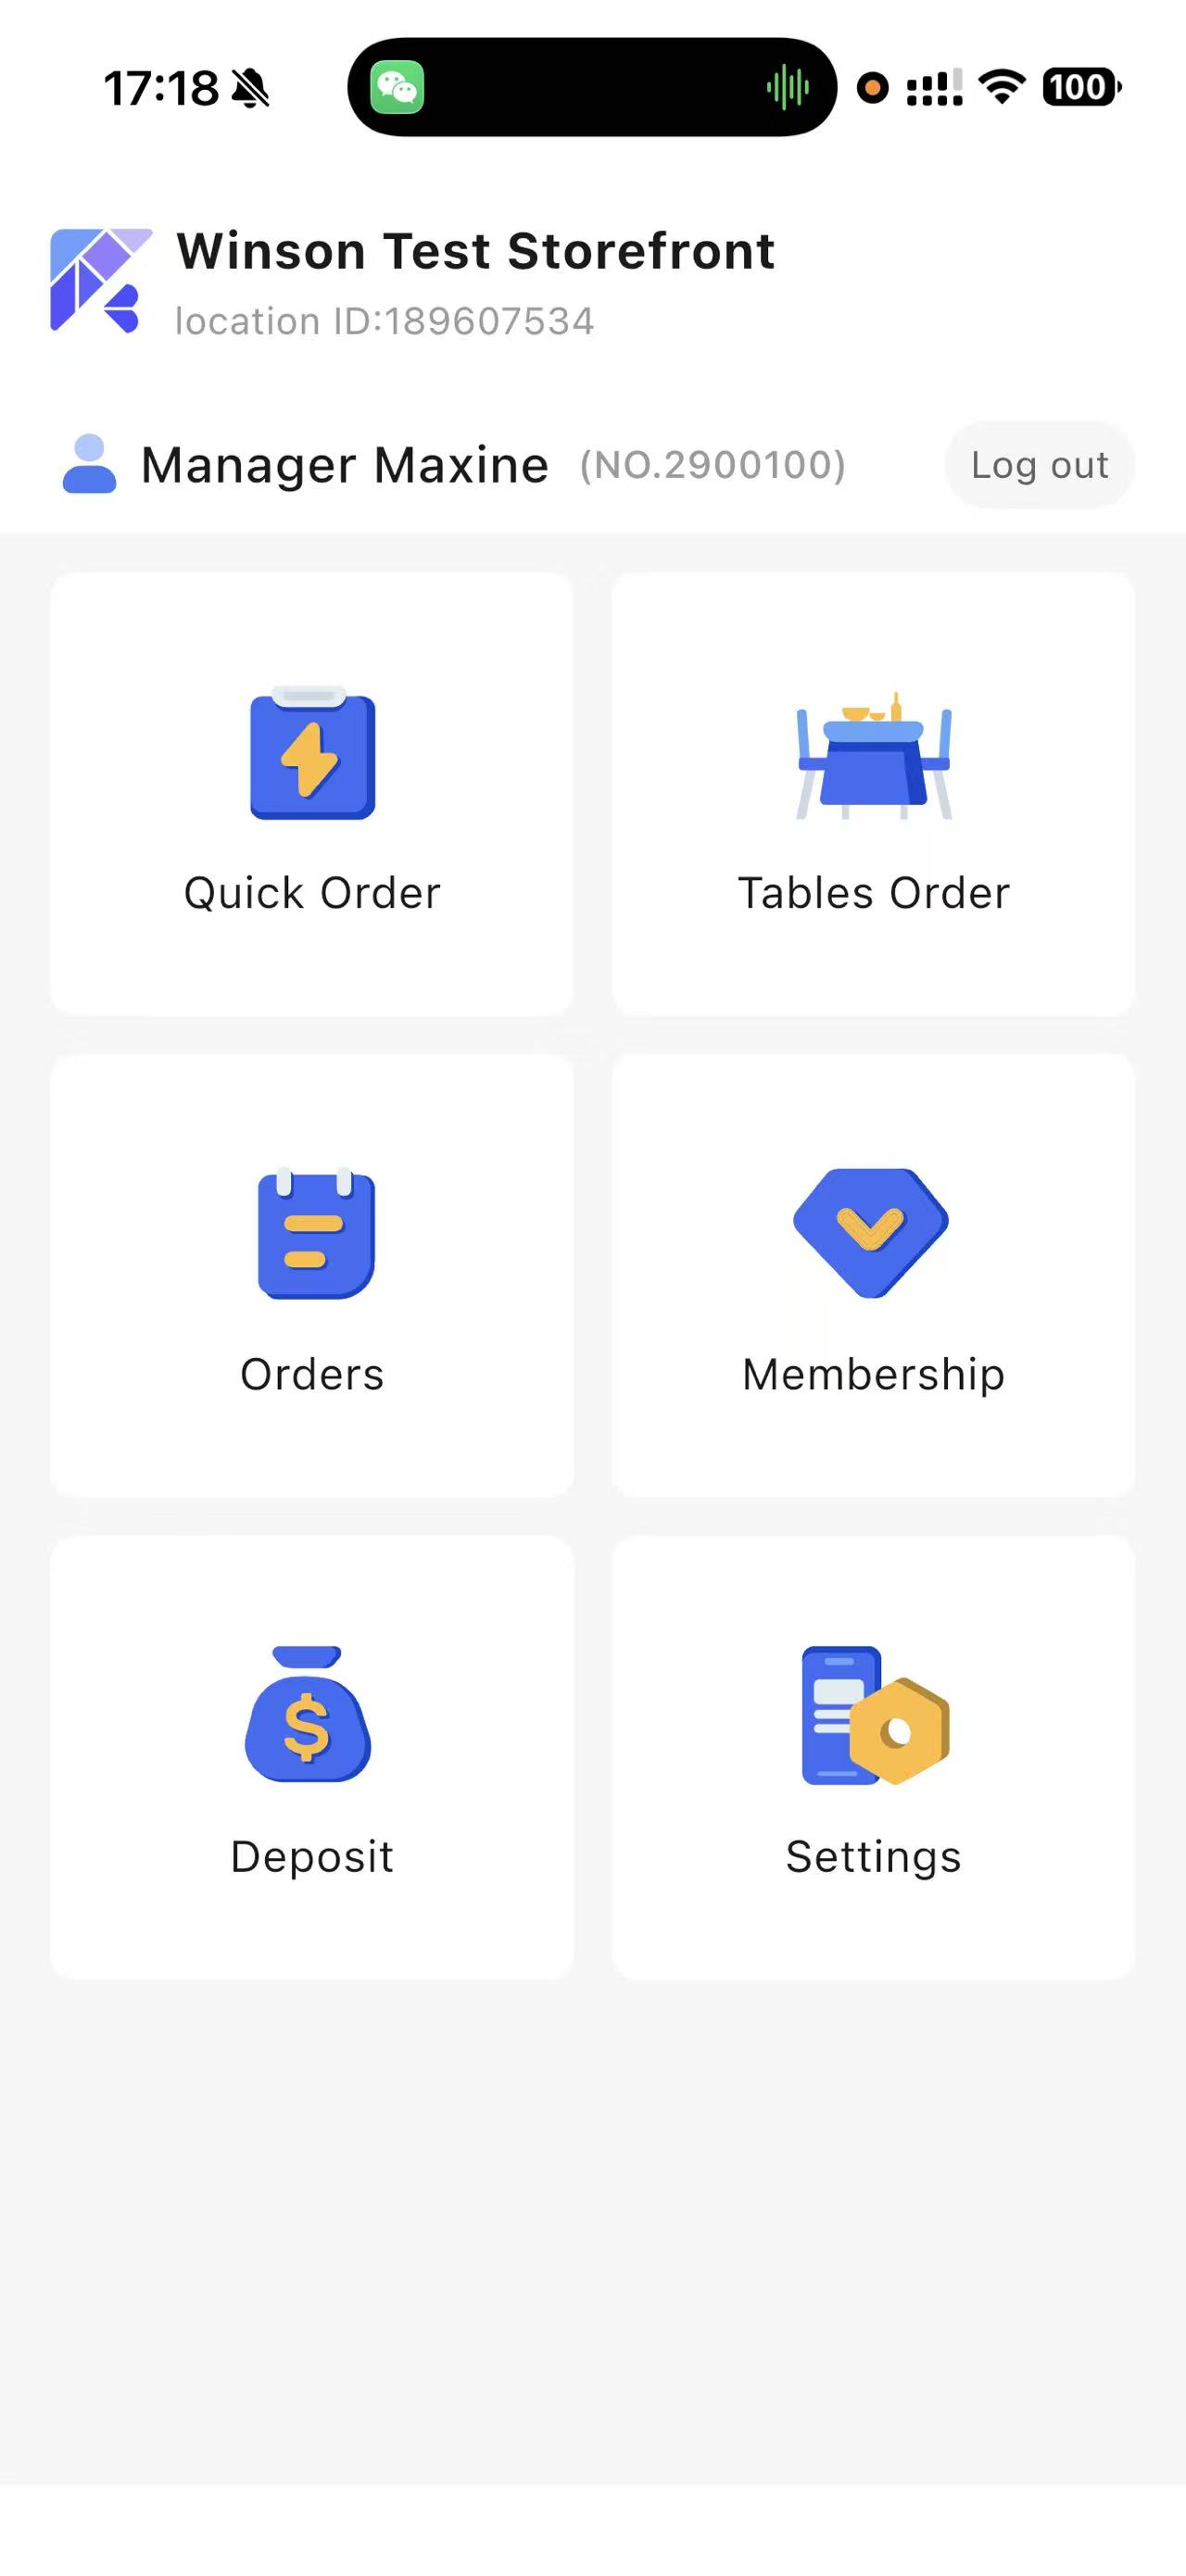
RS Handheld Ordering
1 Introduction
RS Handheld Ordering is a mobile ordering application specifically designed for restaurant servers. It digitizes the cumbersome offline service processes, allowing staff to perform the entire range of tasks—such as opening tables, taking orders, adding items, placing orders, and processing payments—anytime and anywhere using a smartphone or specialized device.
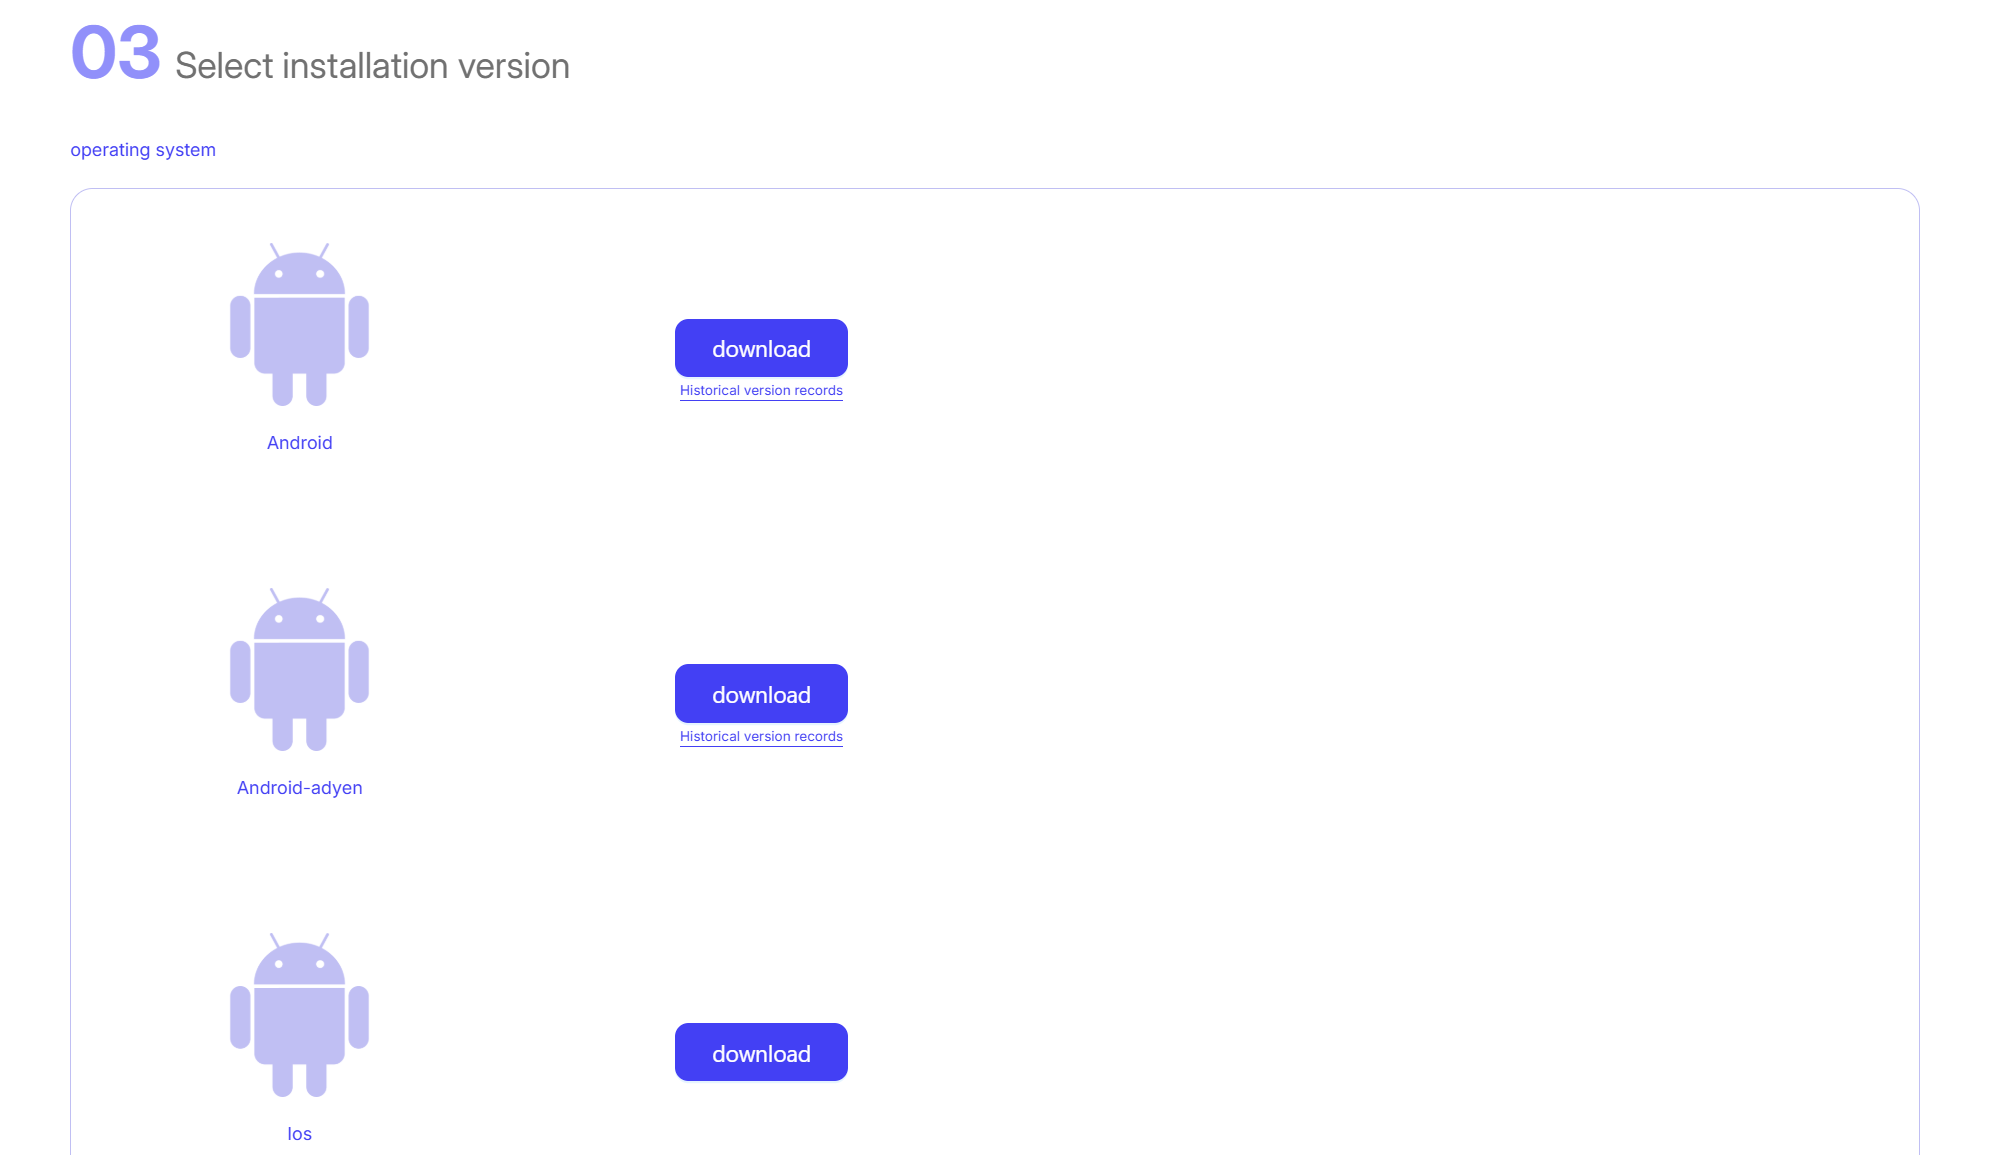
This application offers two versions: the General Version and the Card Tap Payment Version. Download the right one for your needs from our official website—both have identical features.

2 Quick Start: Login & Setup
2.1 Login Operation
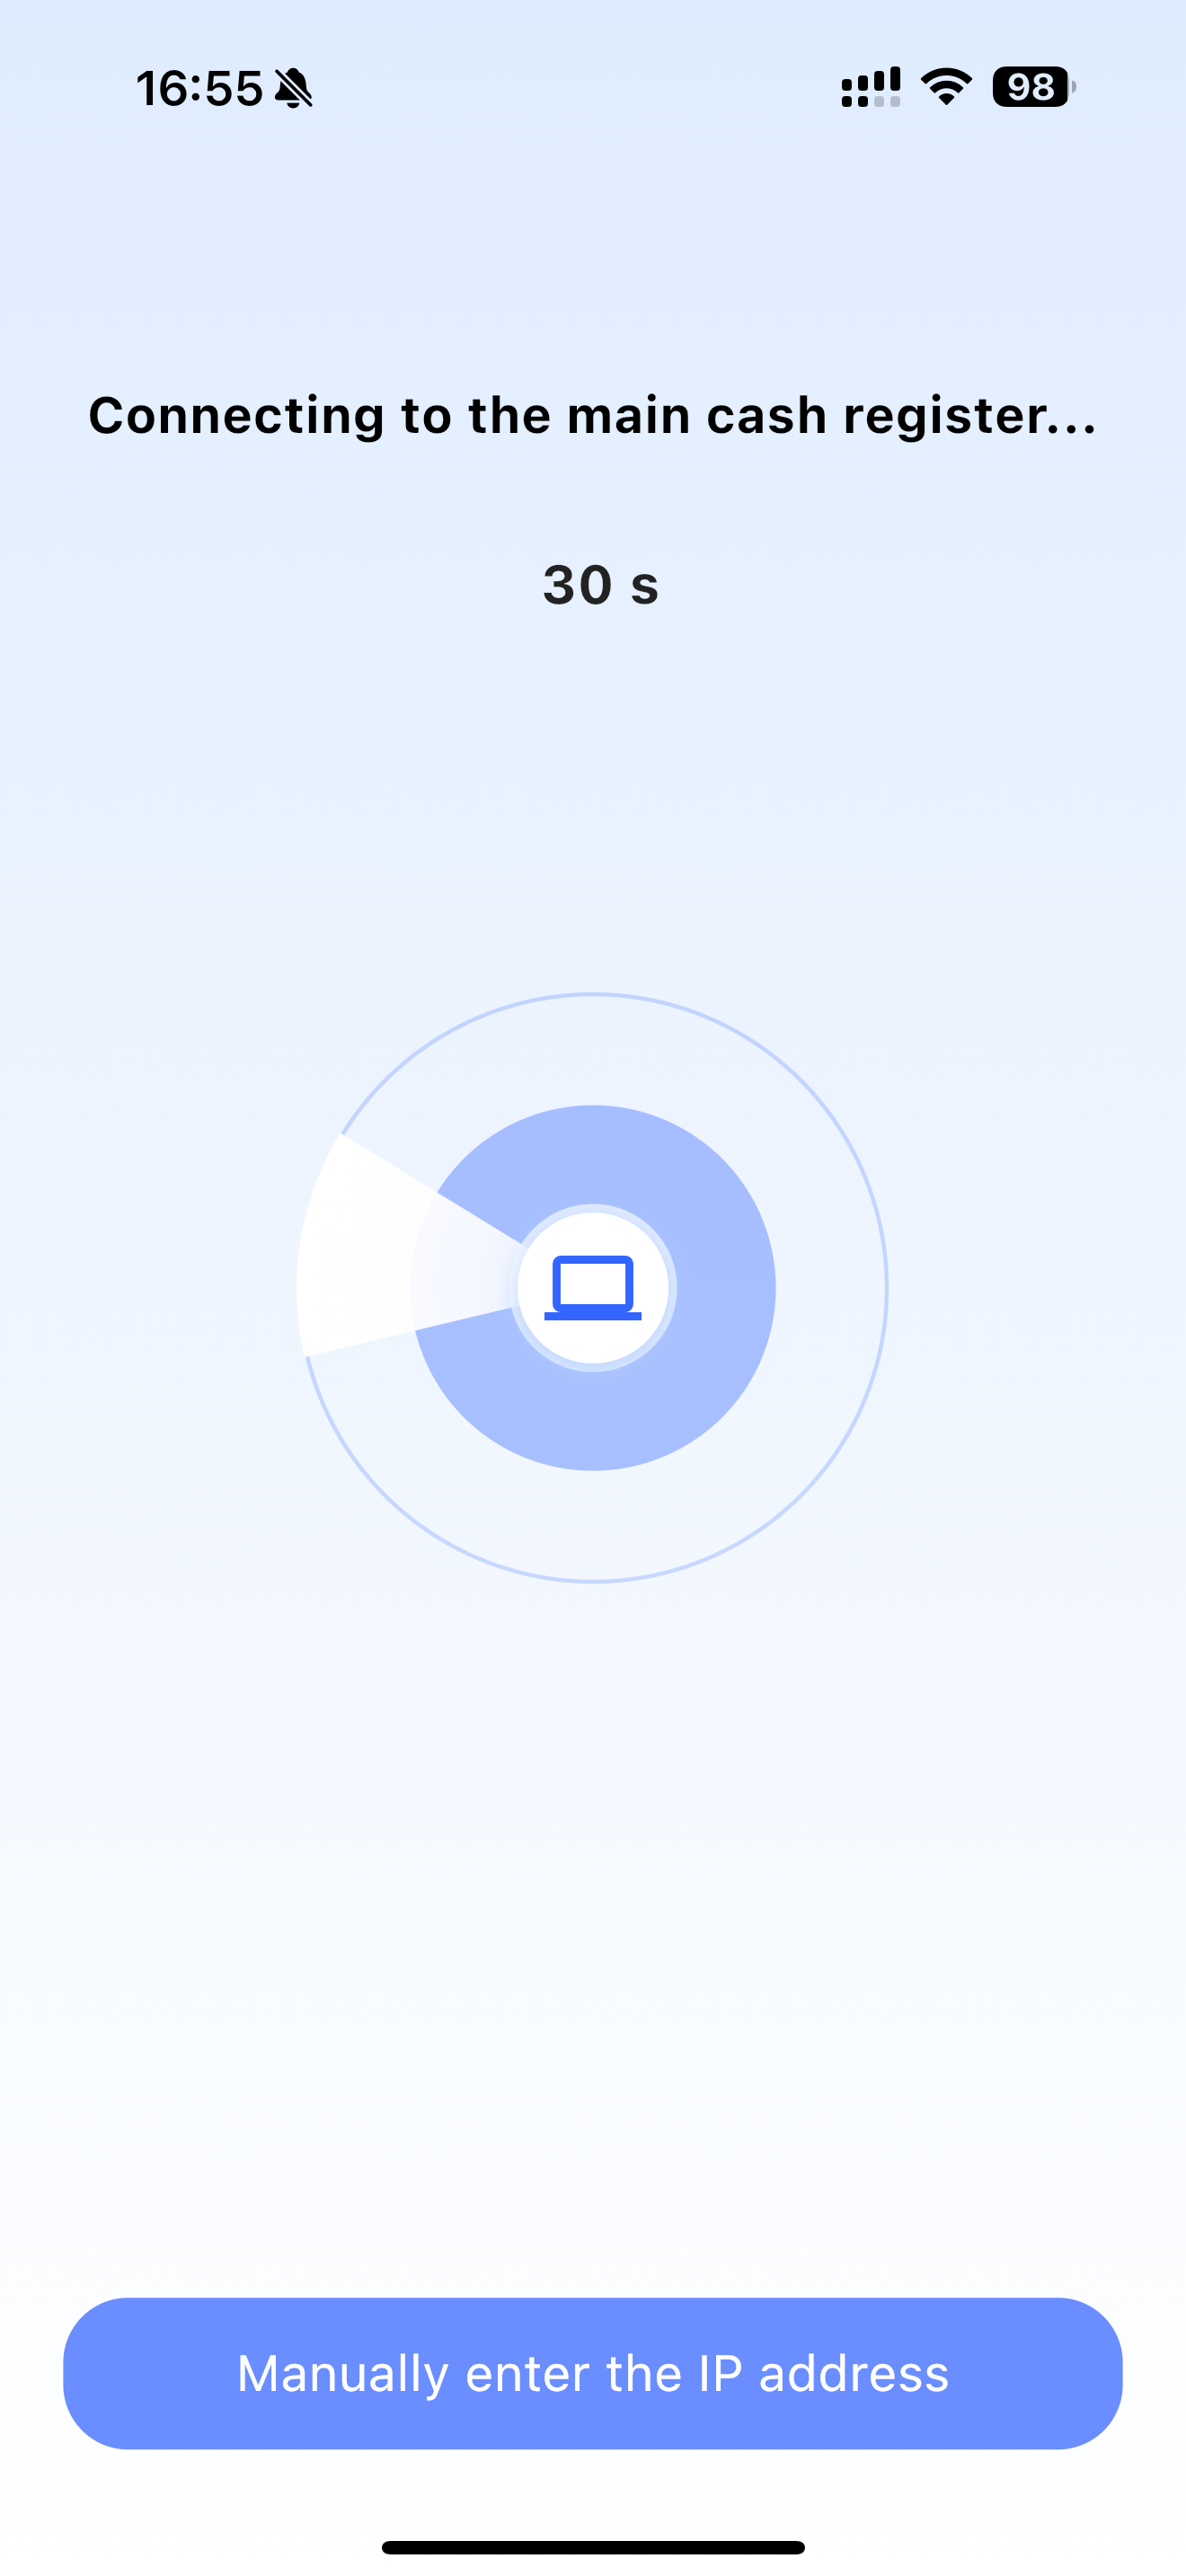
Two ways are available for first-time login. This system will auto save the restaurant information after successful login, no need to resslect later.
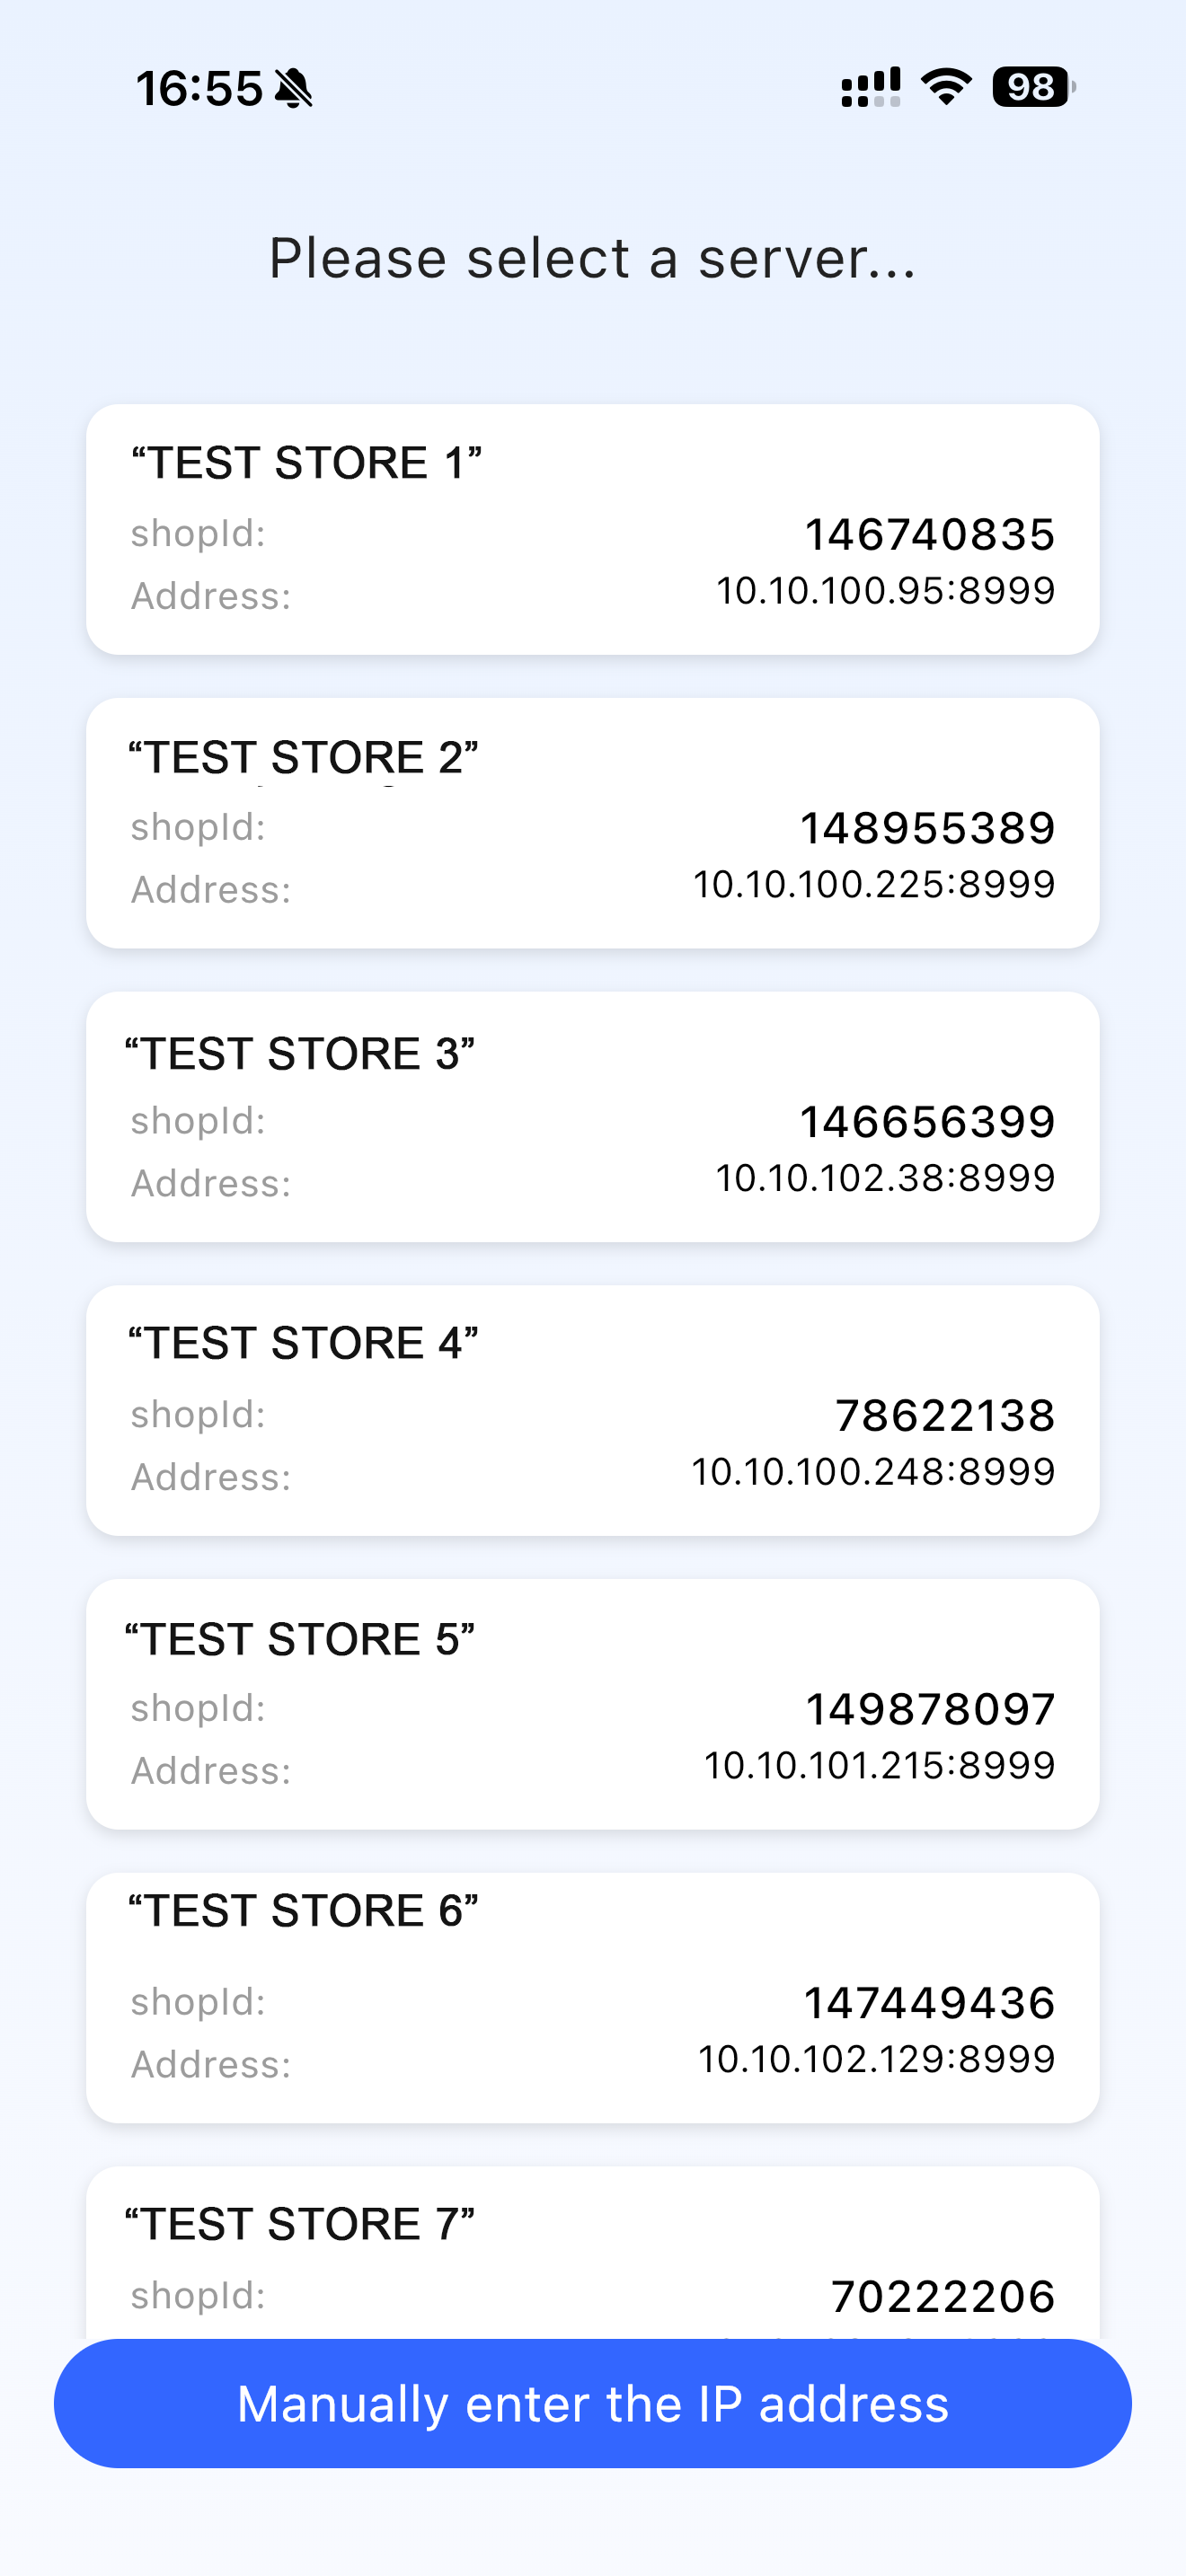
- Auto-connect: After logging into the app, allow device connection permissions and select your restaurant from the nearby device list
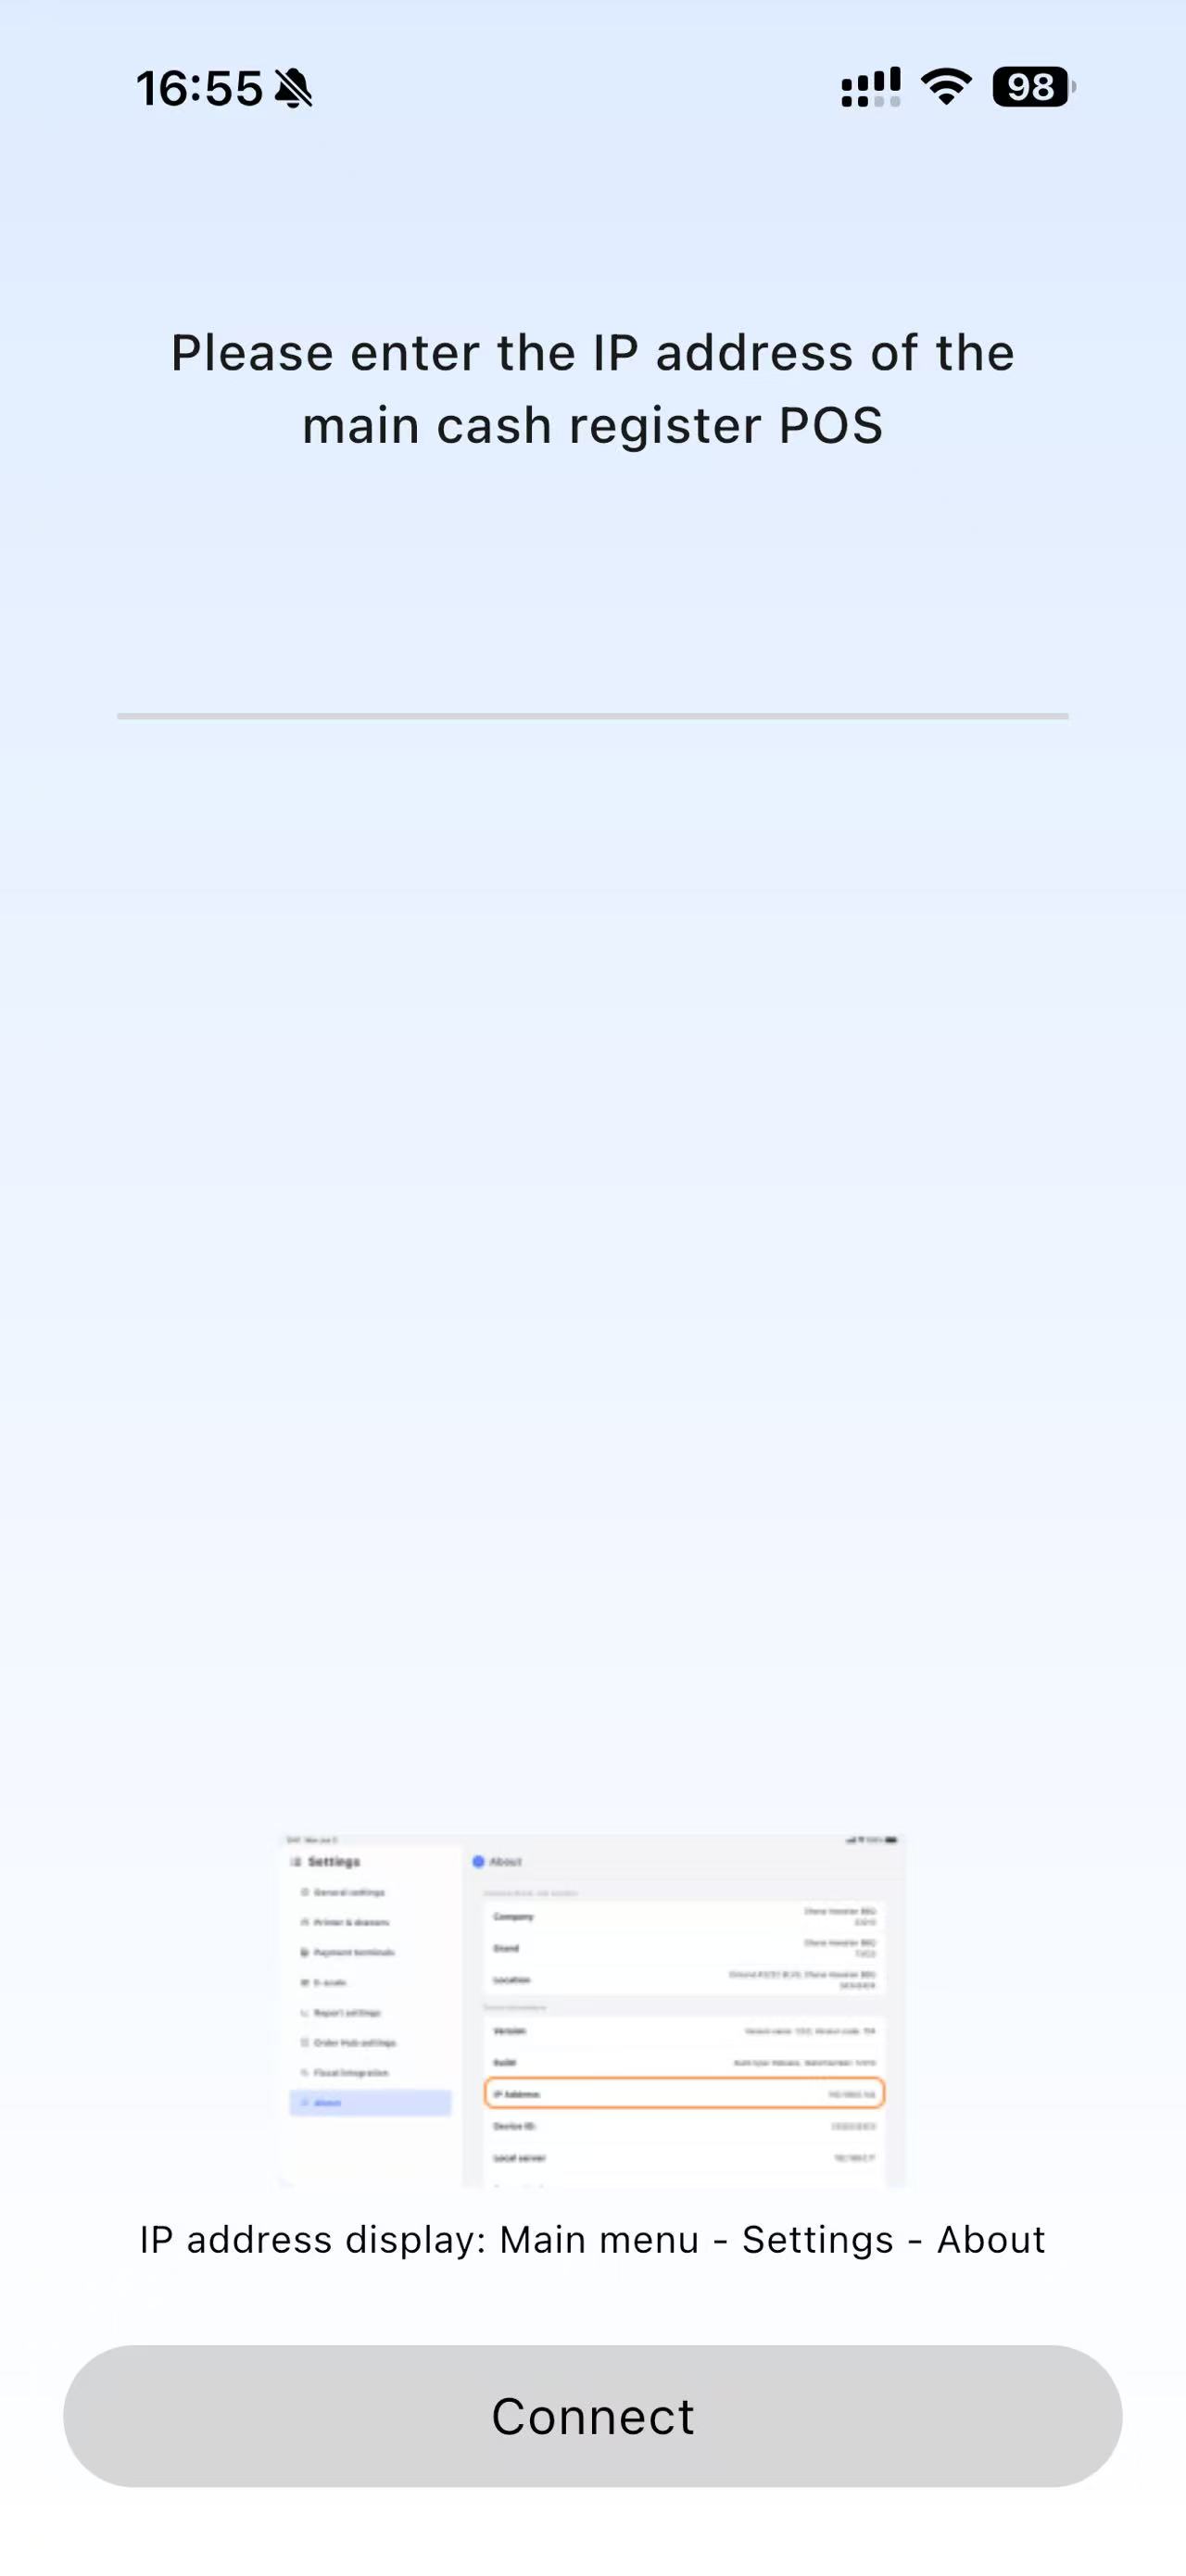
- Manual connect: Manually enter the IP address to connect
Step 1: Select Restaurant
- This page appears when entering the homepage for the first time. You can view your restaurant information and click the restaurant card to access the password input page.
💡
Notes:
If the restaurant cannot be found, restart the app and try again
If it still cannot be found after multiple attempts, confirm that the WiFi connected to the device is consistent with the POS system, or manually enter the IP address of the main cash register POS
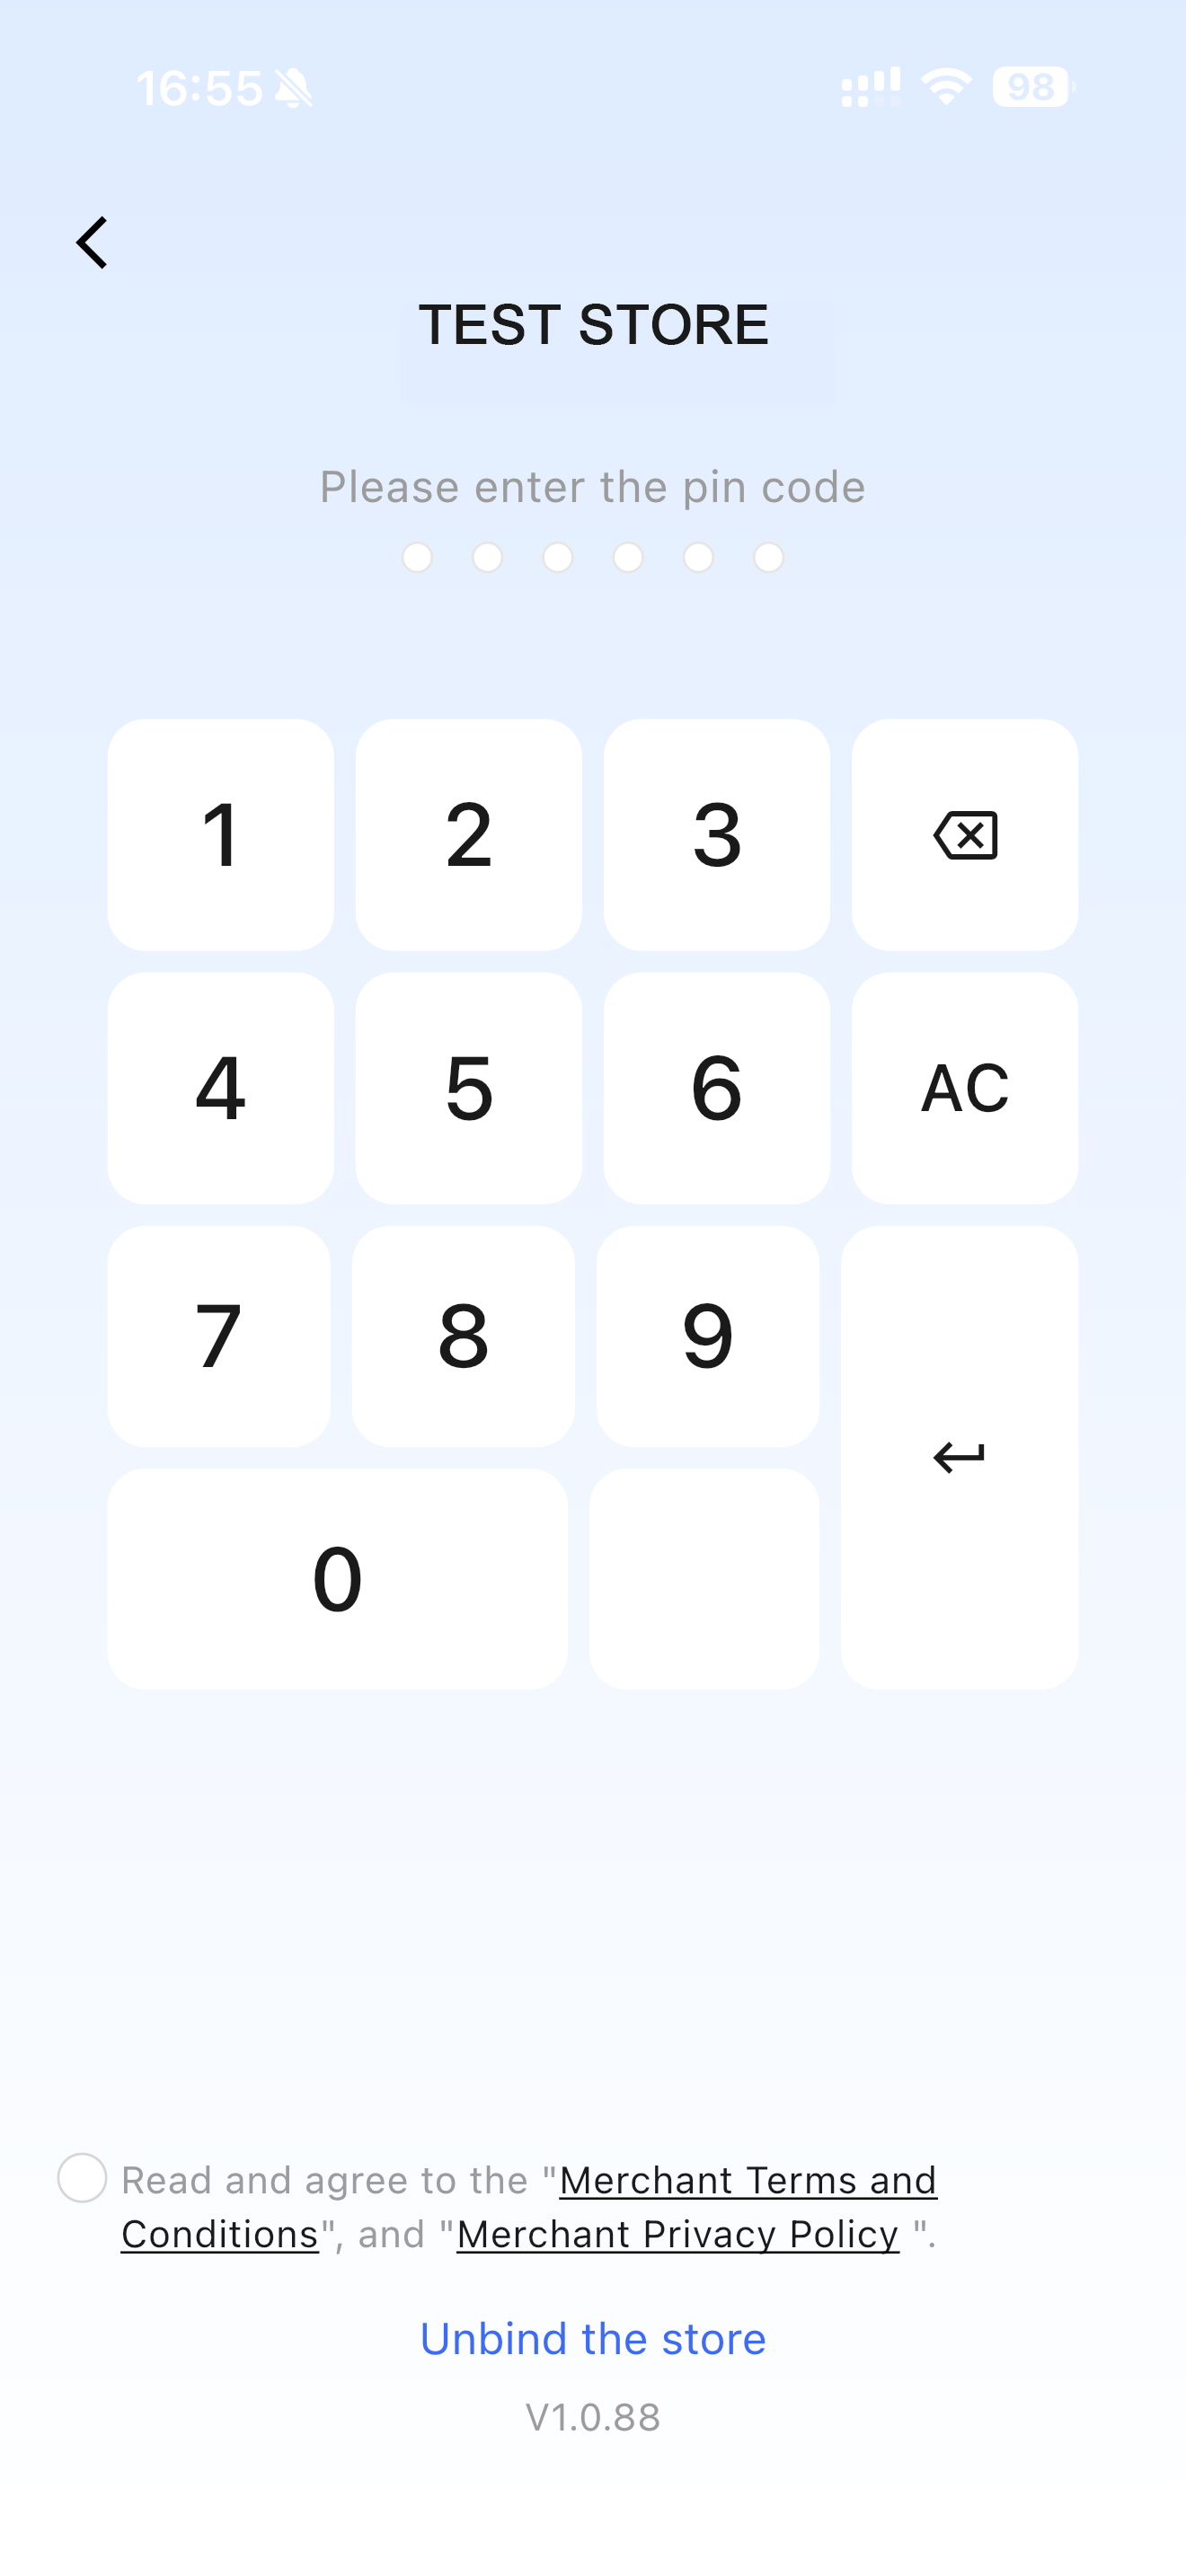
Step 2: Enter Password
- Enter the password after selecting the restaurant
- Check the “Merchant Terms and Conditions” and “Merchant Privacy Policy” at the bottom
- The password is the employee’s Pin code, which can be viewed in the employee account details on the BO end
Notes:
The page automatically navigates to the next step when a 6-digit password is entered
Click the Enter key if the password is less than 6 digit
2.2 Basic Settings
It is recommended to configure the following 3 key settings first after login to quickly adapt to the restaurant’s operation scenario.
- Dining Mode:
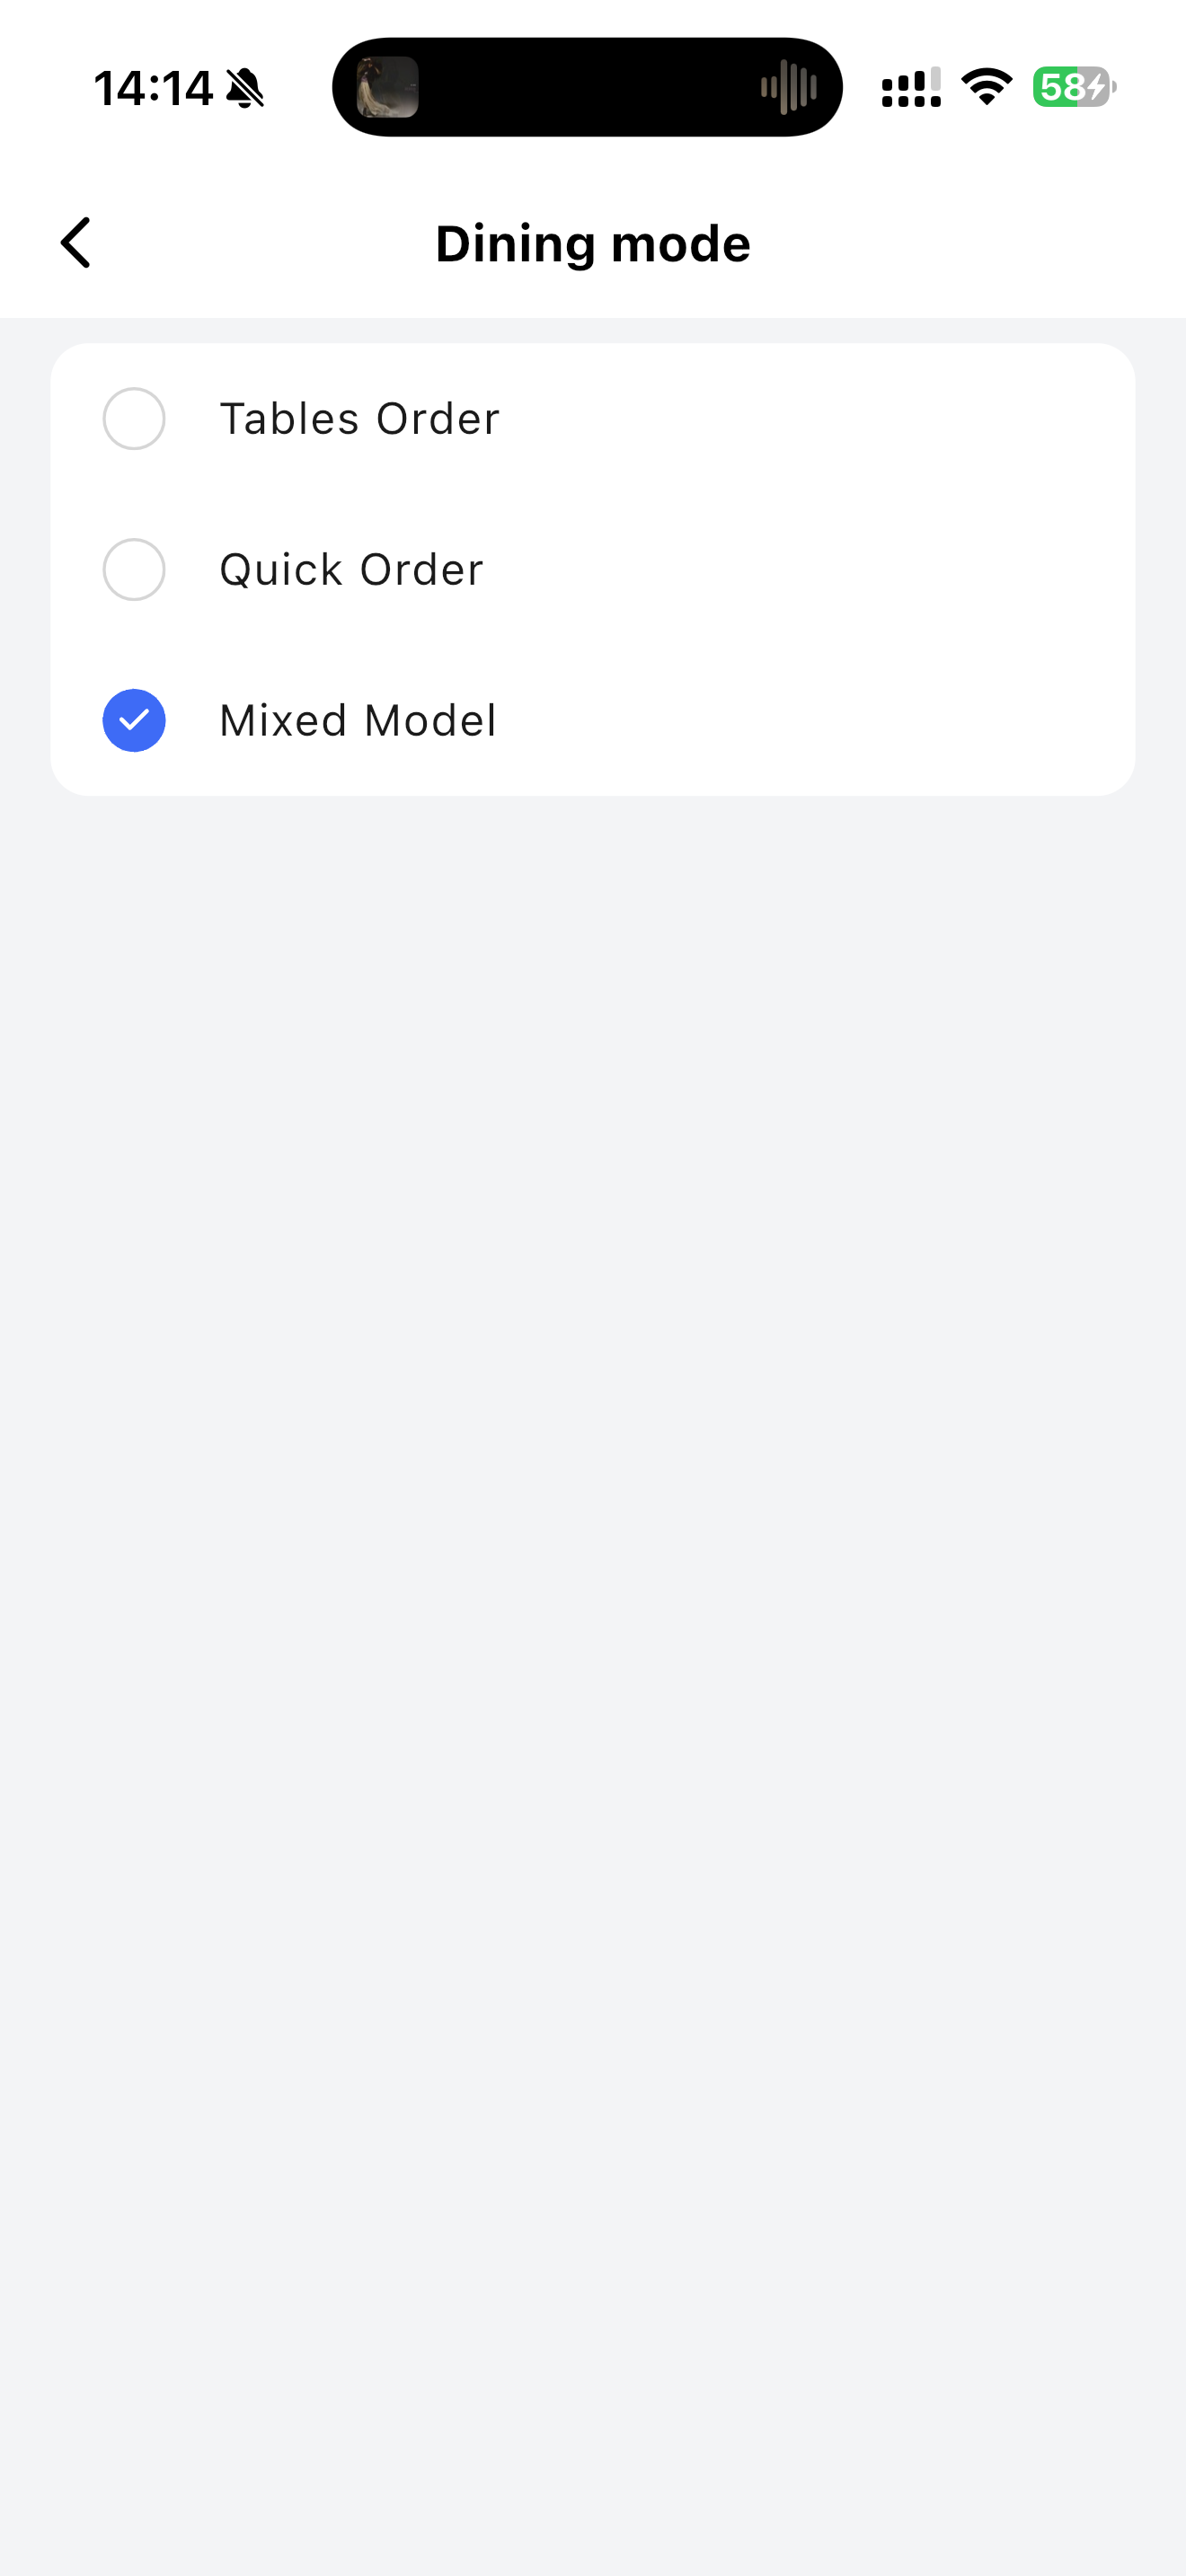
You can select 3 different modes:
- Table Order: Formal scenarios such as lobby dining and banquets
- Quick Order: Quick dining environments such as fast-food restaurants and takeout orders
- Mixed Mode: Supports both Table Order and Quick Order, the system will provide corresponding entrances to adapt to various business types
- Payment Terminals:

Add payment terminal information, including:
- Terminal Name: Set a name for the payment terminal to facilitate the management and differentiation of multiple terminals
- IP Address: Enter the payment terminal’s IP address and ensure it connects to the system properly
- Serial No.: Unique terminal identifier, used to identify and connect to the system
- Model: Choose the specific terminal model to ensure compatibility between the system and the hardware
- Language & Page Layout:
- Language: Switch to the current language

- Page Layout: Adjust the layout of the menu panel and table panel
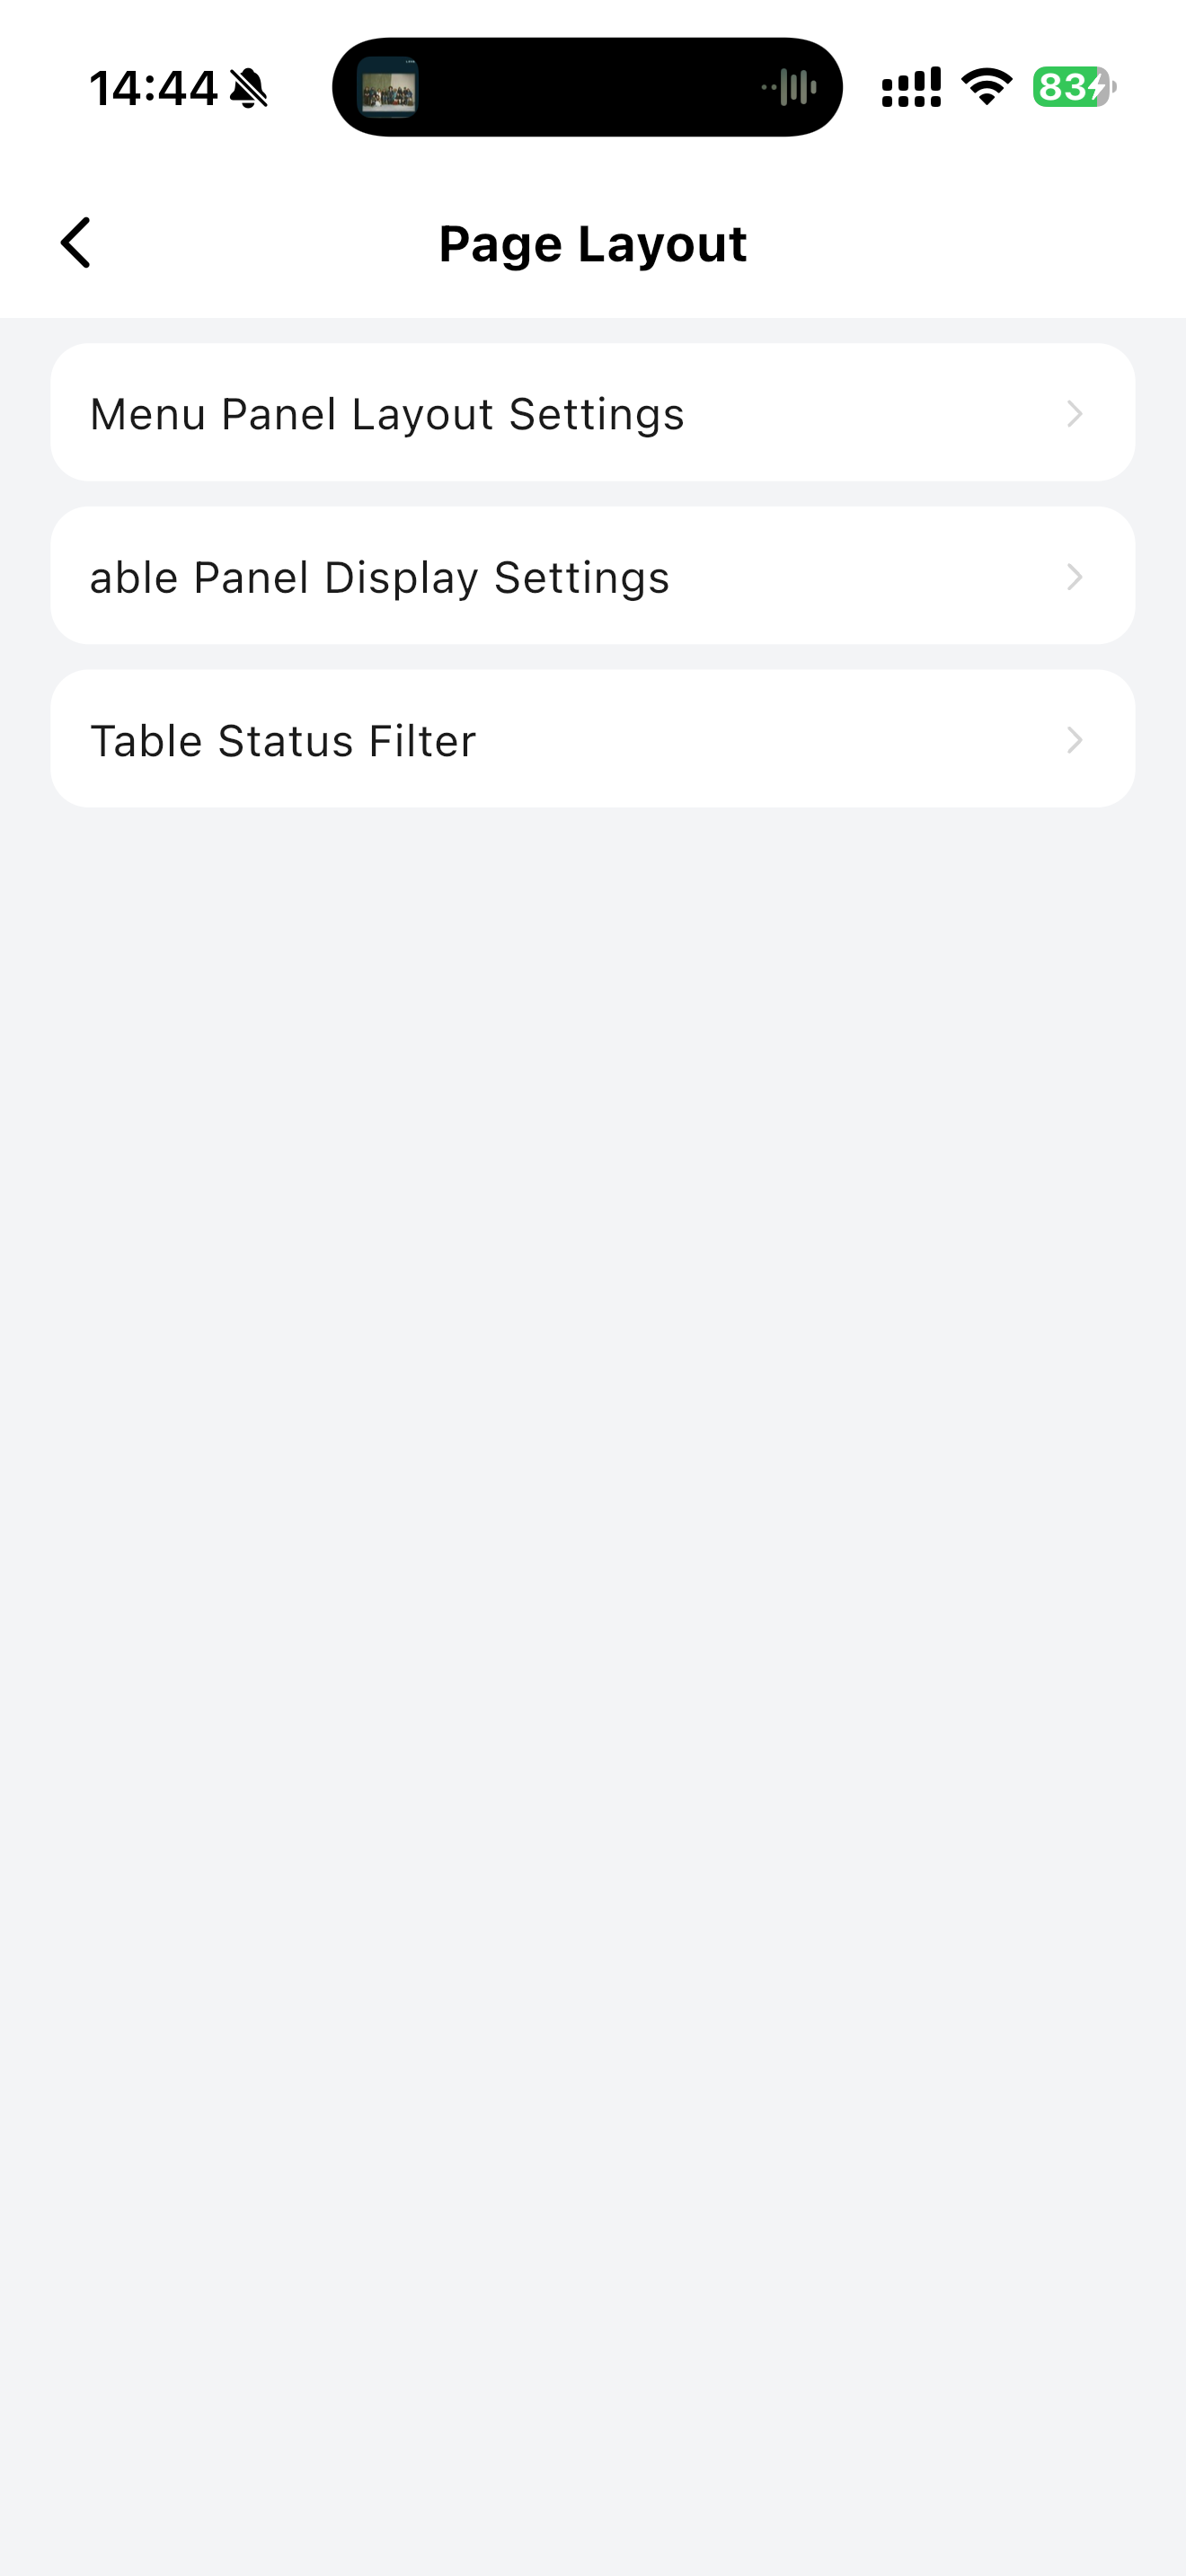
- Menu Layout: You can switch between vertical (top-bottom) or horizontal (left-right) layout
- Item Display Columns: Select 1 or 3 columns; the menu page updates in real-time.
- Picture Display Settings: Once images are set for items in the backend, just enable this function and the item images will show on the food-ordering page.
3 Ordering Modes
3.1 Quick Order Mode
Focus on speed. No need to select a table, directly enter the ordering page.
3.1.1 Core Operations
3.1.1.1 Modify Order Information
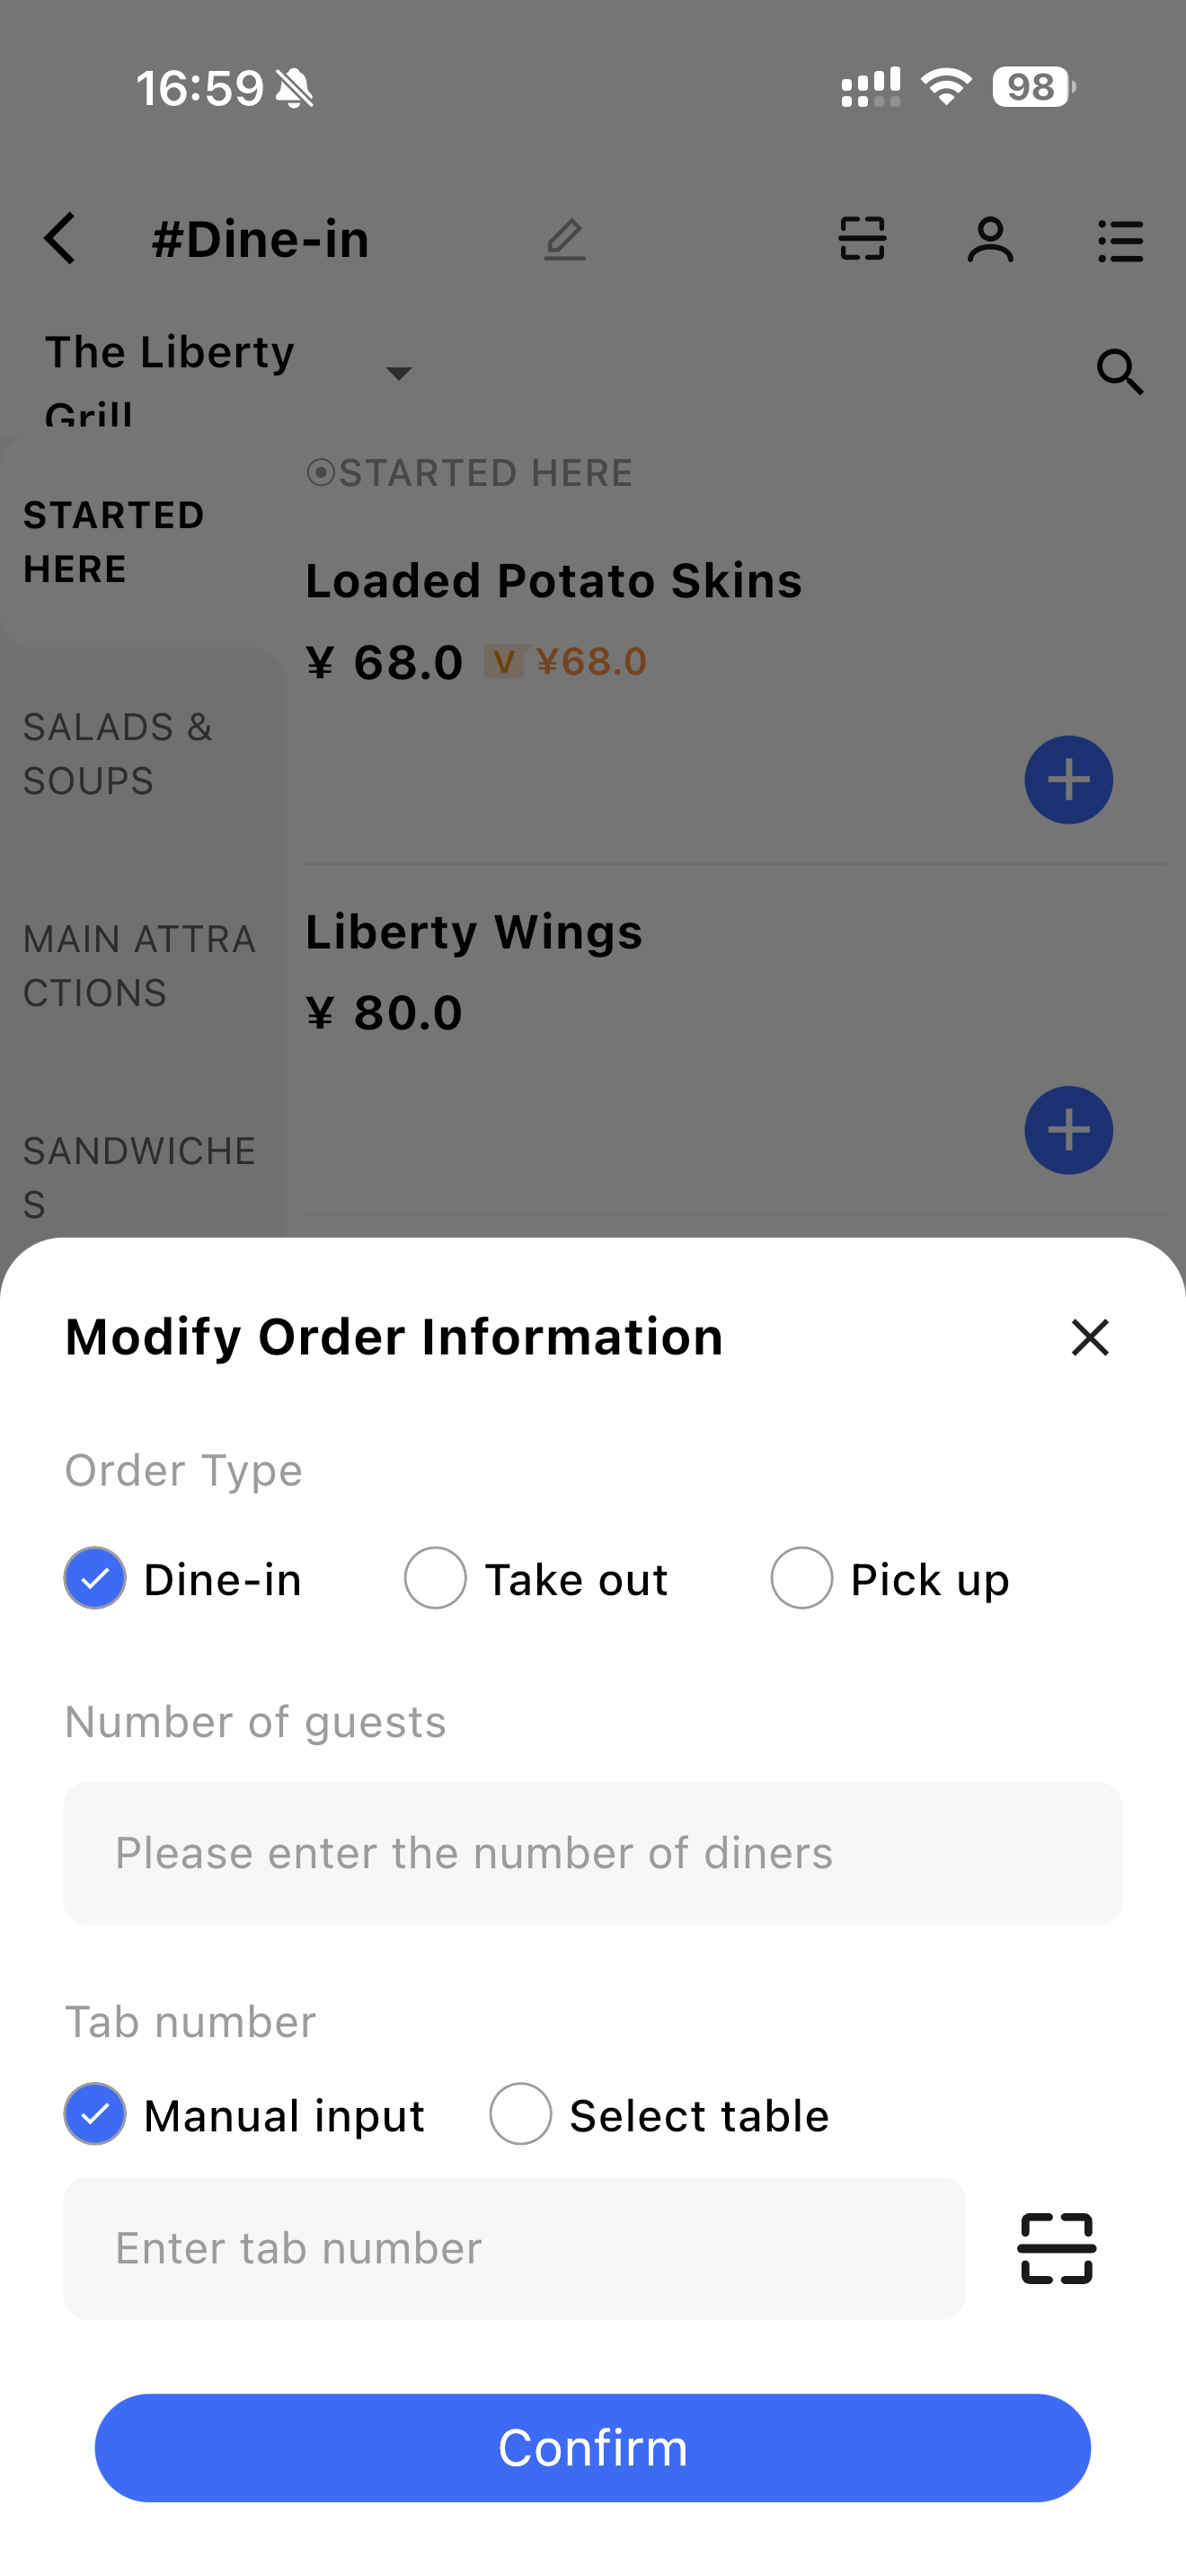
- Use Quick Mode when table opening is unnecessary, and order modifications are allowed.
- You can edit the Order Type (Dine in / Take Out / Pick up), Number of Guests and Table Number.
3.1.1.2 Log in Membership
- Members can log in to enjoy membership benefits in Quick Order Mode.
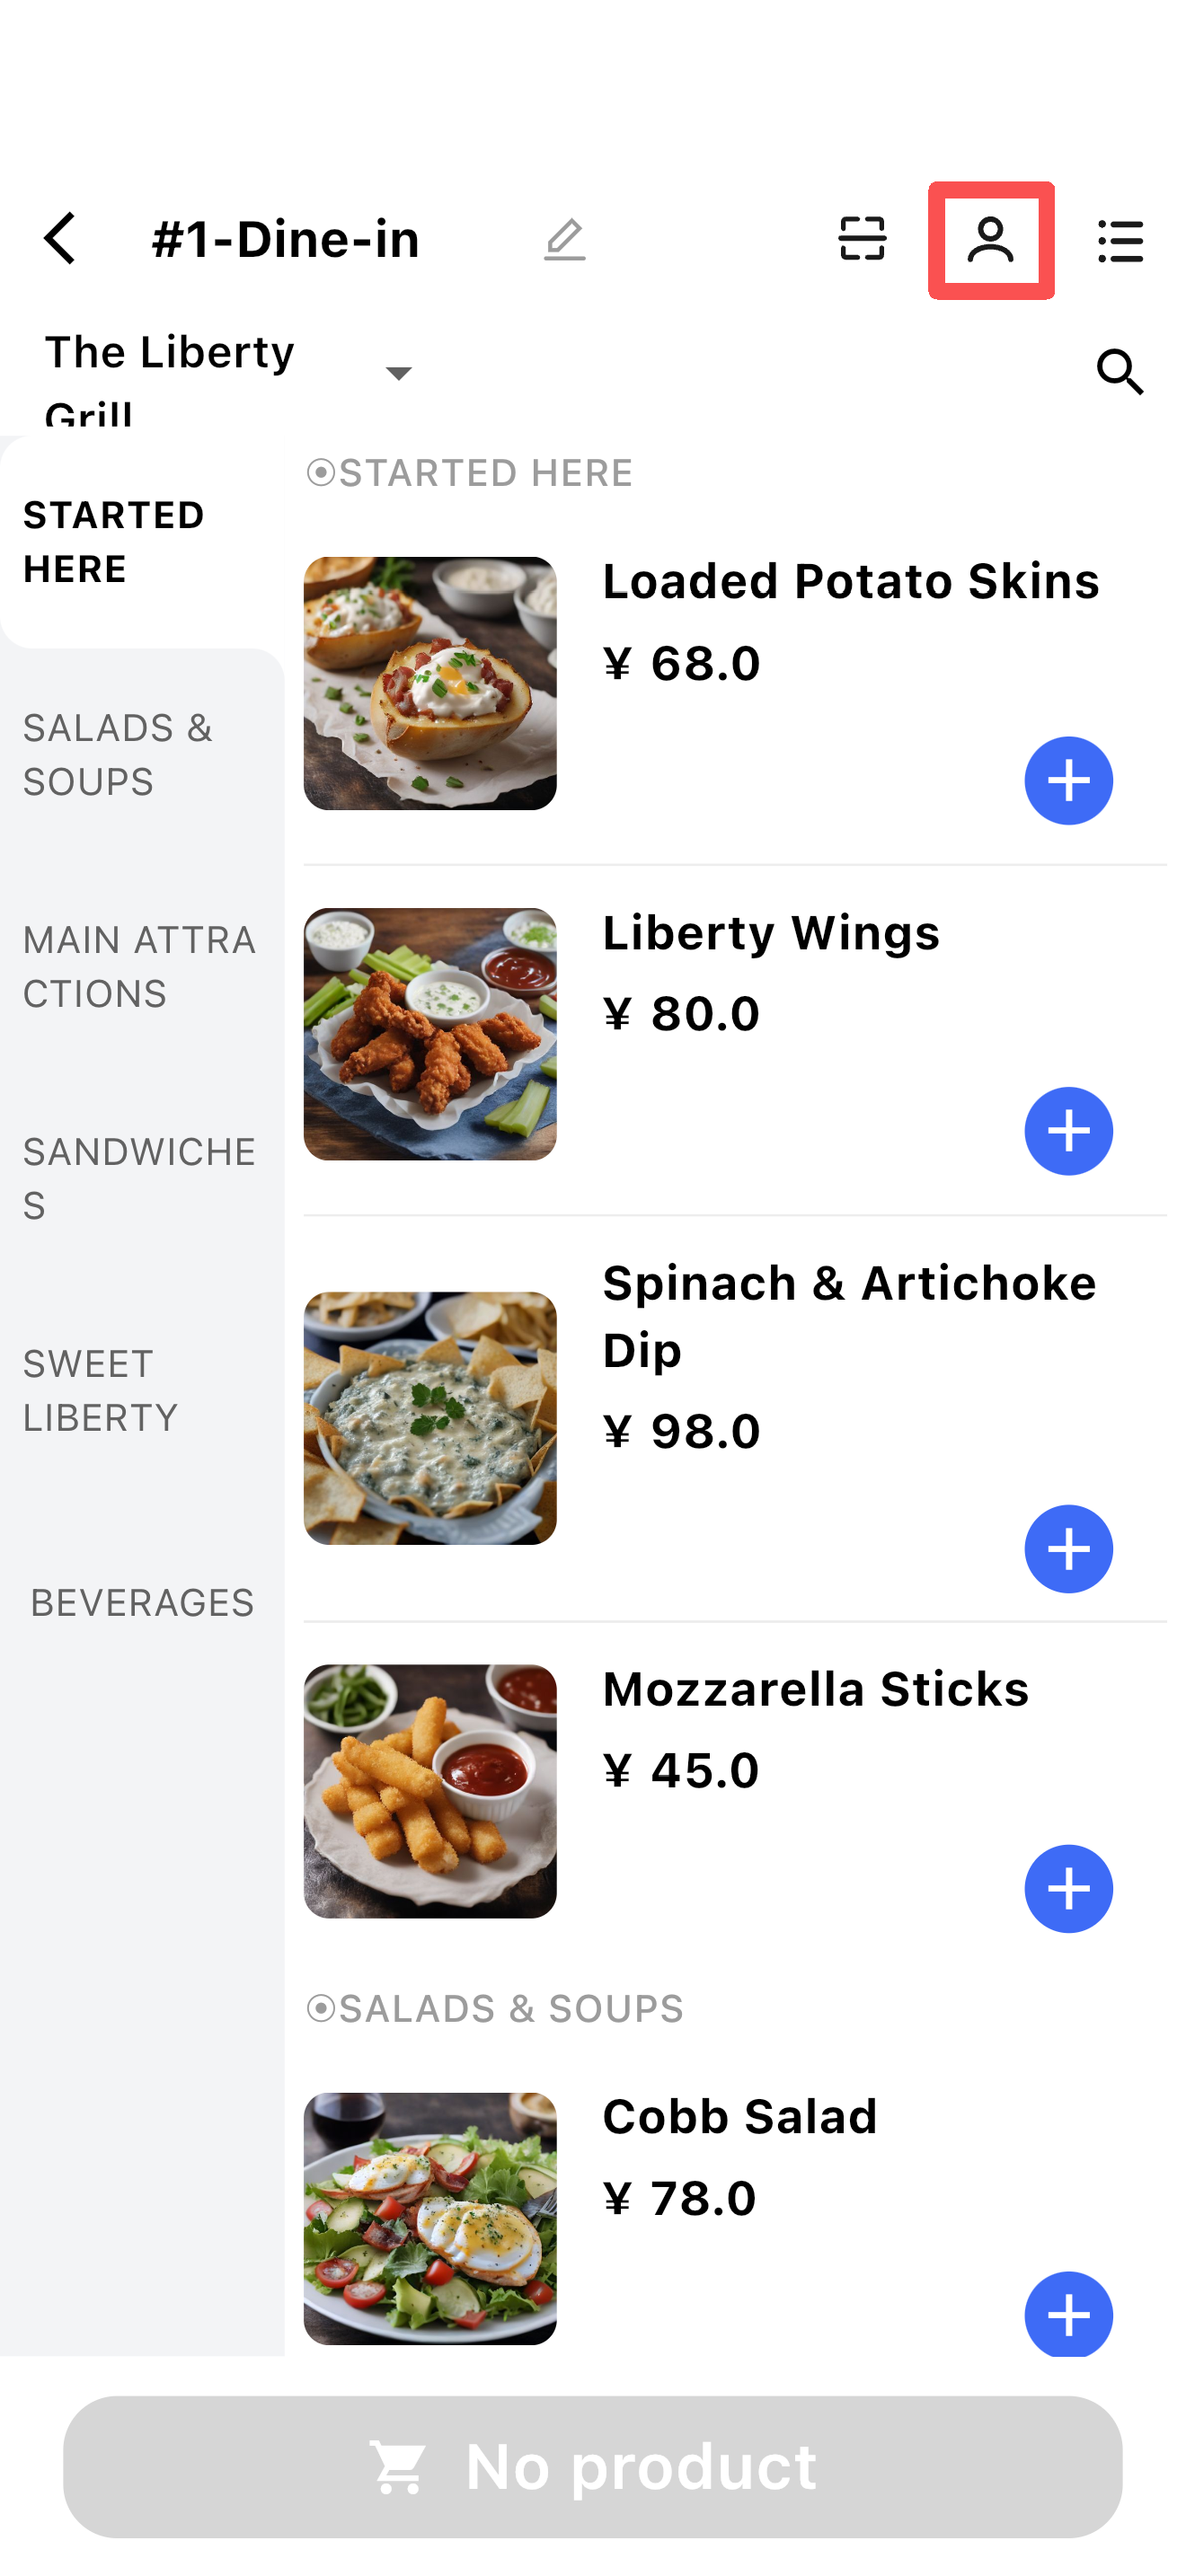
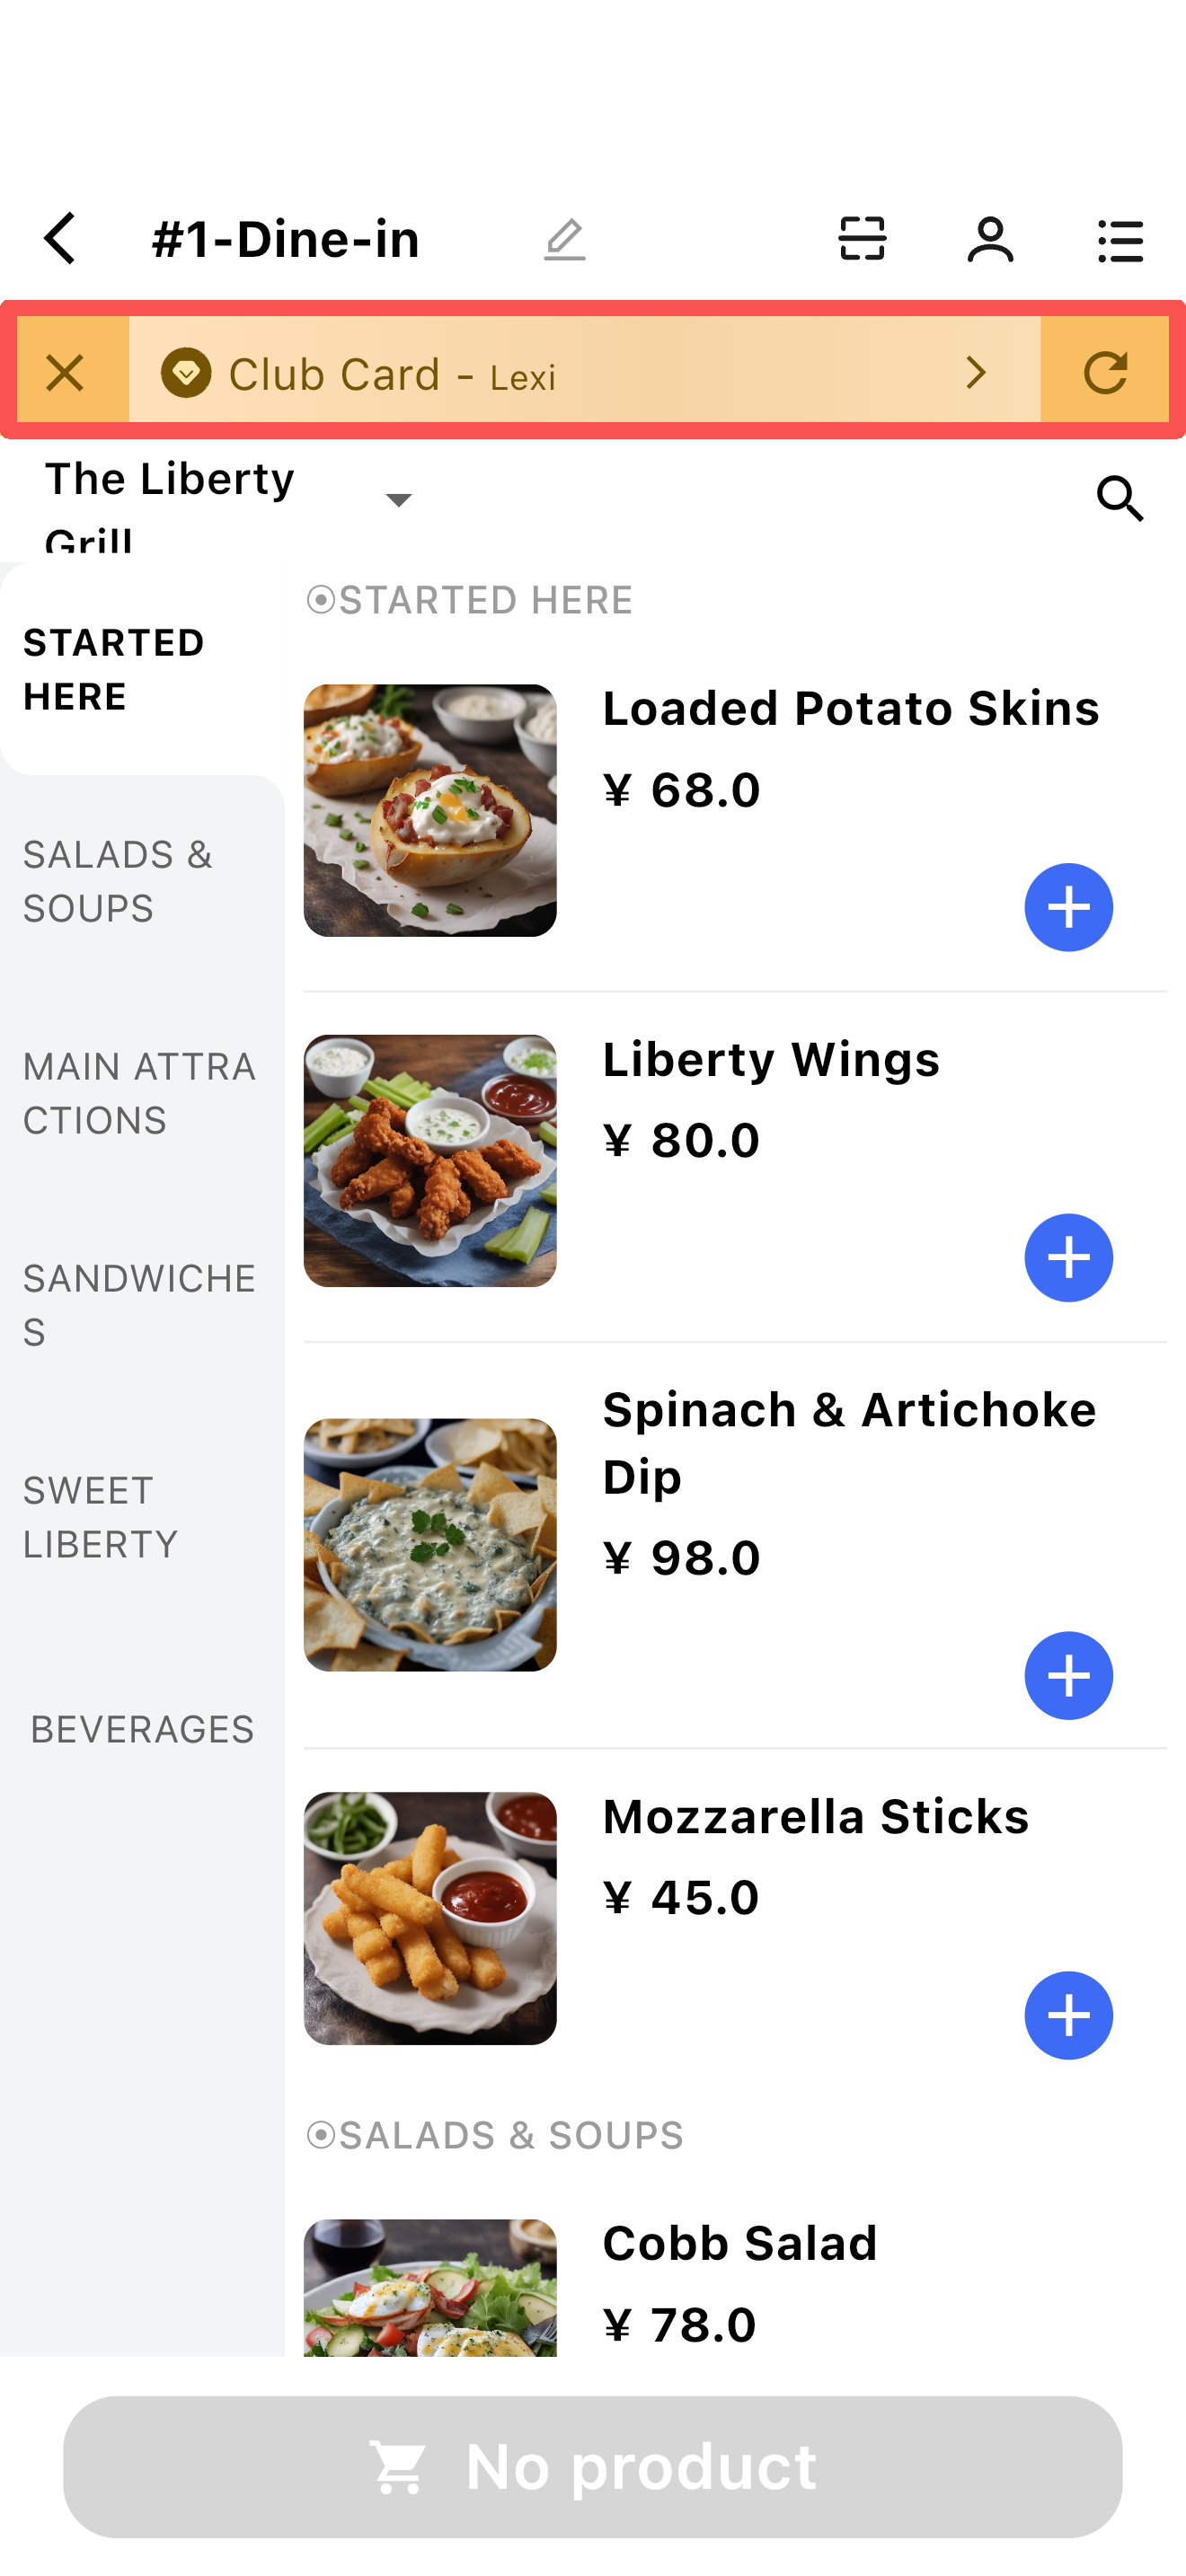
- Click the【user icon】, search for the member (phone/card number) on the page
- After click【Log in】, return to the ordering page, and a member badge will be displayed at the top.
3.1.1.3 Order Page Settings
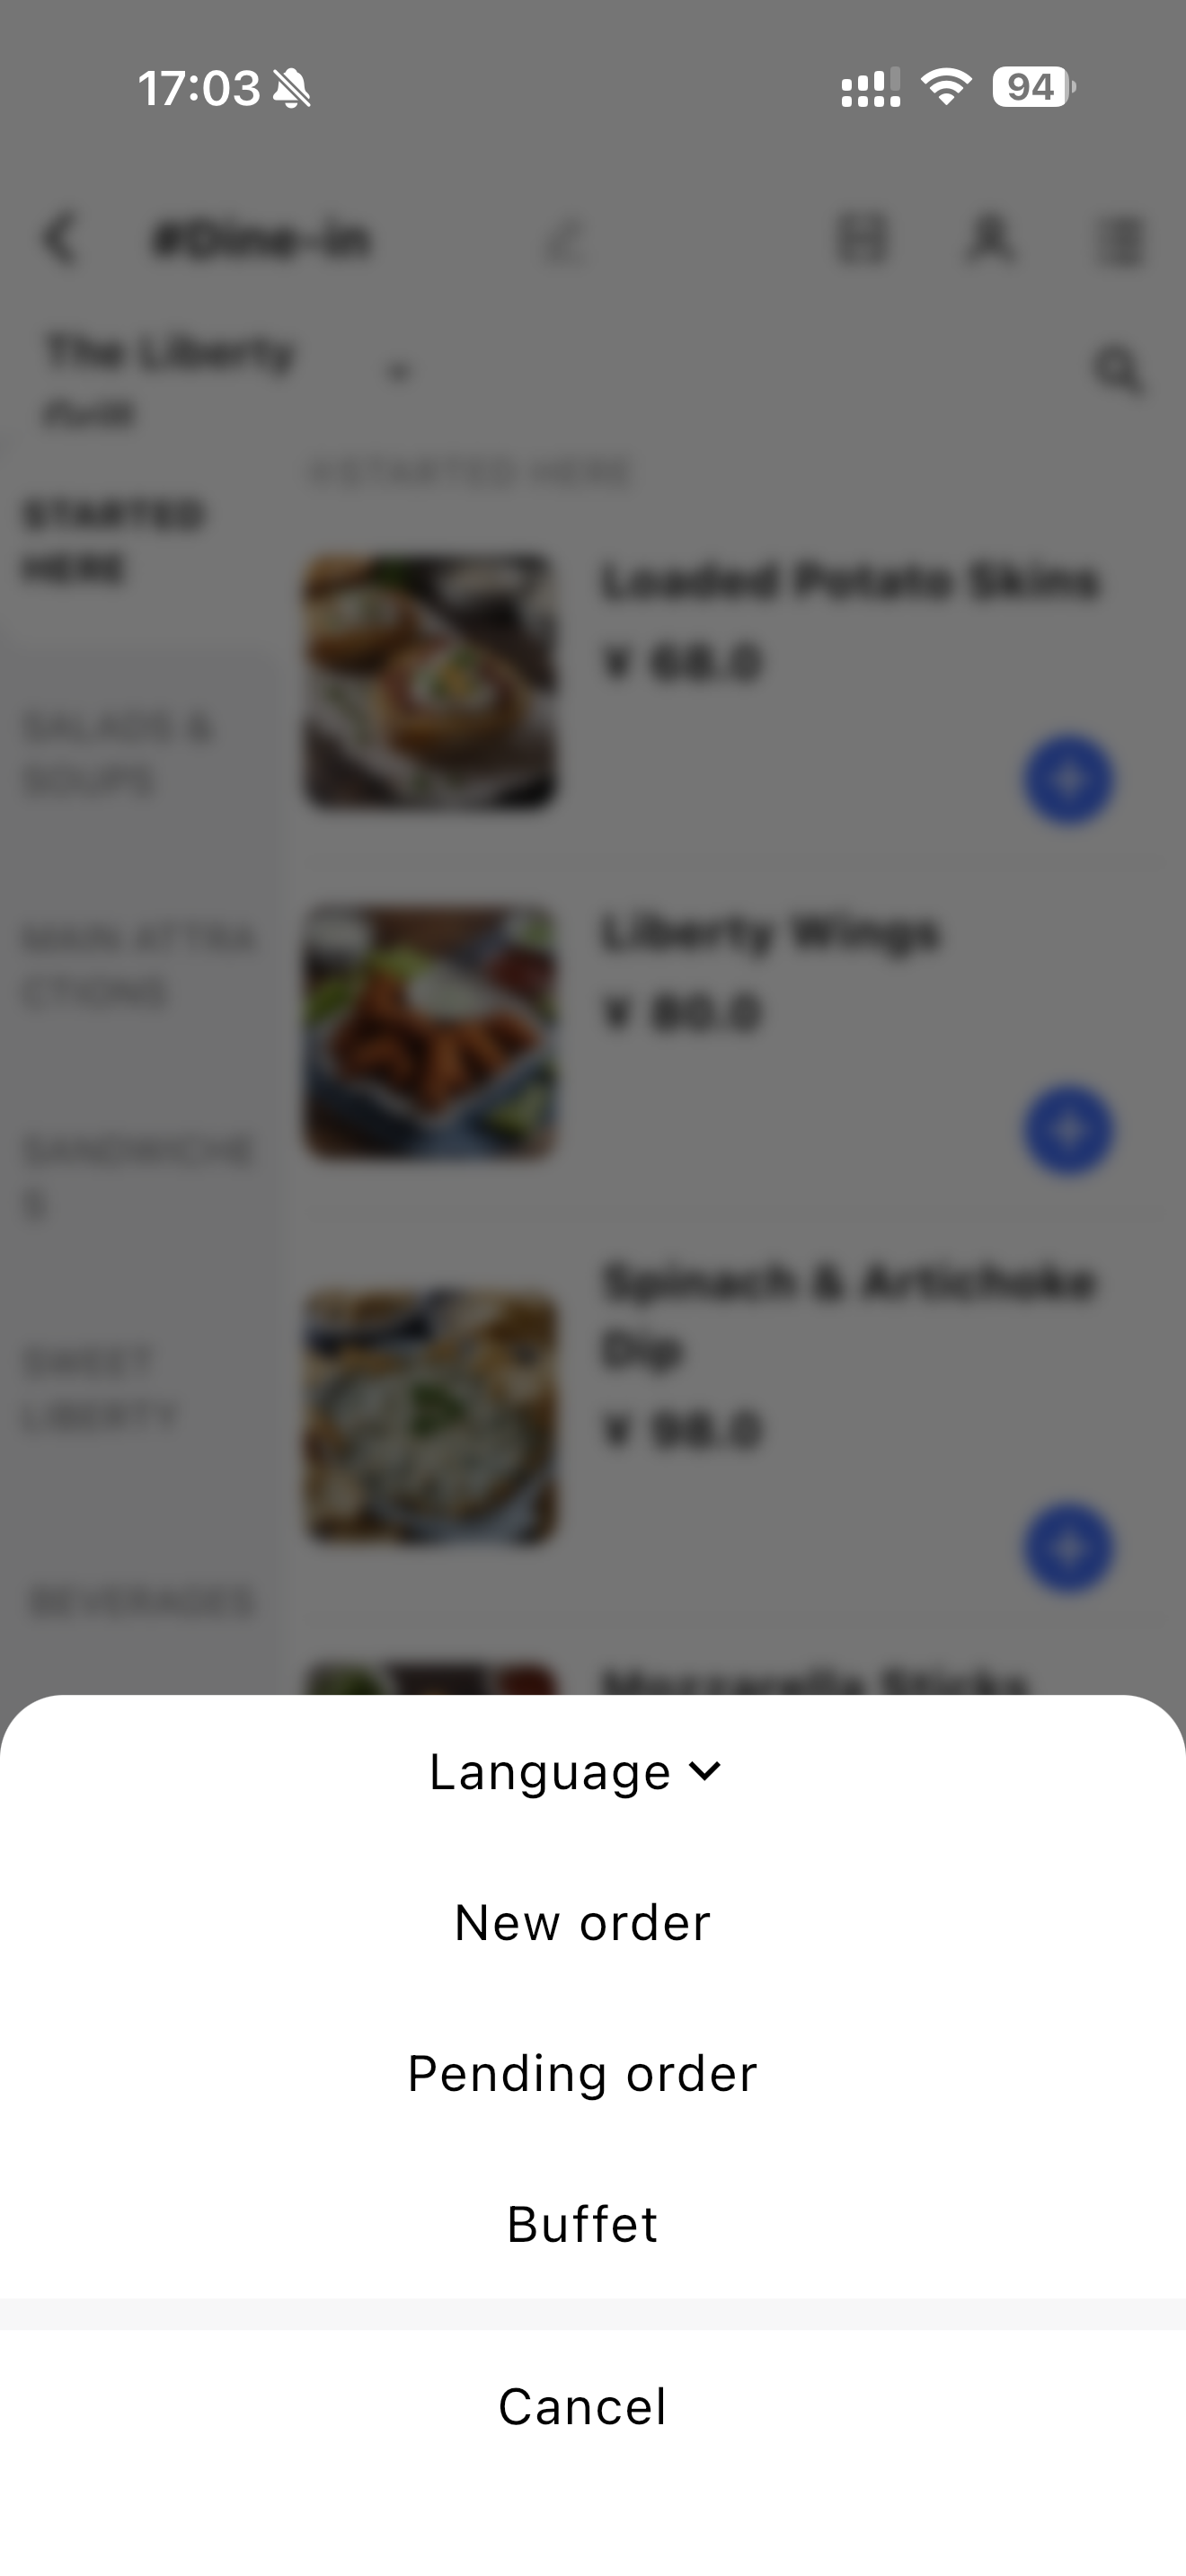
- Language: Switch to other languages
- New Order: Open another Quick Mode order on the ordering page
- Pending Order: Display all unpaid orders, allowing switching for adding items or checkout.
- Buffet: Displayed if the restaurant offers a buffet (with configurable buffet tiers); not displayed otherwise
Search Tips:
Supports Pinyin search and fuzzy search, case-insensitive, and search results only match the content under the current dish category.
3.2 Full Order Mode
Focus on experience. Start by opening a table, then choose buffet or menu ordering.
- The buffet option will only be displayed if the buffet service is configured in the backend, and buffet coupon verification is supported.
3.2.1 Core Operations
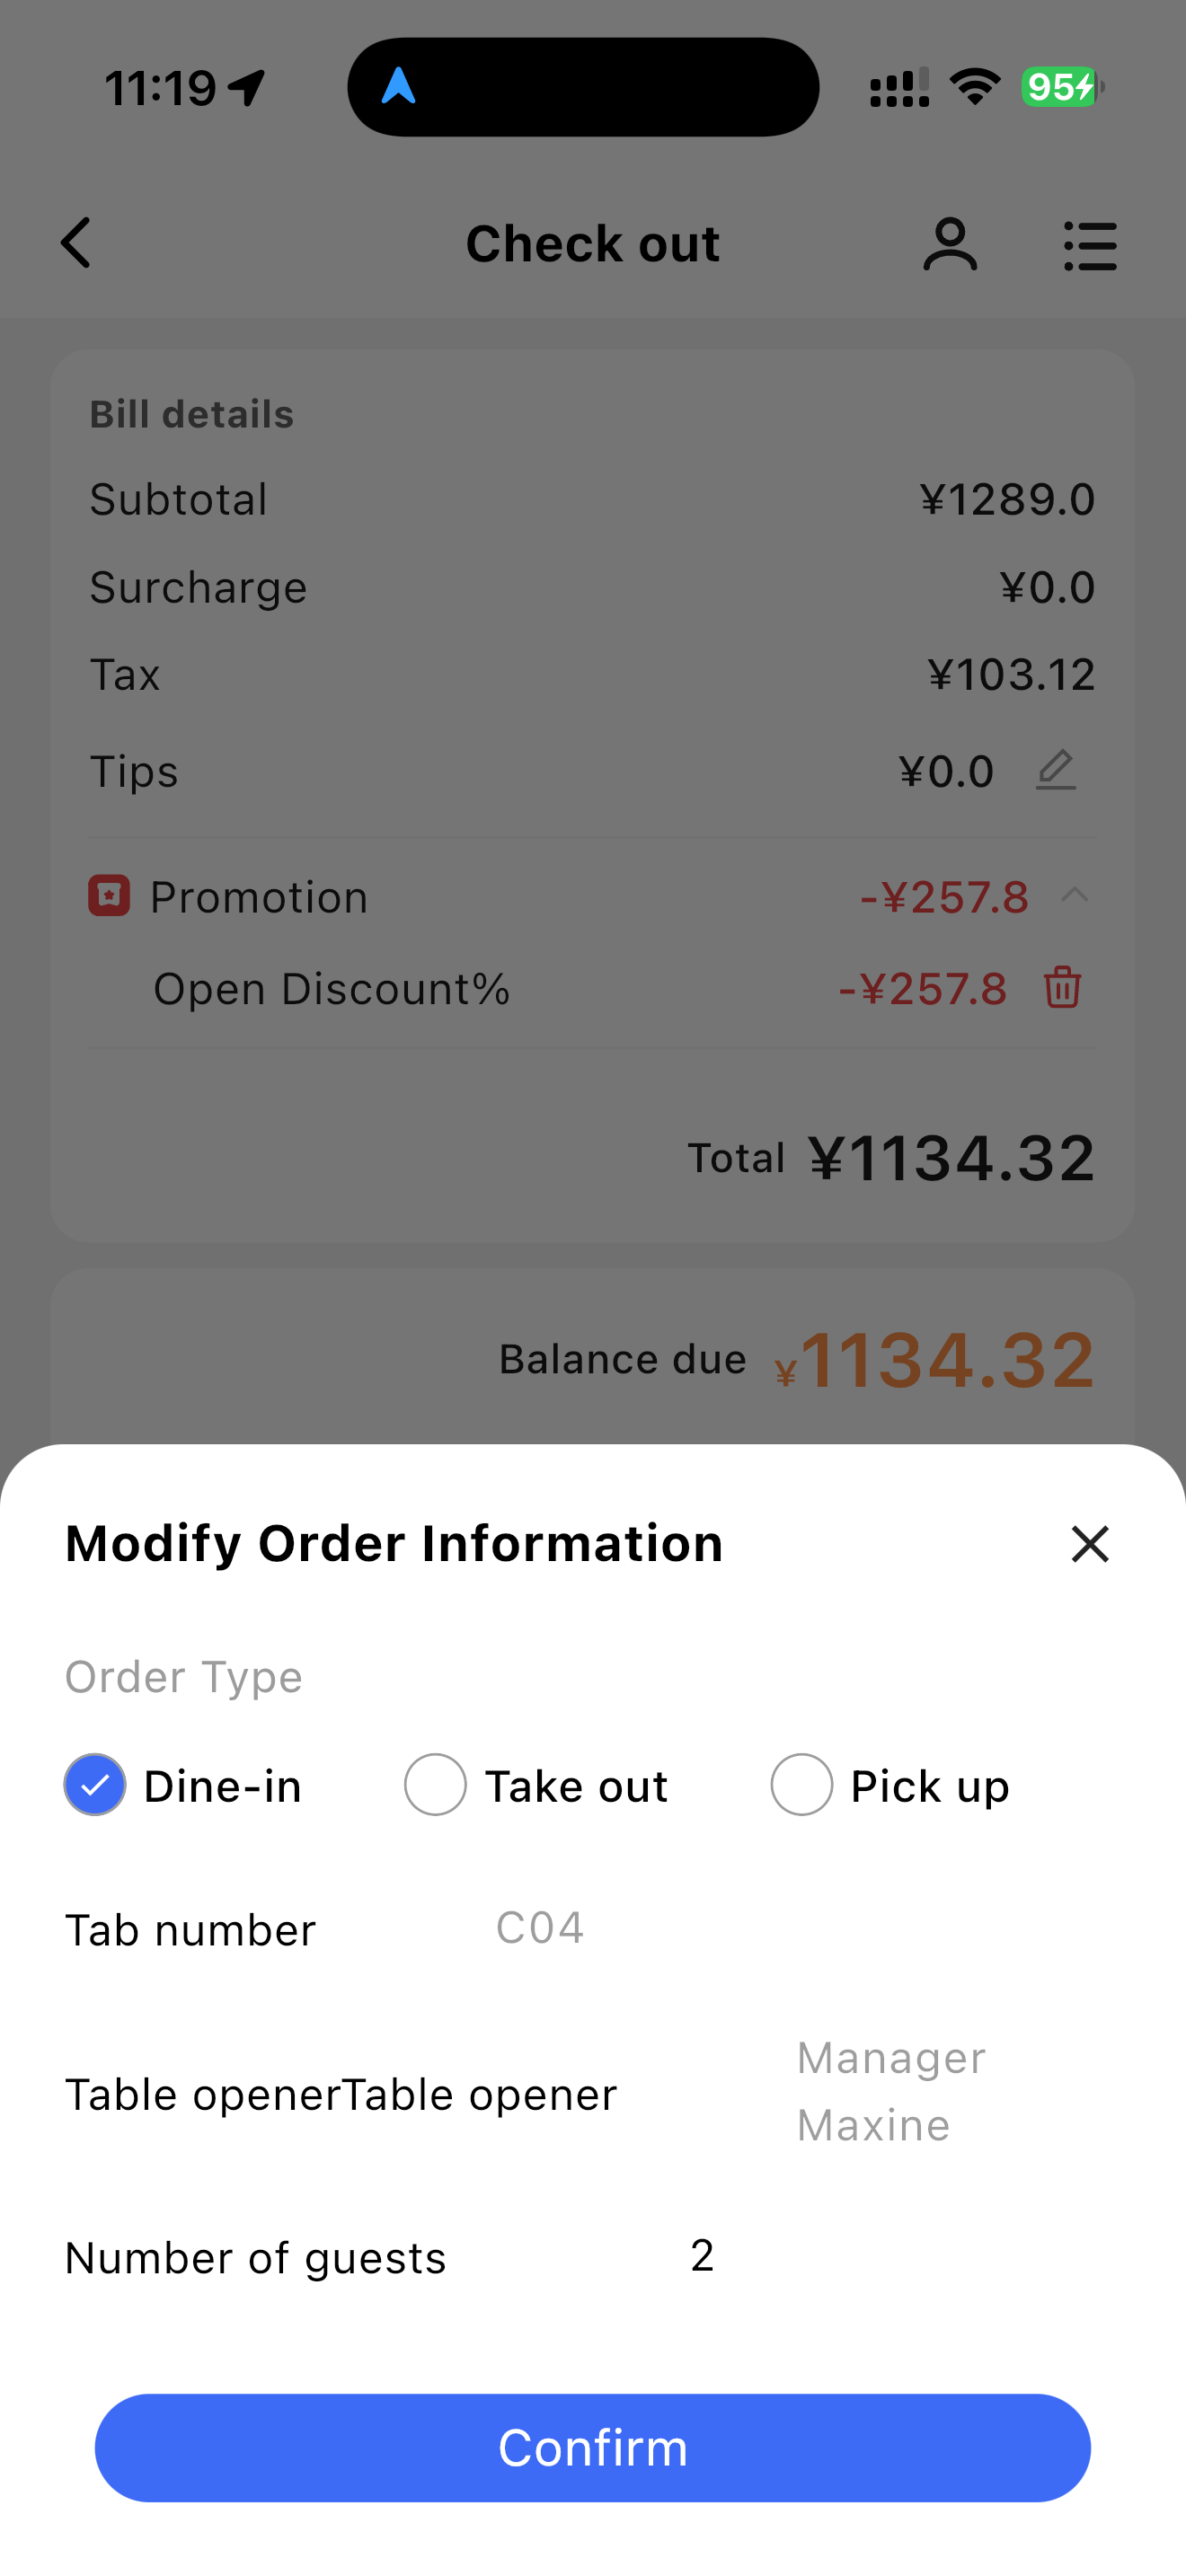
3.2.1.1 Modify Order Information
- You can edit the Order Type (Dine in / Take Out / Pick up) and the Number of guests
- The table number and table opener cannot be changed
3.2.1.2 Log in Membership
Same as member login in Quick Order Mode
3.2.1.3 Order Page Settings
- Language: Switch to other languages
- Print temporary desk code
- Combo fast select:offers a flexible custom package model that allows you to combine any dishes into a banquet. It also supports the free replacement of dishes and custom pricing for the entire order, meeting the personalized dining needs in banquets and private room settings.
3.2.1.4 Menu Operations
-
Menu:
- Click the downward arrow next to the menu name to switch menus.
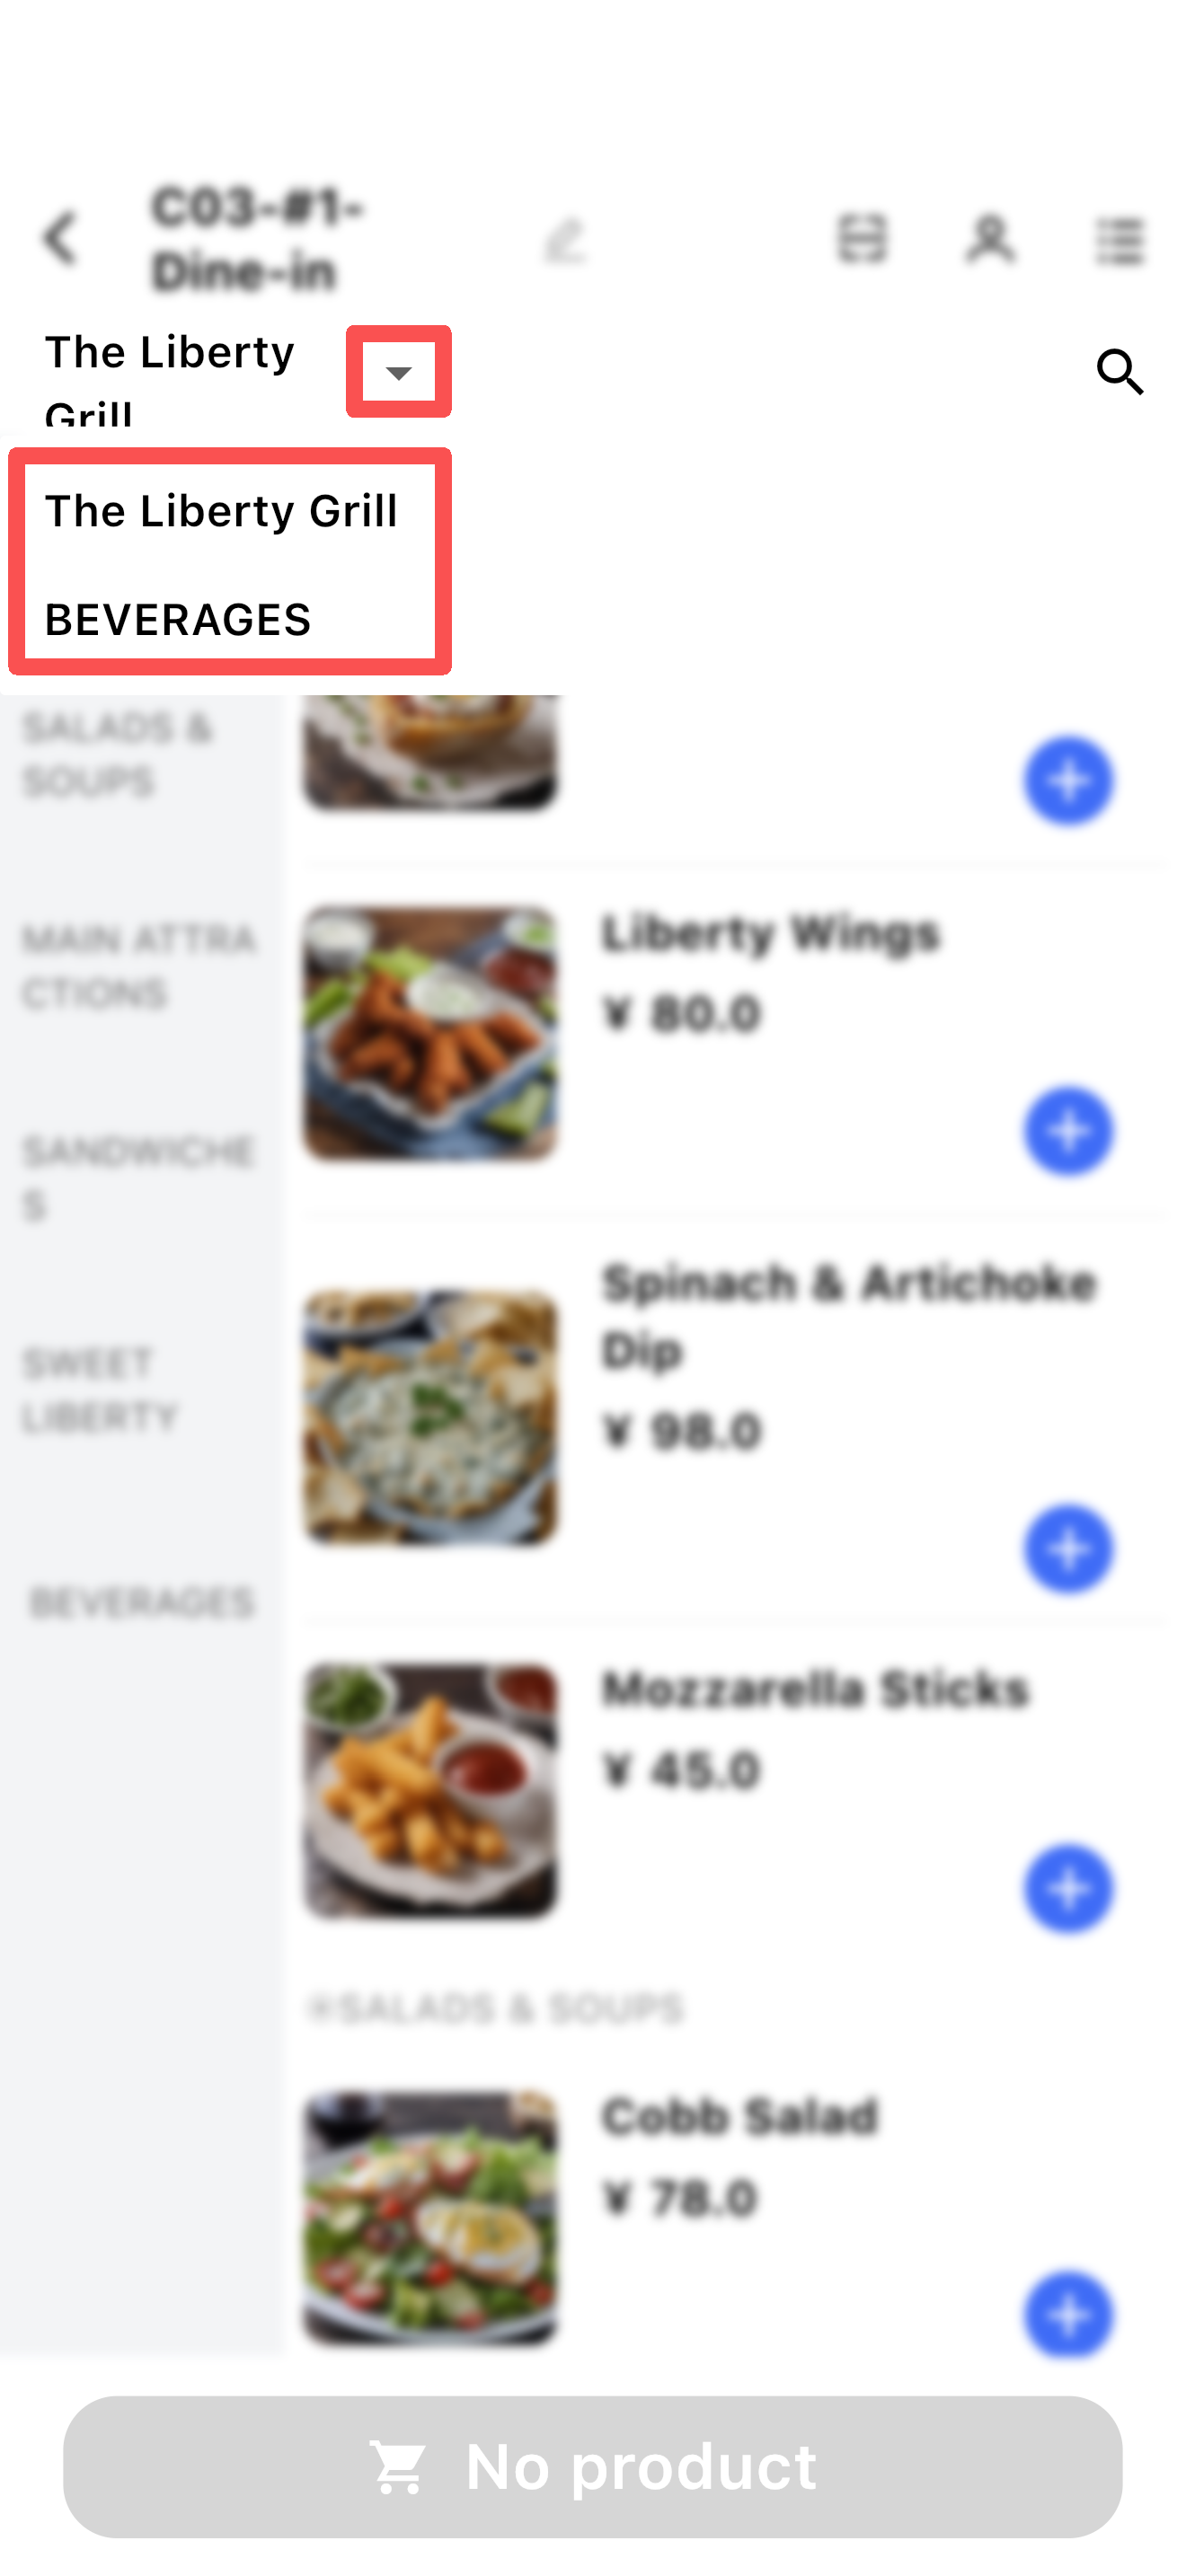
- Click the downward arrow next to the menu name to switch menus.
-
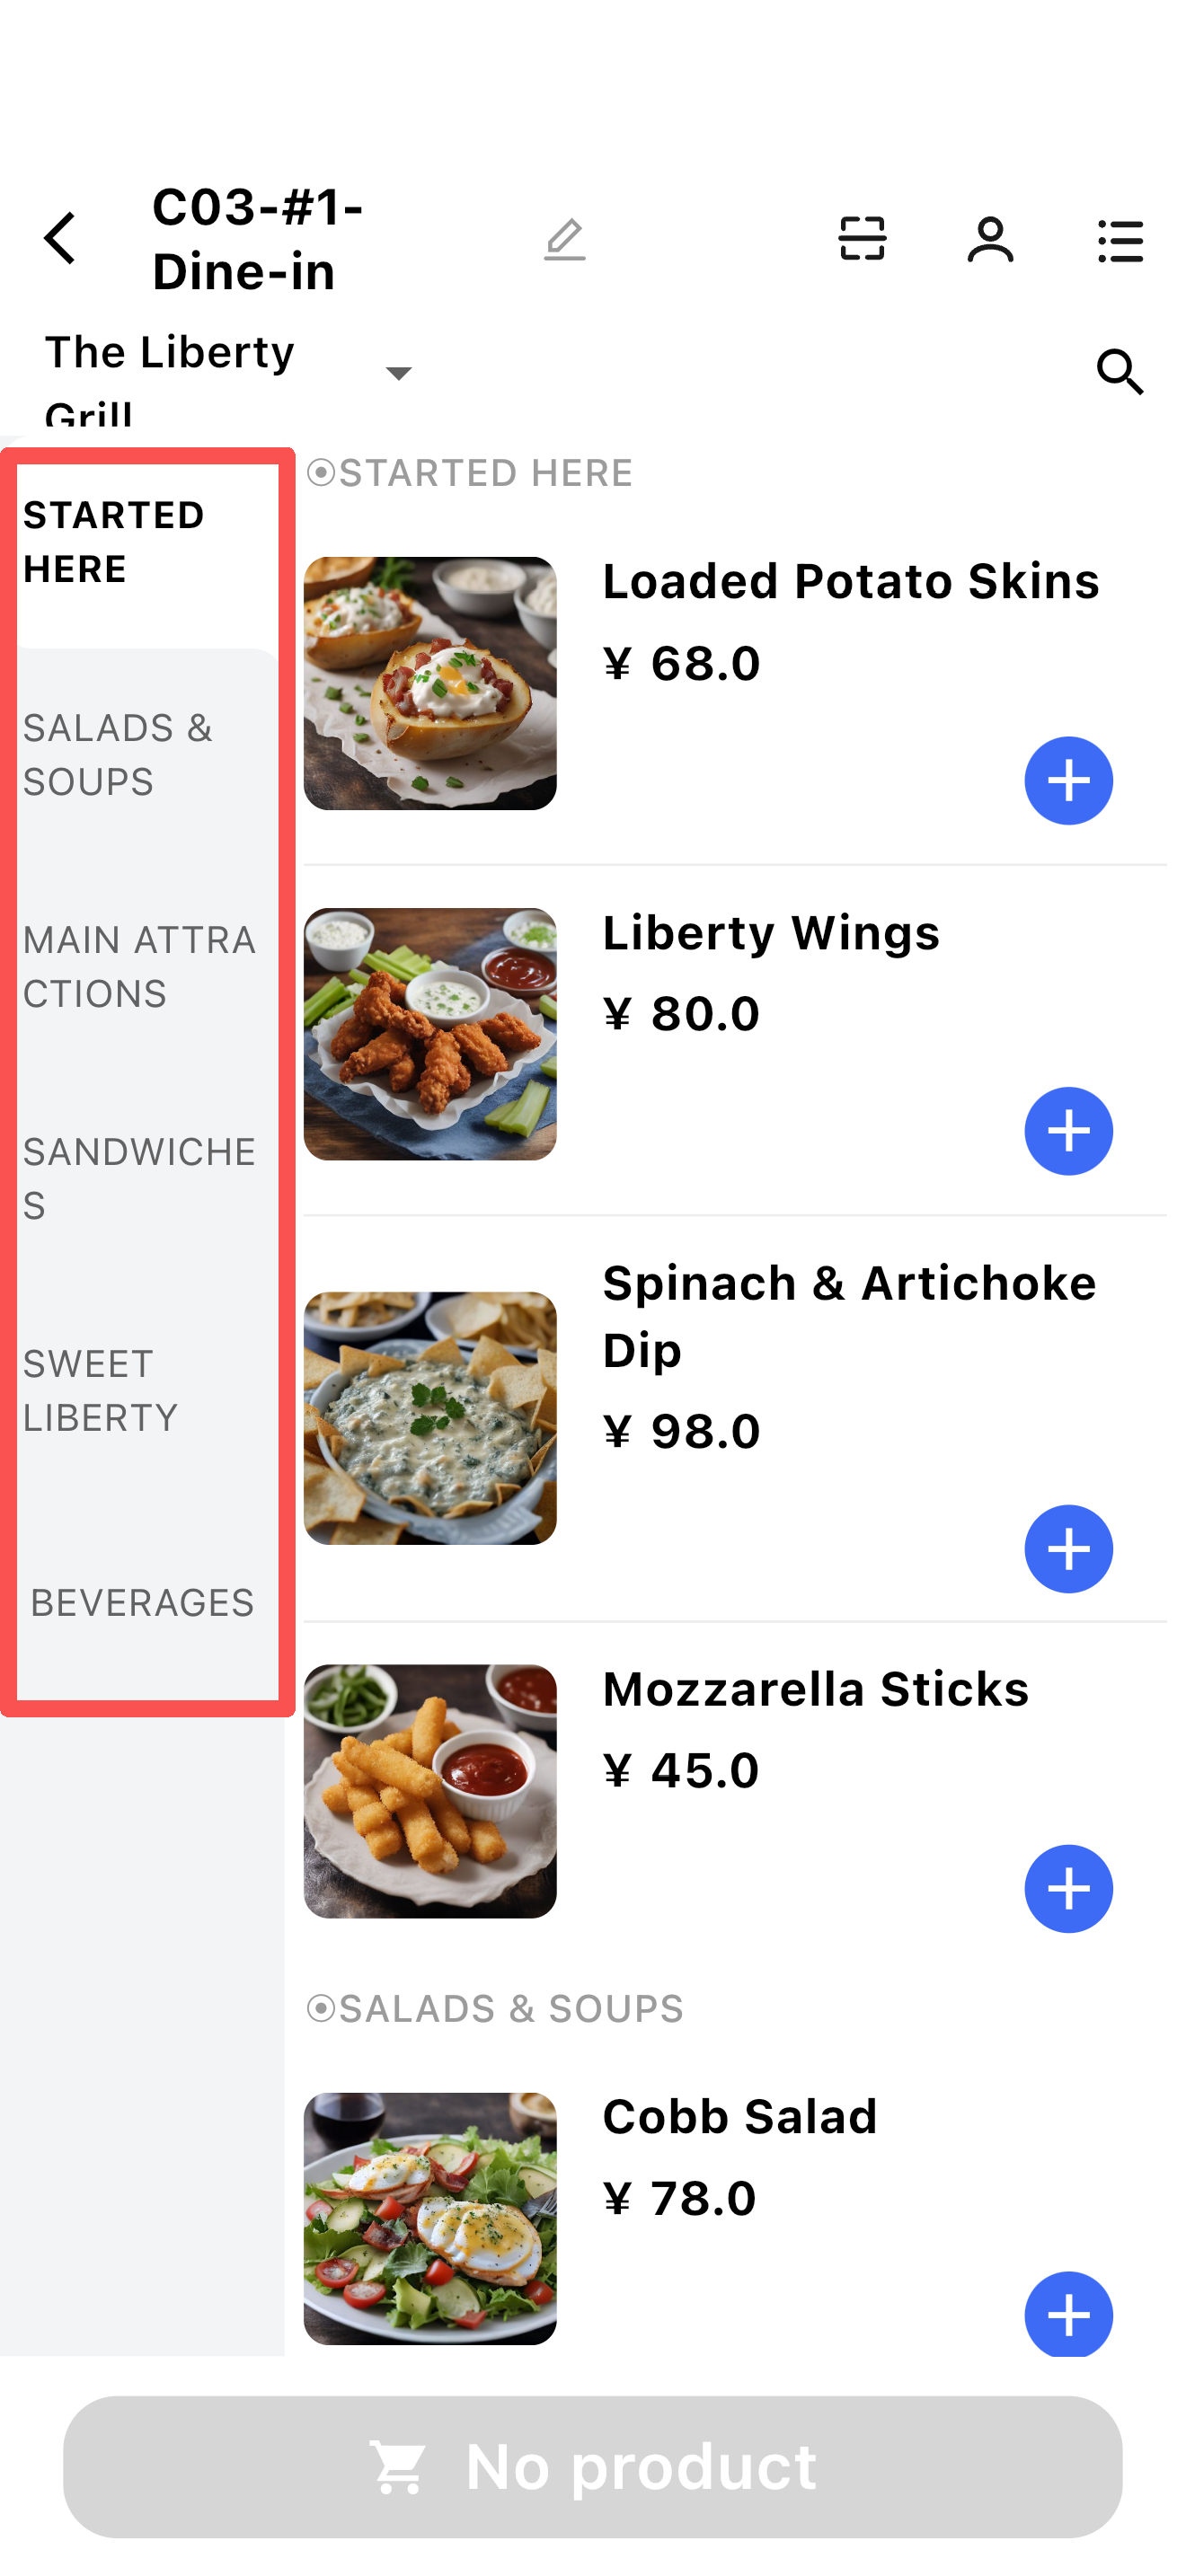
Menu Groups:
- Menu groups are categories of the menu, permanently displayed on the left. Switching menus updates the menu groups accordingly.
- Member Price:
- If an item has a member price, the member price and member badge are displayed after the regular price.
3.2.1.5 Add Items
- Items without modifiers & sides display a plus icon on the right:
- Click the plus icon to add the item to the cart directly.
- You can also click the dish name area to open the item settings.
- Adjust the quantity in the cart using the plus/minus icons.
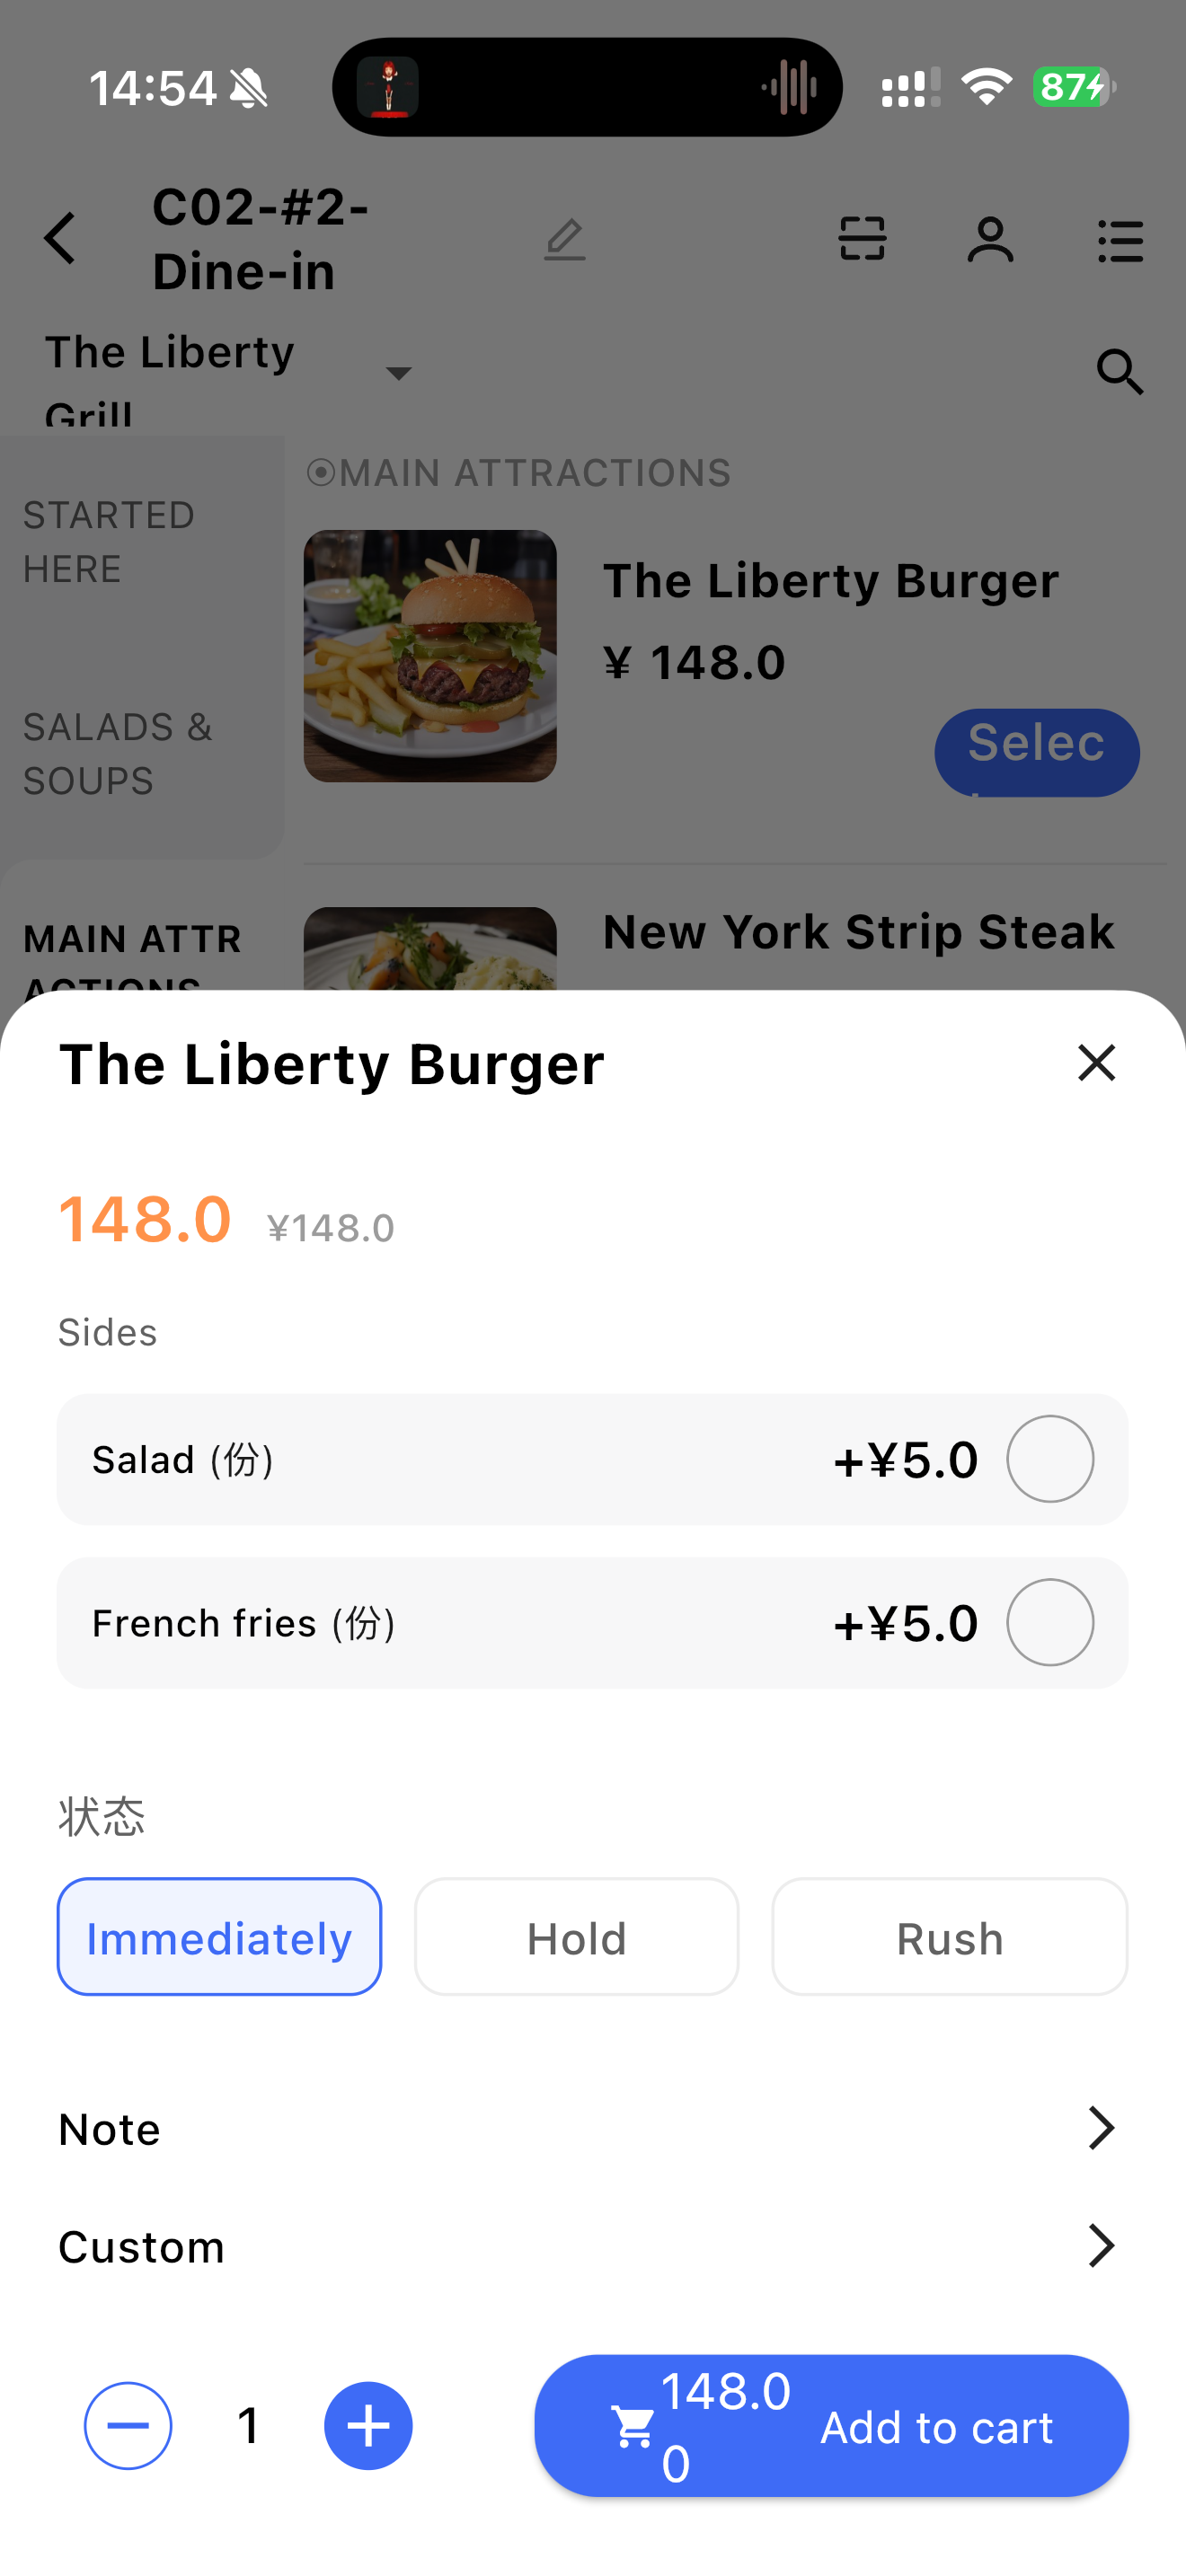
- Configurable items in item settings:
- Status: Immediately, Hold, Rush
- Note: Add notes about the item
- Temporary Customization: Customize as required (Amount / Note)

- Items with modifiers & sides display a【Select】button on the right, click to open the item settings:
- Filter and select item modifiers (if applicable).
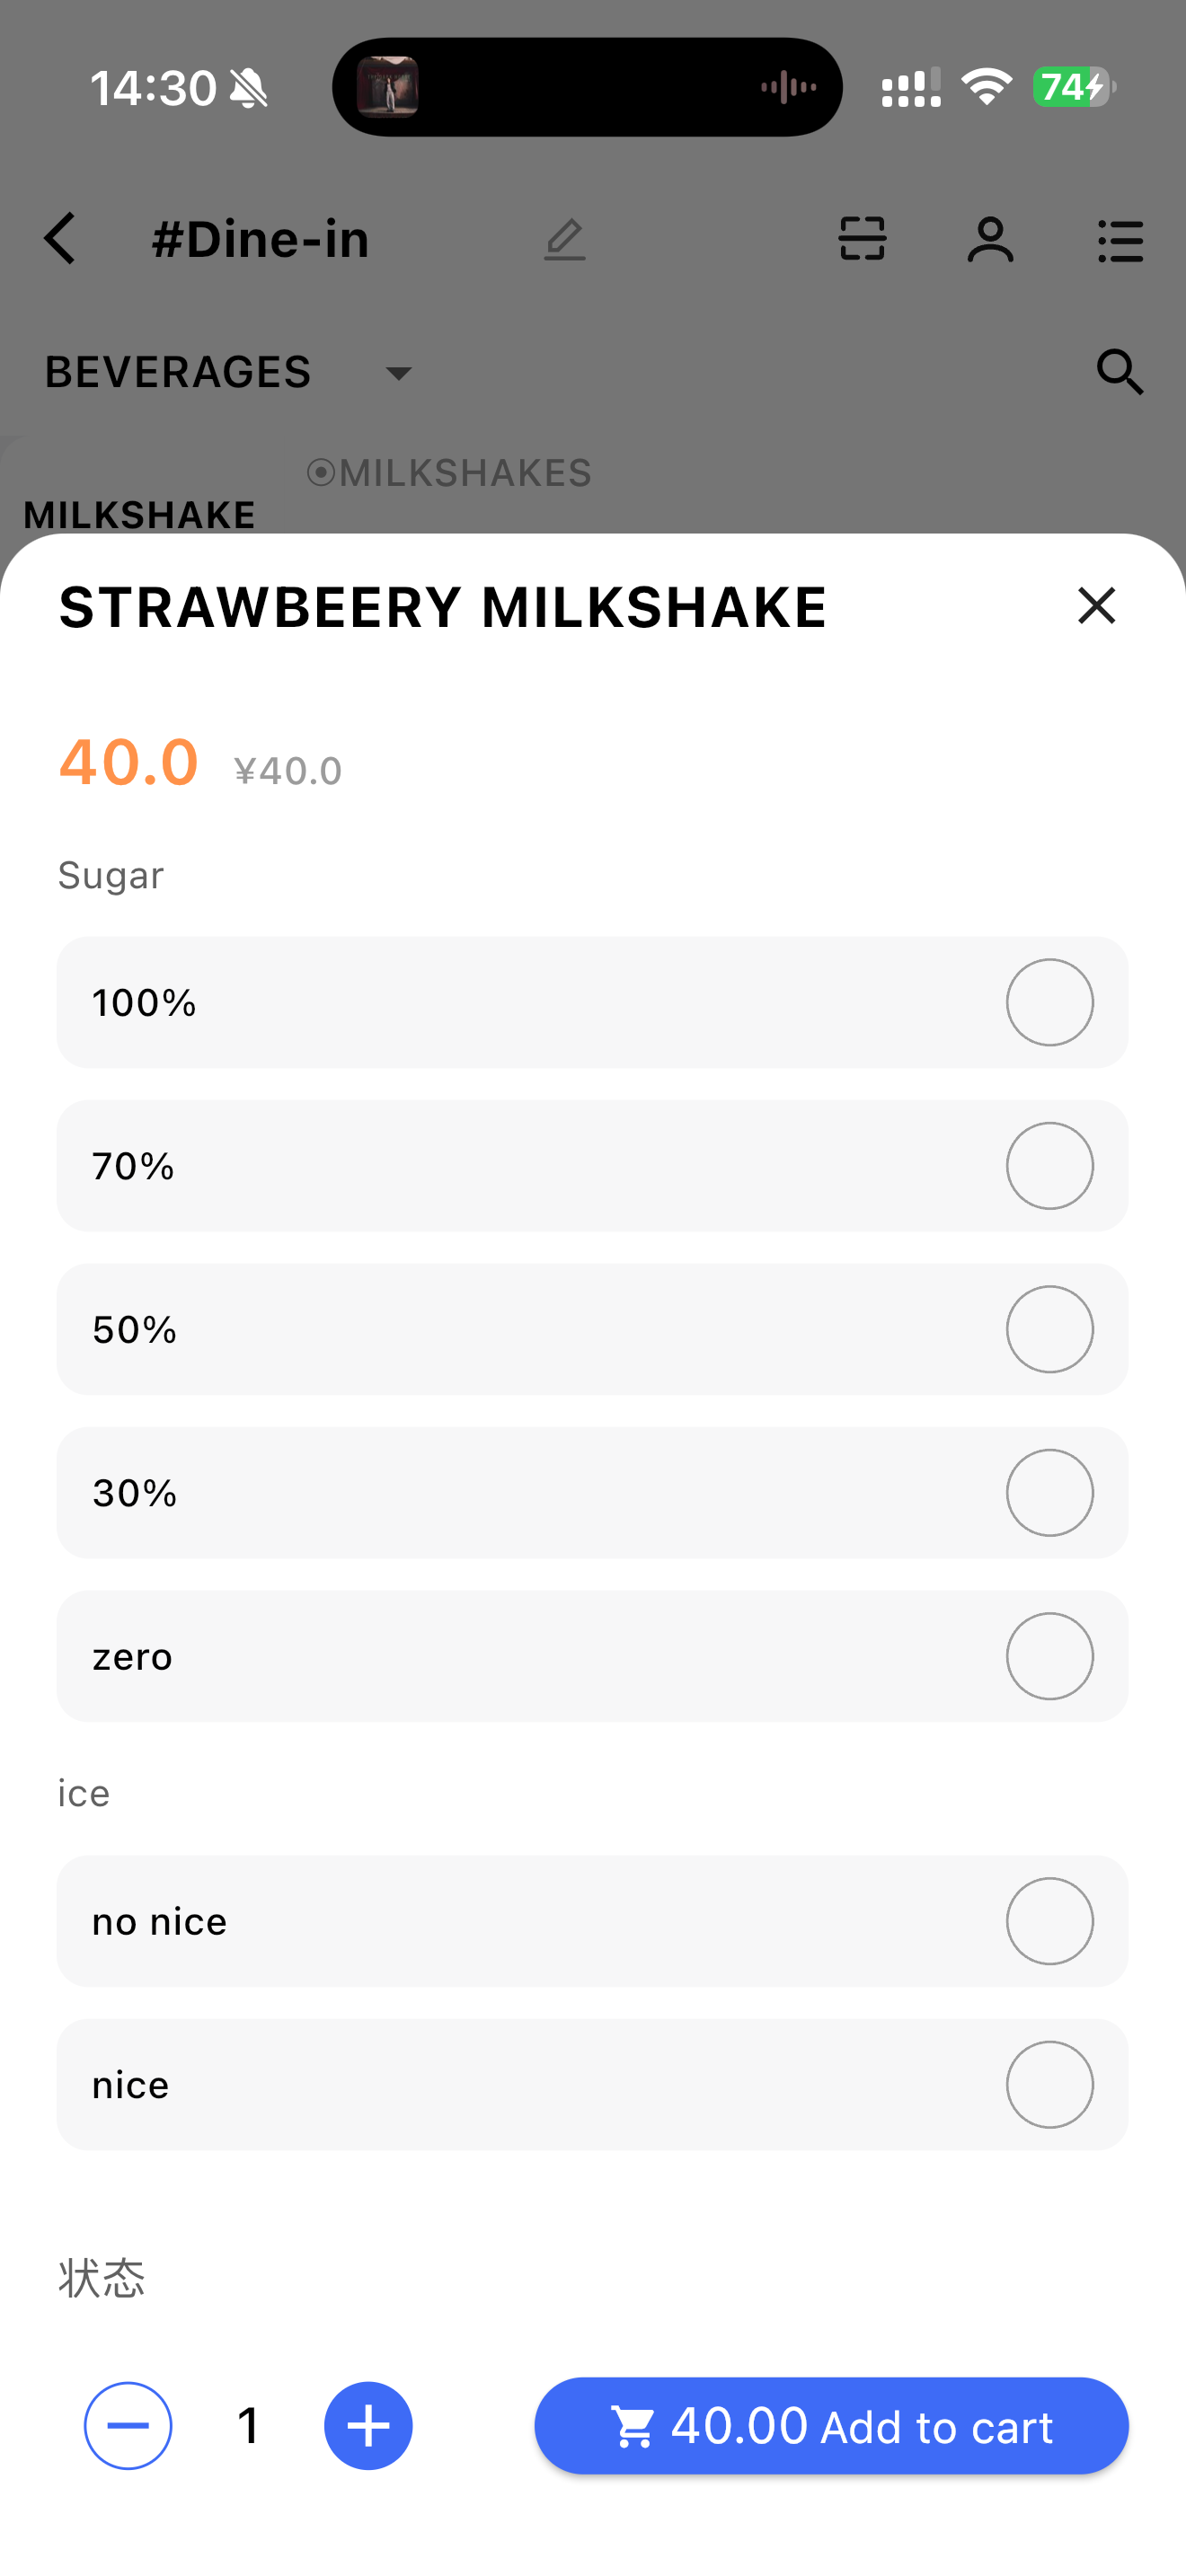
- View and configure side dish information (displayed when available in settings).
- Filter and select item modifiers (if applicable).
3.2.1.6 Item Cart
-
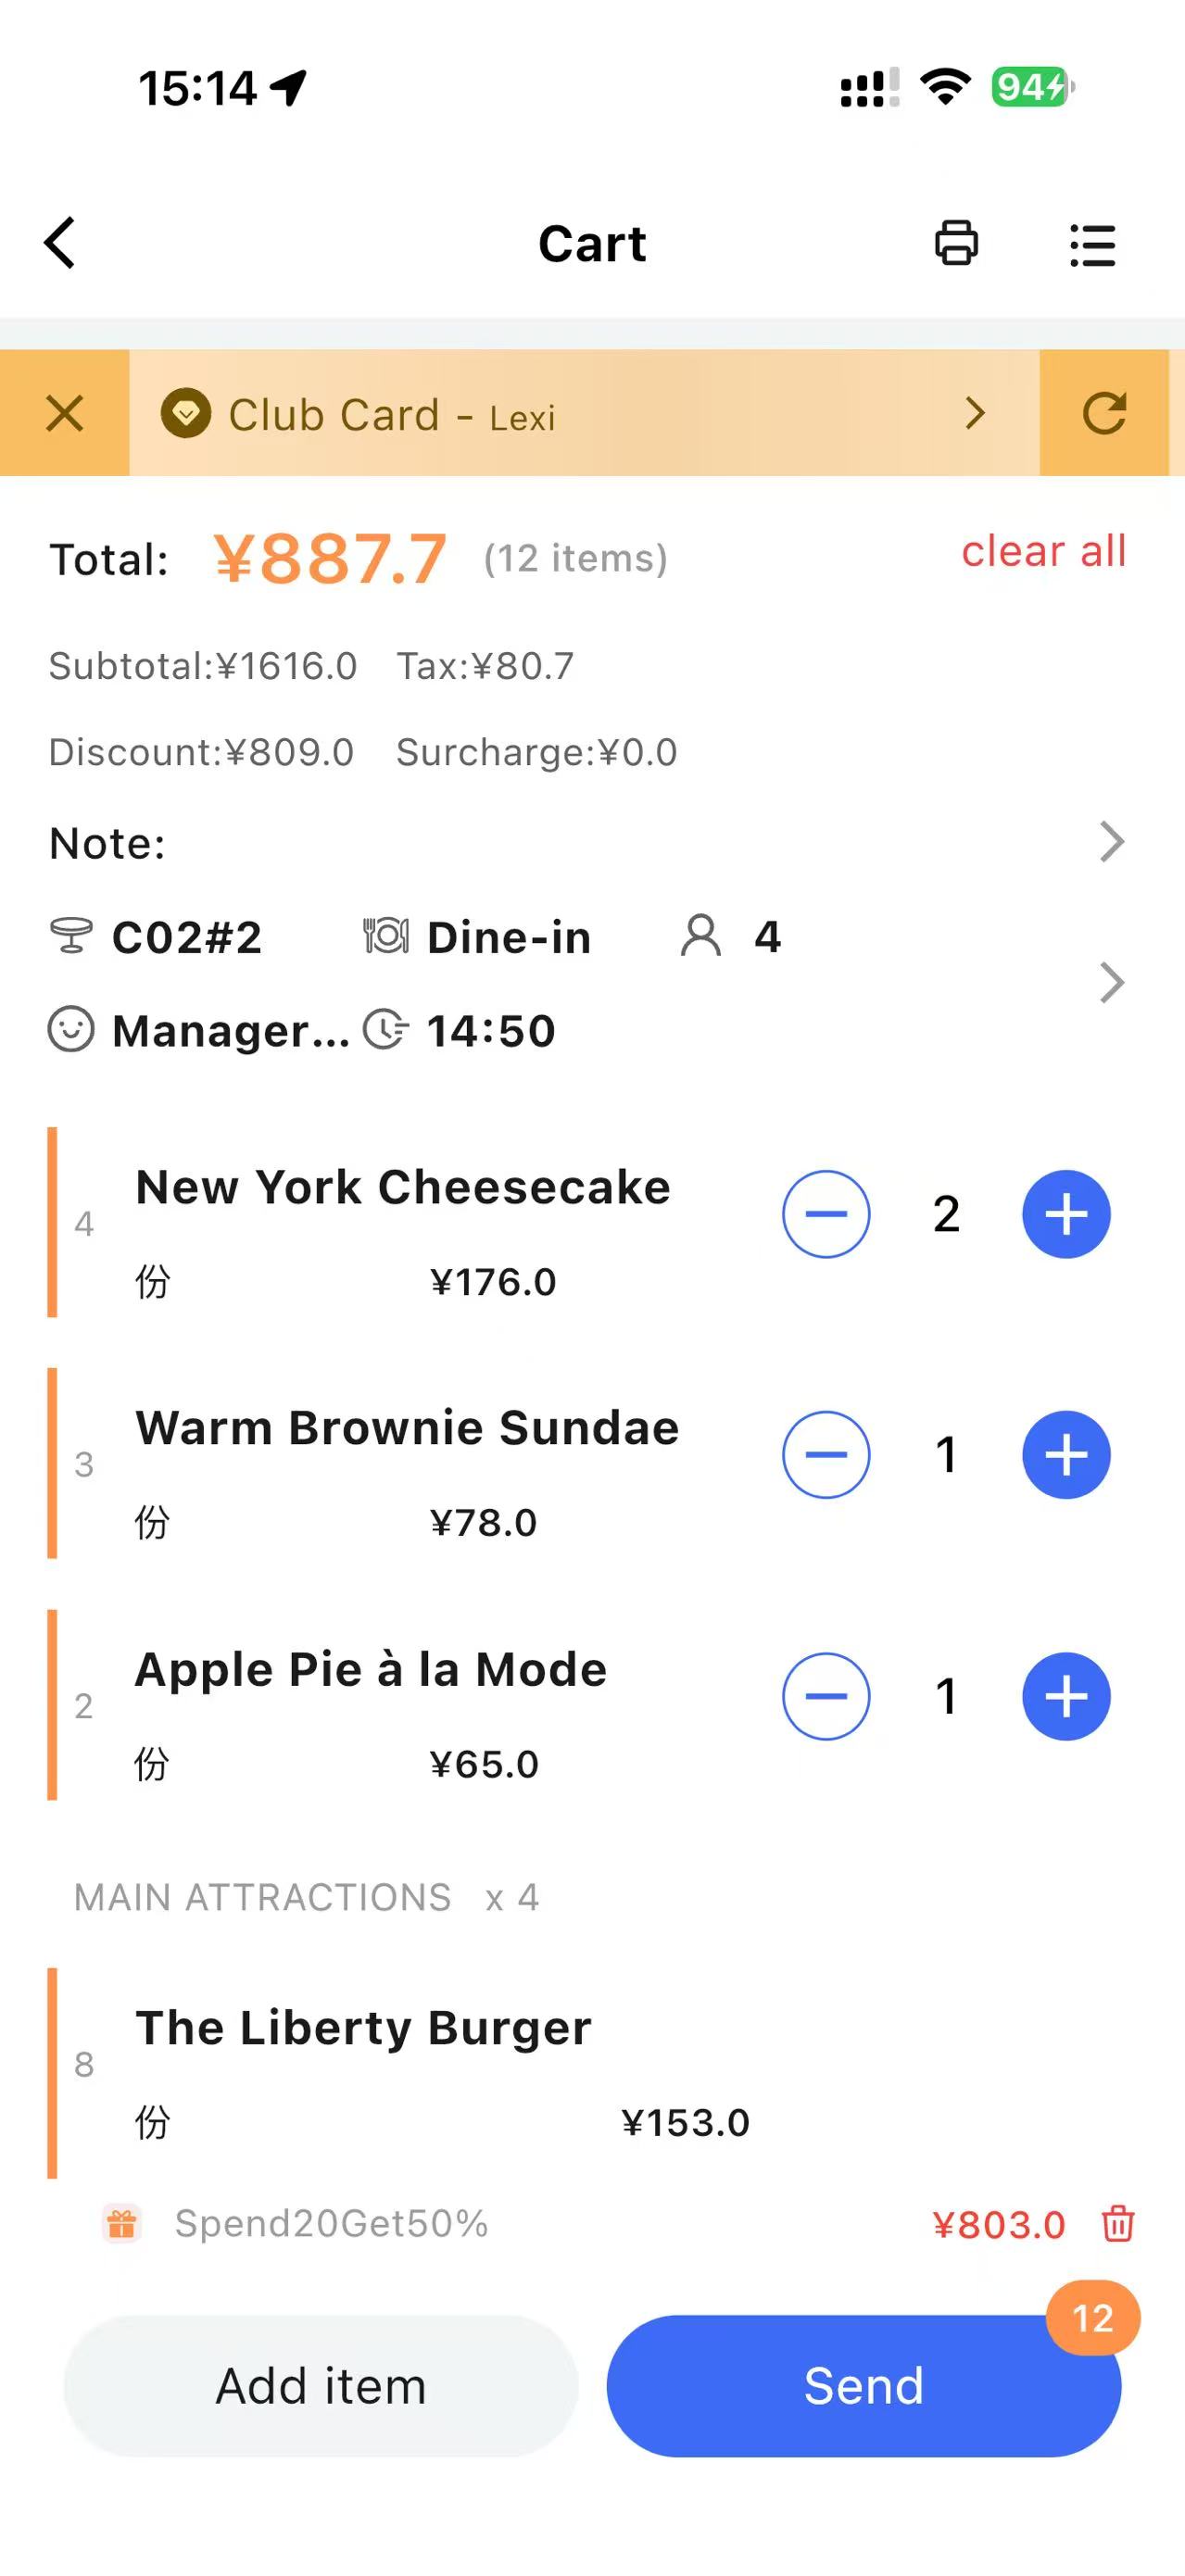
After adding items, click the cart to view detailed information
-
Click the【User Icon】on the cart page to add a member
-
The top of the cart displays amount information and table details:
- Total amount is the sum of item prices, followed by the number of items
- Click【Clear】to remove all items from the cart
- Taxes, discounts, and surcharges are displayed if applicable
- Notes
- Table information, dining type, number of guests, table opener, and order time
-
Item information in the cart:
- You can adjust the quantity of each item using the plus/minus icons
- The item modifiers and side dishes (if any) are displayed below the dish name.
3.2.1.7 Add item/Send Order

- Click【Add Item】on the cart page to navigate back to the ordering page and continue ordering.
- Click【Send】to successfully place the order and remain on the current cart page:
- Plus/minus icons for items are hidden.
- The【Send】button changes to the【Pay】button.
3.2.1.8 Modify Items
Click an ordered item on the cart page to modify it.
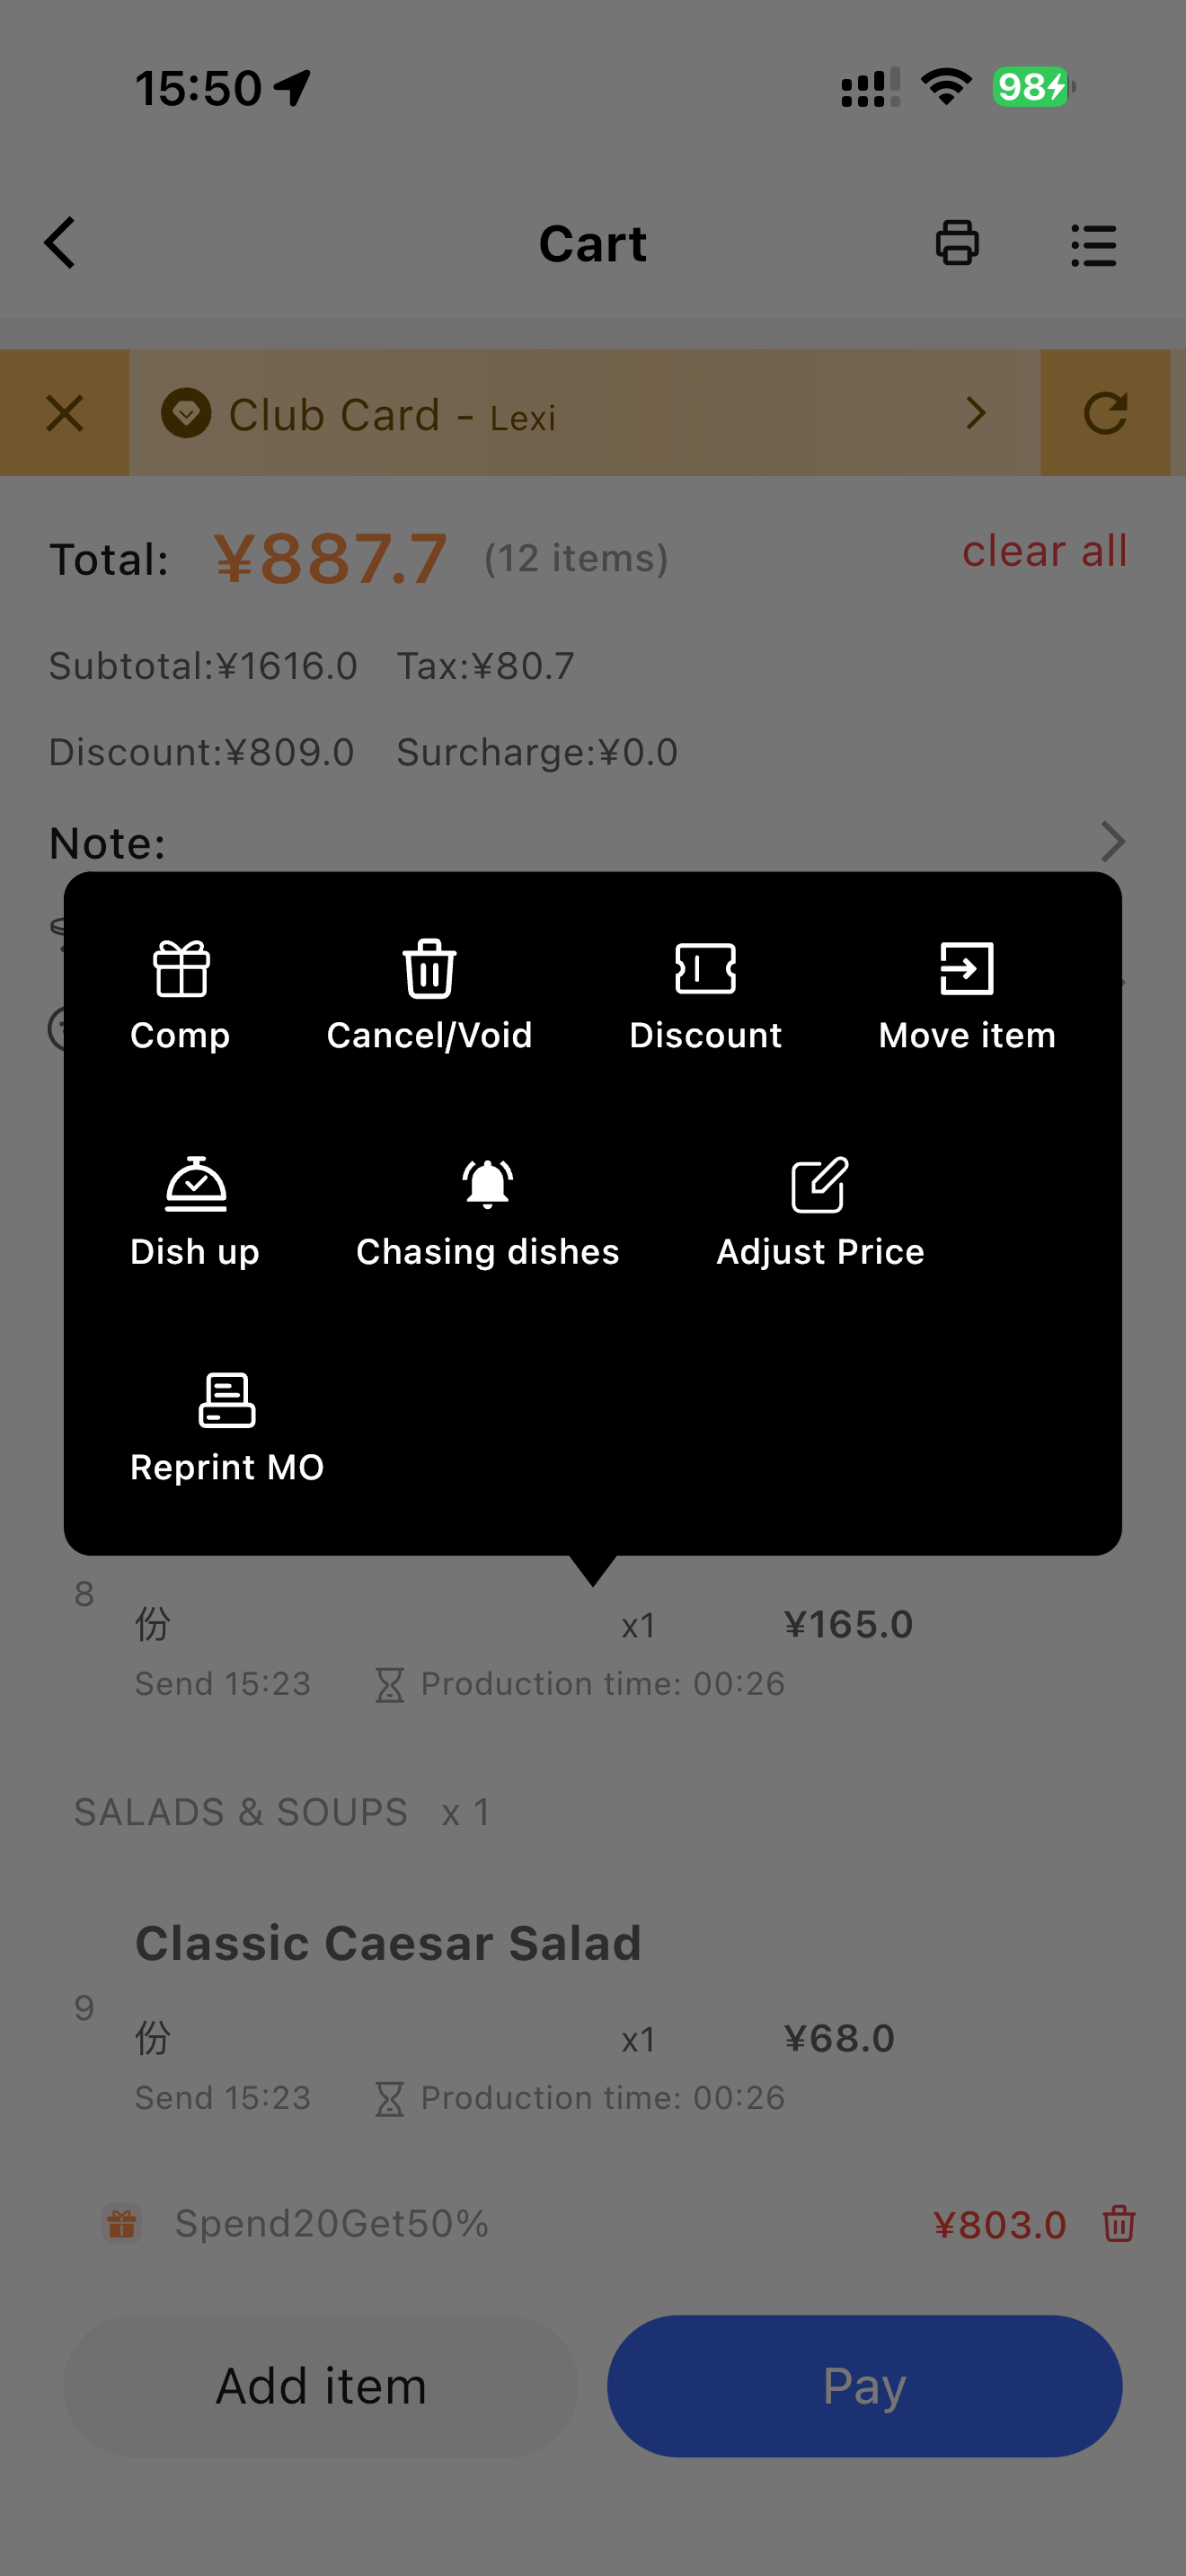
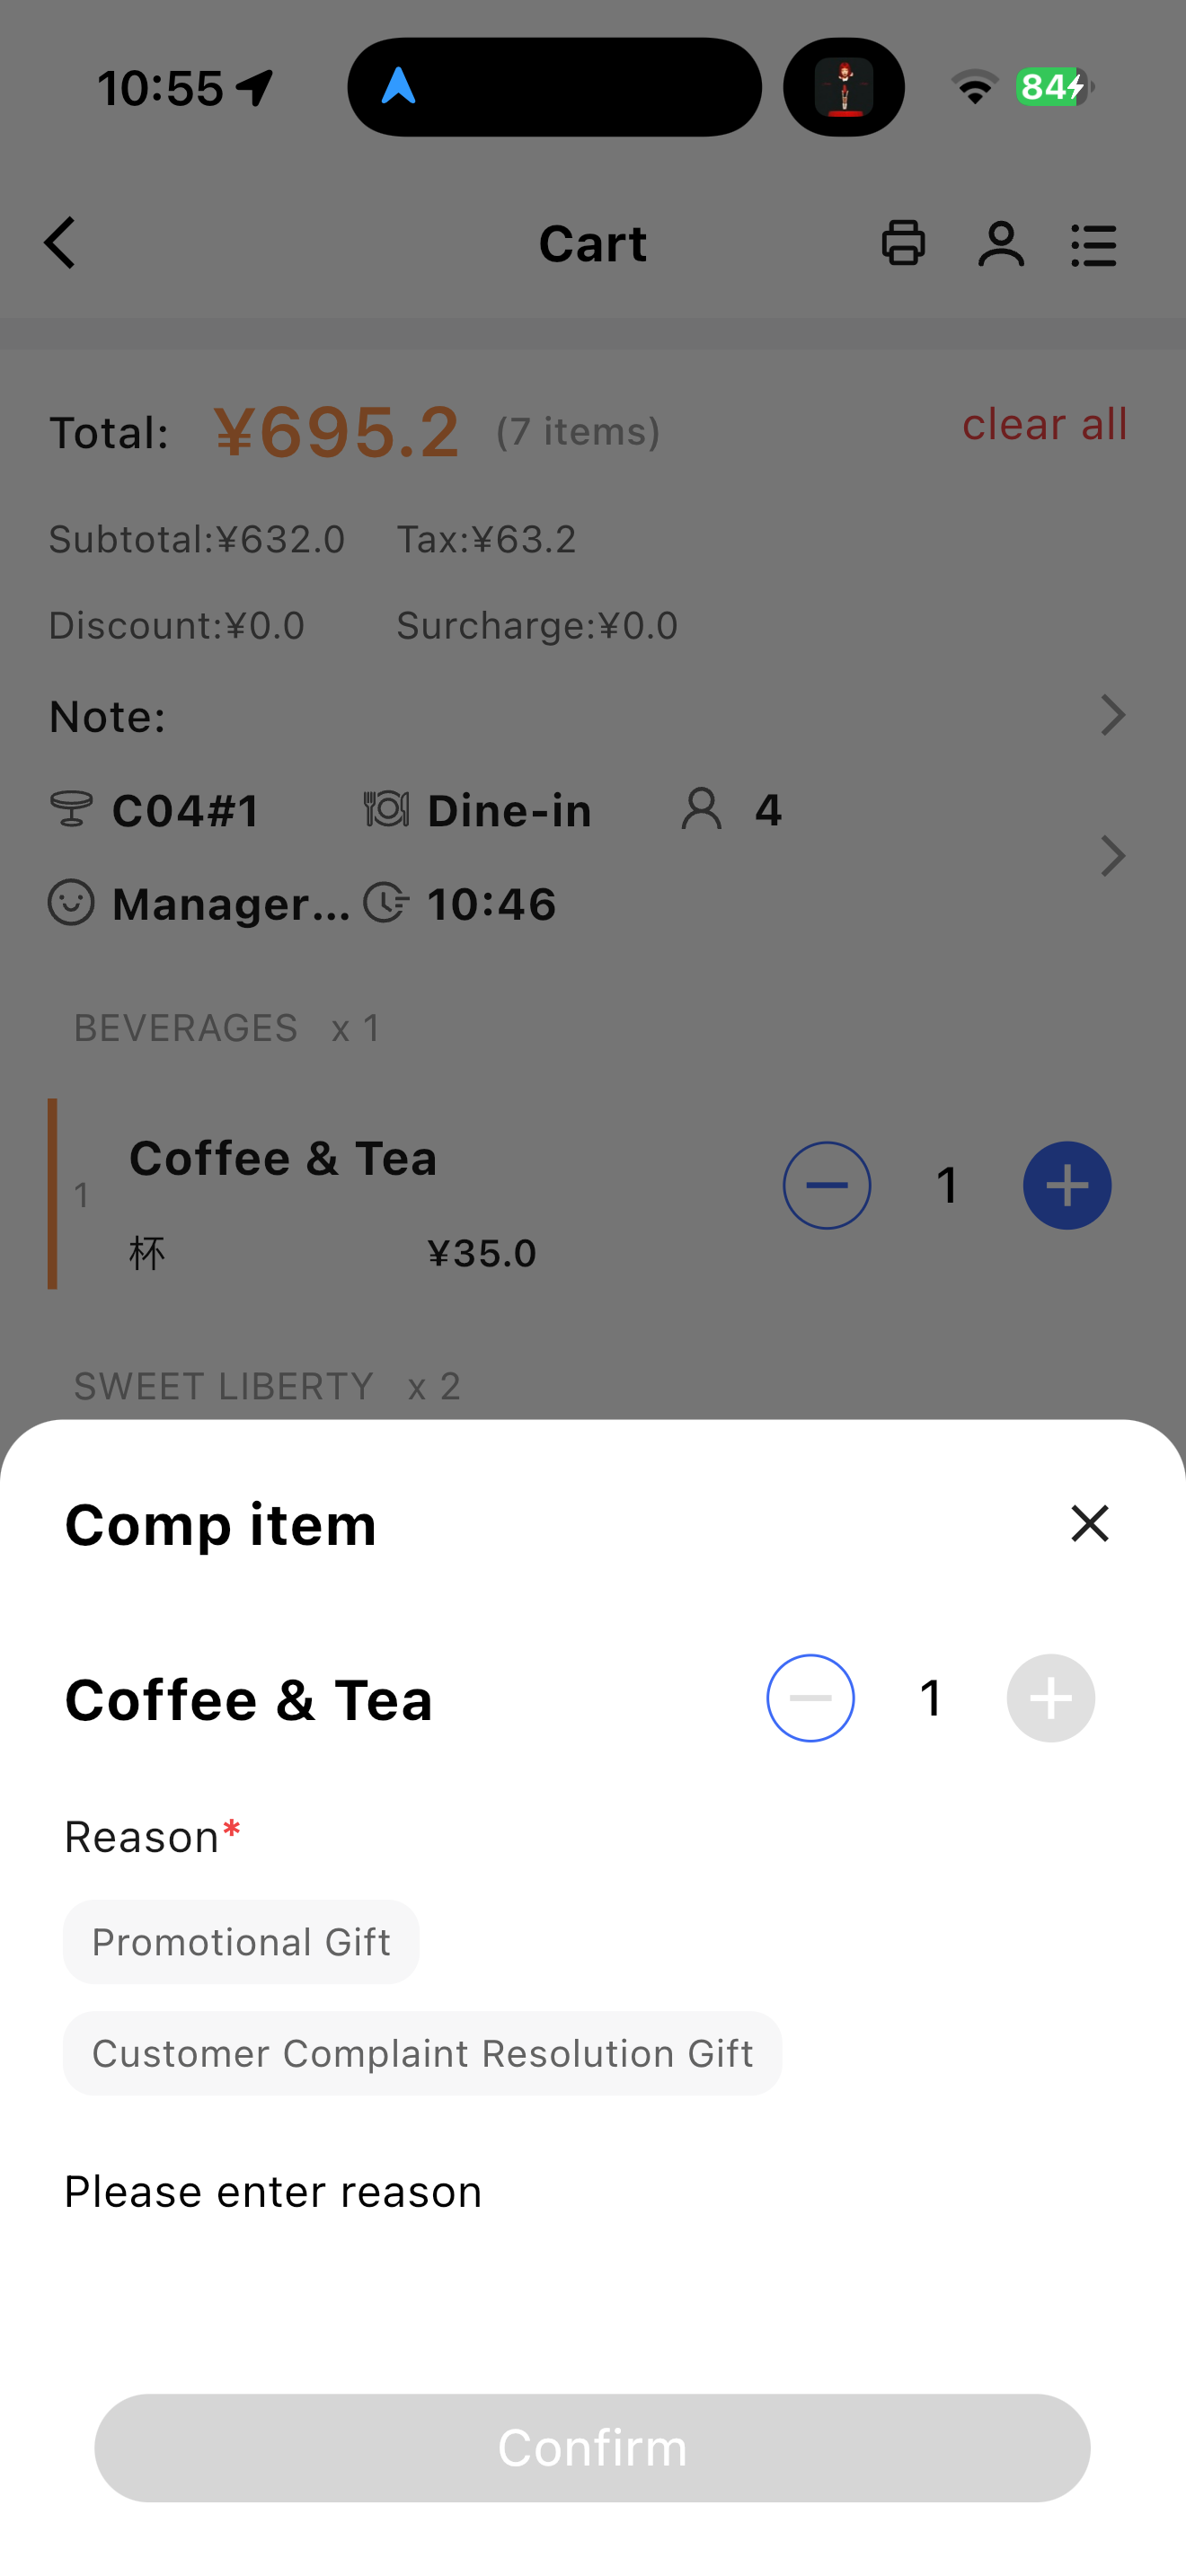
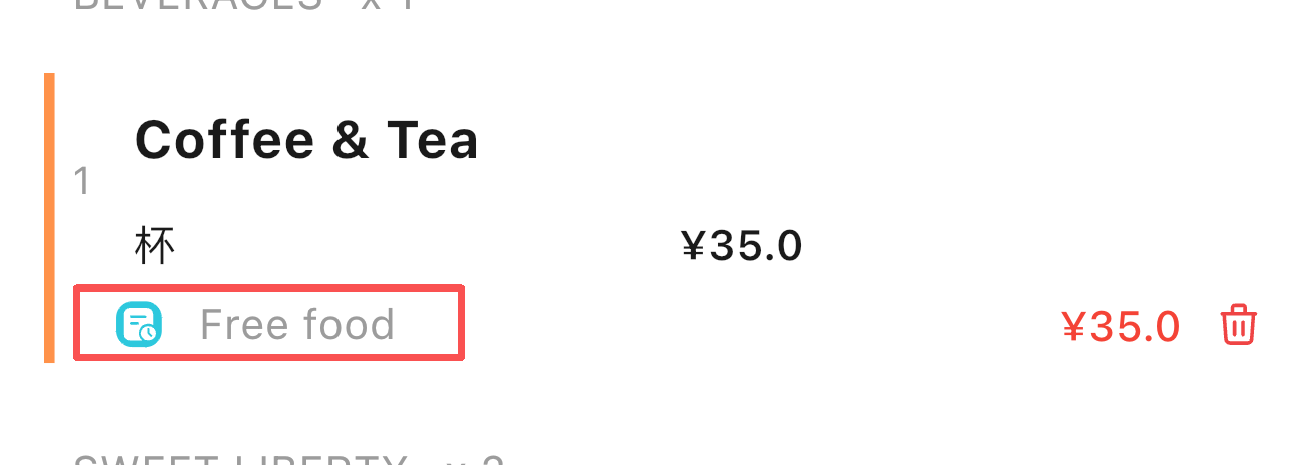
3.2.1.8.1 Complimentary Item
- Enter the reason for the complimentary dish and confirm. The dish price is deducted from the total, and a【Free】label is displayed for the dish in the cart.
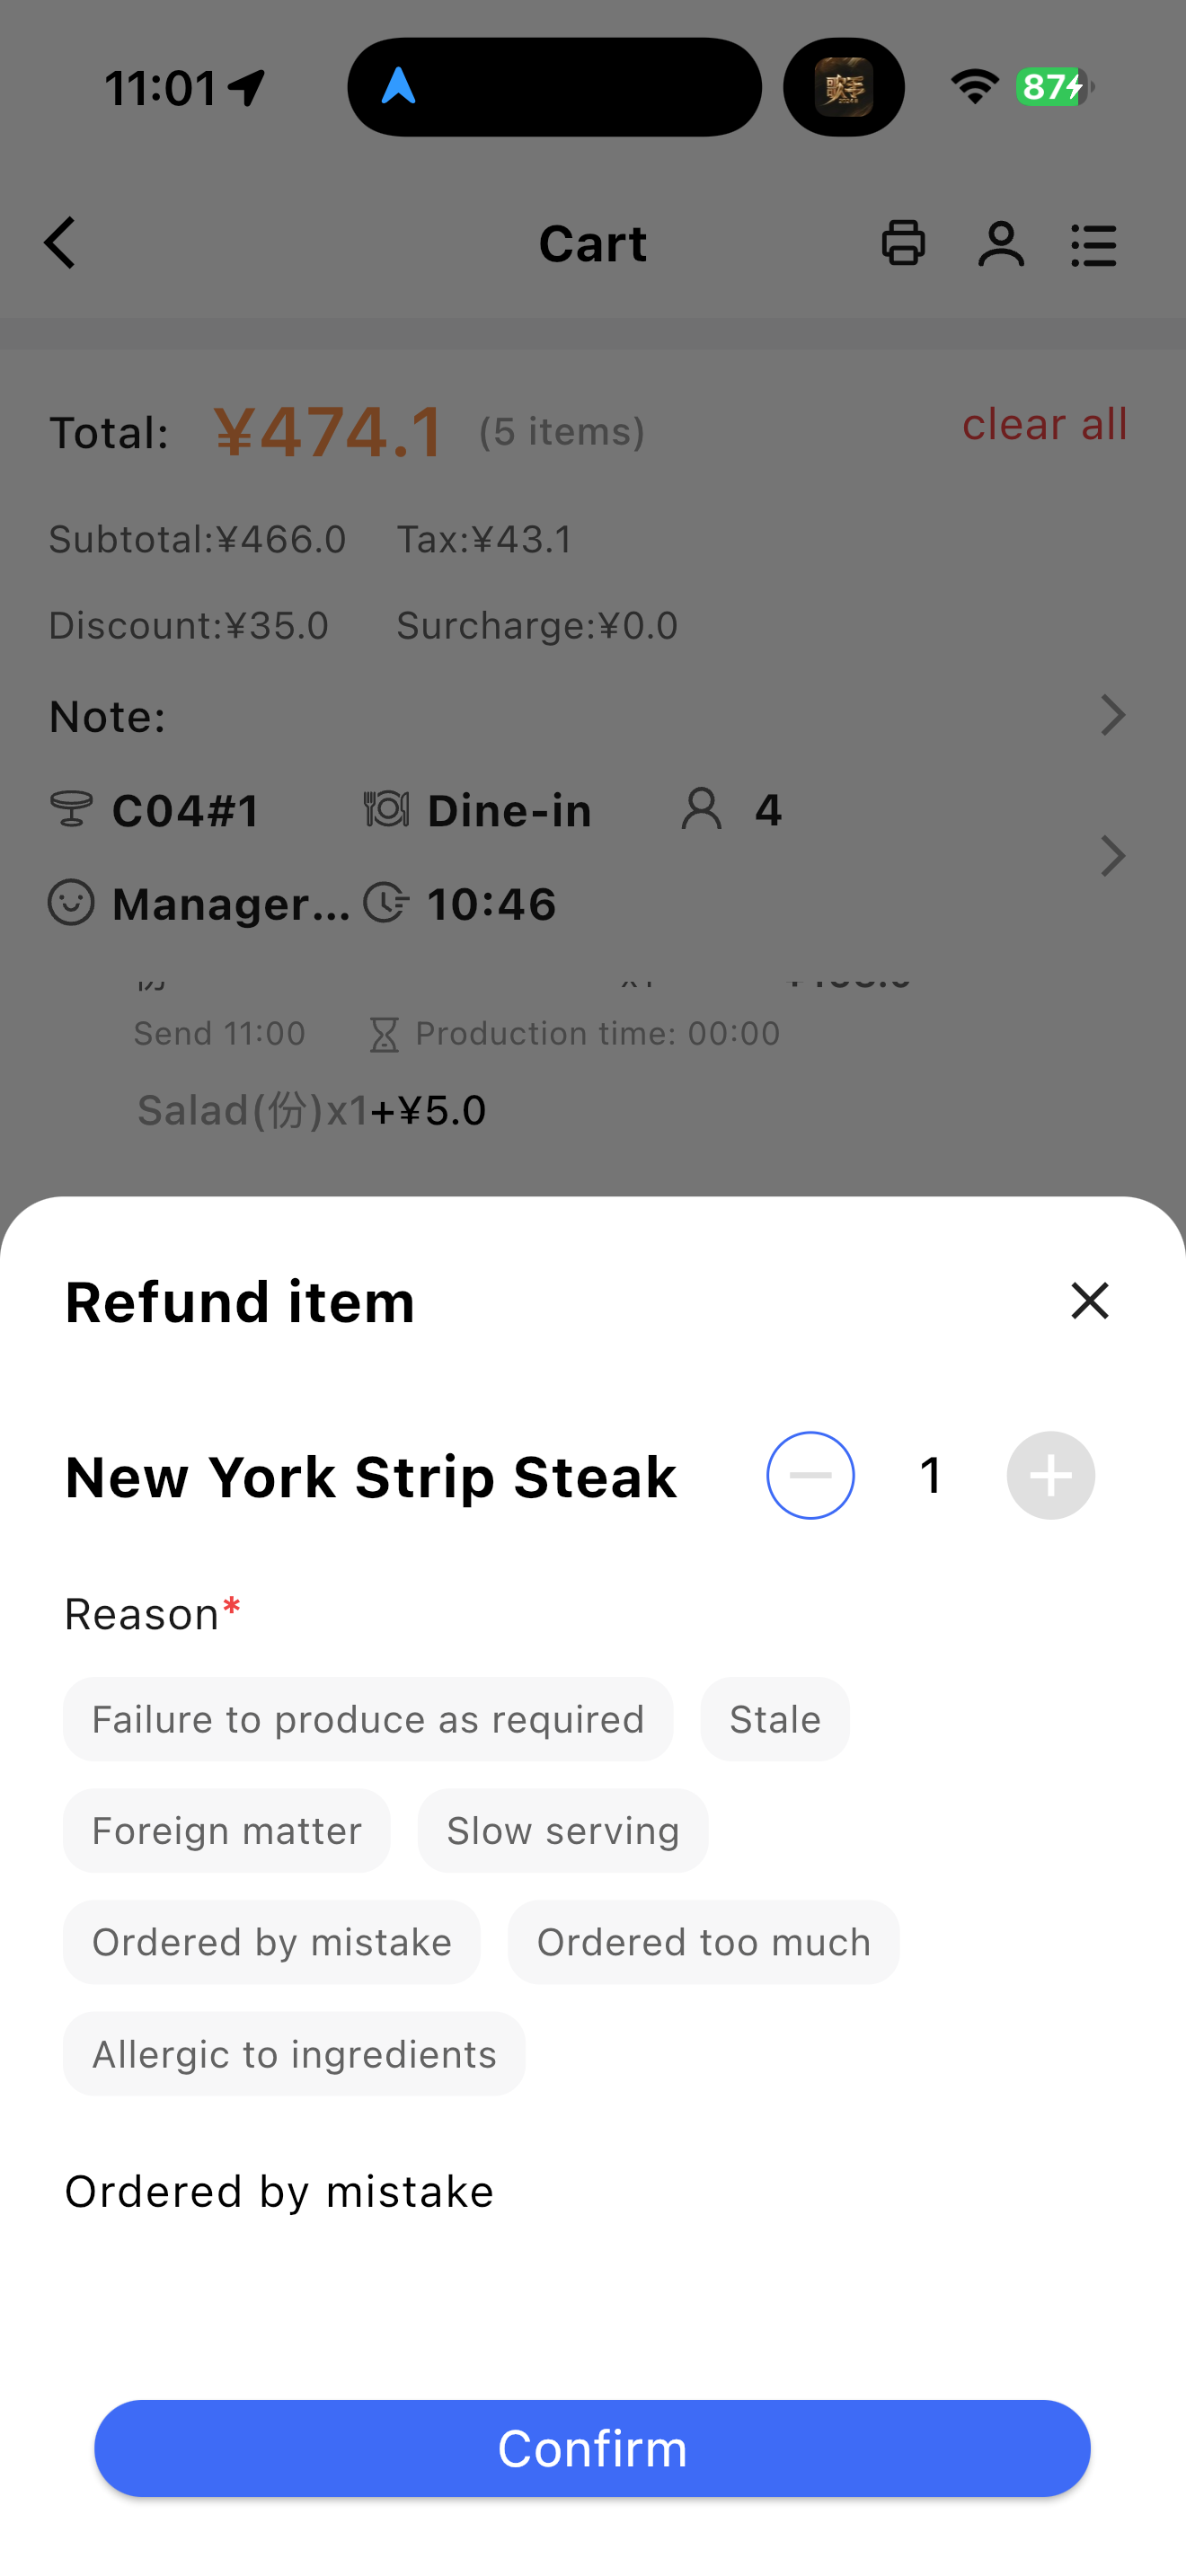
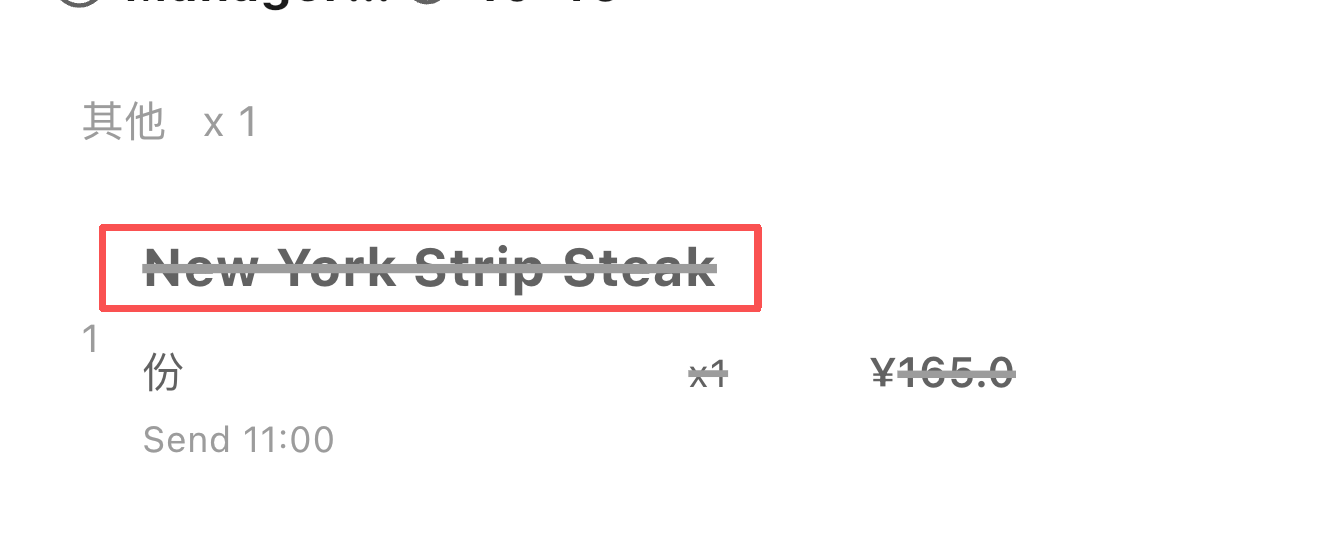
3.2.1.8.2 Cancel / Void Item
- Enter the reason for cancelling/returning the dish and confirm. The dish price is deducted from the total, and the dish is crossed out in the cart.
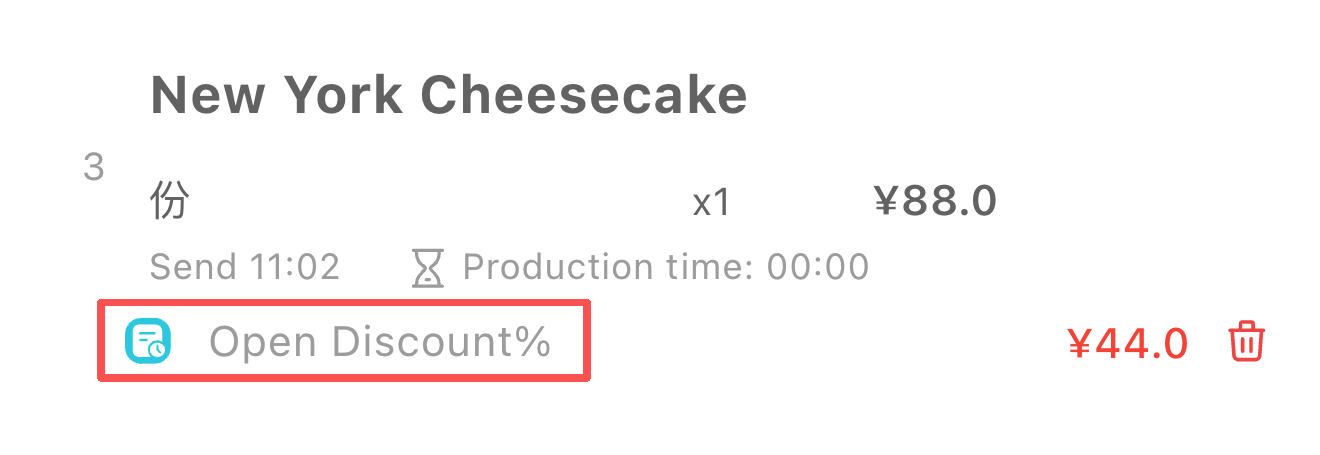
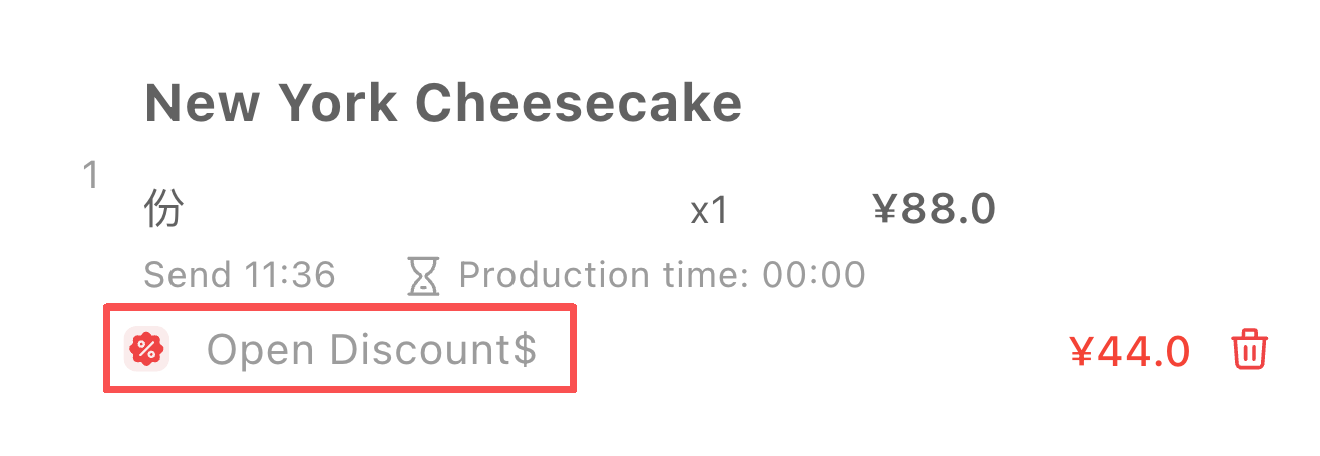
3.2.1.8.3 Discount
- Discounts are configured in the store discount plan on the BO end.
- Apply discounts to dishes by percentage or fixed amount.
- Percentage
- Fixed amount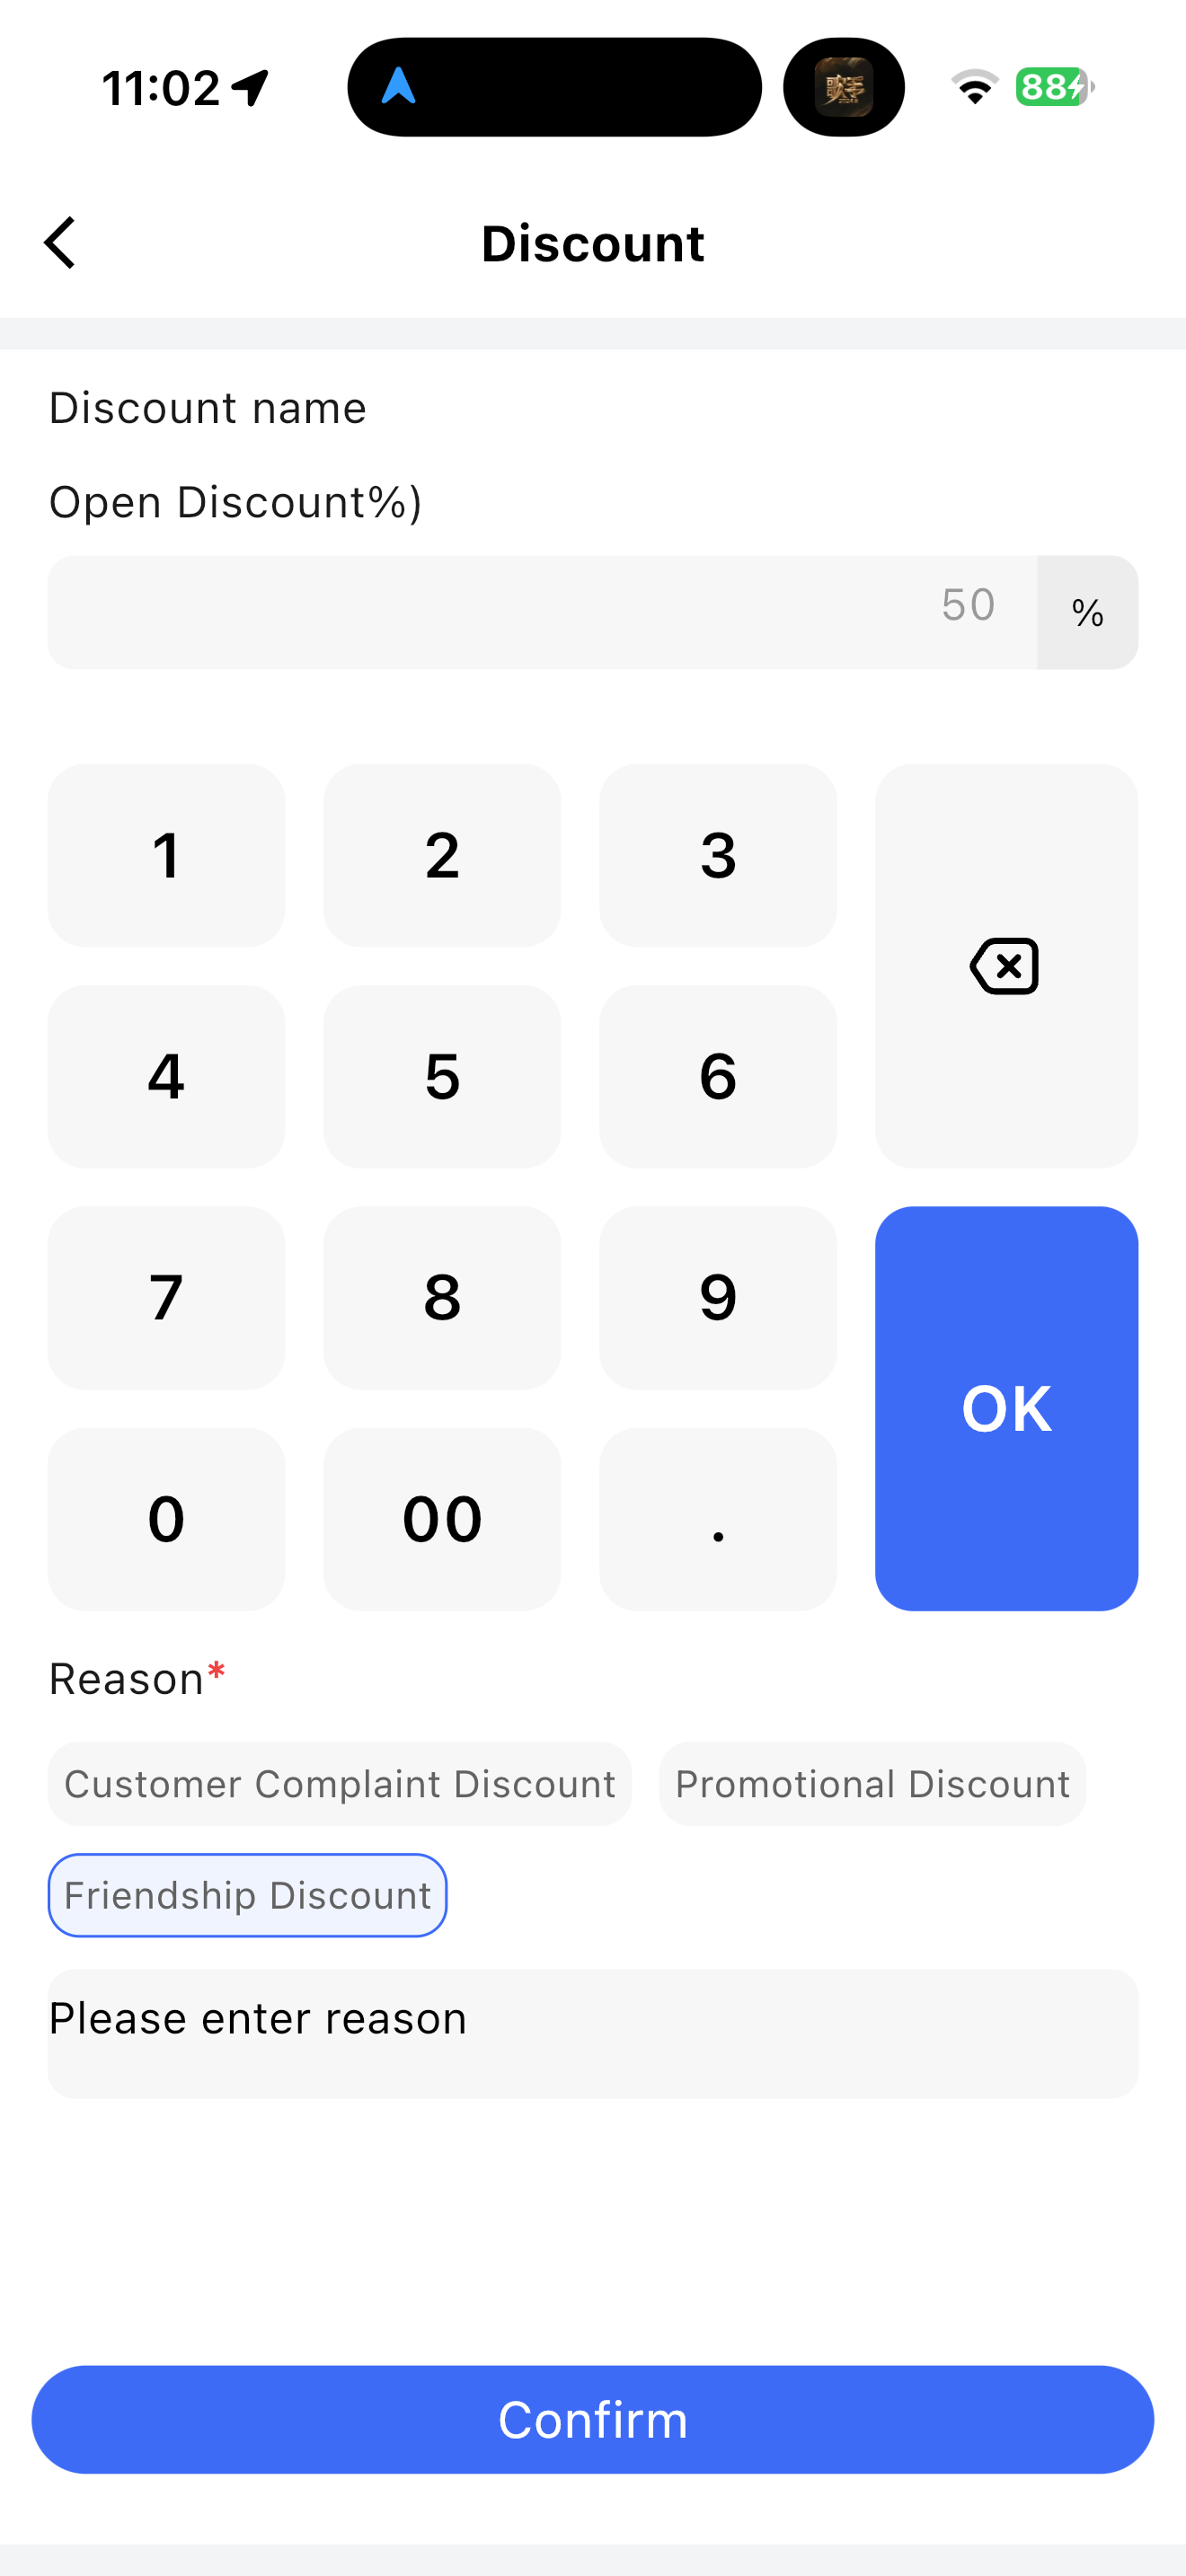

3.2.1.8.4 Move Item
What is Move Item?
Move the item from the current table to another table.
3.2.1.8.5 Serve Item
- Click【Serve】to display a【Served icon】next to the dish

3.2.1.8.6 Rush Item
- Click【Rush】to display a【Rush icon】and rush time for the dish. Multiple rush requests are allowed, with updates to the number of requests and time
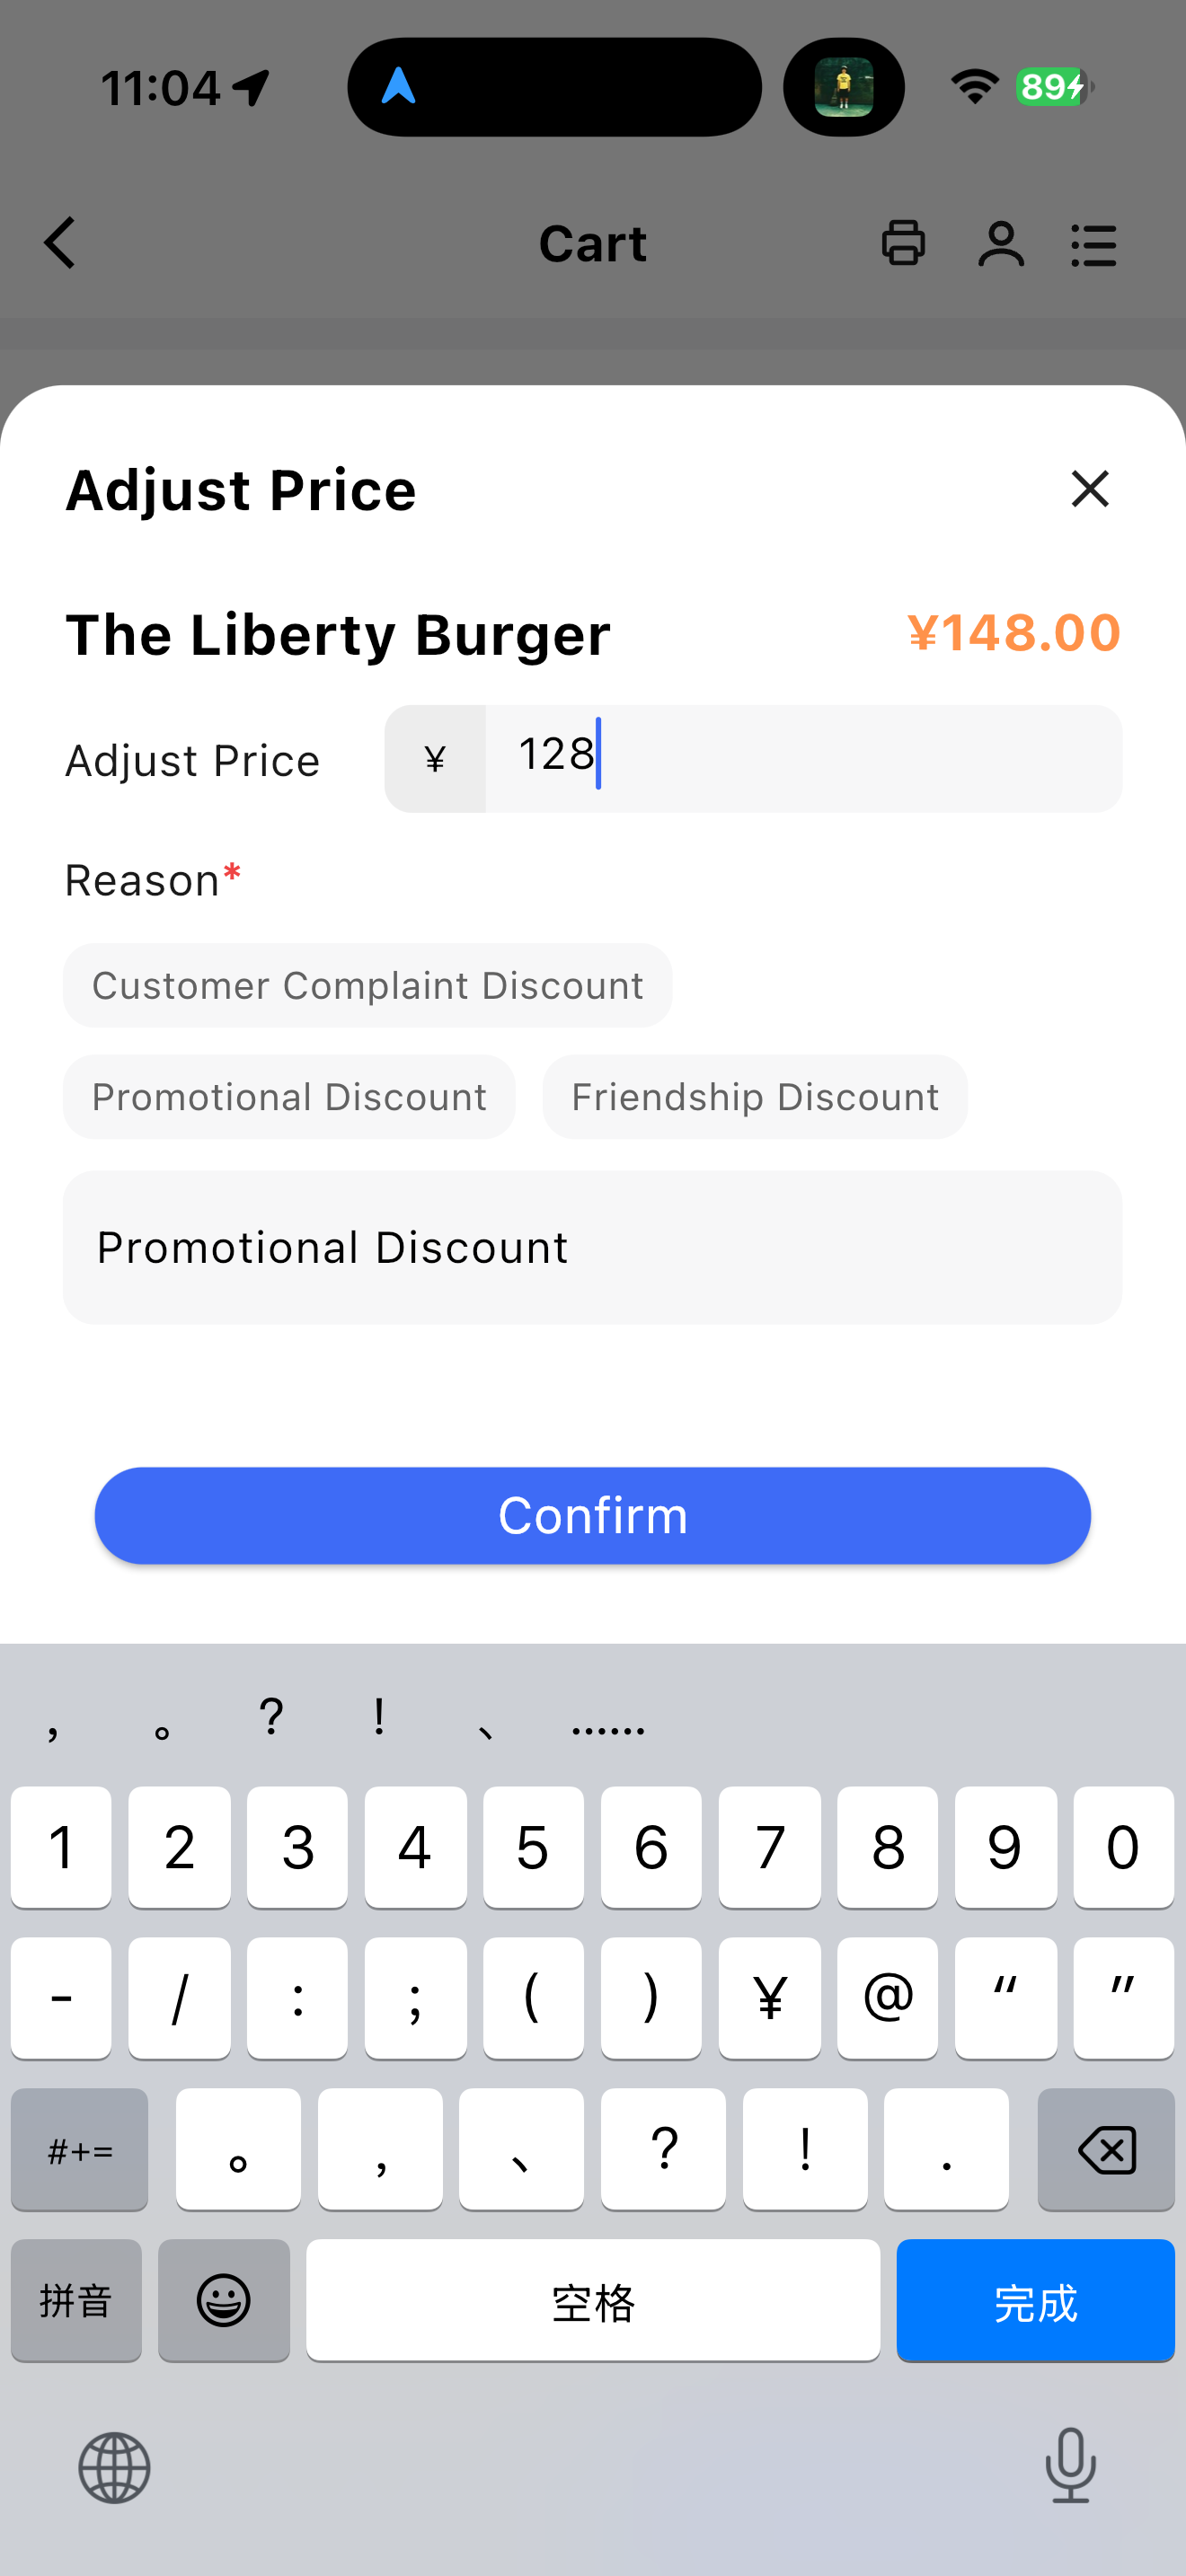
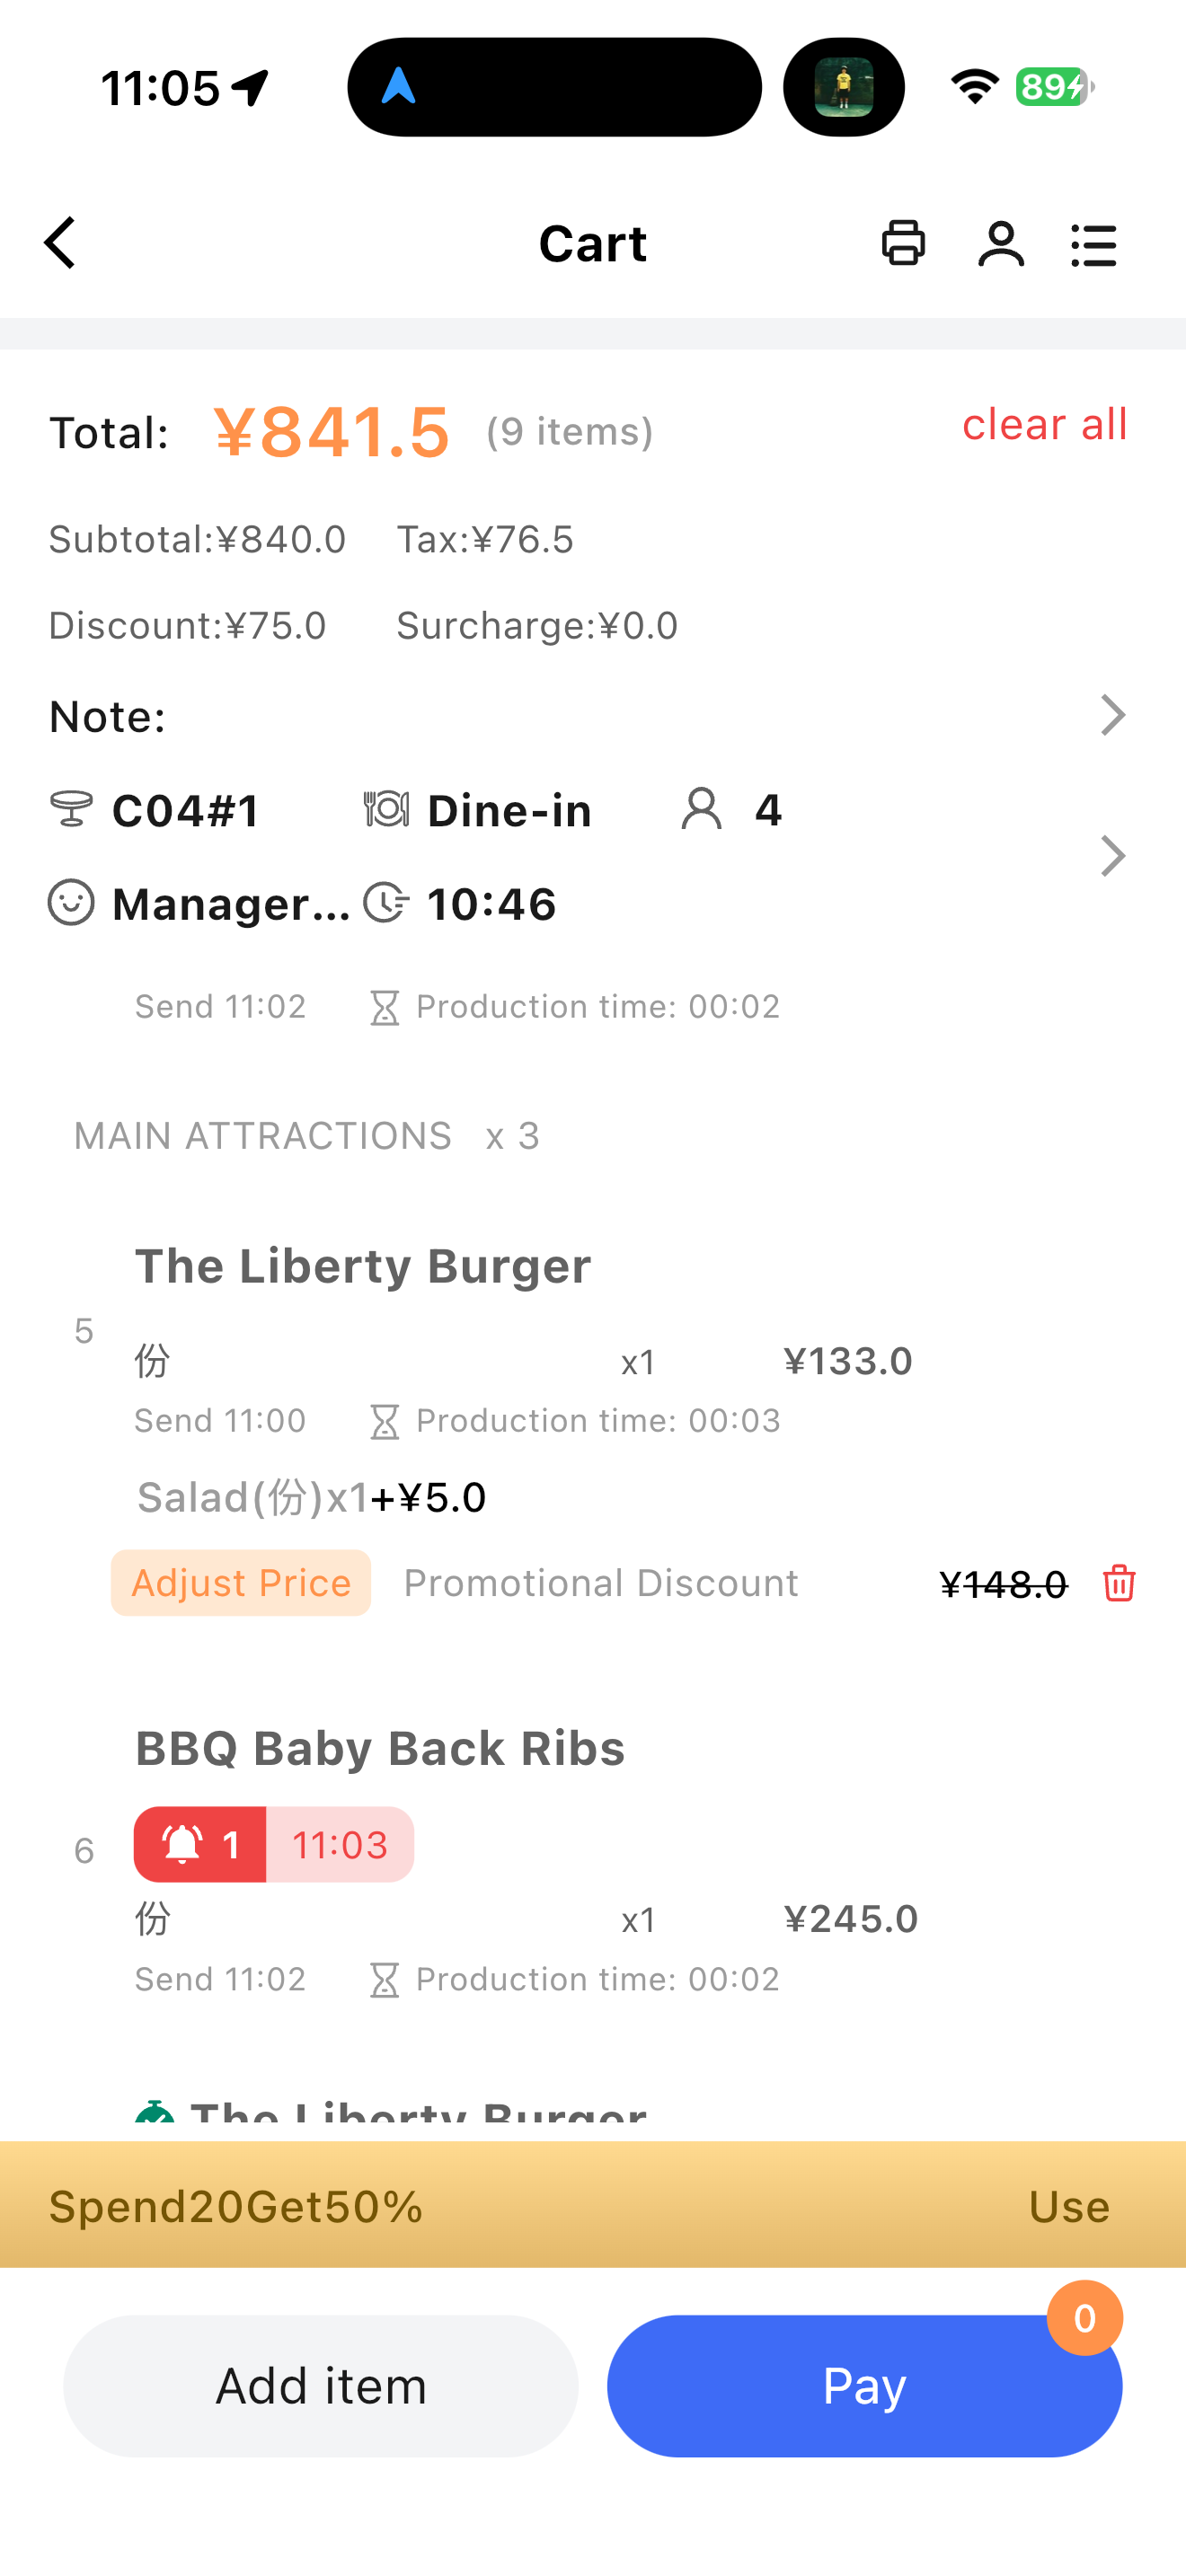
3.2.1.8.7 Adjust Price
- Merchants can adjust dish prices after order placement based on actual circumstances (e.g., promotions, discounts, typos). The system automatically updates the total order amount to ensure accurate billing at checkout.
- If no price adjustment permission is available, an authorization pop-up appears, requiring entry of an authorized Pin code.
3.2.1.8.8 Re-print KOH
- Re-print the kitchen ticket for the dish to the kitchen, ensuring the kitchen processes and prepares the dish promptly according to customer requirements.
3.2.1.9 Checkout Page
- The checkout page displays three sections: Order Details, Payment Details, and Payment Methods.
- A member icon and settings icon are displayed at the top of the checkout page.
3.2.1.9.1 Checkout Page Settings
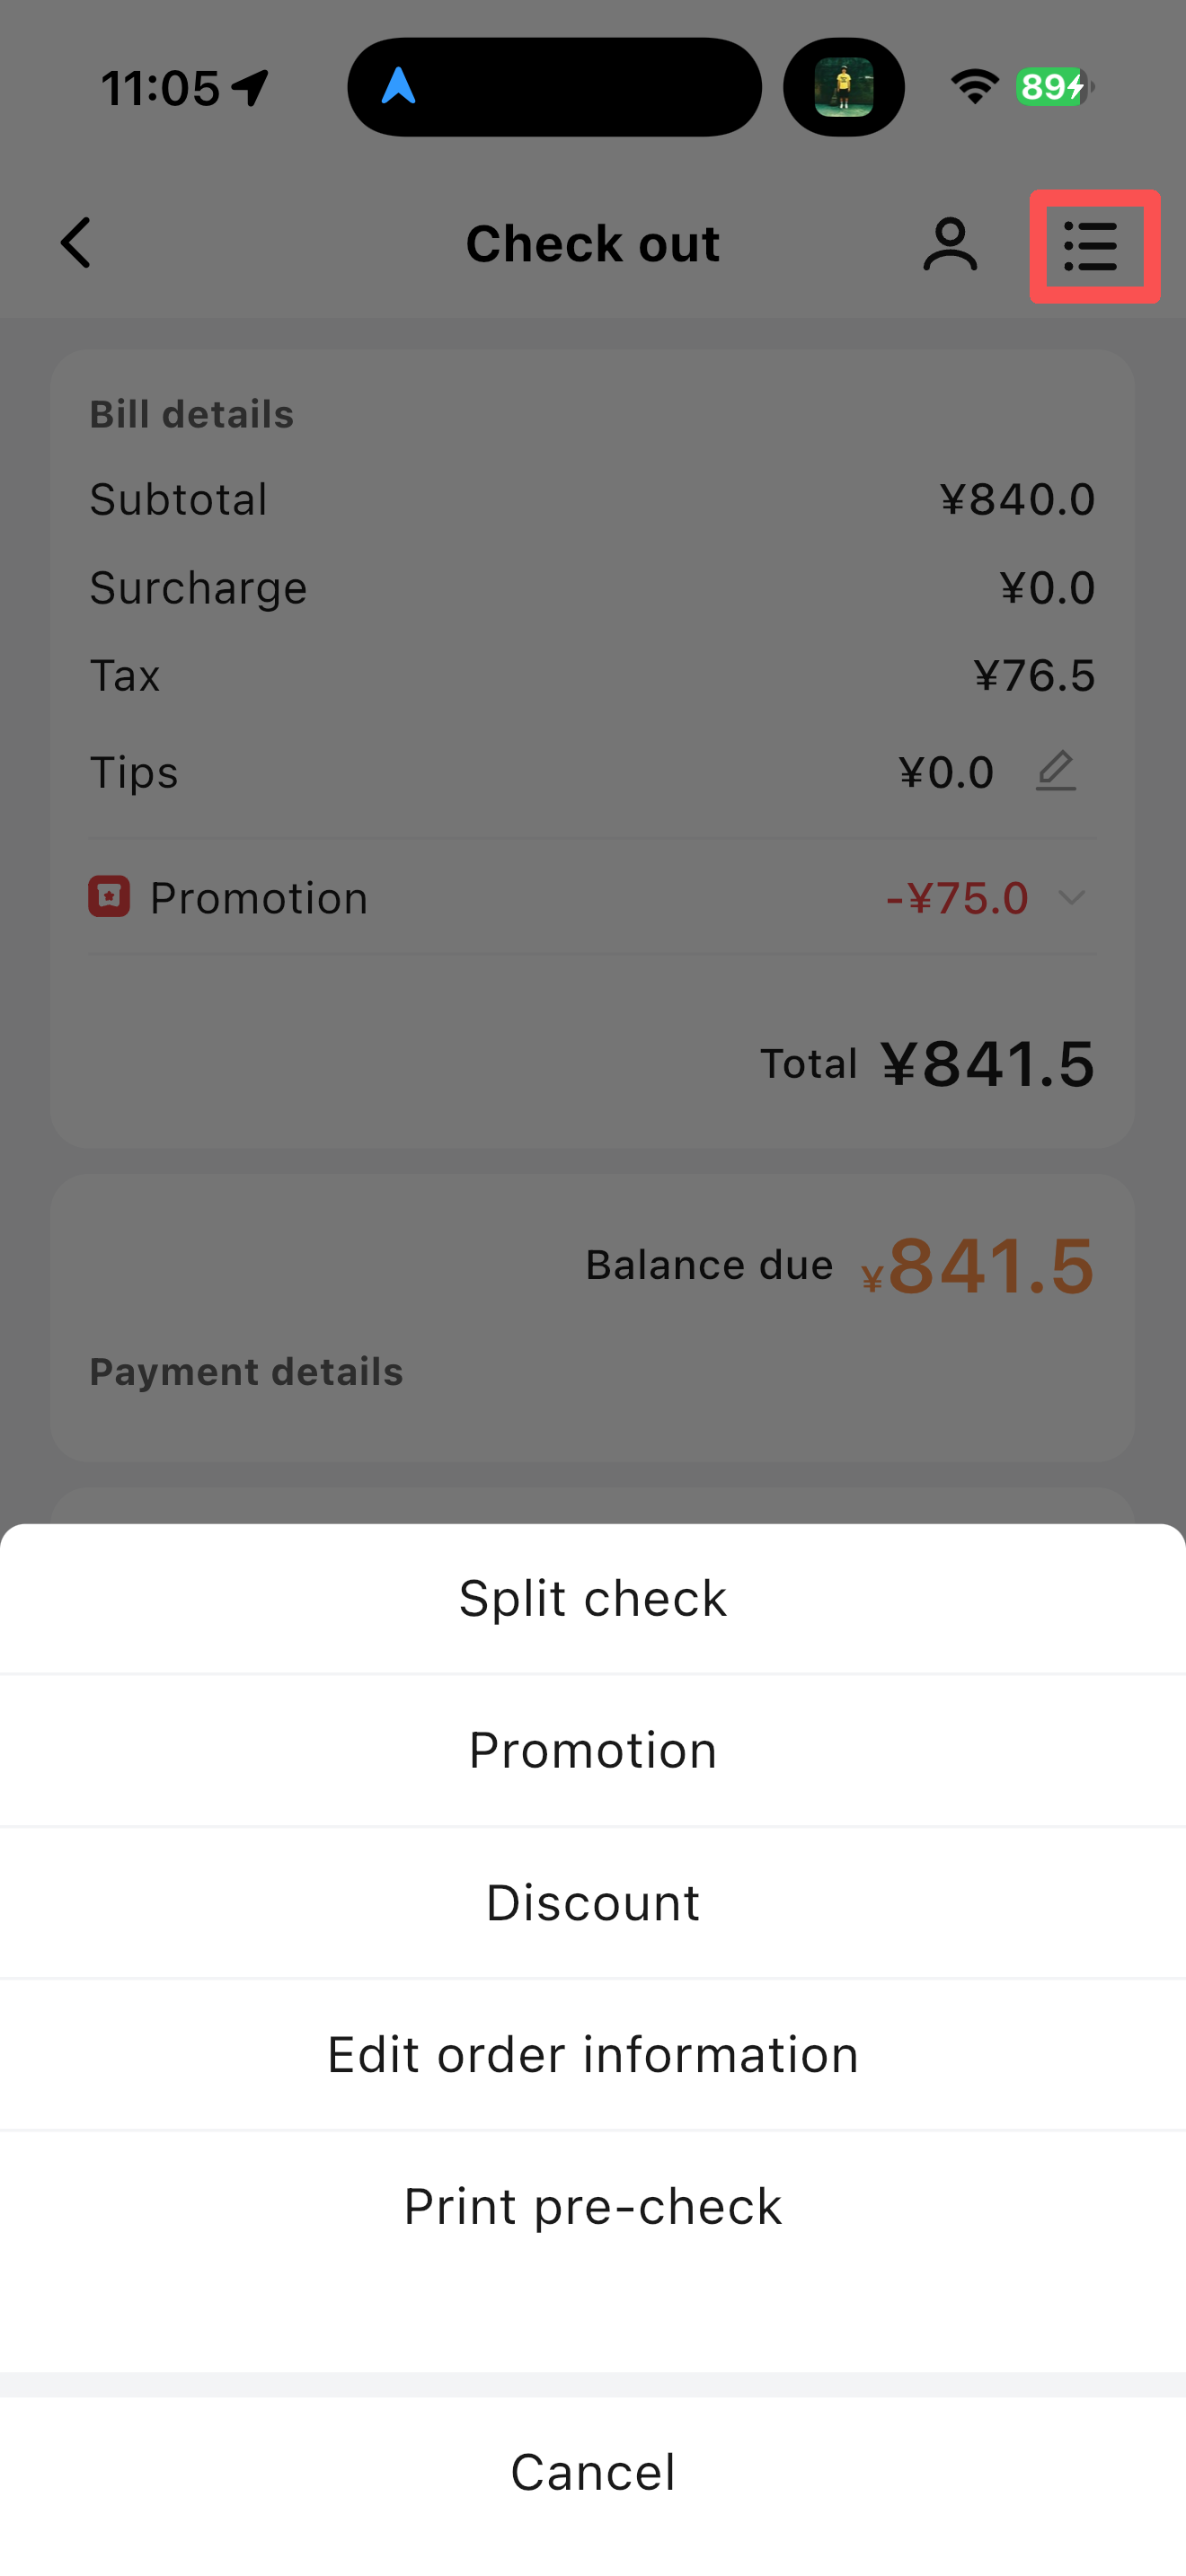
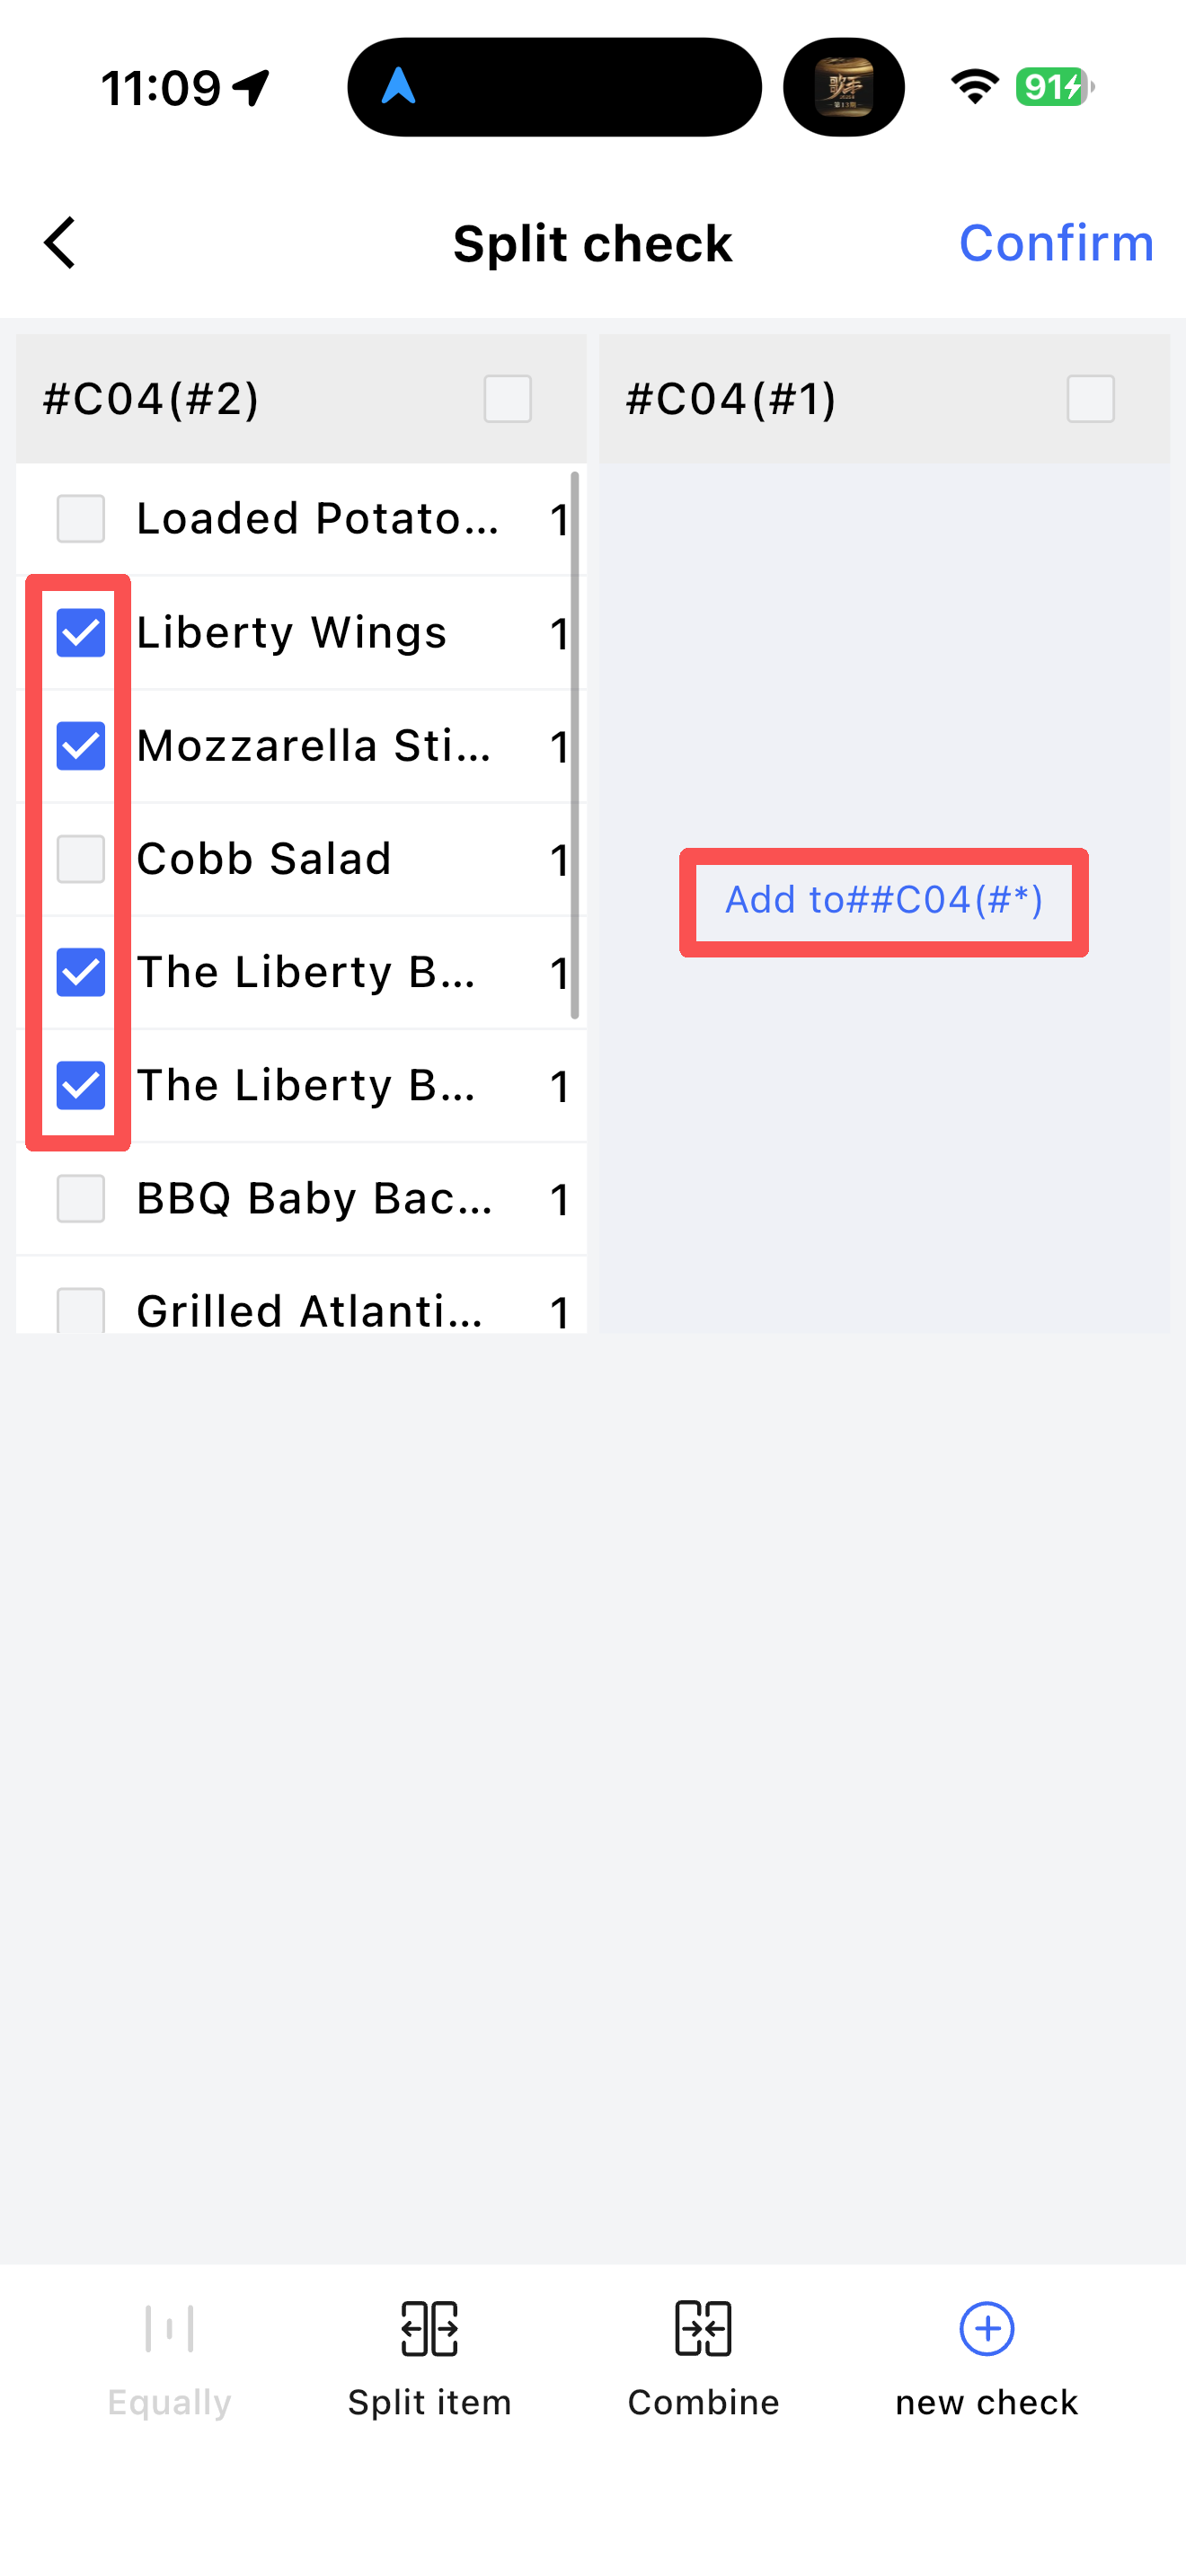
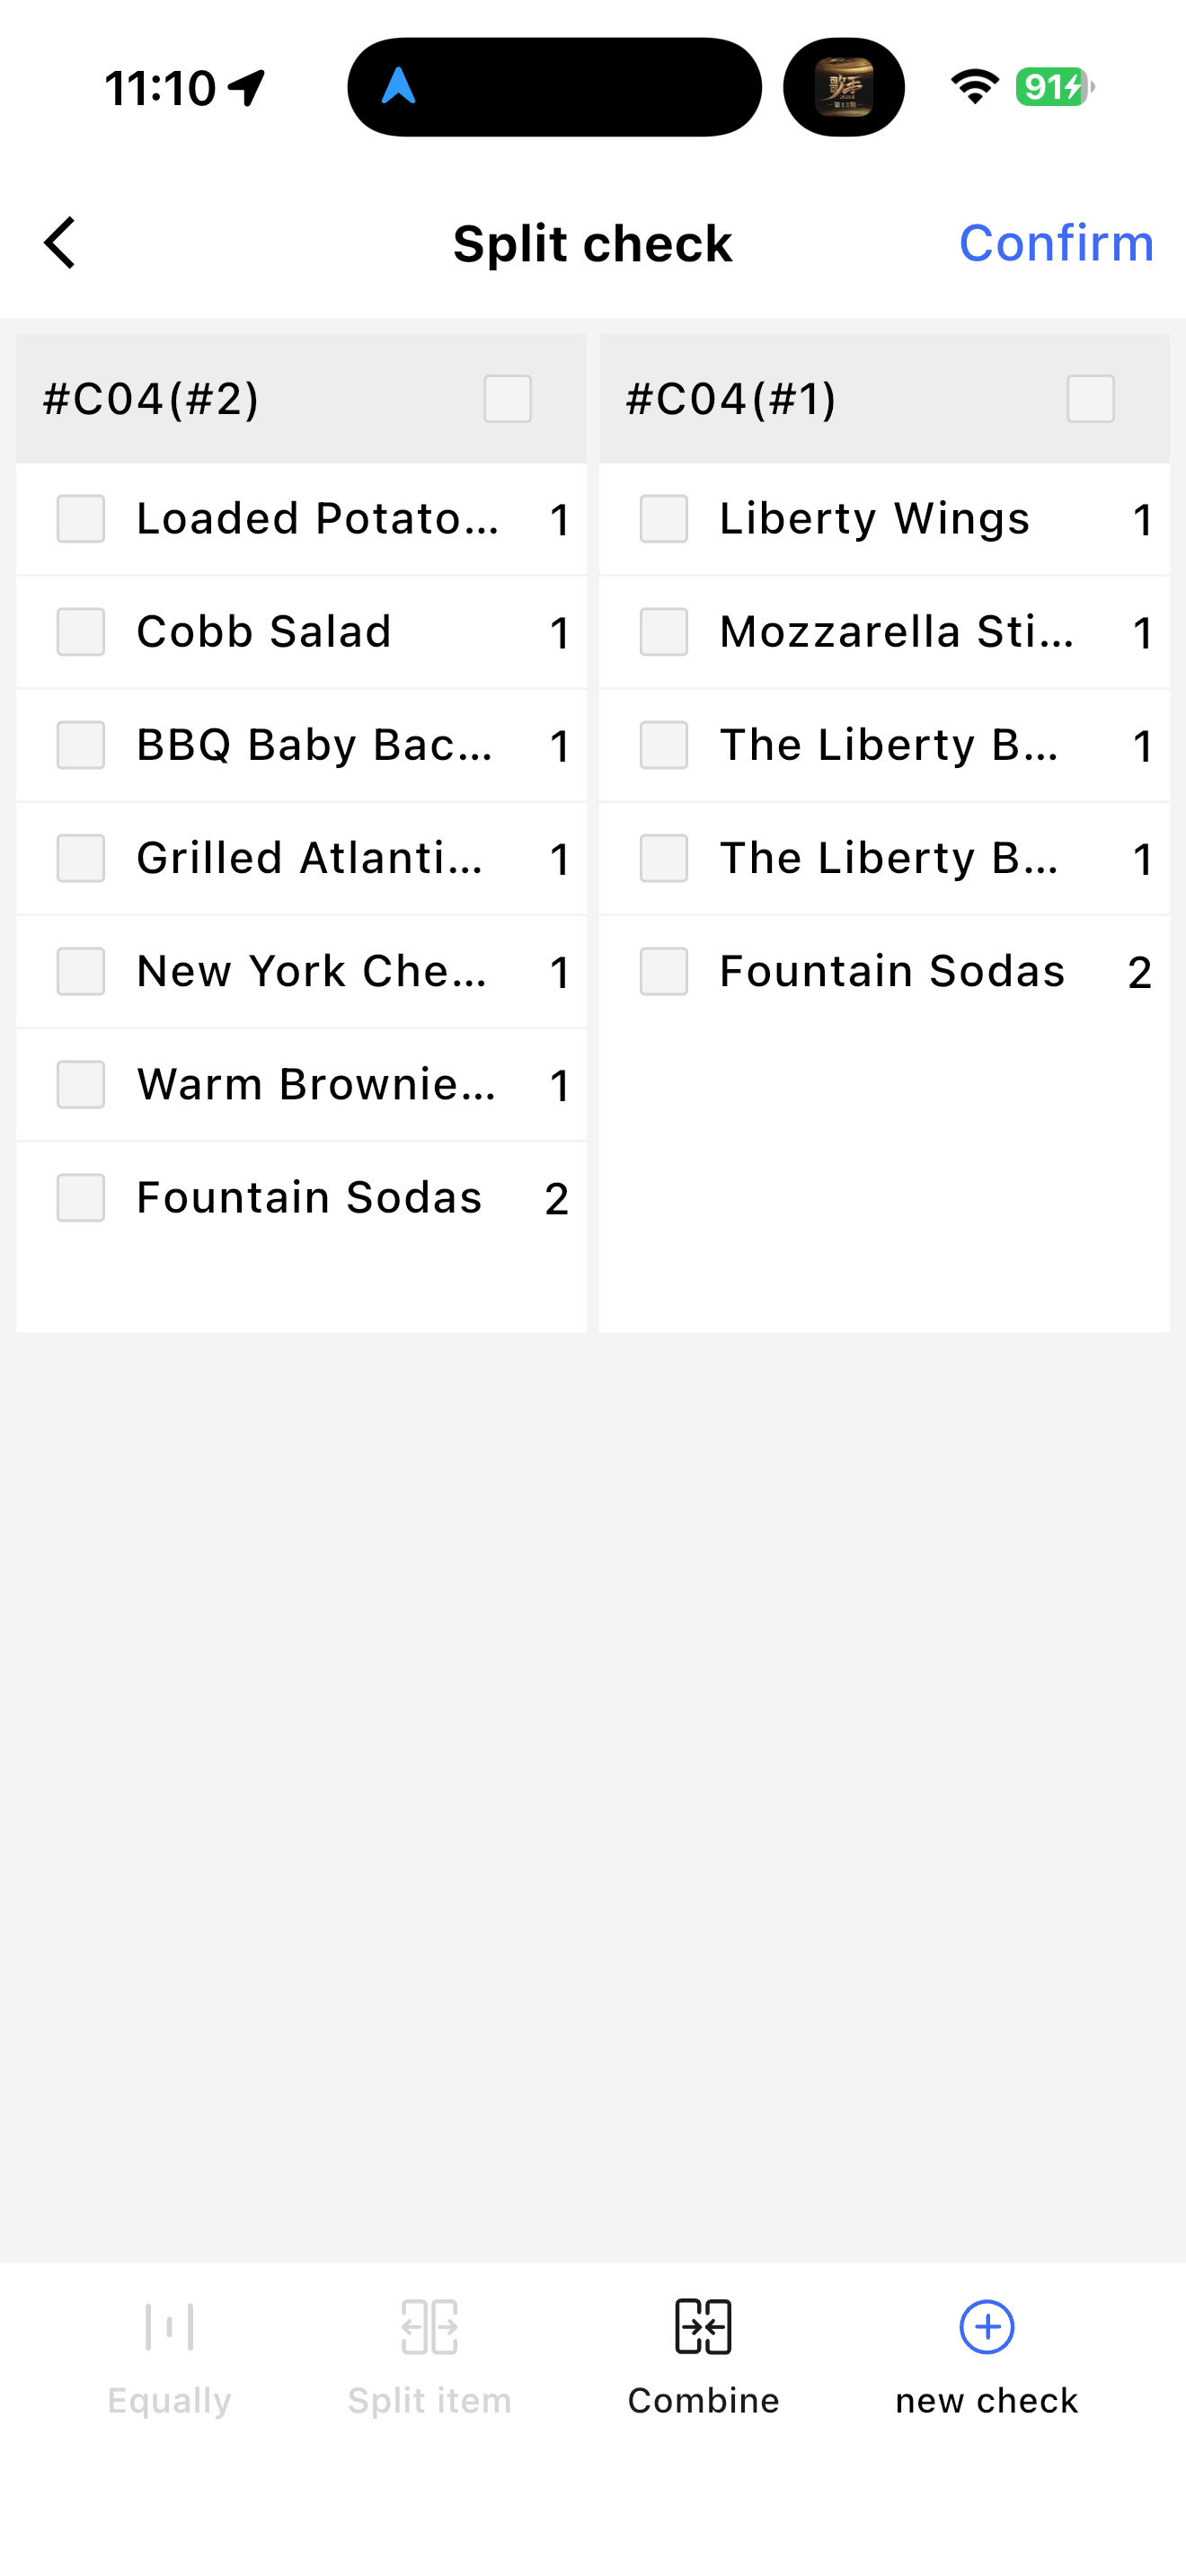
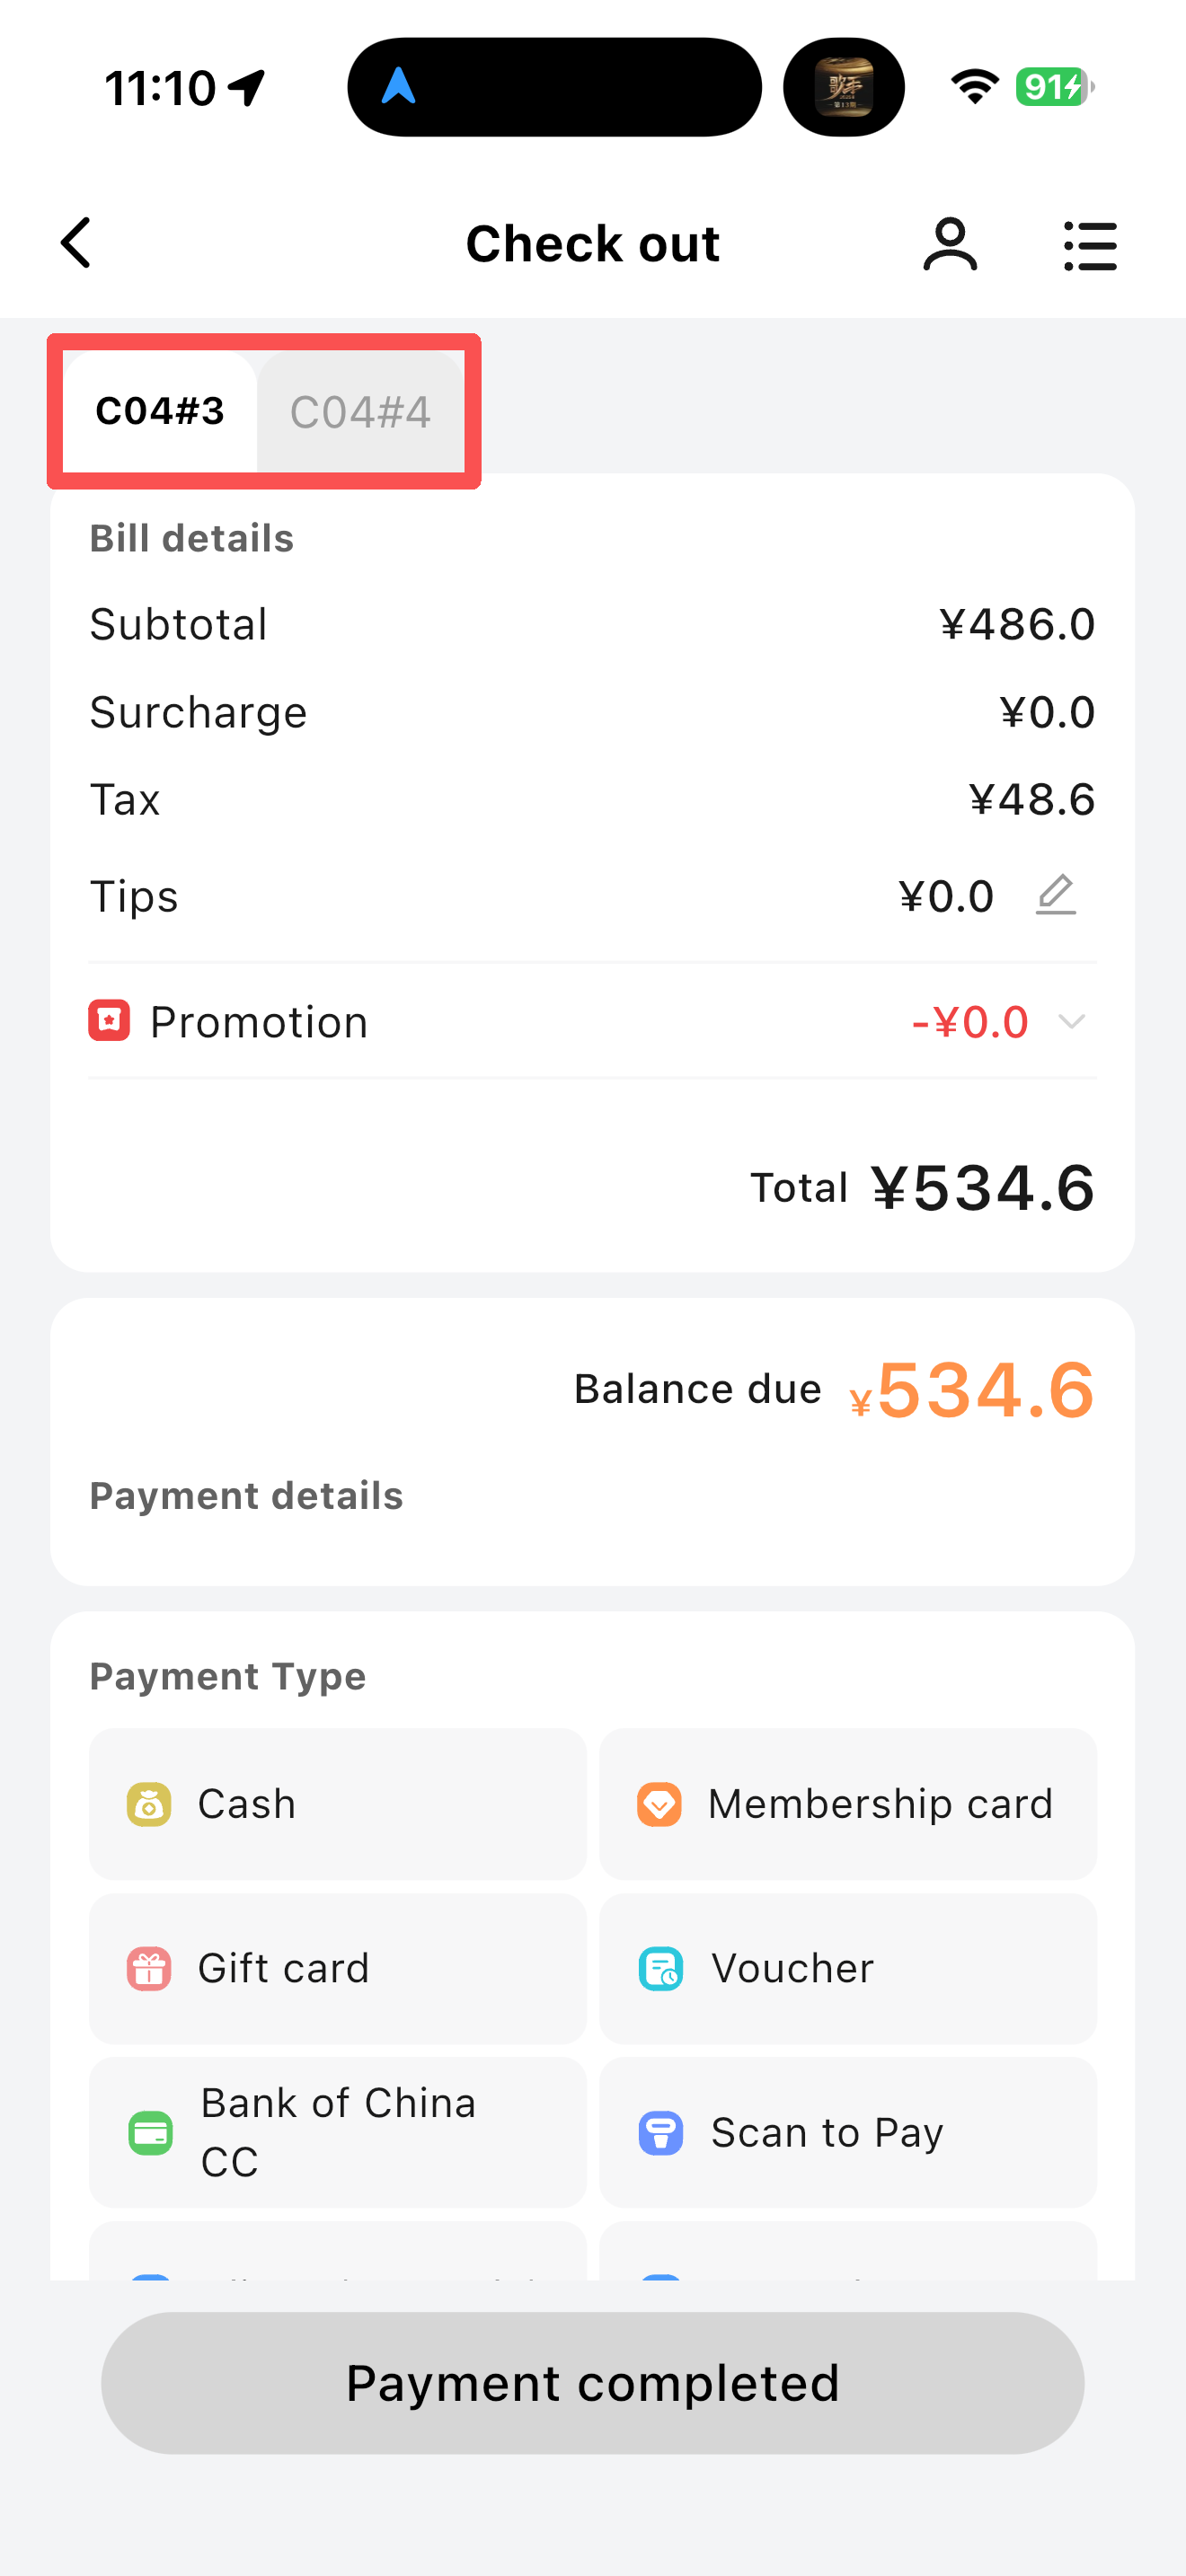
####### Split Order
- Scenario: For customers sharing a table, split the order to allow separate payments or additional ordering.
- Split dishes from one table into 2 orders.
- Click【Add】, select the corresponding dishes, click【Add to ##Table Number】, and confirm. Two order tabs will be displayed on the checkout page, allowing switching for adding dishes or payment.
####### Marketing
- If marketing activities are configured on the BO end and the user’s purchased items meet the activity requirements.
- If no discounts are applied on the cart page, a marketing pop-up on the checkout page displays eligible activities. Click to confirm the activity and receive the corresponding discount amount.
####### Discount
- Configured the store discount plan on the BO end.
- After adding a discount, it is displayed in the Marketing section of the checkout page.
####### Edit Order Information
- Order type and number of diners can be modified.
####### Print Pre-check Bill
- Print the pre-check bill using a printing device.
Order Detail
- Displays the subtotal of dish prices. Surcharges and taxes can be configured in the backend.
- Tips can be entered manually.
- Marketing content includes backend-configured promotions, member price discounts, and discount plan amounts, etc.
3.2.1.9.2 Payment Methods
####### Cash Payment
- A keyboard pops up to enter the cash payment amount, with the current total displayed by default.
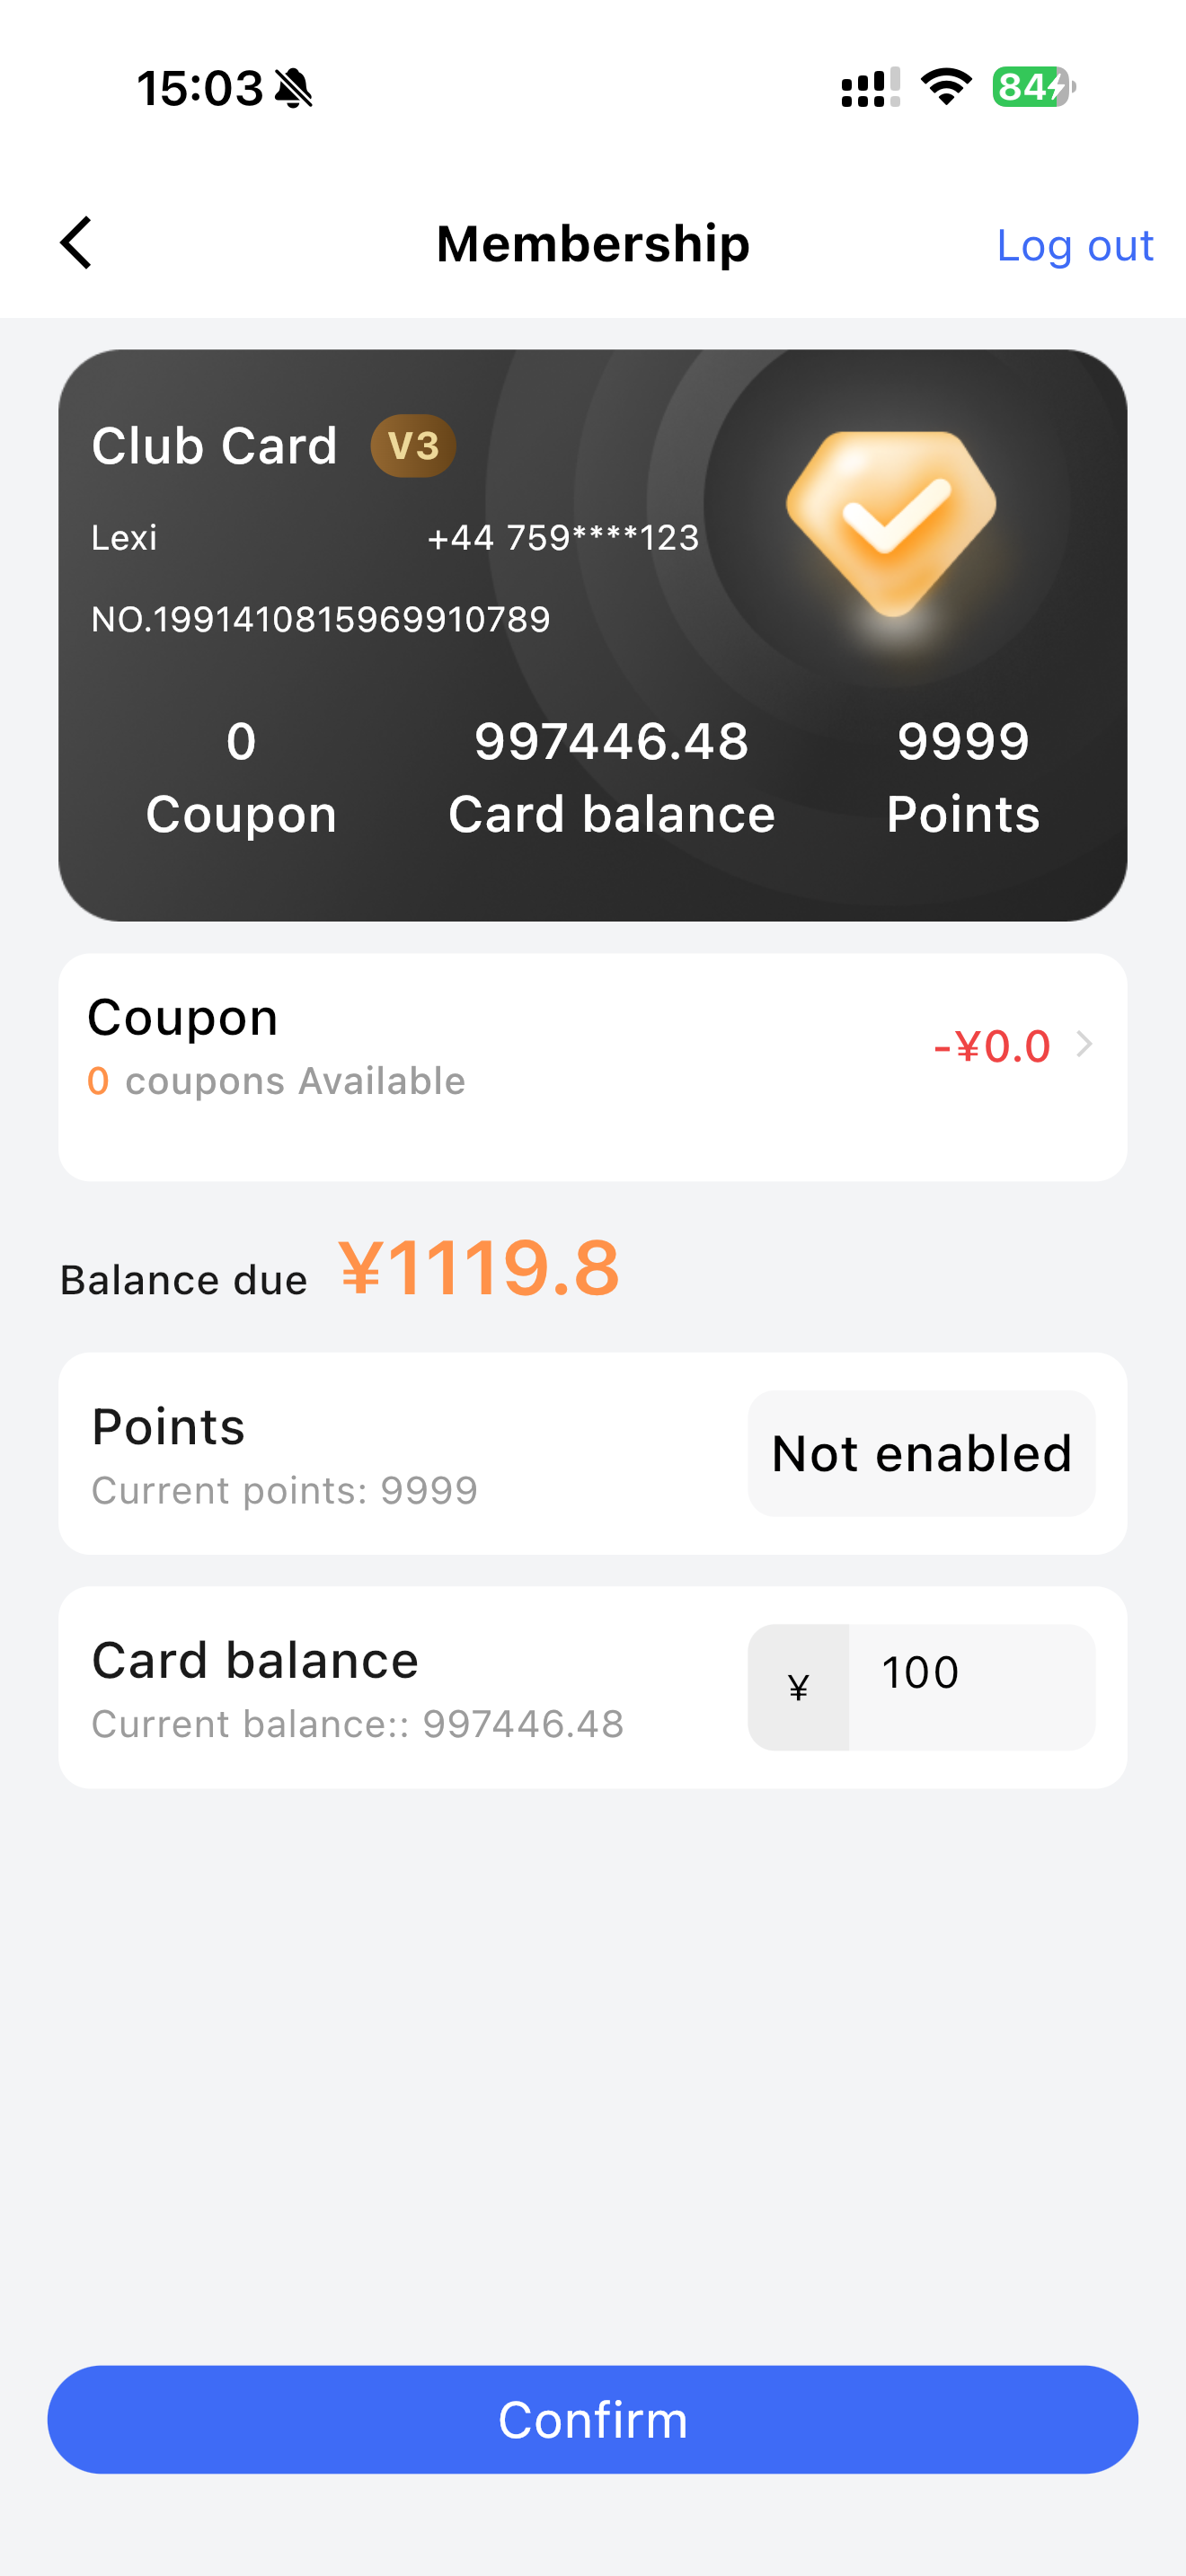
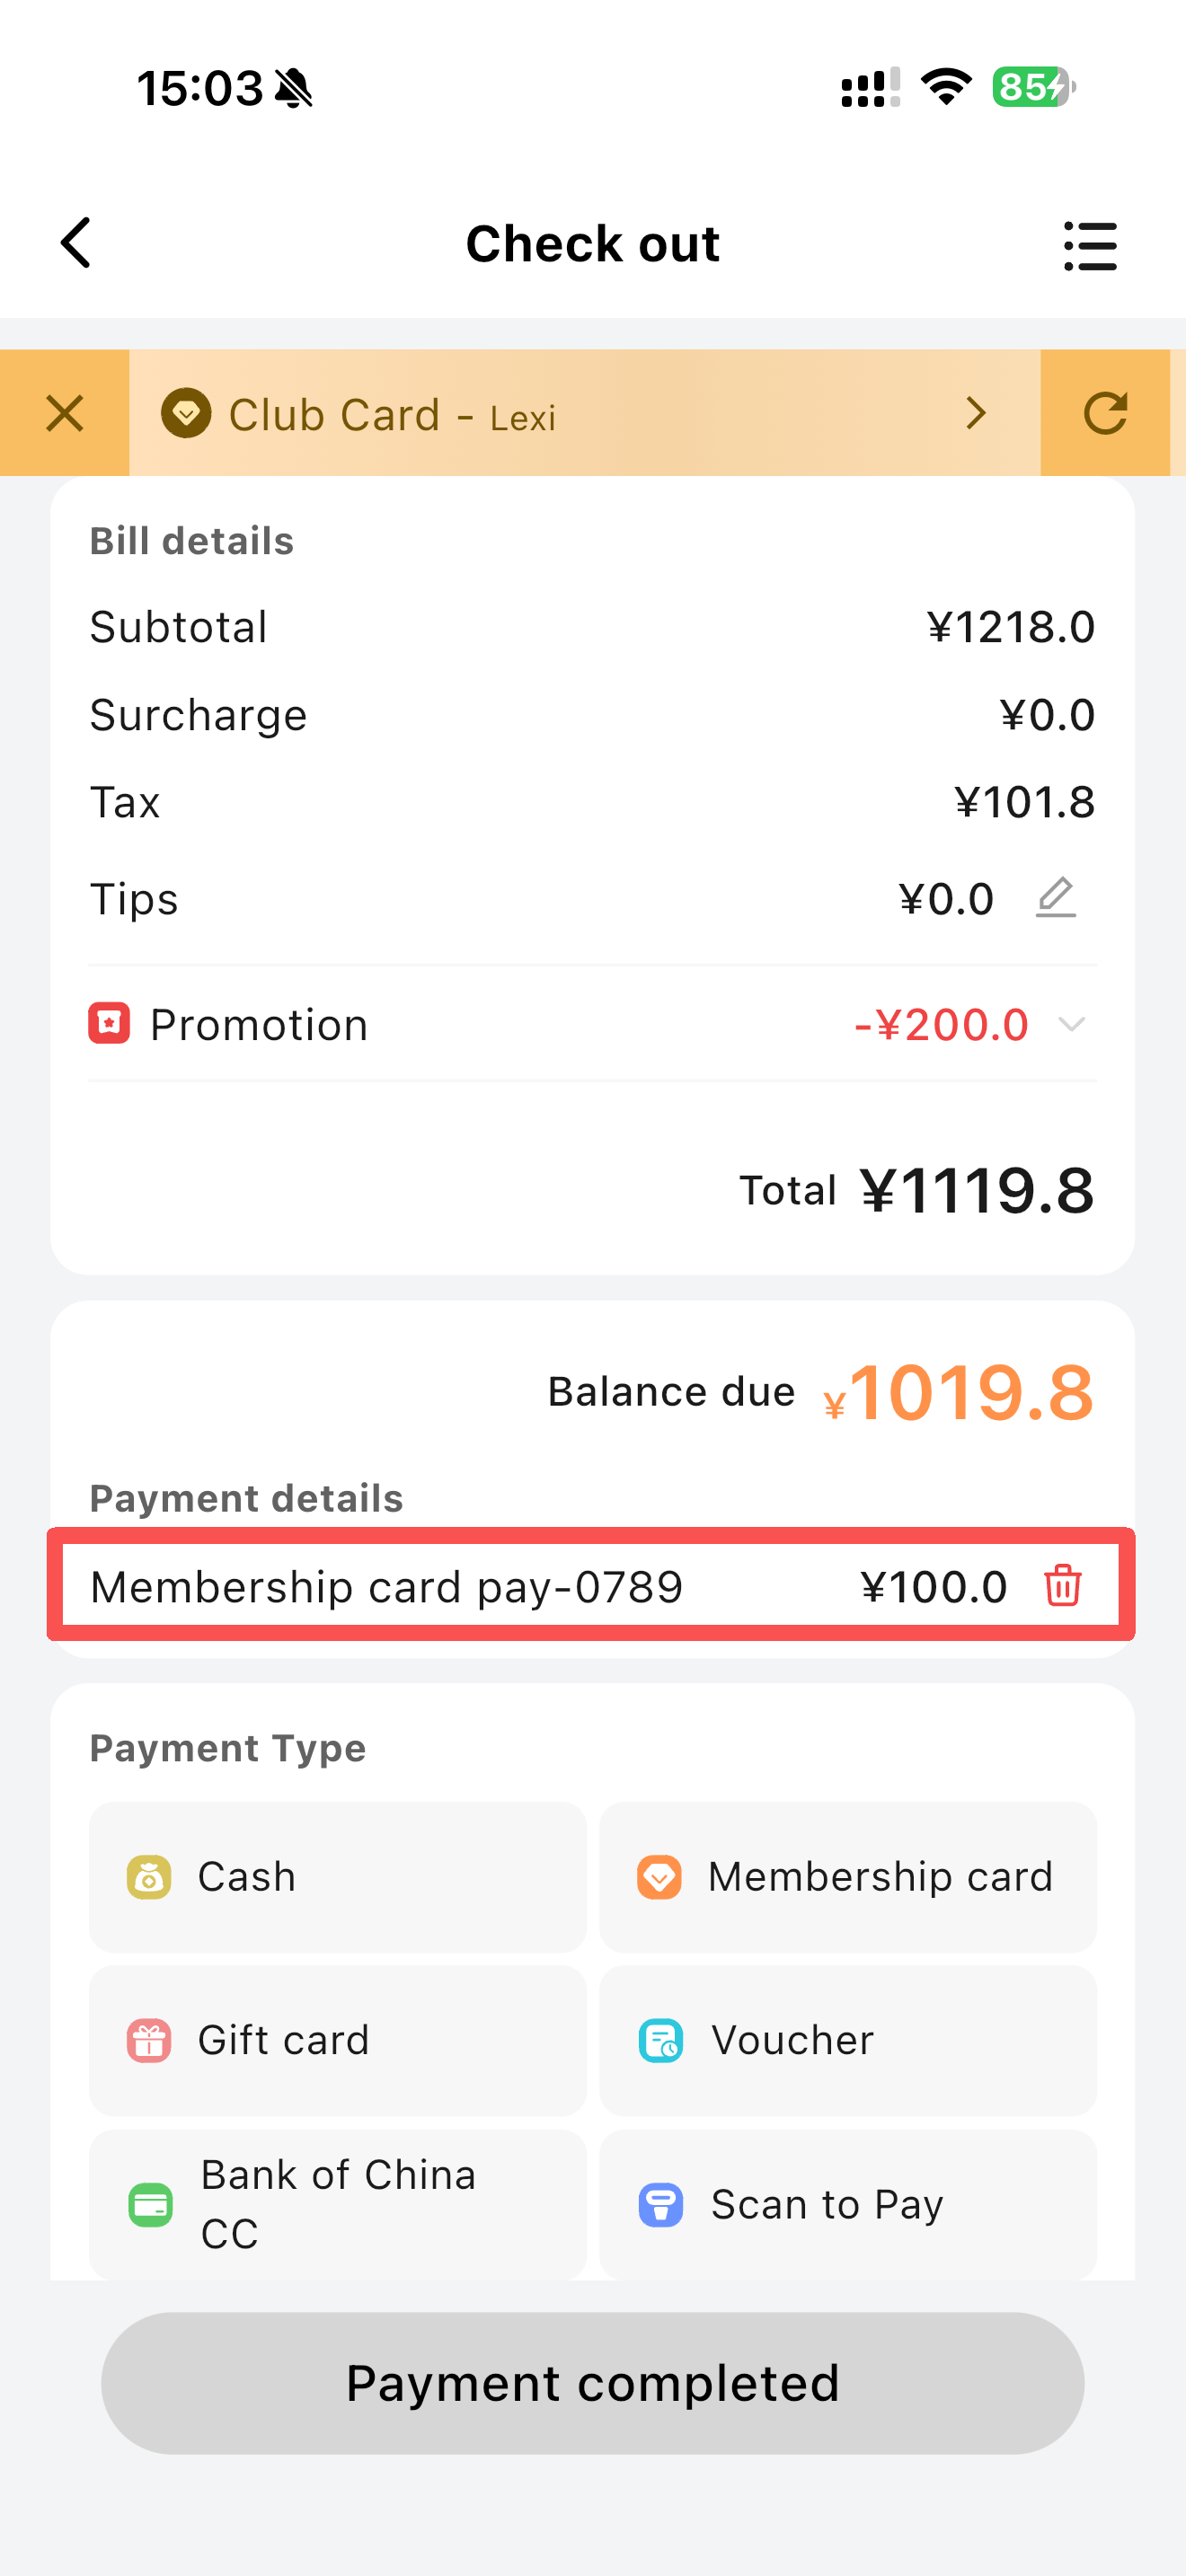
####### Membership Card Payment
- Pay with a membership card using member points or balance. Point redemption rates can be configured in the BO end or disabled.
- If the member balance is sufficient to cover the order, checkout is completed directly.
- If the member balance is insufficient, the amount paid via the membership card is displayed in the payment details.
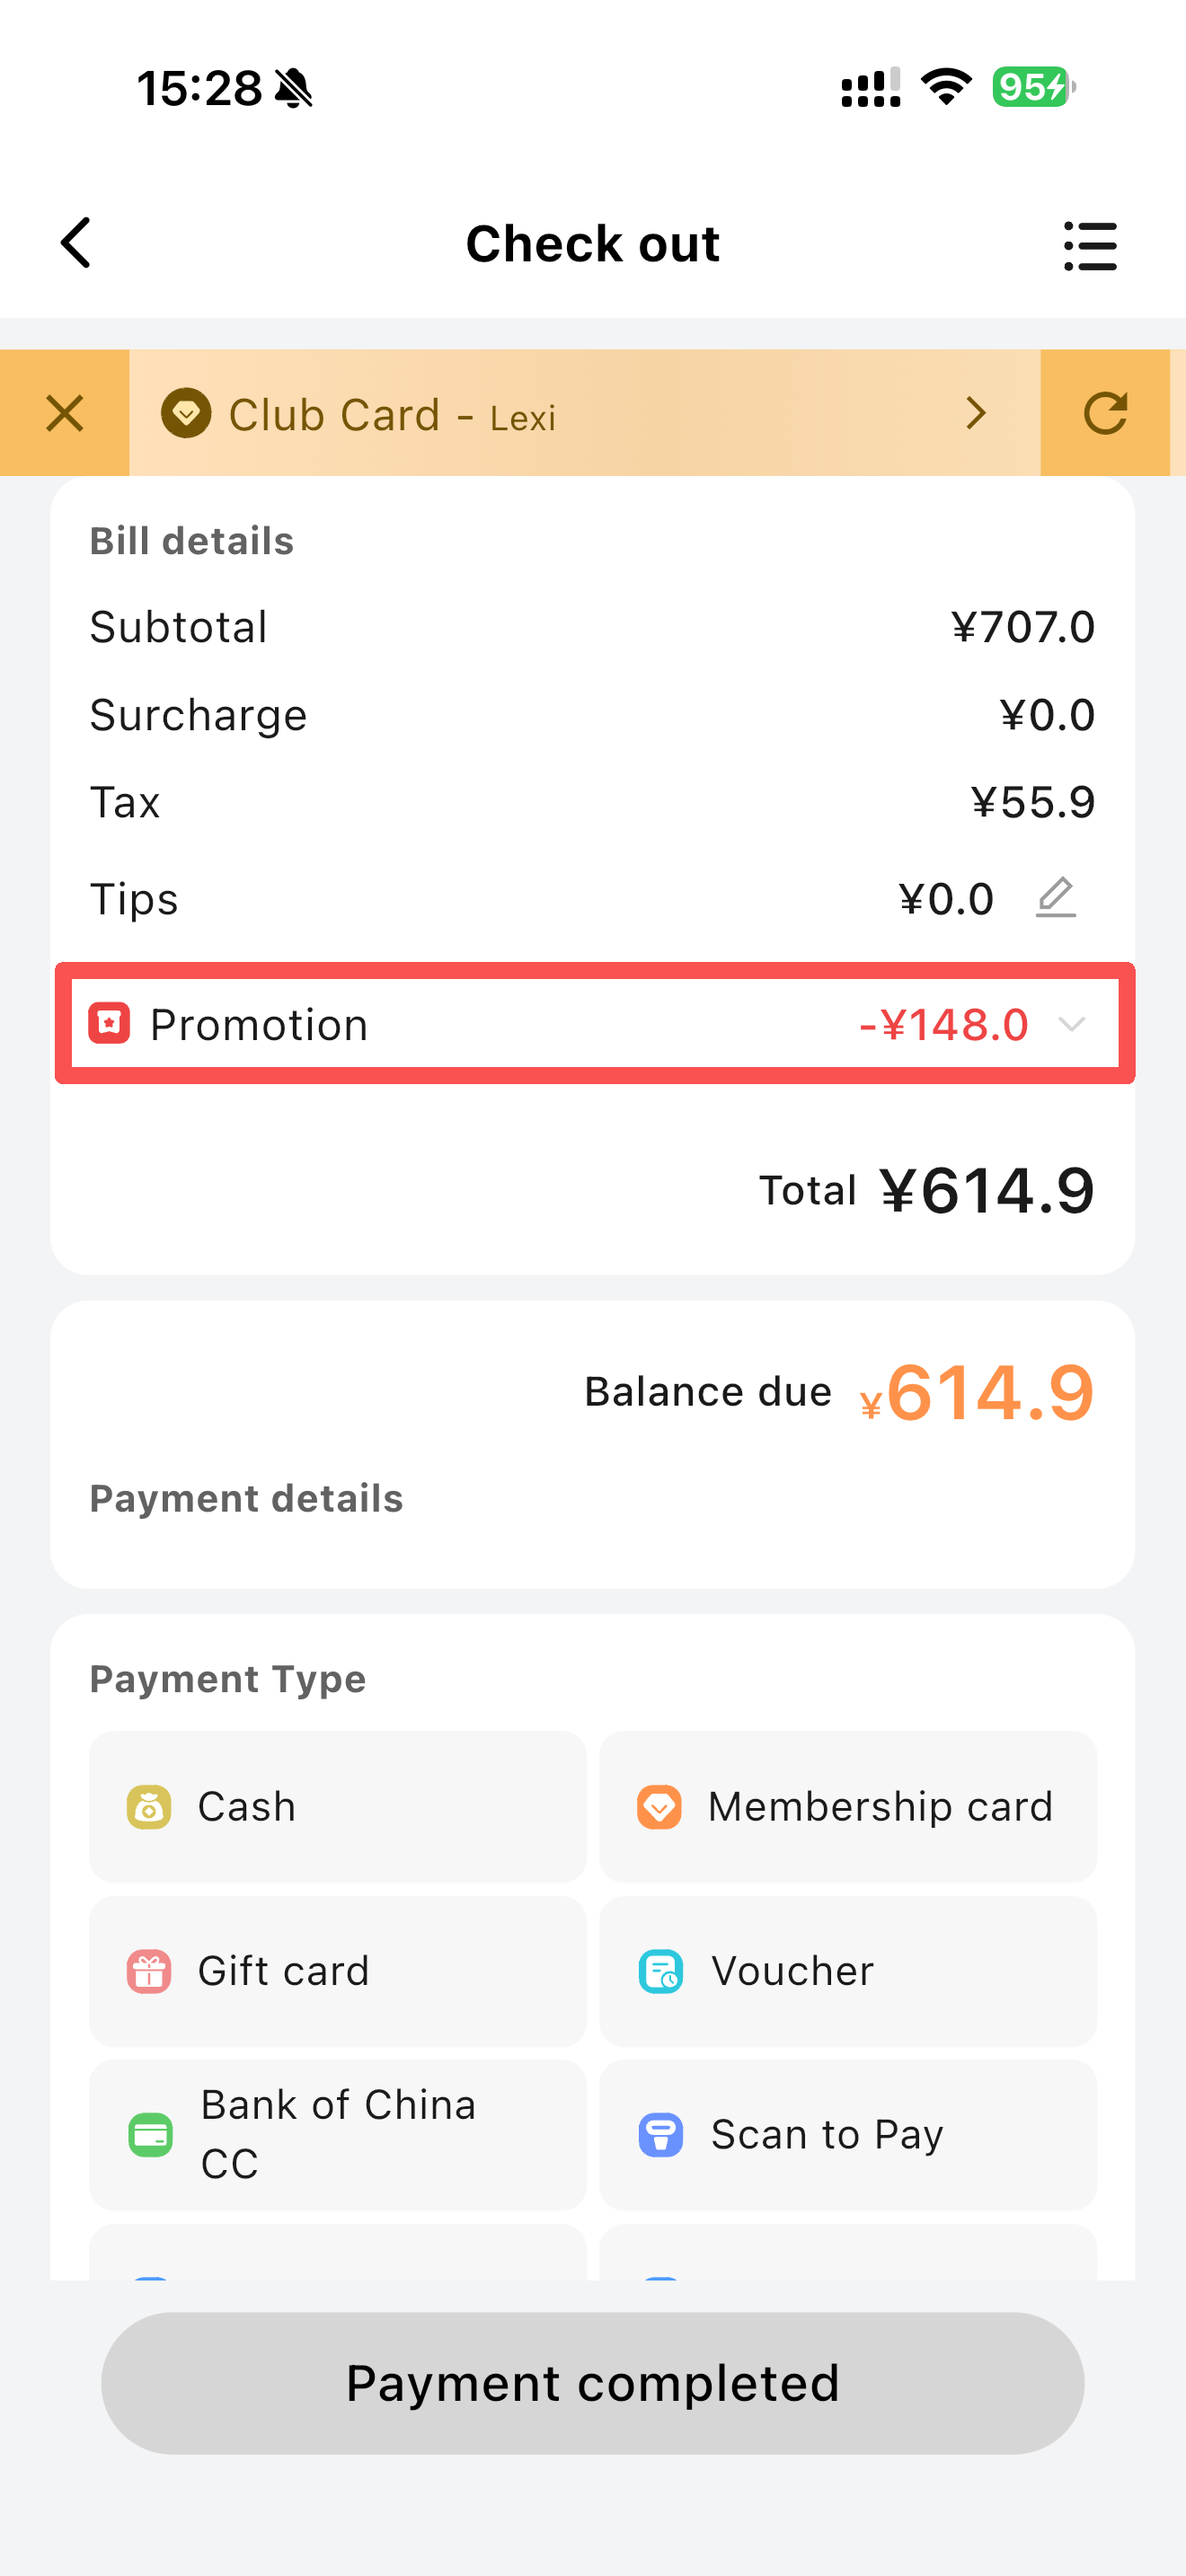
####### Member Coupons
- Member coupons are configured in the marketing section at the BO end.
- If the user has a coupon for an ordered dish, clicking the coupon icon displays the available coupon.
- After adding the coupon, the discount amount is displayed in the Marketing section of the order details on the checkout page.
- Coupon mutual exclusion rules can be configured on the BO end; multiple coupons can be used simultaneously if allowed.

####### Scan Code Payment
- The user presents their WeChat/Alipay payment QR code to pay.
####### Payment QR Code
- Display the payment QR code for the user to scan and pay via WeChat/Alipay.
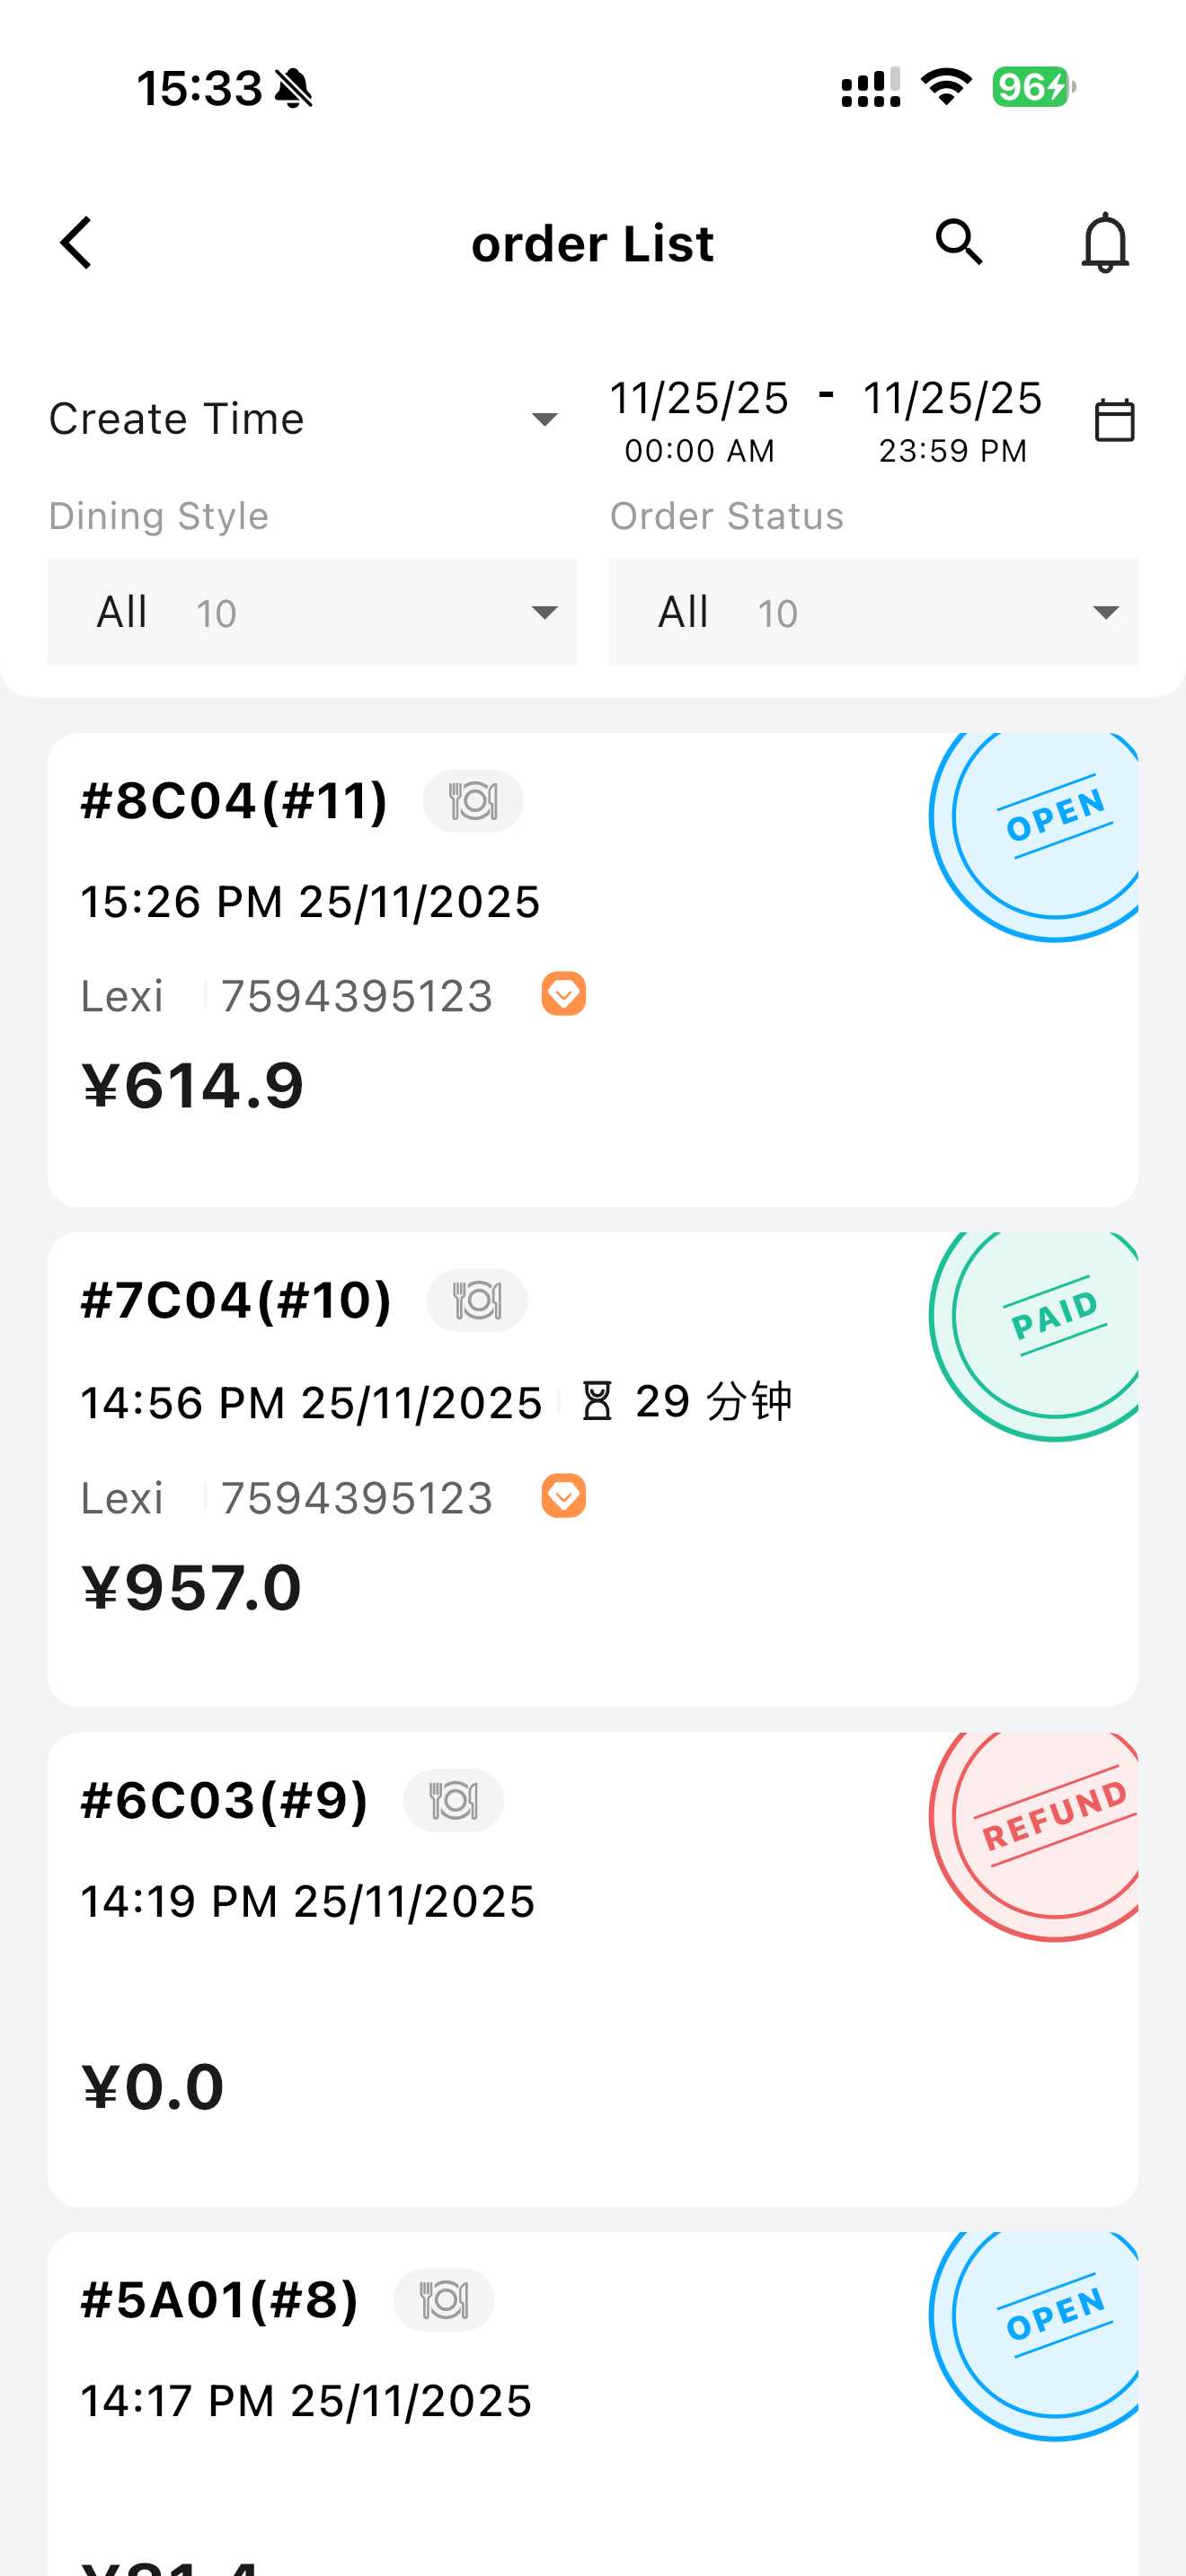
4 Order Center
- The Order Center includes all created orders, allowing viewing of order details and dish information.
- Full or partial refunds can be processed for paid orders.
4.1 Function Operations
4.1.1 Order Filtering
4.1.1.1 Default Display: All Orders of the Day
- The system defaults to displaying all orders of the day, enabling merchants to view all daily business operations, including dine-in, takeout, reservation, and self-pickup orders.
Application Scenarios:
Merchants check all daily orders at the start of business for processing.
During peak hours, merchants can quickly grasp the status of all pending orders.
4.1.1.2 Order Type Filtering
-
Merchants can filter orders by type. Available order types include:
- All: Display all orders
- Dine-in: Display only in-store dining orders
- Takeout: Display take out orders
- Pickup: Display orders for customer pickup at the store
-
Operation Steps:
- Click the order type option in the filter box and select the condition (e.g., “Dine-in”, “Takeout”).
- The system displays orders matching the selected condition.
Application Scenarios:
Merchants want to view specific order types (e.g., all takeout orders to facilitate delivery preparation).
Quickly assign food preparation tasks, especially when handling both dine-in and takeout orders.
4.1.1.3 Order Status Filtering
-
Merchants can filter orders by payment status, including:
- All: Display all orders
- Open: Display unpaid orders
- Paid: Display paid but incomplete orders
- Completed: Display finished orders
- Refund: Display refunded orders
-
Operation Steps:
- Click the order status option in the filter box and select the condition (e.g., “Refund”, “Paid”).
- The system displays orders matching the selected status.
Application Scenarios:
View unsettled orders to promptly address customer payment issues.
Quickly check refunded orders to ensure accurate financial reconciliation.
4.1.1.4 Time Filtering
- Merchants can filter orders by a specific time period. The system defaults to the current day, but merchants can select a specific date or custom time range to view historical orders.
- Operation Steps:
- Click the time option in the filter box and select a specific date or set a custom time range.
- The system displays orders within the selected time range.
Application Scenarios:
Query orders for a specific day (e.g., yesterday's sales records) or time period.
Used for financial statistics and turnover analysis to understand sales trends across different periods.
4.1.2 View Current Order Details
- Merchants can view detailed information for each order, including customer details (e.g., name, phone number), consumption information (e.g., total amount, payment method), item information (item name, quantity, unit price), and order status (e.g., Paid, Pending Delivery).
- Operation Steps:
- Click any order in the order list to access its detail page.
- View all relevant information on the detail page.
Application Scenarios:
Merchants need to check detailed customer consumption records, especially when handling after-sales issues or refund requests.
Verify item details in order to avoid missing or incorrect items.
4.1.3 Full Refund
- Merchants can select “Full Refund” on the order detail page, enter or select a refund reason, and confirm the operation. After a successful refund, the system generates a refund order record in the order list.
- Operation Steps:
- Click the “Full Refund” button on the order detail page.
- Enter or select a refund reason (e.g., “Customer Canceled Order”, “Dish Dissatisfaction”).
- Click “Confirm” and the system will notify you of the successful refund.
- The system generates a refund order in the order list and updates the original order status.
Application Scenarios:
Customers cancel the entire order or request a full refund for other reasons.
Handling refund requests when customers are dissatisfied with the entire order.
4.1.4 Partial Refund
- If customers are dissatisfied with only part of the order, merchants can select specific dishes for a partial refund, enter a reason, and confirm. After a successful refund, the system generates a refund order record in the order list.
- Operation Steps:
- Click the【Partial Refund】on the order detail page.
- Select the dishes to be refunded and enter a refund reason.
- Click【Confirm】and the system will notify you of the successful refund.
- The system generates a refund order in the order list and updates the original order status.
Application Scenarios:
Customers are dissatisfied with specific dishes (e.g., taste or quality issues).
Refunding specific dishes without canceling the entire order when food issues arise.
4.1.5 Print
- Printing enables merchants to process orders efficiently, ensuring seamless coordination between the kitchen and front of house.
- Kitchen Ticket: Transmit customers ordering information from the kitchen for chefs to prepare dishes as requested.
- Receipts: Provide customers with transaction records, ensuring transparency of payment and consumption details. (You can see all receipt types detail in the RS POS help manual)
4.1.6 Reopen Order
- Allows merchants to add dishes to an order even after payment and checkout.
- This function enables restaurants to flexibly adjust orders post-payment, enhancing customer experience while avoiding issues from missing or modified orders.
Application Scenarios:
- Customers want to order additional items, delay checkout, or when a missing item is identified.
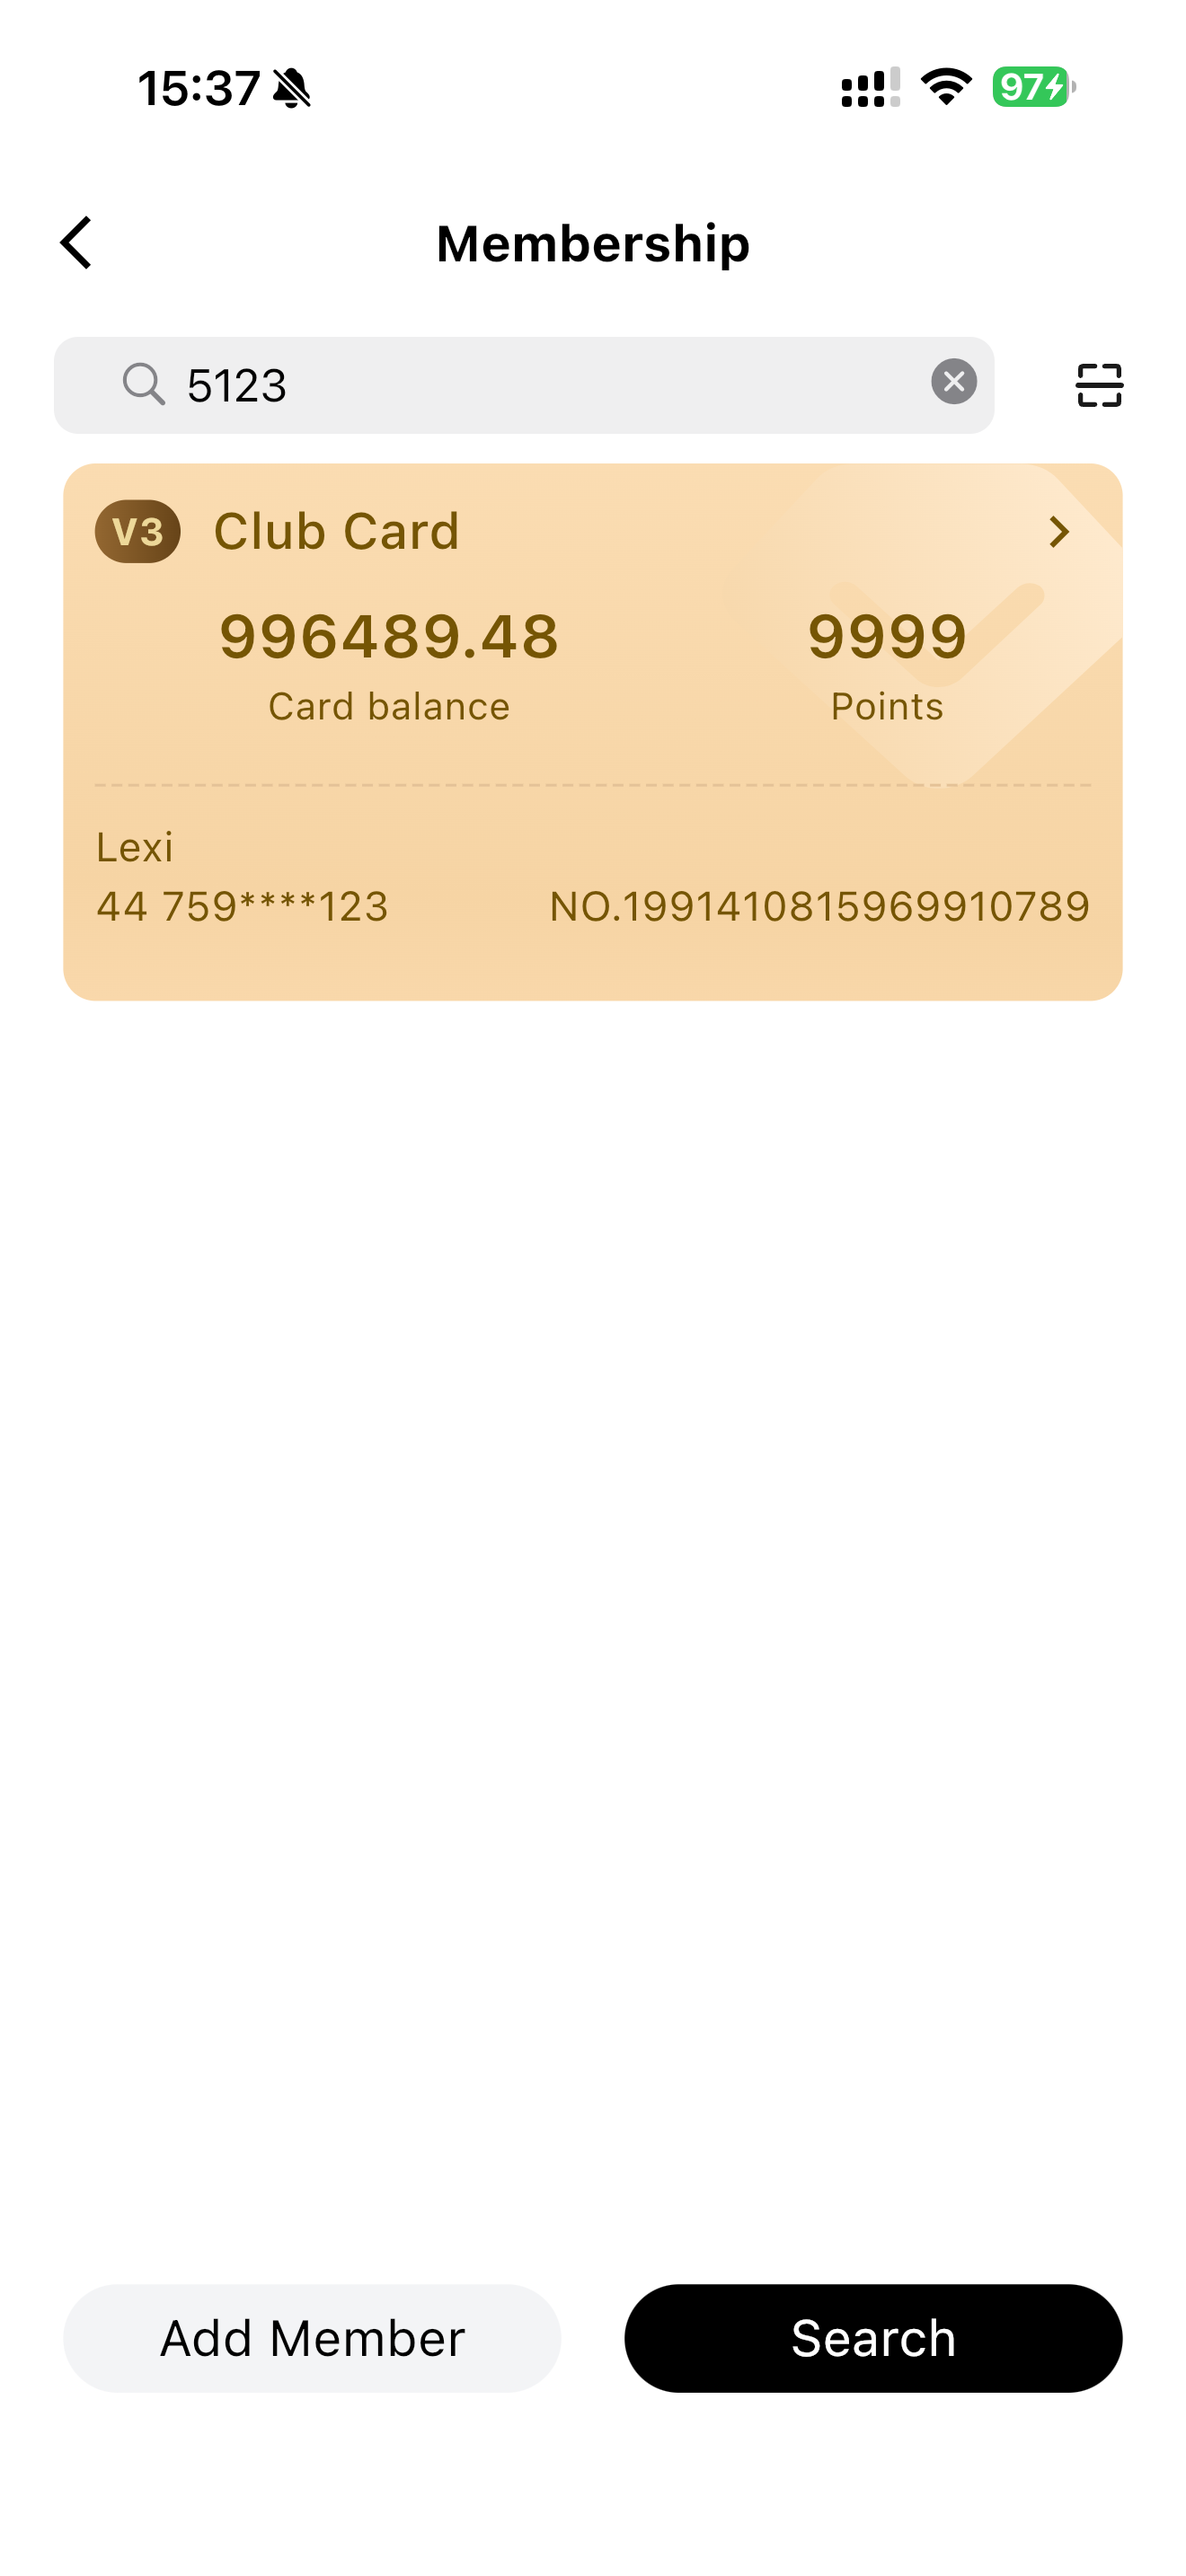
5 Membership
Primarily used for member creation, querying, and recharging. It allows checking of member balances, points, benefits, coupons, and other related information.
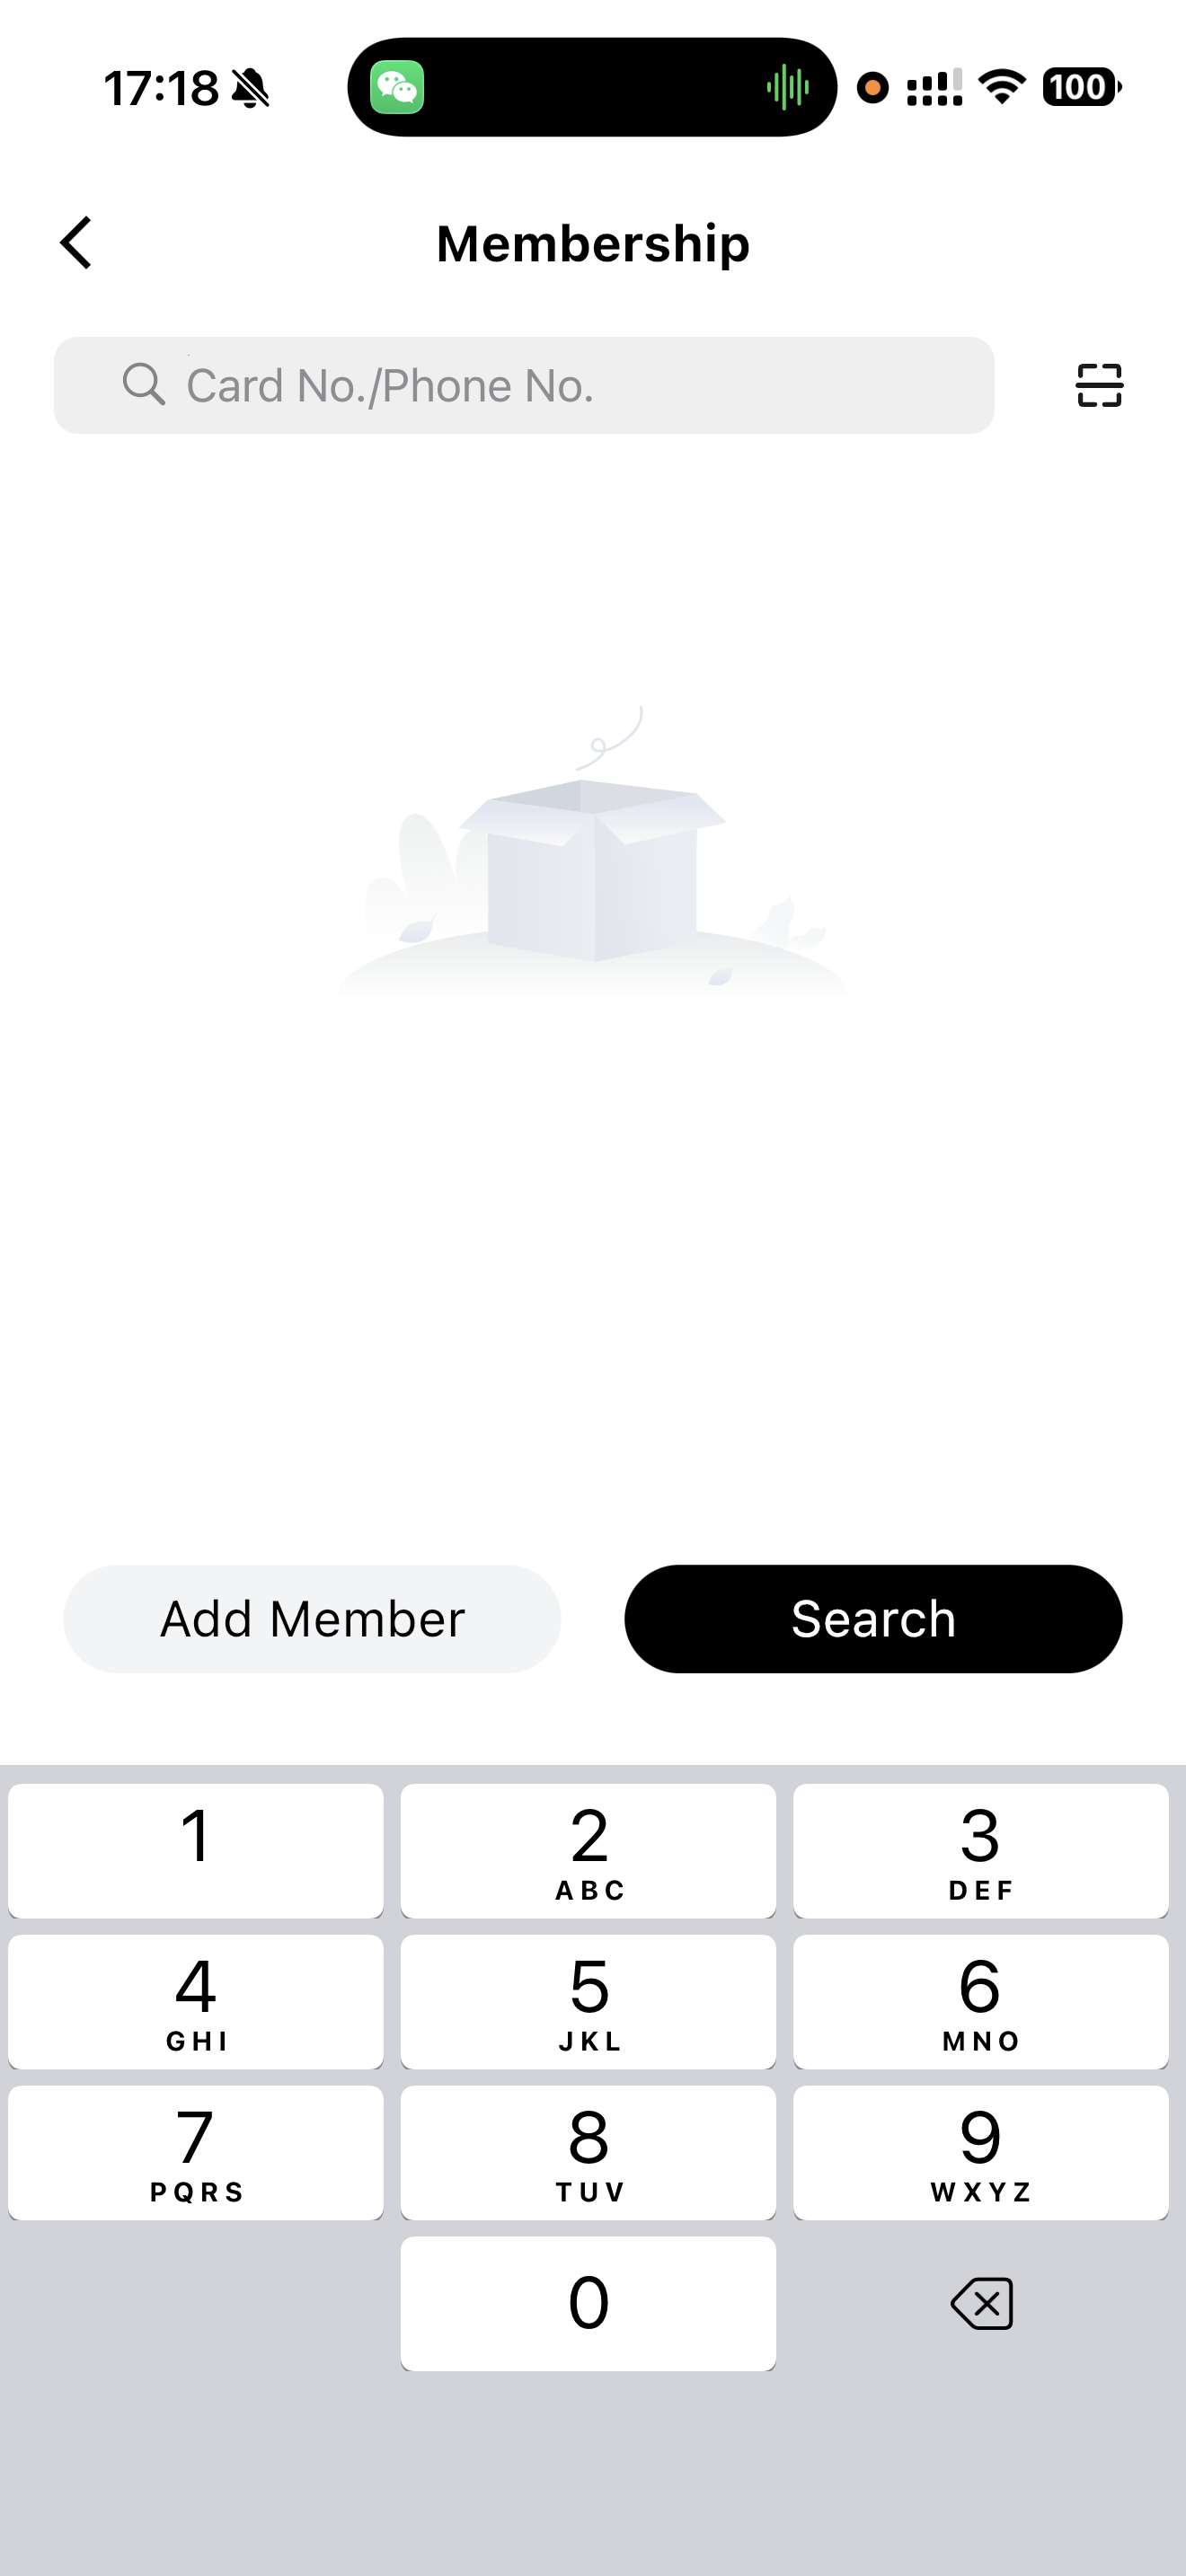
5.1 Function Operations
5.1.1 Search for Member
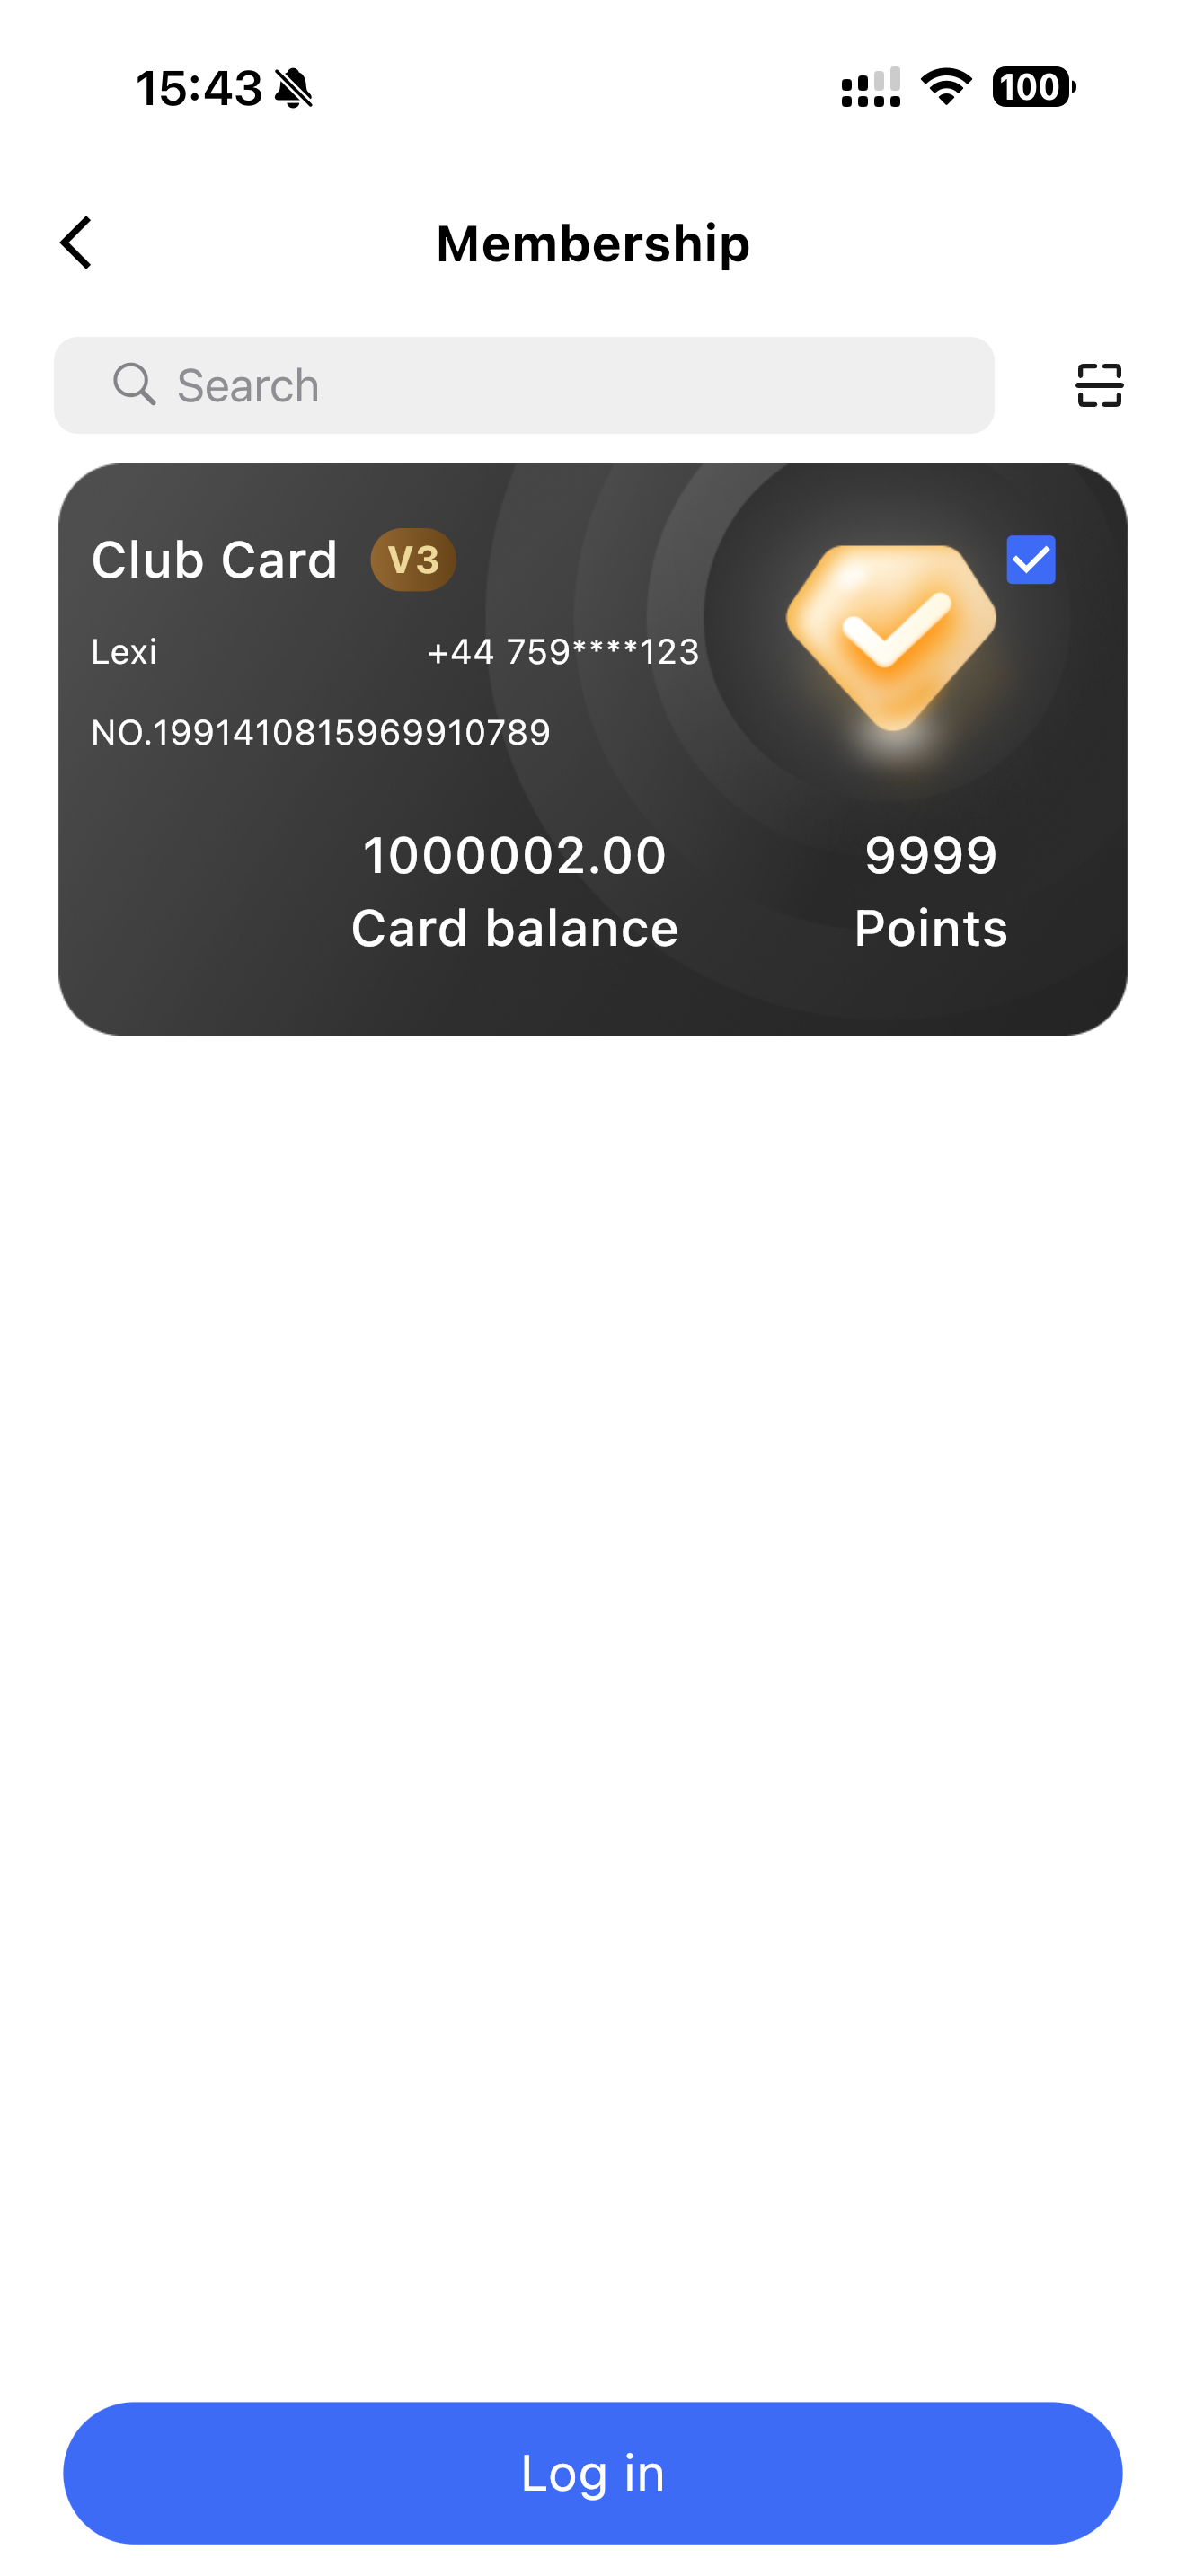
- Search for members by entering the last 4 digits of their phone number. Click the member card to view detailed information.
- Member details include basic information, coupons, balance, points, membership benefits, and the Pop-up entry.

5.1.2 Add Member
- Enter the membership card plan and customer information to enroll as a member or enroll and Top-up.
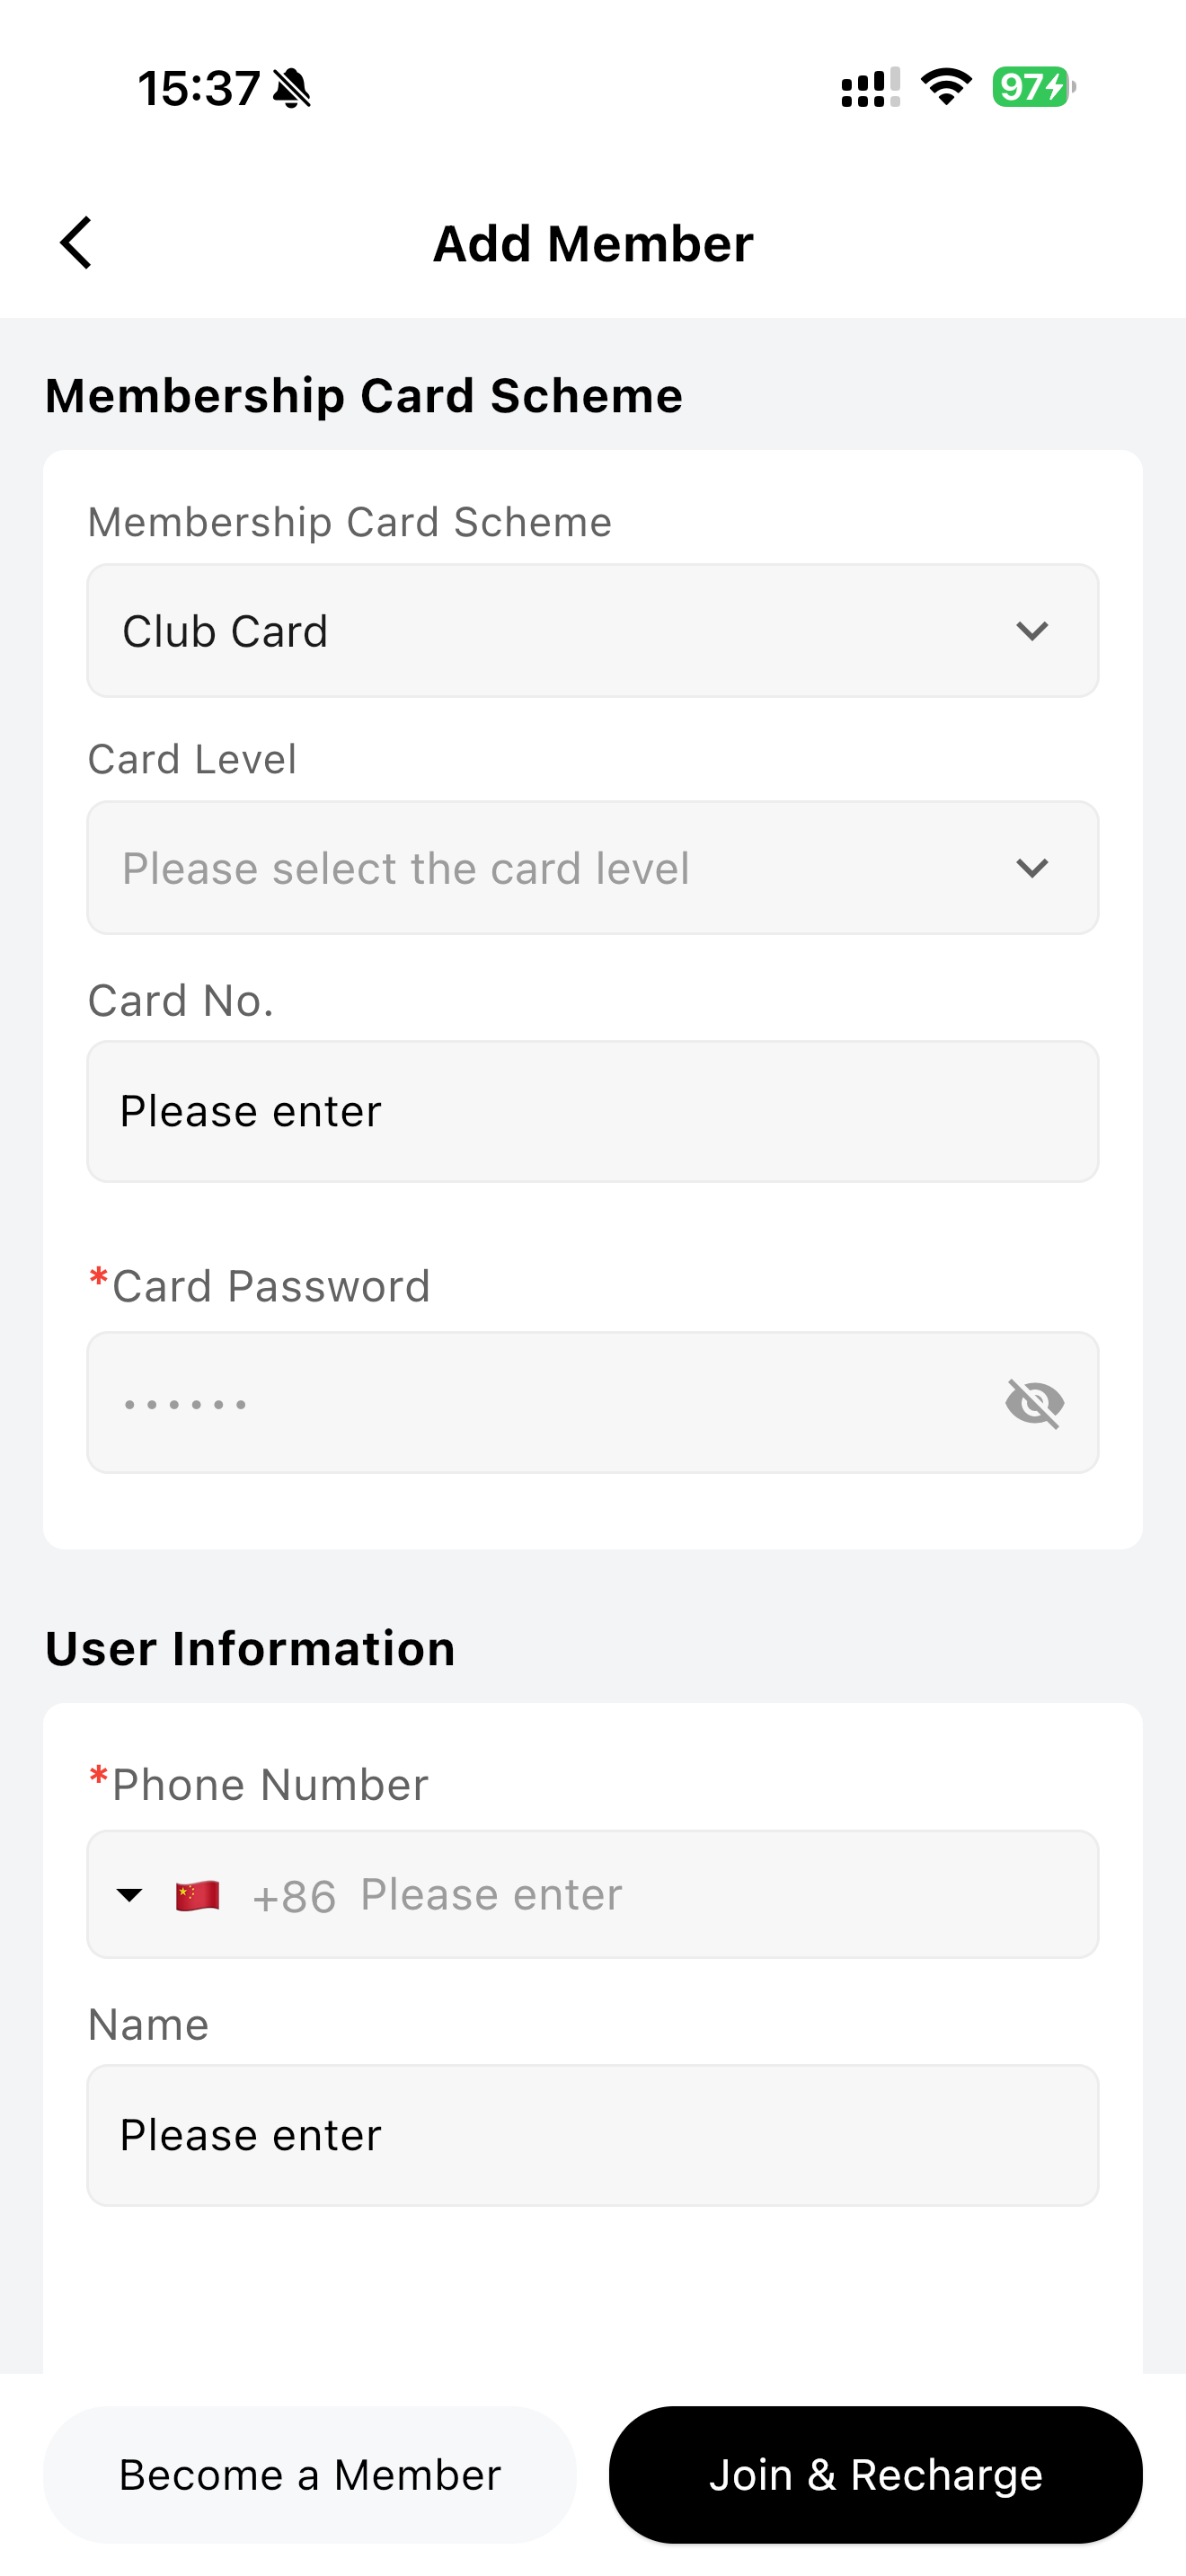
Note:
Fields marked with a red asterisk are mandatory, including:
- card password, phone number, name, date of birth and gender.
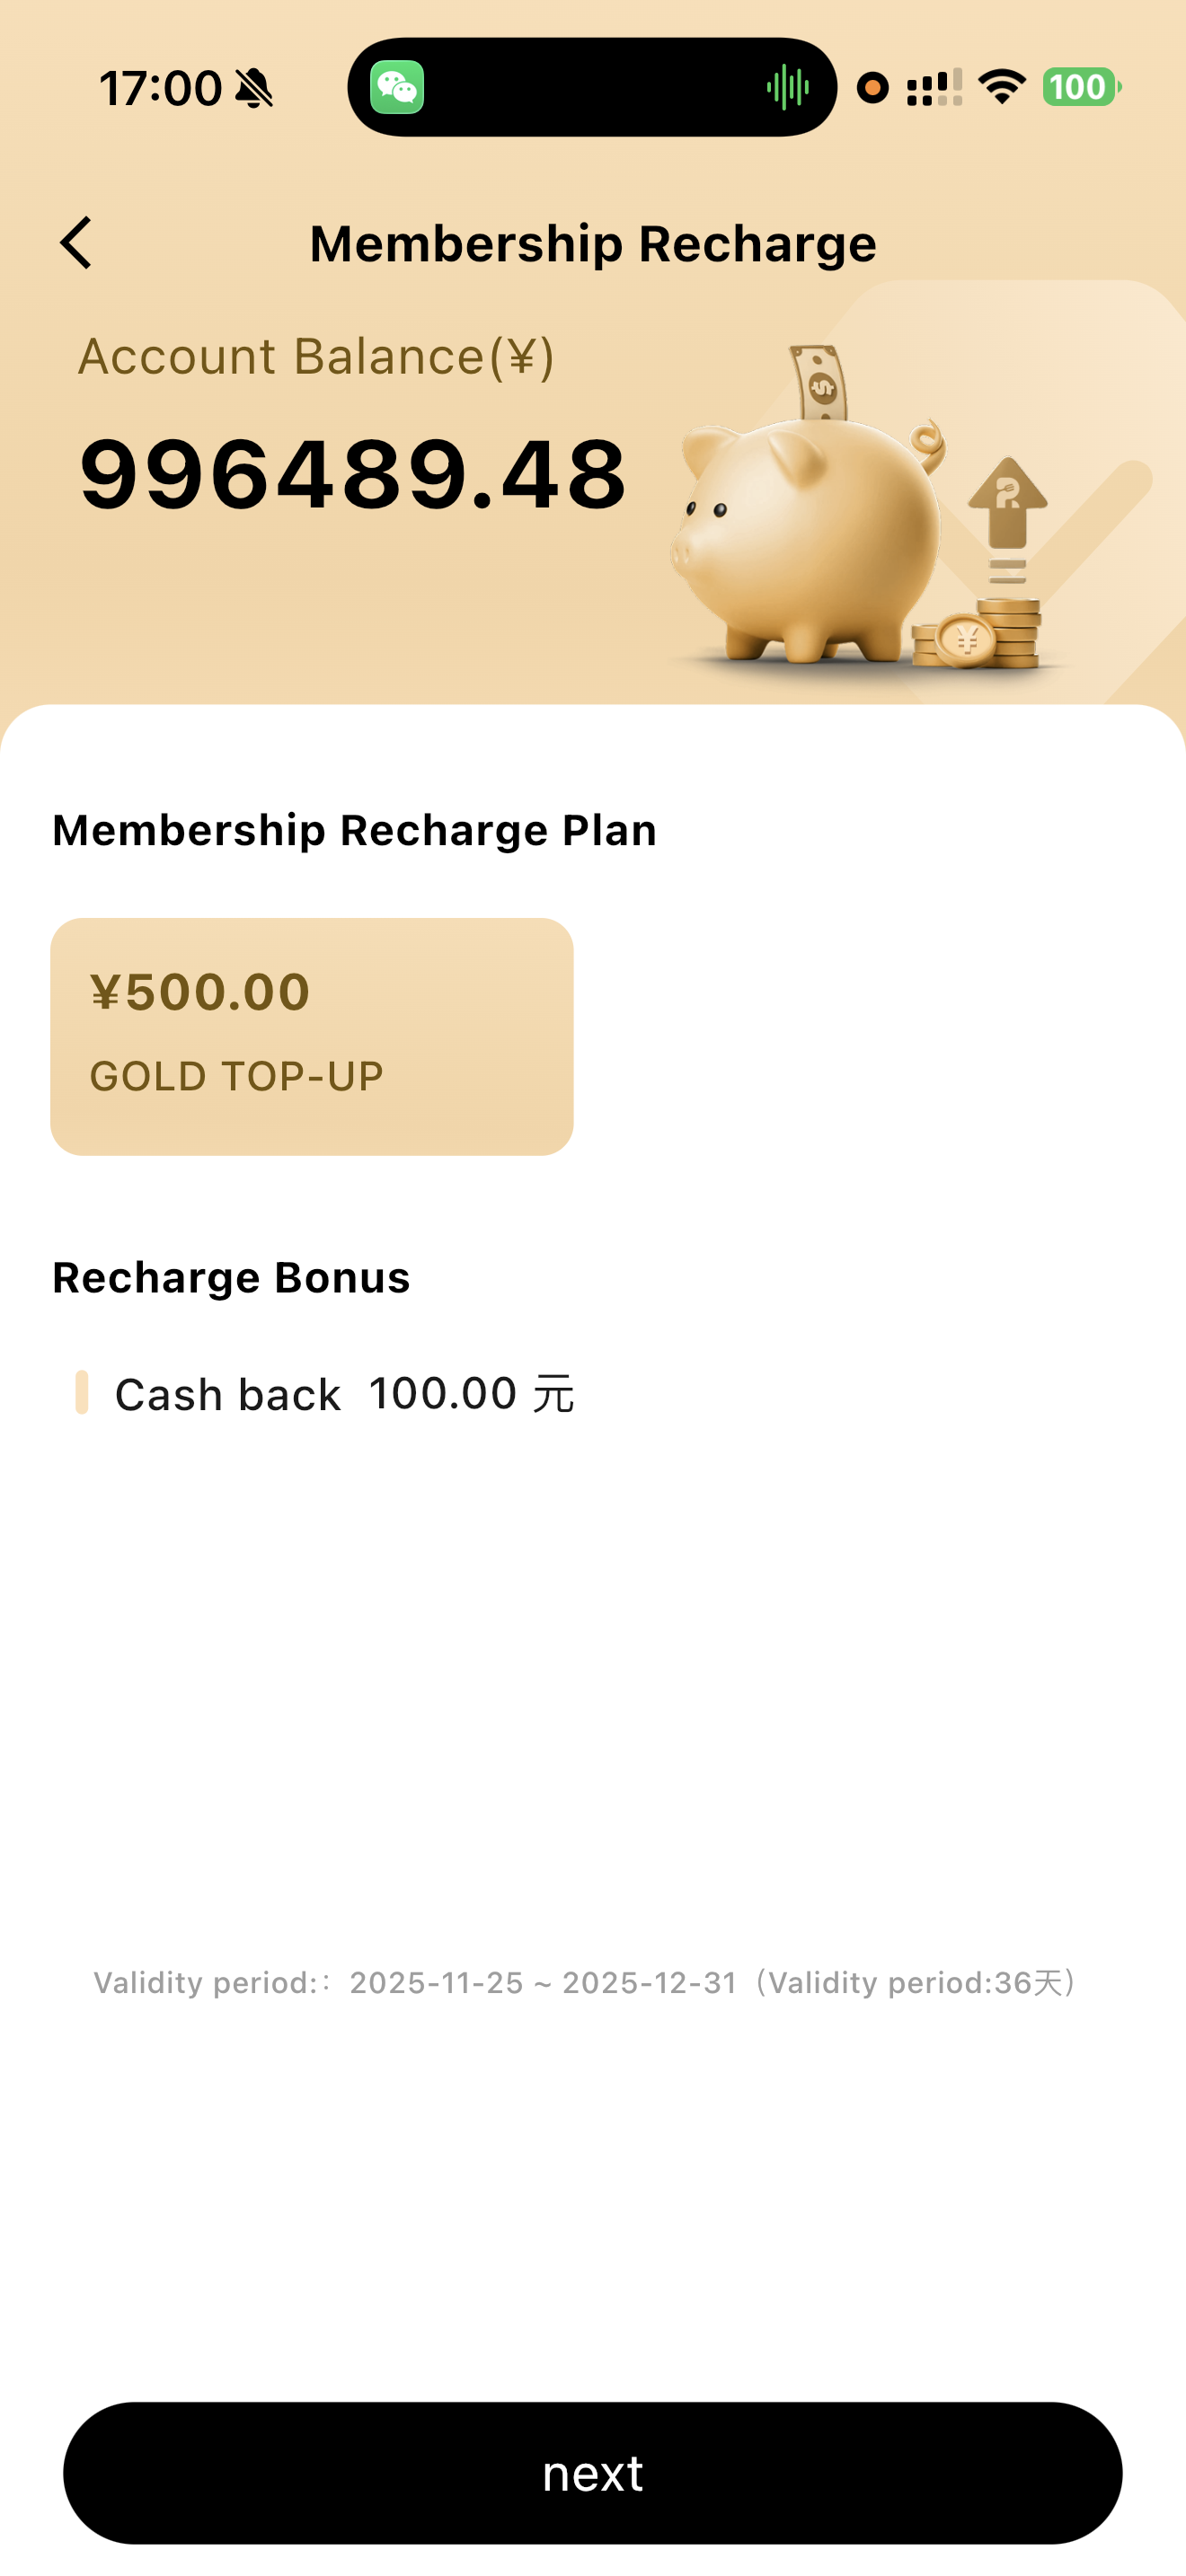
5.1.3 Member Top-up
- Top-up entries are available at the bottom of the member query page, member detail page, or the【Join & Recharge】button during member registration.
- Top-up plans must be configured on the BO end. You can navigate to【Membership Marketing → Member → Membership Benefits → Recharge Plans】
- Recharge amount, bonus amount, and bonus membership cannot be modified in the app; commission staff can be selected.
- Member recharges can be set to offer cashback, points, coupons, or membership benefits.

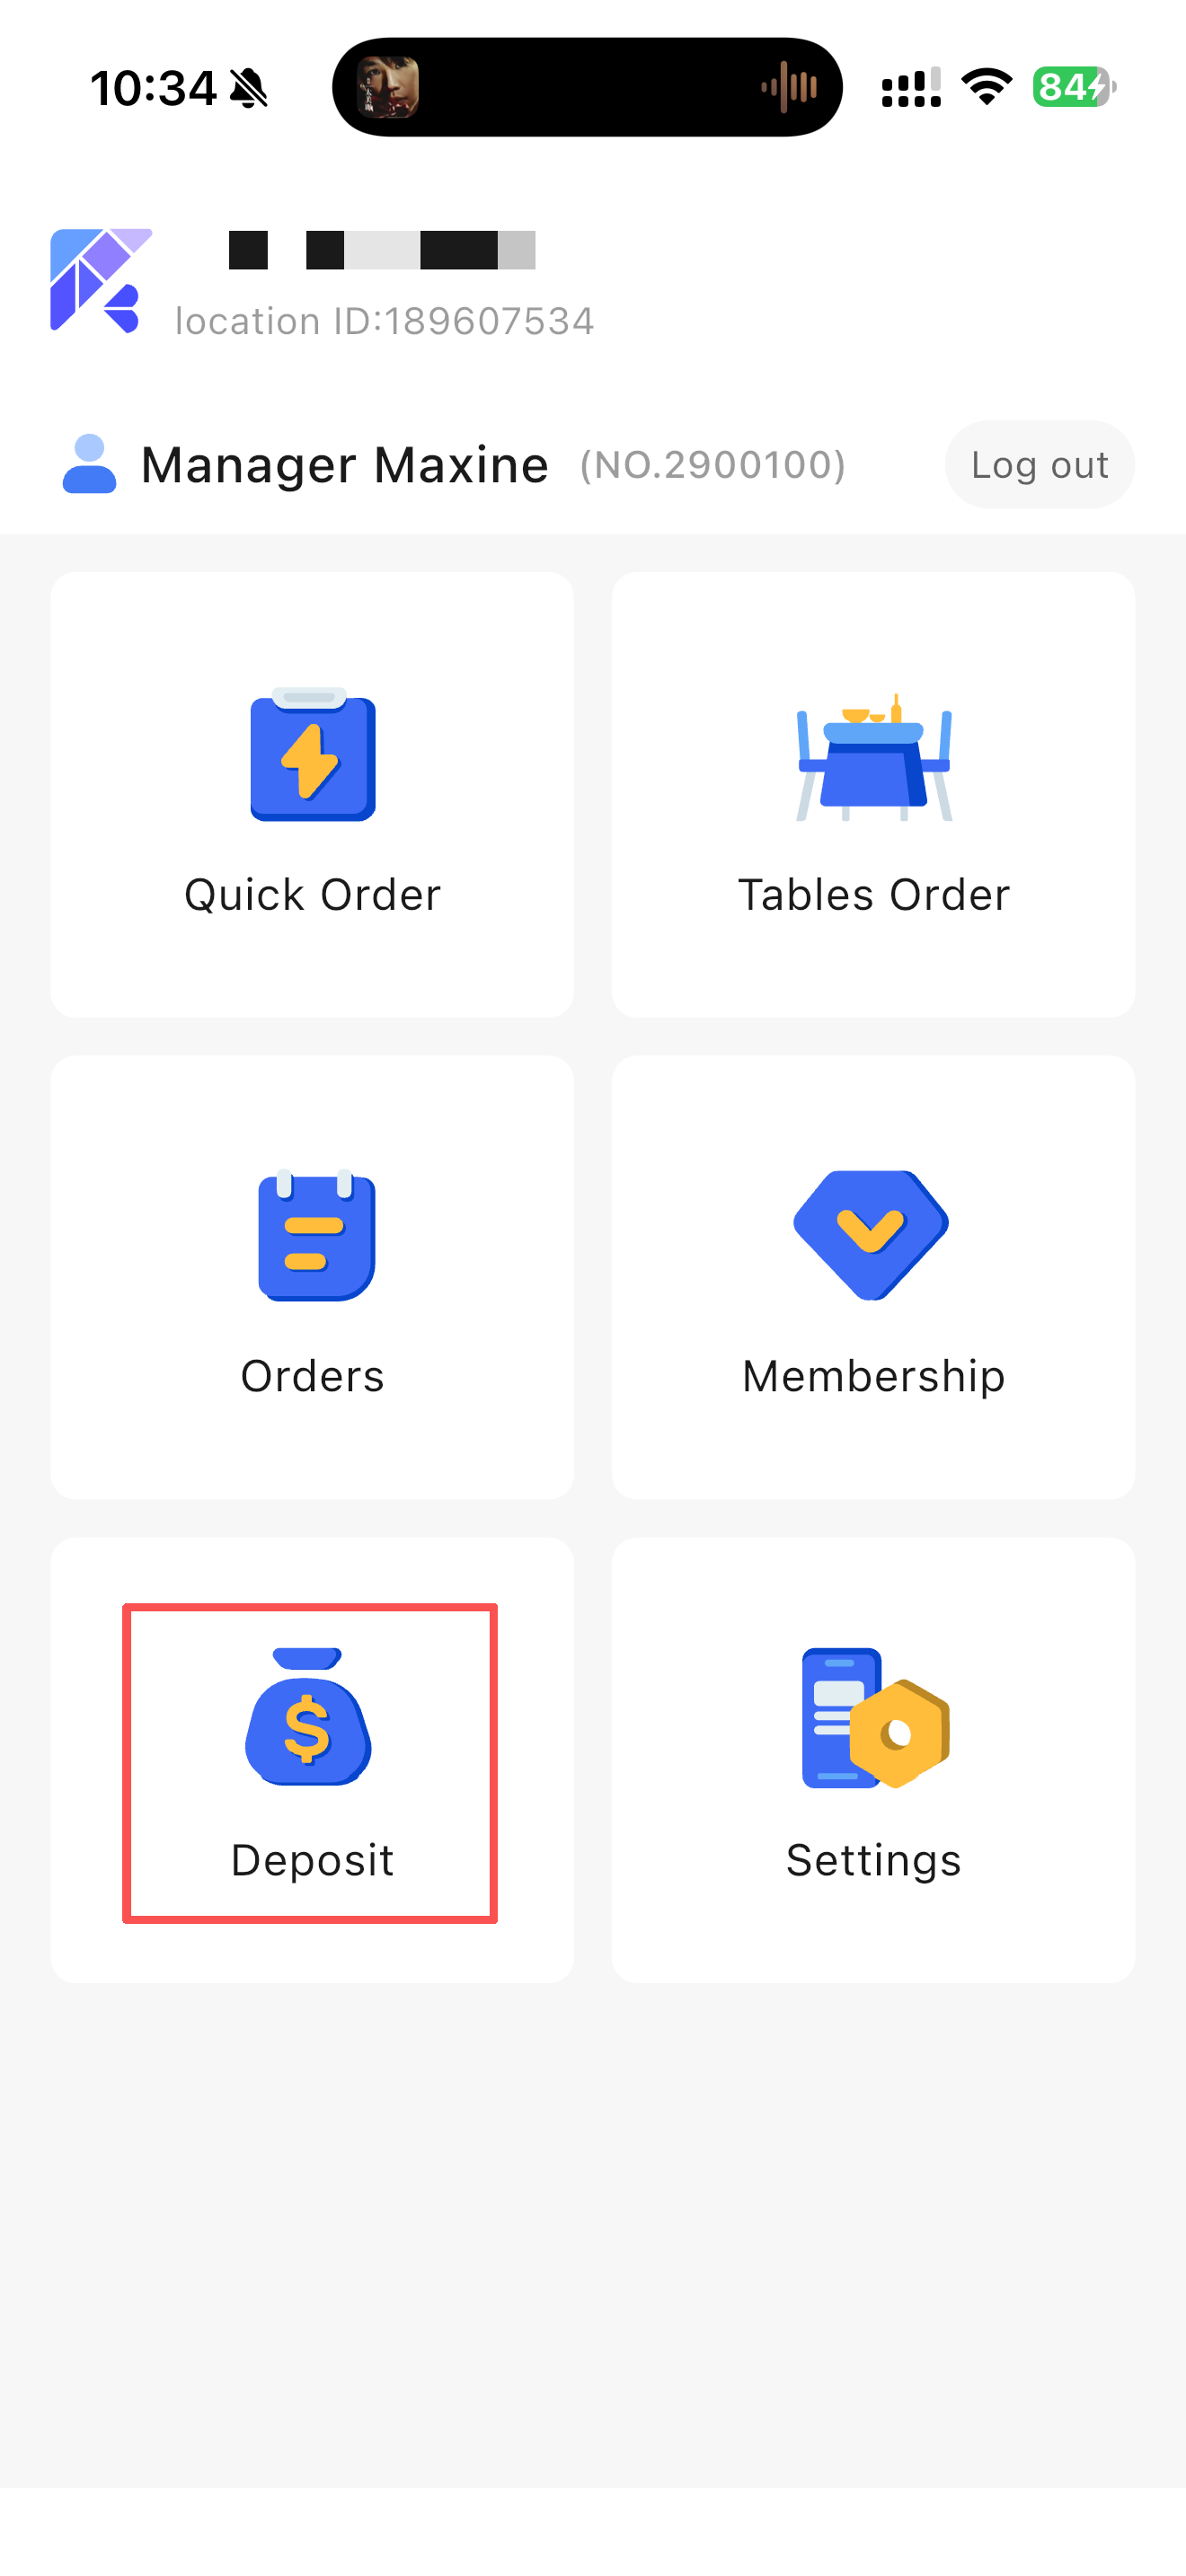
6 Deposit
In specific scenarios where customers need to pay deposits for services or items (e.g., takeout services, tableware deposits, special dishes, membership card deposits), this module helps merchants manage deposit collection, refunds, and settlements.
6.1 Function Operations
6.1.1 Filter Deposit Data
Merchants can filter deposit data by time or status to quickly locate specific deposit records.
- Operation Steps:
- Access the Deposit Management page and locate the filter options at the top or sidebar.
- Select filter conditions (e.g., Status: Pending Payment, Refunding, Pending Use, Used, Refunded, Voided, All).
- The system displays deposit data matching the selected conditions, facilitating quick queries for merchants.
Application Scenarios:
Date-based Query: Merchants can view deposit collection and refund records for a specific date or date range.
Status-based Query: Merchants can quickly find unrefunded or refunded deposits for follow-up management.
6.1.2 Default Display: Same-Day Data
The system defaults to displaying same-day deposit collection and refund data, enabling merchants to quickly check the daily financial status.
- Operation Steps:
- Access the Deposit Management page; the list automatically displays all same-day deposit records.
- Merchants can view same-day data directly to ensure timely and accurate deposit management.
Application Scenarios:
Daily Operation Management: Merchants only need to check the same-day deposit records to ensure smooth daily operations.
Financial Reconciliation: Merchants can compare same-day collected and refunded deposits at any time to ensure account consistency.
6.1.3 Collect Deposit
Merchants can collect deposits for specific services or items by entering the deposit amount, customer name, phone number, and remarks. After completing the collection, the system navigates to the payment page. Successful payment automatically adds the deposit record to the deposit list.
- Operation Steps:
- Click the【Collect Deposit】button at the bottom.
- In the pop-up window, enter the deposit amount, customer name, phone number, and optional remarks (e.g., Tableware Deposit, Membership Card Deposit).
- Click【Confirm】to navigate to the payment page.
- After the customer completes payment, the system automatically returns and displays the deposit record in the list.
Application Scenarios:
Takeout Service Deposit: Merchants can collect deposits to ensure tableware returns when customers order takeout.
Membership Card Deposit: Merchants collect deposits when issuing membership cards.
Special Item Deposit: Collection of deposits for special dishes or tableware.
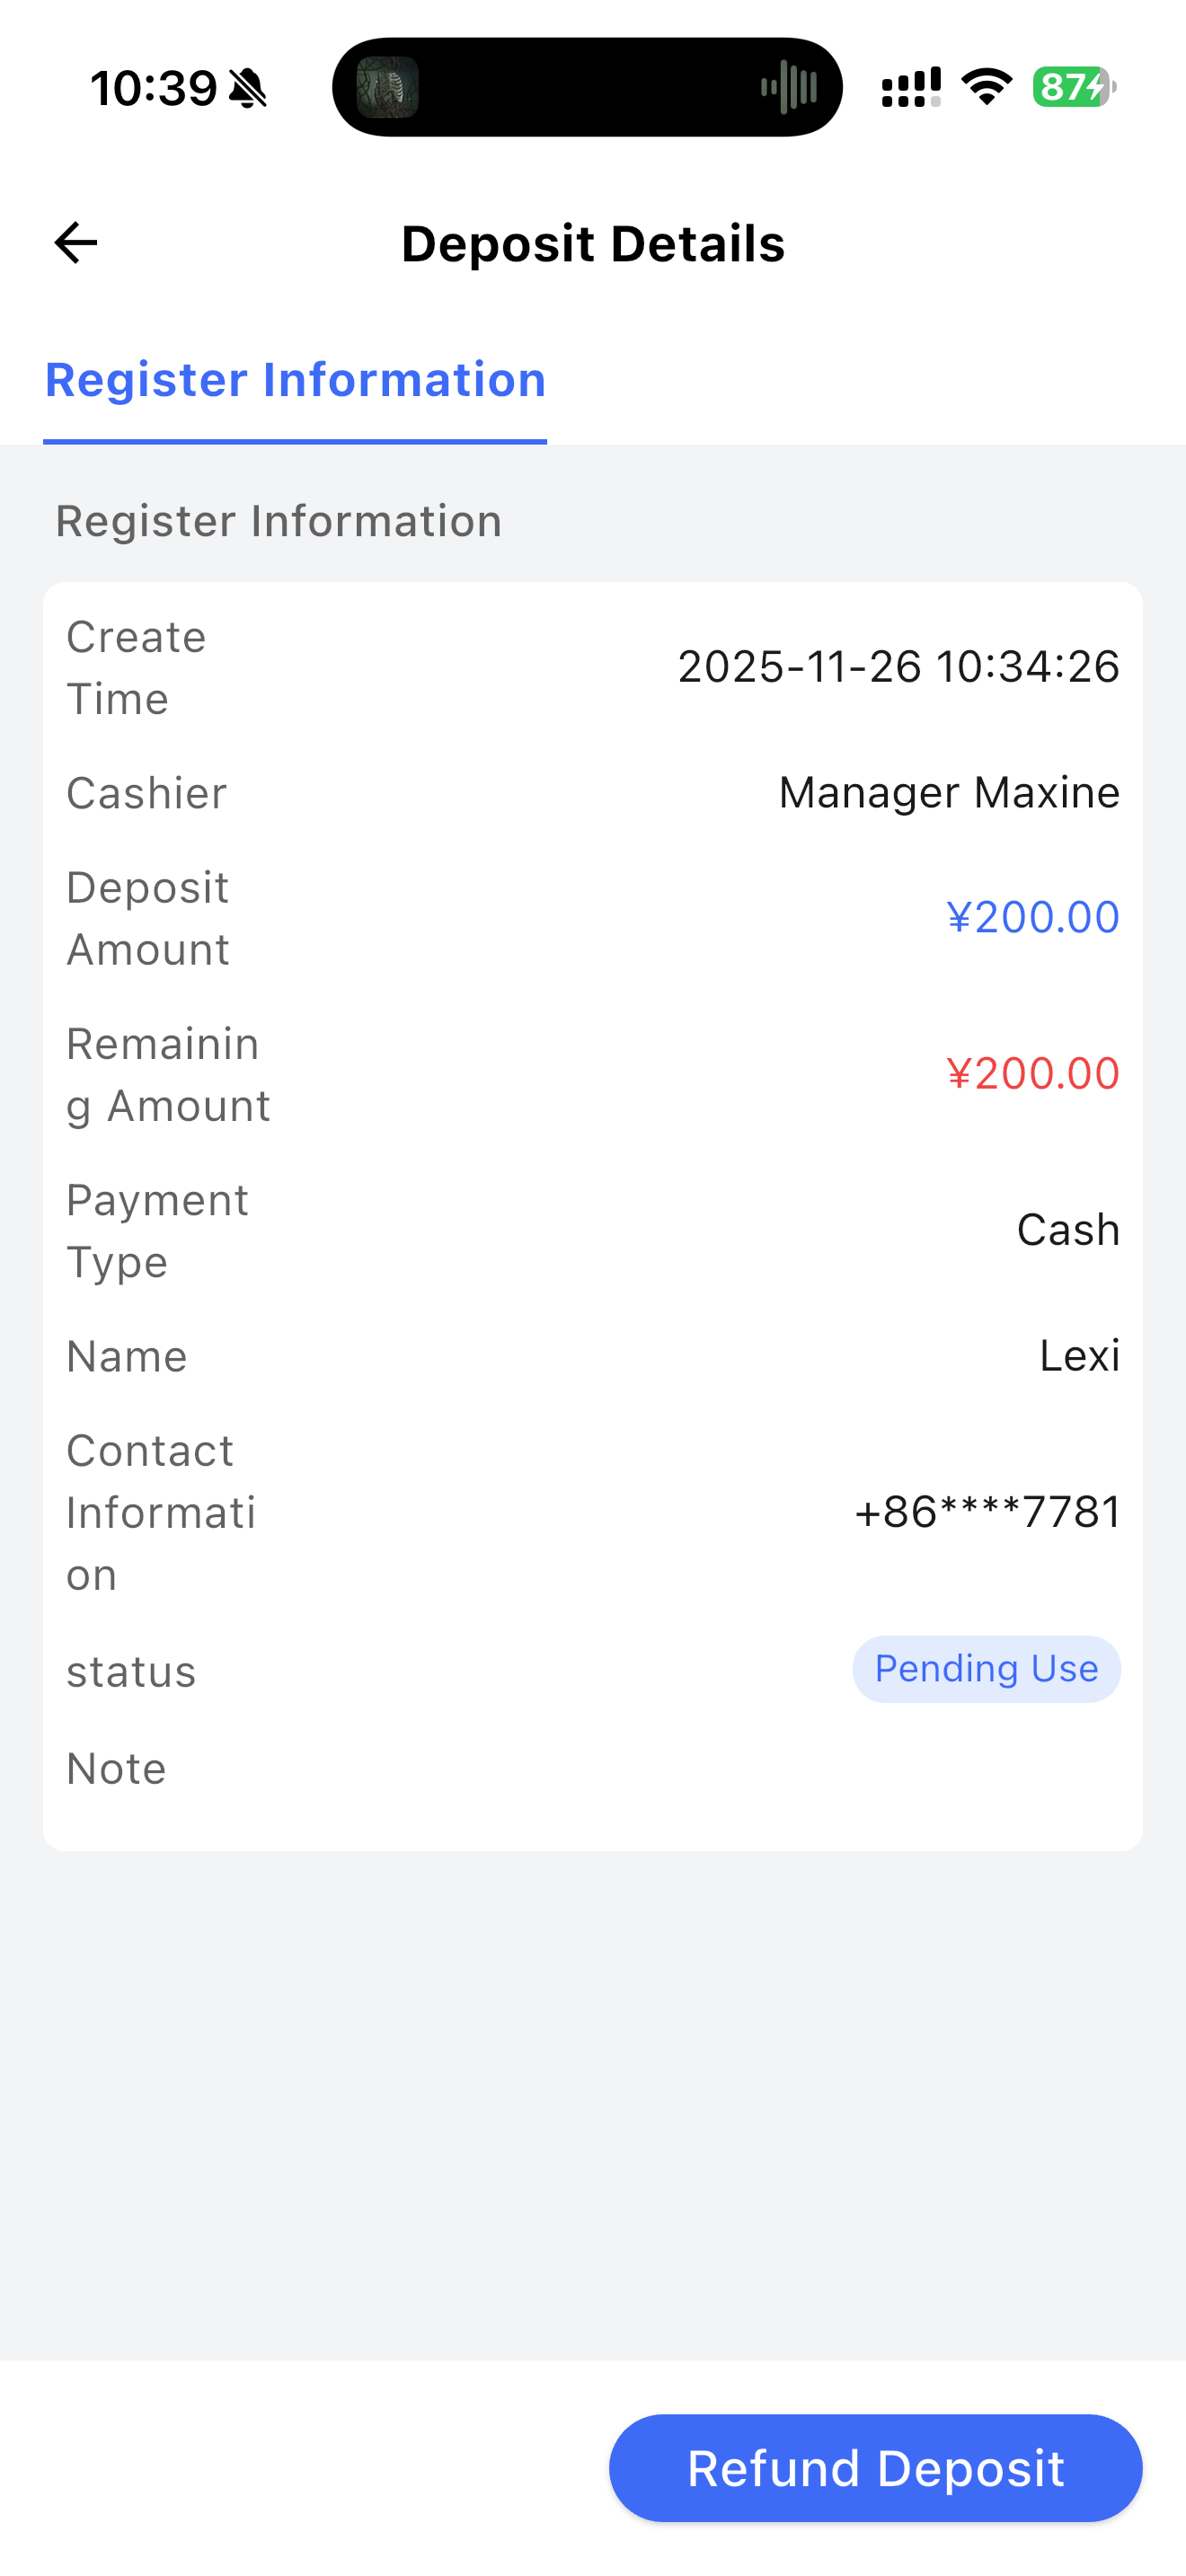
6.1.4 View Deposit Details
Merchants can click any deposit record in the list to access the detail page and view comprehensive information.
- Operation Steps:
- Locate and click the desired deposit record in the deposit list.
- The system navigates to the deposit detail page, displaying the deposit amount, collection time, customer information, deposit status, and other details.
Application Scenarios:
Deposit Information Query: Merchants can view complete deposit records via the detail page when processing refunds or customer inquiries.
Customer Information Verification: Check customer contact details and deposit status for follow-up after-sales service.
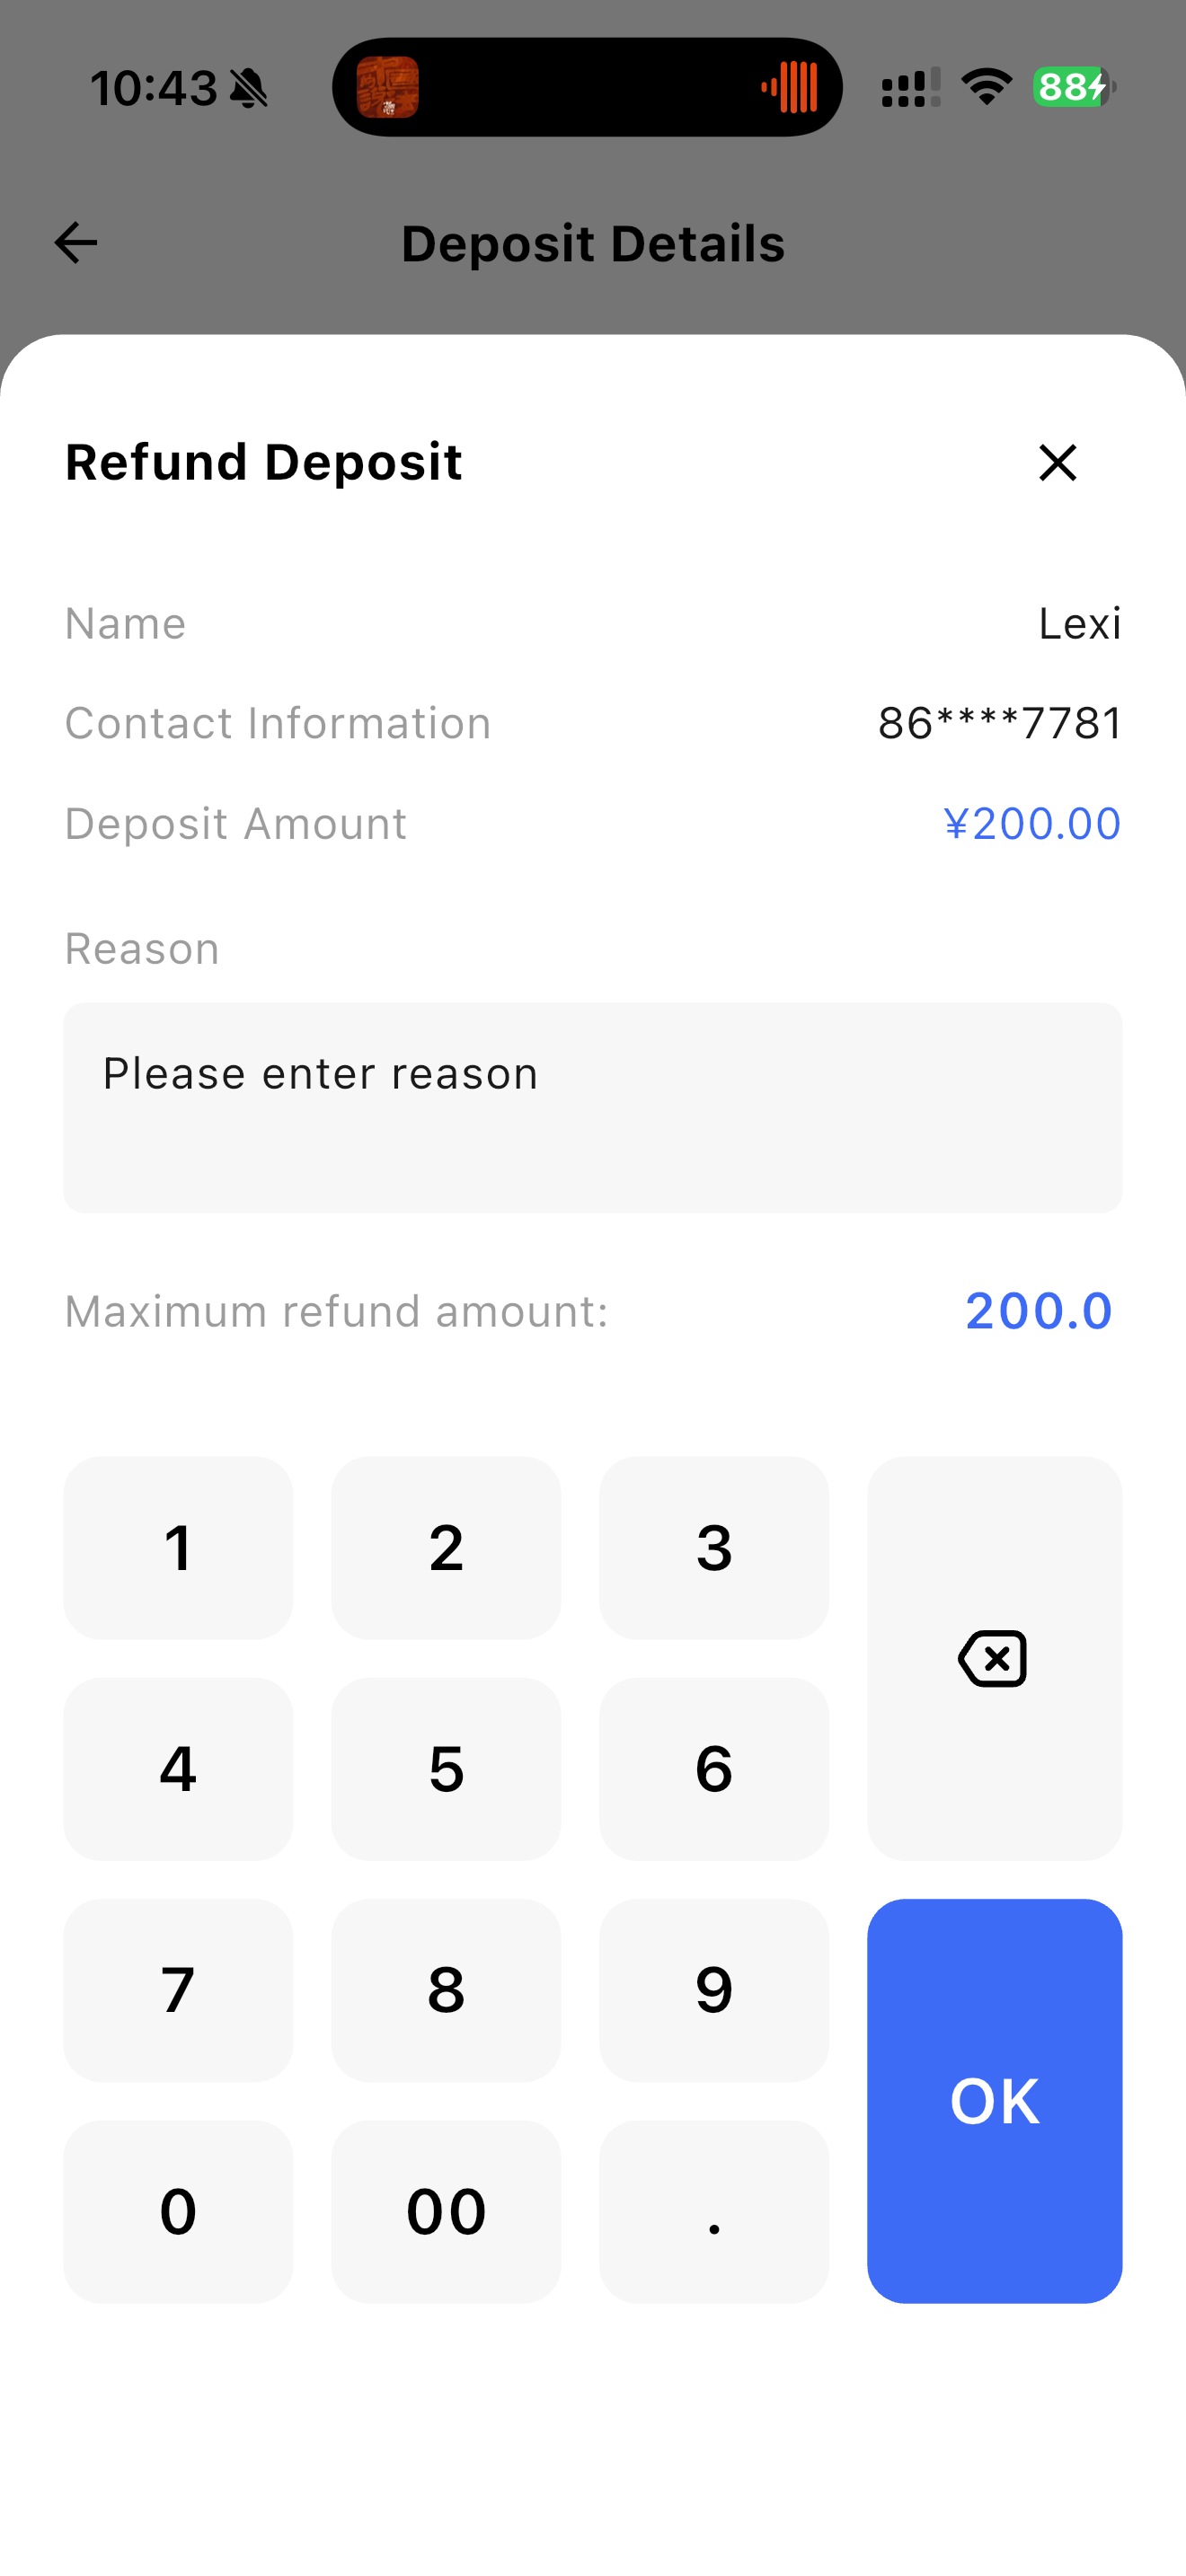
6.1.5 Refund Deposit
Merchants can refund deposits to customers. During the refund process, merchants need to enter the refund reason and confirm the operation; the system automatically processes the refund and updates the deposit status.
- Operation Steps:
- Click the【Refund Deposit】button on the deposit detail page.
- Enter the refund reason (e.g., Customer Returned Tableware, Service Completed).
- Click【Confirm】and the system processes the refund and updates the deposit record status.
Application Scenarios:
Tableware Return: Merchants refund deposits after customers return tableware or other items.
Membership Card Return: Merchants refund deposits when customers cancel their membership or return the membership card.
7 Settings
7.1 Basic Settings
You can find the details in section 1.2.
7.2 Service Switches
7.2.1 Discount Recommendations
- Function: When enabled, the system intelligently recommends discounts to customers in the cart.
- Trigger Condition: The customer’s ordered items meet the configured discount activity rules.
- Display Content: Recommended discounts may include threshold discounts, percentage discounts, free gifts, member prices, etc.
7.2.2 Card Transaction Confirmation Page
- This page displays the order’s payable amount, payment method, and customer signature to ensure customers clearly confirm the payment amount accuracy before and after the transaction, preventing misoperations or amount errors.
7.2.3 Print Notifications
- When enabled, notifications are sent for all operations requiring printing.
7.2.4 Default Fast Food Order Type
- Configure the default order type for Fast Food Mode (supported types: Dine-in, Takeout, Pickup).
7.2.5 Order Page Shopping Cart Amount Display Settings
- Supported Options: Total Order Amount, Unordered Amount.
- Rule Description:
- Total Order Amount: Includes both ordered and unordered amounts.
- Unordered Amount: Displays only the unordered portion, excluding submitted amounts.
7.2.6 Card Swiping Signature Setting
- Switch control for on/off operation, supported types: Before swiping the card/After swiping the card
This switch controls whether customers are required to sign for card payments. Typically, enabling this function requires customers to sign on the payment terminal to ensure the legality of the payment and confirm the transaction.
When enabled, customers must sign on the device screen during payment as proof of confirmation. This enhances payment security, especially when no on-site cashier is available for verification.
7.2.7 Table Amount Display Setting
- Supported Options: Total Order Amount, Unordered Amount.
- Total Order Amount: Displays the total amount of all orders for the table (including unsubmitted amounts).
- Unordered Amount: Displays only the unsubmitted portion (excluding submitted amounts).
- After configuration, the selected amount is displayed below each table on the table page.
7.3 Table Management
- Servers can select the tables they need to manage based on their assigned service areas.
- For example, if a server only needs to manage the lobby, he/she can check all tables in the lobby on this page.
- After configuration, when selecting tables during the dine-in mode, the selected tables will be displayed under the 【My Tables】 tab.
7.4 Print Settings
- Enable built-in printing if the device supports this function.
- Configure paper width, character encoding, and maximum characters per line.
- After configuration, adjust the above parameters based on actual print results for debugging.
7.5 More Settings
- Add RFID scan-to-add functionality here.
- If the device does not support RFID, the system displays “This device does not support this function”.
7.6 Version Update
- Click the button to update when a new version is available.
- If the current version is the latest, the system displays “You are already using the latest version”.