Clock In & Shift Closing
1 Introduction
This guide covers employee check-in, shift closing, and end-of-day procedures in the POS system, including attendance management, shift handover, and daily settlement.
2 Basic Concepts
2.1 Key Definitions
Shift Closing (Handover): The process where cashiers verify shift revenue and funds and generate a shift handover report. It supports single-person handover, proxy handover, and blind handover modes.
Day End Closing: The process of summarizing the day's revenue, handling unclosed orders, and updating the business date at the end of the day's operations. It includes manual and automatic daily summary methods.
Data Statistics Rules: Both shift and daily summaries are based on the order settlement time (instead of the creation time) to avoid missing orders across time periods. It includes personal orders + online orders (automatically attributed to the first person who performs the handover).
2.2 Core Prerequisites
- All unclosed orders must be settled (paid/cancelled/carried over to the next day) before the Shift
- All employees must complete their shift summaries before the Day End Closing (in manual mode).
- Data Retention: By default, billing data is retained for 62 days, adjustable in the BO end (1-999 days). Data older than this is automatically cleared once uploaded to the cloud.
3 Employee Clock-In Management
3.1 Pre-Clock-In Preparation (Admin Configuration)
3.1.1 BO End Clock-In Settings
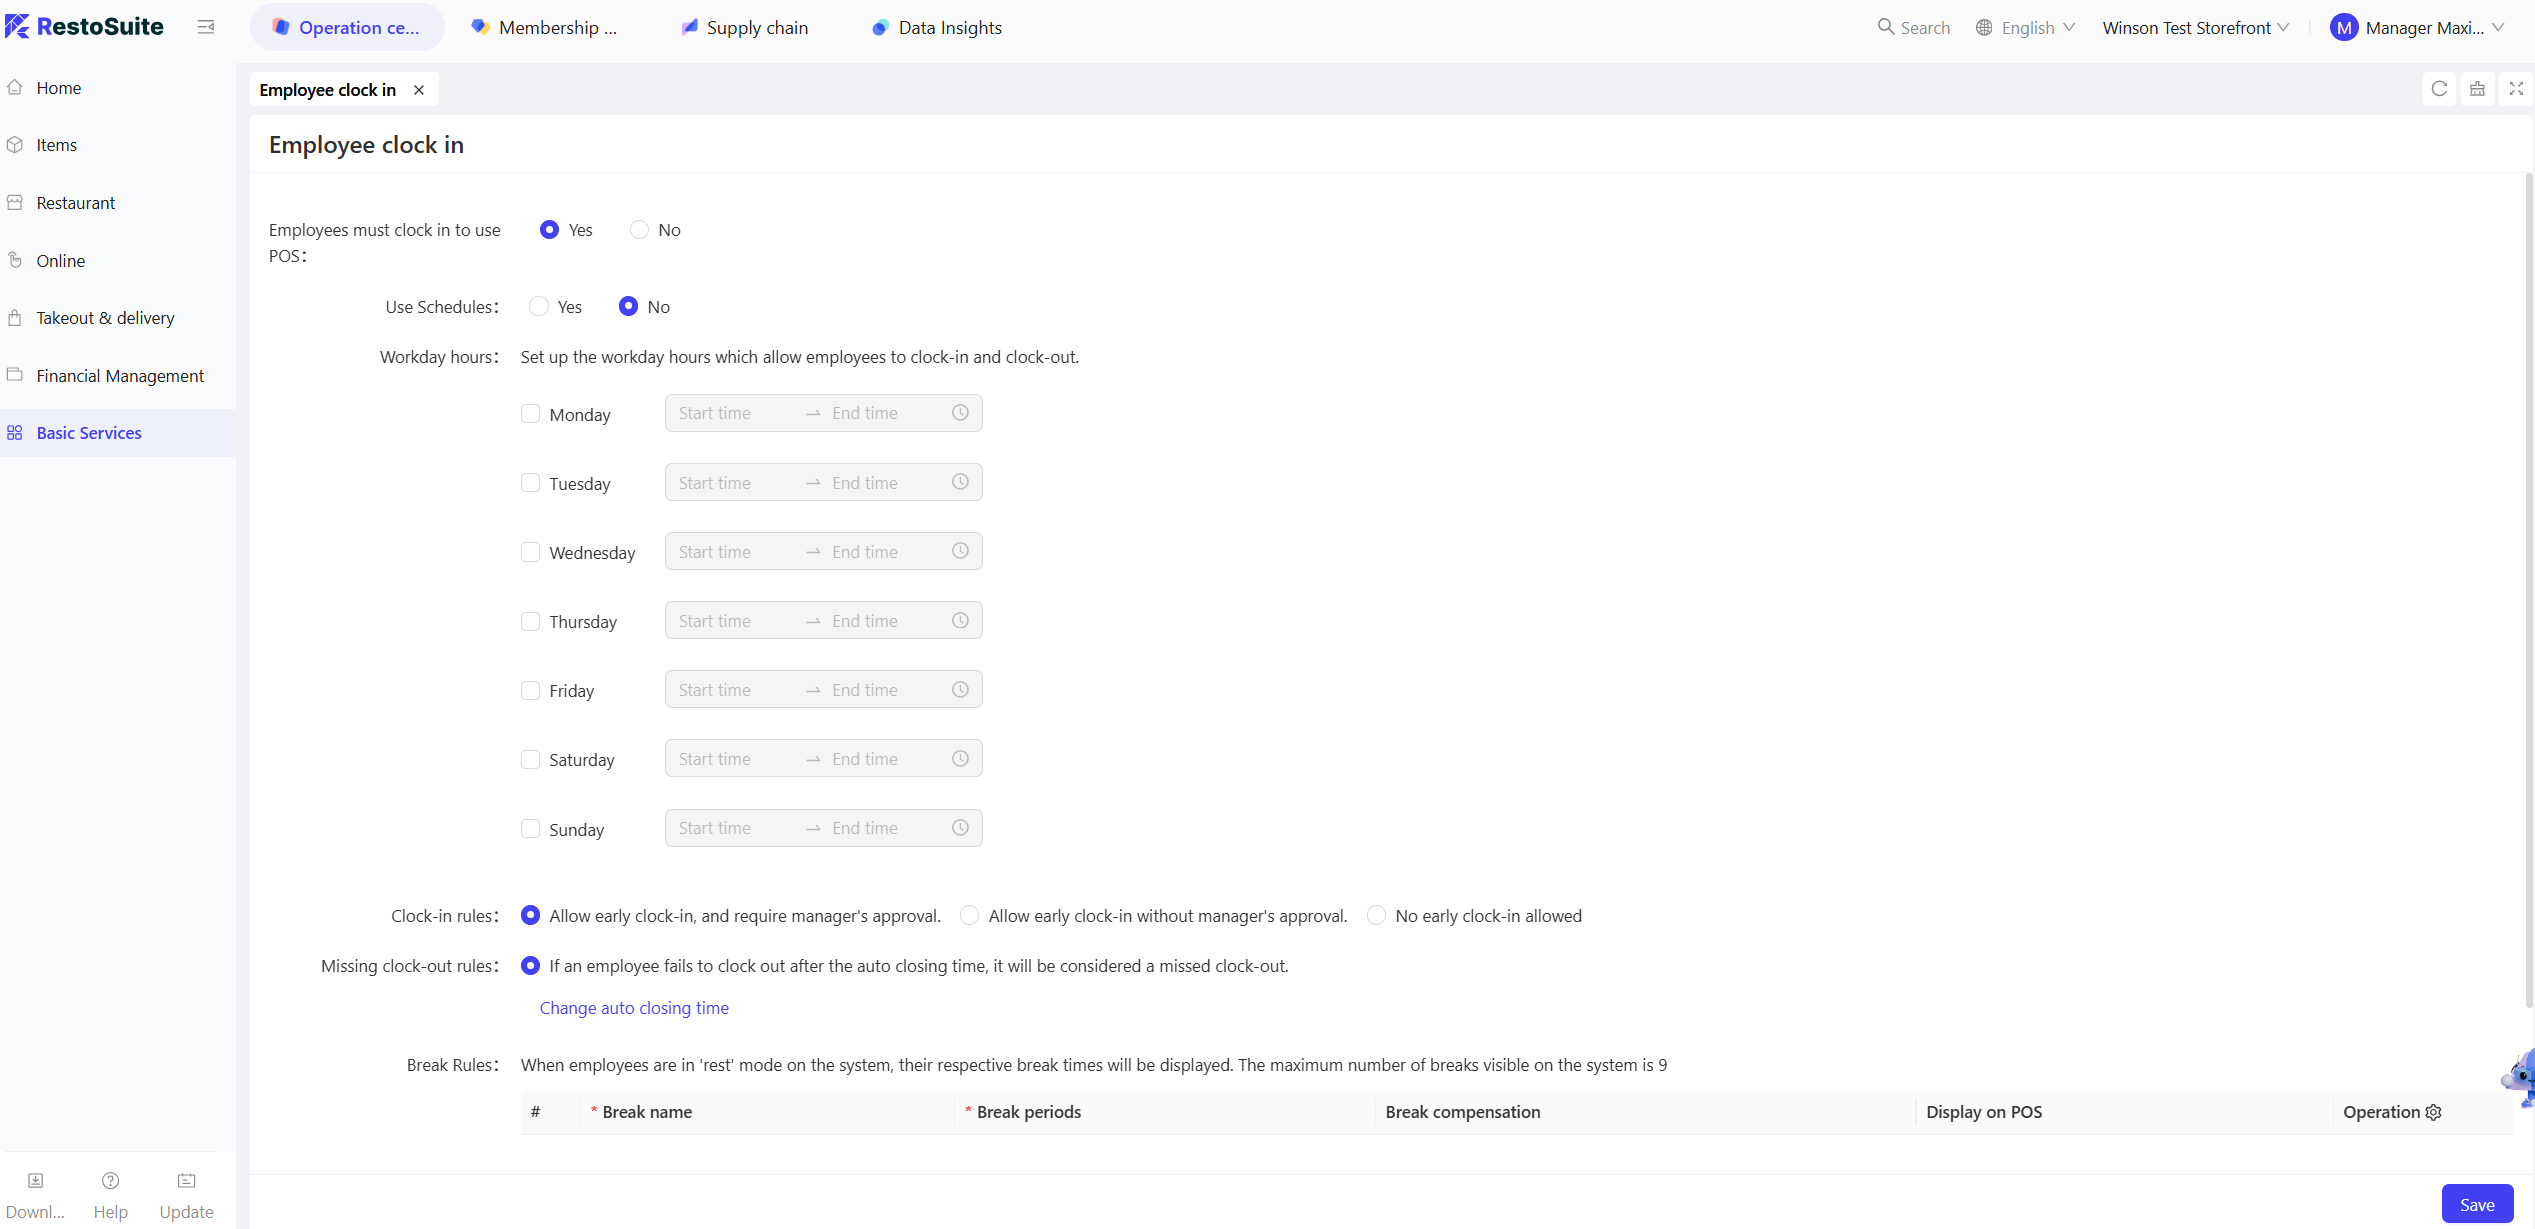
- Step 1: Admins log in to the BO system, go to【Basic Services → Employee clock in】and enable the【Compulsory clock-in】(default is off)
- Step 2: Configure core rules:
- Work Hours: Default is Monday to Sunday, 08:00-23:00. Adjust as needed (e.g., extend to 24:00 on weekends).
- Early Clock-In: Enable “Allow Early Clock-In” (default is enabled). You can choose “Manager Approval Required” (requires manager PIN for early clock-in).
- Break Settings: Add break types (e.g., “15-minute paid break,” “60-minute unpaid lunch”), and check “Display on POS” (display up to 9 types, keep at least 1 type).
3.1.2 POS End Clock-In Permission Confirmation
- Employees log in to POS, go to【Settings → Employee Permissions】and confirm that “Clock-In Permission” is enabled for the account (default for admin/cashier/server).
- If fingerprint clock-in is needed (V1.3 and above):
- Go to【Settings → Card Reader】enable “Fingerprint Clock-In,” and select the device model (e.g., ZKT-live10R).
- In【Main Menu → More → Employee Binding】, the admin can register the employee’s fingerprint (supports multiple fingers). Once successful, it shows “Fingerprint Bound.”
3.2 Daily Clock-In (Employee Perspective)
3.2.1 Clock-In
-
PIN Code Clock-In:
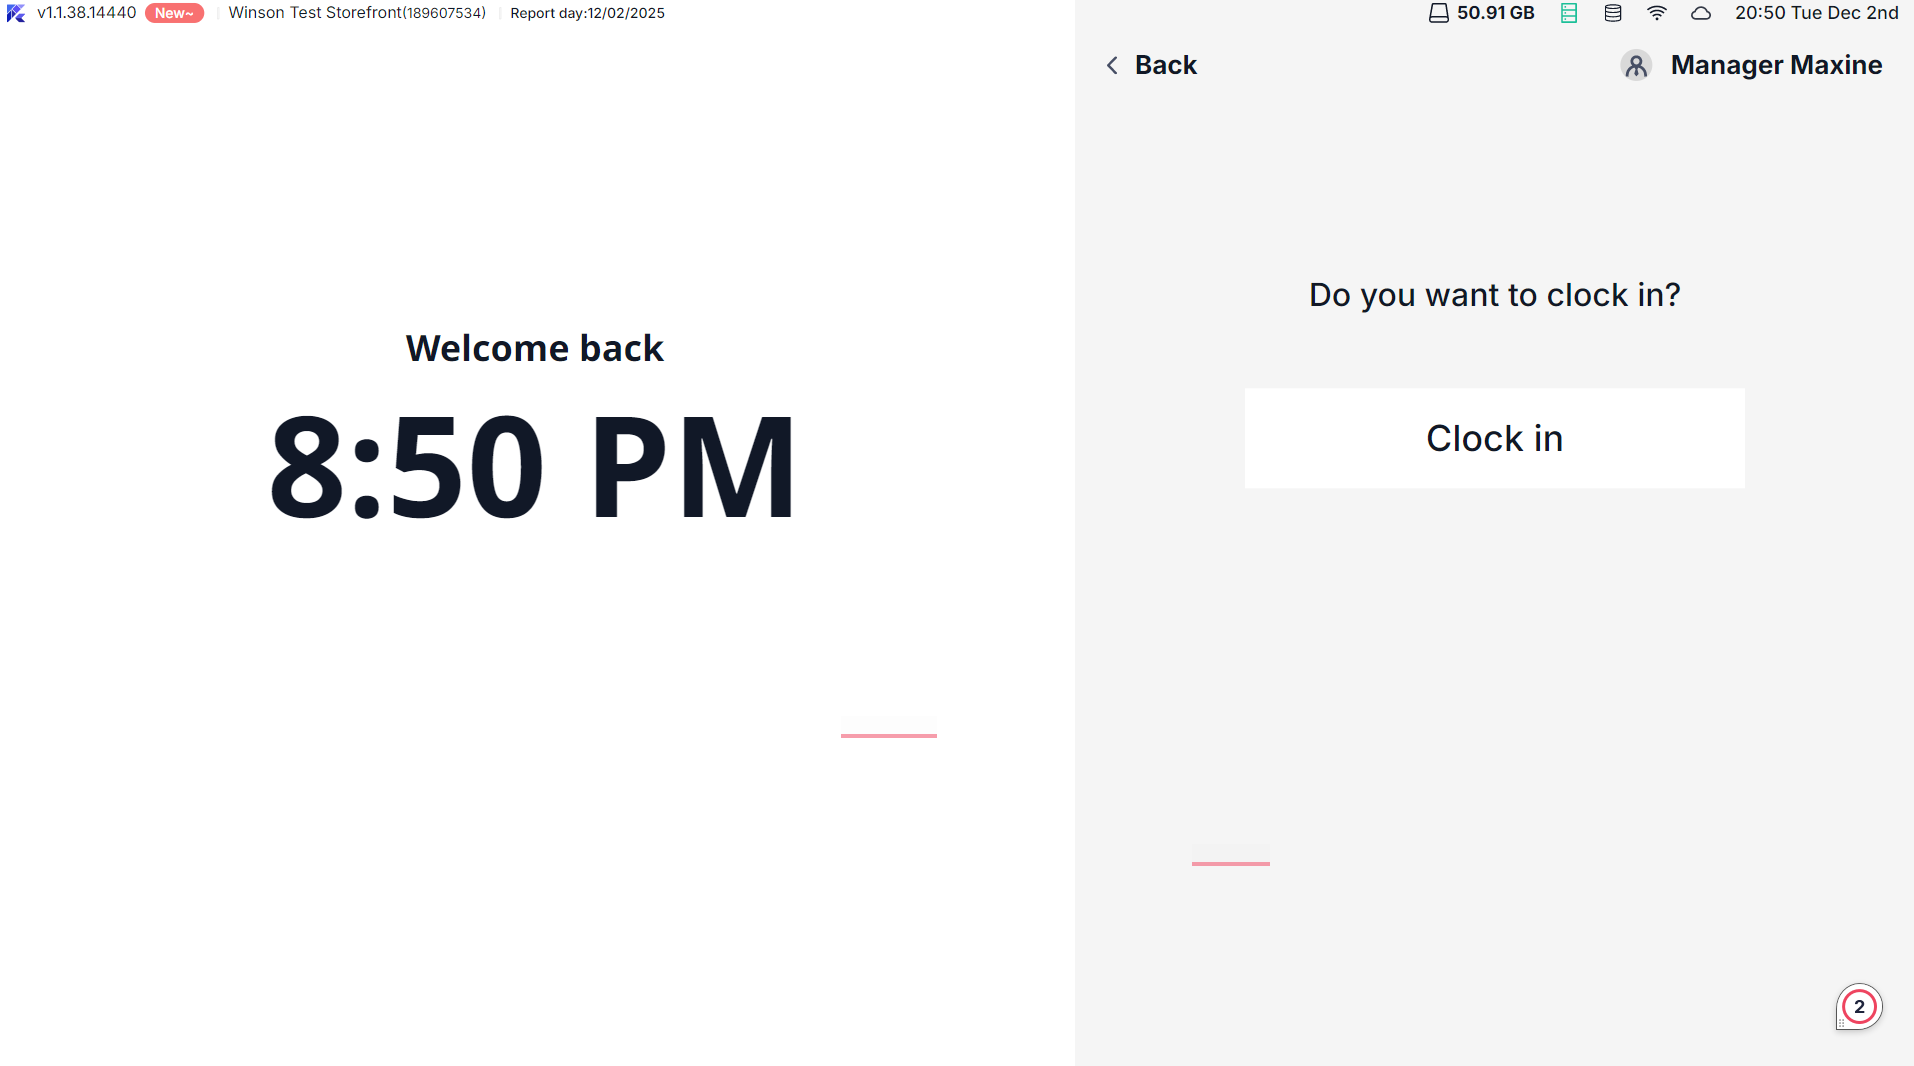
- When logging into POS without being clocked in, the system automatically redirects to the clock-in page.
- Enter personal PIN, select the position (e.g., “cashier,” “server”). If multiple positions, select manually.
- Clock-In Rules:
- On-time/late: Click【Clock In Now】to clock in and be redirected to the main POS interface (tables/orders page).
- Early Clock-In (requires approval): Click【Clock In Now】and the system prompts for manager authorization. Enter the manager PIN to complete clock-in.
- No Early Clock-In Allowed: Only【Clock In at XX: XX】(XX: XX is the start time) is shown. Click to record clock-in at the set time.
-
Fingerprint Clock-In (with configured device):
- Press the fingerprint on any POS page; the system recognizes the employee.
- If not clocked in, it defaults to “clock in,” and a pop-up will show “Clock In Success” (auto-closes in 3 seconds).
- If both “Fingerprint Login” and “Fingerprint Clock-In” are enabled, choose between the two after pressing the fingerprint.
3.2.2 Take a Break
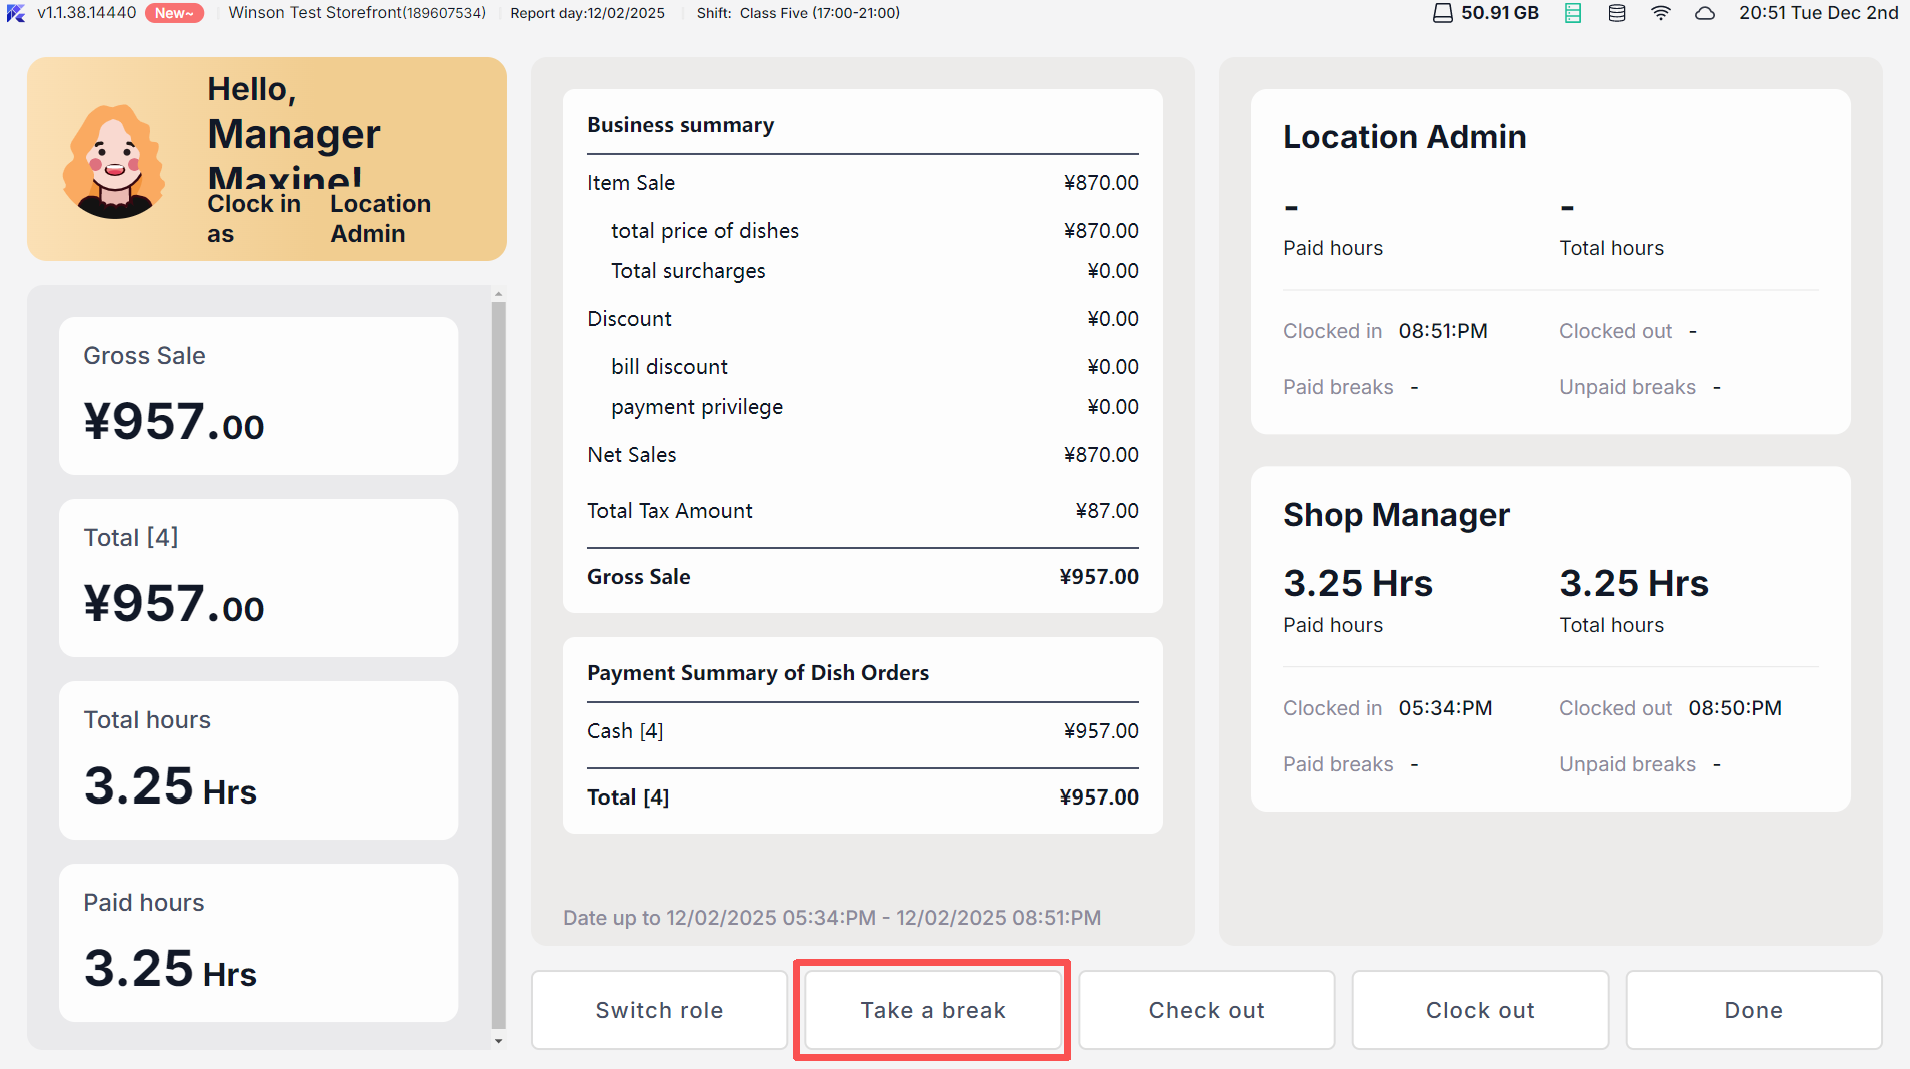
- Go to “Personal Summary Page” (click the main menu avatar), and click【Take a Break】
- Select break type (e.g., “15-minute paid break”). The system records the start time and shows “Estimated End Time” (e.g., starts at 14:00, ends at 14:15).
- Click【Done】to return to the lock screen. Other employees can log in normally during the break without affecting the current clock-in record.
3.2.3 End Break
-
Log in to POS after the break, automatically redirecting to the【End Break】page, showing:
- Remaining break time (e.g., “Remain time 3 min”) or exceeded time (e.g., “Exceeded time 2 min”).
-
Click【End Break】to record the end time of the break, automatically calculate “Effective Work Hours” (excluding unpaid break), and be redirected to the main POS interface.
3.2.4 Clock-Out
- Go to【Personal Summary Page】and click【Clock Out】
- If the break hasn’t ended, the system first executes【End Break】
- After successful clock-out:
- For clock-in employees only: Return to the login page.
- For employees with POS operational permissions: If a handover is needed, complete the【Shift】(verify payment amount), then return to the login page.
- A pop-up will show “Clock Out Success,” displaying the total hours worked (e.g., “Total Hours: 8.5 hrs”).
3.3 Clock-In Record Management
3.3.1 View Clock-In Records
- Employees can go to【Reports → Clock-In Report】select the date range (default is yesterday, can check today), and view personal clock-in details:
- Includes “Position, Start Time, End Time, Break Duration, Effective Work Hours.”
- Exited employees’ names are marked with【Exited】and records for non-active employees are not shown.
3.3.2 Add/Edit Clock-In Records (Admin Permission)
-
Admins can go to【Reports → Clock-In Report】click【Add Timecard】to add past clock-in records:
- Select employee, position, fill in “Start/End Time,” add break records if any.
- Validation Rules: Clock-in duration cannot exceed 24 hours; break time cannot exceed start/end time.
-
Edit Clock-In: Click an existing clock-in record to adjust “Start/End Time” (only supports editing within 24 hours of non-daily summary records). Edited records are marked “Edited.”
4 Shift Closing (Handover)
4.1 Regular Shift Closing Process
4.1.1 Shift Closing Entry
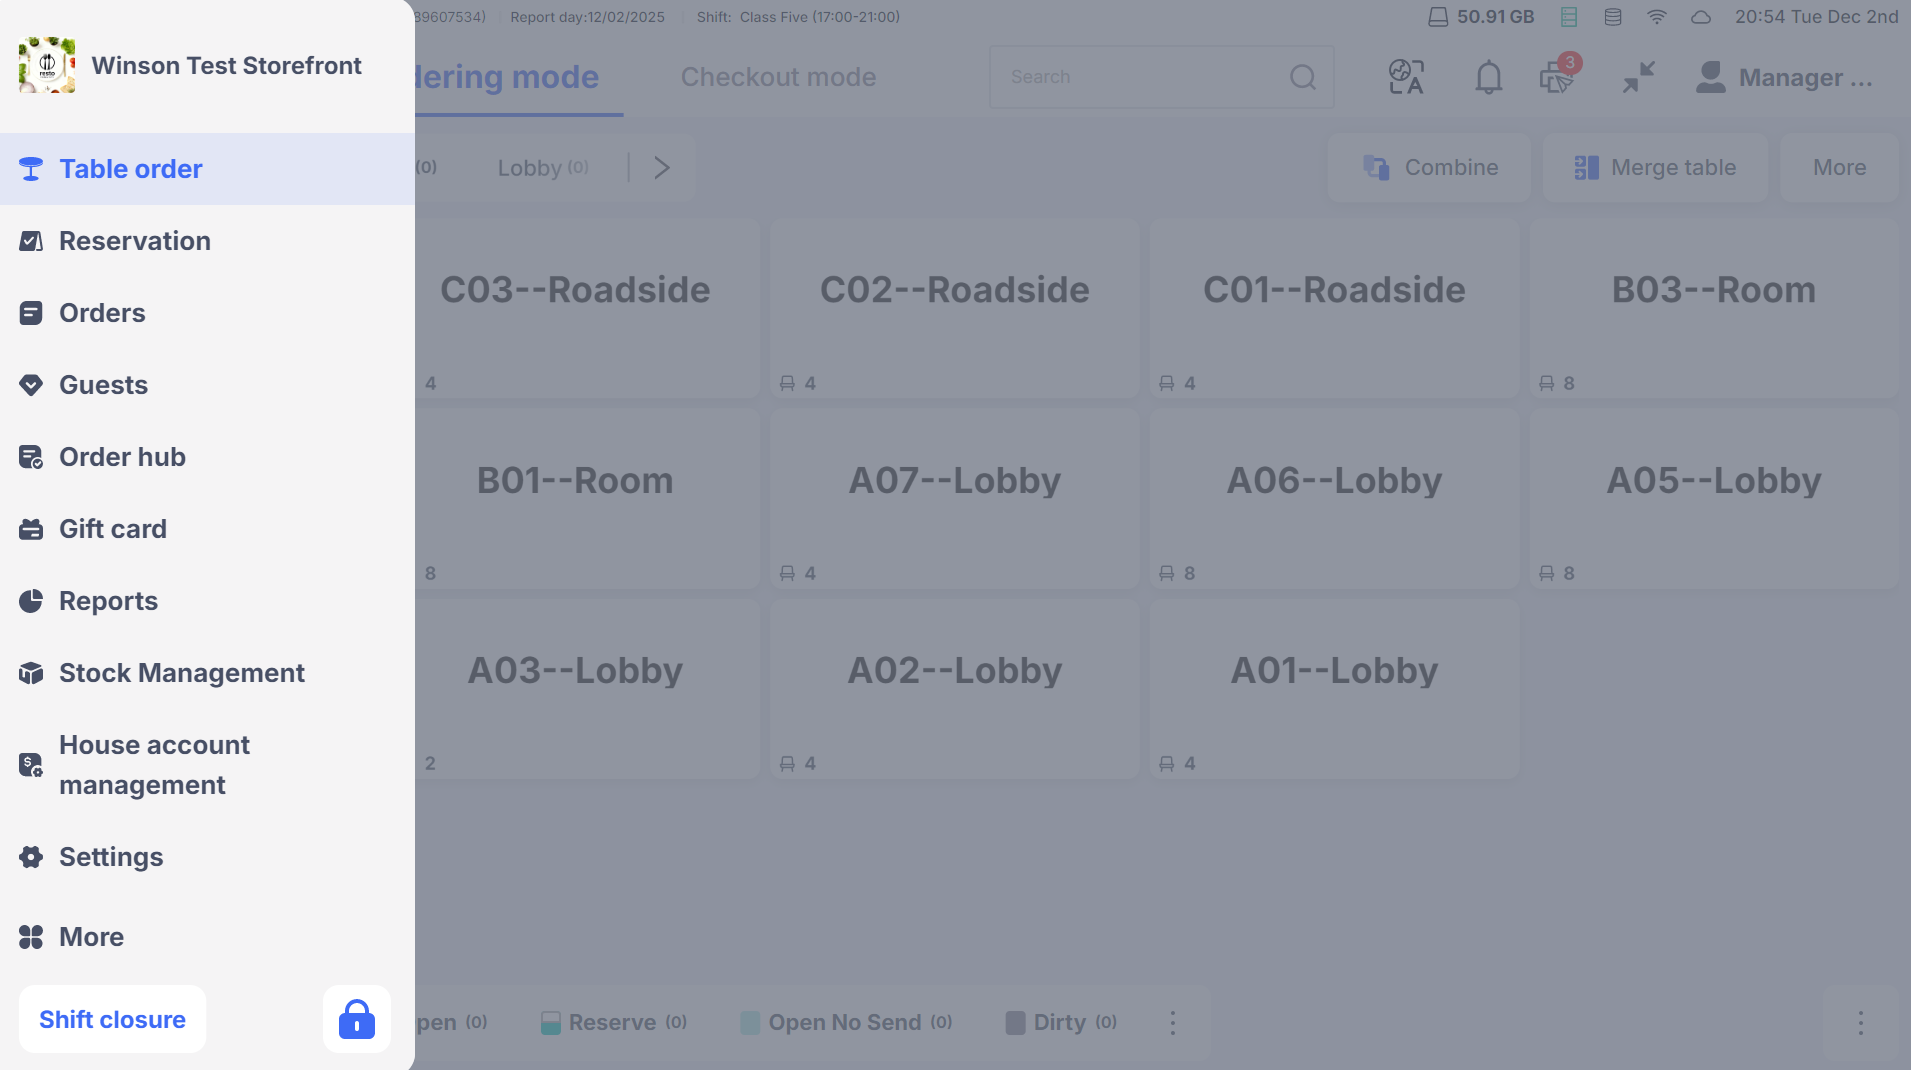
- Main Menu Shortcut: Click the【Shift Closure】on the bottom left of the main menu (shows if you have permission).
- Personal Center Entry: Go to 【My Page】and click【Check out】(button is grayed out if no permission).
4.1.2 Operational Steps
-
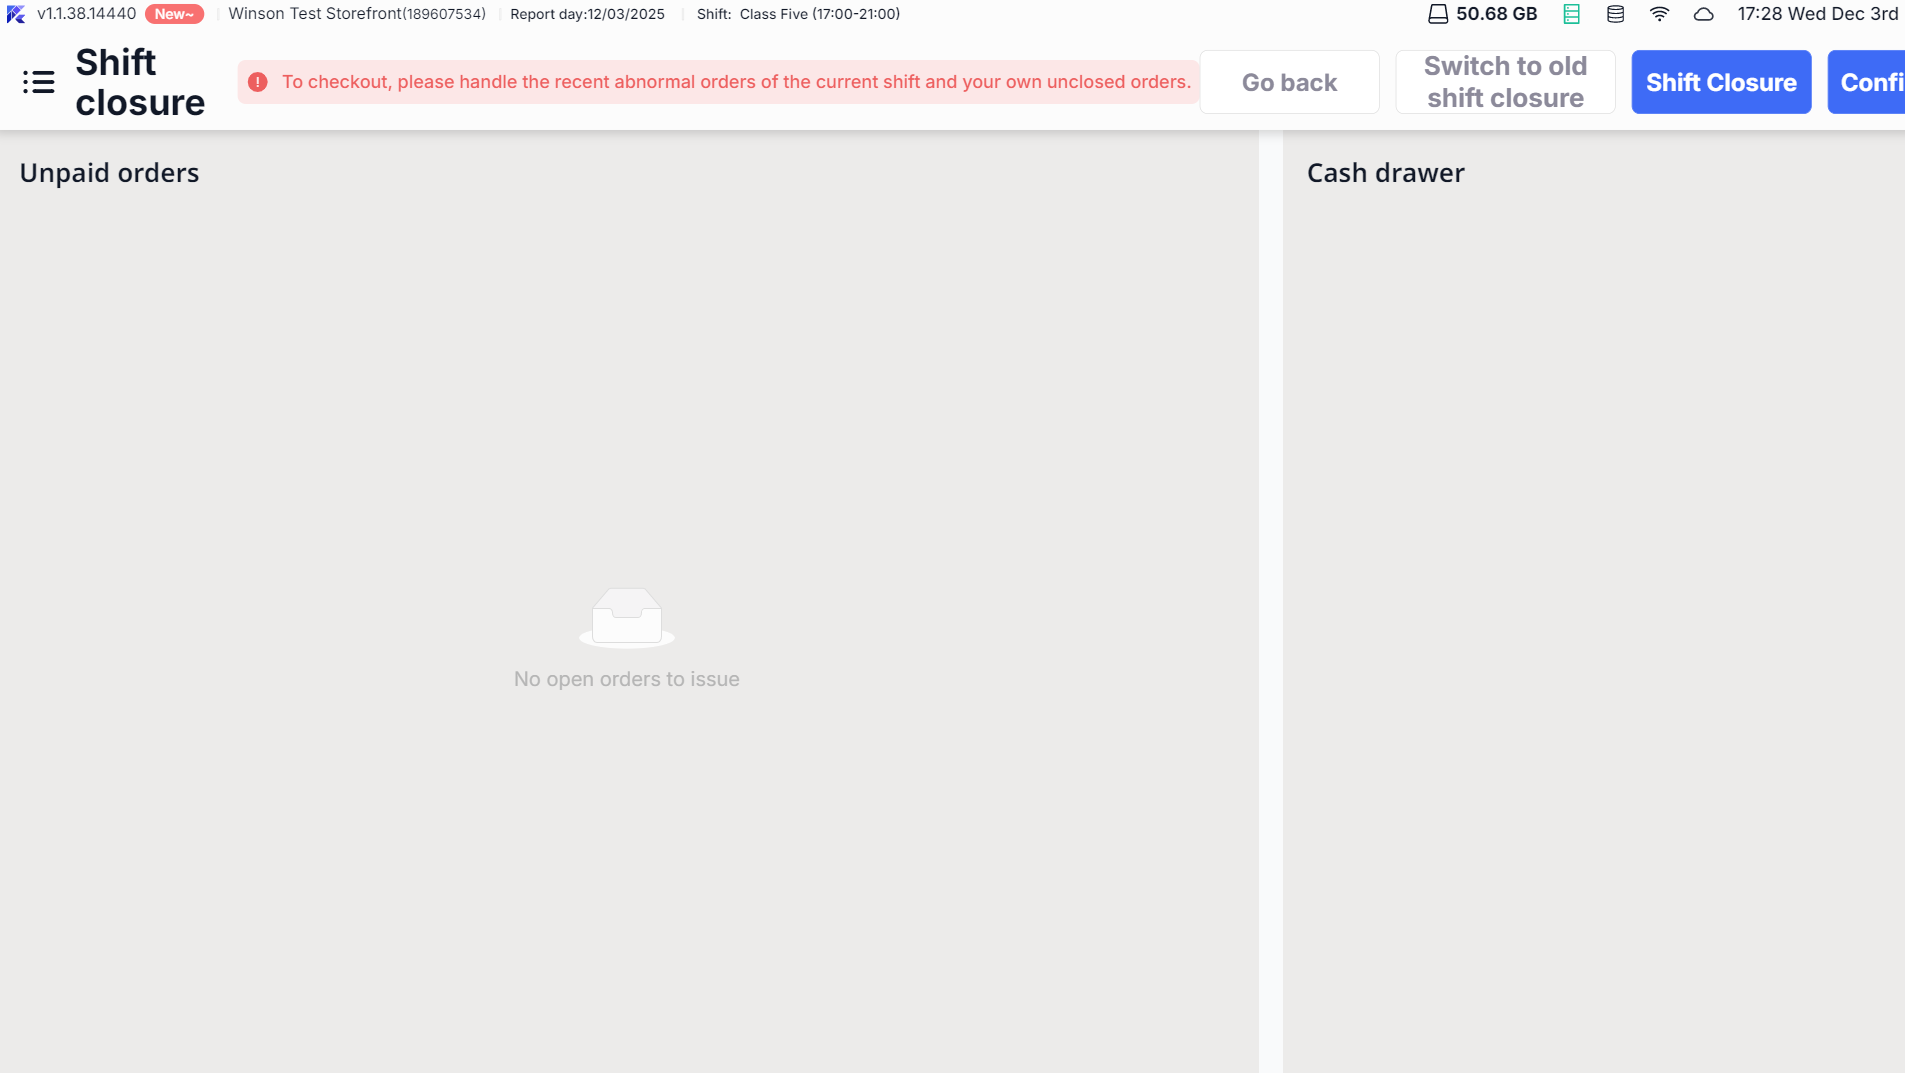
Handle Unclosed Orders:
- The system lists unclosed orders for the shift (created/paid by the user).
- Unpaid orders: Choose “Pay,” “Cancel Order,” or “Carry Over.”
- Partially paid orders: Pay the remaining balance or force close (record as loss).
-
Close Cash Drawer:
- For open cash drawers, enter the actual amount after counting and confirm.
- If there’s no cash drawer, directly enter the cash receipt amount for the shift.
-
Generate and Print Shift Report:
- The system automatically summarizes shift revenue (sales, refunds, payment details).
- Click “Print checkout report” to print the Shift Closure, including revenue summary, payment details, and cash discrepancies.
-
Optional Clock-Out: Click【Clock out】to finalize clock-out and return to the login page.
4.2 Special Shift Closing Modes
4.2.1 Blind Shift Closing (Hide Revenue Data)
- Enable Method: Enable【Enable Blind Shift】on the BO end (Store Settings → Restaurant Operations → Daily Shift Closure/Handover).
- Operational Characteristics:
- All sales data (actual receipt, sales summary, etc.) in the employee page is encrypted.
- Shift page hides “Expected Amount” and “Expected Cash Drawer Remaining Amount.”
- After the handover, the printed Shift Closure shows complete data without hiding.
For no cash drawer scenarios:
Manually enter cash receipt amount; the system does not show expected amounts (replaced with *).
4.2.2 Shift Closing by proxy (Merge Multiple People’s Orders)
- Scenario: Online orders (no fixed cashier) and RS Handheld Ordering device orders need consolidation for handover.
- Operational Steps:
- After handling personal unclosed orders, a pop-up lists all employees not yet handed over (including online orders marked as [000000|Online] ).
- Online orders are selected by default. Manually select other employees for proxy handover if needed.
- After confirmation, the shift report summarizes all selected personnel’s orders, marked as “Consolidated Shift: Personnel List.”
- Rules: After proxy shift closure, the original order cashier remains unchanged, only recording the proxy person information, supporting future recalculation.
4.3 Shift Closing Recalculation
- Permission Requirement: Requires “Recalculate Shift Closure” permission
- Operational Entry: Find the target Shift Closure Report, click the top right【More】→【Recalculate Shift Closure】
- Rules: Recalculate data based on the original Shift Closure time range, generating a new document marked “Recalculated.” The original document is logically hidden, recording the operator and time.
5 Day End Closing
5.1 Manual Day End Closing (Recommended Mode)
5.1.1 Enable and Entry
- Enable Method: Enable “Enable Manual Business Day Management” on the BO end (default is off).
- Operational Entry: Click【Close of day】in the main menu to enter the Day End Closing page (Day End Closing permission: Restaurant Owner / Manager by default).
5.1.2 Operational Steps
-
Pre-Checks:
- Business Date Check: If the business date and system date mismatch, a prompt shows “Business date and system date are inconsistent,” offering options to “Day End Closing”, “Log In,” or “Cancel.”
- Uncompleted Shift Check: If employees haven’t finished Shift Closing, a prompt shows “xx hasn’t handed over yet, please complete handover before Day End Closing.”
-
Handle Unclosed Orders:
- The system lists all unclosed orders for the day (cross-business-day orders need manual handling).
- Choose “Pay,” “Cancel,” or “Carry Over” to settle, then automatically proceed to the next step.
-
Close Cash Drawers and Employee Clock-Out:
- Close all open cash drawers (count amounts and confirm).
- Force clock-out for employees not clocked out (list those not clocked out, click “Clock out all” for one-click clock-out).
-
Cash Deposit (Optional):
- Enable the “Day End Closing Cash QR Code Deposit” switch, the system shows the deposit amount, and displays a QR code.
- Supports both scan and pay modes (prioritizing WeChat / Alipay). Upon successful payment, a deposit bill is generated and uploaded to the cloud.
-
Generate Day End Closing Report:
- The system automatically summarizes daily revenue data. Click “Print Day End Closing report” to print a paper version.
- The report includes sales amount, payment structure, refund details, member storage, and other core data.
-
Finish Day End Closing
- Click【Daily Closing】, business date auto-increments by 1, and meal times/shifts reset to first.
- During Day End Closing, notify supply chain for outbound, overseas scenarios for tax reporting.
- System auto-uploads data to the cloud, showing a pop-up “Uploading Business Summary Data,” then returns to the login page after completion.
5.2 Automatic Day End Closing (Auxiliary Mode)
5.2.1 Enable and Rules
- Enable Method: Set automatic Day End Closing time on the BO end (must be later than the last meal period) and enable “Generate Day End Closing Report Automatically.”
- Core Rules:
- Trigger Condition: Reaching the set time without any unclosed orders (or auto-carry over to next day).
- Auto-Execute: Business date + 1, restore sold-out items, close $0 orders, auto-clear tables, backup database.
- Data Upload: Automatically generates a Day End Closing report and uploads it to the cloud. Supply chain data is synchronized for outbound processing.
5.3 Day End Closing Recalculation
- Permission Requirement: Requires “Recalculate Day End Closing” permission.
- Operational Entry: In the Day End Closing report list, find the target document, click【More】→ 【Recalculate Day End Closing】
- Rules: Can be recalculated within the financial closing period (overdue prompts “Order has exceeded financial closing period, recalculation not allowed”). The new document replaces the original, recording operation logs.
5.4 Monthly Summary Inquiry (For Tax Reporting)
- Permission Requirement: Requires “Monthly Summary” permission (default for store administrators/managers).
- Operational Entry: On the Day End Closing report page, switch query type to “Monthly Summary,” and select the target month.
- Functionality: Summarizes daily actual receipts for the month (excluding gift cards/stored value/deposit orders) and supports printing for tax reporting.
6 Special Situations Handling
6.1 Cash Deposit Issues
- Deposit Failure: Manually supplement payment information, and the system synchronizes to update the deposit status.
- Report Verification: View store deposit details (store number, amount, method, time) on the BO end【Cash Deposit Record Report】
6.2 Unclosed Orders Carry Over
- Available during shift/Day End Closing, order business date changes to the next day without affecting current day revenue statistics.
- The next day, prioritize handling carried-over orders to avoid omissions.
6.3 Data Clearing and Backup
- Auto-Clear: During Day End Closing, automatically delete uploaded data exceeding retention days. Unsettled orders are not deleted.
- Manual Backup: Support database backup. By default, keep the backup files for 3 days and automatically overwrite the old files..
7 FAQs
Clock-In Issues:
-
Issue: “Authorization Required” Message for Early Clock-In but No Manager Available
- Contact the manager remotely for a PIN code.
- Admin can temporarily disable “Early Clock-In Approval” on the BO end in emergencies.
-
Issue: Fingerprint reader not working
- Check whether the fingerprint device is powered on, and reconnect it if not.
- Go to “Employee Binding” and re-register the fingerprint.
-
Issue: Forgot to clock in (over 24 hours)
- Only an admin can manually add clock-in times on the BO end (access【Attendance Report → History】and add clock-in time).
Shift Closing Issues:
- Issue: Revenue Data Not Displaying at Shift Close:
- Check if【Blind Shift Closing】mode is enabled, disable it to display data correctly. Blind mode hides data before shift closing, but the shift closing report will still show complete data.
- Issue: Day-End Closing Report Shows Employees Not Clocked Out:
- Go to the【Employee Management】page, identify employees who haven’t clocked out, and notify them to complete their shift closing; or force clock-out (admin privilege required).
- Issue: Missing Transactions Found After Day-End Closing:
- Use the “Recalculate Day-End Closing Report” feature to re-statistics within the original Day-End Closing timeframe; if beyond the financial cycle, contact technical support.
- Issue: Cash Deposit Payment Fails:
- Click【Check Payment Status】to refresh, or manually record payment info; ensure the network is stable and try again.
- Issue: Data Query Exceeds Retention Days:
- Adjust the “Store Bill Data Retention Days” parameter on the BO end; or export historical data from the cloud for queries.
8 Need Help?
- Operations involving permissions (such as recalculation, monthly closing) require contacting the administrator to obtain the permissions.
- If you encounter issues not mentioned here, go to【Settings → Help Center】for video tutorials or contact your store manager.