Item Information Configuration
1 Introduction
Welcome to the Item Configuration Module Guide! This document offers a comprehensive, step-by-step walkthrough of managing the entire lifecycle of an item. It includes processes for item creation, category management, price adjustment, cross-brand synchronization, and recommendation setup. By following this guide, you’ll be able to standardize operations across various channels and enhance sales efficiency.
Before diving into the instructions, start with the Glossary section to familiarize yourself with core concepts and terminology. Once you have a good understanding of the basics, proceed with detailed instructions to optimize your item management processes.
2 Glossary
Glossary
Item Management: Divided into Regular Items and Combo Items, it is the unified term for all goods or services sold by a merchant. In the restaurant industry, it specifically refers to dishes or beverages. Corresponds to the Standard Product Unit (SPU) in the general merchandise model.
Item Types:
Regular Item: Can be sold as a single item or as a component of a combo item.
Market-Priced Item: The price can be modified at the checkout counter when ordering.
Combo Item: A fixed or selectable combination of multiple regular items sold together.
- Fixed Group: Items in the group cannot be replaced (flavor customization is allowed).
- Variable Group: Items in the group can be replaced.
Multi-Variation Item: A product offering where consumers can choose from various options such as size, flavor, or additional ingredients. Each unique combination of these options is treated as a separate SKU, enabling distinct pricing and efficient handling of orders and stock levels.
Item Categories & Subcategories: A logical classification of items for specific purposes, used for quick item filtering and report analysis. Tax rates, production departments, and serving sequences can be configured for categories and subcategories respectively. It is a backend management classification system.
3 Add & Search Item
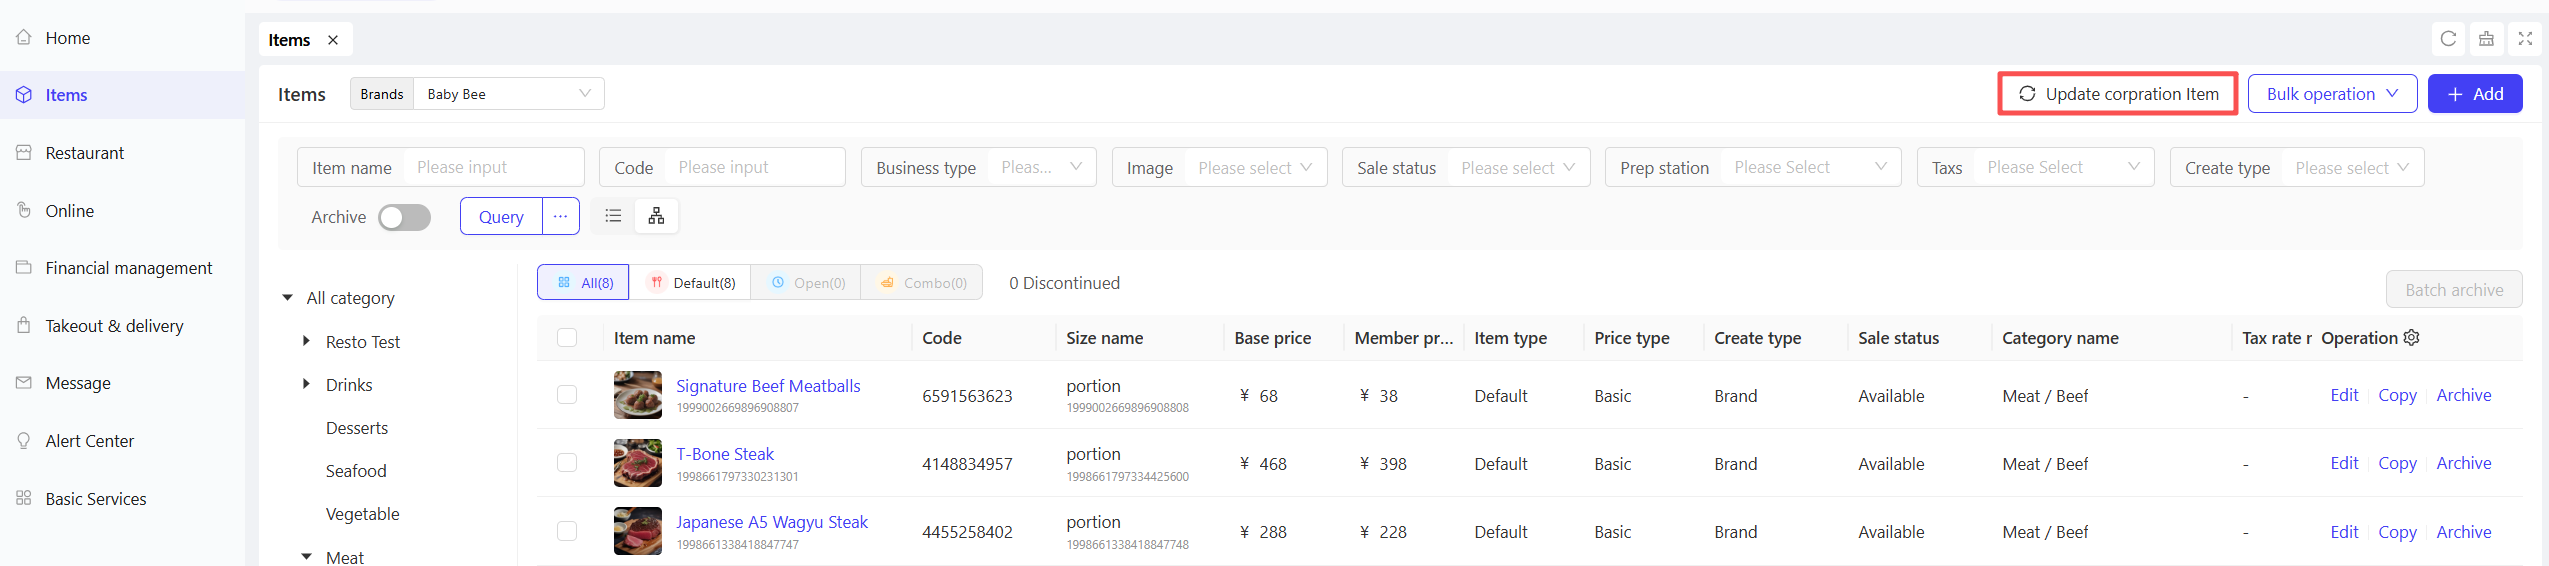
Group administrators can centrally manage items across all brands from the group perspective, including creation, editing, querying, and batch operations. Four item types are supported: Regular Items, Hot Pot Broths, Market-Priced Items, and Combo Items. Additionally, group-level items can be synced to brand-specific catalogues, enabling unified operations for multi-brand businesses.
STEP 1: Switch to Group Perspective
- The Group administrator logs in to the Operation Center.
- Click【View Switch】in the top-right corner, then select 【Group】Perspective.
STEP 2: Access the Item Management Page
- Navigate to【Item Management】>【Menus】>【Items】
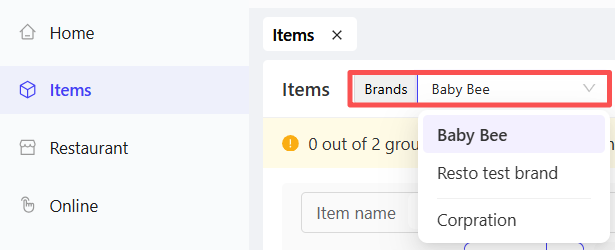
3.1 Item Query & Filtering
- Brand Filter: Use the top “Brand” dropdown to select a target brand (only items under the selected brand will be displayed) or select “Group” to show all group-owned items
- Item Type Filter: Switch tabs for “Regular Items”, “Market-Priced Items”, or “Combo Items” to filter by type

- Category Hierarchy Filter: Display items by their category hierarchy

3.2 Add Item
STEP 1: Click【Add】on the Item Management page to open the item type selection pop-up.
STEP 2: Select the item type to create and complete the settings according to the following configurations:
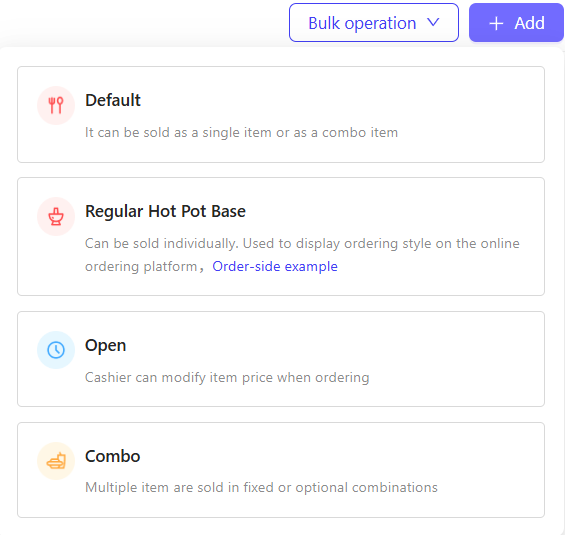
3.2.1 Regular Items
- Can be sold as individual items or sub-items in combos. The configuration items are as follows:
Configuration Item | Configuration Description |
|---|---|
Item Name | Enter the item's name (e.g., French Fries). |
Category Name | Select an item category:
|
Display Menu | Directly assign the menu the item belongs to; if not specified, it can be associated with the menu during menu configuration. |
Item Code | Set a unique code for the item. |
Multi-Scenario Names | Configure names for different scenarios (defaults to item name if not set):
|
Business Type | Select the sales types for the item: Dine-in, Takeaway, Self-pickup |
Preparation Time | Set the time required to prepare the item |
Price type |
|
Other Attributes | Configure additional item details: PLU, Barcode, Expiration Date, Storage Condition, Main Ingredients, Place of Origin. |
Item Customization |
|
POS order default pop-up window | When enabled, the customization options popup automatically when ordering via POS (mandatory if a minimum selection is required) |
Sales Information |
|
Additional Information | Inherit Category Tax Rate, Accounting Subject, Production Department, Serving Order |
Terminal Display | Configure display image, Allergens, Spiciness Level, Item Badge, Description, etc. |
3.2.2 Regular Items (Hot Pot Broths)
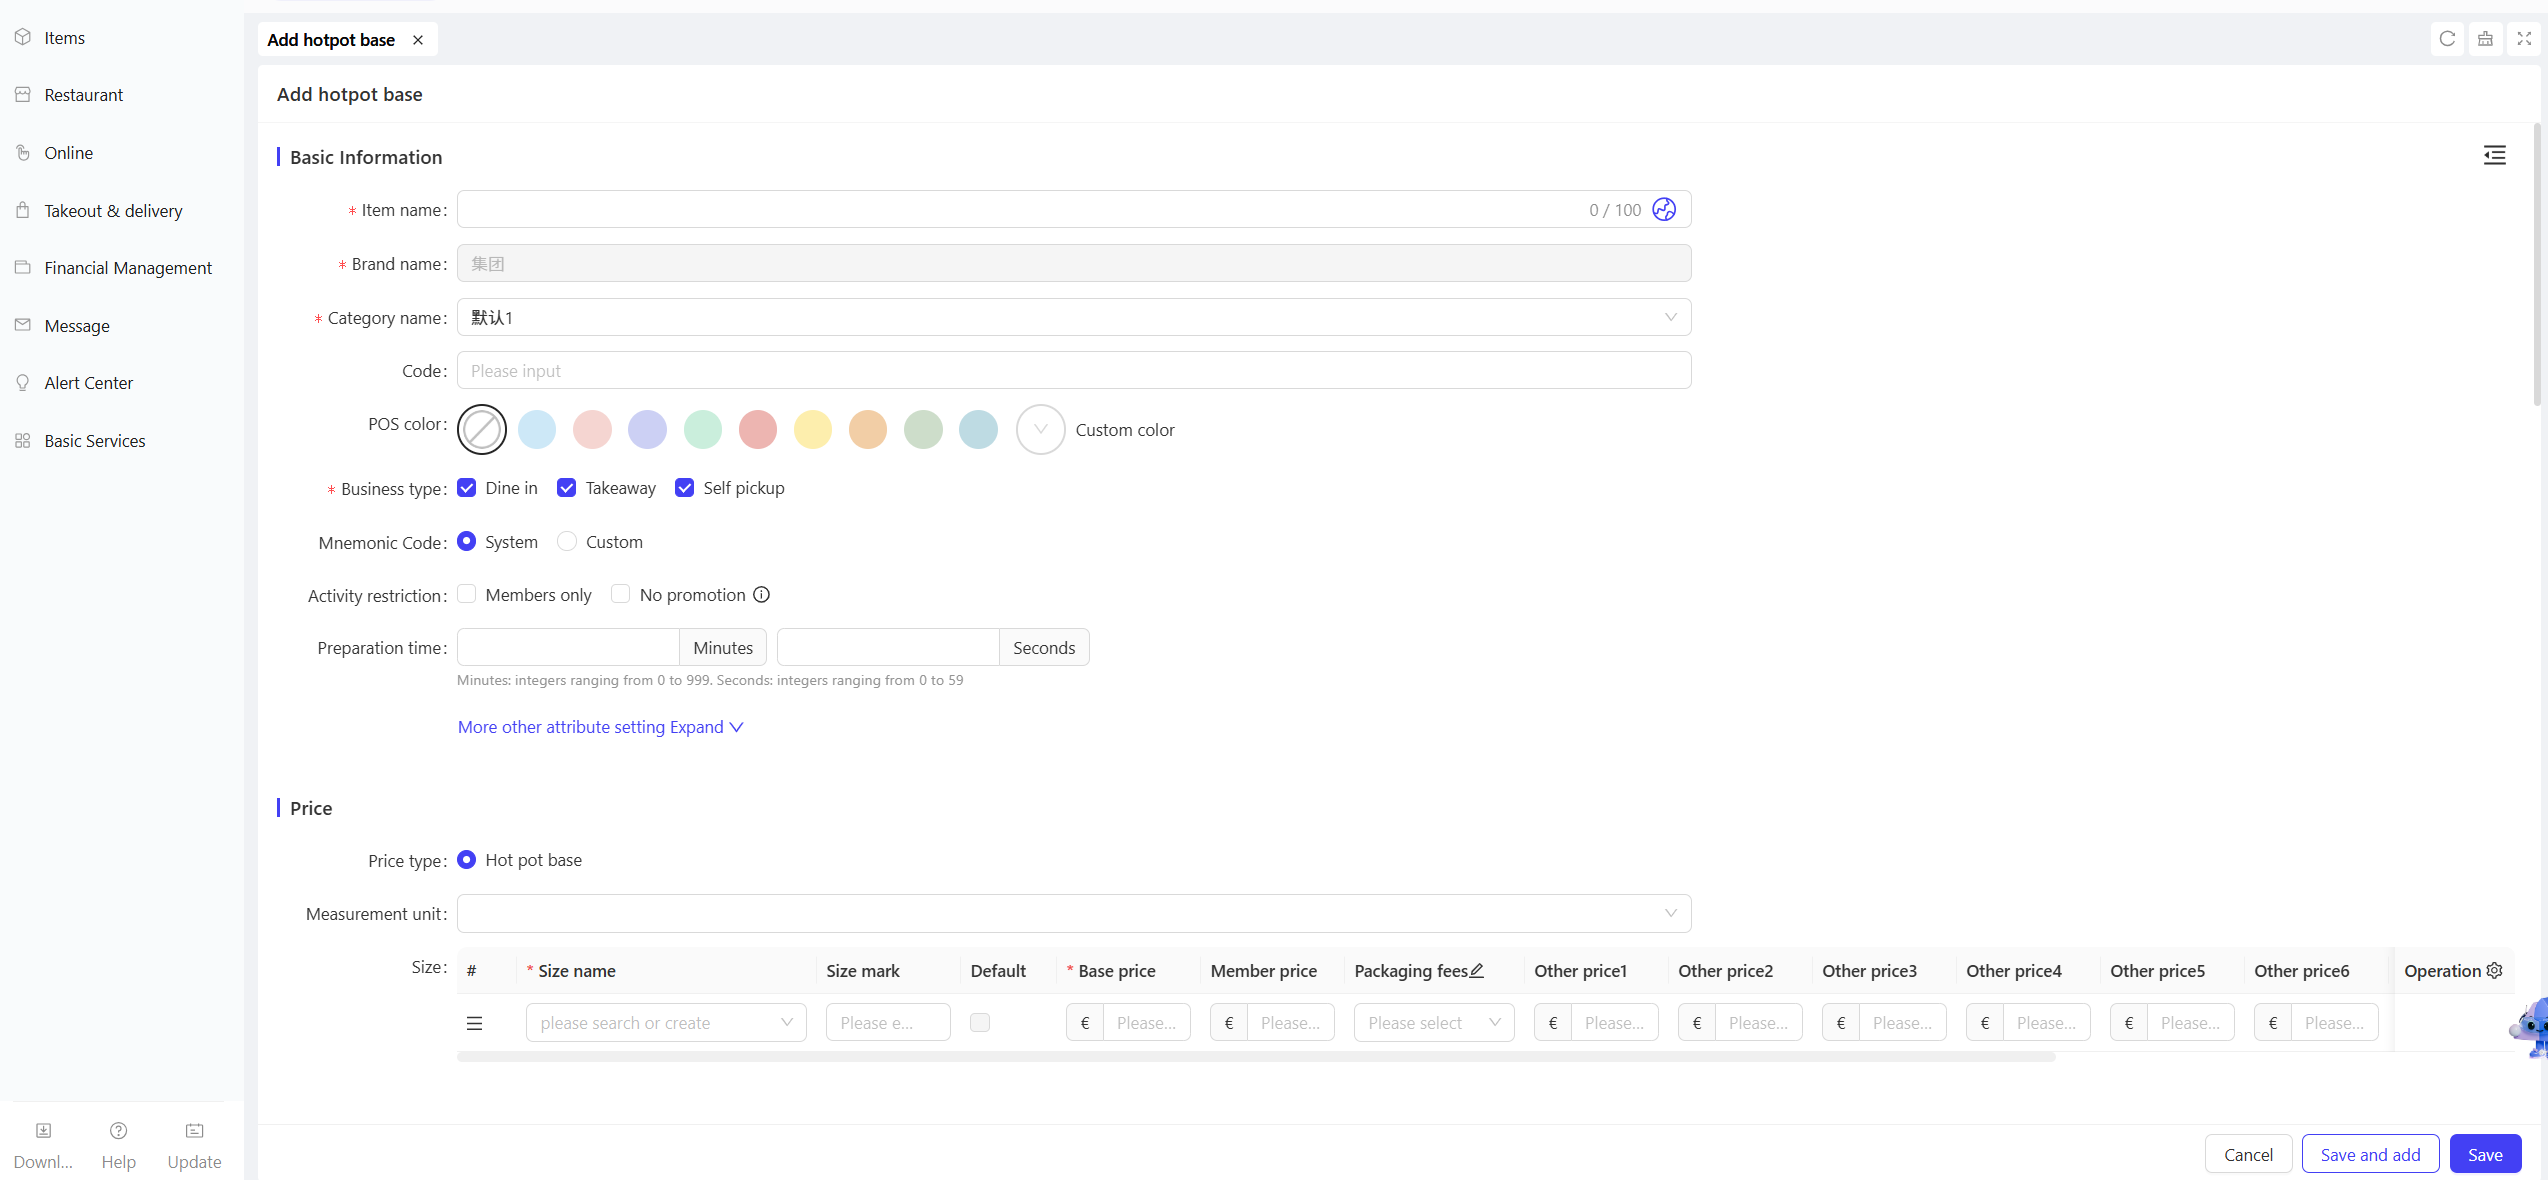
- It can be sold as individual items and will display a dedicated ordering interface on online ordering platforms.
- Other configurations are the same as “Regular Items”
3.2.3 Market-Priced Items
- Price Configuration: No preset price required; entered manually at checkout
- Price Type: Supports Basic / Weighed
- Other configurations are the same as “Regular Items”
3.2.4 Combo Items
Configuration Item | English Configuration Description |
|---|---|
Packaging Fee Rule | Charge by Individual Items / Charge for Entire Combo |
Combo Group Configuration |
|
4 Single Item Operations

Operation | Function Description |
|---|---|
Edit | Modify item details, prices, and configurations |
Copy | Duplicate existing item information to quickly create similar items |
Archive | Archive the item (no longer available for sale, historical data retained) |
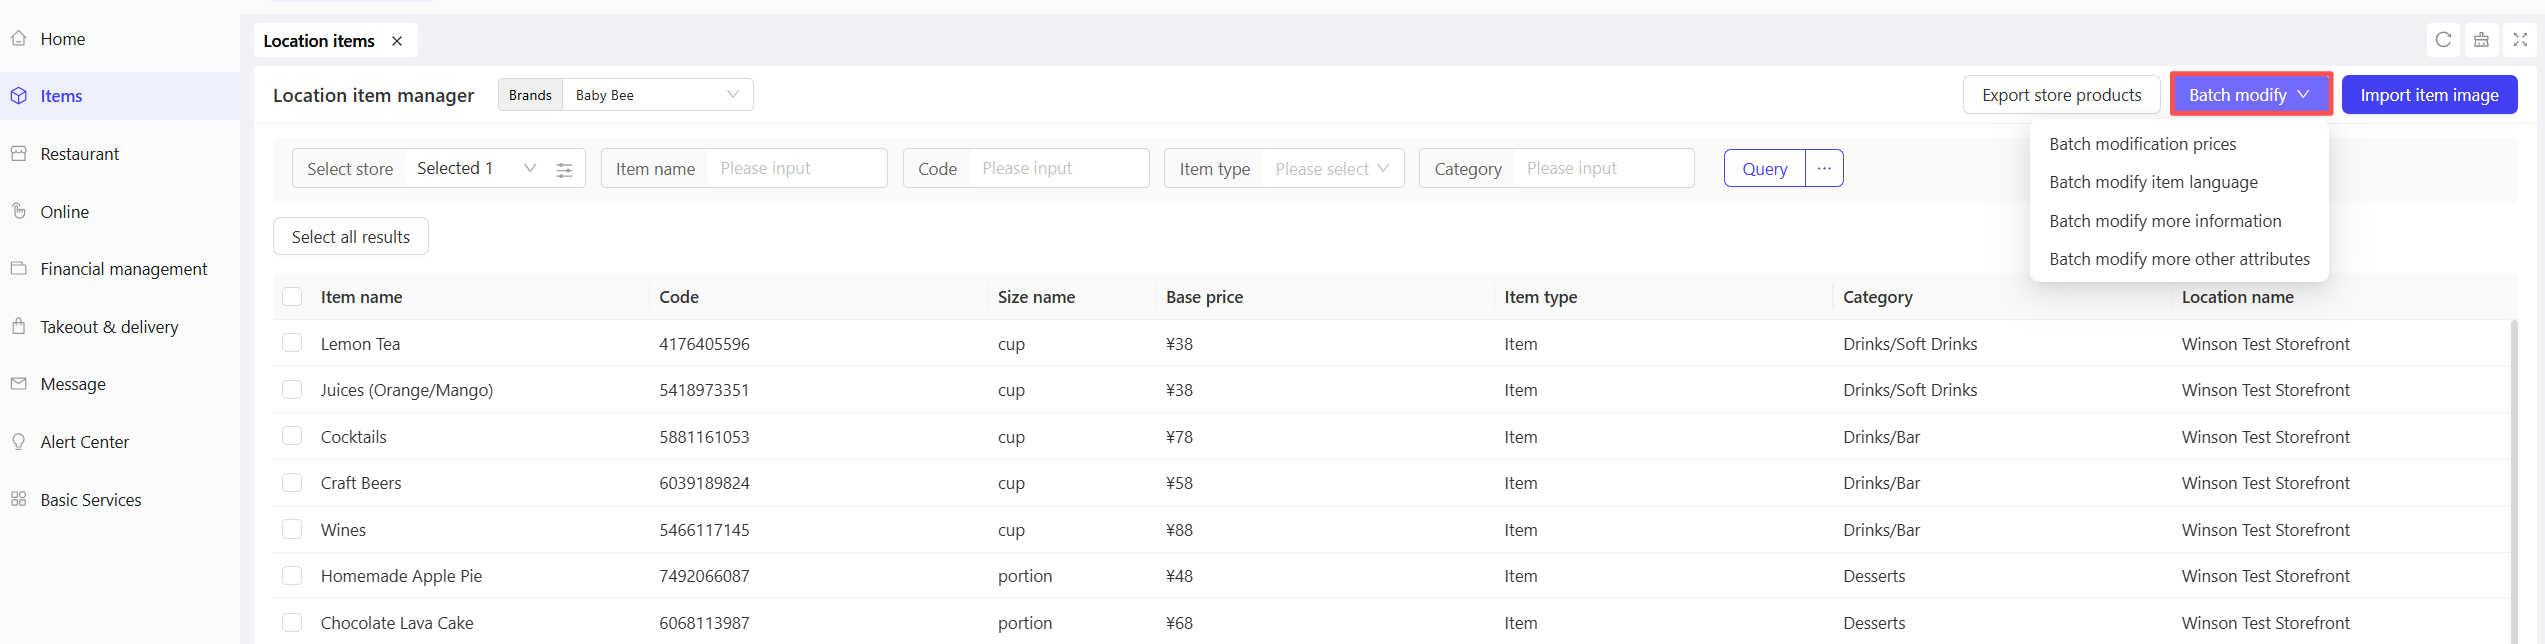
5 Batch Item Operations
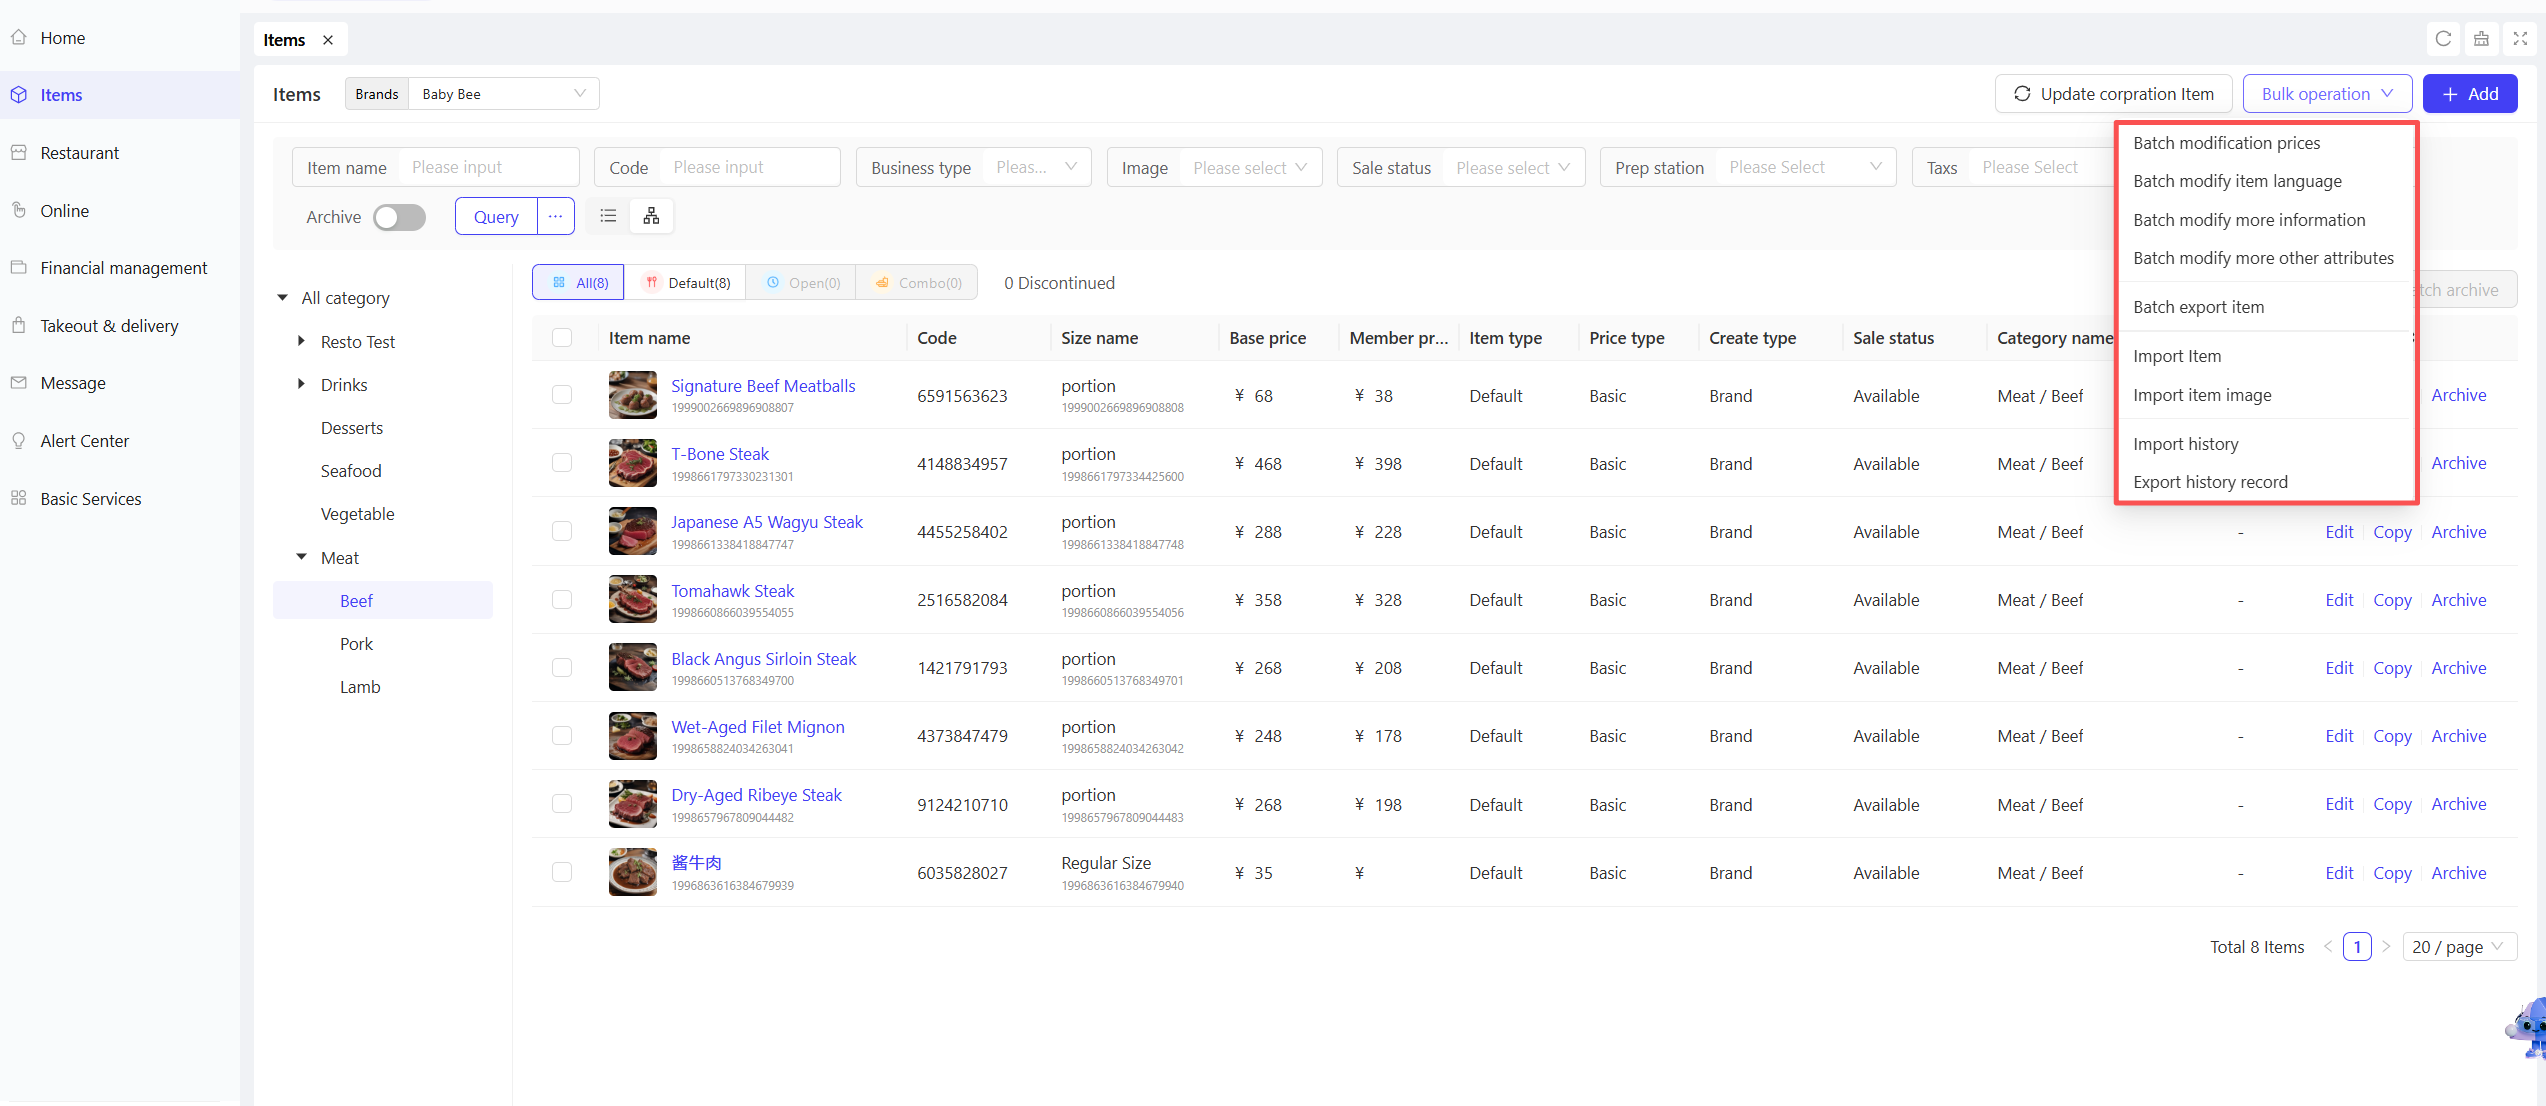
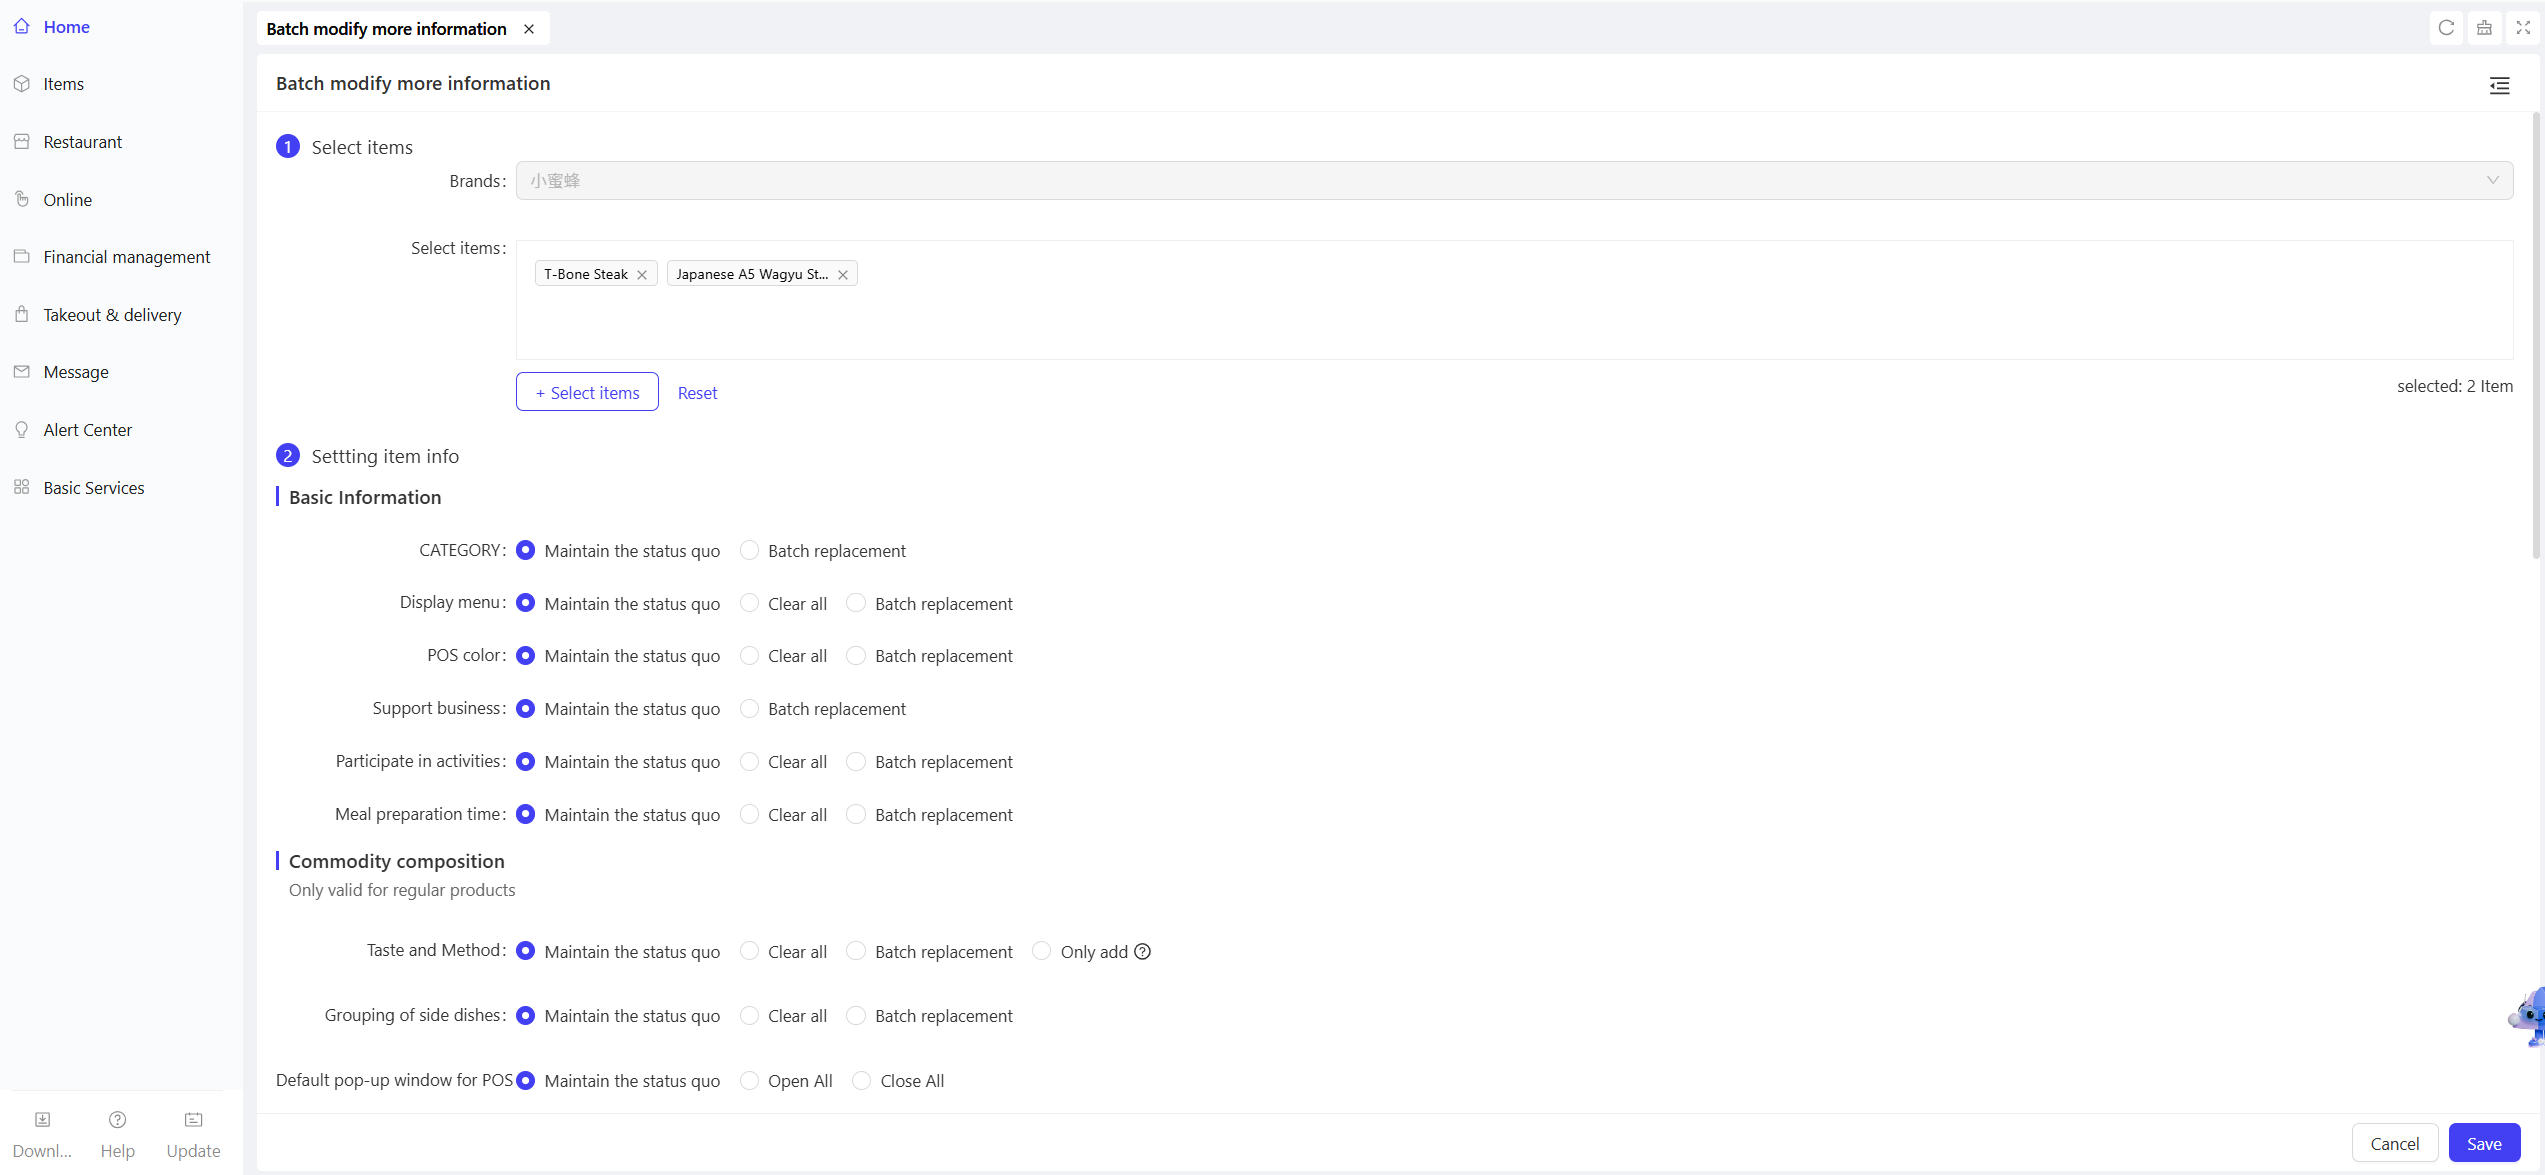
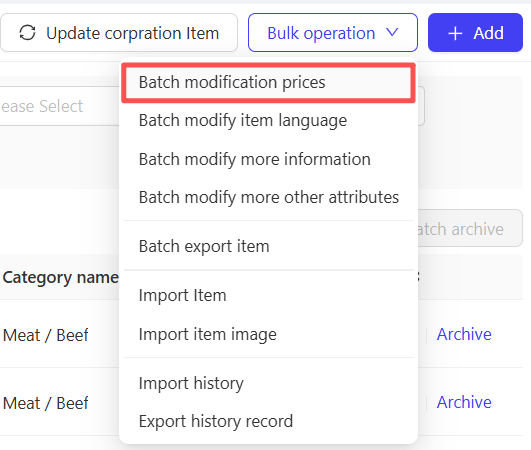
5.1 Batch modify item information (prices/other attributes, etc.)
STEP 1: Select the desired batch modification operation button
STEP 2: On the batch modification details page, select multiple items to modify by checking the boxes
STEP 3: Modify the corresponding item information (fill in relevant configurations based on the selected operation type) and click the【Save】button to complete the operation
Notes:
Two ways to select items in a batch:
Method 1: First check the target items in the item list, then select the batch operation type
Method 2: First select the batch operation type, then check the target items on the details page
5.2 Batch Import Item
STEP 1: On the Item Management List page, click the【Batch Import Items】button
STEP 2: Download the item import template and fill it out
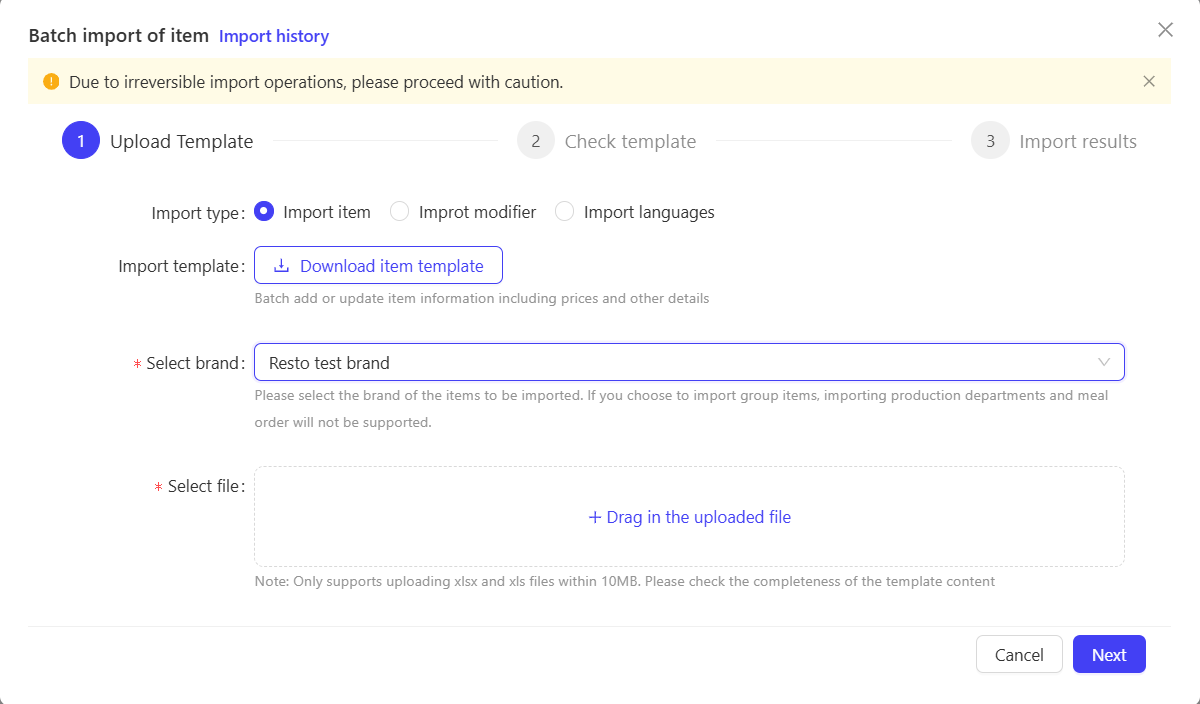
Notes:
Worksheet names and headers cannot be modified
Fields marked with an asterisk (*) are required
Maximum 1,000 entries per import
The system will automatically skip duplicate and non-compliant data
Batch import operations are irreversible; please proceed with caution!
STEP 3: After filling out the template, upload the file for template verification
- If verification passes, click the 【Start Import】 button
- If verification fails, view the document issues on the【Check Template】details page. Modify the document as prompted, click【Back】to re-upload the revised file, and proceed with the import after verification passes
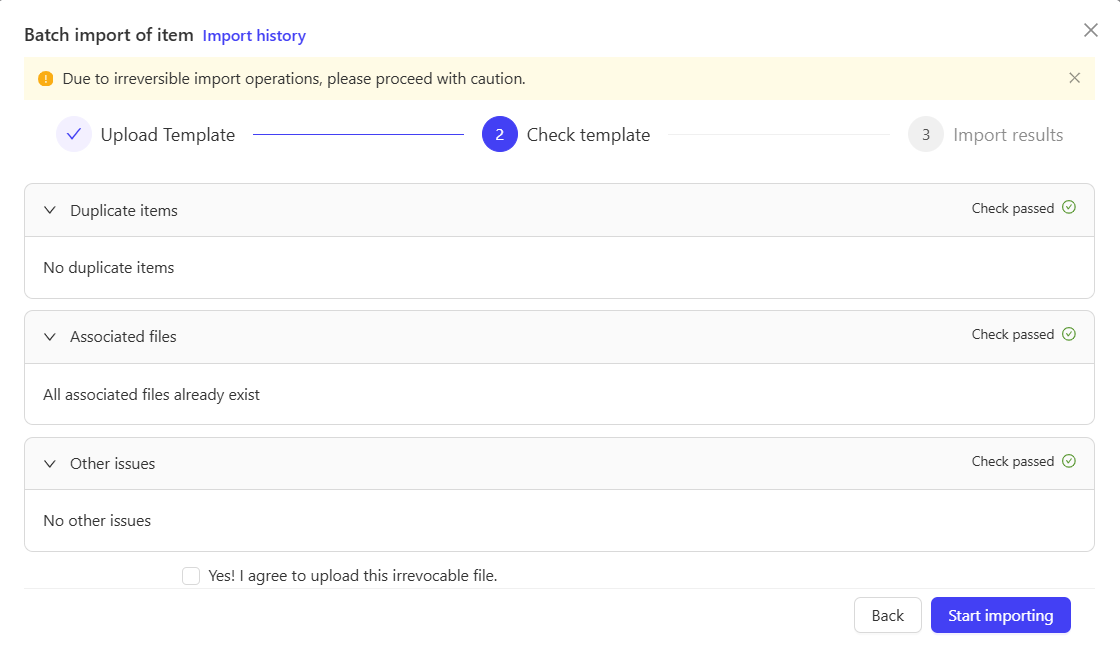
STEP 4: After the upload is complete, view the import results on the【Import Results】 page
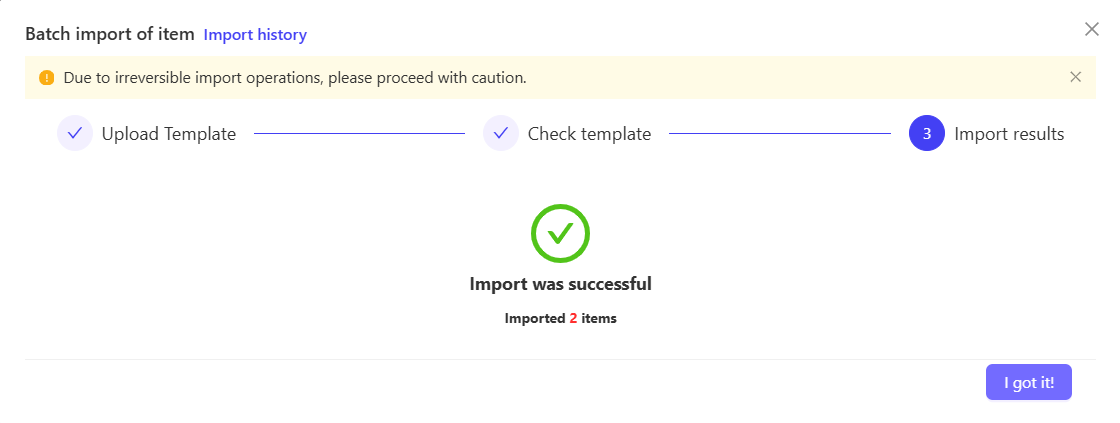
- You can view and download import files from the past 30 days on the 【Import History】 page.
5.3 Batch Export Item
STEP 1: On the Item Management List page, click the【Batch Export Items】button
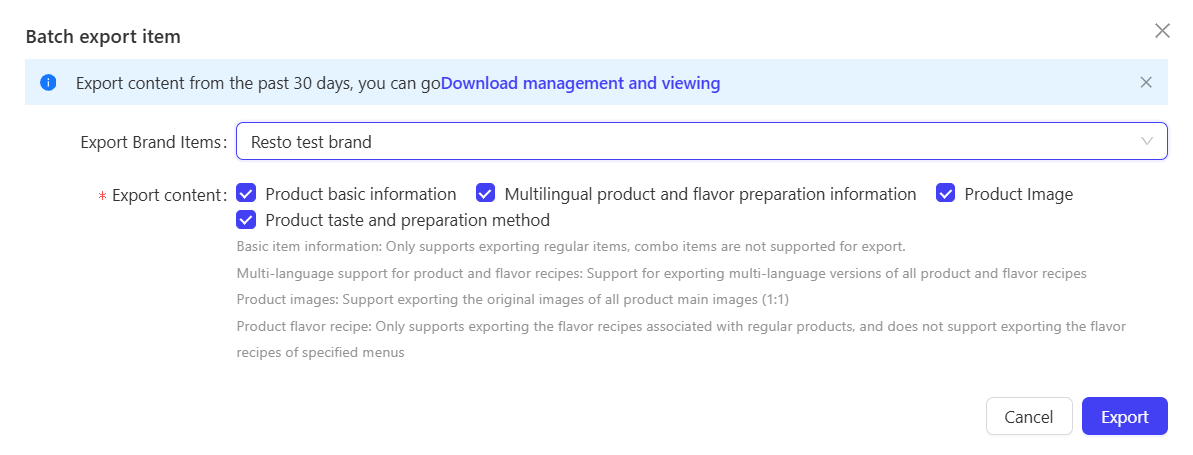
STEP 2: Select the export content as needed, including:
- Basic Item Information: Only regular items are supported; combo items are not available for export temporarily.
- Multi-Language Data for Items & Modifiers: Supports exporting multi-language data for all items and their modifiers.
- Item Images: Supports exporting original images of main images (1:1 aspect ratio) for all items.
- Item Modifiers: Only supports exporting Item Modifiers associated with regular items; does not support exporting specific Item Modifiers.
STEP 3: Click the 【Export】 button to complete the operation.
- Records of exports from the past 30 days can be viewed and downloaded in 【Download Management】
6 Sync Group Items to Brand
When switching to the “Brand Perspective”, you can sync group items to the current brand:
STEP 1: Click【Sync Group Items】
STEP 2: Select the group items to sync
STEP 3: Select an Update Rule:
- Add New & Update Duplicates
- Add New Items Only
- Update Duplicates Only
STEP 4: Click【Confirm】to complete the sync
7 Adjust Item Prices
7.1 Scenario 1: Adjust Price for a Single Item
STEP 1: Log in to the BO system and navigate to【Operation Center】→【Item Management】under the corresponding perspective.
STEP 2: Locate the item to be adjusted and click the【Edit】button.
STEP 3: Modify the price attributes directly on the item details page.
STEP 4: Save the changes to take effect.

7.2 Scenario 2: Batch Adjust Item Prices
STEP 1: Log in to the BO system and navigate to【Operation Center】→【Item Management】under the corresponding perspective.
STEP 2: Click the Batch Operation button in the top-right corner.
STEP 3: Select the【Batch Modification Prices】function.
STEP 4: Upload or fill in the information of items to be price-adjusted in batches as prompted.
STEP 5: Confirm the modifications, and the system will update the prices in batches.
7.3 Scenario 3: Overall Price Adjustment for Group/Store Items
7.3.1 Method 1: Adjust Prices via Menu Change Plan
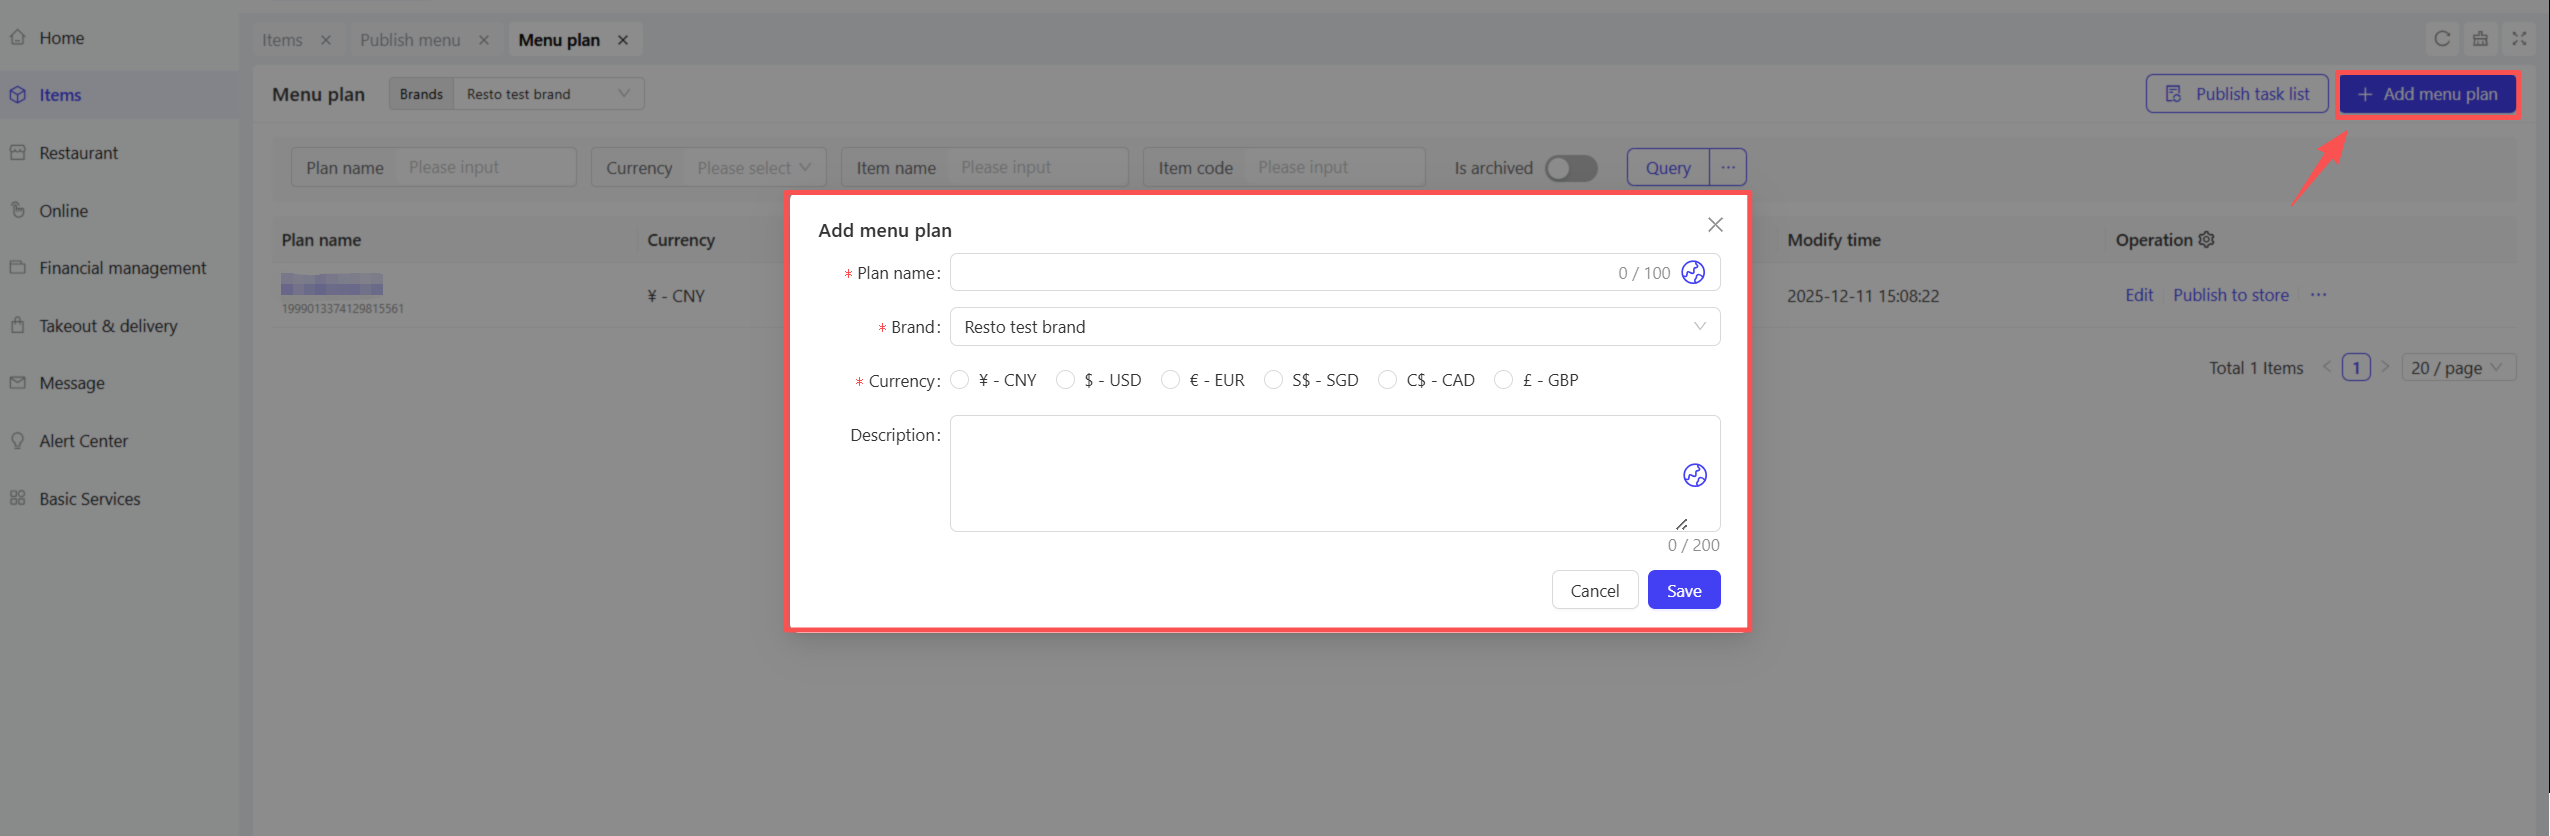
STEP 1: Create a Menu Change Plan (including price adjustments)
- Log in to the BO system, navigate to【Item Management → Menu Change Plan】under the group perspective.
- Click the【Add】button in the top-right corner.
- Enter the plan name, select the corresponding brand and currency symbol.
- Click【Add Existing Items】to select the items to be price-adjusted.
- Modify the price attributes directly in the item list.
STEP 2: Distribute the price plan to stores

-
After creating the plan, click the【Publish to Store】button.
-
Select the publish type:
- Update Published Menus and Items: Only modify attributes such as prices.
- Replace Menus and Items: Fully overwrite the store’s existing price system.
-
Select the publish rules and applicable stores, then click【Continue】.
-
Select the publish time rule (Now/Scheduled) and click【Publish】to complete the operation.
Note: This publish function is irreversible; please proceed with caution!
7.3.2 Method 2: Adjust Prices via Store Item Management

STEP 1: Log in to the BO system, navigate to【Store Items → Store Item Management】under the group perspective.
STEP 2: Use the page filters to select the store for price adjustment, then click Query. The list will display all items under the selected store.
STEP 3: Select the items to be modified, click【Batch Edit → Batch Modification Prices】, and adjust the prices of the selected items uniformly.
STEP 4: Click【Save and Publish】after modification to complete the price adjustment.
8 Item Category Management
8.1 Overview
Item categories form the core framework of store menu and item management systems. Through a hierarchical structure (e.g., “Category-Subcategory”), items are logically grouped to ensure clear and organized display and retrieval in backend management and frontend ordering interfaces (POS, online menus).
8.2 Add Item Category
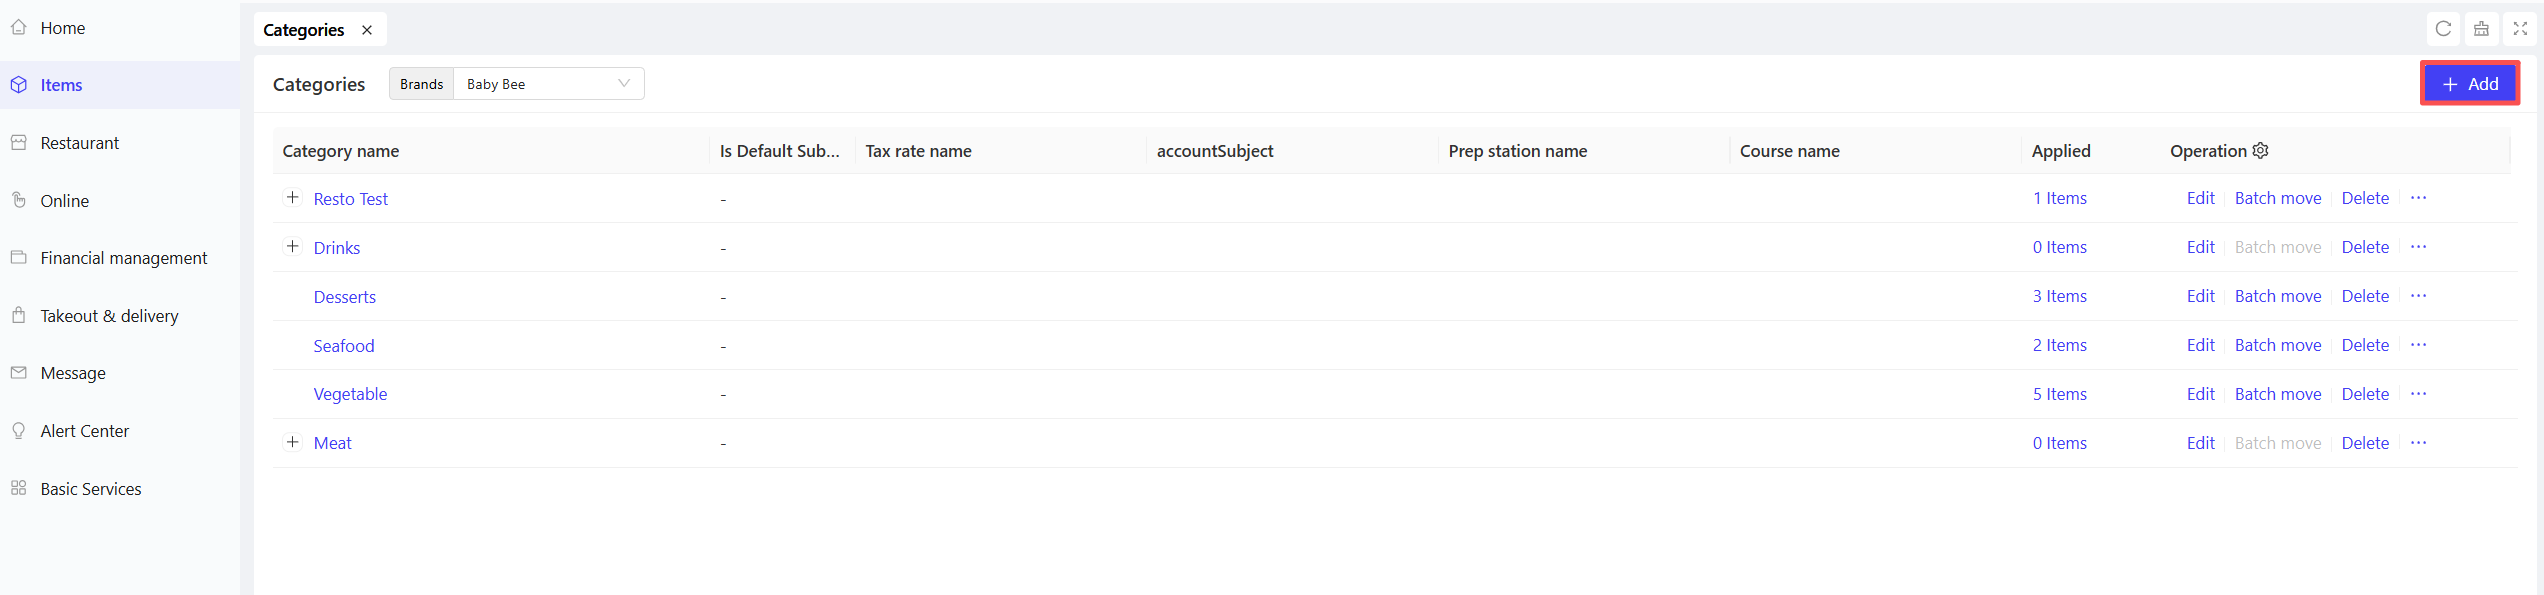
STEP 1: Under the group perspective, go to【Item Management → Menus → Item Categories】and click the【Add】button.
STEP 2: On the Add Item Category page, fill in the detailed information, including the following fields:
-
Basic Information
- Category Name: Enter the name of the item category.
- Description: Enter a text description for the item category.
-
Subcategories: Add and sort multiple subcategories under this category.
Example:
For a Western restaurant, set a category named "Main Courses" and create subcategories such as "Steaks", "Burgers", and "Seafood" under it.
- Additional Information
- Tax Rate Name: Select or add the tax rate corresponding to the item category. Refer to the Tax Rate and Surcharge Management help manual to learn how to add tax rates.
- Accounting Subject Name: Select the corresponding accounting subject.
8.3 Item Category Operations

- Edit: Modify the detailed information of categories/subcategories.
- Batch Move: Batch move all items under a target category to another item category (item categories are selected when adding items).
- Add Subcategory: Directly add subcategories to the target item category on the list page.
- Delete: Click to delete the item category/subcategory.
Notes:
If you edit a category that is already associated with items, all linked items will automatically sync with the category changes.
If you need to delete a category that is already associated with items, deletion is not allowed. It is recommended to change the category of the linked items first before deleting the original category.
9 Recommended Items
9.1 Overview
The Recommended Items function is a powerful marketing and sales guidance tool that allows merchants to create and display specific item collections on ordering interfaces (POS, online H5). It helps highlight flagship products, promote sales campaigns, or provide personalized recommendations based on customer preferences.
By flexibly configuring different types of recommendation groups (e.g., Manager’s Picks, Bestsellers), merchants can effectively increase average order value, clear inventory, or promote new products.
9.2 Add Recommended Items
STEP 1: Under the group perspective, go to【Item Management → Menus → Recommended Items】 and click the【Add】button.

STEP 2: Select one of the following four recommendation menu group types:
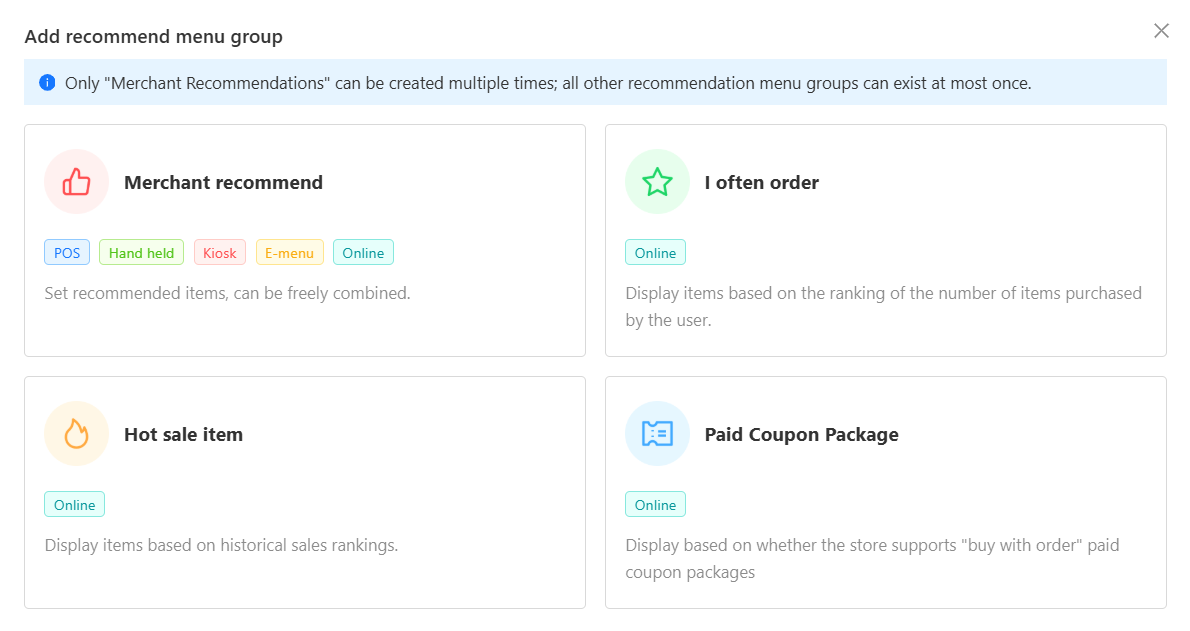
- Chef’s Picks: Customize a collection of recommended items freely.
- My Favorites: Display items ranked by the number of times customers have purchased them historically.
- Bestsellers: Display items ranked by historical sales volume.
- Paid Coupon Packages: Display paid coupon packages that support “purchase with order” at the store.
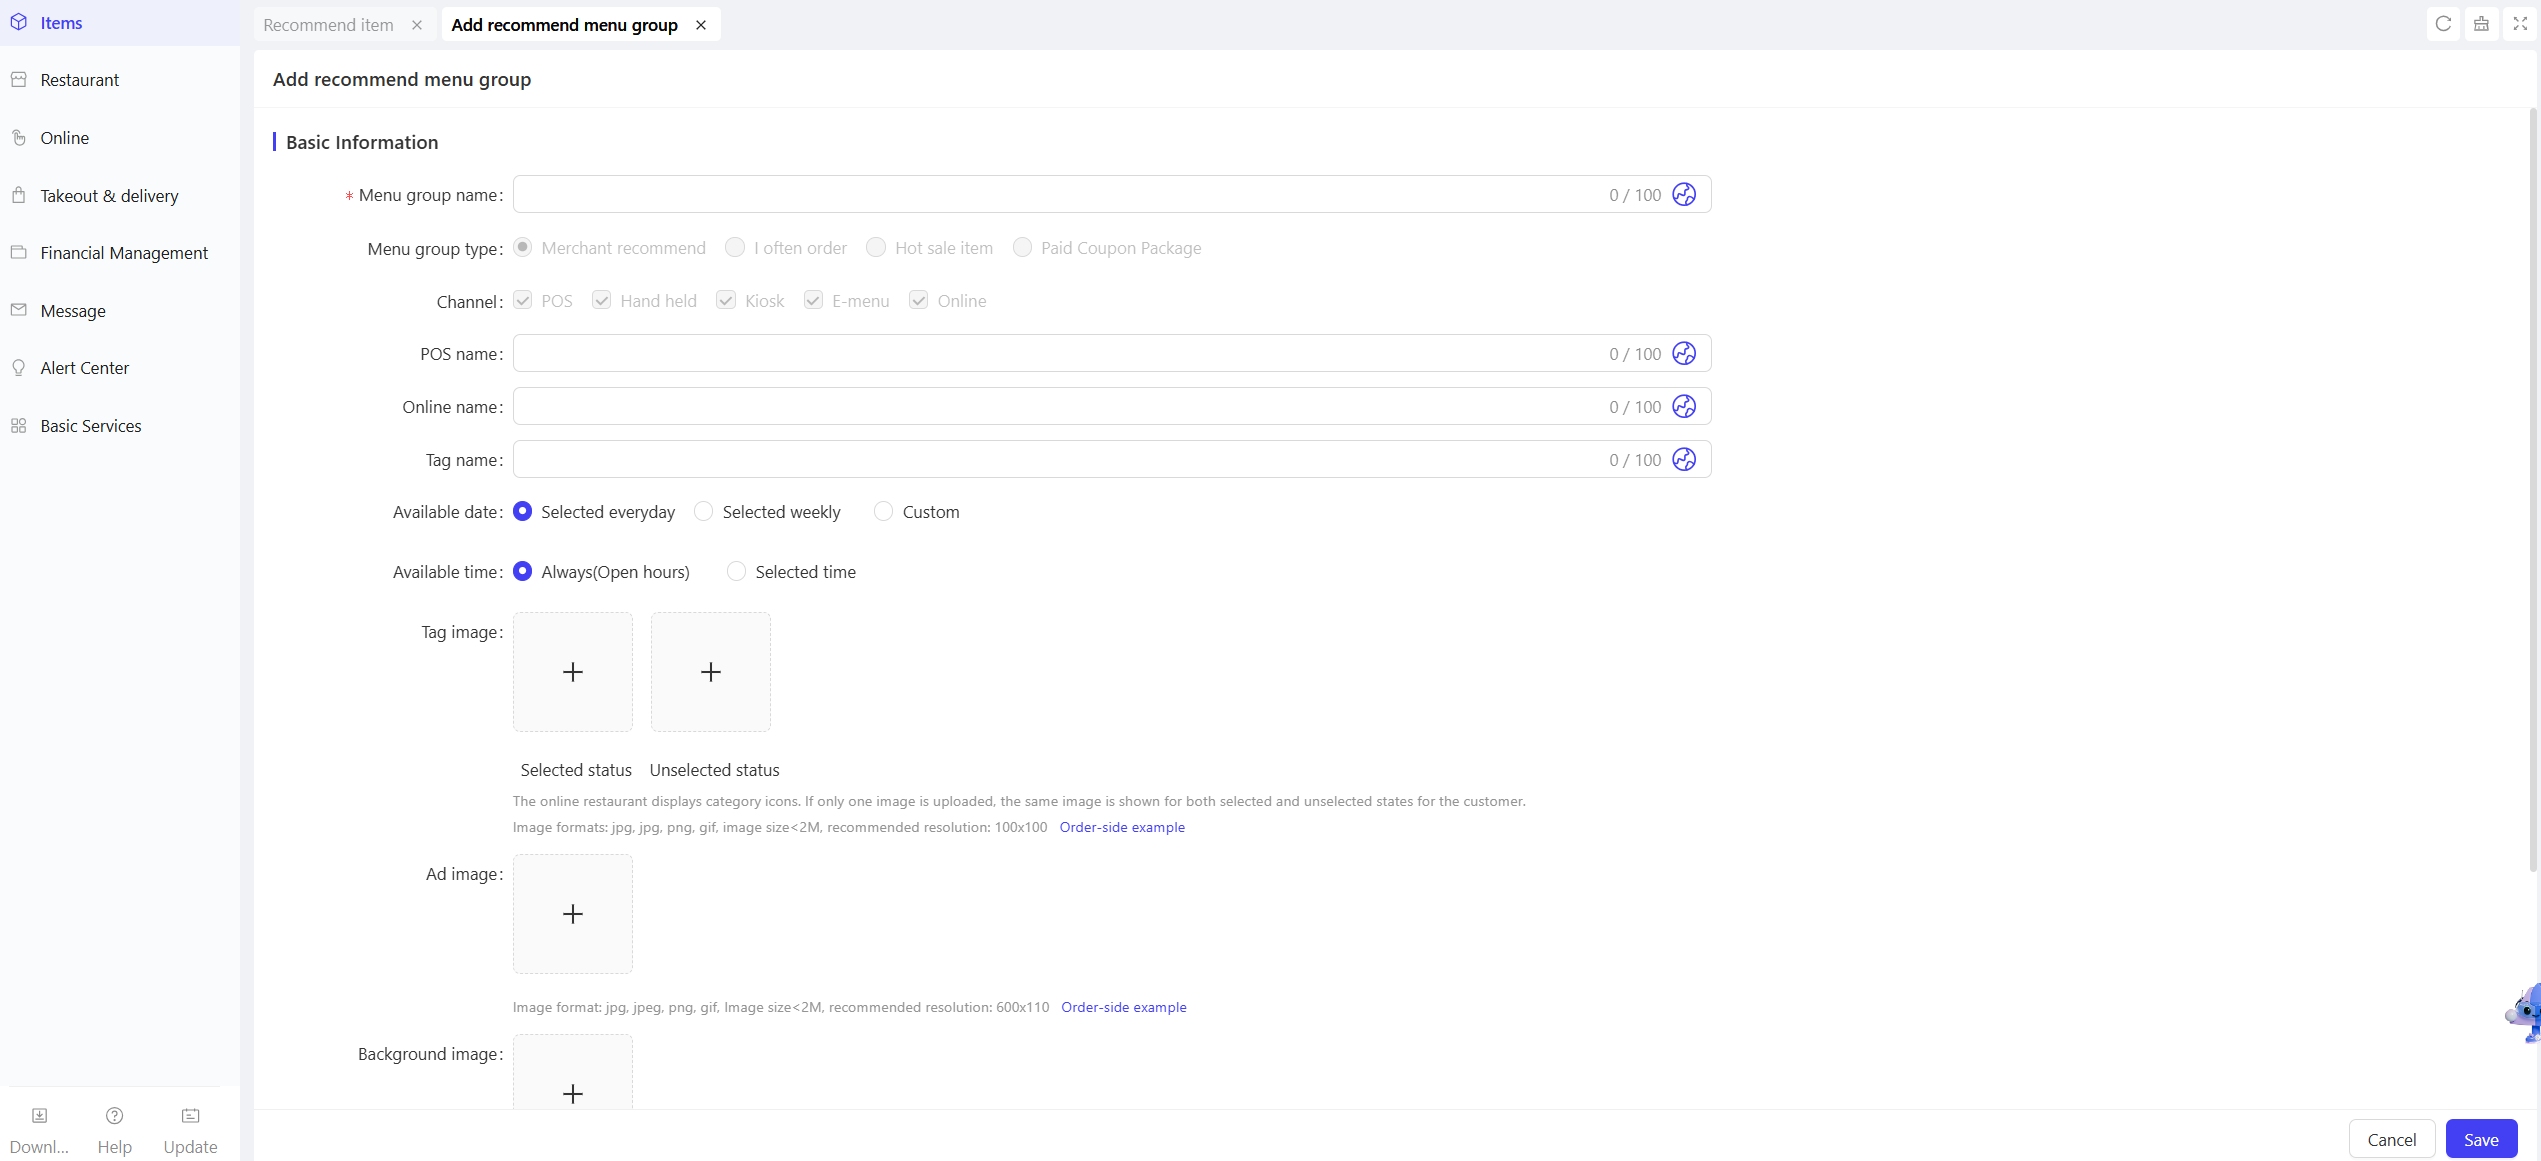
STEP 3: After selection, fill in the details of the recommendation menu group, including the following fields:
- Menu Group Name: Enter the name of the menu group (e.g., Manager’s Picks) (required).
- POS Name: Enter the menu group name displayed on POS terminals.
- Online Name: Enter the menu group name displayed on H5 pages.
- Label Name: Enter the label name for the menu group.
- Available Date/Time: Set the effective period of the recommendation menu group.
- Label Image: Upload the label image for the menu group.
- Advertisement Image: Upload the promotional image for the menu group.
- Background Color: Set the background color of the menu group.
- Description: Enter a text description for the menu group.
STEP 4: Click【Save】after filling in the information. The created recommendation menu group will be displayed in the Recommended Items list.
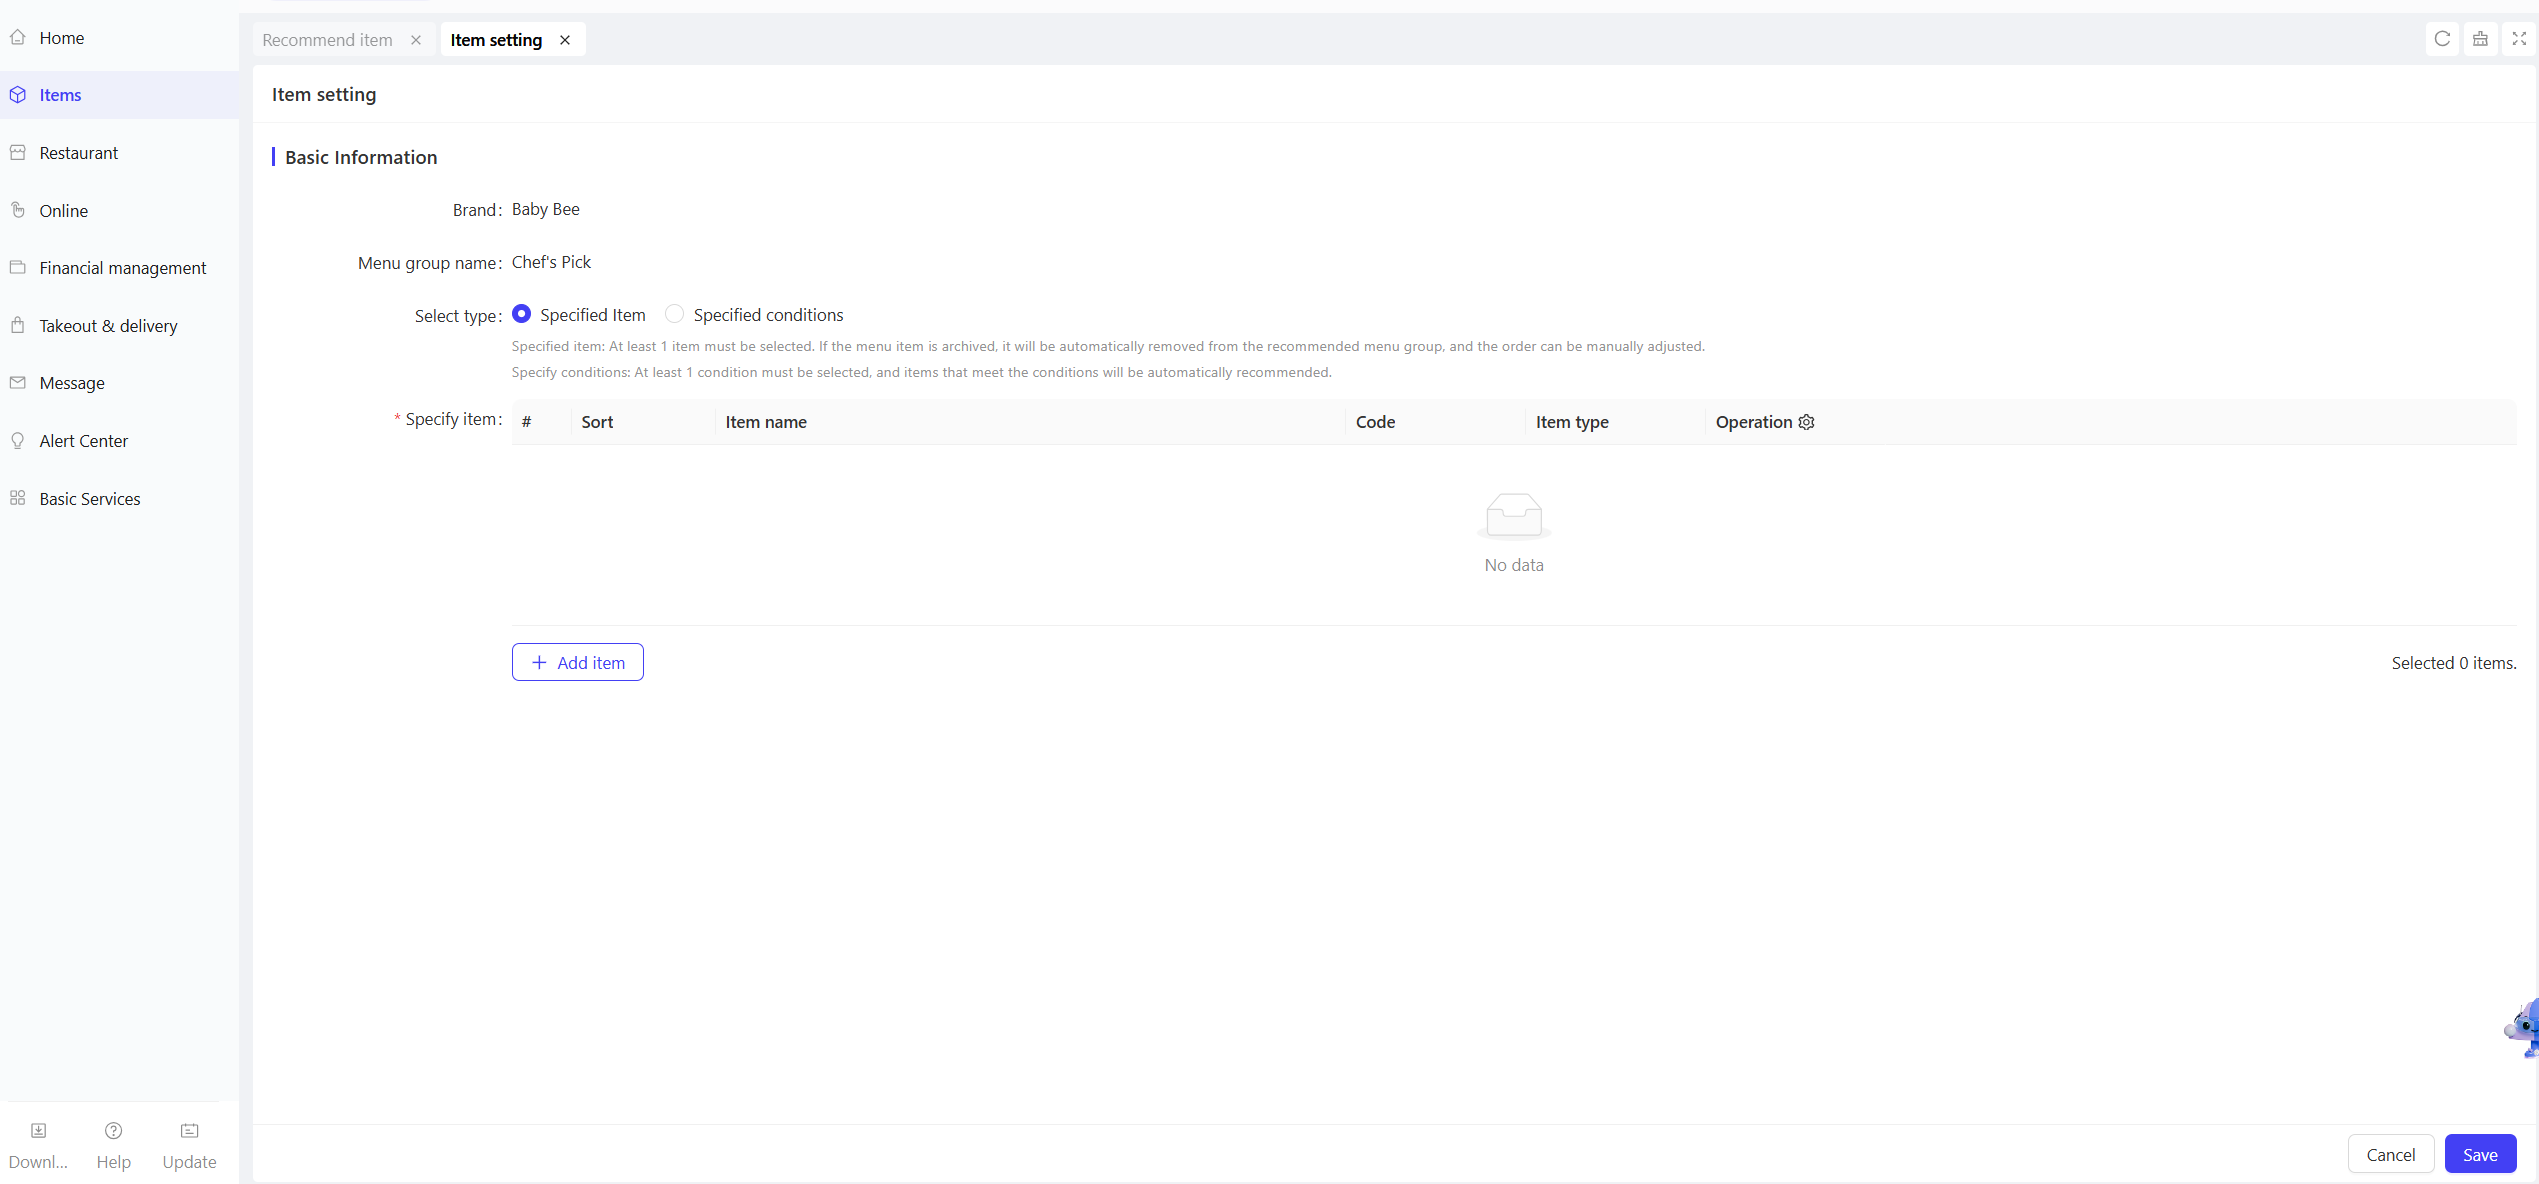
STEP 5: In the operation area of the created recommendation menu group, select【Item Setting】 to configure the recommended items included in the menu group.
- Select the setting type:
- Specified Items: Add individual items, sort multiple added items, or remove items.
- At least 1 item must be selected. Archived items will be automatically removed from the recommendation menu group. Sort order can be adjusted manually.
- At least 1 item must be selected. Archived items will be automatically removed from the recommendation menu group. Sort order can be adjusted manually.
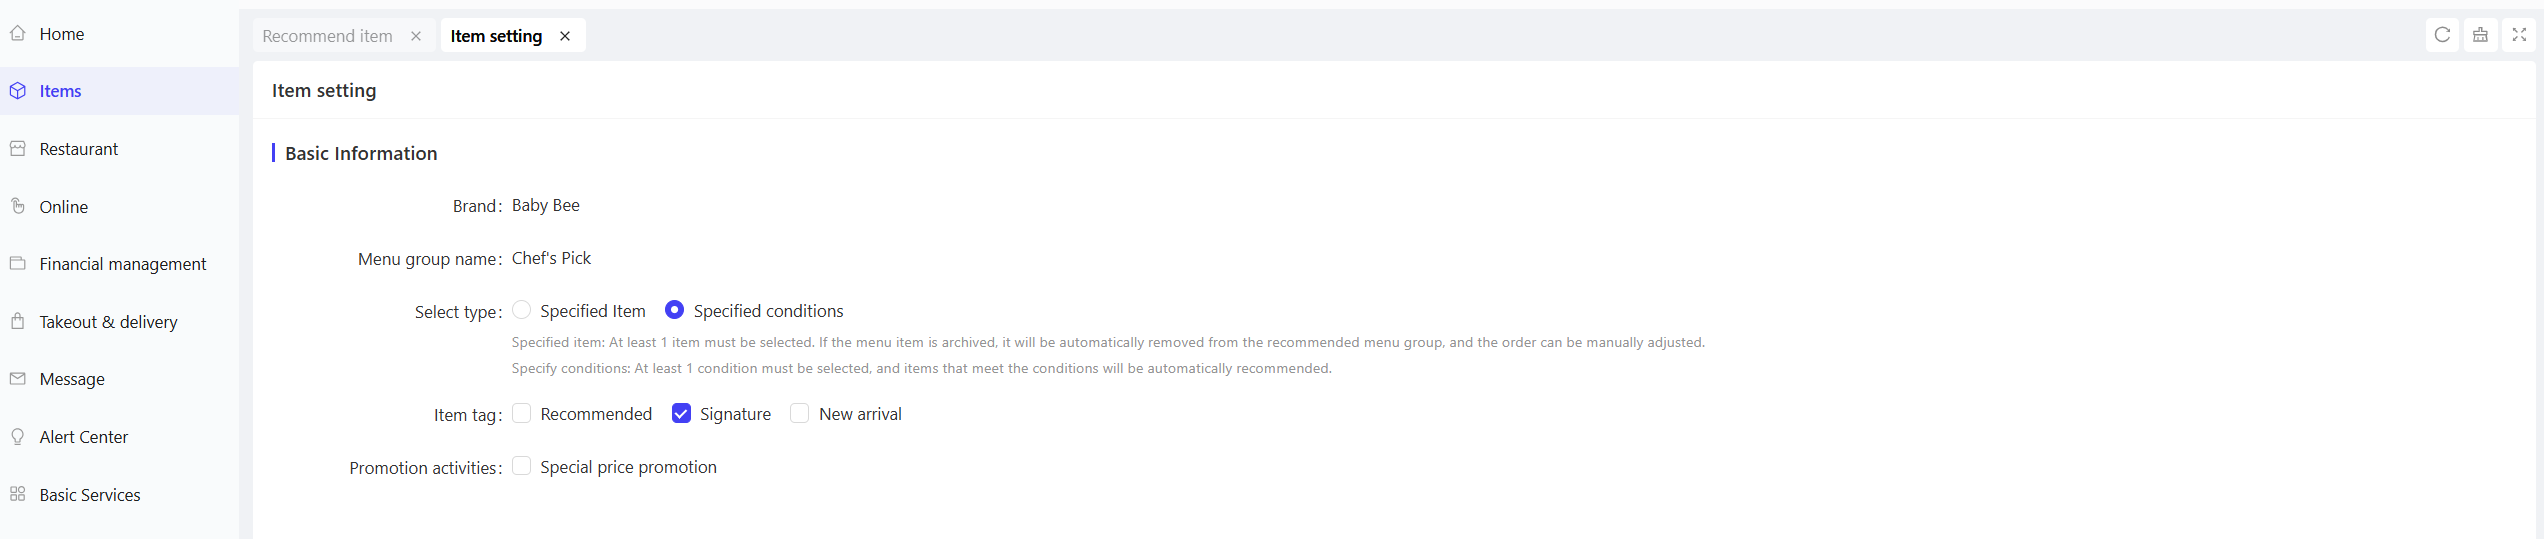
- Specified Conditions:
- Item Badges: Recommend items with badges such as “Recommended”, “Signature”, or “New Arrival”.
- Promotion Activities: Recommend items included in special price campaigns configured in the Marketing Module.
- At least 1 condition must be selected. Items that meet the conditions will be recommended automatically.
- Click【Save】after selection to complete the recommended item configuration.
- Specified Items: Add individual items, sort multiple added items, or remove items.
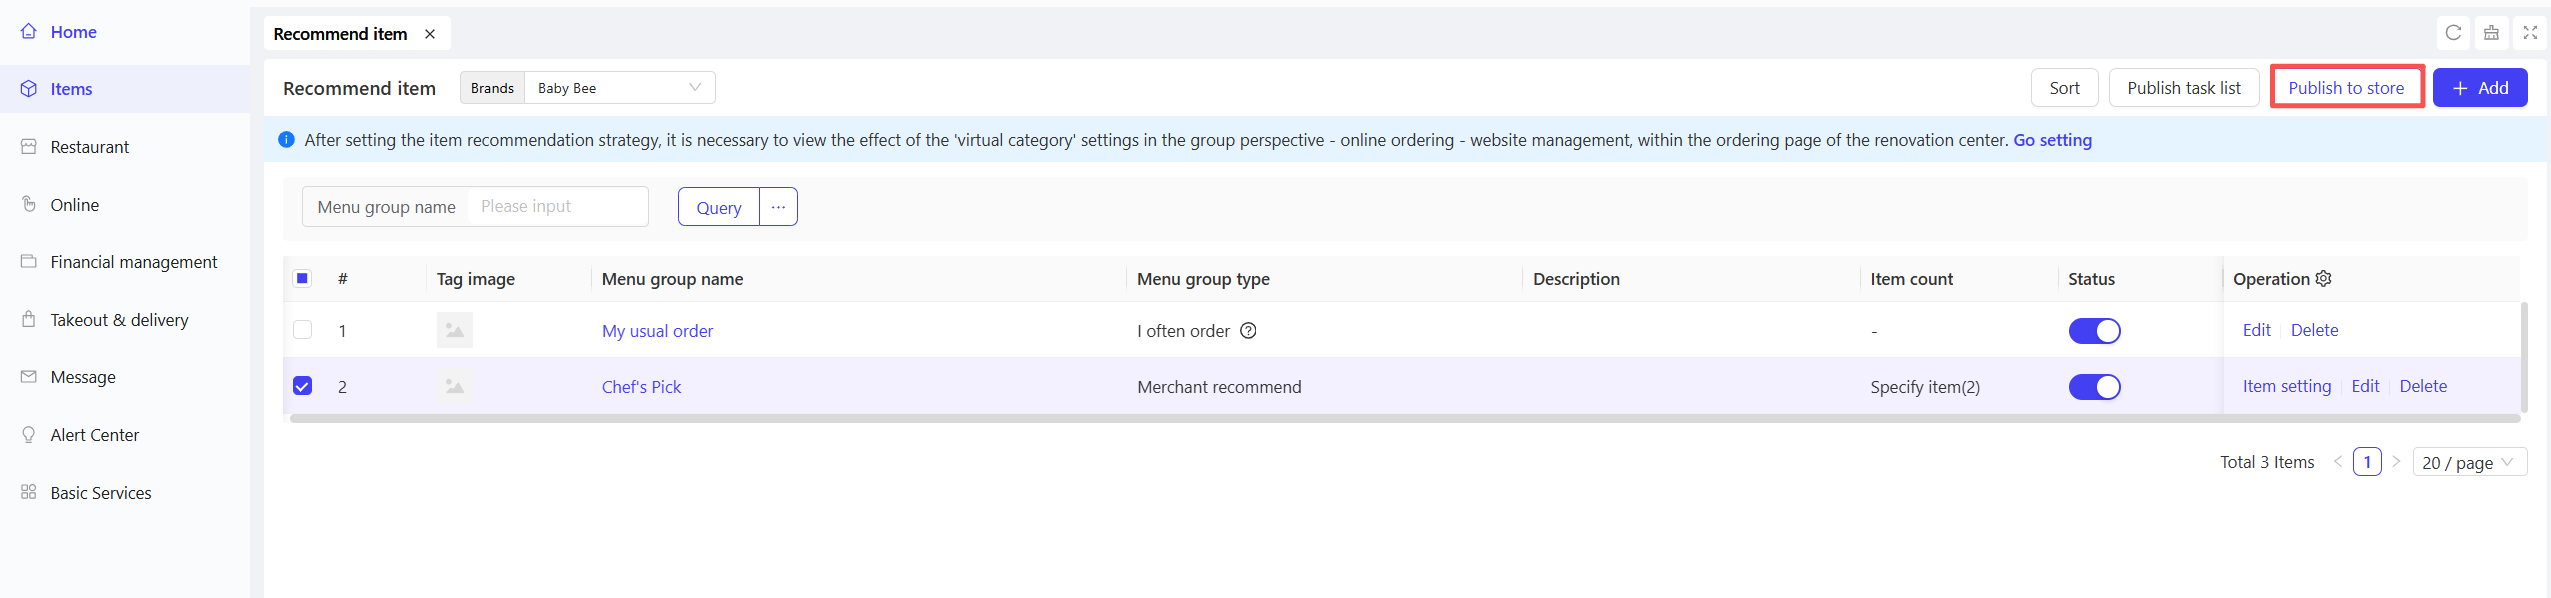
STEP 6: Publish the recommendation menu group to store
Select the configured recommendation menu group, click【Publish to Store】, enter the publish plan name, select the target stores and publish rules (Replace Store Recommendation Menu Groups / Add Only / Update Only), then click【Confirm】to publish and apply the plan to the stores.
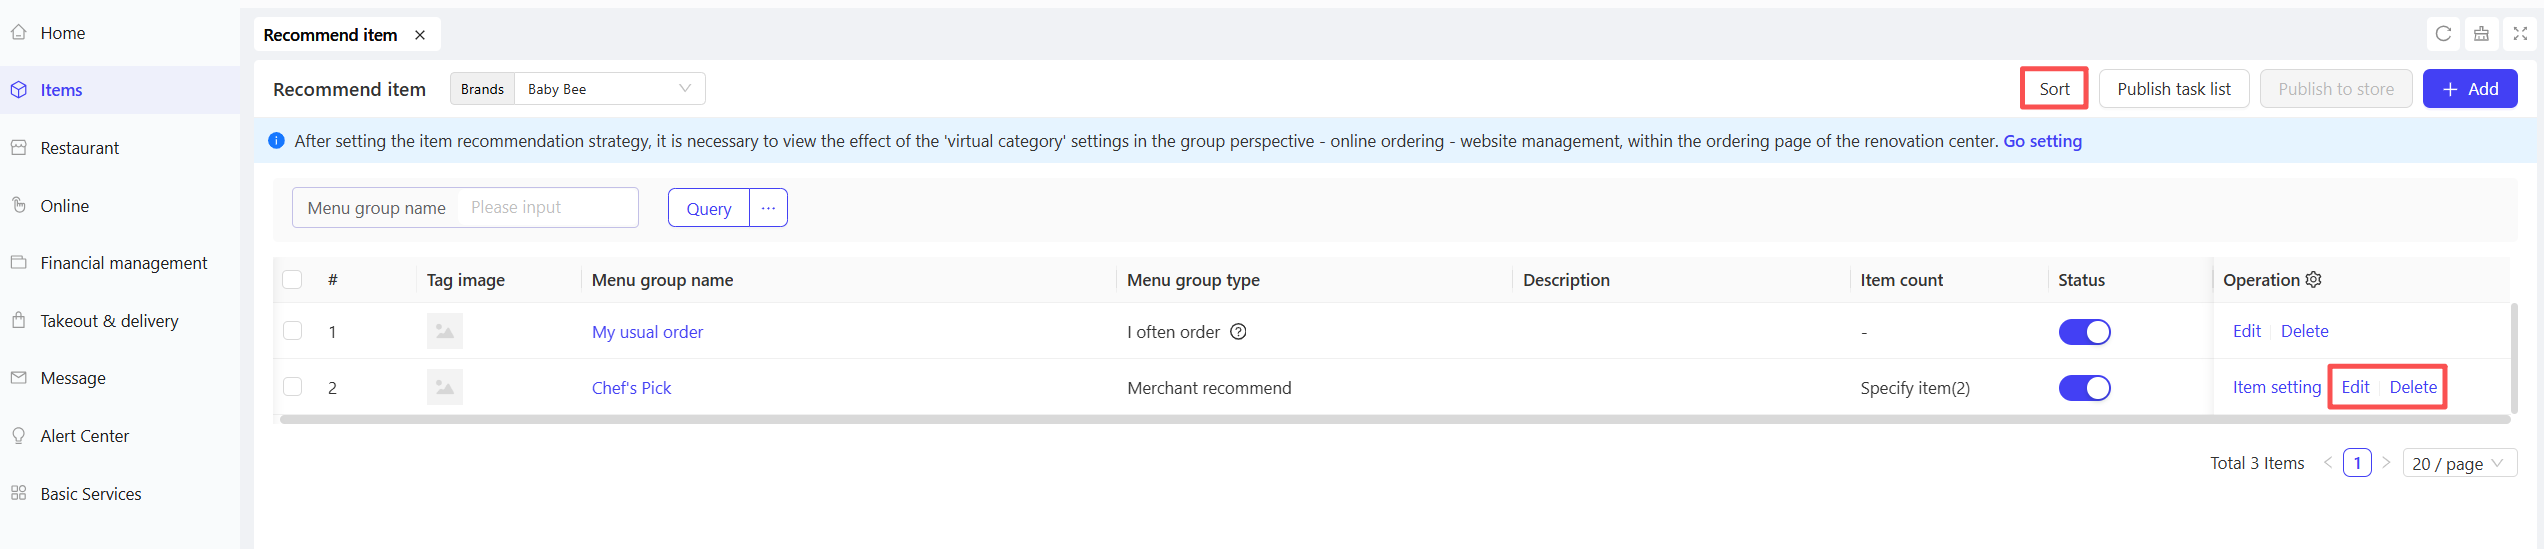
9.3 Recommendation Menu Group Operations
- Edit: Click the【Edit】button in the operation column of a single recommendation menu group to modify its details.
- Delete: Click the【Delete】button in the operation column of a single recommendation menu group to remove it.
- Sort: Click【Sort】in the top-right corner of the page. Adjust the order of menu groups by dragging rows or entering sequence numbers. The new order will take effect after the next publication.
Note:
After setting the item recommendation strategy, go to【Online Ordering → Website Management】under the group perspective, and configure the display effect of the Category Section on the ordering page in the Decoration Center.
10 Store Item Management
10.1 Batch Management of Store Items
STEP 1: Log in to the BO end, switch to the group perspective, and navigate to【Item Management → Store Items → Store Item Management】to access the store item configuration page.
STEP 2: Query the item list of the target store, select multiple items by checking the boxes, and perform the following batch edit operations (same as batch item operations):
- Batch Modify Specification Prices
- Batch Modify Item Multi-Language Information
- Batch Modify Additional Item Information
- Batch Modify Other Attributes
STEP 3: For items without images or needing image updates, perform the Batch Import Item Images operation to supplement and update item images.
10.2 Restore Menu

STEP 1: Keep the group perspective and navigate to【Item Management → Store Items → Restore Menu】to access the menu restoration page.
STEP 2: Query the historical publishing records of the target store. Select the record to restore and click the 【Restore】 button to revert the store to its original menu items. Multiple records can be selected for Batch Restore.
Note: Publishing records from the past 30 days can be restored.